Whimsical crafts often begin with materials that look too small, too mismatched, or too ordinary for another use. A wooden box can hold a miniature library, a pinecone can become a tiny home, and a few loose jewellery findings can turn into a bracelet with its own little story. The charm comes from scale and surprise, but the finished object still needs to feel secure, balanced, and worth keeping after the novelty has passed.
I am Stella Eve Louise, and I especially enjoy projects that use familiar scraps without hiding what they once were. Paper offcuts, old sequins, felt remnants, yarn, sample bottles, and broken jewellery can all become useful parts of these whimsical crafts ideas. I do not think the materials need to match perfectly. A limited colour palette and one repeated shape usually do more to connect a project than buying an entirely new set of supplies.
Before starting, decide whether the finished piece will be worn, handled, hung, or simply displayed. That choice affects everything from the adhesive and weight to the size of small parts and the kind of lighting that is safe. A project can feel playful and still be made carefully. In fact, the practical decisions are often what allow the imaginative details to stand out.
Sort Reusable Materials by Weight, Texture, and Safety
Gather the small materials first and sort them by what they can safely do. A stiff paper scrap may support a miniature book, while soft felt is better for a pinecone roof. Heavy beads need stronger findings than lightweight sequins, and glass bottles need sound corks and stable shelves. Remove sharp, cracked, sticky, or brittle pieces rather than trying to hide damage beneath decoration.
Clean each item in a way that suits the material and let it dry fully before gluing, painting, or filling. Pinecones need to be dry and free from insects, jewellery should be wiped and checked for corrosion, and reused containers must not hold unidentified residue. Small parts can roll away surprisingly quickly, so place them in shallow dishes while you decide which combinations actually belong together.
Plan the Scale, Colour Story, and Final Display
Whimsical objects look most convincing when the scale remains consistent. A chair that fills half a miniature room, a roof much wider than its pinecone, or a charm heavier than the whole bracelet can make the project feel accidental. Arrange the largest pieces first, then add smaller details only where they help the idea read more clearly. A paper mock-up is often enough to reveal whether a shape is too large before anything is cut from the final material.
Choose two or three main colours and let the original materials provide the remaining variation. Pastels suit the clouds and tea bracelet, while jewel tones work naturally on potion bottles and mermaid scales. Then decide where the finished item will live. A shelf display needs a stable base, a hanging piece needs reliable support, and anything worn against the skin should use smooth, secure findings.
Prepare Adhesives, Small Tools, and a Clear Work Area
Different surfaces need different attachment methods. Paper glue should not soak a lantern, a thick bead should not rely on a weak craft adhesive, and a sentimental locket should not be permanently filled unless that is genuinely intended. Test glue on spare material and apply it with a small brush, toothpick, or fine nozzle. A tiny amount placed accurately is usually stronger and cleaner than a large visible blob.
Use a cutting mat for paper and card, keep jewellery pieces on a bead mat or folded towel, and work over a tray when mixing decorative bottle contents. Good lighting makes small joins much easier to inspect.
Keep sharp tools, hot glue, glass, loose strings, batteries, and tiny decorations away from children and pets, and supervise any project that includes parts small enough to swallow.
Miniature Reading Nook
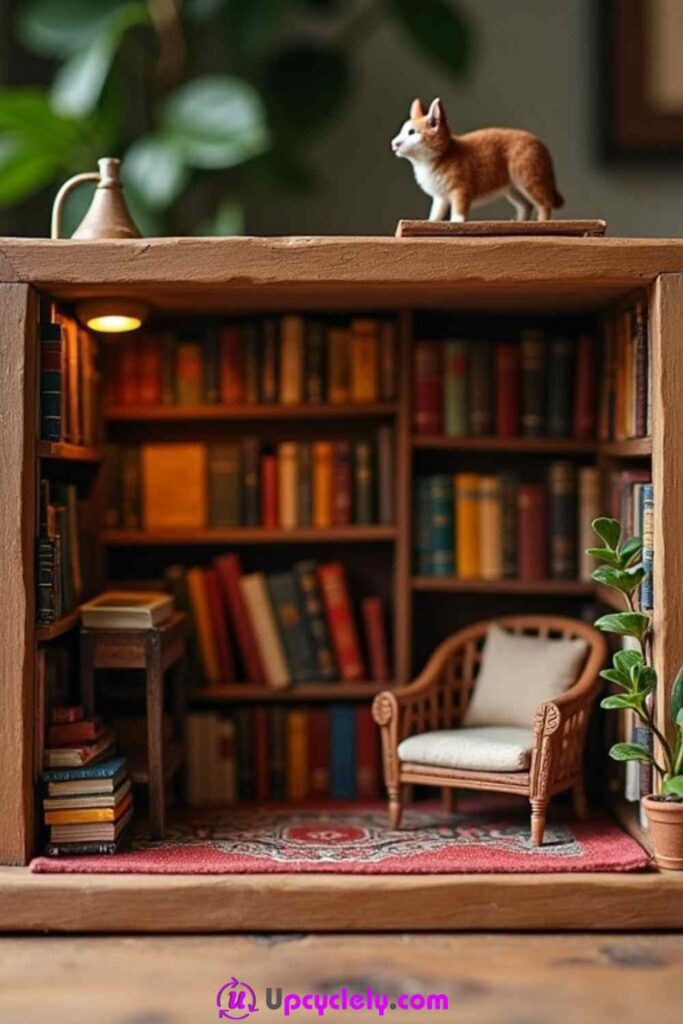
A miniature reading nook turns a small wooden box or deep frame into a room that feels much larger than its actual size. Tiny shelves packed with books, a comfortable chair, a narrow side table, a rug, a plant, and one small animal figure create the sense that someone has only just stepped away. The warm wood and closely arranged objects are what make the scene feel lived in rather than like a collection of unrelated dollhouse pieces.
This idea is especially useful for the scraps that are too small for ordinary projects. Thin card can become book covers, offcuts of fabric can form the rug and seat cushion, and narrow strips of wood can become shelving. I would keep the colour palette slightly muted so the tiny objects remain easy to read. A single bright accessory is usually more convincing than giving every item a different colour.
Materials and Tools
· A small wooden box, deep picture frame, drawer, or sturdy packaging box
· Thin scrap wood, coffee stirrers, or firm card for shelves and furniture
· Paper offcuts for miniature books
· Small fabric or felt scraps for a rug and cushion
· Miniature chair, or card and wood pieces to make one
· Tiny plant, lamp, animal, or other small accessories
· Craft glue and optional low-temperature hot glue
· Ruler, pencil, craft knife, and cutting mat
· Paint and small brushes when the box needs a new finish
How to Build the Miniature Room
1. Choose the room proportions before adding anything. Place the chair, largest shelf, and rug inside the box without glue. Check that the furniture leaves a visible path through the scene and that the shelves do not make the opening feel blocked. Mark the main positions lightly, then remove everything so the walls and floor can be prepared first.
2. Create the background and fixed furniture. Paint or line the inside surfaces with paper, keeping the finish calm enough for the books and chair to stand out. Build shelves from thin wood or layered card, and test them against the back wall before securing them. Keep the front edges straight because uneven shelves become very noticeable at this scale.
3. Make the books, rug, and smaller details. Fold coloured paper around narrow card strips to create book spines, then arrange them in mixed heights rather than identical rows. Cut a fabric scrap for the rug and add a simple cushion to the chair. Use only a few loose-looking stacks so the room feels full without becoming crowded.
4. Secure the scene in a sensible order. Glue the shelves and table first, then the chair, rug, and larger accessories. Add the smallest books, plant, lamp, and animal last with tweezers when helpful. Let each layer set before reaching across it, because one sleeve can rearrange a tiny library much faster than expected.
For me, the little empty areas matter as much as the miniature objects. A small gap beside the chair or a clear patch of floor makes the room easier to understand and prevents the scene from looking like a storage box.
A beginner can create only one shelf, a chair, and a stack of books. The finished nook can stand on a desk, sit inside a bookcase, or hang as a shadow-box display when the backing and wall fixing are strong enough.
Mermaid Scale Trinket Box
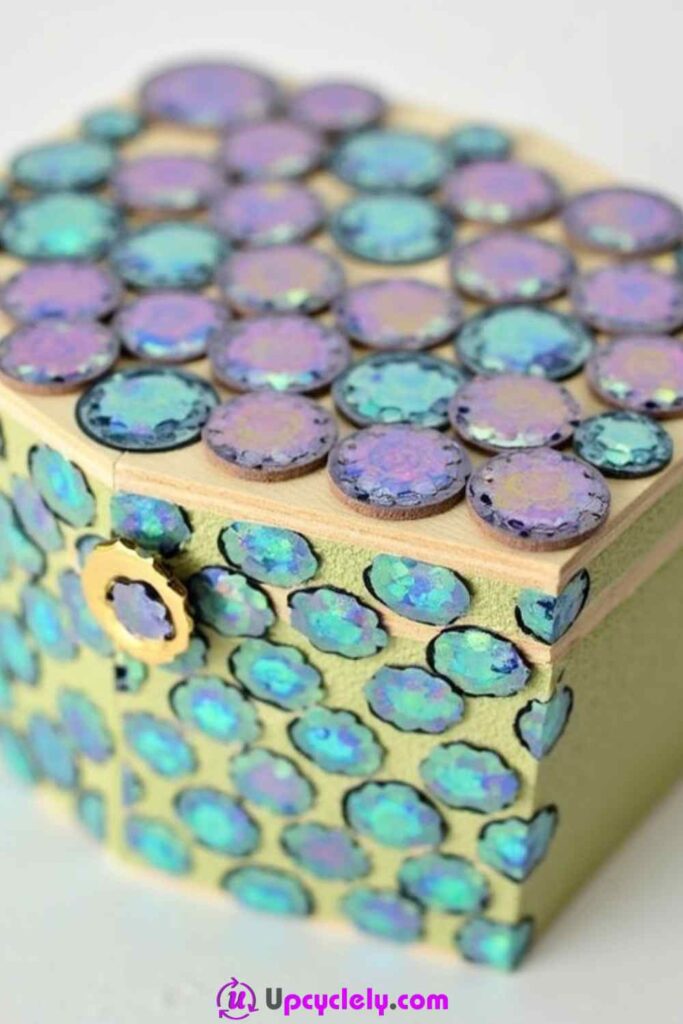
A plain box changes completely when overlapping iridescent circles cover its lid and sides. The blue, turquoise, lavender, and green surfaces shift as the light moves, while the repeated rounded shapes create the look of scales without needing a painted illustration. The small gold-toned clasp and exposed edge of the box give the decoration a clear boundary, which keeps the finish from becoming visually heavy.
Old sequins, reflective gift packaging, damaged costume-jewellery pieces, or circles cut from sturdy metallic material can all help recreate a similar surface. The key is consistency in the overlap. I do not think every disc needs to be exactly the same colour, but the lower edge of each row should follow a steady line. That rhythm is what makes mixed materials look intentional.
Materials and Tools
· A small wooden or firm cardboard box with a secure lid
· Iridescent discs, large sequins, or circles cut from reusable reflective material
· Paint for the box base when needed
· Craft glue suitable for the box and decorative pieces
· Tweezers or a wax pickup tool
· Ruler and pencil for row guides
· Small brush for applying glue neatly
· Optional beads, pearls, or a reclaimed decorative clasp
· Clear protective finish only when compatible with all materials
Steps for an Even Scale Finish
1. Prepare the box and test the decoration. Remove dust, old stickers, and loose finish, then repair any weak hinge or corner before decorating. Paint the box if the original surface shows through the gaps. Lay several discs on one side without glue to check how much overlap creates a clear scale pattern without wasting material.
2. Mark the first row carefully. Draw a light guide line near the lower edge of the panel or lid. Attach the first row so each circle sits level with its neighbour. This row controls everything above it, so adjust the spacing while the adhesive is still workable instead of hoping later rows will hide a crooked start.
3. Build overlapping rows from the bottom upward. Place each new disc across the join between two pieces below it, creating a staggered arrangement. Work on one surface at a time and pause at corners to trim or reposition the pattern rather than forcing a full circle around an edge. Wipe away visible adhesive before it dries cloudy.
4. Finish the edges and check the lid movement. Add a narrow painted border or a few smaller pieces where the scale rows meet the box edges. Keep decoration clear of the hinge, clasp, and lid seam so the box still opens easily. Once the adhesive has set, press each piece gently and remove anything that catches on clothing or lifts at the edge.
One detail I would not skip is opening and closing the box several times before calling it finished. A lovely surface is not useful if a scale blocks the clasp or scrapes away every time the lid moves.
A simpler version can decorate only the lid and leave the sides painted. Neutral pearl discs can create a softer shell-like box, while mixed blue and green pieces suit a more dramatic mermaid effect.
Pinecone Pixie Houses
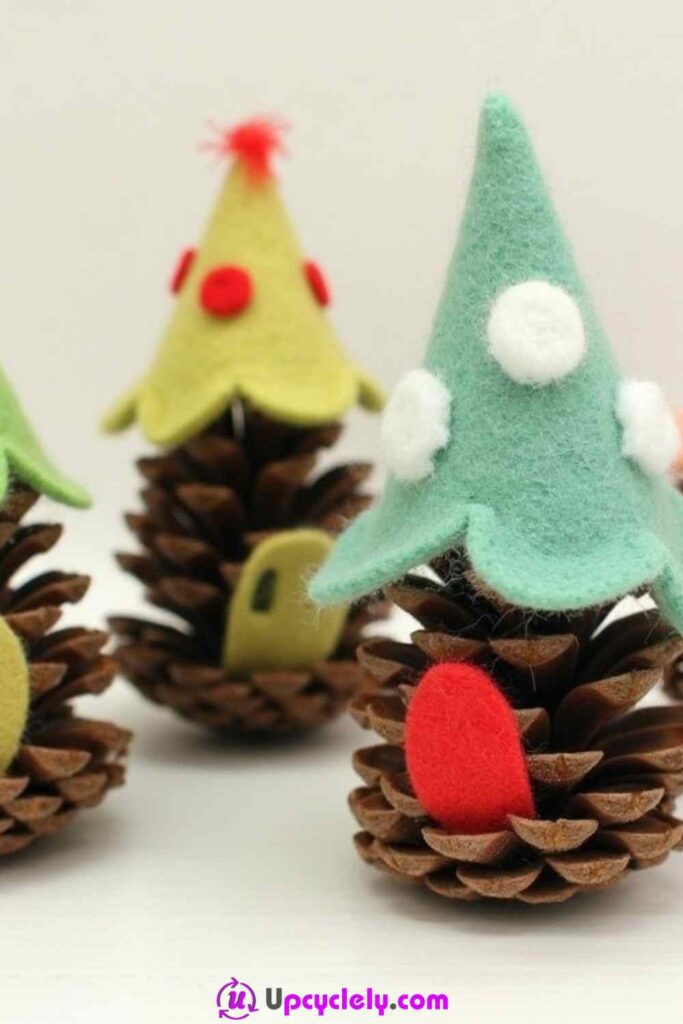
Pinecones already have the layered shape of tiny woodland buildings, so very little needs to be added before they begin to look like pixie houses. Pointed felt roofs, round pom-poms, bright doors, and a few small windows bring character to the natural brown surface without covering the cone completely. The contrast between the rough scales and soft felt is what gives these little houses their playful quality.
Collected pinecones should be clean, dry, and free from insects before they reach the craft table. Felt offcuts, single buttons, scraps of ribbon, and leftover pom-poms are ideal here because each house needs only tiny pieces. I would make three houses with related colours rather than trying to make a large village at once. A small group is easier to balance and leaves room for each roof and door to be seen.
Materials and Tools
· Clean, completely dry pinecones with stable bases
· Felt scraps in two or three coordinated colours
· Small pom-poms, buttons, beads, or ribbon remnants
· Strong craft glue or a low-temperature glue gun
· Paper for testing roof templates
· Small sharp scissors
· Acrylic paint and fine brush for optional windows
· A firm card, bark, or reclaimed wood base when a grouped display is planned
· Tweezers for placing tiny details
How to Turn Pinecones Into Pixie Homes
1. Check each pinecone and decide its front. Stand the pinecones upright and rotate them until the most stable side faces forward. Brush away loose debris and remove any sharp broken scale that could catch on felt or fingers. Match the widest cone with the largest roof so the finished group does not feel top-heavy.
2. Cut the roofs and doors from felt. Make a paper roof template first, then wrap it loosely around the top of the pinecone. Transfer the shape to felt and trim until it sits without forcing the scales inward. Cut a simple arched door and, if wanted, two tiny window shapes from contrasting scraps.
3. Attach the main pieces before the decoration. Glue the roof in place and hold it only until it grips, taking care not to flatten the felt. Add the door low on the front and make sure it follows the curve of the pinecone. Let these larger pieces set before adding pom-poms, beads, or painted details.
4. Create a small setting around the houses. Arrange the finished cones on a piece of bark, card, or reclaimed wood with enough space between them. Add a few pebble paths, moss-like yarn scraps, or paper leaves rather than covering the entire base. Keep the display indoors unless every material and adhesive is genuinely suitable for outdoor moisture.
The pinecone should still look like a pinecone. I know it can feel tempting to add more buttons, windows, and glitter, but the natural scales are already the most interesting texture in the project.
Children can help choose colours and arrange the village, while an adult handles hot glue and very small parts. For a seasonal version, use red and cream roofs in winter or soft green and yellow felt for spring.
Cotton Candy Clouds Mobile
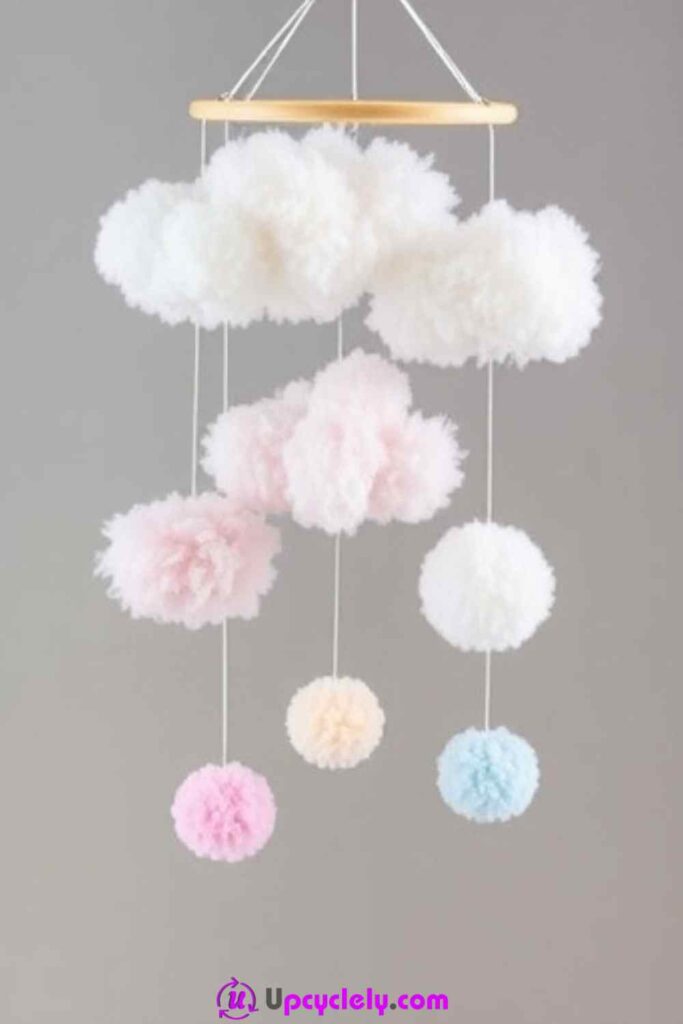
A cloud mobile works because the shapes are soft, uneven, and suspended at several levels. Large white yarn pom-poms form the main clouds, while smaller pink, peach, cream, and pale blue pieces hang below like drifting drops of colour. The plain wooden ring keeps the top light and simple, allowing the fluffy forms to carry the whole design.
Leftover yarn can replace ready-made pom-poms, and a reclaimed embroidery hoop or smooth ring can form the frame. The clouds do not need perfect outlines. In fact, grouping different sizes produces a more convincing shape than one large uniform ball. What matters here is balance: the mobile should hang level, the strings should remain untangled, and the heaviest cluster should not pull one side of the ring down.
Materials and Tools
· A lightweight wooden ring, embroidery hoop, or smooth reclaimed frame
· White yarn and pastel yarn remnants, or reusable soft pom-poms
· Strong thread, clear line, or fine cord
· A blunt yarn needle and sharp scissors
· Cardboard circles or a pom-pom maker when making new pom-poms
· Ruler or measuring tape
· Three or four cords for the upper hanging loop
· A ceiling hook and fixing suited to the final location
· Optional small felt raindrops or stars
Steps for a Balanced Cloud Mobile
1. Make and group the fluffy shapes. Create pom-poms in several sizes and trim only enough to remove very long strands. Tie two or three together to form each larger cloud, keeping the knots hidden inside the fluff. Prepare the smaller coloured pieces separately so their hanging positions can be changed during balancing.
2. Plan the hanging lengths on a flat surface. Place the ring on the table and arrange the clouds beneath it as though viewing the finished mobile from above. Cut the cords longer than needed and assign a different length to each cluster. Avoid making every piece hang in a neat row, because the staggered spacing creates the floating effect.
3. Attach the clouds and test the weight. Tie each cord securely to the centre of its pom-pom cluster, then connect it to the ring. Add the largest clouds first and hold the frame up after each attachment. Move a knot around the ring when one side drops, rather than adding unnecessary weight to the opposite side.
4. Create the top suspension and install it safely. Attach three or four equal cords to the upper ring and join them into one hanging loop. Test the mobile for level balance and tug each knot gently. Mount it with a suitable ceiling fixing, and keep strings and detachable pieces well away from cots, beds, play spaces, and anywhere a child or pet could reach them.
For me, the safest placement is part of the design, not an afterthought. A mobile can still be enjoyed across the room or in a quiet corner without hanging directly above a sleeping or play area.
A smaller version can use one cloud and three coloured drops. Grey, cream, and pale blue create a calmer weather theme, while warm peach and pink yarn can give the piece more of a cotton-candy look.
Floating Fairy Lanterns
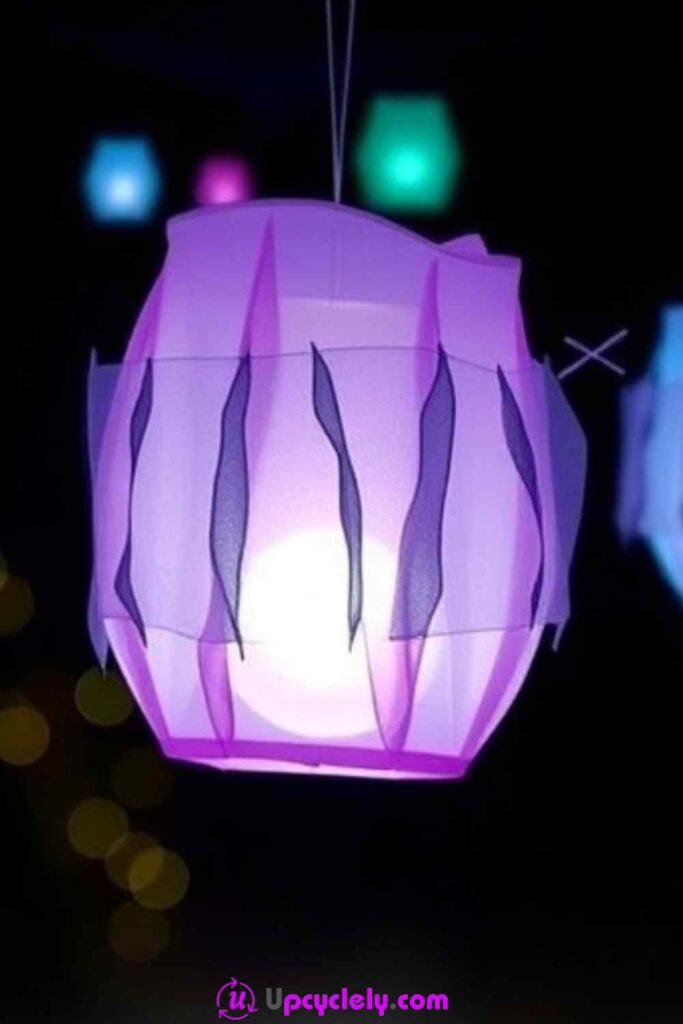
Paper lanterns become far more atmospheric when translucent colour, narrow layered panels, and a soft internal light work together. Purple paper and darker leaf-shaped pieces create depth around the outside, while the bright centre makes the lantern appear to glow from within. Hanging several at different heights gives the strongest floating effect, especially against a darker background.
Because the structure is paper, the lighting choice matters more than any decorative finish. Use only cool, battery-powered LEDs or flameless lights that do not heat the shade. I would also keep the paint and glue light. Heavy wet layers can soften the paper, pull it out of shape, and turn a delicate lantern into something that looks tired before it has even been hung.
Materials and Tools
· Paper lanterns, clean paper packaging, or a lightweight handmade shade
· Translucent tissue, tracing paper, or thin paper scraps
· Water-based paint used sparingly
· Small brush or sponge
· Craft glue suitable for paper
· Scissors and paper templates for repeated shapes
· Cool battery-powered LED lights or flameless tea lights
· Fine cord or clear line for hanging
· A secure hook or support suited to the lantern weight
How to Create the Floating Glow
1. Test the paper before adding colour. Open the lantern fully and check the ribs, seams, and hanging support. Try the paint or glued paper on an inconspicuous area to see whether it wrinkles or tears. If the structure is fragile, use dry tissue overlays instead of adding a wet painted layer.
2. Build a light translucent background. Apply a very thin wash of colour or attach overlapping pieces of tissue, leaving some areas paler than others. Work around the lantern gradually so one side does not become much wetter or heavier. Let the surface dry while the lantern remains fully supported and open.
3. Add the darker decorative shapes. Cut several leaf, flame, or curved panels from darker translucent paper and test their spacing before gluing. Repeat the shapes around the shade without making every gap identical. Keep decoration away from the top opening, support wires, and any place where the paper folds during storage.
4. Install the LED and arrange the lanterns. Place a cool battery light inside and secure the battery pack so it does not rest against thin paper. Test the light in a darkened room, then hang the lantern with a reliable cord and hook. Use several heights when displaying a group, but keep the shades away from real flames, heaters, hot bulbs, and damp outdoor conditions.
The glow should remain soft. I would rather use one small LED than a bright light that shows every glue mark and overpowers the translucent colour.
A beginner can decorate one ready-made lantern with removable tissue shapes. Small lanterns can also sit on a shelf around flameless lights when hanging is not practical, provided the LED remains cool and stable.
Secret Message Lockets
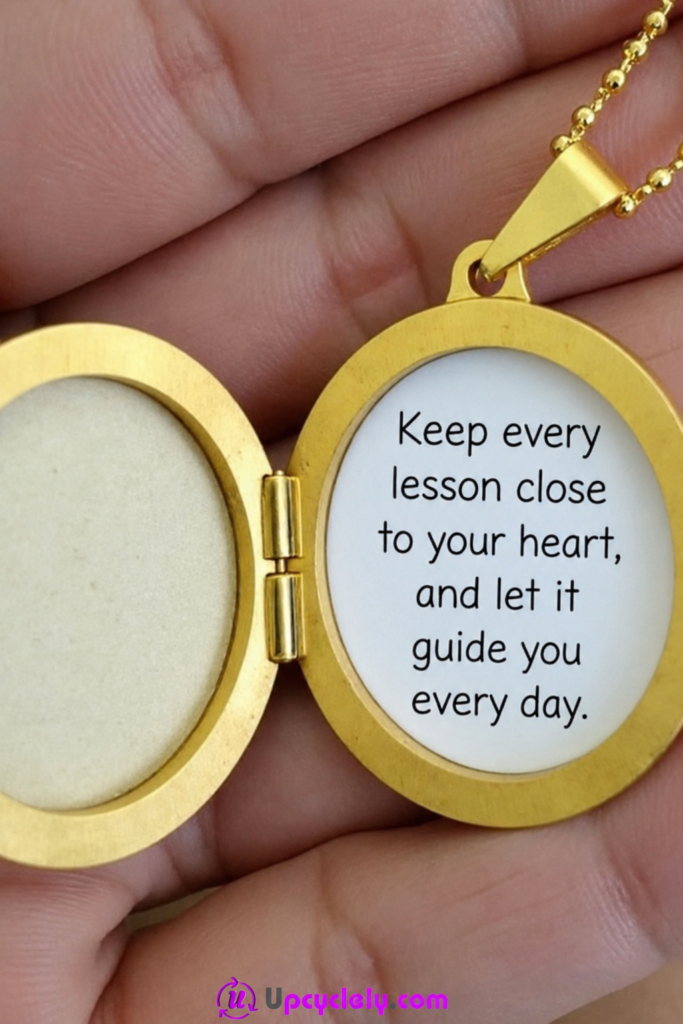
A locket can hold more than a photograph. A tiny handwritten sentence, a meaningful word cut from a damaged book page, or a small piece of decorative paper turns the inside into a private message that is visible only when the pendant opens. The round gold-toned frame gives even an ordinary paper fragment a sense of importance, which is part of the appeal.
This is a good project for an unused costume-jewellery locket, but the hinge and clasp should work smoothly before anything is placed inside. I would keep the insert removable whenever possible, especially if the locket is old or sentimental. A fitted paper circle can stay in place beneath the inner rim without permanent adhesive, allowing the message to be changed later.
Materials and Tools
· An opening locket with a sound hinge and clasp
· Small paper offcuts, damaged book pages, or handwritten notes
· Fine-tip pen or archival-style pen when appropriate
· Tracing paper for making a template
· Small sharp scissors or a craft knife and mat
· Tweezers
· Thin card backing when the paper needs support
· Optional tiny removable adhesive dot
· Soft cloth for cleaning the locket interior
Steps for Fitting the Hidden Note
1. Check the locket and make a paper template. Open and close the jewellery several times, then wipe the inside gently with a soft dry cloth. Press tracing paper lightly into the recess or draw around a removable insert to create the correct shape. Cut the template slightly large and trim it gradually until it rests flat without buckling.
2. Choose a message that remains readable. Write a short sentence, date, name, or single word rather than trying to fit a full paragraph. Practise on scrap paper and place the most important words near the centre. When reusing printed text, choose a fragment that still makes sense once the surrounding page has been removed.
3. Support and position the paper. Back very thin paper with a matching piece of card if it curls or shows marks from the metal. Use tweezers to place the insert inside the locket and check that no corner crosses the hinge or clasp area. Add only a tiny removable adhesive point if the fit alone does not hold it.
4. Close, wear, and store the locket carefully. Snap the pendant shut without forcing it and reopen it to confirm the paper has not shifted. Keep the locket away from water, perfume, and damp storage because the message may stain or stick to the metal. Replace the insert whenever the paper becomes creased or the meaning deserves an update.
The message does not need to be grand. A familiar word, an inside joke, or a small date often feels more personal than a quotation squeezed into unreadably tiny type.
A similar idea works inside a small brooch, watch case, or reclaimed miniature frame. For a gift, include a second blank insert so the person receiving it can add a message of their own.
Mini Glass Bottles of Potions

Small corked bottles filled with green, purple, yellow, and clear mixtures look like a shelf of collected potions even before labels are added. Fine glitter, larger beads, and tiny coloured pieces create movement inside the liquid, while the repeated glass shapes keep the display organised. The bottles are most convincing when each one has a slightly different colour and texture rather than all using the same formula.
Clean sample bottles, tiny favour jars, or unused craft containers can be repurposed for this display. They must be free from cracks and any previous residue. These are decorative objects, not drinks or cosmetics, so clear labelling and secure sealing matter. I would avoid using anything that can spoil or grow mould, and I would keep the finished bottles well away from children and pets.
Materials and Tools
· Small clean glass bottles with well-fitting corks or caps
· Water, glycerin, or another stable display liquid chosen for the container
· A small amount of washable colouring
· Fine and chunky glitter, beads, or tiny reusable decorative pieces
· Mini funnel, pipette, or rolled paper funnel
· Small labels and a fine-tip pen
· Strong clear adhesive for sealing the outside of the cork when required
· Tray or washable work surface
· Gloves and paper towels for handling colour
How to Mix and Seal the Display Bottles
1. Inspect, clean, and sort the bottles. Check every container for chips, cracks, and loose corks. Wash and dry them completely, then group bottles by size so the display has a clear rhythm. Test each stopper with plain water before adding colour, because a loose cork is much easier to replace at this stage.
2. Create one mixture at a time. Work over a tray and add the base liquid with a funnel or pipette. Mix in only a small amount of colouring, then add glitter or beads gradually. Leave an air gap at the top so the contents can move when the bottle is turned and so pressure does not force liquid around the stopper.
3. Close and seal the containers. Wipe the neck of each bottle before inserting the cork or cap. When a permanent display is intended, apply adhesive around the outside joint rather than allowing glue to fall into the liquid. Let the seal set upright and test for leaks over a protected surface before placing the bottle on a shelf.
4. Label the bottles as decorative items. Add imaginative names, symbols, or colour codes, but include a small clear note that the contents are not for consumption. Arrange the bottles where they cannot be knocked over and where direct sunlight will not overheat or fade them. Clean any spill immediately, especially when glitter or colouring is involved.
The best effect usually comes from restraint. One bead and a little glitter can look more mysterious than a bottle packed so tightly that nothing moves.
A no-liquid version can use coloured sand, sequins, tiny paper stars, or dried craft materials. That option is lighter, less likely to leak, and often more suitable for a classroom or temporary display.
Tea Party Charm Bracelets
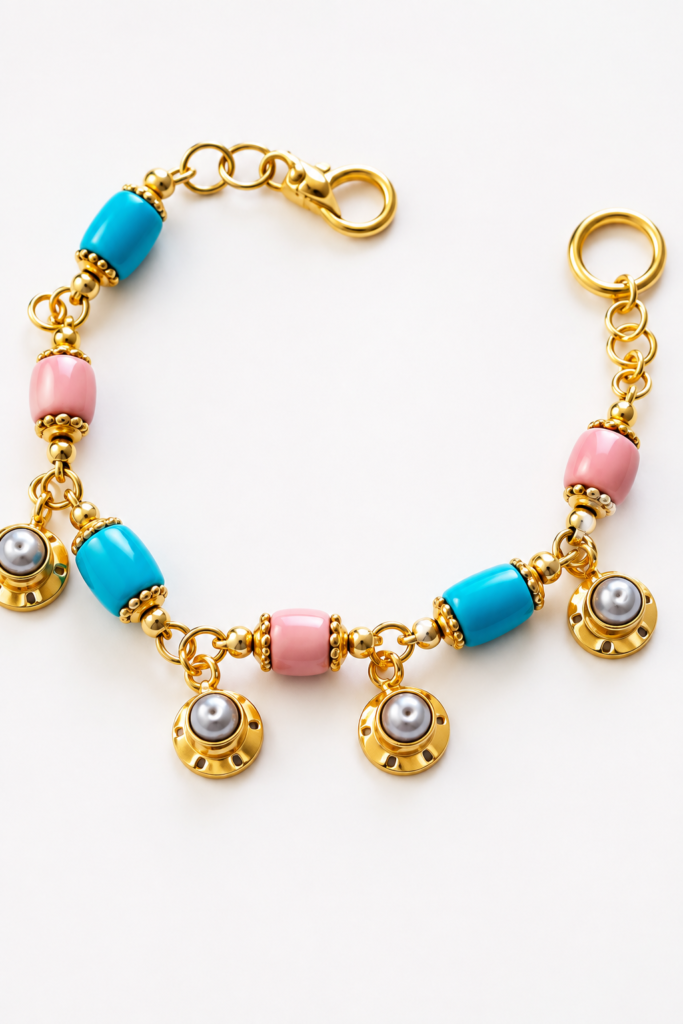
A charm bracelet can turn odd beads and small jewellery findings into a piece with a clear story. Pink and turquoise barrel beads create a playful rhythm along the chain, while tiny cup-and-saucer charms hang between them like pieces from a miniature tea service. Gold-toned links connect the colours and keep the bracelet from feeling too much like a toy.
Broken necklaces, single earrings, unused beads, and a serviceable clasp can all contribute to a similar bracelet. The practical challenge is not choosing more charms; it is making every connection secure and comfortable. I would space the heavier pieces evenly around the chain so they do not gather at one point or pull the bracelet awkwardly around the wrist.
Materials and Tools
· A bracelet chain in wearable condition
· A reliable clasp and optional extension chain
· Reclaimed beads in two or three coordinated colours
· Small tea-themed charms or suitable reused pendants
· Jump rings and eye pins
· Round-nose and flat-nose jewellery pliers
· Wire cutters when eye pins need trimming
· A bead mat or folded towel to stop pieces rolling away
· Optional replacement findings suited to sensitive skin
Steps for Assembling the Bracelet
1. Check the chain and plan the spacing. Lay the bracelet flat and inspect every link, clasp, and joining ring. Arrange the beads and charms beside it before opening any findings. Place the largest or most noticeable tea charms at balanced intervals, then fill the gaps with the coloured beads.
2. Prepare the bead links. Thread each bead onto an eye pin or short jewellery wire and form a neat loop at the open end. Keep the loops similar in size so the bracelet hangs evenly. Tug each finished link gently and remake any loop with a visible gap rather than relying on it to hold during wear.
3. Attach charms with properly closed rings. Open jump rings by twisting the ends sideways, not by pulling the circle apart. Connect each charm to the planned chain link and twist the ring closed until the ends meet cleanly. Use two pliers for control and check that fine charm loops cannot slip through the opening.
4. Test the fit, movement, and comfort. Fasten the bracelet and move the wrist gently to see whether any charm catches, scratches, or turns under the hand. Add or remove an extension link for fit, and reposition heavy pieces if the bracelet rotates constantly. Keep very small detachable charms away from young children, and repair loose findings before wearing the piece again.
For me, three or four clear tea-party charms are enough. Leaving small spaces between them allows each cup or saucer to be recognised and keeps the bracelet pleasant to wear.
A quieter version can use cream beads and one teacup charm. The same recovered components could also become a necklace, bag charm, or set of matching earrings when the original chain is too short or damaged for a bracelet.
Whimsical Craft Choices That Can Make the Magic Feel Messy
Adding every small decoration at once. Whimsical does not mean crowded. Too many beads, glitter pieces, miniature objects, or charms can hide the main idea and make cleaning or handling difficult. Place the essential shapes first, step back, and add only the details that make the story clearer.
Using one adhesive for every material. Paper, glass, wood, felt, metal, and plastic behave differently. An unsuitable glue may wrinkle tissue, release from glass, stain felt, or leave cloudy marks on reflective scales. Test the bond on spare material and choose the least visible reliable method for each join.
Ignoring weight and balance. A mobile can tilt, a lantern can strain its cord, and a bracelet can rotate constantly when heavy pieces gather in one area. Arrange components before attaching them, distribute weight evenly, and test the finished object in the position where it will actually be used.
Using real flames inside paper lanterns. Paper and thin decorative materials should never surround an open flame or hot bulb. Use cool battery-powered LEDs or flameless lights, secure the battery pack, and keep the lantern away from heaters and other heat sources.
Hanging strings where children or pets can reach them. Long cords, mobiles, detachable pom-poms, and small charms can create avoidable hazards. Install hanging pieces securely and well outside reach, especially near cots, beds, play areas, doorways, and climbing furniture.
Sealing potion bottles without checking for leaks. A decorative mixture can stain shelves, fabrics, and nearby projects if the cork is loose or the bottle is cracked. Test the container with plain water first, leave a small air gap, seal the outside joint when appropriate, and label the contents as display-only.
Forcing old or sentimental items into a permanent makeover. A vintage locket, inherited box, or meaningful piece of jewellery may be more valuable when alterations remain reversible. Use fitted inserts, removable attachments, or a separate replica rather than drilling, painting, or gluing an object that should be preserved.
Leaving sharp jewellery connections slightly open. A tiny gap in a jump ring can release a charm, catch on clothing, or scratch the skin. Close rings with two pliers, inspect every cut wire end, and test the finished bracelet before wearing it for a full day.
Skipping a full-size mock-up. Miniature and hanging projects can be difficult to judge from individual pieces. Arrange the complete design on paper or a flat surface first so the scale, spacing, and colour balance can be corrected before glue makes the decisions permanent.
Choosing display beauty over practical stability. A tall pinecone house, overfilled shadow box, or narrow bottle arrangement may look appealing in a photograph but tip easily in real use. Widen the base, reduce top weight, secure shelves and hooks, and place fragile objects where they cannot be knocked down.
Frequently Asked Questions
Which whimsical crafts ideas are easiest for beginners?
Pinecone pixie houses, a simple secret-message locket insert, and a small cloud mobile use clear shapes and a limited number of steps. Begin with a project that does not require glass filling, jewellery wire, or overhead installation, then move to those skills once the basic layout feels comfortable.
Can I make these projects mainly from recycled materials?
Yes. Small boxes, paper offcuts, yarn remnants, felt scraps, broken jewellery, old sequins, and clean bottles can supply much of the material. Check every reused item for cleanliness, strength, sharp edges, and suitability for the way the finished project will be handled.
What adhesive works best for mixed-material crafts?
There is no single adhesive that suits every combination. Use a paper-safe glue for lanterns and miniature books, a stronger compatible adhesive for wood or glass decoration, and mechanical jewellery findings for wearable pieces. Test a small hidden area before committing to the full surface.
How do I stop a miniature scene from looking cluttered?
Choose one clear focal point, such as the chair in the reading nook, and leave a little open floor or wall around it. Repeat a few colours, vary the height of the objects, and remove any accessory that blocks another important detail.
Are floating lanterns and cloud mobiles suitable for a nursery?
They can be decorative in the room, but placement and installation need special care. Use only cool LEDs, secure all hooks and knots, and keep cords, batteries, pom-poms, and detachable parts well outside a child’s reach and away from the sleep space.
How can I make decorative potion bottles safer?
Use clean unbroken containers, test the stopper, label every bottle as non-consumable, and store the display where it cannot be reached or knocked over. A dry filling made from sand, paper stars, or sequins avoids leaks and may be the better choice in homes with children or pets.
Can the projects be changed later without starting again?
Many of them can. Use removable paper inserts in lockets, avoid gluing every miniature object, tie mobile elements so their position can be adjusted, and decorate only the lid of a box. Reversible choices make repairs and seasonal changes much easier.
Let Small Scraps Tell a More Imaginative Story
The most satisfying whimsical crafts ideas do not depend on filling a basket with new supplies. They begin by noticing what a tiny box, one pinecone, a handful of yarn, an unused locket, or several loose beads could become when scale and purpose are considered together. The imaginative detail attracts attention, but careful joins, stable bases, safe lighting, and sensible placement are what make the finished project last.
Choose one idea that suits the materials already available and keep the first version manageable. Then arrange everything before attaching it, protect the feature that gives the project its character, and stop when the story feels clear. Which of these 8 whimsical crafts ideas would give your smallest forgotten materials the most enjoyable new role?