Pencils rarely become useless all at once. One may be too short for comfortable writing, another may have a cracked eraser, and a coloured pencil may be worn down to the point where it disappears inside the tin.
Even then, the painted wood, lettering, hexagonal shape, and bright cores can still support a practical craft. The challenge is choosing a new purpose that respects the material instead of turning a small object into a splintery or unstable decoration.
I am Stella Eve Louise, and I prefer pencil craft ideas that keep some evidence of the original tool. A row of worn paint, a familiar yellow body, or a sharpened coloured core can give the finished piece more character than extra glitter ever could. I know it can feel tempting to cut every pencil immediately, but planning the layout first saves useful lengths, reduces waste, and makes the safer construction method much easier to see.
Check Which Pencils Are Suitable to Reuse
Sort the pencils before choosing a project. Keep clean, dry wooden pencils with sound paint and no signs of mould, deep cracking, or loose splinters. Separate full working pencils from retired pieces; a usable pencil can join a temporary garland or removable display, while short or damaged writing ends are better candidates for cutting, collage, jewellery, or keychain projects.
Look closely at erasers, metal ferrules, and sharpened ends. A rusted ferrule, crumbling eraser, or broken point should be removed or enclosed rather than hidden beneath decoration. Coloured-pencil pigment can also transfer during sanding, so handle dust carefully and clean the work area before returning to food, children, or pets.
Plan Cuts, Layouts, and Safe Working Methods
Make a full-size paper arrangement before cutting a pencil. Mark the lengths, photograph the order, and decide which labels, erasers, or coloured cores should remain visible.
Whole pencils are easier to reuse later, so cut only when the project genuinely needs a shorter section. Group several cutting jobs together so an adult can prepare the pieces on one protected surface rather than bringing tools in and out repeatedly.
Wooden pencils can roll, split, and throw small fragments when cut or drilled. Use a clamp with padding, a suitable fine-tooth tool, eye protection, and controlled pressure. Sand every new edge and clear the dust with a brush or damp disposable cloth suited to the task. Children can help sort colours and plan patterns, but power tools, craft knives, and small hardware need appropriate adult control.
Choose Adhesives, Hardware, and Protective Finishes
The correct adhesive depends on both the pencil and the base. Wood glue may suit a wooden panel, while mixed surfaces may need a compatible craft adhesive. Test one offcut first, use a thin amount, and give the join the drying or curing time stated by the manufacturer. Hot glue may create bulky ridges and can soften some finishes, so it is not automatically the best choice simply because it sets quickly.
Key rings, mirrors, wall pieces, and jewellery need mechanical support as well as decoration. Attach hanging hardware to rigid backing, use proper jewellery findings, and reinforce stressed points rather than relying on a surface blob of glue.
Apply a protective finish only when it suits the material and purpose, work with ventilation when required, and never assume an ordinary craft coating makes an item food-safe or heat-resistant.
Pencil Collage
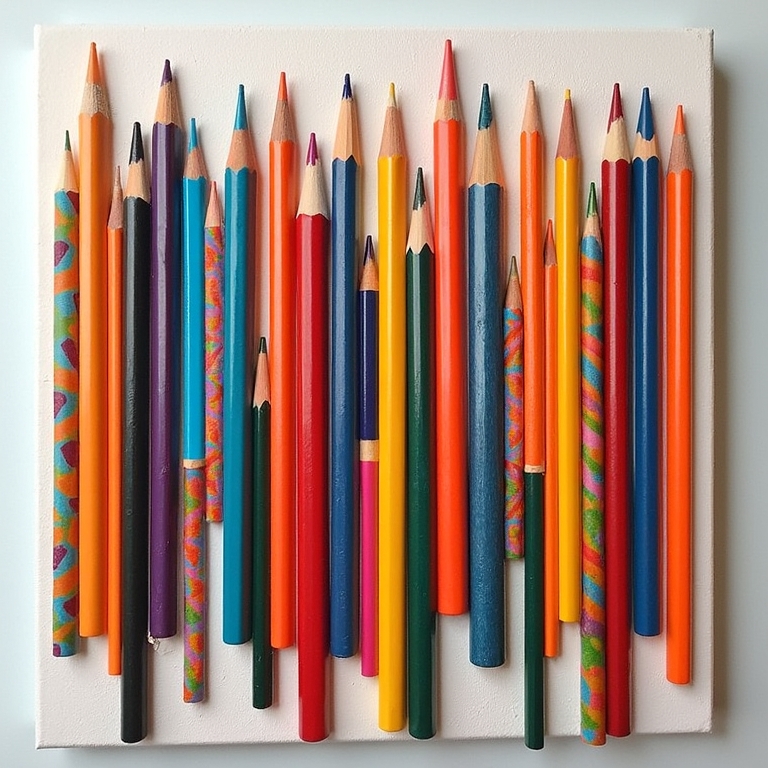
A pencil collage turns the colour, lettering, sharpened ends, and worn paint of old pencils into a textured wall piece. The strongest arrangements do more than place pencils side by side. They use changes in length, direction, and colour to create a clear shape, whether that is a loose burst, a striped panel, a letter, or an abstract pattern that still allows individual pencils to remain recognisable.
Short pencils are especially useful here because they no longer need to feel awkward beside full-length supplies. I would sort them by condition first, then decide whether the marks and bite dents belong in the design or should face the backing. A collage can preserve those traces of use, but every cut edge still needs to be smooth and every pencil needs enough contact with the base to stay attached.
Materials and Tools
· Used wooden pencils in mixed lengths and colours
· Rigid backing such as plywood, thick mounting board, or a reclaimed frame panel
· Paper for testing the layout at full size
· Ruler, pencil, and low-tack tape
· Fine-tooth saw or adult-controlled cutting tool
· Sandpaper and a dust brush
· Strong adhesive suitable for wood and the chosen backing
· Eye protection and a protected cutting surface
How to Build the Pencil Collage
1. Sort the pencils and choose a clear composition. Separate sound pencils from cracked, mouldy, or heavily splintered pieces. Arrange the usable ones on paper before touching the backing, and decide where the eye should land first. Repeating one direction across most of the design usually makes a few diagonal or shortened pieces look intentional rather than accidental.
2. Mark and cut only after the arrangement works. Number the pencils lightly or photograph the layout so it can be rebuilt. An adult should trim the pieces with a suitable tool, keeping hands away from the cutting line and wearing eye protection. Sand every cut end until it feels smooth, then remove dust before gluing.
3. Transfer the design to the rigid base. Draw faint guide lines on the backing and position the largest or most important pencils first. Apply adhesive in a thin, continuous line along the area that touches the board, then press the pencil into place without allowing glue to squeeze across the visible surface. Work in small sections so the arrangement does not drift.
4. Let the panel cure flat and prepare it for display. Place a clean board and light, even weight over the collage when the adhesive instructions allow it. Once the joins are secure, check for rocking pieces and reinforce only those that move. Add hanging hardware suited to the total weight, or stand the finished panel on a shelf if the backing is not designed for wall mounting.
For me, the most interesting collages leave some pencil labels, sharpened points, or worn paint visible. Sanding every mark away can make the material look less like the object that gave the project its character.
A beginner can make a small rectangular panel with uncut pencils and one repeated colour order. Leftover pencil sections can also form initials, house numbers, or a narrow border around a plain noticeboard.
Decorated Pencil Box
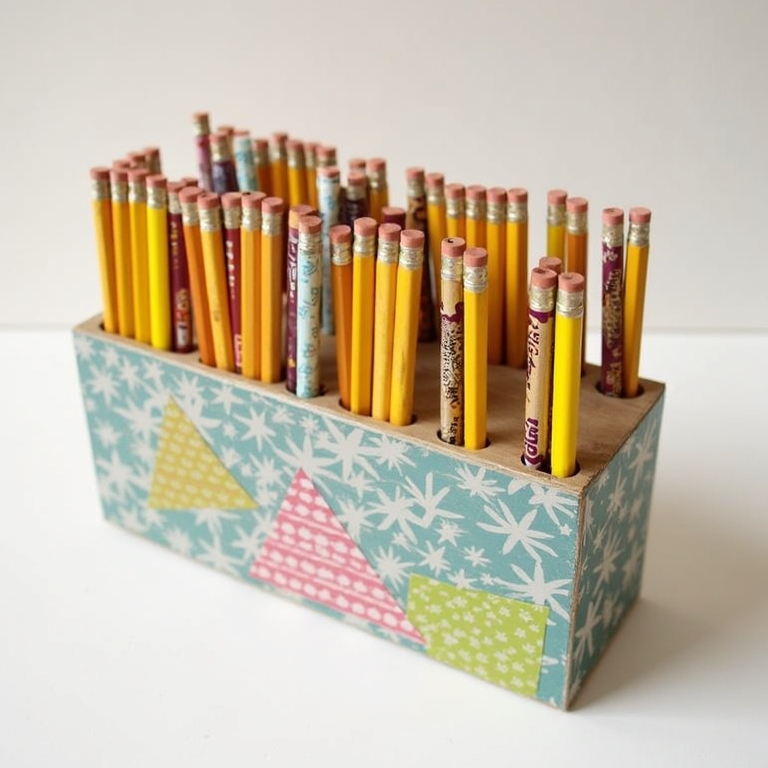
A decorated pencil box gives a plain container a clearer place on the desk while using paper scraps, short pencils, and leftover trim that may already be in the craft drawer. The box can remain a simple lidded case, or a solid wooden block with holes can hold pencils upright. What matters is that the decoration does not interfere with the lid, the pencil openings, or the way the box sits on the table.
I like this idea because the pencil theme can come from the materials rather than from a printed label. A few shortened pencils may create a border, while patterned paper covers the larger surfaces. The design stays practical when the corners are wrapped cleanly and the inside remains free from loose glue, splinters, and raised decorations that catch on supplies.
Materials and Tools
· Plain wooden, cardboard, or sturdy reused pencil box
· Decorative paper scraps, maps, book-page copies, or leftover wrapping paper
· Short pencils or coloured-pencil offcuts for optional trim
· Ruler, pencil, scissors, and craft knife for adult use
· PVA, decoupage adhesive, or double-sided tape suited to the box
· Fine sandpaper for a wooden surface
· Small brush or smoothing card
· Optional removable dividers and felt pads
Steps for the Decorated Pencil Box
1. Check the box before covering it. Open and close the lid several times, tighten loose hinges, and repair weak corners before adding decoration. Sand only rough wooden areas and wipe away dust. If the box has an old finish, test the adhesive on the underside so the paper does not lift with the coating.
2. Measure each panel and plan the paper joins. Make paper templates for the lid, sides, and ends rather than wrapping the whole box in one difficult sheet. Leave moving edges, hinge gaps, and pencil holes uncovered. Then arrange the patterns so the most noticeable seam falls at the back or along a natural corner.
3. Attach the paper in manageable sections. Spread a thin, even layer of adhesive and smooth the paper from the centre outward with a clean card. Fold corners only after checking that the lid still closes. Add short pencil pieces as a narrow border if desired, sanding their ends and keeping them away from handles and hinges.
4. Finish the storage area and test everyday use. Let the surface dry fully before adding supplies. Fit removable dividers or small cups inside so pencils, erasers, and sharpeners do not roll together. Wipe away any dried adhesive ridges, add felt pads beneath a wooden block, and check that the decorated box remains stable when opened with one hand.
One detail I would keep simple is the top. A crowded lid can look cheerful when closed but becomes frustrating if beads or pencil ends stop another box from stacking above it.
A no-cut version can use pencil-patterned paper and one real pencil fixed only along the front edge. The same treatment works on a small drawer organiser, a reused tea tin, or a cardboard stationery tray.
Pencil Art Frame
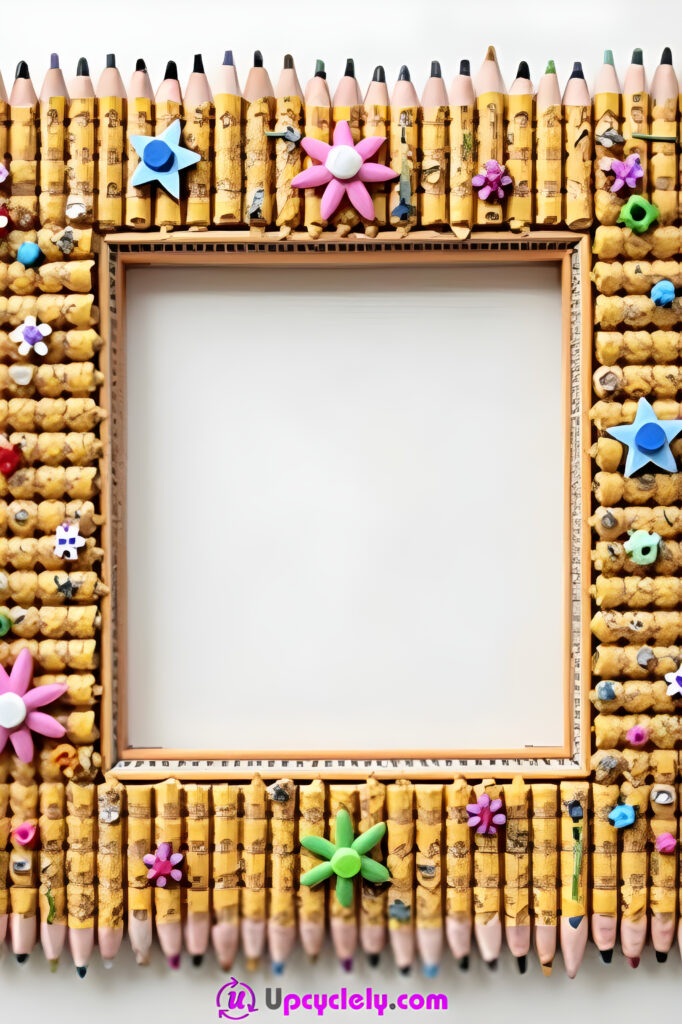
Whole pencils create a strong straight border around a photograph, drawing, or small print. Yellow school pencils make the frame feel graphic and familiar, while mixed coloured pencils produce a softer patchwork effect. The frame works best when the pencils sit on a separate backing rather than carrying the picture by themselves, because the backing keeps the corners square and supports the hanging hardware.
The visible pencil shape is already decorative, so extra stars, flowers, or small shapes should be placed carefully. I do not think every gap needs filling. A little breathing space around the picture opening helps the subject remain the focus and keeps the frame from becoming too heavy for its backing.
Materials and Tools
· Matching or mixed pencils in sound condition
· Sturdy backing board and separate rear support
· Photograph, print, or child’s artwork
· Ruler, square, and paper template
· Fine-tooth saw for adult use if pencils need trimming
· Sandpaper and soft brush
· Strong wood-compatible adhesive
· Picture tabs, easel support, or wall hardware suited to the weight
· Optional small flat decorations
How to Assemble the Pencil Art Frame
1. Size the opening around the artwork. Place the picture on the backing and mark a clean border that does not cover important details. Arrange pencils along all four sides, testing whether the corners will overlap, meet squarely, or use shortened filler pieces. Keep the inner edge straight even if the outer pencil lengths vary.
2. Prepare the pencils and backing. Clean the pencils with a dry cloth and remove any loose splinters. If trimming is needed, an adult should cut and sand the pieces before they return to the layout. Paint or cover the backing first when small areas may remain visible between the pencils.
3. Fix the border from opposite sides. Glue the top and bottom pencils first, using a ruler to keep them parallel. Then add the side rows and check the corners before the adhesive sets. Flat decorations can be added after the structure is secure, but keep them clear of the inner opening and hanging point.
4. Add the picture and choose a secure display. Attach the photograph with removable corners or a backing layer so it can be changed later. Fit a stand for a tabletop frame or proper hardware for a wall frame, taking the added pencil weight into account. Test the finished frame over a soft surface before placing it above furniture.
The part I like most is the contrast between an orderly rectangular frame and pencils that show small differences in paint and sharpening. Those variations stop the border from feeling too rigid.
Use four uncut pencils for a very small frame, or create only a top and bottom pencil border on a larger recycled frame. Crayons can make a similar look, but they need cooler handling and a different adhesive test.
Pencil Bookmark
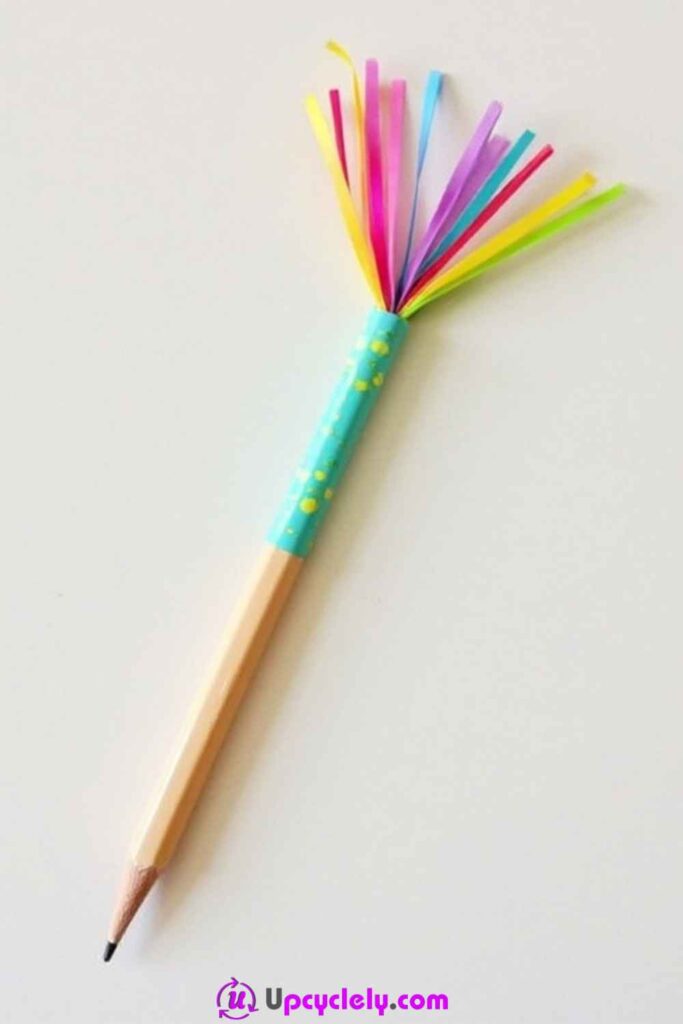
A real pencil is usually too thick to sit between book pages, but the pencil shape can be reused in a slim bookmark made from card, fabric, or a flattened decorative sleeve. The eraser, painted body, and sharpened point become design cues rather than bulky parts. A tassel or ribbon can extend above the book, while the main strip stays smooth enough not to mark the paper.
Short pencil offcuts may still appear at the top as a decorative tab, provided the solid piece remains outside the closed book. I would avoid putting a full pencil between pages, even when it looks playful, because the pressure can damage the spine or leave an uneven crease. The useful version borrows the appearance without forcing the book to hold the tool.
Materials and Tools
· Reclaimed card from packaging or a narrow fabric strip
· Coloured paper, paint, or patterned tape
· Small pencil offcut for an optional external topper
· Ruler, pencil, scissors, and corner rounder if available
· PVA, double-sided tape, or fabric adhesive
· Ribbon, thread, or paper tassel material
· Fine sandpaper for any wooden topper
· Optional clear protective film or stitched edge
Steps for the Pencil Bookmark
1. Cut a slim, page-friendly base. Measure a strip that fits comfortably inside the intended book without reaching beyond the lower edge. Round or soften the corners so they do not catch. If using packaging card, choose an uncreased section and cover any rough printed surface before decorating.
2. Build the pencil design in flat layers. Add a painted body, a narrow eraser band, and a triangular wood-and-lead point using paper or fabric pieces. Keep glue thin and press the strip flat while drying. Then check both sides with a fingertip for ridges, loose tape, or sharp corners.
3. Add the top detail outside the pages. Punch a reinforced hole for ribbon or attach a paper tassel at the upper end. A short wooden pencil piece can sit above the book as a topper, but sand it thoroughly and bond it only to the external tab. Make sure its weight does not pull the bookmark out when the book is moved.
4. Protect and test the finished bookmark. Cover the front with a thin protective film or stitch around a fabric version when extra durability is needed. Place it in an inexpensive notebook first, close the cover, and check that the pages remain flat. Remove any raised embellishment that presses into the paper.
I know it can feel tempting to add beads and charms to the tassel, but a light top is less likely to tear the bookmark or swing against the cover.
A child-friendly version can use washable markers on thick card. The same pencil-shaped strip can become a gift tag, library reading tracker, or label for a notebook pocket.
Pencil Coasters
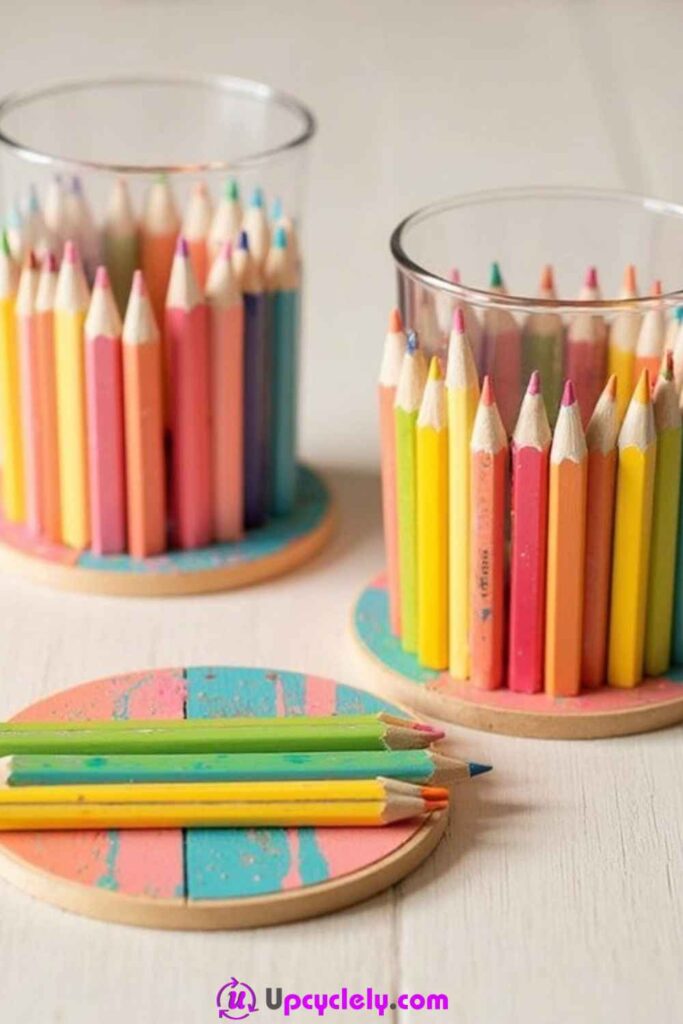
Pencil coasters can take two sensible forms: a flat pencil-themed surface made from reused wooden bases, or a display in which painted coasters support jars filled with pencils. For regular drink use, I would keep real pencil sections away from the direct contact area unless they are mounted perfectly level beneath a durable, suitable top layer. A wobbly cup is not a worthwhile price for a decorative idea.
A safer beginner version reuses plain wooden or cork coasters and adds eraser-stamped dots, painted pencil stripes, or a simple pencil motif. The pencils still contribute to the process as stamping tools and colour inspiration, while the coaster remains flat, wipeable, and easier to clean.
Materials and Tools
· Plain reclaimed wooden or cork coasters in sound condition
· Old pencils with flat erasers for stamping
· Water-based craft paint suited to the coaster material
· Small brush, palette, and paper towels
· Fine sandpaper for wooden bases
· Masking tape for straight pencil-like bands
· Suitable clear protective finish if needed
· Felt or cork pads for the underside
How to Make Pencil-Themed Coasters
1. Prepare a level coaster base. Check each coaster for warping, deep cracks, loose cork, or peeling finish. Sand rough wooden surfaces lightly and remove all dust. Set a cup on every blank before decorating; any piece that rocks should be repaired or used for a non-drink purpose.
2. Plan a flat pencil-inspired design. Use masking tape to mark stripes, sketch small pencil shapes, or arrange a pattern of eraser-stamped circles. Limit the palette so the set feels connected. Keep thick texture, gems, and real pencil tips away from the area where the cup base will sit.
3. Paint and stamp in controlled layers. Apply thin paint coats and let each layer dry according to the product instructions. Dip a clean flat eraser lightly into paint and test the stamp on scrap paper before pressing it onto the coaster. Wipe the eraser between colours to keep the dots clear rather than muddy.
4. Protect the surface and test it again. Add a finish suitable for the coaster material and intended use, following its instructions and ventilation guidance. Once fully cured, attach fresh pads underneath and place a cool cup on top. Check for rocking, colour transfer, and trapped moisture before using the set regularly.
For me, the pencil connection feels stronger when the eraser stamps are slightly irregular. Perfect printed dots would lose the handmade evidence of the tool that created them.
Use the same method on a jar tray or desk mat, or place the painted coasters beneath clear pencil-filled containers as a coordinated stationery display. Do not treat an ordinary craft finish as a heat-proof trivet.
Pencil Mirror Frame
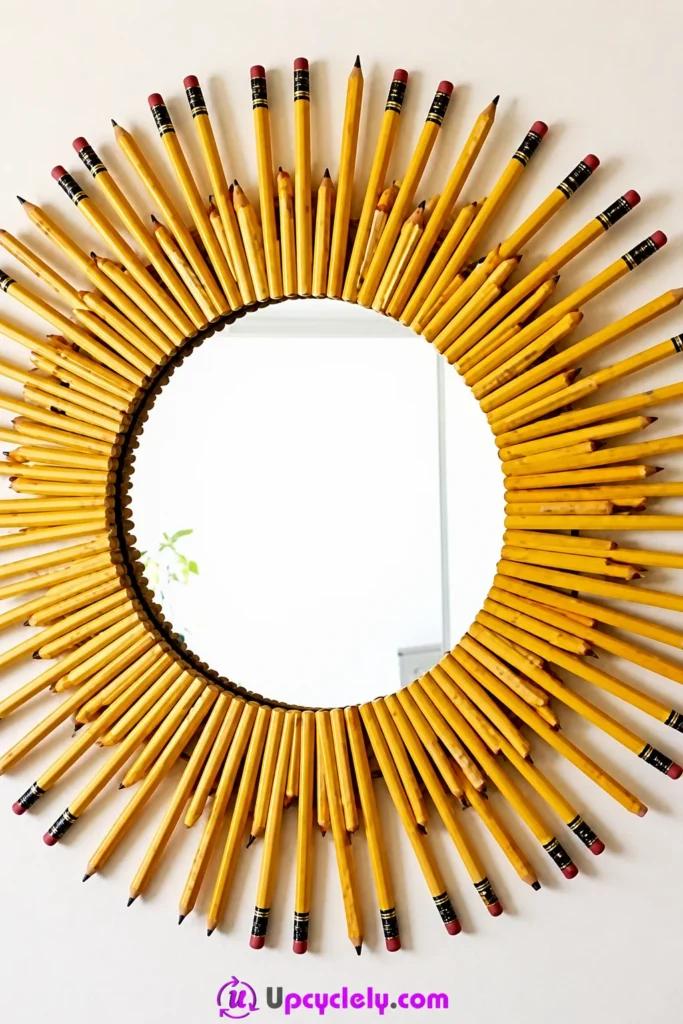
A ring of pencils around a round mirror creates a sunburst shape without needing carved wood or metal spokes. The pencils provide repeated straight lines, while the mirror gives the centre a clean reflective circle. The arrangement can use erasers at the outer edge for a soft coloured ring, or sharpened ends outward for a more pointed look, though exposed sharp tips are better avoided in reachable areas.
The backing carries the real responsibility here. Pencils glued only to the mirror edge can loosen, and a heavy frame needs hardware attached to a rigid board rather than to decorative pieces. I would build the entire composition on a strong circular or square base, then add the mirror and pencils as separate layers.
Materials and Tools
· Round mirror with smooth, undamaged edges
· Rigid plywood or strong backing board larger than the mirror
· Whole pencils of similar length
· Paper circle template and ruler
· Strong adhesive suited to mirror backing, wood, and the base
· Fine sandpaper and cleaning cloths
· Adult-controlled cutting tool if lengths need adjustment
· Proper wall hardware and eye protection
· Optional narrow trim to cover the outer backing edge
Steps for the Pencil Mirror Frame
1. Mark the centre and pencil ring. Trace the mirror position on the backing and draw a second guide for the pencil ends. Divide the circle into quarters, then place pencils at the main compass points before filling the spaces. This prevents the final section from becoming crowded because the spacing drifted around the ring.
2. Prepare every component before gluing. Clean the mirror according to its needs and sand rough pencil ends. If some pencils must be shortened, an adult should cut them to a consistent length and smooth the ends. Paint the visible backing edge now, because reaching it after assembly will be difficult.
3. Attach the pencils in balanced groups. Work from opposite sides of the circle rather than moving continuously in one direction. Keep the inner ends on the same guide line and use only enough adhesive for a secure join. Then place the mirror in the centre after confirming that no pencil intrudes beneath its edge.
4. Fit hardware and test the weight safely. Attach hanging hardware directly to the rigid backing with fixings suited to the wall and total weight. Let all adhesive cure flat before lifting the frame. Test it close to the floor, then hang it where the pencil ends cannot be brushed by shoulders, children, or pets.
The repeated yellow bodies and coloured erasers already make a strong pattern. I would leave the spaces between pencils plain rather than filling them with more decoration.
A small tabletop version can use short coloured pencils around a compact mirror. For a rental-friendly option, stand a lightweight frame on a deep shelf instead of relying on removable wall strips that may not support the combined weight.
Pencil Garland
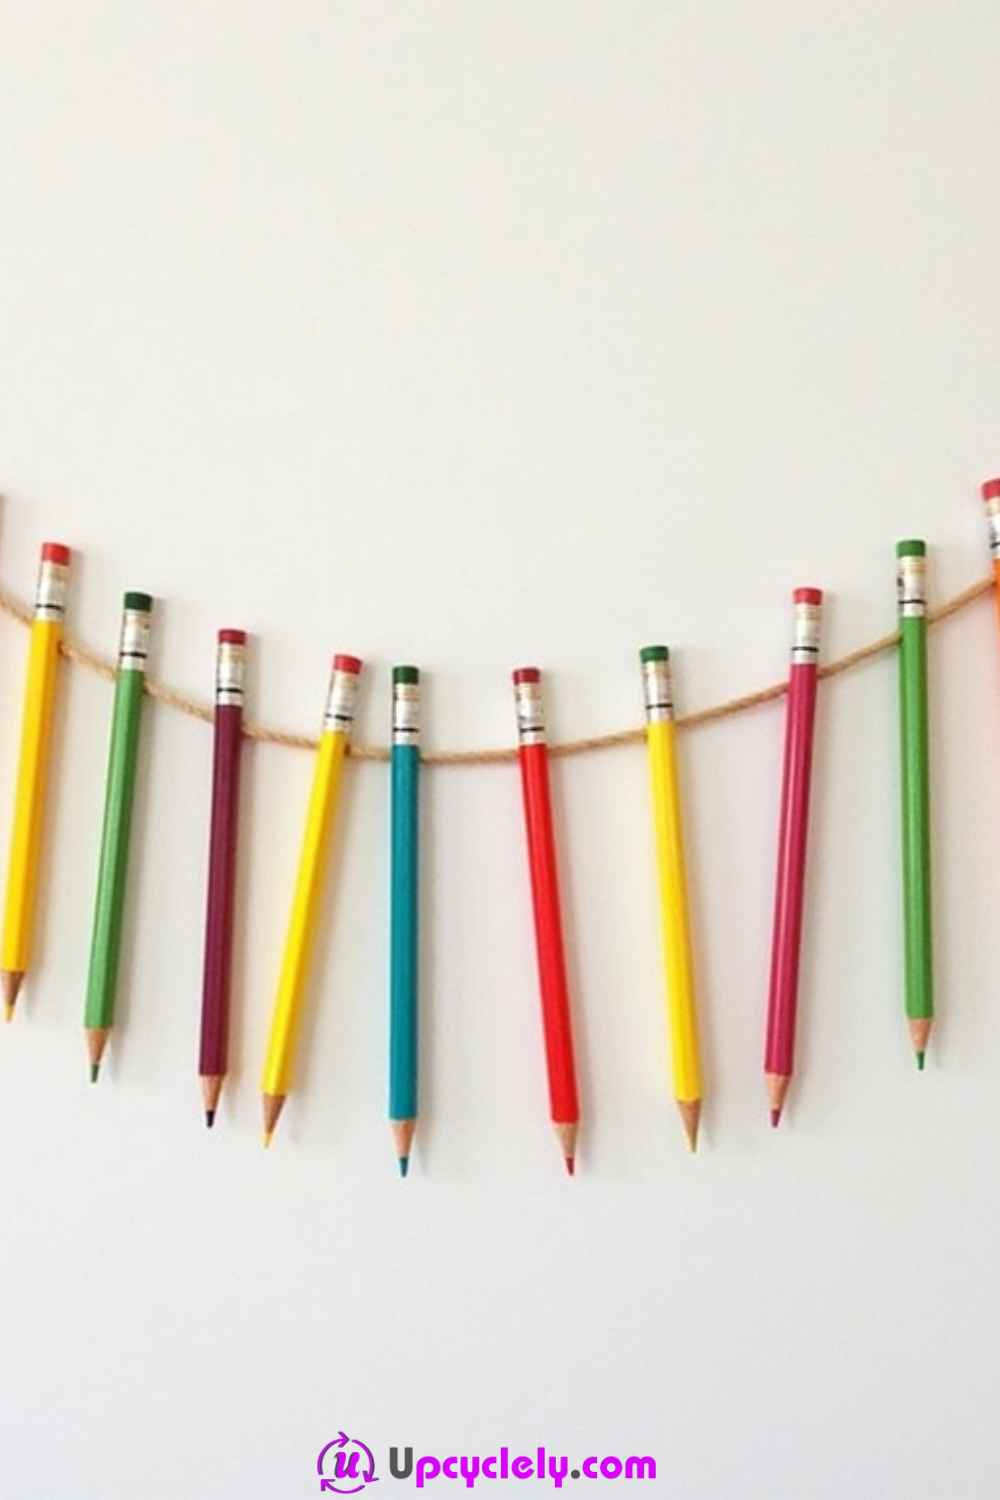
A pencil garland can decorate a classroom, studio, party table, or reading corner while keeping the pencils recognisable and removable. The simplest construction ties or loops cord around the upper pencil body, avoiding drilled holes that may split the wood. Spacing matters more than quantity: each pencil needs room to hang straight without striking its neighbours whenever the cord moves.
Whole usable pencils should remain usable whenever possible. A temporary loop or small paper sleeve lets the garland return to the pencil case after the event. Damaged or very short pencils can take a more permanent attachment, but any cut or drilled area needs sanding and adult handling.
Materials and Tools
· Coloured or ordinary pencils in sound condition
· Strong cotton cord, twine, or ribbon
· Small paper sleeves, elastic loops, or removable knots
· Ruler or card spacer
· Scissors
· Optional beads or flat paper shapes
· Adult drill and tiny eye screws only for permanent offcut versions
· Wall hooks or supports suited to the display location
How to Assemble the Pencil Garland
1. Choose a hanging method that suits the pencils. Use removable loops for full pencils and reserve permanent holes or screws for offcuts that will no longer be used for writing. Test one pencil by lifting and gently shaking the cord. The attachment should hold without squeezing hard enough to crack the paint or slide over the eraser.
2. Lay out the colour and spacing on a table. Stretch the cord flat and place the pencils beneath it in the planned order. Use a piece of card as a spacer so the gaps remain consistent. Add beads or paper shapes only if they are light enough not to pull the cord into uneven dips.
3. Attach the pencils from the centre outward. Fix the central pencil first, then work in pairs towards both ends. This keeps the weight balanced and makes the colour sequence easier to correct. Tie each loop securely, trim long tails, and keep every sharpened end pointing in the same safe direction.
4. Hang, level, and check the surrounding area. Support both ends with hooks suited to the wall or furniture, leaving enough slack for a gentle curve. Keep the garland away from fans, doors, heat, and places where people may walk into it. After hanging, check that no pencil can slip free when the cord is touched.
One detail I would not skip is testing the centre pencil. It carries a visible share of the weight and quickly reveals whether the cord or knot is too slippery.
Use paper pencil cut-outs for a lightweight children’s version, or hang only short retired pencils below a shelf. A vertical garland can label art stations when each pencil is paired with a small card.
Pencil Holder
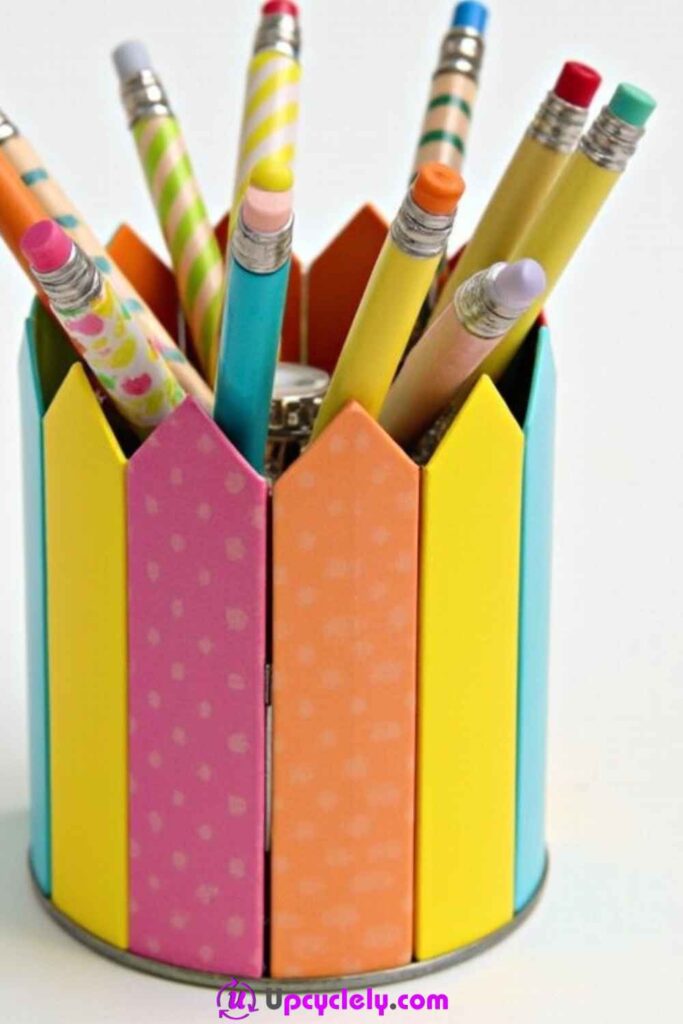
A pencil holder made around an empty tin, jar, or sturdy cardboard tube gives a discarded container a useful second role. The outside may be covered with whole pencils, painted craft sticks shaped like pencils, or a mixture of both. The inner container should carry the stationery; the decorative outer layer should not be expected to hold tools by itself.
The design needs a stable base and a rim that will not catch hands. Real pencils add weight and can make a narrow container tip, especially when tall scissors or rulers lean to one side. I would choose a low, broad core, keep the heaviest supplies near the centre, and add a washable removable cup when the reused container has an unknown interior coating.
Materials and Tools
· Clean empty tin, jar, or rigid cardboard tube
· Whole pencils, short pencils, or painted craft sticks
· Strong adhesive suitable for the container and wood
· Ruler, elastic bands, and low-tack tape
· Fine sandpaper for wooden edges
· Felt, cork, or non-slip pad for the base
· Optional washable inner cup or divider
· Protective gloves for handling any metal container edge
Steps for the Pencil Holder
1. Prepare the container and make the rim safe. Wash and dry the core completely. Check metal tins for sharp edges and cover or replace any unsafe rim rather than hiding it beneath decoration. Add an inner cup if the original container should not touch stationery directly, then test the empty holder for wobble.
2. Plan the outer pencil arrangement. Stand the pencils or craft sticks around the container without glue and measure how many will fit. Alternate colours or keep one calm sequence. If full pencils rise far above the rim, consider shorter decorative pieces so the holder does not become top-heavy.
3. Glue in small groups and keep the base level. Apply adhesive to a few pieces at a time and align their lower ends on the same flat surface. Use elastic bands or removable tape as temporary support while the join sets. Turn the container regularly so gaps do not collect on the final side.
4. Finish the base and organise the contents. Attach felt or cork beneath the holder and remove dried adhesive from the outside. Add a divider for scissors or long tools, then load the container gradually. If it begins to tip, reduce the height or weight of the contents rather than relying on more decoration to steady it.
The fence-like rhythm works best when the lower ends form one clean line. Small differences at the top can remain; they make the holder feel made from real reused pieces.
Wrap a tin with pencil-printed fabric for a no-glue-to-wood version, or use only four pencils as corner accents on a square cardboard organiser. The same method can hold paintbrushes or knitting needles with a taller, wider core.
Pencil Jewelry
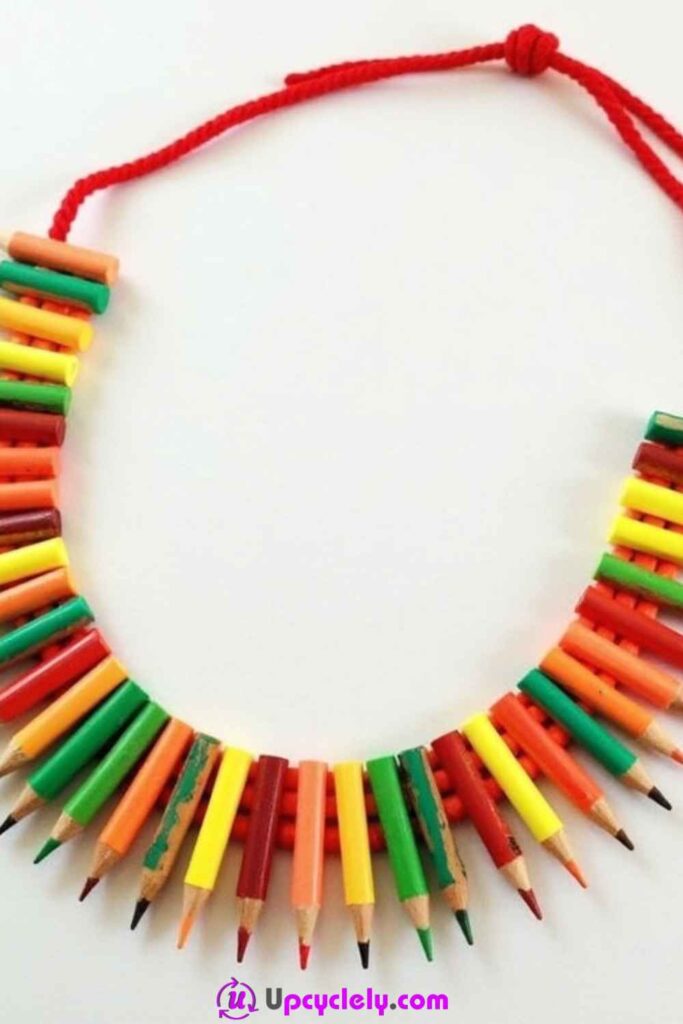
Coloured-pencil wood reveals bright circular or hexagonal cores when it is cut into small sections, which makes the material useful for pendants, beads, earrings, or a simple brooch. The colour comes from the pencil itself rather than from added plastic gems. Even so, jewellery pieces need smoother finishing than wall crafts because every edge may touch skin or clothing.
This is an adult cutting and drilling project. Pencil wood can split, and pigment dust should not be breathed or left on the work surface. I would keep the shapes slightly larger than a tiny bead, sand them thoroughly, and use jewellery findings intended for skin contact rather than improvised wire or rusty hardware.
Materials and Tools
· Retired coloured pencils with sound wood
· Fine-tooth saw and clamp for adult use
· Eye protection and dust mask suited to sanding tasks
· Fine and extra-fine sandpaper
· Pin vise or small drill with suitable bit
· Jewellery cord, jump rings, clasp, or brooch finding
· Small pliers
· Optional compatible clear finish
· Protected, well-ventilated work area
How to Make Pencil Jewelry Safely
1. Select and secure the pencil before cutting. Choose pencils without deep cracks and mark the sections while they are full length. Clamp the pencil gently with padding so it cannot roll. An adult should make slow, straight cuts and discard any piece that splits through the coloured core.
2. Sand each piece on every face. Smooth the cut sides first, then soften the outer edges so they will not scratch. Keep the section flat against the abrasive rather than pinching it close to a moving tool. Remove dust frequently and compare matching pieces before drilling.
3. Drill a centred attachment hole. Mark the hole away from thin corners and support the piece on scrap wood. Use a small hand drill or controlled tool, working slowly so the wood does not burst at the exit. For a pendant, a single top hole may be enough; beads need a straight passage through the centre.
4. Assemble, finish, and test against clothing. Seal the piece only with a compatible product and allow it to cure fully. Connect it with proper jump rings, cord, or a brooch back, then pull gently on every join. Rub the finished surface against scrap fabric to check for pigment transfer, roughness, or a sharp finding.
For me, one pencil section can make a stronger pendant than a crowded necklace of many tiny pieces. The coloured core remains easier to see and the finished item stays lighter.
Use sanded pieces as bag charms or zipper pulls when jewellery is not practical. A child can help choose colours and arrange finished beads, but cutting, drilling, and small findings should remain under appropriate adult control.
Pencil Keychain
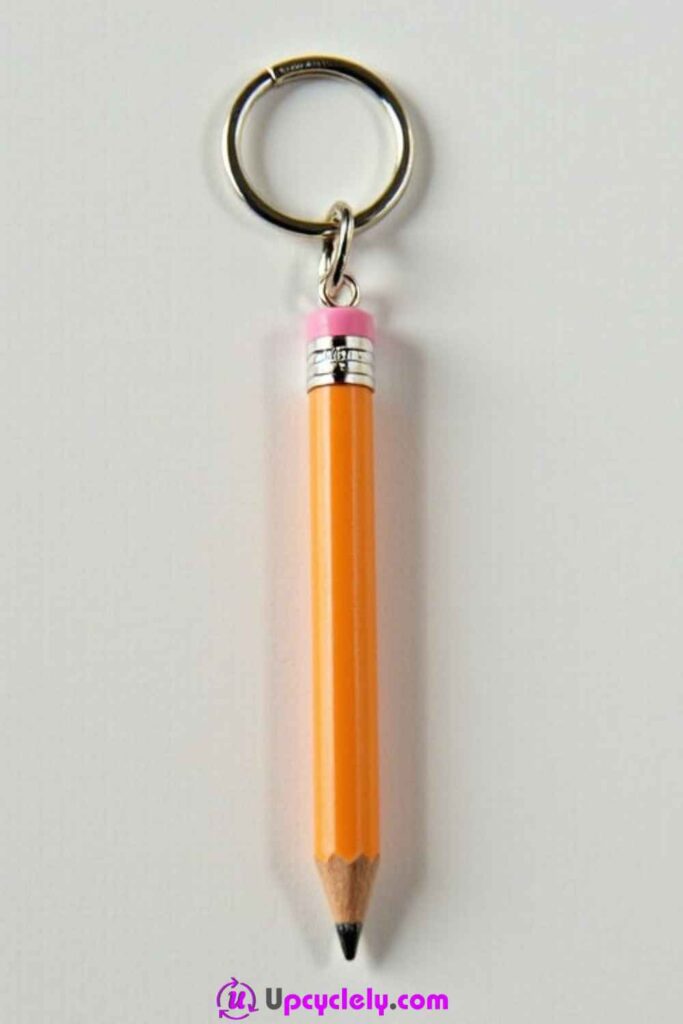
A shortened pencil makes a clear, lightweight keychain charm while preserving the eraser, painted body, or sharpened shape that identifies the original object. The attachment point must be stronger than the decoration, because keys are pulled from pockets, dropped into bags, and twisted around rings. A glued loop alone may not survive that repeated movement.
I would use a retired pencil section rather than cutting a perfectly useful full pencil only for this purpose. The piece should be long enough to handle safely but short enough not to jab the hand or catch inside a pocket. Rounded, sanded ends are more practical than a real sharp point.
Materials and Tools
· Short retired pencil or coloured-pencil section
· Fine-tooth saw and clamp for adult use
· Sandpaper
· Small eye screw or drilled through-hole attachment
· Key ring and optional swivel connector
· Pliers
· Compatible adhesive for reinforcing the hardware if required
· Eye protection and protected work surface
· Optional paint marker or flat label
Steps for the Pencil Keychain
1. Choose the section and remove sharp areas. Decide whether to keep the eraser end or a coloured body section. An adult should cut the pencil cleanly, then sand the cut and any sharpened point into a smooth rounded shape. Check the paint for flaking and remove loose material before adding hardware.
2. Create a mechanical attachment point. Drill a small centred hole near one end or fit an eye screw into solid wood after making a pilot hole. Avoid placing the hardware through cracked wood or directly into a soft eraser. Reinforce only when the adhesive is compatible, and never rely on glue as the sole connection for a frequently pulled keychain.
3. Connect the key ring and optional detail. Open the connector ring sideways with pliers, attach it to the pencil hardware, and close it fully. Add one light charm or label if desired, keeping the total bundle compact. Make sure no wire end points outward where it can scratch a hand or bag lining.
4. Test the keychain before adding important keys. Pull, twist, and shake the charm over a table while watching the eye screw or drilled hole. Carry it for a day with an empty ring, then recheck the wood for splitting. If the attachment begins to loosen, retire the charm rather than risking lost keys.
The worn paint on a familiar pencil can make this feel more personal than a new decorative charm. I would keep that history visible and add only a small initial if identification is needed.
Make the same form as a zipper pull, luggage tag accent, or school-bag charm. Keep small rings and pencil sections away from young children and pets.
Pencil Stamped Art
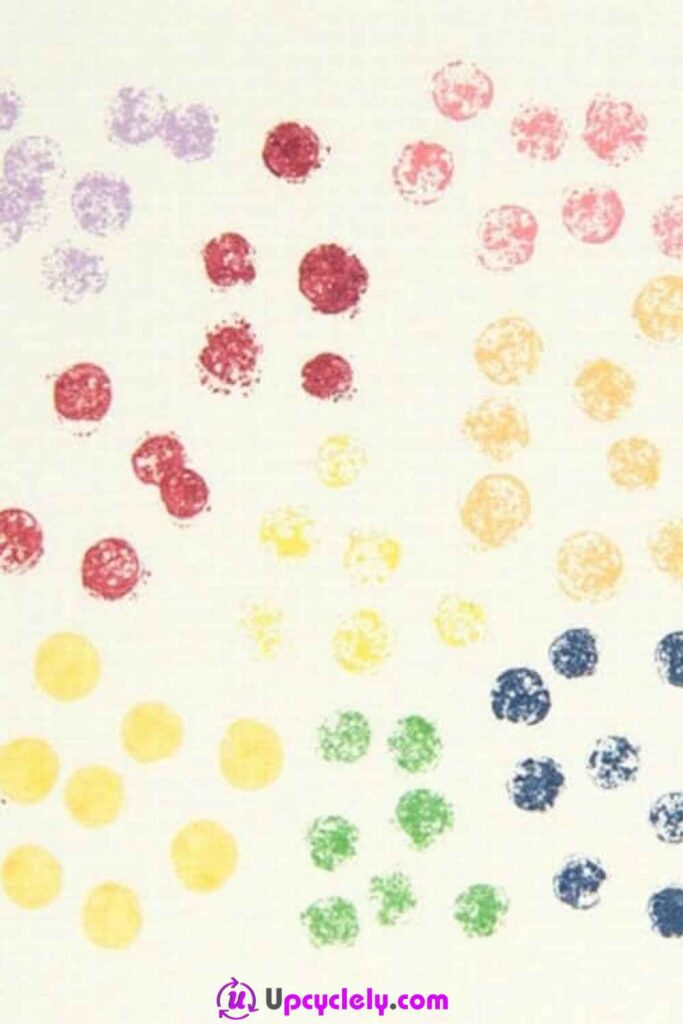
The flat eraser on an ordinary pencil becomes a small round stamp that can build flowers, leaves, letters, gradients, or abstract clusters. Because the mark is repeated one dot at a time, pencil stamped art works well with leftover paint and small pieces of card. The method is simple, but clear prints depend on using very little paint and lifting the eraser straight up.
This project also gives pencils with worn writing ends one more job before disposal. The eraser needs to remain reasonably flat and clean. If it is hard, cracked, or deeply rounded, the prints will become broken crescents rather than circles, which may still suit a textured design but should be tested first.
Materials and Tools
· Pencils with flat, clean erasers
· Thick paper, card, canvas board, or a reused frame insert
· Water-based paint in a limited palette
· Shallow palette or washable plate
· Scrap paper for testing prints
· Paper towels and water for cleaning
· Low-tack tape and stencil if desired
· Apron and covered work surface
How to Create Pencil Stamped Art
1. Prepare the surface and test the erasers. Secure the paper so it cannot slide and place a test sheet beside it. Press each dry eraser onto the scrap first to see whether the edge is intact. Assign one pencil to each colour when possible, which keeps the process cleaner and protects the erasers from repeated washing.
2. Load the stamp with a thin paint layer. Spread the paint shallowly rather than dipping into a deep puddle. Touch the eraser to the surface, then make one test print. If paint squeezes around the edge, blot once on scrap paper before stamping the artwork.
3. Build the pattern from light guides. Sketch the main shape faintly or use a stencil. Stamp larger clusters first, leaving small gaps so the circles remain readable. Then add darker or contrasting dots after the first layer has dried enough not to smear under the hand.
4. Clean the edges and prepare the piece for display. Lift tape or stencils carefully and correct only obvious stray marks; a few irregular dots keep the work human. Let the paint dry flat, erase visible guide lines where possible, and frame the sheet behind glazing once it is completely dry. Clean the pencils before returning any still-usable ones to the desk.
I like the way one ordinary eraser can create a whole field of colour without every dot matching perfectly. The repeated scale holds the design together even when the pressure changes slightly.
Use a single colour for a calm geometric print, or stamp around a cut-paper name to create negative-space lettering. Cotton swabs can fill tiny gaps, but the pencil eraser should remain the main visible mark.
Pencil Picture Holder
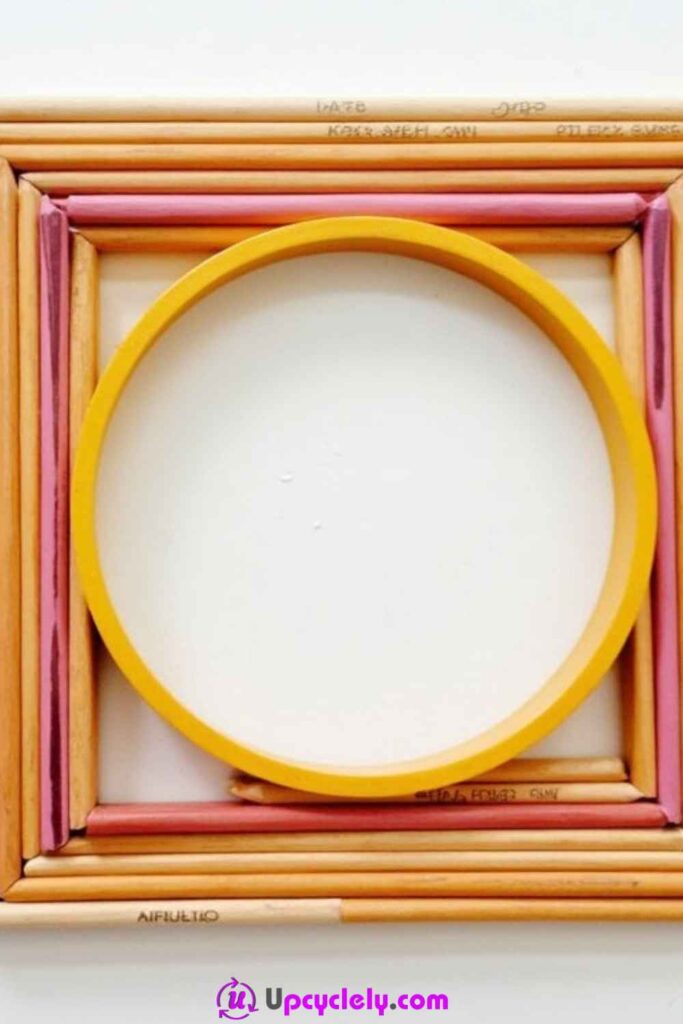
A pencil picture holder can be a small frame, a weighted base with a clip, or a square arrangement that supports a note in its centre. The most practical version keeps the photograph removable and uses the pencils as a border or base rather than gluing them directly across the image. Short coloured pencils provide enough visual interest without making the holder taller than the picture.
Balance matters because photographs act like small sails when the holder is moved. I would make the base broad and keep the clip near the centre. If the piece is intended only for a shelf, a slotted backing is often simpler than wire; if it will hold changing notes, a proper photo clip gives better repeated use.
Materials and Tools
· Short pencils or coloured-pencil offcuts
· Rigid cardboard, wood block, or reclaimed coaster for the base
· Photo corners, small clip, or slotted backing
· Strong adhesive suitable for wood and the base
· Ruler, square, and pencil
· Adult cutting tool and sandpaper if trimming is needed
· Optional wire photo holder and pliers
· Felt pad for the underside
· Sample photograph or note for testing
Steps for the Pencil Picture Holder
1. Choose the holding method before building the border. Decide whether the photograph will slide into a slot, sit behind a small frame, or stand in a clip. Test the picture at full size and mark its centre. This prevents the pencil arrangement from covering the image or leaving the clip in an awkward off-centre position.
2. Prepare a stable base and pencil pieces. Use a broad, flat base and add weight inside only if it can be enclosed safely. An adult should cut and sand pencil sections, keeping their lower ends level. Lay them out around the clip or opening before applying any adhesive.
3. Attach the pencils without trapping the photograph. Glue the border or base pieces in small groups, keeping the removable photo path clear. If using wire, insert it into a properly drilled hole and secure it mechanically rather than pushing it into soft card. Hold the clip upright while the join sets.
4. Add the picture and check tipping from several directions. Fit the photograph after the adhesive has cured. Tap the table lightly and turn the holder so the picture faces left and right; the base should remain planted. Add felt underneath, reduce the picture size, or lower the clip if the piece leans.
The best holder is the one that lets the photograph change without dismantling the craft. I would avoid gluing the image permanently unless it is a copy that can be replaced.
Use the holder for recipe cards, place names, or small reminders. A flat pencil frame with a folding cardboard stand makes a no-wire alternative and packs away more easily.
Pencil Sculpture

Pencils can become a small sculpture when their repeated straight form is arranged as steps, a bar graph, a spiral, or a balanced geometric cluster. A descending row of different lengths is especially effective because the familiar pencil becomes a simple unit of height. The base and the joins need to be strong enough that the piece reads as one object rather than a row of loose tools.
This is a good place for very short or partly used pencils that are no longer comfortable to write with. I would not cut them randomly. A planned progression of heights, colours, or angles gives the sculpture a reason, and a paper sketch prevents useful pieces from being shortened before the proportions are decided.
Materials and Tools
· Retired pencils in coordinated or mixed colours
· Paper sketch and ruler
· Rigid wood, card laminate, or reclaimed block for the base
· Fine-tooth saw and clamp for adult use
· Sandpaper and dust brush
· Strong wood-compatible adhesive or drilled mounting holes
· Eye protection
· Optional labels, painted base, or small title card
How to Construct the Pencil Sculpture
1. Plan the rhythm of heights and spacing. Draw the sculpture from the front and mark the intended pencil lengths. Arrange full pencils beside the sketch and decide which pieces can remain uncut. A steady progression is easier to read than several nearly identical heights that look accidental.
2. Cut and smooth the pieces safely. An adult should clamp and trim the pencils, working slowly to reduce splintering. Sand every cut face flat so it can sit securely on the base. Keep the sharpened ends rounded or pointed upward only when the sculpture will be displayed out of reach.
3. Mark the base and attach from the centre. Draw guide lines or drill shallow mounting holes where appropriate. Fix the central or tallest pieces first, then work outward while checking the sculpture from the front and side. Use a square or temporary support to keep vertical pencils upright until the adhesive holds.
4. Finish the presentation and test stability. Paint or cover the base only after the structure is secure, protecting the pencil surfaces. Add labels if the heights represent data, dates, or a personal story. Push the base gently from different directions; widen or weight it safely if the sculpture feels easy to tip.
For me, the idea becomes more interesting when the pencil lengths mean something, even if the meaning is simple, such as months read, colours used, or stages of a project.
A no-cut sculpture can weave pencils into a removable triangular or star arrangement with elastic loops. Short sections can also create a low mosaic relief on a board when a freestanding piece is impractical.
Additional Upcyclely Idea: Pencil Plant Markers
Short pencils can label seed trays and indoor pots when they are paired with a flat writing tag. The pencil provides a sturdy stem and keeps a familiar school-supply shape, while the tag carries the plant name clearly. A pencil alone is not an ideal outdoor marker because wood, paint, and graphite can deteriorate in wet soil, so the most useful version keeps the pencil above the damp area or uses it inside a dry cover.
I would reserve this project for indoor pots, covered growing areas, or temporary seed-starting labels. The pencil should never be pushed into soil with a sharpened point where it may snap. A blunt end, sealed paper tag, and removable clip make the marker easier to update when seedlings move.
Materials and Tools
· Short blunt pencils or retired coloured pencils
· Reclaimed plastic tabs, coated card, or wooden label blanks
· Permanent marker suited to the tag material
· Small clips, elastic loops, or wire ties
· Scissors or hole punch
· Fine sandpaper
· Optional clear tag cover or reusable label tape
· Small empty pot for testing placement
Steps for Pencil Plant Markers
1. Prepare blunt, clean pencil stems. Choose pencils without mould or loose paint and sand any broken end smooth. Keep the sharpened end above the soil or round it off completely. Wipe the pencil dry so the attachment will not slide.
2. Make labels that remain easy to read. Cut broad tags and write the plant name, sowing date, or variety in large lettering. Leave room for later notes. When using card, protect it with a reusable sleeve rather than assuming ordinary paper will survive repeated watering.
3. Attach the tag without weakening the pencil. Use a small clip, elastic loop, or tie near the upper body. Avoid drilling a thin pencil for a temporary label. Turn the tag so it faces the viewing direction and does not shade a small seedling.
4. Position the marker away from regular moisture. Place the blunt lower end into a dry edge of the pot or insert it into a separate reusable tube. Remove the marker before heavy watering if needed. Check it weekly and replace any pencil that begins to soften, split, or shed paint.
The useful part is the removable label. The same pencil stem can follow a plant from seed tray to pot without rewriting the whole marker.
Use craft sticks for wetter outdoor beds and keep the pencil version on a kitchen herb shelf, propagation station, or covered windowsill.
Additional Upcyclely Idea: Pencil Desk Nameplate
This second original Upcyclely idea completes the fifteen-idea title without implying that it came from an existing image on the published page.
A pencil desk nameplate turns several short pencils into a low border around a reusable card. It can identify a workspace, label a craft station, or hold a short message without becoming a permanent sign. The pencils create the visual theme, while a slot or clip allows the name card to change when the desk changes hands.
The base should stay low and broad so it does not tip when someone brushes the desk. I would use blunt pencil pieces and keep all sharpened points enclosed or facing inward. A simple rectangular arrangement is easier to keep stable than a tall bundle, and it leaves room for the lettering to remain readable.
Materials and Tools
· Short blunt pencils in similar or mixed colours
· Reclaimed wood strip, layered card, or wide cork base
· Reusable card or thin label panel
· Small slot, binder clip, or photo clip
· Strong adhesive suitable for the base and pencils
· Ruler, square, and sandpaper
· Adult cutting tool if lengths need adjustment
· Felt or cork pads for the underside
How to Make the Pencil Desk Nameplate
1. Size the label before arranging the pencils. Write or print a sample name card and place it on the base. Mark the visible opening and the position of the slot or clip. Keep enough height for the text while preventing the card from rising so far that it acts like a lever.
2. Prepare a level pencil border. Choose pencil pieces with smooth ends or have an adult cut and sand them. Arrange them horizontally along the lower edge or vertically at the sides. Check that no point projects into the user’s hand space.
3. Attach the pencils and card holder separately. Glue the pencil border first and let it become secure. Then fit the slot, clip, or folded card support at the centre. Keeping these functions separate makes it easier to replace the name card without stressing the decorative wood.
4. Finish the base and test it during normal desk use. Add felt underneath and place the sign near notebooks, a keyboard, or a supply tray. Slide papers past it and tap the table to check stability. Lower the card, widen the base, or remove heavy decoration if the nameplate tips or blocks the work area.
I would keep the lettering plain because the pencil colours already frame it. A crowded typeface can make a small sign harder to read from across the table.
Use the same base for price cards at a craft stall, labels on a classroom supply shelf, or short reminders near a sewing machine.
Pencil Craft Missteps That Can Leave the Finish Rough or Unsafe
Cutting useful pencils before the design is settled. A collage or sculpture may need fewer short pieces than expected, and an early cut cannot be reversed. Arrange the full project on paper, mark each required length, and preserve any pencil that can remain whole or return to writing use.
Ignoring cracks near a cut or drilled hole. A fine split can widen when an eye screw, jewellery ring, or wall hanging is pulled. Inspect every piece after cutting, discard weak sections, and place hardware in solid wood with enough material around it.
Leaving rough pigment and wood dust on the project. Sanded pencil sections may look smooth while still carrying coloured dust that transfers to skin, fabric, or a pale wall. Brush and wipe each piece carefully, clean the work surface, and test the finished item on scrap material before use.
Using a large blob of adhesive as structural support. Thick glue can create visible ridges, hold a pencil at an angle, and fail under repeated pulling. Increase the contact area, use the adhesive recommended for both materials, and add mechanical hardware where the project hangs, twists, or carries weight.
Building a heavy frame on weak card. Pencils add more weight than paper decoration, especially around mirrors and large photographs. Use rigid backing, attach the hanger to that backing, and test the complete item close to the floor before placing it above furniture or a bed.
Keeping sharp points in reachable positions. A pencil tip that looks effective in a sunburst or keychain can scratch skin, catch fabric, or break. Round, enclose, or direct points away from handling areas, and keep pointed display pieces out of reach of children and pets.
Making functional surfaces uneven. Raised pencil pieces, beads, or thick paint can make a coaster wobble, a bookmark press into pages, or a desk sign tip. Keep the working face flat and move dimensional decoration to borders or non-contact areas.
Treating ordinary craft finishes as food-safe or heat-proof. A clear coating may protect paint from light handling but does not automatically make a pencil craft suitable for hot cookware, food contact, or a child’s mouth. Match the item to a low-risk purpose and use materials specifically intended for any higher-demand use.
Adding too many colours without a visual order. A mixed pencil collection already contains labels, wood tones, ferrules, erasers, and bright cores. Repeat a limited sequence, group similar tones, or leave a neutral backing visible so the main shape remains clear.
Skipping a real-use test. A keychain may loosen, a picture holder may tip, and a garland may slide only after it is moved. Test the object gently in the way it will actually be used, then reinforce, reduce weight, or change the display before trusting it with keys, glass, or a favourite photograph.
Frequently Asked Questions
Which pencil craft ideas are easiest for beginners?
Pencil stamped art, a flat pencil-themed bookmark, a wrapped pencil holder, and simple plant markers need little or no cutting of wood. A beginner can focus on arrangement and clean attachment while an adult handles any sharp tools or small hardware.
Can I use pencils that are still good for writing?
Yes, but choose a reversible project such as a removable garland, temporary display, or pencil-filled holder. Reserve permanent cutting and drilling for pencils that are already too short, damaged at one end, or no longer comfortable to use.
How should wooden pencils be cut safely?
Secure the pencil so it cannot roll, use a suitable fine-tooth tool, wear eye protection, and keep hands away from the cutting path. An adult should complete the cut, sand the new edge, and clean the dust before the piece returns to the craft table.
What adhesive works best for pencil crafts?
The answer depends on the pencil coating and the backing material. Choose an adhesive intended for both surfaces, test it on an offcut, use a thin even amount, and follow the manufacturer’s instructions instead of guessing at curing time.
Can pencil crafts be used by young children?
Flat stamped art and large paper-based pencil designs can be adapted for supervised children. Cut pencil sections, sharpened points, magnets, jewellery findings, key rings, and small decorations may create injury or choking risks and should remain with an appropriate adult.
How can I stop a pencil frame or sculpture from tipping?
Use a rigid, broad base and keep the heaviest pieces low and centred. Test the complete project from several directions, reduce height where needed, and attach wall hardware directly to the structural backing rather than to decorative pencils.
Should I seal cut coloured-pencil pieces?
A compatible finish can reduce pigment transfer and make sanding marks easier to clean, but it is not required for every display piece. Test the product first, use ventilation when instructed, let it cure fully, and remember that sealing does not automatically make the object food-safe, washable, or heat-resistant.
Let Short Pencils Keep Their Colour and Purpose
The most successful pencil craft ideas begin by deciding what the material can still do. A working pencil can remain removable in a garland or holder, a short pencil can become a picture border or plant marker, and carefully prepared coloured-pencil sections can supply the pattern for jewellery, keychains, or a small sculpture. Planning before cutting protects useful lengths and usually produces a cleaner result as well.
Start with the pencil that has become too short to reach for comfortably, then choose one project that suits its condition. Smooth the wood, keep the attachment appropriate to the new use, and let the original paint or coloured core remain visible. Which of these 15 pencil craft ideas would give the forgotten pencils in your drawer the most useful next role?