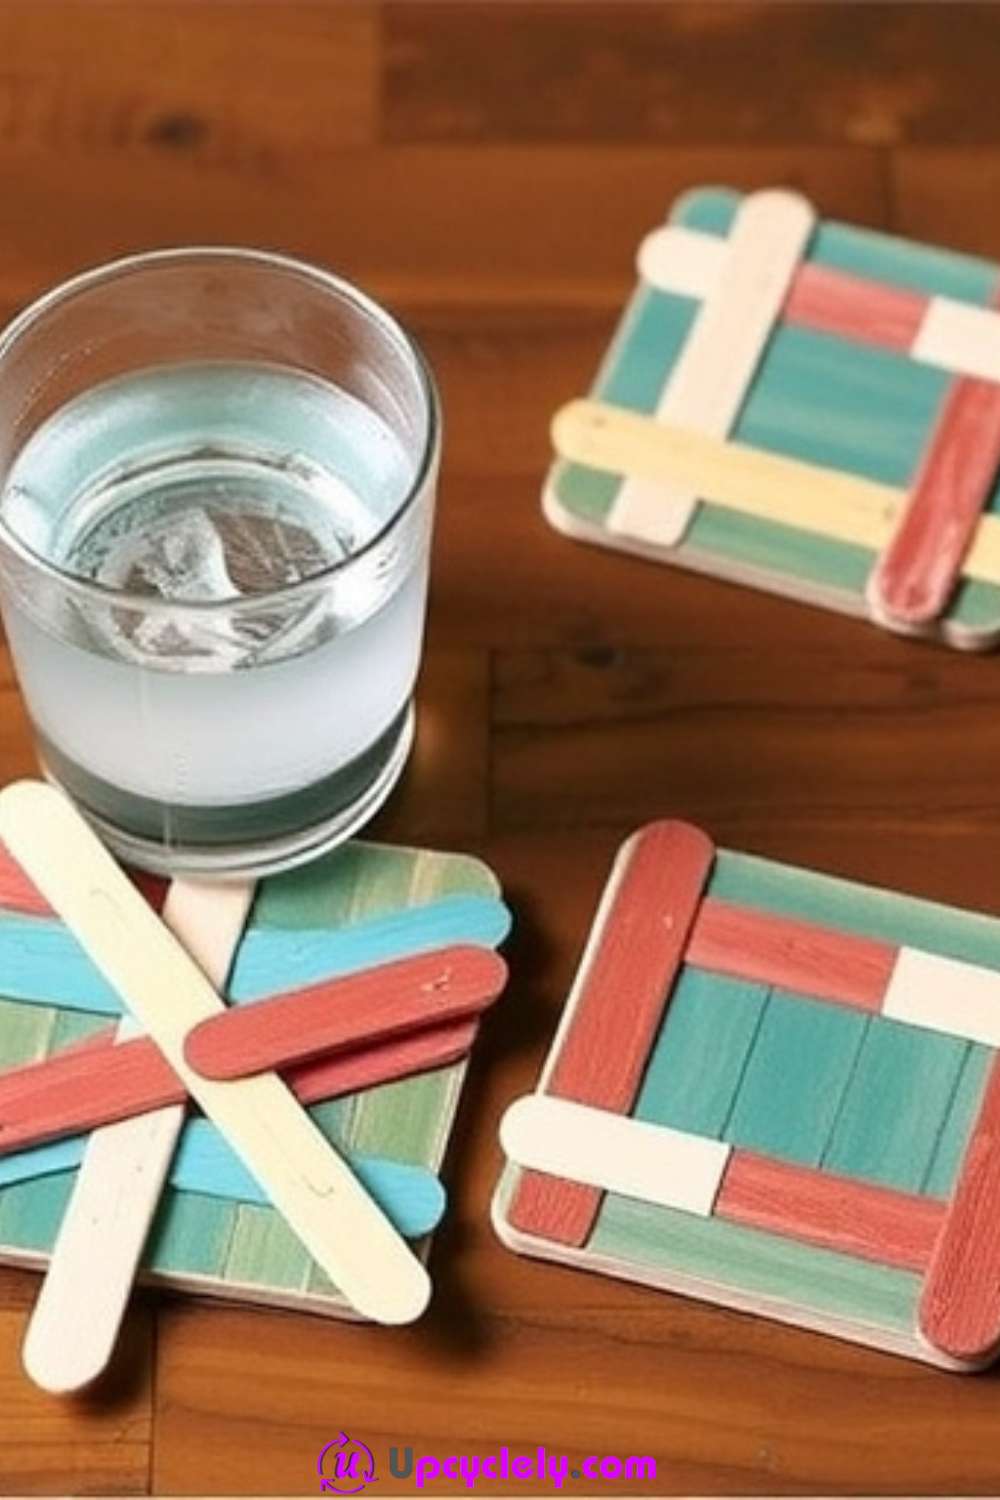
DIY Popsicle Stick Coasters
Materials Needed:
- Popsicle sticks (about 16-20)
- Paint (acrylic paints in your favorite colors)
- Glue gun or white glue
- Clear sealant (optional)
Step-by-Step Instructions:
- Paint the Popsicle Sticks: Begin by painting your popsicle sticks with vibrant, eye-catching colors. You can go for a simple solid color or create a fun pattern by painting alternating sticks different shades. Let them dry completely.
- Assemble the Coasters: Lay out the painted popsicle sticks in a square shape (4×4) or a grid that fits the size you want your coasters to be. Glue each stick to the others at the edges.
- Finish and Seal: Once the glue has dried, flip the coaster over and apply a thin layer of clear sealant to protect the paint. Let it dry completely before using.
Pro Tip: If you want a more rustic or natural look, leave the popsicle sticks unpainted, and just sand the edges for a smooth finish.
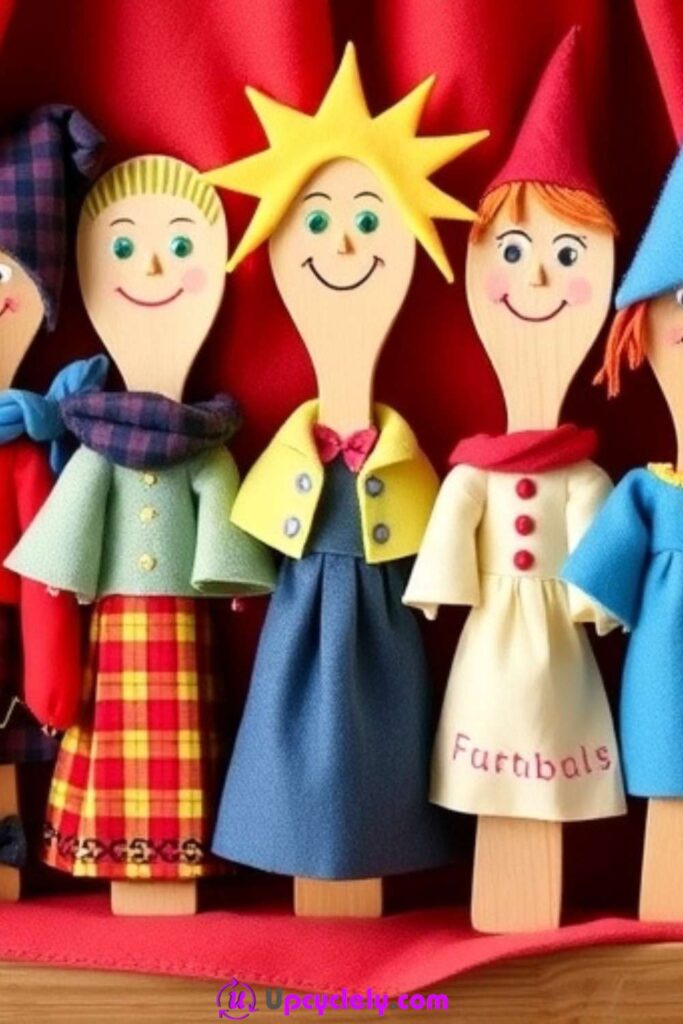
Wooden Spoon Puppet Theater
Materials Needed:
- Wooden spoons (5-6)
- Felt or fabric scraps
- Hot glue gun or white glue
- Googly eyes
- Markers
- Fabric for curtains (optional)
- Small cardboard box or wooden frame for the stage
Step-by-Step Instructions:
- Make the Puppets: For each puppet, glue felt or fabric onto the wooden spoons to create characters. You can add googly eyes, stitch some hair, or use markers to create faces. Be as creative as possible — each puppet can have its own personality!
- Set Up the Stage: Use a small cardboard box or frame to create a simple puppet theater. You can even decorate the box with colorful paper or paint it to make it more fun.
- Perform: Once your puppets are ready, you can set up a mini puppet show with your friends or family. The stage adds a nice touch, and you can even create little scenes using paper or fabric.
Pro Tip: Use different fabric textures to make each puppet unique — some can have wool hair, others can have felt dresses. The more variety, the more fun!
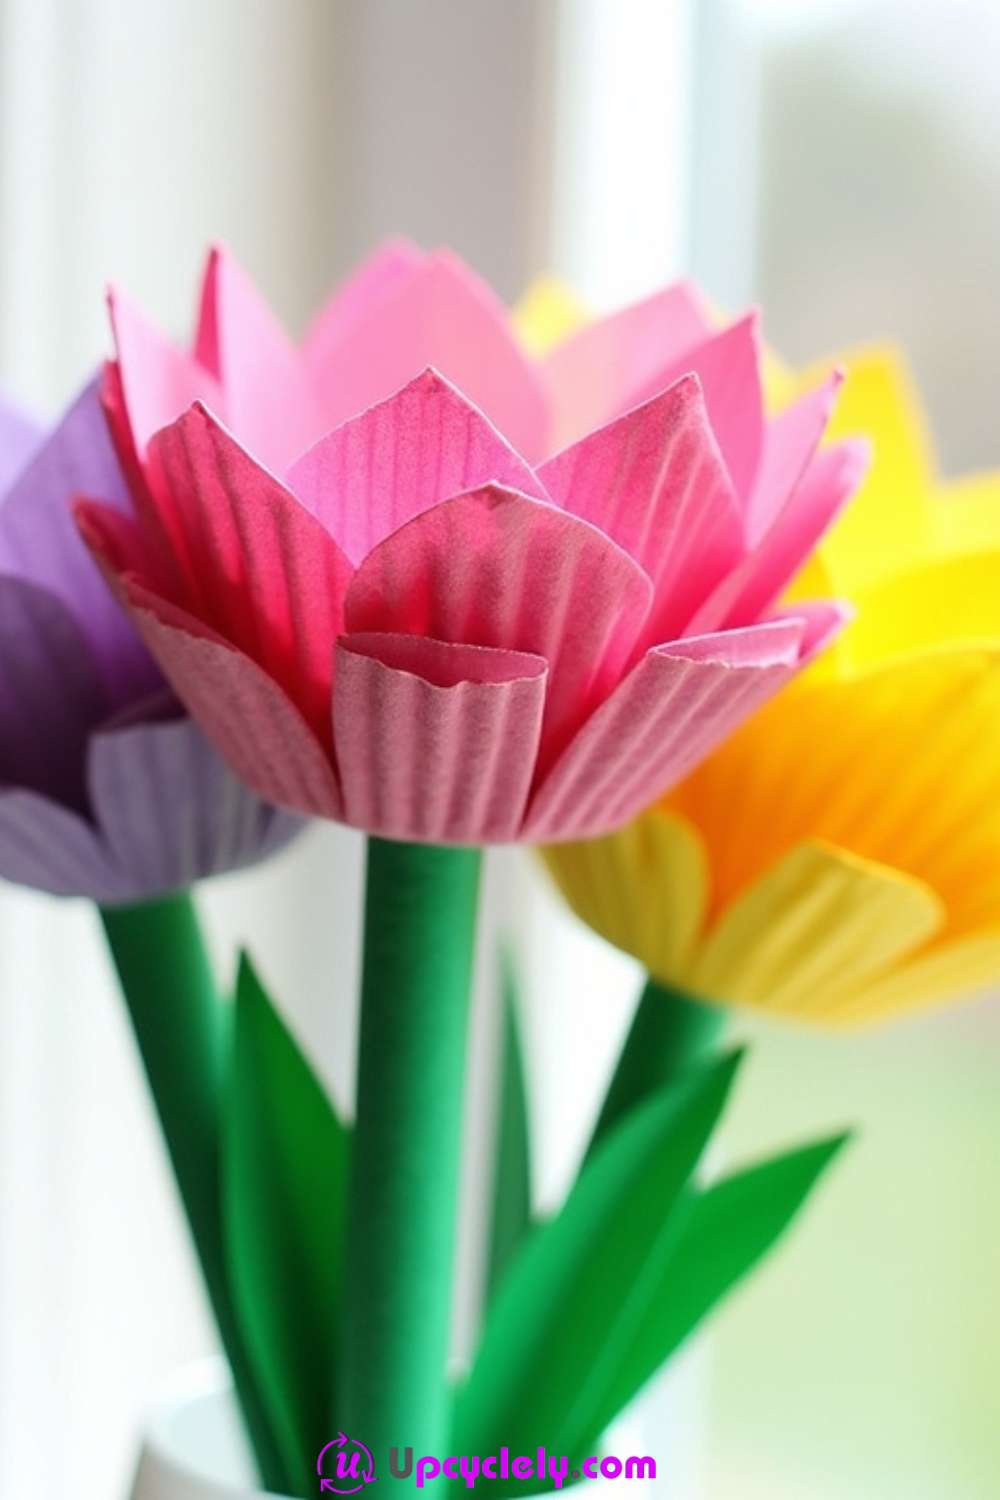
Cupcake Liner Flowers
Materials Needed:
- Cupcake liners (3-4 colors)
- Green straws or sticks
- Glue
- Scissors
- Craft wire or pipe cleaners (for stems)
Step-by-Step Instructions:
- Create the Flower Petals: Take a cupcake liner and fold it into quarters. Cut the edges to make them look more like flower petals. You can layer different colors for a fun effect.
- Assemble the Flower: Once the petals are ready, glue the cupcake liners together in the shape of a flower. Layering them creates dimension, making your flowers pop.
- Add Stems: Attach a green straw or craft wire to the bottom of each flower to serve as the stem. For a more natural look, you can wrap the wire with green tape.
Pro Tip: If you want your flowers to stand out even more, try adding a little glitter or paint to the tips of the petals.
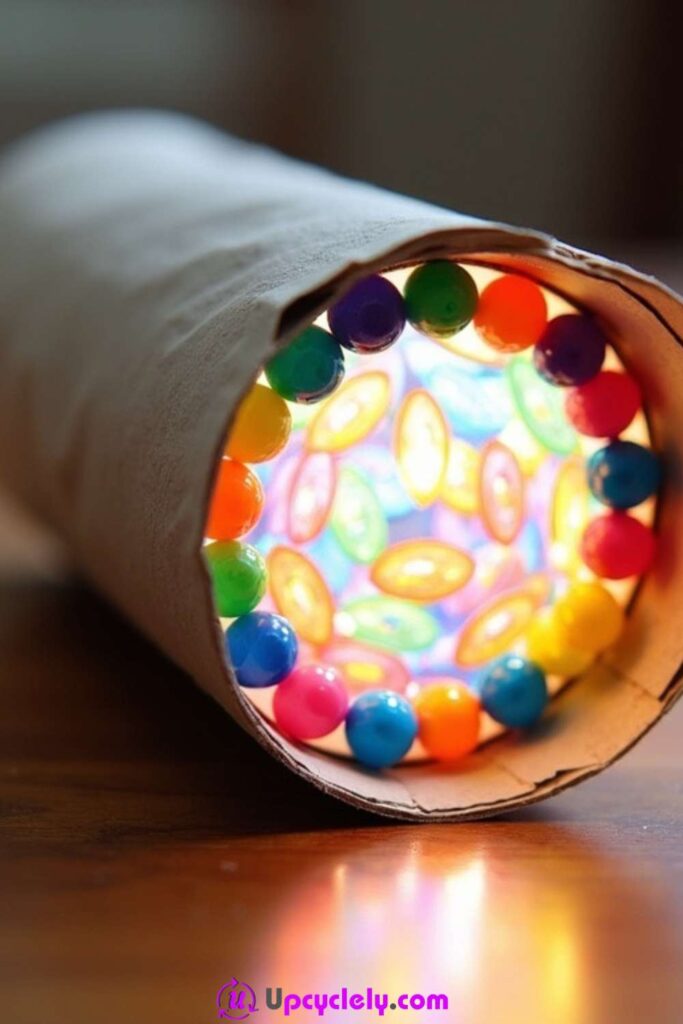
Kaleidoscope DIY
Materials Needed:
- Empty toilet paper roll or a paper towel roll
- Clear plastic sheet (like from a CD case)
- Beads, buttons, or small colorful objects
- Aluminum foil
- Glue
- Tape
- Flashlight
Step-by-Step Instructions:
- Create the Tube: Start by using an empty toilet paper roll as your base. Cover the edges with tape to ensure they’re smooth and won’t snag.
- Build the Kaleidoscope Lens: Cut a piece of clear plastic sheet into a square that fits snugly over one end of the tube. Attach small colorful beads or buttons inside the tube, making sure they can move freely. Then, tape the clear plastic sheet over the open end to hold everything in place.
- Finish and Test: Seal the other end of the tube with aluminum foil, leaving it slightly open to let in light. Now, shine a flashlight into the open end, and start rotating the kaleidoscope to watch the colors shift and change!
Pro Tip: To make the beads move more freely, make sure the tube isn’t too tight. You can also experiment with different objects inside to create unique patterns.
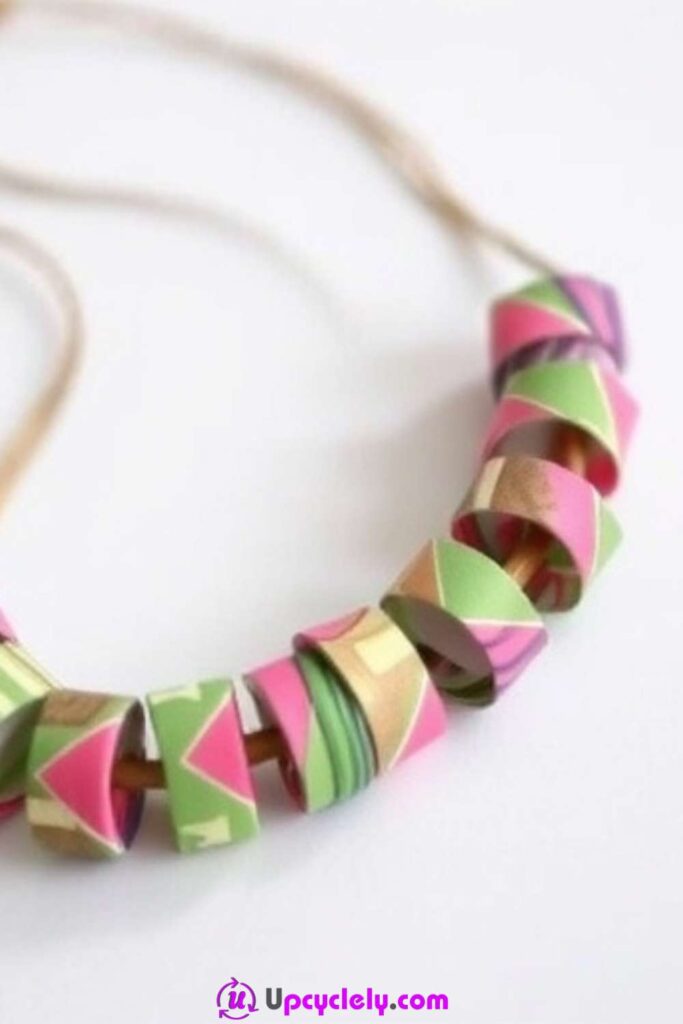
Handmade Paper Beads Jewelry
Materials Needed:
- Colorful scrapbook paper or old magazines
- Scissors
- Glue stick or white glue
- Needle and thread or elastic cord
- Beads or charms for decoration (optional)
- Ruler and pencil (for measuring)
Step-by-Step Instructions:
- Create the Paper Strips: Start by cutting your paper into long, triangular strips. The width at the base should be about 1 inch, and the length can vary depending on how long you want your beads to be. The longer the strip, the bigger the bead.
- Roll the Strips: Take each strip and apply glue to the wide end. Carefully roll the strip tightly around a toothpick or small stick, making sure the paper stays in place. Secure the end of the strip with glue. Repeat for as many beads as you want.
- String the Beads: Once your beads are dry, use a needle and thread or elastic cord to string them into a necklace, bracelet, or even earrings. You can also add other beads or charms for an extra touch.
Pro Tip: If you want your beads to have a shiny finish, you can coat them with a layer of clear varnish or Mod Podge after they’ve dried.
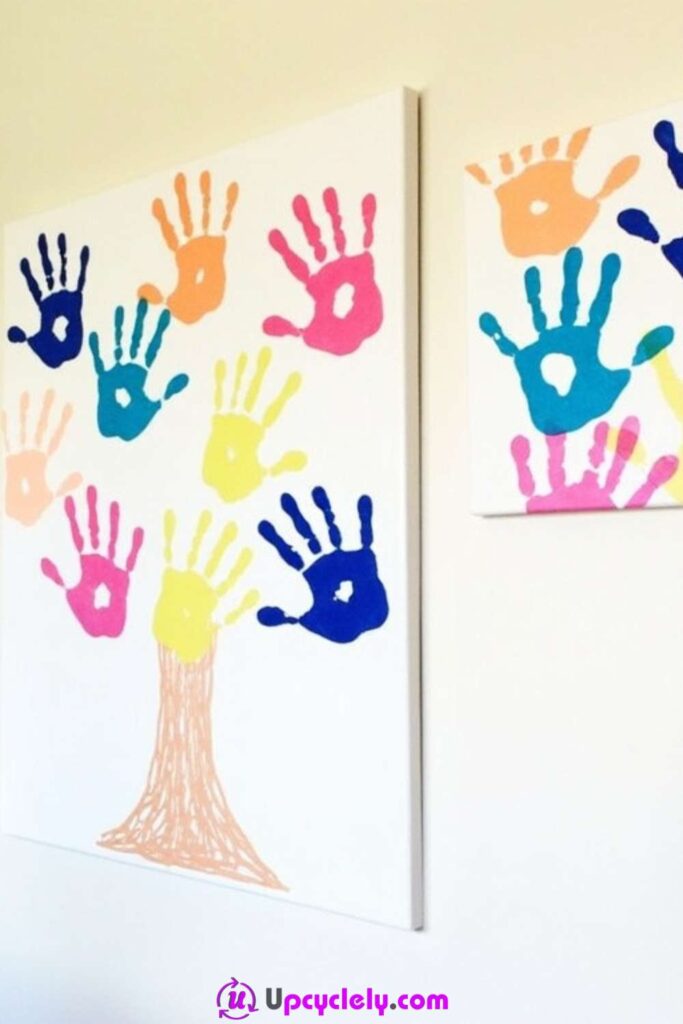
Handprint Wall Art
Materials Needed:
- Canvas or large sheet of thick paper
- Paint (various colors)
- Paintbrushes
- Markers or pens (for outlining and details)
Step-by-Step Instructions:
- Prepare Your Canvas: Lay out your canvas or large sheet of thick paper where you can easily work with it. Choose your colors for the handprints and any extra colors for the tree or background.
- Create the Handprints: Dip your hand in your chosen paint color and press it onto the canvas, leaving a colorful handprint. Repeat this process, overlapping the handprints to create the effect of leaves on a tree. You can have a gradient effect by layering lighter or darker colors as you go.
- Finish the Artwork: Once the handprints are dry, use a marker or paintbrush to add the tree trunk and branches. You can even outline the handprints with a fine marker to make them pop.
Pro Tip: If you’re doing this craft with children, make sure to help them with the handprint part as it can get a little messy. But it’s worth it for such a personal and meaningful piece of art!
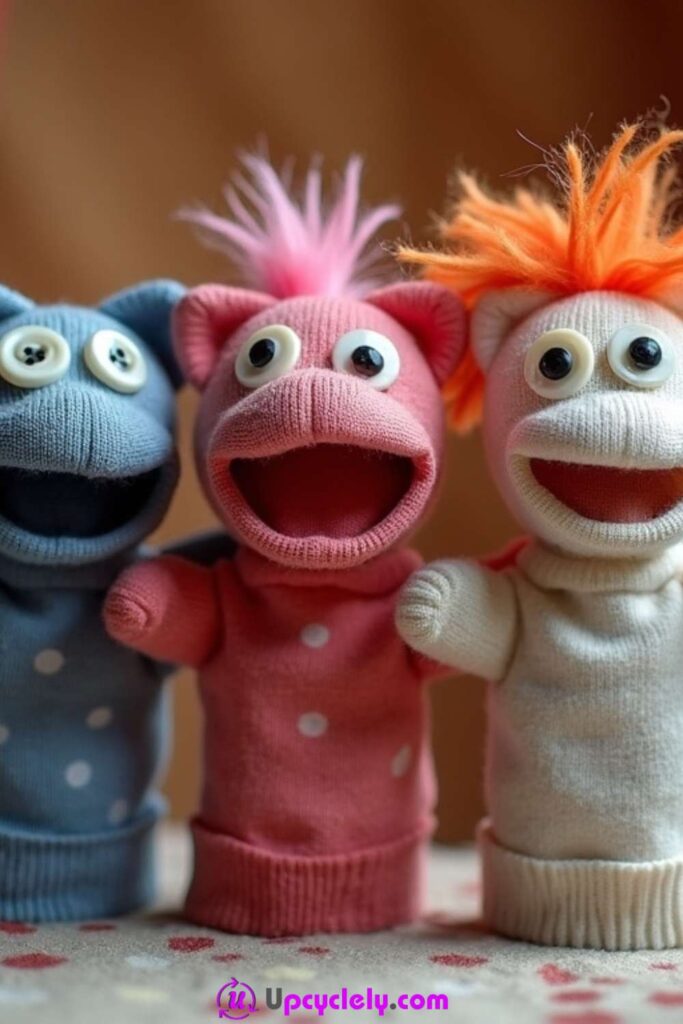
No-Sew Sock Puppets
Materials Needed:
- Old socks (preferably bright and colorful)
- Googly eyes
- Fabric glue or hot glue gun
- Yarn or fabric scraps for hair
- Felt or fabric for decoration (optional)
Step-by-Step Instructions:
- Prepare the Sock: Find a colorful sock to use as the base of your puppet. Turn the sock inside out and cut a slit along the toe area so that it opens up for the mouth. This will be where you “talk” when you use the puppet.
- Decorate the Puppet: Glue googly eyes onto the sock to make the face. For the hair, cut yarn or fabric strips and glue them onto the top of the sock. You can also use felt or fabric to create ears, noses, and other fun features.
- Add the Finishing Touches: Once everything is dry, turn the sock right side out, and your puppet is ready to perform! You can also use fabric scraps to make clothing or accessories for your puppets.
Pro Tip: Let the kids design their own sock puppet characters! This allows for endless creativity and gives them a sense of ownership over their work.
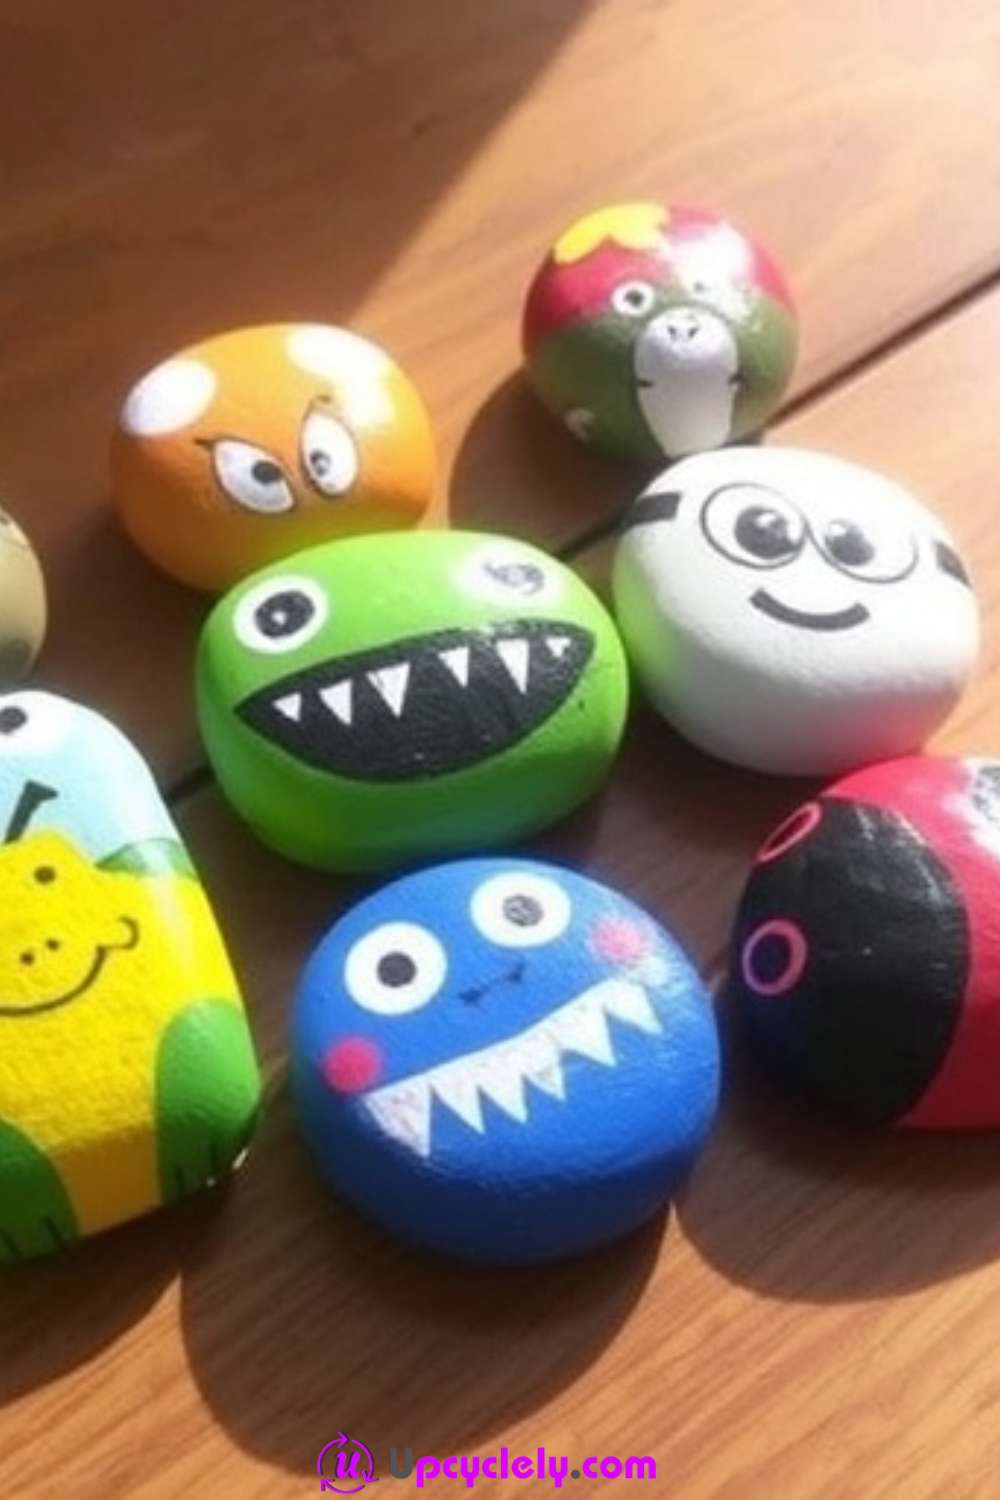
Painted Rock Creatures
Materials Needed:
- Smooth, clean rocks (variety of sizes)
- Acrylic paints (variety of colors)
- Paintbrushes
- Permanent markers (for details)
Step-by-Step Instructions:
- Prepare the Rocks: Clean the rocks and make sure they are dry. You can choose small rocks for little creatures or larger ones for bigger designs. The smoother the rock, the easier it will be to paint.
- Paint the Rocks: Using your acrylic paints, create colorful designs on each rock. You can turn them into little animals, creatures, or even characters from a favorite story. Paint simple shapes or go for detailed patterns — the choice is yours!
- Add Details: Once the paint is dry, use a permanent marker to add fine details like eyes, scales, or even little mouths. You can make them into cartoonish characters or realistic animals, depending on what you’re going for.
Pro Tip: Let the paint dry completely before adding details. This way, your markers won’t smudge and you’ll have crisp, clean lines.
Paper Plate Masks
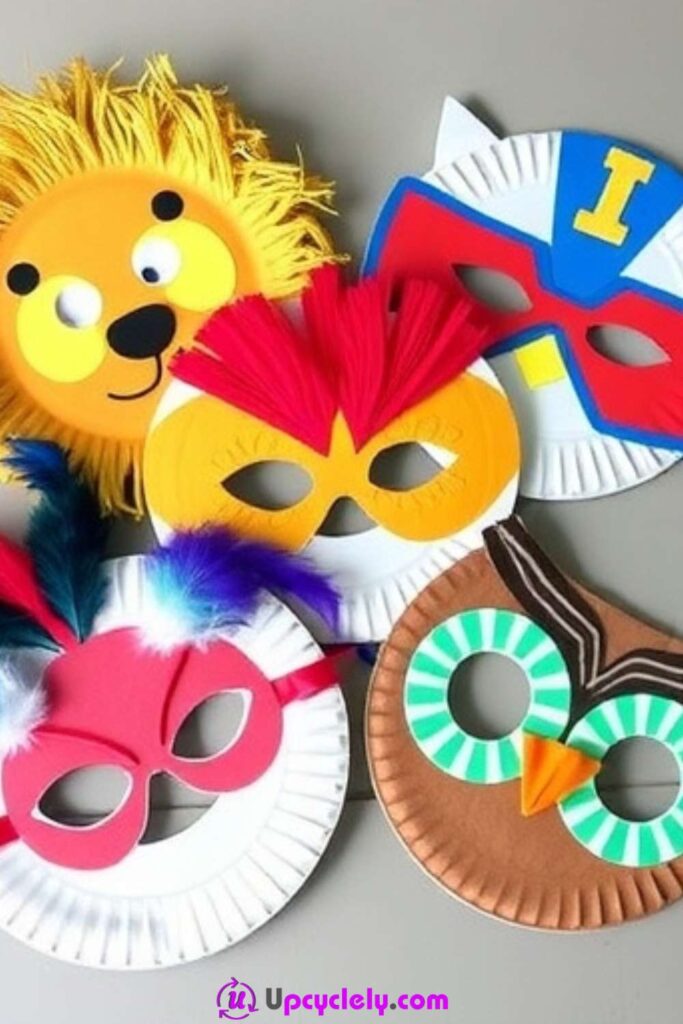
Materials Needed:
- Paper plates (at least 5)
- Colorful paper (construction paper or scrap paper)
- Glue or tape
- Scissors
- Markers, feathers, stickers, or googly eyes for decoration
- String or elastic for wearing
Step-by-Step Instructions:
- Cut the Plates: Take a paper plate and cut out eye holes in the center. You can make the mask as big or small as you want, but be sure the eye holes are wide enough for clear vision.
- Decorate the Masks: Start decorating your mask using colorful paper, markers, stickers, or feathers. You can make animals, superheroes, or even a fun character mask. Glue on googly eyes, feathers, and fabric for extra texture.
- Attach the String: Once your mask is fully decorated, punch a hole on each side of the plate and attach a string or elastic so that you can wear it. Tie the ends securely to fit comfortably on your face.
Pro Tip: If you’re creating masks for a group, let each child or participant design their own! You could even hold a “mask parade” at the end for a fun activity.
Tissue Paper Tree
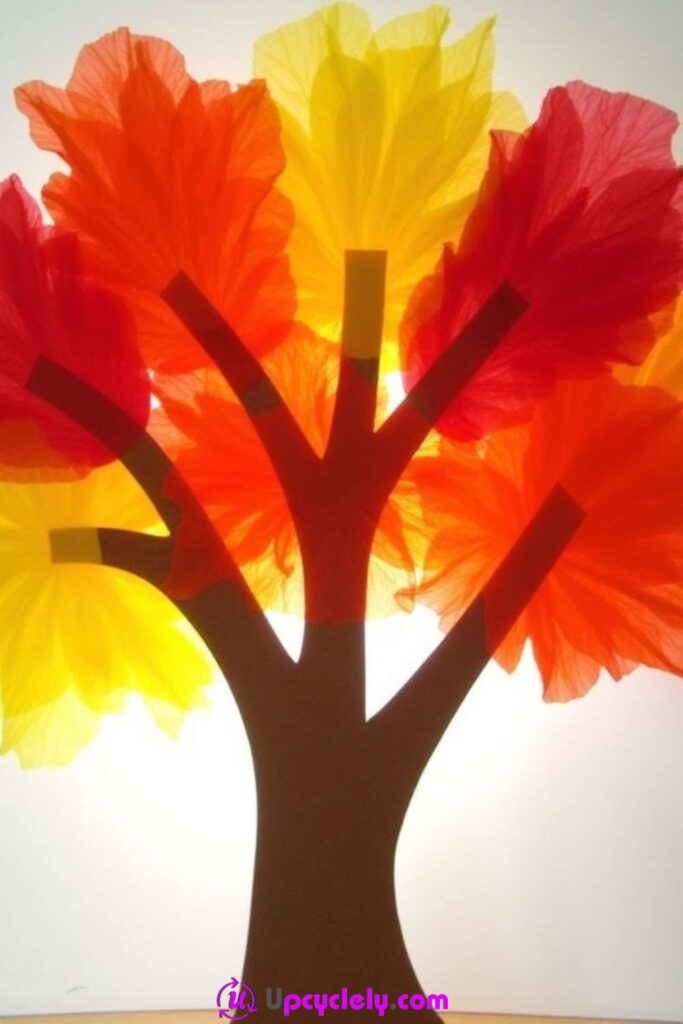
Materials Needed:
- Brown construction paper or cardstock (for the trunk)
- Yellow, orange, red, and green tissue paper
- Scissors
- Glue or glue stick
Step-by-Step Instructions:
- Create the Tree Trunk: Start by cutting out a tree trunk shape from the brown construction paper or cardstock. You can make it tall and narrow or short and wide, depending on your preference. Glue this onto your surface (like a piece of white paper or a canvas).
- Cut the Tissue Paper: Cut the tissue paper into small squares or rectangles. You can mix the colors for a fall-like effect, using warm shades like red, yellow, and orange for the leaves.
- Form the Leaves: Take each square of tissue paper and crumple it lightly into a small ball. Glue these crumpled tissue paper balls onto the top of the tree trunk to form the leaves. Place them close together to create a full tree.
- Finishing Touches: Add a few green leaves to represent the last remnants of summer, or decorate the background with more details like the sun or clouds.
Pro Tip: If you want a 3D effect, gently puff up the tissue paper and glue it down so that some of it stands out from the page, giving your tree a more lifelike appearance.
Personalized Bookmarks
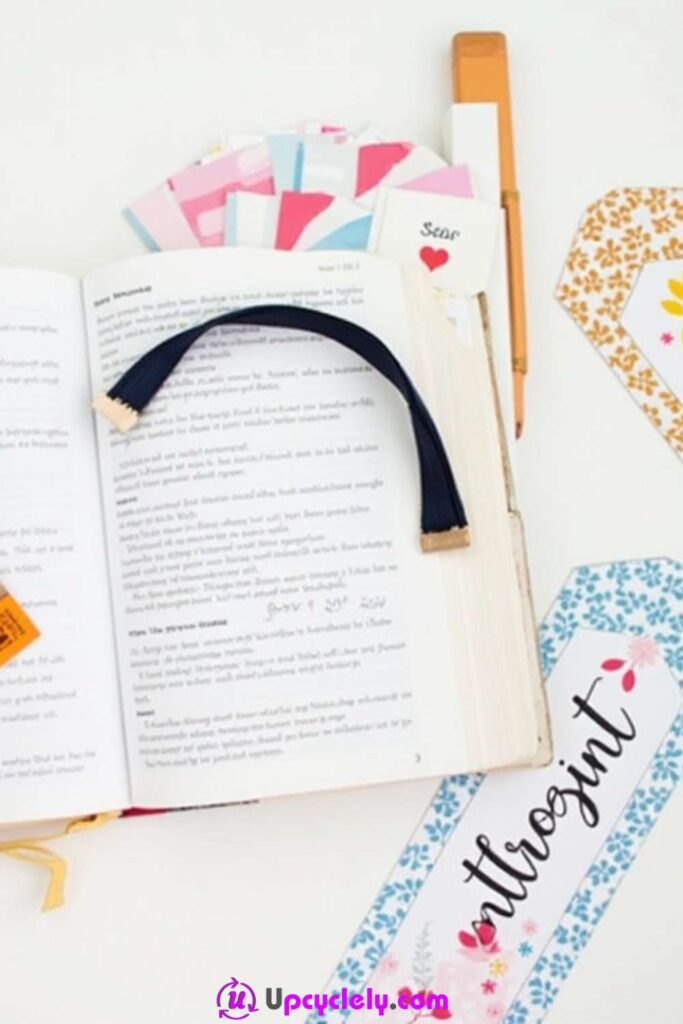
Materials Needed:
- Heavy cardstock or thick paper
- Markers, stamps, or stickers for decoration
- Ribbon or twine (optional)
- Glue, tape, or a laminator (optional for extra durability)
Step-by-Step Instructions:
- Cut the Bookmark Shape: Begin by cutting the cardstock into long, narrow strips (about 2 inches wide and 6 inches long). These will serve as the base for your bookmark.
- Decorate: Now comes the fun part! Use markers, stamps, or stickers to personalize the bookmarks. You can add a quote, favorite pattern, or design that reflects your personality or your reading habits.
- Add a Ribbon: If you like, punch a hole at the top of your bookmark and tie a colorful ribbon or twine through it to make it extra special.
- Laminate (Optional): For added durability, you can laminate your bookmark or cover it with clear tape to make sure it lasts through countless pages.
Pro Tip: Try using washi tape along the edges for a decorative touch. It adds a fun, vibrant element to the bookmark and can help keep the edges from getting frayed over time.
Pom-Pom Caterpillars
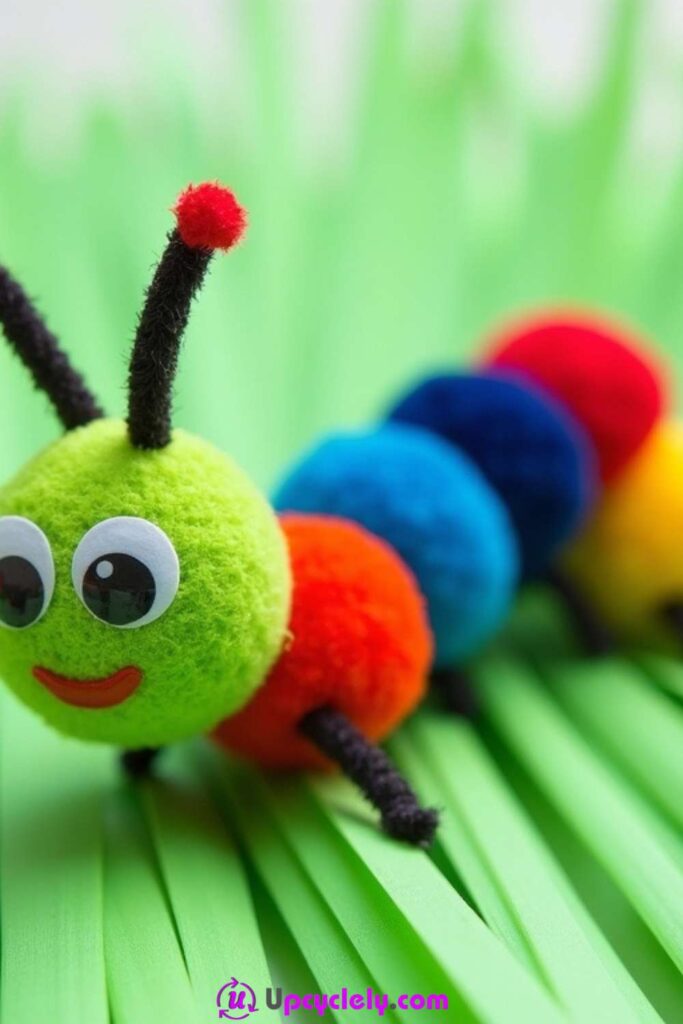
Materials Needed:
- Colored pom-poms (various sizes)
- Pipe cleaners (black for antennae)
- Googly eyes
- Glue gun or craft glue
Step-by-Step Instructions:
- Prepare the Pom-Poms: Select pom-poms in a variety of colors for your caterpillar. You’ll need one larger pom-pom for the head and several smaller ones for the body.
- Glue the Pom-Poms: Start by gluing the head pom-pom (larger) onto the body. Attach the smaller pom-poms in a line, forming a caterpillar body. Let each pom-pom overlap slightly for a smooth transition.
- Create the Antennae: Cut two short pieces of pipe cleaner and bend them into antennae shapes. Glue them to the top of the head pom-pom.
- Add Eyes and Details: Glue googly eyes onto the head, and use markers to draw a little smile or other facial features to give your caterpillar personality.
Pro Tip: You can make your caterpillar even more fun by adding little paper feet or decorating the body with glitter for extra sparkle.
Popsicle Stick Puppets
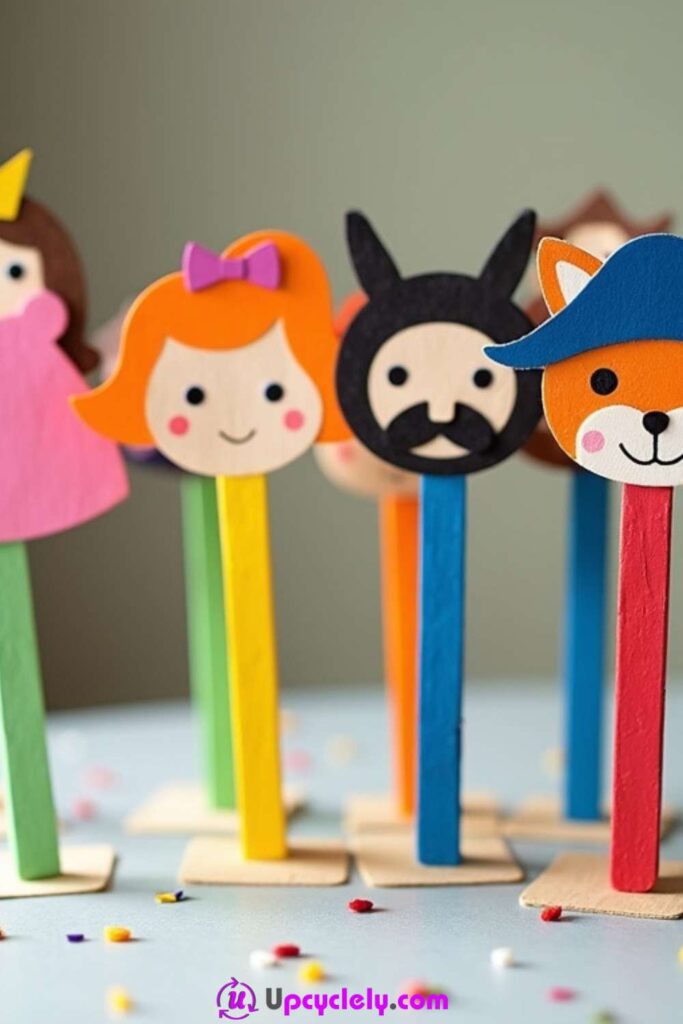
Materials Needed:
- Popsicle sticks
- Paint (acrylic or tempera)
- Markers or colored pencils
- Craft glue
- Decorative items like buttons, felt, or googly eyes
Step-by-Step Instructions:
- Paint the Sticks: Start by painting the popsicle sticks in vibrant colors. Each stick will serve as the puppet’s body, so choose colors that reflect the character you’re creating.
- Create Faces and Features: Use markers or colored pencils to draw faces on the top of the popsicle sticks. You can make animals, people, or even imaginary creatures! Add googly eyes or buttons to bring the characters to life.
- Attach Accessories: Use felt, fabric, or other materials to create clothes, hats, or other accessories for your puppets. You can cut out small pieces of felt to make a shirt or a crown.
- Play and Perform: Once the puppets are finished, let your imagination run wild. You can create a mini puppet theater or put on a show with friends or family.
Pro Tip: Make sure the paint is fully dry before adding any other details. You don’t want to smudge your hard work! Also, try using craft glue instead of a hot glue gun to avoid burning your fingers.
Tissue Paper Bunting
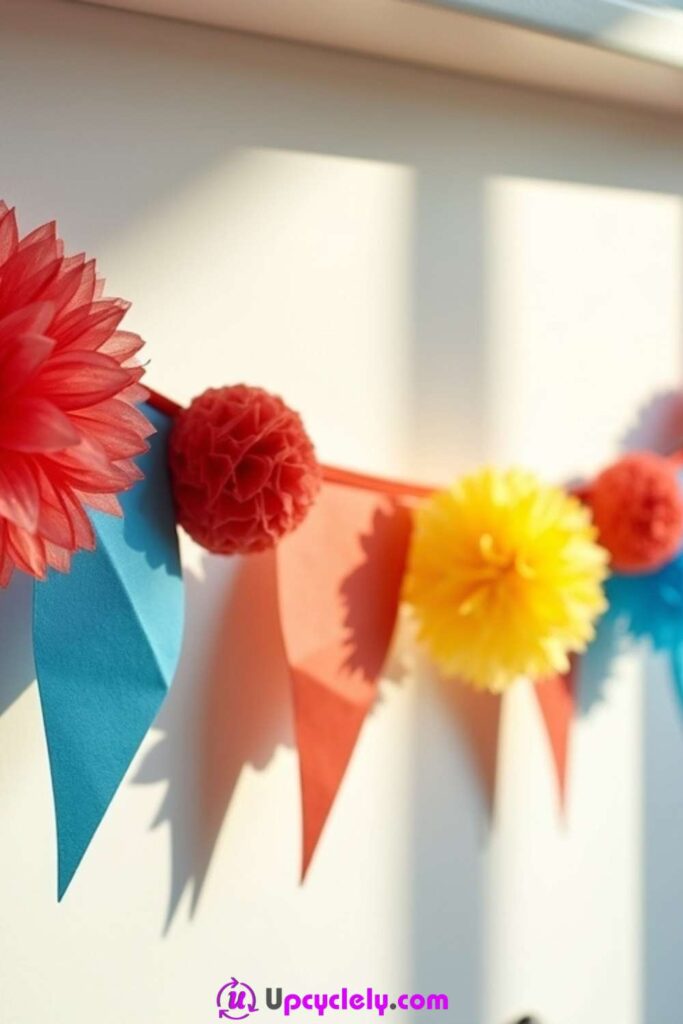
Materials Needed:
- Colorful tissue paper (variety of colors)
- String or ribbon
- Glue or glue dots
- Scissors
Step-by-Step Instructions:
- Cut the Tissue Paper: Start by cutting the tissue paper into squares or triangles. These will form the individual flags of your bunting.
- Glue the Flags: Glue the top of each tissue paper piece onto a piece of string or ribbon. You can space them out as much or as little as you want, depending on the look you’re going for.
- Create Layers: For added texture, layer several pieces of tissue paper on top of each other for each flag. This will give the bunting a fuller, more vibrant appearance.
- Hang and Display: Once everything is dry, hang your tissue paper bunting across your room, along a mantel, or even outside for a festive touch.
Pro Tip: If you want to make it even more durable, consider using a string made of twine or a thicker cord. This way, your bunting can be used again for future celebrations.
Tissue Paper Confetti
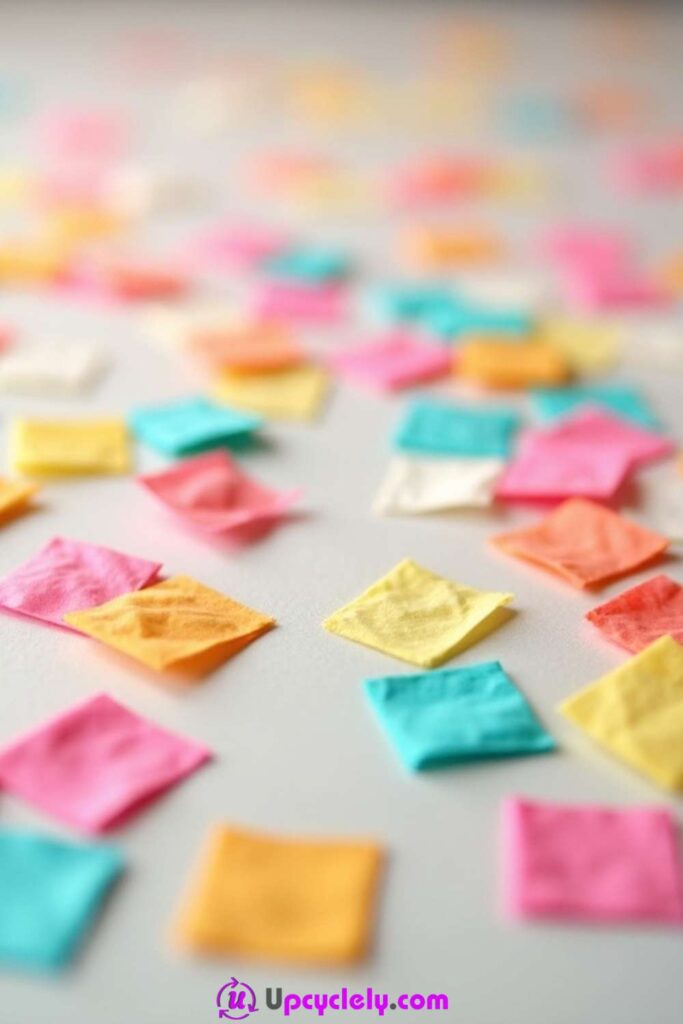
Materials Needed:
- Tissue paper (various colors)
- Scissors
- A hole puncher (for circles) or ruler (for squares)
- Decorative containers or bags (optional)
Step-by-Step Instructions:
- Cut the Tissue Paper: Start by cutting your tissue paper into small squares or using a hole puncher to create circles. You can go for a more uniform look or mix different shapes and sizes for a fun effect.
- Sort by Color: If you want to make different kinds of confetti, sort the pieces by color so that you can create different color themes for different occasions.
- Use or Store: Use the confetti for parties, celebrations, or as fun filler for gift bags. Alternatively, store it in small containers or bags to keep it organized.
- Toss and Enjoy: When you’re ready for a celebration, toss the confetti into the air or use it to decorate tables and gifts!
Pro Tip: If you want to make the confetti biodegradable, opt for natural materials like tissue paper. It’s eco-friendly and adds a festive touch.
Tissue Paper Mosaics
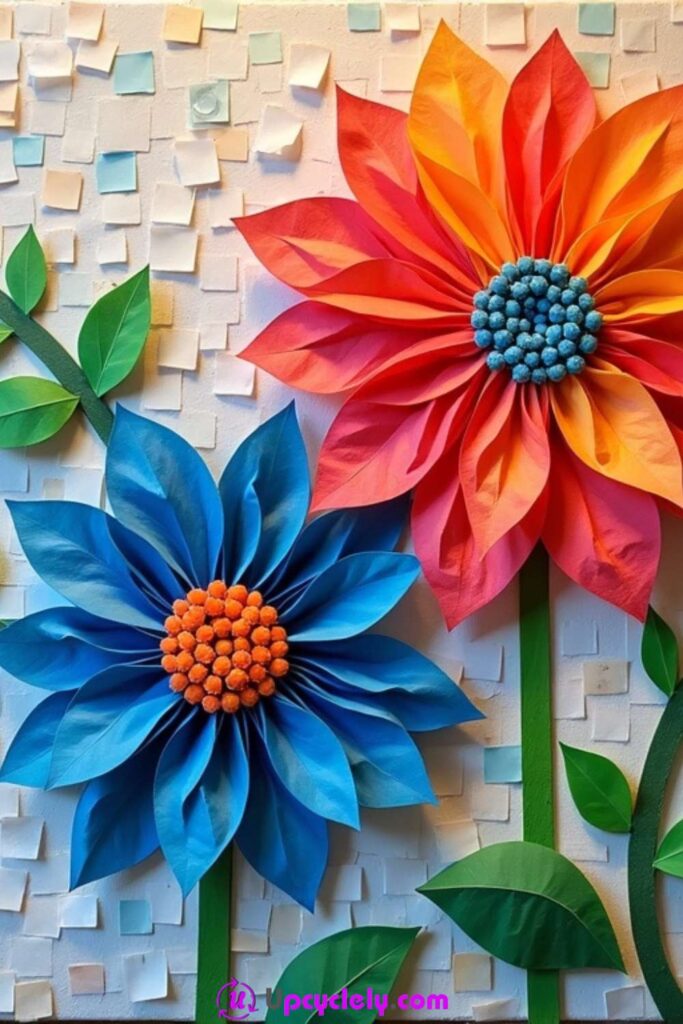
Materials Needed:
- Colored tissue paper (cut into small squares)
- Glue stick or liquid glue
- White cardstock or canvas
- Pencil (for sketching the design)
Step-by-Step Instructions:
- Sketch Your Design: On your piece of cardstock or canvas, lightly sketch the design you want to create. It can be anything from a geometric pattern to a picture of a flower or animal.
- Prepare the Tissue Paper: Cut your tissue paper into small squares or other shapes, depending on the size and type of mosaic you want to create.
- Glue the Tissue Paper: Starting from the edges of your design, begin gluing the tissue paper pieces onto the sketch. Layer the tissue paper pieces to fill in the design, working your way towards the center.
- Add Final Touches: Once your design is complete, let the glue dry completely. You can frame it or hang it up as a beautiful homemade piece of art.
Pro Tip: For a more vibrant mosaic, use multiple layers of tissue paper in different colors. Overlap the edges slightly for a seamless, blended look.
Tissue Paper Suncatchers
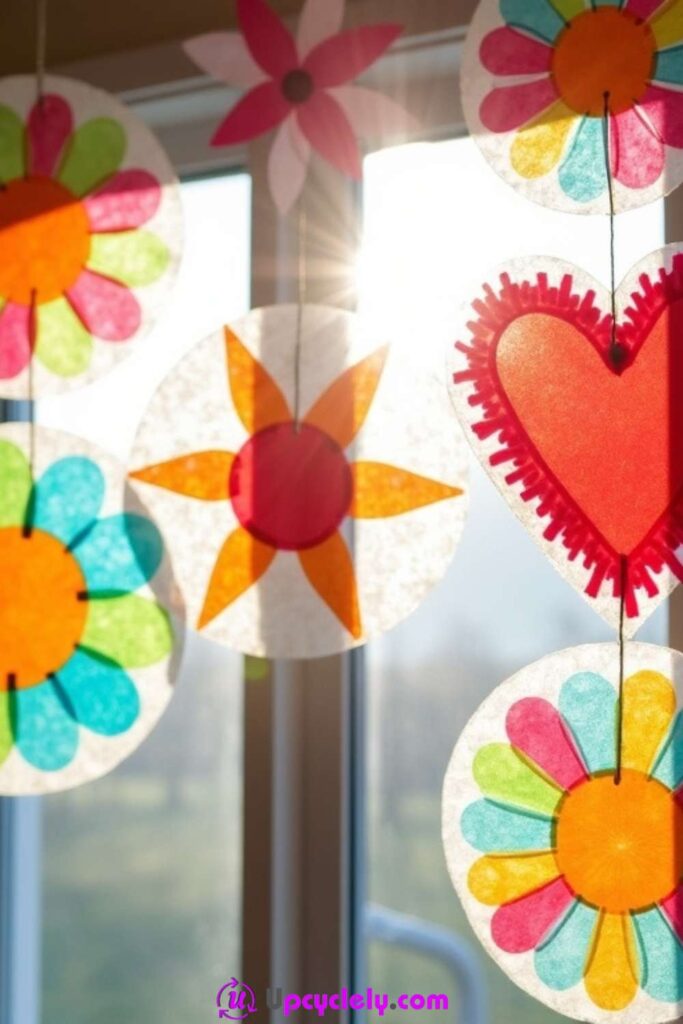
Materials Needed:
- Clear contact paper or plastic sheet
- Colored tissue paper
- Scissors
- String (for hanging)
Step-by-Step Instructions:
- Prepare the Contact Paper: Cut a piece of clear contact paper or plastic sheet to your desired size. This will serve as the base for your suncatcher.
- Cut Tissue Paper: Cut the tissue paper into small pieces or shapes, like circles or squares. You can use multiple colors for a vibrant effect.
- Create Your Design: Stick the tissue paper pieces onto the sticky side of the contact paper, arranging them into a pattern or design of your choice.
- Seal and Hang: Once you’re happy with the design, place another piece of contact paper on top to seal everything in place. Punch a hole at the top and hang it by tying a piece of string.
Pro Tip: To make your suncatcher extra shiny, try adding a little glitter or metallic paint around the edges for a bit of sparkle when the light hits it.