Have you ever looked at a picture frame tucked away in the back of your closet and thought, “This frame is so outdated, I don’t know what to do with it”? You’re not alone. Many of us have old picture frames lying around, collecting dust.
Whether they’re old wooden frames, brass ones that have lost their shine, or frames with outdated designs, we often feel they no longer fit in with our modern decor. But what if I told you that you could breathe new life into these forgotten pieces?
Upcycling picture frames is not only a creative way to repurpose old items, but it’s also an affordable method to add unique and personalized decor to your home. In this article, I’ll guide you through various ways to upcycle picture frames into stunning and functional home decor.
From turning them into wall art to creating rustic photo holders, the possibilities are endless. Let’s dive in and see how you can easily transform your old frames into something new and exciting.
The Beauty of Upcycling Picture Frames: Why Bother?
You might be wondering, “Why should I upcycle picture frames when I can just buy new ones?” Well, the answer lies in creativity and sustainability.
Not only does upcycling help reduce waste by giving old frames a second life, but it also allows you to create one-of-a-kind pieces that perfectly match your style.
Imagine incorporating these unique frames into your home decor, whether it’s for a DIY gallery wall, a functional jewelry holder, or even a charming message board.
Upcycling Ideas and Step-by-Step Instructions
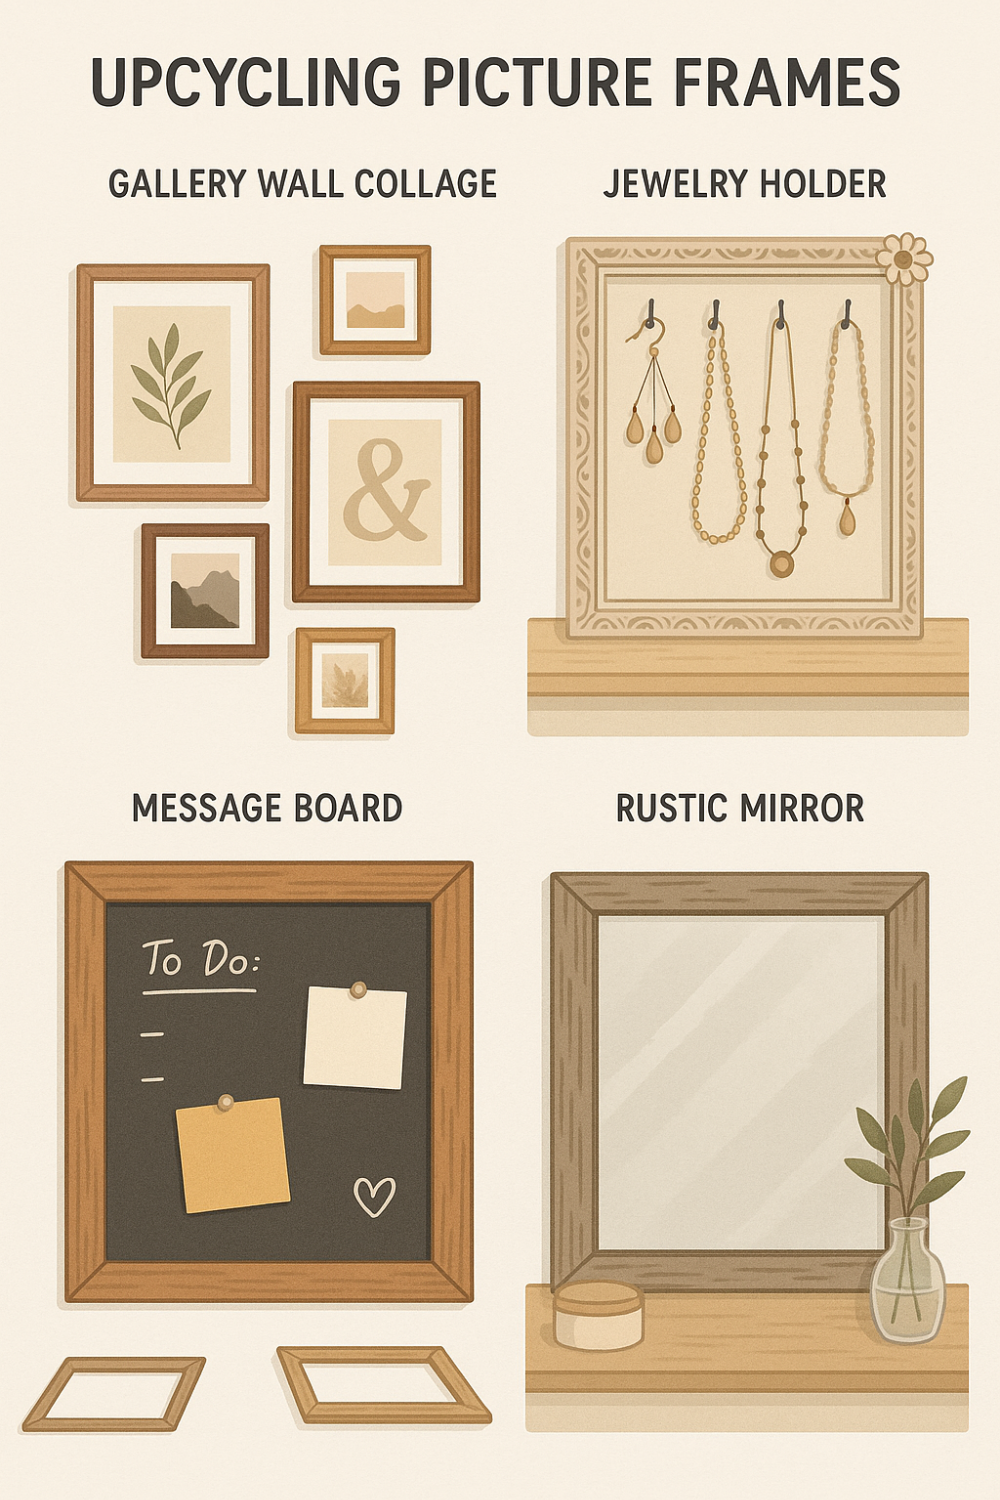
Upcycle Old Picture Frames into a Stylish Wall Collage
Creating a gallery wall is a trendy way to display your personal memories or art. Instead of purchasing expensive frames, why not transform the ones you already have?
Materials You’ll Need:
- Old picture frames (various sizes)
- Paint or spray paint
- Sandpaper (if you want a distressed look)
- A ruler and level
- Nails or picture hooks
- A hammer
Step-by-Step Instructions:
- Select Your Frames: Gather old picture frames of different sizes. You can mix and match styles or choose frames that have a consistent theme (e.g., all vintage wood frames).
- Prepare Your Frames: If you want to distress the frames or paint them a new color, lightly sand the surface for a rustic look. Then, apply a coat of paint—pick a color that complements your room’s decor.
- Arrange Your Layout: Before hanging the frames on the wall, lay them out on the floor to get a sense of how you want them arranged. You can go for a symmetrical or asymmetrical design, depending on your style.
- Hang the Frames: Once you’re happy with the arrangement, use a ruler and level to ensure the frames are hung straight. Install nails or picture hooks and carefully hang your frames.
This upcycled picture frame collage will add a personalized touch to any room and give your walls a refreshed look.
Create a Unique Jewelry Holder Using Picture Frames
If you’re someone who loves keeping things organized but still wants to add a bit of flair, this project is for you! You can easily turn an old picture frame into a stylish jewelry holder to keep your earrings, necklaces, and bracelets neat and accessible.
Materials You’ll Need:
- Picture frame
- Chicken wire or string
- Hot glue gun
- Small hooks or nails
- Scissors
Step-by-Step Instructions:
- Choose Your Frame: Select a frame that is large enough to hold your jewelry but still fits the space you have in mind (e.g., above your vanity or on a bedroom wall).
- Remove the Glass and Backing: Carefully remove the glass and any backing materials from the frame.
- Cut the Chicken Wire or String: Measure the length of the frame and cut a piece of chicken wire (or string) that will fit snugly within the frame.
- Attach the Chicken Wire/String: Using a hot glue gun, secure the wire to the back of the frame, making sure it is taut enough to hold your jewelry.
- Add Hooks or Nails: Place small hooks or nails along the bottom of the frame to hang necklaces or bracelets.
- Hang the Frame: Mount the frame on the wall or place it on your dresser for easy access to your jewelry.
Now, not only will you have a functional piece, but it will also be an eye-catching decor item that adds personality to your space!
Turn Picture Frames into a Charming Message Board
Picture frames can also serve as functional home accessories. One great way to upcycle them is by creating a personalized message board, perfect for jotting down reminders, inspirational quotes, or grocery lists.
Materials You’ll Need:
- Picture frame
- Corkboard, fabric, or chalkboard paint
- Pushpins or magnets
- Hot glue gun or nails
Step-by-Step Instructions:
- Pick the Right Frame: Choose a sturdy frame that will hold the weight of whatever you plan to attach to it (such as corkboard or fabric).
- Prepare the Frame: Remove the glass and backing from the frame.
- Insert the Material: For a corkboard, cut a piece of cork to fit the frame and attach it with glue. If you prefer fabric, stretch it over the frame and staple it at the back. Alternatively, you can use chalkboard paint to cover the backing for a writeable surface.
- Reassemble the Frame: Once the material is securely in place, reassemble the frame by placing it back into its original structure.
- Hang and Use: Mount the frame on the wall in a place where it will be useful, such as near the kitchen or entryway.
This message board is perfect for keeping your daily tasks organized while adding a creative touch to your room.
Repurpose Picture Frames for Rustic Mirrors
If you’re into rustic decor, turning a picture frame into a mirror can be an easy and budget-friendly project.
Materials You’ll Need:
- Picture frame (preferably wooden)
- Mirror glass or mirror adhesive
- Hot glue gun
- Sandpaper (optional)
- Paint (optional)
Step-by-Step Instructions:
- Choose Your Frame: Select a frame with a style that complements your room’s decor. A wooden frame works great for a rustic vibe.
- Prepare the Frame: Sand down the frame to remove any rough patches or to achieve a weathered look.
- Apply the Mirror: If you’re using mirror glass, cut it to fit inside the frame. For adhesive mirrors, carefully apply the adhesive to the back of the frame and press the mirror onto it.
- Reassemble the Frame: Once the mirror is in place, reassemble the frame as needed.
- Hang and Enjoy: Mount your new rustic mirror on the wall, and enjoy the stylish addition to your space.
Quick Overview of Upcycle Picture Frame Projects:
| Project Idea | Materials Needed | Estimated Time to Complete | Difficulty Level | Best For |
| Gallery Wall Collage | Old frames, paint, sandpaper, nails, hammer, ruler, level | 2-3 hours | Intermediate | Living rooms, hallways, offices |
| Jewelry Holder | Picture frame, chicken wire, hot glue gun, hooks, scissors | 1-2 hours | Beginner | Bedrooms, dressing rooms, bathrooms |
| Message Board | Picture frame, corkboard/fabric/chalkboard paint, glue, pushpins | 1-2 hours | Beginner | Kitchens, entryways, offices |
| Rustic Mirror | Picture frame, mirror glass/adhesive, sandpaper, glue | 1-3 hours | Intermediate | Bathrooms, hallways, living rooms |
Common Mistakes to Avoid When Upcycling Picture Frames
While upcycling picture frames can be a fun and rewarding project, there are a few common mistakes you should avoid:
- Choosing the Wrong Paint: Always choose paint that’s suitable for the material of your frame. Some paints may not adhere well to certain surfaces, like metal or glass, so be sure to read the instructions on the can.
- Overcrowding Your Layout: When arranging frames for a collage, avoid cramming too many frames into a small space. Leave some breathing room for each frame to shine.
- Ignoring Frame Stability: When creating a functional piece like a jewelry holder, make sure your frame is stable enough to hold the weight of the items you’re planning to store.
Conclusion
Upcycling picture frames is a fun and creative way to give new life to old items. Whether you’re creating a unique wall collage, organizing your jewelry, or turning a frame into a functional message board, the possibilities are endless. By following the simple step-by-step instructions above, you can easily transform your old picture frames into stylish and functional pieces of decor.
I hope this guide has inspired you to tackle your own picture frame upcycling project. If you’ve tried any of these ideas, feel free to share your results in the comments or on social media. I’d love to see how your upcycled frames turn out!
FAQs: Upcycling Picture Frames
Q: Can I use upcycled picture frames for outdoor decor?
A: Yes, but you may need to use weather-resistant materials and paints. Consider adding a waterproof sealant to protect the frame from the elements.
Q: How do I remove glass from a picture frame?
A: Carefully remove the backing of the frame and gently lift the glass out. Be cautious, as glass can break easily.
Q: Can I upcycle picture frames without painting them?
A: Absolutely! You can also distress or reassemble the frames in creative ways without painting. For example, you can add fabric or decorative elements like lace or burlap.