Abstract Animal Shapes

Materials Needed
- Acrylic paints (orange, red, blue, pink, white)
- Canvas with a light background
- Fine and flat brushes for details and fills
- A ruler or straight edge for sharp shapes
Steps to Create
Step 1: Sketch the Elephants
I began by outlining two abstract elephants using geometric shapes. For example, triangles for ears, rectangles for trunks, and circles for eyes. The smaller elephant’s spikes were drawn as jagged rectangles.
Step 2: Paint the Larger Elephant
I filled the left-side elephant with a bright orange base and added red accents to emphasize key shapes like the ear and trunk. I used flat brushes to keep the paint layers even.
Step 3: Design the Smaller Elephant
Next, I painted the smaller elephant in a bold dark blue. Its inner mouth section was given a pink tint, and the eye was treated with a white highlight to enhance playfulness.
Step 4: Add Final Details
I refined overlaps between the two elephants and outlined some areas with a contrasting color to sharpen the imagery. Using a very fine brush, I touched up the corners and borders for crisp edges.
Pro Tip
Experiment with complementary colors like orange and blue. It makes the geometric forms stand out!
Abstract Dandelions

Materials Needed
- Acrylic paints (white, green, yellow)
- Thin paintbrushes for stems and details
- Light yellow canvas background
- A toothpick or very fine brush for tiny seeds
Steps to Create
Step 1: Prepare the Background
I painted the canvas with a subtle yellow gradient, fading from light into lighter hues at the top. This step added a soft, natural feel.
Step 2: Paint the Stems
Using green acrylic paint, I carefully painted two wispy, thin stems originating from the bottom edge of the canvas. I added slight curves to make the stems appear delicate and realistic.
Step 3: Create the Dandelions
For the fluffy dandelions, I used a very fine round brush dipped in white. I started from the center and radiated outward with short strokes to mimic tiny seeds. Touching the center with a bit of yellow added depth and warmth.
Step 4: Add Dispersing Seeds
I scattered tiny seeds extending from the dandelions toward the upper left corner of the canvas. A toothpick helped me create their fine, feather-like shapes.
Pro Tip
If you want to show movement, angle the seeds slightly in the direction of a “breeze.”
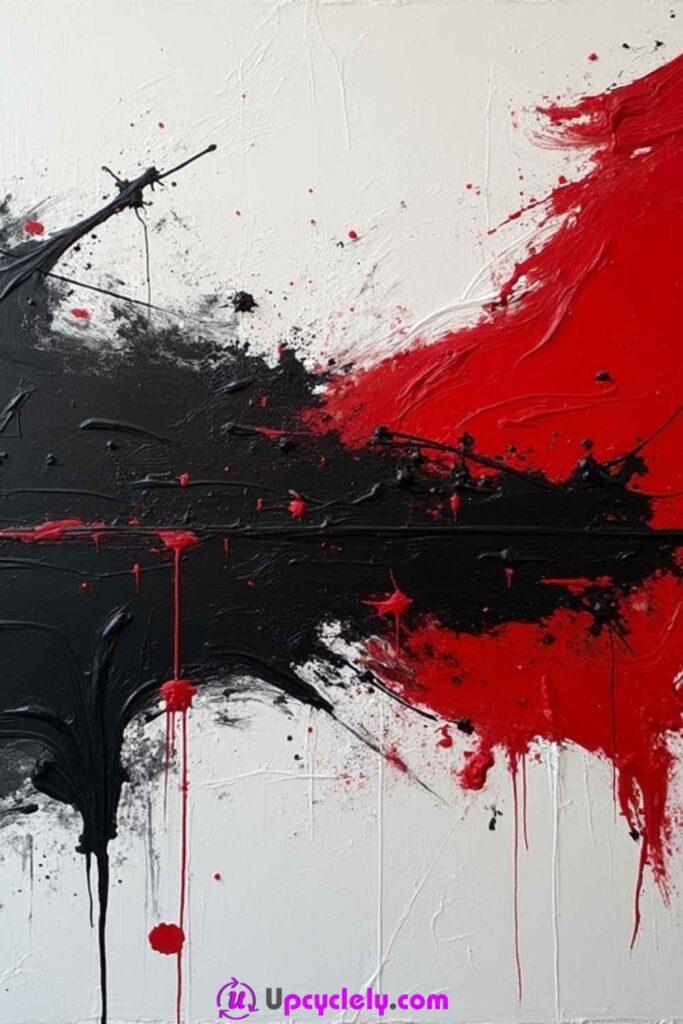
Bold Strokes
Materials Needed
- Acrylic paints (black, red, white)
- Textured canvas
- Palette knife and wide brushes for thick strokes
- Paper towels for cleaning splatters
Steps to Create
Step 1: Prepare the Textured Canvas
I started with a blank, rough-surface canvas to give the artwork depth. It doesn’t need to be perfect; the surface’s imperfections will add character.
Step 2: Paint with Black
Using a palette knife, I applied thick strokes of black paint on the left side, pulling it toward the middle. I pressed firmly to create splatters and spills.
Step 3: Add Red Contrasts
On the opposite side, I repeated the process with red paint. I extended the red strokes toward the black section, letting the colors naturally blend in the center.
Step 4: Create Splatter Patterns
I dipped a brush into watered-down paint and flicked it onto the canvas for energetic splatter effects. I layered black over red and vice versa to create contrast.
Pro Tip
Use a palette knife to give this piece an expressive, textural finish that brushes alone can’t achieve!
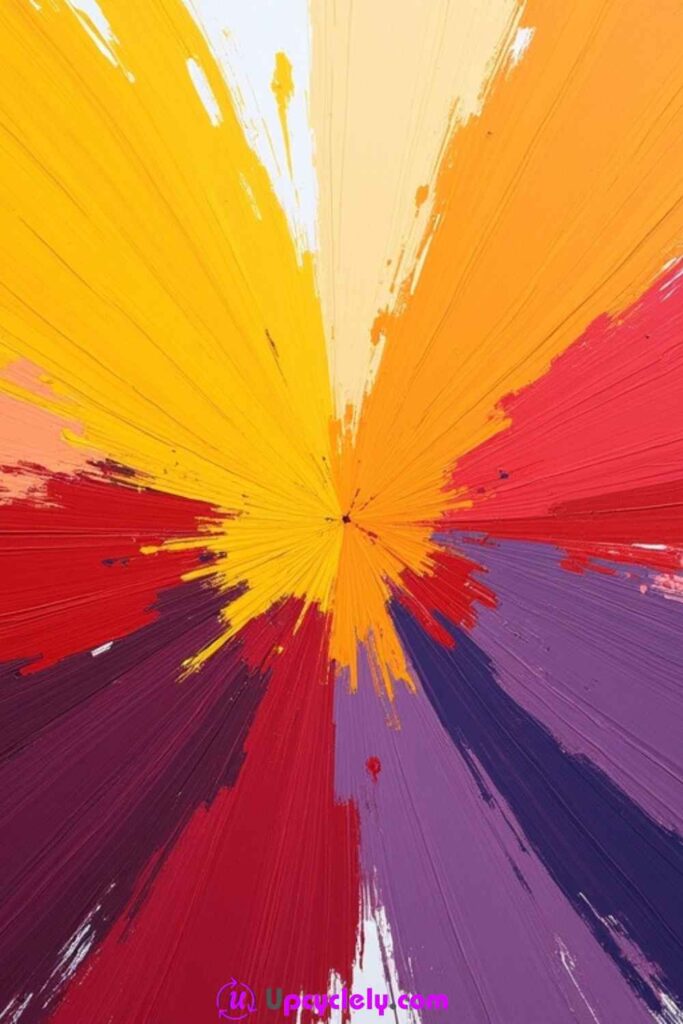
Brushstroke Explosion
Materials Needed
- Acrylic paints in yellow, orange, red, purple, and white
- Canvas with a smooth surface
- Fan brush for streaking effects
- Spray bottle or water cup
Steps to Create
Step 1: Set the Center Point
I lightly marked the canvas’s center with a pencil since this would be the focal point for all the paint strokes.
Step 2: Apply Base Colors
Around the center, I brushed yellow and orange paint outward. Working quickly, I overlapped these warm hues to give them a natural flow.
Step 3: Expand with Contrasting Colors
I added red and purple paints in sweeping brushstrokes radiating from the same center point. Each color was blended lightly for soft transitions as I worked outward.
Step 4: Enhance the Burst Effect
To finish, I used a dry fan brush to create streaks at the edges, adding texture that mimics an explosion. I later added white highlights in the center for glow.
Pro Tip
Water down some paint to create smooth transitions during the blending process, especially near the center.
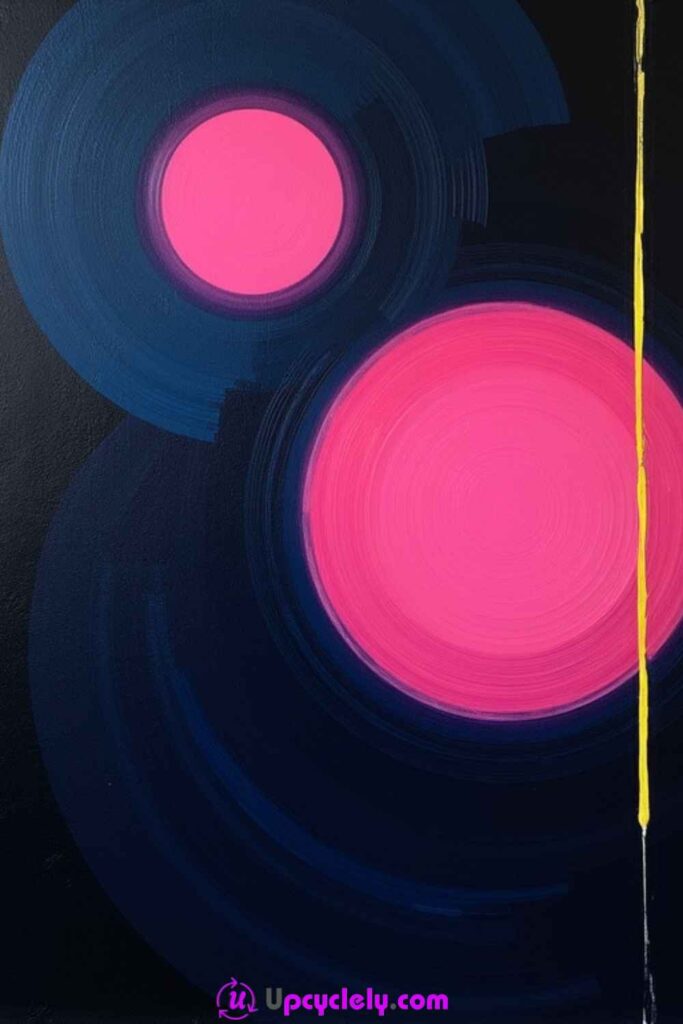
Inverted Colors
Materials Needed
- Acrylic paints (pink, blue, yellow, black)
- Dark canvas or black-painted surface
- Round brushes in medium and small sizes
- Thin detail brushes
Steps to Create
Step 1: Create the Dark Background
I started with a dark canvas. If you don’t have one, paint your surface with black acrylic paint and allow it to dry completely. A dark background highlights the bright colors we’re about to use.
Step 2: Paint the Concentric Circles
Using a medium-sized round brush, I painted a large pink circle towards the bottom right of the canvas. Then, I added smaller pink circles above it, ensuring some concentric bands to mimic depth.
Step 3: Add the Blue Arcs
For contrast, I painted semi-circular arcs around the pink circles with a small brush and blue paint. Starting close to the circles, the arcs expanded outward to create a wave-like texture.
Step 4: Include Final Details with a Yellow Line
I added a thin, vertical yellow line on the right of the image to break the circular flow. A steady hand or painter’s tape can help keep it straight. This contrasting element brings a modern touch.
Pro Tip
Layer the pink and blue paint to achieve a glowing effect. Use a dry brush to blend edges subtly where needed.
Colorful Smudges
Materials Needed
- Acrylic paints (pink, purple, blue)
- Large flat paintbrushes
- White canvas
- Palette for mixing colors
Steps to Create
Step 1: Prepare the Canvas
I chose a clean white canvas to make the vibrant brush strokes stand out. I smoothed any dust off so the paint layers could adhere evenly.
Step 2: Paint the Pink Stroke
Using a wide flat brush, I dipped it in pink acrylic paint and brushed horizontally across the top of the canvas. I made sure the stroke was even but not overly blended, leaving the texture of the brush visible.
Step 3: Add the Purple Stroke
Directly below the pink stroke, I painted a wider purple stroke, leaving a small gap for separation. I used bold, unbroken strokes to maintain the color’s intensity.
Step 4: Finish with the Blue Stroke
I completed the piece with a blue brush stroke at the bottom, blending it lightly into the edge of the previous purple. Each stroke was applied in one direction for a clean, layered look.
Pro Tip
Use a palette knife for additional texture along the edge of each stroke if you want more contrast and movement.
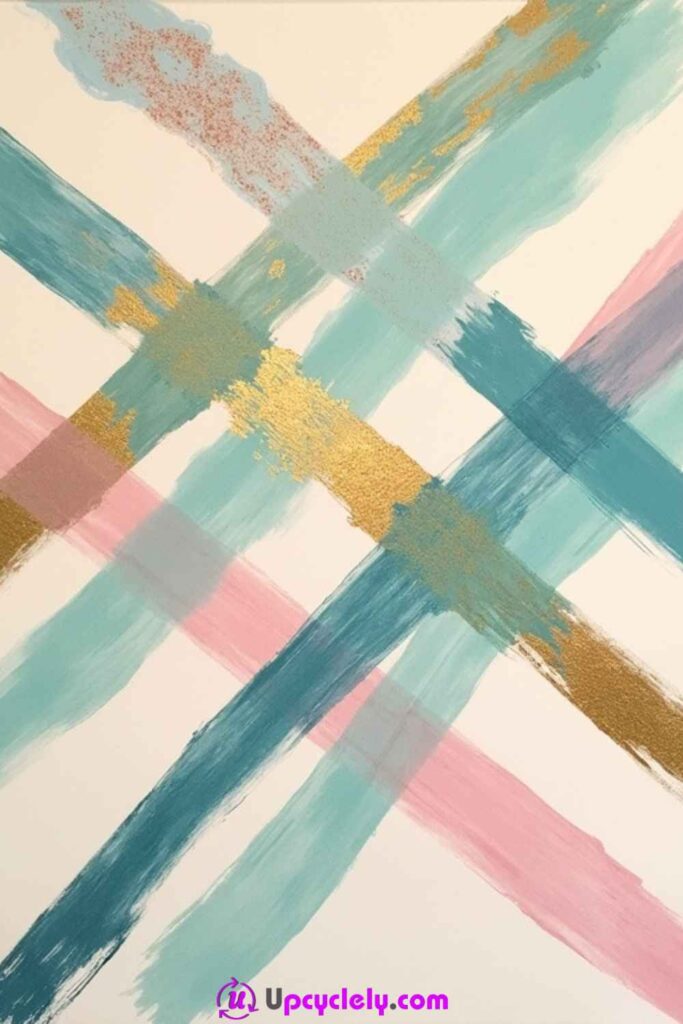
Crisscrossing Colors
Materials Needed
- Acrylic paints (teal, pink, gold)
- Canvas or thick paper
- Large flat brushes
- Gold metallic paint for highlights
Steps to Create
Step 1: Prepare Your Work Area
I laid my canvas flat and secured it to avoid any movement while painting diagonal brush strokes.
Step 2: Apply the Base Strokes
I began with a bold teal stroke diagonally from the bottom left corner to the top right of the canvas. I made sure it was wide and opaque enough to anchor the piece.
Step 3: Add Intersecting Strokes
After the teal dried, I added a pink stroke from the bottom right to the top left. I intentionally overlapped it with the teal, letting the two strokes interact and create subtle blends.
Step 4: Detail with Gold Highlights
To finish, I applied smaller gold strokes across the intersections. These metallic accents added depth and a touch of elegance.
Pro Tip
Use slightly watered-down gold paint for a sheer effect or layer it for thicker lines. Placement is key to making the piece look dynamic.
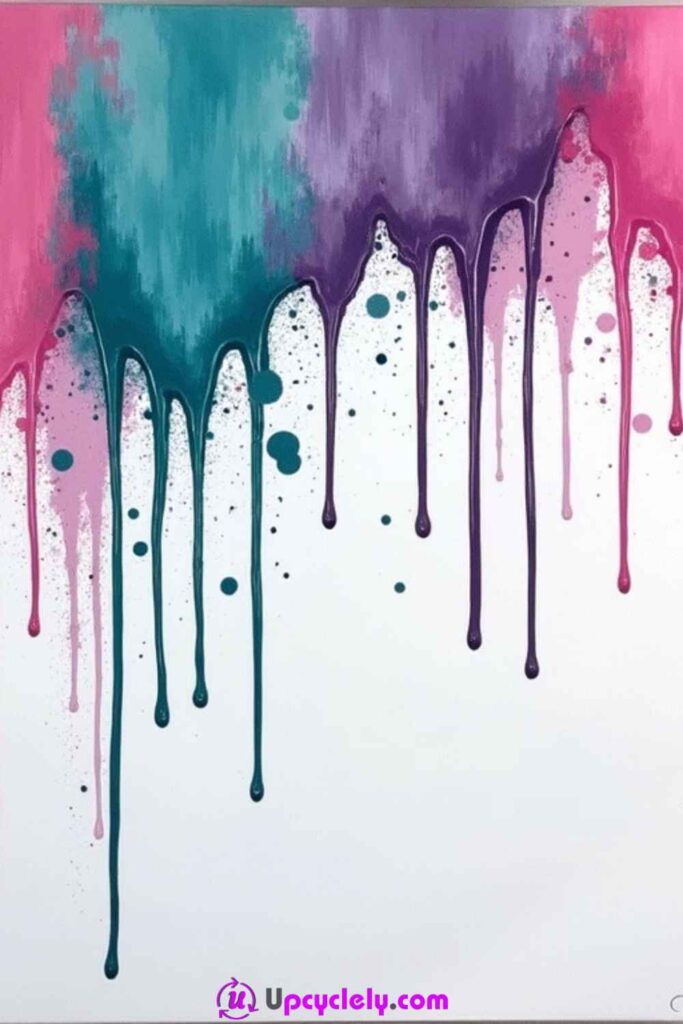
Dripping Paint
Materials Needed
- Acrylic paints (pink, teal, purple)
- White canvas
- Spray bottle and cups for watered-down paints
- Small brushes for splattering
Steps to Create
Step 1: Prepare the Paints
I mixed each color (pink, teal, purple) with a bit of water until they were fluid enough to drip, but not so watery that they lost opacity.
Step 2: Drip the Paint
Starting with pink, I dripped paint from the top of the canvas, letting gravity create the drips. Teal and purple were added next to create overlapping streams.
Step 3: Splash for Texture
I dipped a small brush into each paint color and splattered it across the drips. Flicking the brush with controlled motions added energy and variation.
Step 4: Create Blending Effects
At the top of the canvas, I used a damp brush to blend overlaps, creating soft gradients where one shade met another.
Pro Tip
Tilt the canvas slightly in different directions as the paint drips to create natural, flowing patterns.
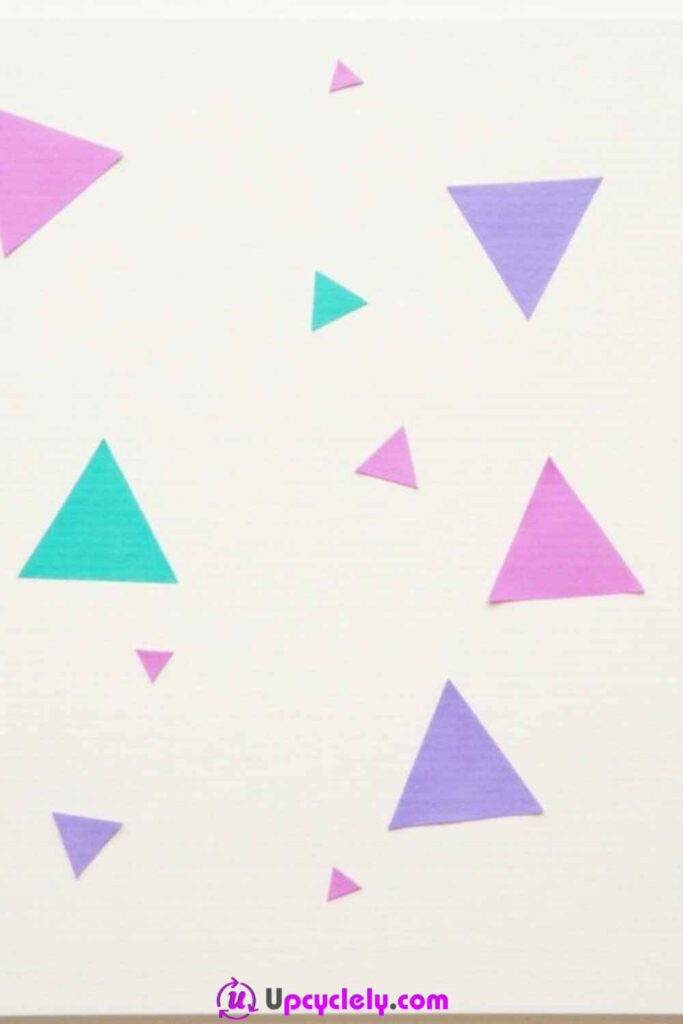
Floating Triangles
Materials Needed
- Acrylic paints (purple, pink, teal)
- Brushes of different sizes
- Painter’s tape or stencil for triangles
- Light-colored canvas
Steps to Create
Step 1: Sketch Triangle Placement
I lightly sketched where I wanted each triangle, ensuring a mix of sizes and positions to keep the piece visually balanced.
Step 2: Paint the Large Triangles
Using painter’s tape, I outlined the largest triangles, filling them in with bold acrylic colors like teal and purple. Once dry, I removed the tape carefully.
Step 3: Add Medium and Small Triangles
I freehand-painted medium and small triangles to add variation, some overlapping for depth. Pink and purple made excellent accent colors.
Step 4: Final Details
To finish, I added tiny filled-in triangles and adjusted any uneven edges with a fine brush. This step brought harmony to the random arrangement.
Pro Tip
Overlap triangles slightly to create a sense of layering and depth, and add subtle gradients to larger ones for extra dimension.
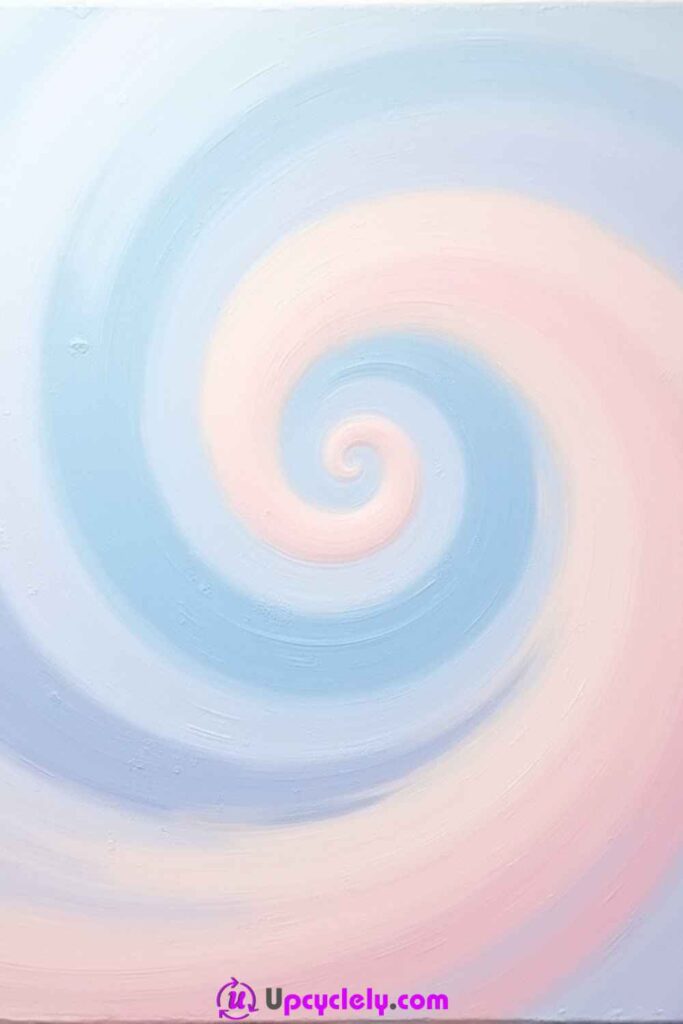
Swirling Spirals
Materials Needed
- Acrylic paints (light blue, pink, white)
- Canvas or thick paper
- Round brushes (small and medium sizes)
- Blending sponge
Steps to Create
Step 1: Draw the Spiral Outline
First, I lightly sketch a spiral using a pencil. Starting from the center of the canvas, I worked outward, making sure the spiral got wider as it expanded.
Step 2: Paint the Spiral Base
Next, I painted the spiral with pastel pink and blue acrylic paints, using the smaller round brush for precision. I alternated between the two colors to create a pattern while leaving some areas unpainted for blending later.
Step 3: Blend the Colors for Flow
With a sponge, I blended the pink and blue where they met, softening the transitions and adding a gradient effect. This step was crucial for achieving the smooth, calming look of the spiral.
Step 4: Enhance Depth with White Highlights
To add depth, I went back with white paint and applied highlights along the edges of the spiral. This gave the design a glowing effect.
Pro Tip
Use circular motions when blending colors with the sponge to maintain the flow of the spiral.
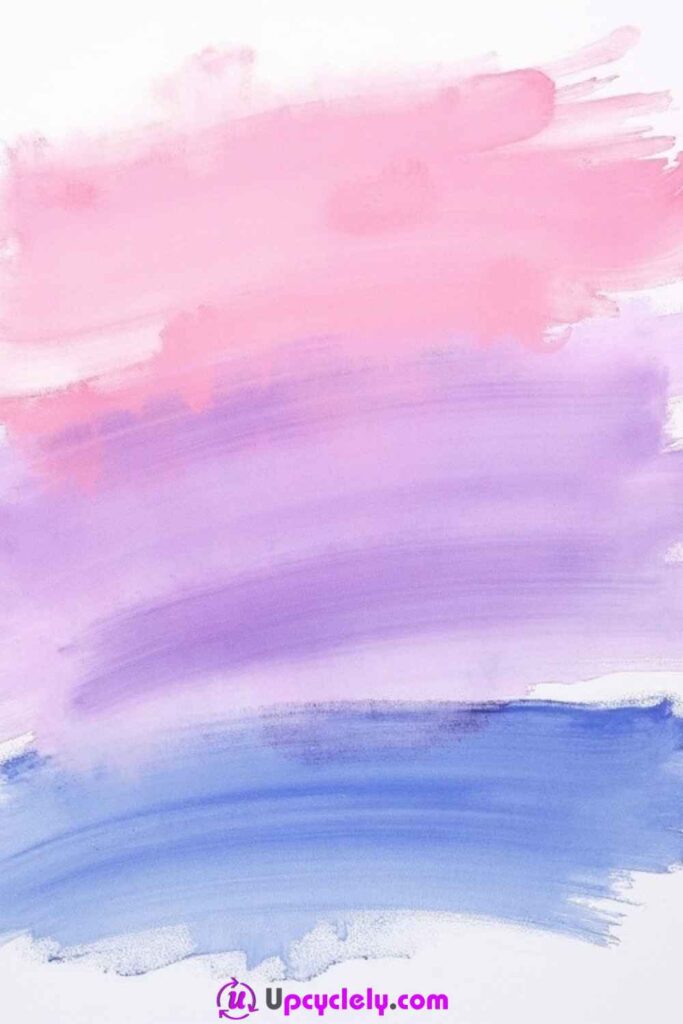
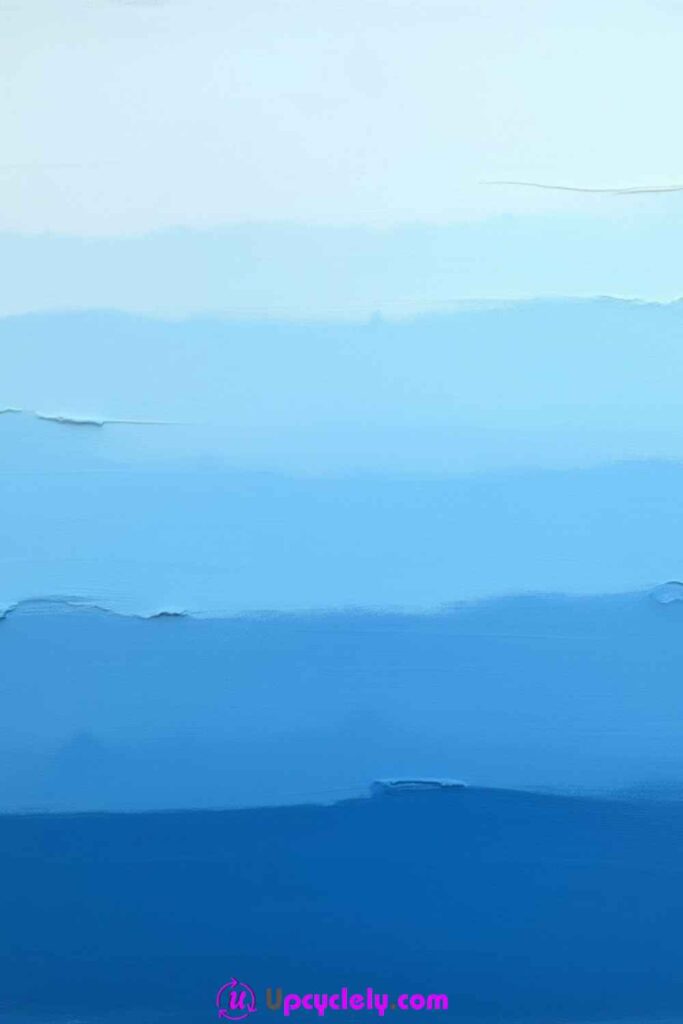
Monochromatic Tones
Materials Needed
- Acrylic paints (sky blue, navy blue, white)
- Flat brushes (various sizes)
- Clean palette
- Spray bottle of water
Steps to Create
Step 1: Prepare the Canvas
I started by priming my canvas with a very thin layer of white paint, which helped make the gradient blending smoother when applying the color bands.
Step 2: Paint the Base Band
Using a wide flat brush, I laid down the first band at the top in light sky blue. I ensured the layer was even but left a softer edge below, which made blending easier.
Step 3: Add Layers and Blend
I painted subsequent darker blue layers underneath, transitioning from sky blue to navy blue toward the bottom. A damp brush and a bit of water helped me blend the edges for a seamless gradient effect.
Step 4: Finish with White Streaks
To complete the serene look, I added a few streaks of white to the sky blue area and gently blended them in to create subtle highlights.
Pro Tip
Work quickly to blend layers while the paint is still wet for smoother transitions.
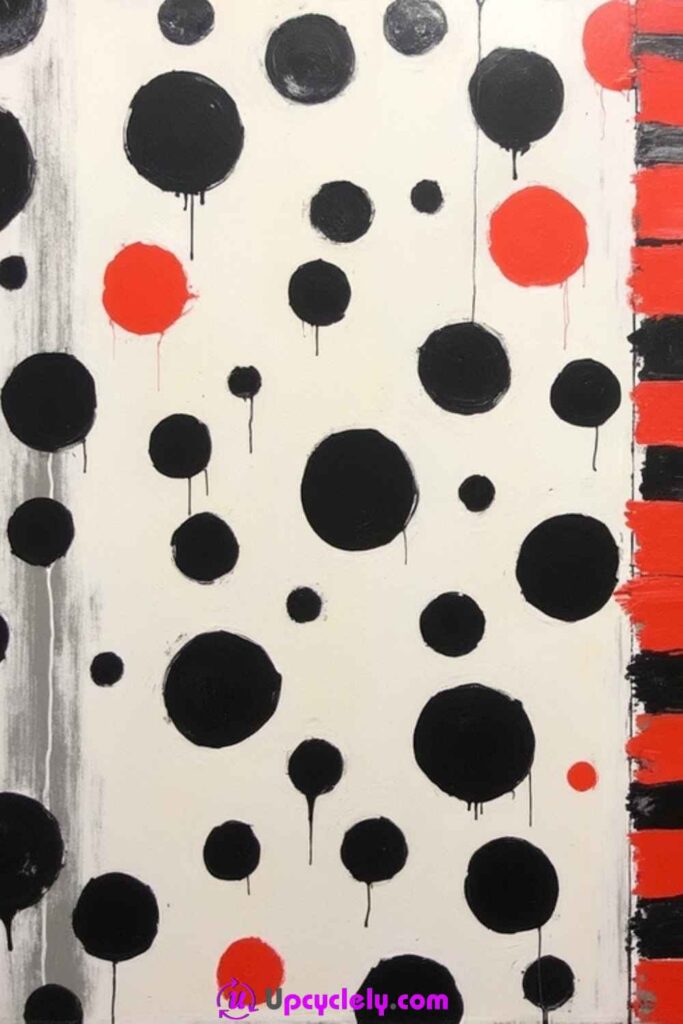
Polka Dots and Stripes
Materials Needed
- Acrylic paints (red, black, gray)
- Canvas with a white background
- Paintbrushes (small round and flat brushes)
- Palette knife
Steps to Create
Step 1: Paint the Background Features
I started by painting a vertical gray stripe on the left side of the canvas using a flat brush. The right side was decorated with alternating red and black rectangles. These elements acted as a framing pattern for the main artwork.
Step 2: Add the Black Circles
Using black paint and a small brush, I added circles of varying sizes across the canvas, leaving space for the red ones. Several of these circles were intentionally placed to look slightly random.
Step 3: Create the Dripping Effect
With the black and red paint slightly watered down, I added drips to the circles. To create a natural, flowing effect, I tilted the canvas slightly and allowed gravity to pull the paint downward.
Step 4: Layer and Adjust
After the drips dried, I added additional smaller black and red shapes to balance the composition. I also used the palette knife to refine edges of the alternating rectangle pattern.
Pro Tip
Use an eyedropper for more controlled dripping where precision is required.
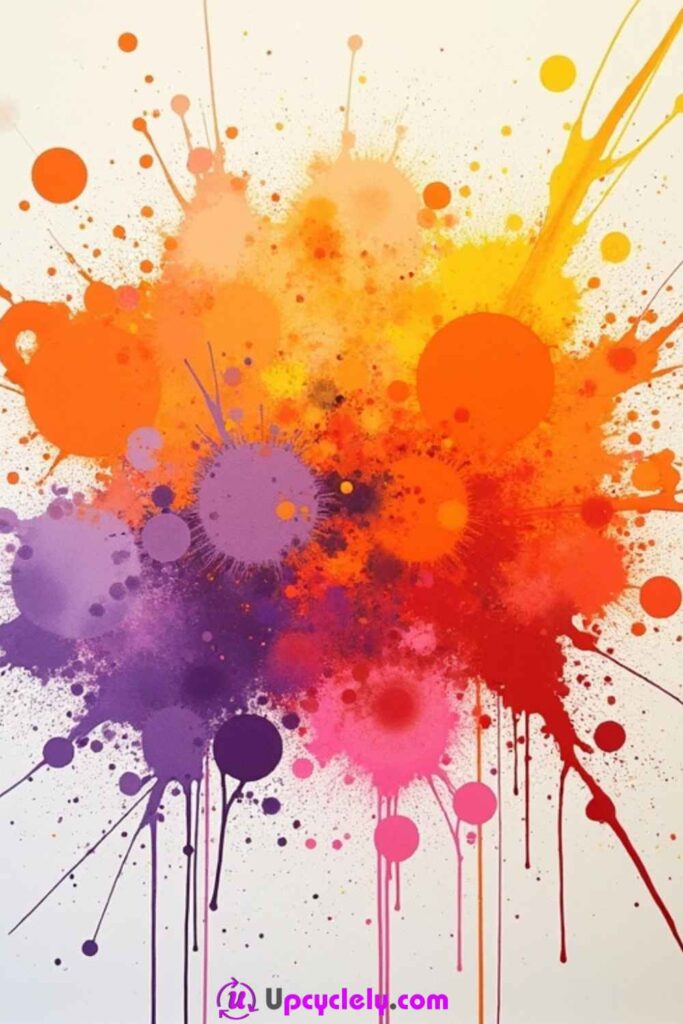
Splattered Colors
Materials Needed
- Acrylic paints (orange, red, pink, yellow, purple)
- Plain white canvas
- Spray bottle of water
- Toothbrush for splattering
Steps to Create
Step 1: Prepare Paint for Splashing
I diluted the orange, pink, and yellow paints slightly with water. This step helped the paints splash and spread easily onto the canvas.
Step 2: Apply the First Splashes
Using a medium brush, I flicked the orange paint at the center of the canvas. Following that, I repeated with pink and yellow paints, ensuring they overlapped for a layered effect.
Step 3: Add Controlled Circles
Once the splashes dried, I used a small round brush to add defined circular shapes in purple and red. These circles became the focal points amidst the chaos of the paint explosion.
Step 4: Layer Additional Splashes
I used a toothbrush dipped in watered-down paint to create finer splatter patterns. This added depth and texture to the artwork.
Pro Tip
Use a spray bottle to mist the canvas lightly before splattering for a softer, blooming effect with the paint.
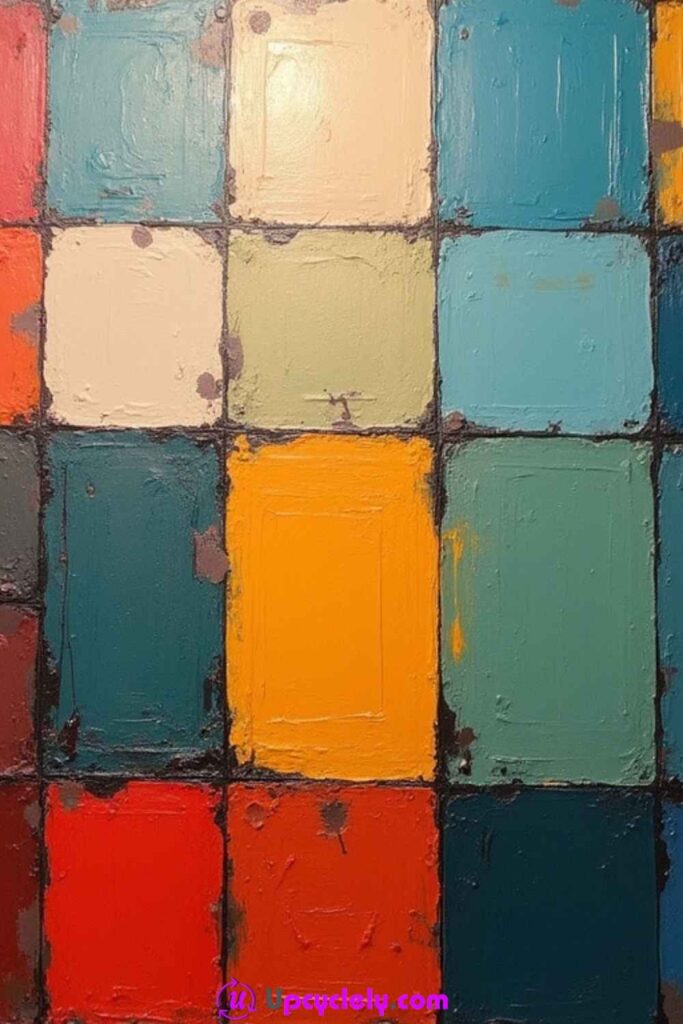
Square Grid

Materials Needed
- Acrylic paints (red, blue, teal, orange, white, green)
- Canvas with a smooth finish
- Masking tape
- Large flat brushes
Steps to Create
Step 1: Tape the Grid
I started by positioning masking tape on the canvas to outline a 4×4 grid of rectangles. The tape ensured clean edges while painting.
Step 2: Paint Base Colors
I filled in each rectangle with bold, solid colors like red, teal, orange, and green. For variety, I experimented with mixing blues and reds to create unique shades.
Step 3: Add Texture
Once the base paint dried, I went back with a dry brush and added rough, textured strokes to each rectangle. This created a distressed, rustic look.
Step 4: Remove the Masking Tape
To finish, I carefully removed the tape to reveal sharp, clean borders for each rectangle. This step gave the entire piece its modern, geometric appeal.
Pro Tip
Don’t worry if some paint seeps under the tape. It adds character to the rustic design!
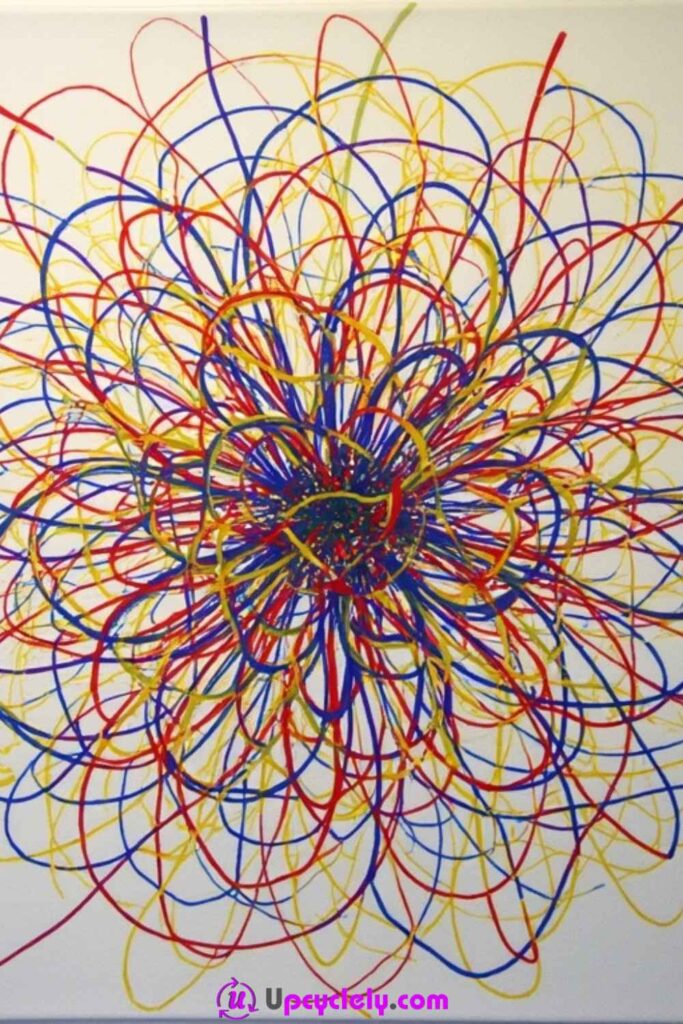
Tangled Lines
Materials Needed
- Acrylic paints (red, blue, yellow)
- Round brushes (thin and medium sizes)
- White canvas or thick art paper
- Pencil for initial sketching
Steps to Create
Step 1: Sketch the Central Starting Point
I began by deciding on the center of the canvas. Using a pencil, I drew a small circle to mark the origin. From this point, I lightly sketched spiral and curving lines radiating outward to establish a rough guide.
Step 2: Layer the Primary Colors
Using a medium round brush, I painted bold red, blue, and yellow lines extending from the center. I alternated colors and varied line thicknesses to make it dynamic, ensuring the lines overlapped as they expanded outward.
Step 3: Add Depth and Intricacy
Once the base layer dried, I added thinner and denser lines in the same colors. I intertwined them to create a tangled web effect. Delicate lines filled gaps and added complexity to the piece.
Step 4: Refine Line Intensity
After the paint dried, I added a second layer of paint to some lines to enhance their vibrancy. This technique helped make certain sections stand out, adding visual balance across the piece.
Pro Tip
Vary your brush pressure while painting the lines to create natural-looking transitions in thickness, making the design appear more organic.
Square Grid
Materials Needed
- Acrylic paints (yellow, purple, orange, red)
- Masking tape
- Flat and palette knives for texture
- Canvas with a smooth finish
Steps to Create
Step 1: Tape the Grid
I sectioned off the canvas into six equal rectangles using masking tape. This setup gave structure to the design and ensured clean edges.
Step 2: Lay Down Base Colors
I applied vibrant acrylic paints to each rectangle, alternating between yellow, orange, purple, and red. Using flat brushes, I made sure every section had an even coat.
Step 3: Build Texture with Palette Knives
With the base coat partially dry, I used palette knives to add patches of thick paint onto each rectangle. I dragged the knife lightly for some areas and pressed harder for others to create depth and dimension.
Step 4: Finalize and Remove Tape
Once everything was dry, I carefully peeled off the masking tape to reveal clean, sharp edges for every section. I touched up any imperfections along the borders.
Pro Tip
Experiment with overlapping textures by layering multiple colors on the palette knife before applying the paint to the canvas.
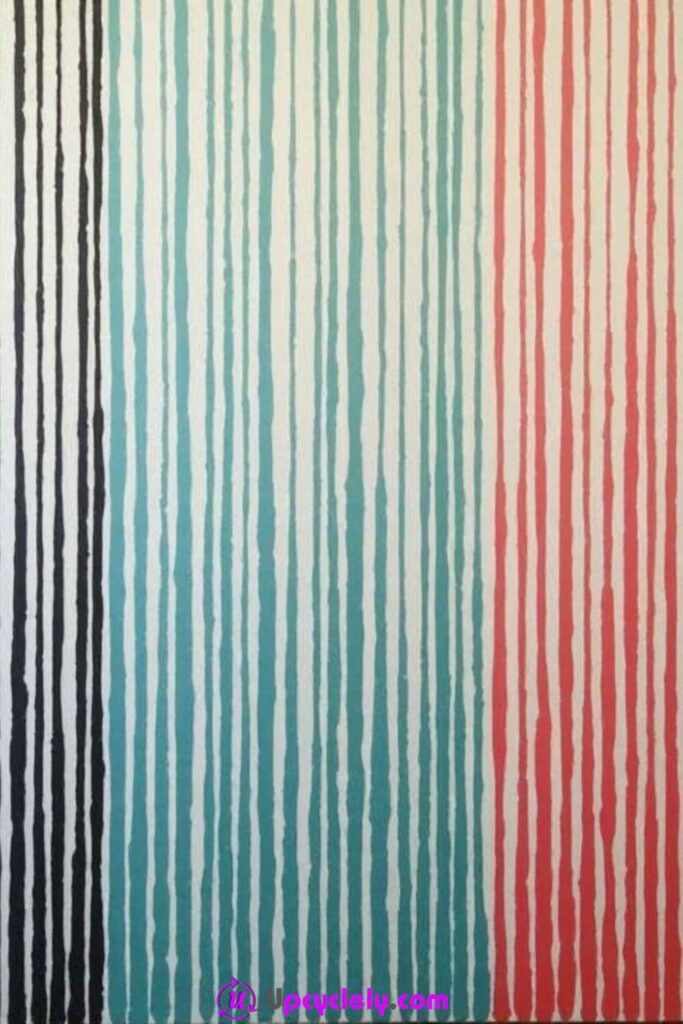
Vertical Lines
Materials Needed
- Acrylic paints (black, teal, red, white)
- Flat brushes (various sizes)
- Ruler or painter’s tape for line precision
- Canvas or thick art paper
Steps to Create
Step 1: Divide the Canvas into Sections
To start, I mentally divided the canvas into three equal vertical sections. I outlined these sections lightly with a ruler to keep the lines aligned.
Step 2: Paint the Left Section
For the left section, I painted alternating black and white vertical stripes. I used a flat brush for clean, bold lines. The slight unevenness of the edges added a hand-painted charm.
Step 3: Work on the Middle Section
Next, I painted alternating teal and white vertical lines in the center section. I kept the stripes similar in width to the first section but ensured the colors didn’t bleed into adjacent areas.
Step 4: Finish with the Right Section
The final section got a red and white pattern using the same technique. I varied the thickness of the stripes slightly, creating an interesting balance.
Pro Tip
Use painter’s tape to achieve perfectly crisp edges, or freehand the lines for a more organic, artistic appearance.