Embroidery has a way of making tiny errors feel much larger than they are. One misplaced satin stitch can interrupt a smooth edge, a dense fill can hide a trapped thread, and removing a section too aggressively can leave a permanent nick in fabric that took hours to prepare.
The tool used to undo those stitches matters because the job is not simply cutting thread; it is separating thread from fabric while keeping the weave, stabilizer, and surrounding embroidery as undisturbed as possible.
That is why the best seam ripper for embroidery is not always the biggest, sharpest, or most elaborate option. Fine control, a tip that can get under a stitch cleanly, a handle that stays steady in the hand, and sensible protection for the blade are usually more important. Some embroiderers also benefit from having more than one size available, while others prefer a single well-shaped tool or a set that can be kept in several work areas.
Why Precision Matters More Than Speed When Removing Embroidery
A seam ripper is a small hand tool built around a forked metal tip. One side of the fork extends into a pointed prong that can slip beneath a stitch. Between the prongs is the cutting edge. On many traditional designs, the shorter prong ends in a rounded ball intended to help the tool move along fabric with less chance of the short side digging into the surface.
For ordinary garment seams, a user may be removing a long, straight line of machine stitching with plenty of space around it. Embroidery can be less forgiving. Decorative stitches may cross one another, thread can be densely packed, and the fabric may already be under tension from a hoop or stabilizer. A single aggressive push can cut neighboring stitches or catch the base fabric.
The safest technique is usually selective cutting rather than trying to plow through a whole embroidered area. Slip the point under a stitch you can clearly see, bring the thread into the curved cutting area, make a controlled cut, and then remove loosened pieces with fingers, tweezers, or a thread-grabbing surface if the tool provides one. If the thread does not release easily, cut another stitch rather than pulling harder.
| Product Image | Product Name | Features | Price |
|---|---|---|---|
 |
2PCS Seam Rippers | Two Convenient Sizes Sharp & Long-Lasting Blades Non-Slip Ergonomic Grip Fabric-Safe Design |
Check Price |
 |
Clover White Ergonomic Seam Ripper | Precision Seam Removal Comfortable grip reduces hand fatigue during extended use |
Check Price |
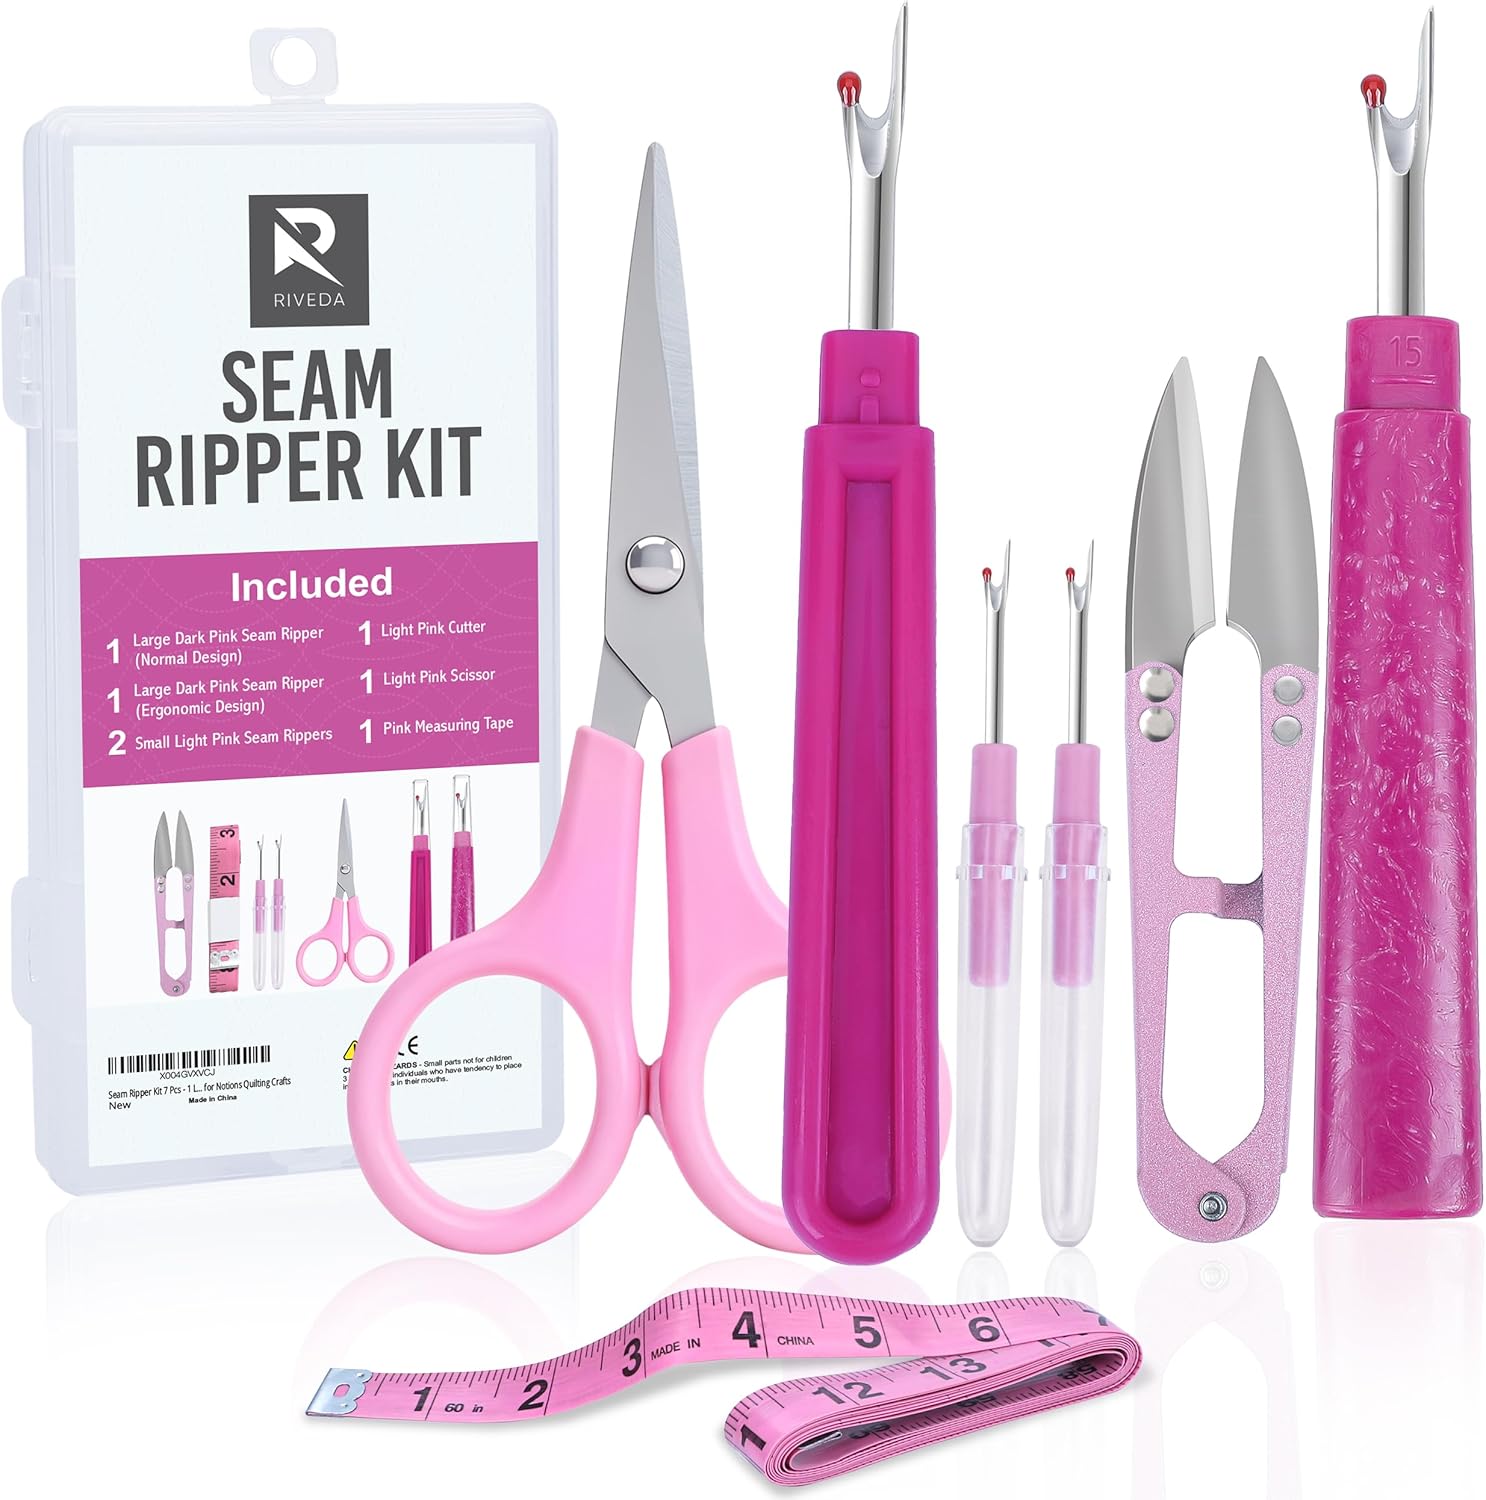 |
Seam Ripper Kit 7 Pcs | Complete Stitching Toolkit Designed with easy-to-hold handles Durable & Sharp Performance Foldable Measuring Tape |
Check Price |
 |
BEADNOVA Seam Ripper | Compact & Precise Design Includes 4 vibrant seam rippers in blue, green, yellow, and red Features a sharp metal blade and durable plastic handle |
Check Price |
 |
Dritz 665 Seam-Fix Seam Ripper | Sharp blade quickly cuts unwanted stitches Easy to Use Includes one seam ripper with protective cap Designed for comfort and control during detailed stitch work |
Check Price |
 |
SINGER ProSeries Folding Seam Ripper | Multi-Tasking Sewing Tool Cushioned handle reduces hand fatigue during long sewing sessions Protective red ball tip lifts stitches gently and cuts cleanly |
Check Price |
 |
DODOGA 40pcs Colorful Seam Ripper | Designed for ease and comfort Durable & Long-Lasting Build Curved blade with extra-sharp concave point and red mini ball tip ensures clean seam removal Includes 40 seam rippers in 4 colors |
Check Price |
What Makes the Best Seam Ripper for Embroidery?
A point fine enough to reach the thread
The pointed prong should slide under a stitch without needing to force its way between fabric yarns. For detailed embroidery, a smaller tip can make it easier to isolate one stitch from the ones around it. Even with a fine point, good lighting and a stable work surface are important because the point is still sharp enough to pierce fabric.
A cutting edge that works without heavy pressure
A seam ripper should cut thread with a modest forward motion. If you repeatedly need to push hard, the blade may be dull or the stitch may be too thick for the way you are approaching it. Excess force makes it harder to stop the tool once the thread gives way, which is exactly when fabric can be nicked.
A handle you can control
Handle comfort is personal, but control is not. A handle should let you rotate the point deliberately and keep your fingers away from the blade. Slim handles are easy to store and can feel precise in fingertip work. Wider, textured, cushioned, or ergonomically shaped handles can be easier to hold during longer repair sessions.
A protective ball that is actually used correctly
The small red or rounded ball found on many seam rippers is not a guarantee against fabric damage. It can help keep the shorter fork from scratching along the fabric, but the sharp point still needs to be positioned carefully. For embroidery, treat the ball as a helpful design detail rather than permission to move quickly.
Safe storage
A seam ripper tossed uncapped into a notions box can snag thread, scratch other tools, or prick a hand reaching into the box. A reusable cap or a folding blade makes storage simpler. If a cap doubles as a handle extension, that can also make a compact tool feel more substantial while in use.
One size or several
If you move between fine hand embroidery, machine embroidery, garment repair, and general sewing, two or more sizes can be useful. A multi-size set gives you a smaller point for detailed work and a larger handle for ordinary seams. If your work is mostly delicate and close-set, one dependable fine ripper may be all you need.
Pack quantity that matches how you work
A multi-pack makes sense for classes, shared studios, makerspaces, teaching kits, or anyone who likes to keep a seam ripper beside several machines. For one person working at one desk, a pack of dozens may create more storage than value. Quantity should solve a practical problem rather than simply look generous on a listing.
Aipker 2PCS Seam Rippers — Two Sizes for Mixed Stitch Work
The Aipker 2PCS Seam Rippers set is built around a straightforward idea: include one smaller seam ripper and one larger one so the user can switch tools instead of asking a single tip and handle to suit every job. The current listing identifies the brand as Aipker and specifies two different lengths, with clear caps included. That two-size setup is the main reason this set is useful for embroidery alongside ordinary sewing.
For fine corrections, the smaller ripper is easier to bring close to a compact cluster of stitches. The larger tool gives more handle to hold when you are unpicking a longer seam, taking out machine basting, or working on a repair where access is not so tight. Having both in the same set also makes it easier to reserve one for detail work and use the other for routine sewing, which can help keep the finer tool from becoming the default for every rough job.
The listing describes hardened-steel blades and an embossed, non-slip handle design. That combination matters because a seam ripper should cut with the blade rather than with force from the wrist. The clear cap can also be fitted as an extension to the handle, giving the smaller tool a little more reach and keeping the protective piece useful while you work instead of leaving it loose on the table.
Like many traditional seam rippers, the Aipker tools use a rounded red ball on the shorter fork. In embroidery work, that design can help when the shorter side of the fork is resting near the fabric surface, but the pointed side still needs careful placement.
Key features and why they matter
· Two sizes in one pack: The smaller and larger rippers let you match the amount of handle and tip access to the job, which is useful when you switch between dense decorative stitching and ordinary seams.
· Hardened-steel cutting area: A sharp cutting edge reduces the need to force the tool through thread, helping you keep movements small and deliberate.
· Embossed grip: Texture on the handle can make the tool easier to rotate and steady between the fingers, especially when your hands are dry or the task takes more than a few minutes.
· Clear protective caps: The caps cover the pointed ends for storage, and the listing notes that they can serve as handle extensions while the tools are being used.
· Rounded red ball on the short fork: This familiar seam-ripper shape can help the shorter prong move near fabric without presenting another sharp point.
- Two sizes cover both detailed stitch removal and more general unpicking. The textured handles give a more secure hold than very smooth plastic. Reusable caps keep the sharp points protected. The small-and-large pairing is practical without taking up much room.
- It is still a basic two-piece set rather than a specialized embroidery tool. The larger ripper may feel bulky around very dense stitch clusters.
Who It’s Best For
This set suits someone who wants one purchase to cover embroidery corrections and routine sewing repairs. It also makes sense if you are not yet sure which handle size you prefer, because you can compare the smaller and larger formats without buying two unrelated tools.
Not Ideal For
If nearly all your work involves extremely fine hand embroidery, you may use the smaller ripper far more often than the larger one. It is also less appealing if you prefer a cushioned or folding handle rather than a classic capped design.
Clover White Ergonomic Seam Ripper — Focused Control in a Familiar Form
Clover’s White Ergonomic Seam Ripper is a single-tool option for people who would rather have one familiar ripper than manage a set. The product is sold as Clover’s 482/W seam ripper. Clover’s own product information says it is intended for cutting seams, basting threads, and threads under buttons, and describes the conventional long-point-and-small-ball design used to place the longer tip under a thread and push forward.
What separates this version from many bare-bones rippers is the emphasis on the handle. Retail listings for the 482/W identify an ergonomic handle, while the tool itself keeps the uncomplicated forked blade that makes a seam ripper useful in close work. That balance is helpful for embroidery because extra features are not always an advantage around a dense motif. A tool that is easy to orient, easy to see, and easy to hold can be more useful than a complicated multi-function design.
The fine point is suited to getting beneath isolated stitches, while the small ball on the shorter fork provides a rounded surface near the fabric. As always, that ball is not a substitute for good technique. It works best when you can see exactly which thread is entering the cutting notch and when the fabric is supported rather than pulled taut enough to distort the weave.
Key features and why they matter
· Clover 482/W design: The manufacturer positions it for cutting seams, basting threads, and threads beneath buttons, all tasks that rely on controlled access rather than large cutting strokes.
· Long pointed prong: The longer tip can be worked beneath a selected stitch so the thread reaches the cutting edge between the forks.
· Small protective ball: The rounded end on the shorter side reduces the number of sharp surfaces near the fabric while you guide the tool.
· Ergonomic handle: A shaped handle can give the fingers a more stable place to hold the tool during repeated unpicking.
· Single-tool simplicity: There are no extra cutters, folding joints, or accessories to manage while working close to a delicate stitched area.
- The design is simple and easy to orient in detailed work. Clover documents the small protective ball and traditional cutting method clearly. The ergonomic handle offers more substance than many tiny basic rippers. It is easy to keep as a dedicated fine-work tool.
- It does not give you a second size for larger seams. The protective cover is more basic than a folding storage system.
Who It’s Best For
This option is well suited to embroiderers who value precise, uncomplicated hand tools and want a single ripper that can live beside the hoop or sewing machine. It is especially appealing if you do not need a large accessory set and prefer fewer pieces on the worktable.
Not Ideal For
If you regularly switch between delicate embroidery and bulky garment seams, you may prefer a two-size set. It is also not the strongest match for someone whose main priority is a blade that folds fully into the handle for transport.
Riveda Seam Ripper Kit 7 Pcs — A Compact Toolkit for Sewing Repairs
The seven-piece kit linked from the original article resolves to a Riveda set rather than a single seam ripper. Its current listing includes four seam rippers in different handle styles and sizes, plus a thread cutter, scissors, and a measuring tape. That makes it the broadest toolkit among the seven products in this guide.
For embroidery, the biggest advantage is not simply receiving more items. It is having multiple seam rippers available for different levels of access. The listing describes a large classic ripper, a large ergonomic ripper, and two small rippers. A fine correction inside a compact embroidered area calls for a different grip and approach than opening a longer line of stitching on a garment or backing. With several rippers in the same kit, you can choose the one that gives the clearest view of the thread you are trying to cut.
The trade-off is that a kit invites you to keep more tools at hand than a single seam ripper requires. For someone who already owns embroidery scissors, a tape, and thread snips, the extra pieces may overlap with what is already in the sewing box. I don’t see that as a flaw in the tools themselves; it simply means the value depends on how complete your current kit already is.
Key features and why they matter
· Four seam rippers: The mix of large, ergonomic, and small rippers gives you several handle and access choices without needing separate purchases.
· Ergonomic option included: A fuller grip can be useful when you are removing a longer run of stitching and want more hand contact with the tool.
· Thread cutter and scissors: These give you separate ways to trim loose thread tails after the main stitches have been opened.
· Measuring tape: The tape is useful for repair work that involves checking placement, spacing, hems, or the position of a design before stitching again.
· One coordinated kit: Keeping the basic repair tools together can be convenient for a portable sewing bag, a mending station, or a beginner building a first tool set.
- Multiple seam rippers give you more choice for fine and general work. The included cutting tools reduce the need to reach for a separate pair of scissors. An ergonomic ripper is part of the set rather than a separate purchase. The kit can fill several gaps in a new sewing box at once.
- Some included tools may duplicate supplies you already own. The set takes more storage space than a single dedicated ripper.
Who It’s Best For
This kit suits a newer sewer, an embroiderer assembling a portable repair pouch, or anyone who genuinely needs both stitch-removal tools and basic cutting and measuring accessories. It is also practical for households where the sewing kit serves several kinds of mending rather than embroidery alone.
Not Ideal For
If you already own good scissors, snips, and a tape measure, you may be paying for overlap. A specialist who wants one very fine tool for detailed embroidery may also prefer the simplicity of a single-ripper design.
BEADNOVA Seam Ripper 4pcs — Small Tools for Fine Embroidery Threads
BEADNOVA’s four-piece seam-ripper pack is specifically sold as a small-size set. The manufacturer’s product page states that each ripper measures 3.54 inches including its protective cover and describes the smaller format as suitable for delicate fabrics and threads. That makes this one of the most directly relevant designs in the group for compact embroidery corrections.
Each pack contains four colors: blue, green, yellow, and red. The color variation does not change cutting performance, but it can be practical in a shared sewing space or if you want to assign one ripper to a particular kit. For example, one can stay with hand-embroidery supplies, another with the sewing machine, and another in a travel pouch without having to move the same sharp tool back and forth.
BEADNOVA specifies a metal blade, plastic handle, red ball point, and clear protective cover. The manufacturer also lists removing unwanted embroidery, zig-zag stitches, and overlock stitches among the intended uses. That is useful confirmation because it shows the design is meant for more than simply opening straight garment seams.
Key features and why they matter
· Small-size design: The compact format keeps your hand close to the work and can make it easier to approach fine stitches without a large handle blocking the view.
· Four rippers in one pack: Multiple pieces are useful for separate workstations, travel kits, or shared use, and one dull or misplaced tool does not leave you without a ripper.
· Metal blade and plastic handle: The construction is simple and light, keeping the tool easy to maneuver during small corrections.
· Red ball point: The rounded short prong gives the familiar fabric-protective shape used on standard seam rippers.
· Clear cover: The cover protects the sharp point during storage and makes the tool safer to carry in a sewing pouch.
- The small format is well matched to fine thread and detailed work. Four pieces make it easy to keep a ripper in several kits. The manufacturer explicitly lists unwanted embroidery among its uses. Protective covers are included for storage.
- The compact handle may feel too small for users who prefer a full-hand grip. Four identical small rippers offer quantity rather than different sizes.
Who It’s Best For
BEADNOVA’s set is a good fit for hand embroiderers, crafters who work with fine thread, and anyone who wants several compact rippers in different locations. It also suits a shared craft room where tools are frequently moved or misplaced.
Not Ideal For
If most of your work involves long, heavy seams, a larger handle may be more comfortable. It is also less useful if you want a mixed-size set rather than four small versions of the same basic design.
Dritz 665 Seam-Fix Seam Ripper — Cut and Sweep Away Loose Threads
The Dritz 665 Seam-Fix takes the familiar seam-ripper blade and adds a rubbery thread-removal tip. Dritz describes the tool as a seam ripper that cuts unwanted threads and uses the rubber tip to grab and remove the loose pieces afterward. For embroidery repair, that second function can be genuinely useful because cutting is often only half the job.
After a row of stitches has been clipped, short thread fragments can cling to the fabric surface or remain caught in small holes. Picking every piece out with fingernails can be tedious, and brushing too aggressively can fuzz the fabric. The Seam-Fix concept gives you a different surface for gathering those loose threads after the blade has done the cutting. Dritz’s instructions specifically describe replacing the cap and using the rubbery tip to grab loose threads away.
The 665 is sold as the large version, giving the user more handle than a miniature seam ripper. That can make it easier to maintain a steady grip during longer unpicking sessions. The downside is that a larger handle can take up more visual space when you are working inside a very tight motif, so the tool is strongest when the repair includes both controlled cutting and a fair amount of thread cleanup.
Key features and why they matter
· Sharp seam-ripper blade: The main end is built for cutting unwanted stitches and opening seams in the same way as a traditional ripper.
· Rubbery thread-removal tip: After stitches are cut, the special end can grab loose thread pieces from the fabric surface, reducing the amount of picking needed by hand.
· Protective cap: The cap covers the blade for storage and becomes part of the cleanup process when the rubber end is used.
· Large format: More handle area can provide a steadier grip for people who find very small seam rippers fiddly.
· Useful for buttonholes and stitch removal: Dritz lists both seam ripping and buttonhole opening among the tool’s intended tasks, making it a versatile repair tool beyond embroidery.
- The rubbery tip adds a practical cleanup function that the other standard rippers do not offer. The larger handle is easy to hold during repeated cutting. The cap protects the blade in storage. The two-stage cut-and-clean workflow is well suited to repairs that leave many small thread fragments.
- The larger form can feel less nimble inside very tight embroidery. The rubber tip is useful only after stitches have been properly cut and loosened.
Who It’s Best For
This Dritz model suits embroiderers and sewers who dislike picking loose thread fragments from fabric after unpicking. It is also a strong fit for quilting, garment sewing, and machine-embroidery repairs where a longer section of stitching may need to be removed and cleaned up afterward.
Not Ideal For
If your priority is the smallest possible point-and-handle combination for extremely fine hand embroidery, the large format may not be your first choice. It is also unnecessary if you already have a thread-removal method you prefer and only want a basic cutter.
SINGER ProSeries Folding Seam Ripper — Safer Storage with a Folding Point
SINGER’s ProSeries Folding Seam Ripper, model D50002/50002, is the most storage-focused design among these seven products. Instead of relying on a separate cap, the sharp end folds into the handle. SINGER calls this the Flip ’n Rip safety fold and describes it as a way to hide the point during storage and travel.
SINGER also specifies an ergonomic comfort grip and compatibility with both left- and right-handed users. The manufacturer lists removing stitches, tags, buttons, and snaps among the intended uses, and states that the tool is designed to lift and cut stitches cleanly without snagging fabric. For embroidery, the main benefit is still the controlled seam-ripper point, but the grip and folding storage make the tool easier to live with between uses.
The folding joint does add more structure than a one-piece plastic handle. Some users prefer the absolute simplicity of a fixed ripper, especially when they want the least possible movement between the handle and tip. For a portable kit, though, the attached safety mechanism is a meaningful advantage.
Key features and why they matter
· Flip ’n Rip folding mechanism: The sharp point folds into the handle, so there is no separate cap to misplace and the tool is easier to store safely.
· Ergonomic comfort grip: A cushioned handle gives the fingers a broader, softer surface during longer unpicking sessions.
· Left- and right-hand compatibility: The tool is designed so either hand can use the same grip and blade orientation.
· Multi-use stitch-removal design: SINGER lists stitches, tags, buttons, snaps, and stitched buttonholes among the jobs this tool can handle.
· Hanging hole: The handle can be stored on a pegboard or lanyard, useful in an organized sewing space where small tools otherwise disappear into drawers.
- The folding blade is convenient and secure for storage. The cushioned grip is designed for longer sewing sessions. It works for either hand. The attached safety system means there is no loose cap to keep track of.
- The folding handle is more mechanically complex than a fixed ripper. Users who prefer a very small rigid tool may find it larger than necessary for tiny details.
Who It’s Best For
This is a good fit for anyone who moves sewing tools between rooms, carries a portable embroidery kit, or frequently loses small protective caps. It also suits users who want a cushioned grip and a design that can be stored on a pegboard or lanyard.
Not Ideal For
A minimalist hand embroiderer who wants the smallest possible rigid tool may prefer a compact capped ripper. It is also more feature-rich than needed if the tool will live permanently in one protected drawer.
DODOGA 40pcs Colorful Seam Ripper — Quantity for Classes and Shared Workspaces
The DODOGA 40-piece pack is fundamentally different from the single-tool and small-set options above. Its value comes from quantity. Product listings describe forty seam rippers divided among four colors, with ten of each color. That makes the set most relevant to sewing classes, workshops, shared craft rooms, volunteer repair groups, or anyone preparing multiple project kits.
The individual rippers use a familiar traditional design: metal and plastic construction, a curved cutting area, a red rounded ball on the shorter fork, and a clear plastic cap. The cap can also be used as a handle extension. In other words, the basic tool is not unusual; the unusual part is receiving enough of them to distribute widely.
For a single person, forty pieces are harder to justify unless you deliberately build many sewing kits or give tools away. More pieces do not improve the precision of the blade, and storing a large pack can become its own problem. The decision should be based on how many people or workstations need a tool, not on the idea that a larger number automatically means better value.
Key features and why they matter
· Forty seam rippers: The large quantity is suited to teaching, group use, kits, or multiple workstations rather than a single sewing box.
· Four colors: Ten pieces of each color make it easier to divide tools among groups, rooms, or project kits.
· Traditional curved blade: The familiar seam-ripper head works for opening stitches and hems without adding a learning curve for people who already know this style.
· Red rounded ball: The short side of the fork uses a rounded end rather than a second sharp point near the fabric.
· Clear cap that extends the handle: The cap protects the point in storage and can give the handle more length while the tool is in use.
- The pack is practical for classes and shared workspaces. Multiple colors make distribution and organization easier. Each tool includes a protective cap. The familiar design requires little explanation for people who have used a standard seam ripper before.
- Forty pieces are excessive for most individual embroiderers. The design prioritizes quantity over a specialized comfort grip or folding mechanism.
Who It’s Best For
This pack makes the most sense for teachers, sewing clubs, community repair events, makerspaces, and people assembling multiple starter kits. It can also work for a very busy shared studio where small tools regularly migrate from one station to another.
Not Ideal For
A single hobbyist with one sewing box will probably not need forty seam rippers. If comfort, fine-grip shape, or compact premium storage matters more than quantity, one of the single-tool options is a more focused purchase.
Comparing the Seven Options Without Overcomplicating the Decision
The most useful way to compare these products is to start with the kind of stitch removal you do, then look at how much tool you actually need around the blade.
For a simple two-size setup, the Aipker pair is the most flexible. The small ripper can handle tighter work while the larger one gives you more handle for routine seams. It is a practical middle ground for someone who does embroidery, mending, and general sewing and does not want a large kit.
The Clover White Ergonomic Seam Ripper is more focused. It keeps the traditional forked design, adds a handle intended for comfortable control, and does not surround the job with extra accessories. If you like a dedicated tool that is easy to identify and keep beside your embroidery setup, the Clover is straightforward.
The Riveda seven-piece kit makes more sense when you are building or refreshing a sewing kit rather than replacing only a seam ripper. Its multiple rippers, scissors, cutter, and tape can cover a wider range of repair tasks. If those extra tools would duplicate items you already own, the kit becomes less compelling.
BEADNOVA’s four small rippers are particularly suited to people who want compact tools and several identical pieces. The manufacturer specifically positions the small size for delicate fabric and thread, so this is one of the clearest fits for detailed embroidery. The main compromise is the short handle.
Dritz 665 Seam-Fix stands out for what happens after the cut. The rubbery tip is designed to lift away thread fragments, which can save time when a removed seam leaves a trail of tiny pieces. If cleanup is the part of unpicking you dislike most, that feature is more meaningful than simply receiving another standard ripper.
SINGER ProSeries is the strongest option for storage and portability because the point folds into the handle. That design is useful when tools travel in a pouch, drawer, tote, or class kit and you do not want to manage a separate cap. The comfort grip also makes it better suited to longer sessions than many thin-handled rippers.
DODOGA’s 40-piece pack should be judged on a different question: how many people or stations need a seam ripper? If the answer is one, it is probably too much. If the answer is a classroom, club, workshop, or set of distributed kits, the quantity becomes the feature that matters most.
How to Use a Seam Ripper on Embroidery Without Damaging the Fabric
A good tool cannot compensate for rushed technique. Embroidery removal is safest when you work in small sections and keep the fabric supported so you can see the relationship between the thread and the weave.
1. Identify exactly what needs to come out
Look at both the front and back of the work before cutting. Decide whether you are removing one misplaced stitch, a short line, or a larger stitched area. If the embroidery is machine-made, the reverse side may make the stitch path easier to understand than the decorative front.
2. Reduce tension before you start
If the fabric is stretched very tightly in a hoop, consider loosening it enough that the weave is not under unnecessary stress. You still want the fabric supported, but extreme tension can make a nick spread or make holes appear larger after threads are removed.
3. Slide the point under thread, not through fabric
Use strong light and approach a stitch you can clearly see. Slip the long point under the thread and stop as soon as the thread reaches the cutting notch. If the point catches resistance from the fabric itself, withdraw and change the angle rather than pushing harder.
4. Cut a few stitches at a time
For dense embroidery, do not try to run the ripper through a long row in one movement. Cut selected stitches, then check what has loosened. Working gradually gives you repeated chances to confirm that the fabric and neighboring design remain intact.
5. Turn the work and release the opposite side
After several stitches are cut, turn the work over and see whether a longer thread can be lifted away from the back. Sometimes the cleanest removal comes from cutting on one side and pulling the loosened thread from the other. If it resists, cut another anchor point instead of tugging.
6. Remove fragments gently
Use fingertips, fine tweezers, or a thread-removal surface such as the rubber end on the Dritz Seam-Fix. Avoid scraping the fabric with the sharp point just to chase tiny fibers. The goal is to remove thread without raising a fuzzy patch around the repair.
7. Inspect the fabric before restitching
Once the thread is out, look for stretched holes, pulled yarns, or stabilizer that has shifted. Smooth the fabric with your fingers and let it relax before placing new stitches. On some materials, the old needle holes will soften after gentle handling or pressing appropriate to the fabric.
8. Re-mark the design only after the surface settles
If the removed section needs to be embroidered again, check alignment after the fabric has returned to its natural shape. Then mark or re-hoop as needed. Rushing straight from unpicking into restitching can lock distortion into the corrected area.
Care and Storage That Keep a Seam Ripper Useful
Seam rippers are small enough to be forgotten, but they are cutting tools and benefit from the same basic care as good scissors. The most important habit is protecting the point. Replace the cap immediately after use or fold the blade into the handle if you are using the SINGER design. This protects your fingers and helps keep the fine point from striking other metal tools in a drawer.
Use the ripper for thread rather than as a general-purpose pick. Prying open hardware, scraping dried glue, or digging into thick non-textile material can bend the point or dull the cutting area. Once a seam ripper stops cutting cleanly, replacement is often safer than compensating with extra force.
The rubber thread-removal end on the Dritz Seam-Fix should also be kept clean. If it becomes loaded with lint or fibers, remove the debris gently rather than scraping it with the blade. The folding joint on the SINGER should be kept free of thread scraps so the point can fold fully into the handle.
Small Habits That Protect Fabric While Unpicking
Forcing the point when it does not slide under a stitch
Resistance is information. It often means the point is contacting fabric rather than thread, the stitch is too tight to approach from that direction, or the blade has lost some sharpness. Withdraw the tool, improve the lighting, and try another stitch or angle instead of adding force.
Trying to remove too much at once
Long, sweeping passes look efficient, but they reduce control. On embroidery, nearby stitches may cross or share the same area of fabric. Cutting two or three known stitches and then checking the result is slower for a minute and faster than repairing a hole.
Pulling thread before enough anchors are cut
A thread that feels stubborn is usually still attached somewhere. Strong pulling can distort the weave, especially on loosely woven linen or soft cotton. Find the remaining anchor and cut it rather than using tension to tear the thread free.
Treating the rounded ball as complete fabric protection
The small ball on the shorter fork is helpful, but the pointed prong and central blade are still sharp. Keep your attention on the long point and the thread entering the cutting notch. The ball works with good technique; it does not replace it.
Using a dull seam ripper because it still looks fine
There is no easy visual test for every blade. If the tool starts requiring more pressure, catching thread instead of cutting it, or making you repeat the same motion several times, its useful edge may be declining. A seam ripper is inexpensive compared with the time invested in a piece of embroidery.
Leaving the point exposed on the table
An uncapped seam ripper can roll under fabric, disappear beneath a project, or catch a hand reaching across the work area. Replace the cap, fold the blade, or place the tool in a dedicated tray whenever you stop. This is especially important in a shared home or teaching space.
Cleaning thread fragments with the blade
Once stitches are cut, the sharp point is not the best tool for brushing away fuzz. Use fingers, tweezers, a lint-removal method, or the Dritz rubber tip. Scraping with the blade can catch the weave after the difficult part of the repair is already finished.
Safety Notes for a Small but Very Sharp Tool
A seam ripper is designed to enter spaces that scissors cannot, which means the point is intentionally sharp. Always push the tool away from your supporting hand rather than toward your fingers. If you need to hold fabric close to the stitch, move slowly and keep the non-cutting hand out of the path the tool would follow if it slipped.
Good lighting is a safety feature as much as a comfort feature. A task light that makes the thread easy to distinguish from the fabric reduces the urge to probe blindly with the point. Magnification can help with very fine work, especially when thread and fabric are similar colors.
Store seam rippers with the sharp area covered or folded. The Aipker, Clover, Riveda, BEADNOVA, Dritz, and DODOGA options rely on caps or covers; the SINGER folds the point into its handle. Keep all of them away from children and from any place where a hand may reach in without looking.
Do not use a seam ripper as a toy, a general puncturing tool, or a substitute for equipment intended for leather, wood, packaging, or other tough materials. The fine point can bend or break if it is forced, and a damaged tool is harder to control on fabric afterward.
Frequently Asked Questions
Can a seam ripper remove machine embroidery?
Yes, but machine embroidery is often dense and may include bobbin thread and stabilizer on the back. Work from the side that gives the clearest access to the stitch structure, cut only a few stitches at a time, and remove loosened threads gradually rather than trying to lift the whole design at once.
Is a small seam ripper better for hand embroidery?
A small ripper can improve access around fine, closely spaced stitches, but handle comfort still matters. If the handle is so small that you cannot control the point, a slightly larger ergonomic tool may be safer. The best size is the one that lets you see the stitch and move the blade without forcing it.
What is the red ball on a seam ripper for?
The rounded ball sits on the shorter fork and provides a smoother surface near the fabric than another sharp point would. It can help reduce snagging as the tool is guided along a seam, but the long pointed prong and cutting edge still need careful positioning.
How often should I replace a seam ripper?
There is no single replacement schedule because usage varies. Replace it when it stops cutting thread cleanly, requires noticeably more pressure, has a bent point, or develops damage that makes control less predictable. A sharp, inexpensive tool is safer than struggling with a worn one.
Can I use a seam ripper to open buttonholes?
Many traditional seam rippers are intended for that task, and Clover, Dritz, and SINGER all describe buttonhole-related use in their product information. Use a controlled method and consider placing a pin across the far end of the buttonhole so the blade cannot travel farther than intended.
Is an ergonomic handle really important?
It matters most during repeated use. A fuller or cushioned grip can give your fingers more surface to hold and may feel steadier during a long unpicking session. For one or two tiny corrections, a compact fine tool may feel more precise, so comfort and access need to be balanced.
Should I remove embroidery from the front or the back?
Use the side that exposes the stitch path most clearly. Machine embroidery is often easier to analyze from the back because bobbin threads and stabilizer are visible, while a misplaced hand stitch may be easiest to cut from the front. Turn the work frequently rather than committing to one side for the whole repair.
What should I do if the fabric looks stretched after stitches are removed?
Stop before restitching. Let the fabric relax, gently smooth it, and use fabric-appropriate pressing if needed. If threads have been pulled rather than cut, distortion may take longer to settle, which is another reason to unpick gradually and avoid tugging.
Choosing the Right Seam Ripper Is Mostly About Control
The best seam ripper for embroidery is the one that lets you isolate thread, cut it with minimal pressure, and store the sharp point safely when the correction is finished.
That may be a small BEADNOVA ripper for fine work, the two-size Aipker set for mixed sewing tasks, Clover’s simple ergonomic design, the broader Riveda kit, Dritz’s cut-and-clean Seam-Fix, SINGER’s folding ProSeries tool, or the large DODOGA pack for shared use.
There is no need to buy the option with the most pieces or the most features if those extras do not match the way you sew. Start with your usual stitch size, how long you spend unpicking at one time, whether the tool travels, and whether you need one ripper or several. Then choose the design that gives you the clearest view and the steadiest hand.
A seam ripper is a tiny purchase compared with the fabric, thread, stabilizer, and time invested in embroidery. Treating it as a precision tool rather than an afterthought makes corrections calmer, cleaner, and much less likely to turn one wrong stitch into a damaged project.