A wall stencil can look wonderfully simple while it is lying flat on a table, then become surprisingly demanding the moment you try to repeat it across eight feet of painted wall. The design has to stay level, the bridges have to remain flat, the paint load has to be controlled, and every repeat has to meet the last one closely enough that the eye reads one continuous pattern rather than a collection of separate impressions.
That is why the best stencils for wall painting are not chosen by pattern alone. Sheet size, material thickness, registration, edge pieces, pattern density, and the way the stencil behaves under a roller all matter once the project moves from a small sample board to a full wall.
A compact A4 sheet can be easier to handle around furniture or awkward corners, while an XL Mylar stencil can cover open wall space much faster. Neither is automatically better; they solve different problems.
I would also separate “pretty in a product photo” from “pleasant to repeat for several hours.” Large open motifs are usually forgiving. Fine crackle lines and dense botanical shapes demand more paint control. A stencil that includes an edging piece can save a surprising amount of hand-finishing around ceilings and corners. Those practical differences are what make the nine options below worth comparing carefully.
How Wall Stencils Actually Behave on a Painted Surface
A stencil is a mask. Paint reaches the wall through the cut openings while the uncut plastic protects the background. The idea is simple, but a crisp result depends on keeping three things under control at the same time: contact with the wall, paint quantity, and alignment.
Material thickness changes control
Most reusable wall stencils are made from PET or Mylar-type plastic. Thin material follows a surface easily and is light enough to tape in place without much effort. Thicker Mylar generally feels more substantial in the hand and tends to hold its shape well through cleaning and repeated placement.
Thickness is not a quality score by itself. A 10-mil or 12-mil stencil can be excellent for a large repeated wall pattern because it combines flexibility with enough stiffness to move from one repeat to the next. A thinner 0.25 mm plastic template can still work very well for compact motifs, furniture, fence panels, or designs where you need the sheet to flex around a surface.
Large sheets speed up open walls but demand better positioning
An XL stencil can reduce the number of placements dramatically. That matters on a long accent wall because every move introduces another opportunity for the pattern to drift. Fewer repeats can therefore mean faster work and more consistent spacing.
The trade-off is handling. A sheet around three feet tall is more awkward near a ceiling, baseboard, inside corner, light switch, or built-in cabinet. It is also more sensitive to gravity. If you are working alone, a large stencil benefits from several pieces of low-tack painter’s tape or a repositionable adhesive that the stencil maker approves.
Registration marks are more valuable than they look
Repeating patterns need a reference point. Some large wall stencils include registration marks, cutouts, or repeated pattern elements that show where the next placement should land. These guides reduce the amount of measuring required after the first row is established.
Without good registration, you can still stencil a wall successfully, but you need a level, light pencil marks, or carefully measured reference points. The first two or three placements deserve more time than the next twenty because they establish the geometry for everything that follows.
Pattern density controls how forgiving the stencil feels
A broad palm leaf, pine silhouette, or large starburst gives the roller relatively open spaces. Paint can be applied quickly and there are fewer fragile bridges to lift. Fine crackle designs have many narrow channels, so a heavily loaded roller is more likely to force paint underneath the plastic.
Dense floral designs sit somewhere in the middle. They can produce rich decorative detail, but you may need to work in smaller passes and clean the stencil more often if dried paint begins to build on the edges.
An edging stencil can be more useful than a larger main sheet
Ceilings, baseboards, corners, door trim, and cabinets interrupt a repeating pattern. A full stencil often cannot sit flat in those areas. Dedicated edging pieces solve that by giving you a narrower version of the pattern that can reach close to boundaries without folding a large sheet sharply.
Two of the STENCILOGY designs below include separate edging stencils. The STENCILIT Starburst set also includes a smaller supporting piece for awkward areas. If you want a true wallpaper-style repeat from wall to wall, edge handling deserves almost as much attention as the main motif.
| Product Image | Product Name | Features | Price |
|---|---|---|---|
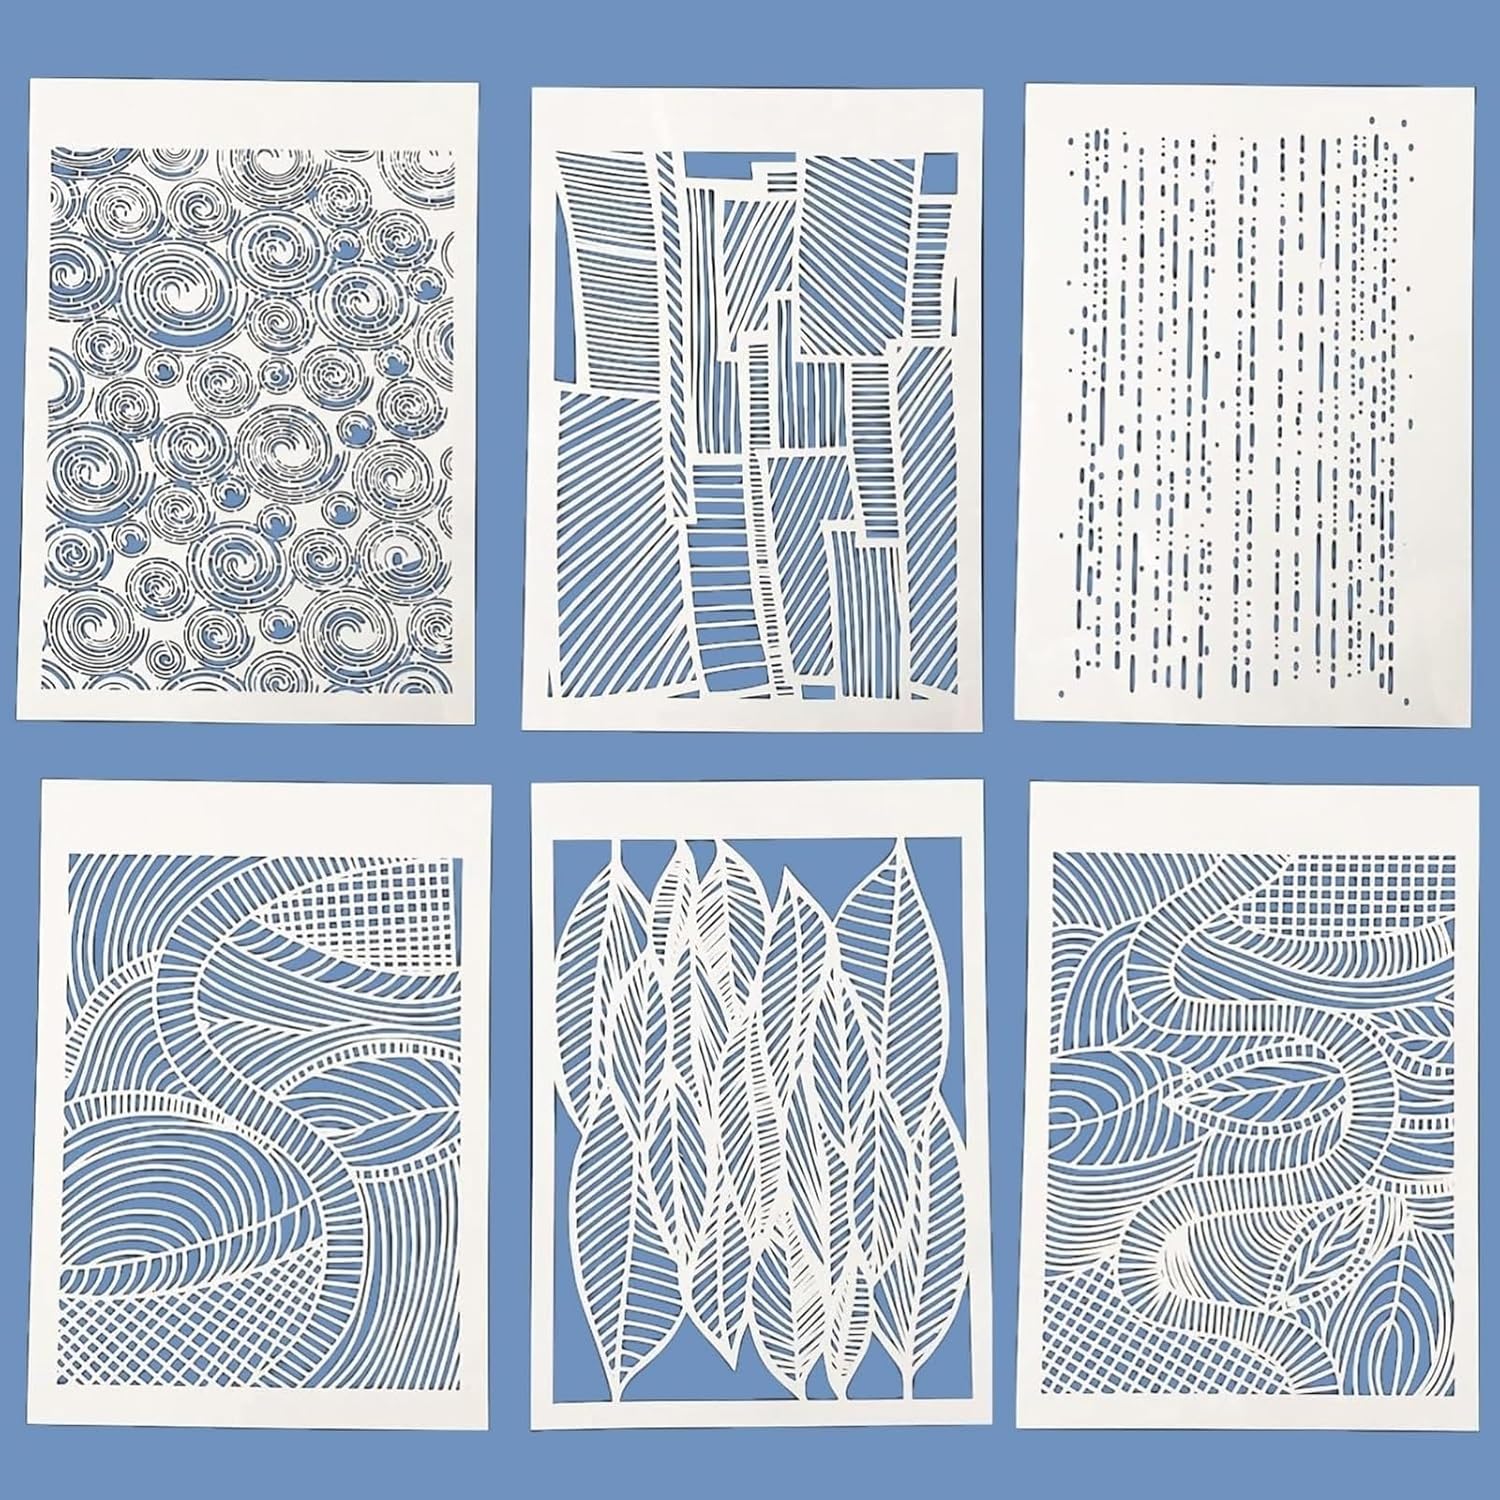 |
TIAMECH 6 Pcs A4 Reusable Geometric Stencils for Painting | Includes 6 reusable stencils, each A4 size (8.3″x11.7″ / 21×29.7 cm). Made of flexible, reliable plastic that is reusable for long-term creative projects. Suitable for use on floors, walls, doors, tiles, wood, cabinets, boxes, and more. Simply place on a clean, dry surface and apply paint with brushes, chalks, sprays, or acrylics. |
Check Price |
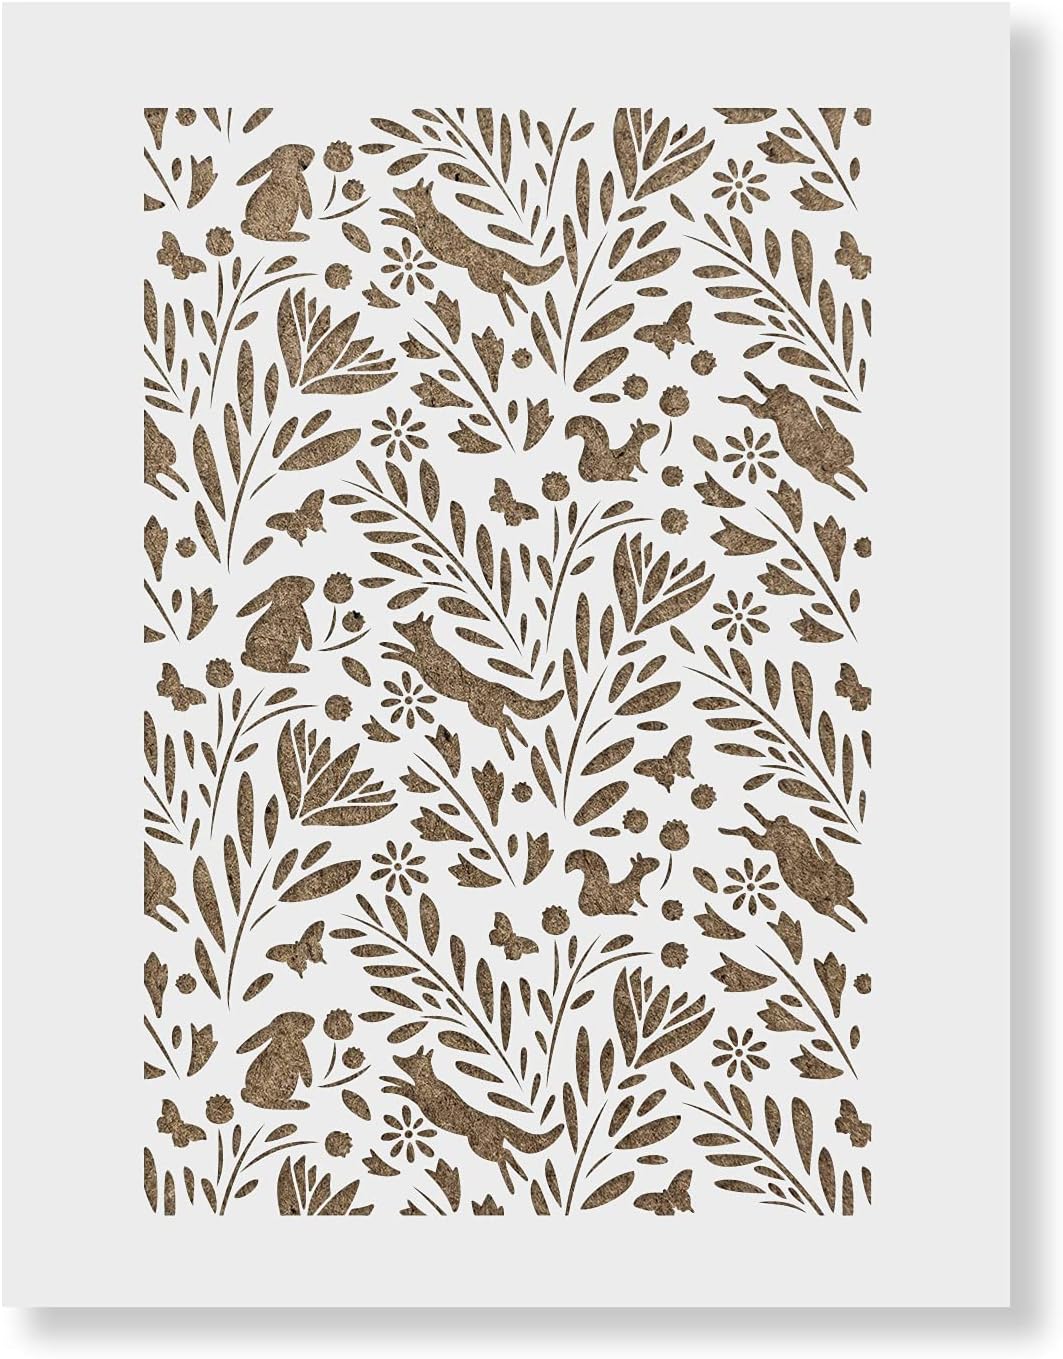 |
Forest Pattern Wall Stencil | 36″x24″ stencil covers large areas quickly, making projects fast and efficient. Forest pattern instantly elevates ordinary walls and surfaces into artistic focal points. Perfect for bathrooms, living rooms, kitchens, bedrooms, accent walls, or business spaces. Works with paints, sprays, or textured finishes, allowing customization to match any style. |
Check Price |
 |
STENCILOGY® / Danube – 23″ x 38″ XL Wall Stencil | Includes 1 extra-large stencil and 1 edging stencil (2 pieces total). Extra-large stencil covers more surface area quickly, reducing project time and effort. Makes painting corners and edges faster and cleaner, ensuring professional results. Works with water-based paints such as latex and acrylic for flexible use. |
Check Price |
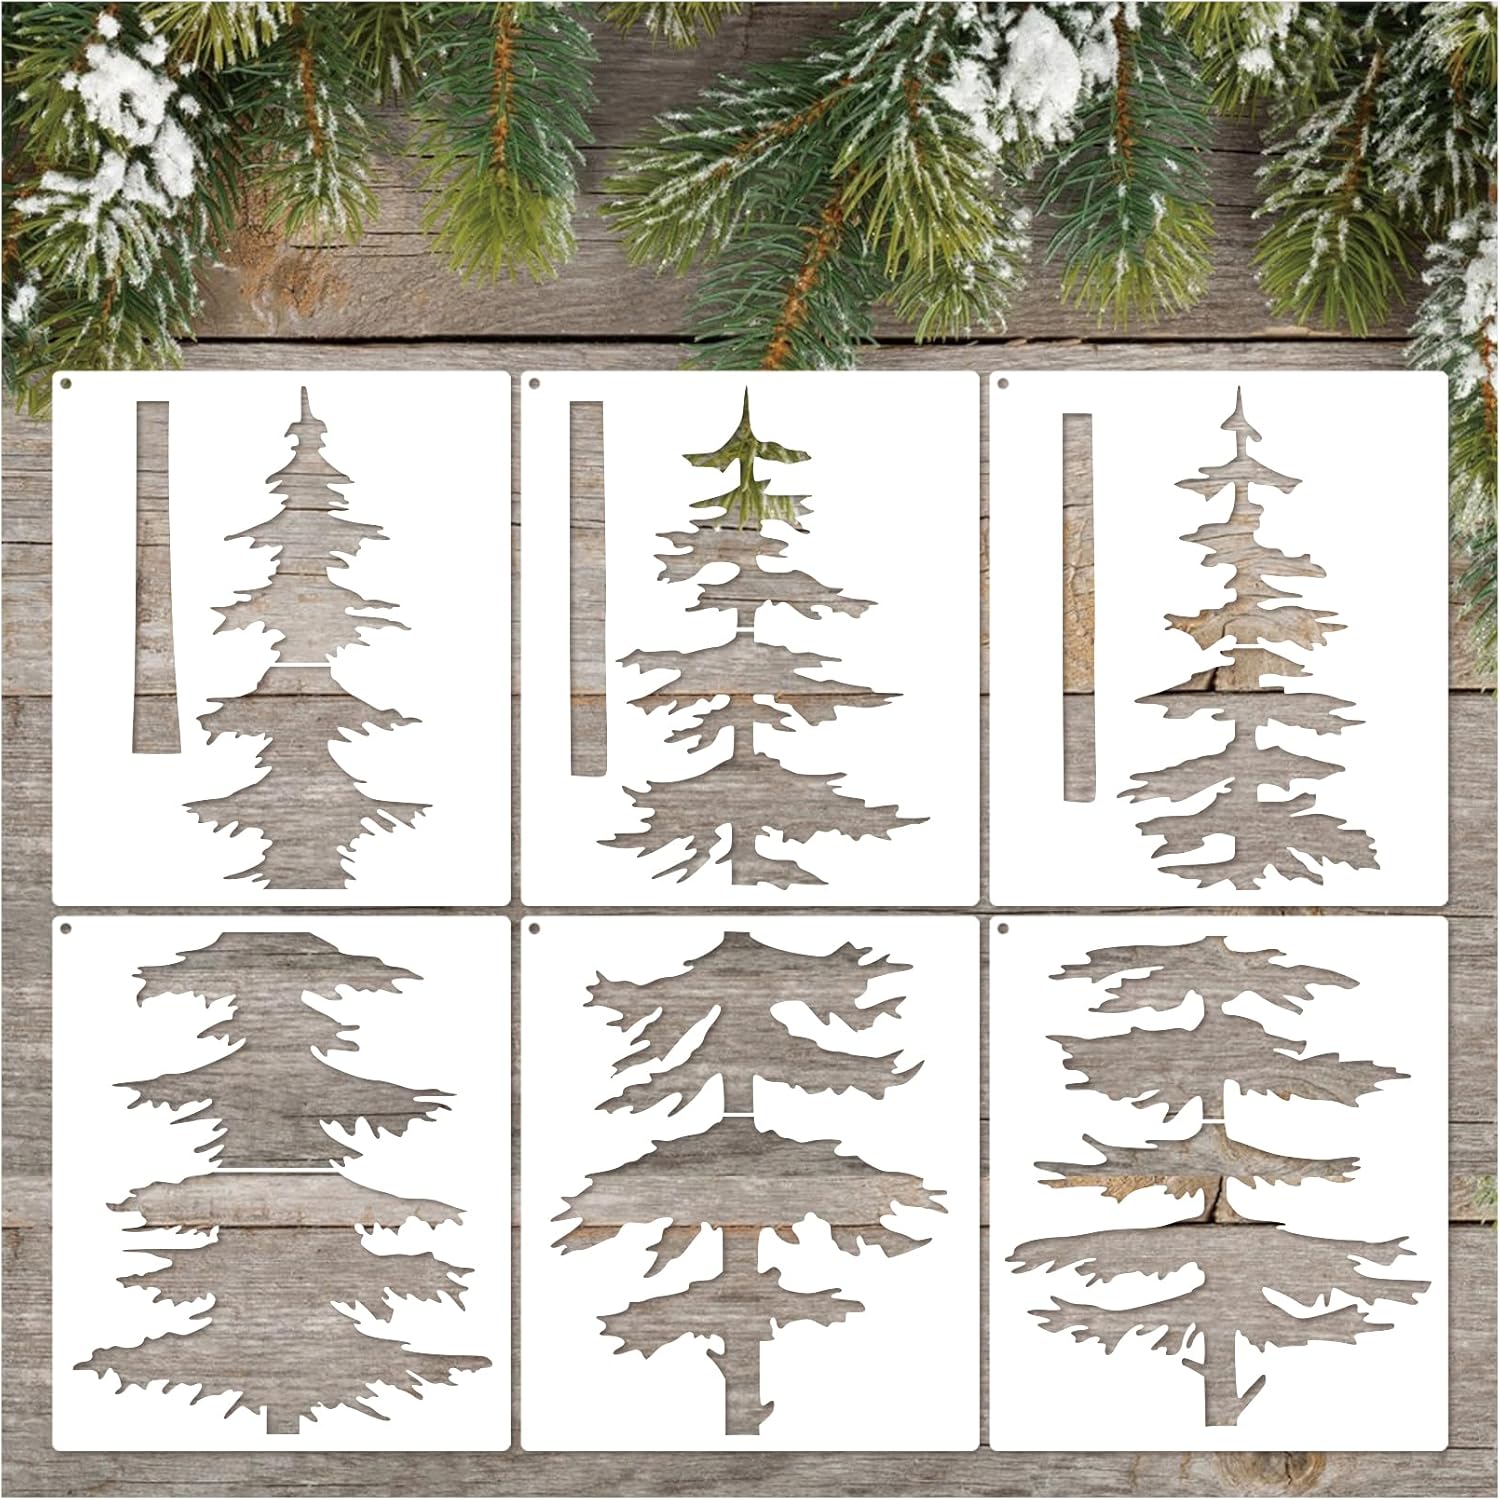 |
Large Stencils for Painting | Includes 6 large pine tree stencils, each measuring 13.8″, perfect for big projects. Ideal for painting fences, doors, walls, tabletops, furniture, windows, and backsplashes. Made from 0.25mm thick plastic, ensuring flexibility, strength, and long-term reusability. No sharp points, making them safe to handle and easy to position. |
Check Price |
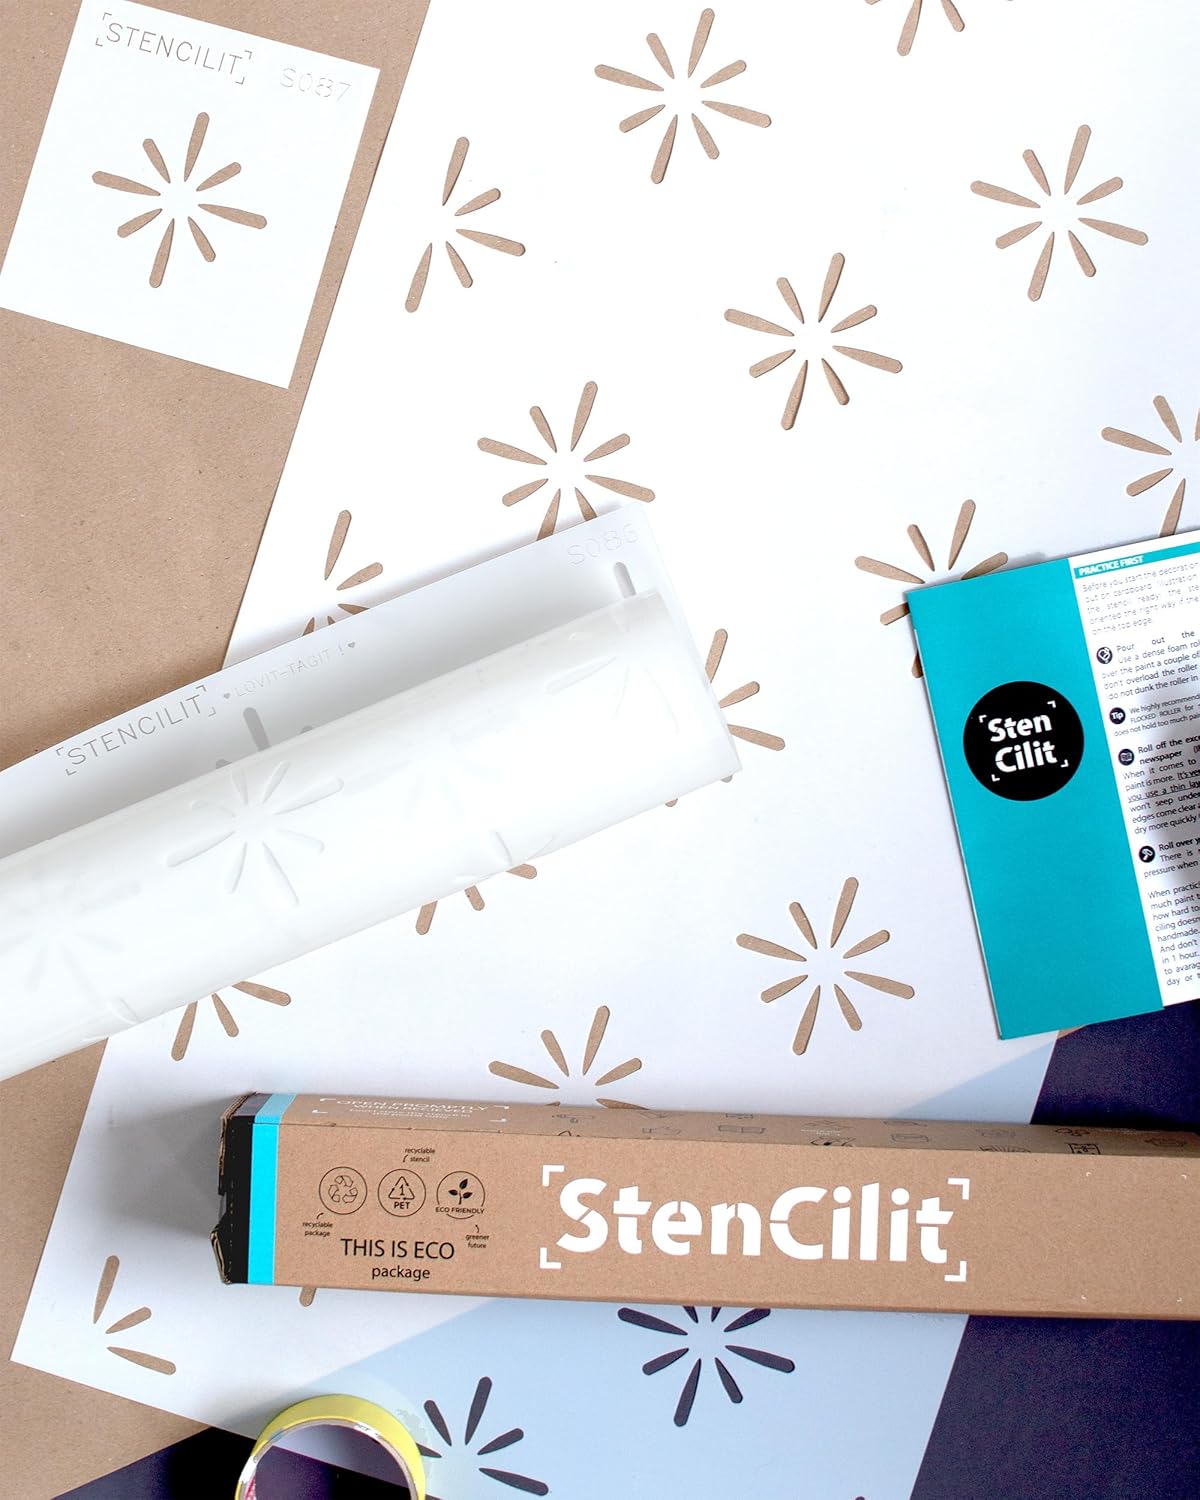 |
STENCILIT® Starburst Stencil for Painting | Includes 2 large stencils plus an extra edge piece for seamless corner and edge coverage. Designed for use with spray adhesive and flocked rollers; works with water-based, chalk, or latex paints. Crafted from premium 10 mil Mylar, washable, reusable, and built to last through multiple projects. |
Check Price |
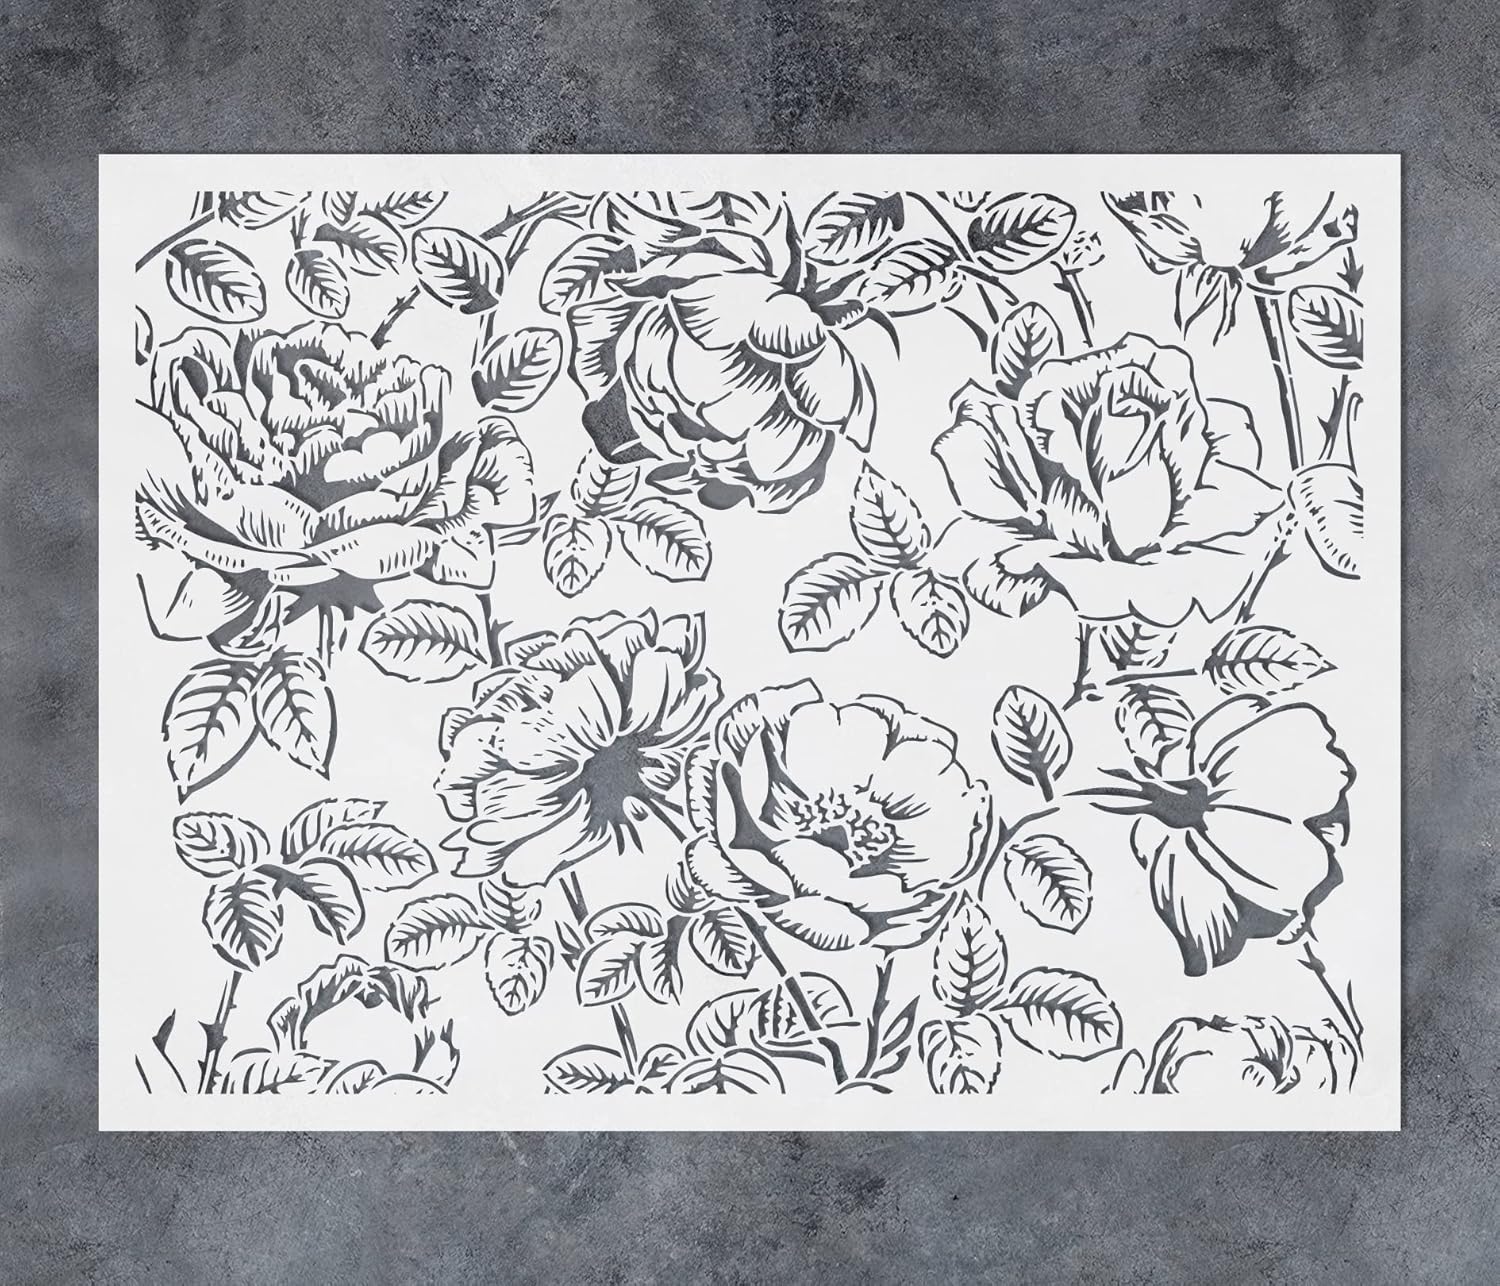 |
GSS Designs Large Flower Wall Stencils for Painting | Includes 1 reusable stencil measuring 12″x16″, perfect for medium-sized projects. Suitable for walls, tiles, wood, canvas, furniture, and floors; even doubles as art pieces. Simple to use with paints, sprays, or brushes, ideal for DIYers and artists alike. |
Check Price |
 |
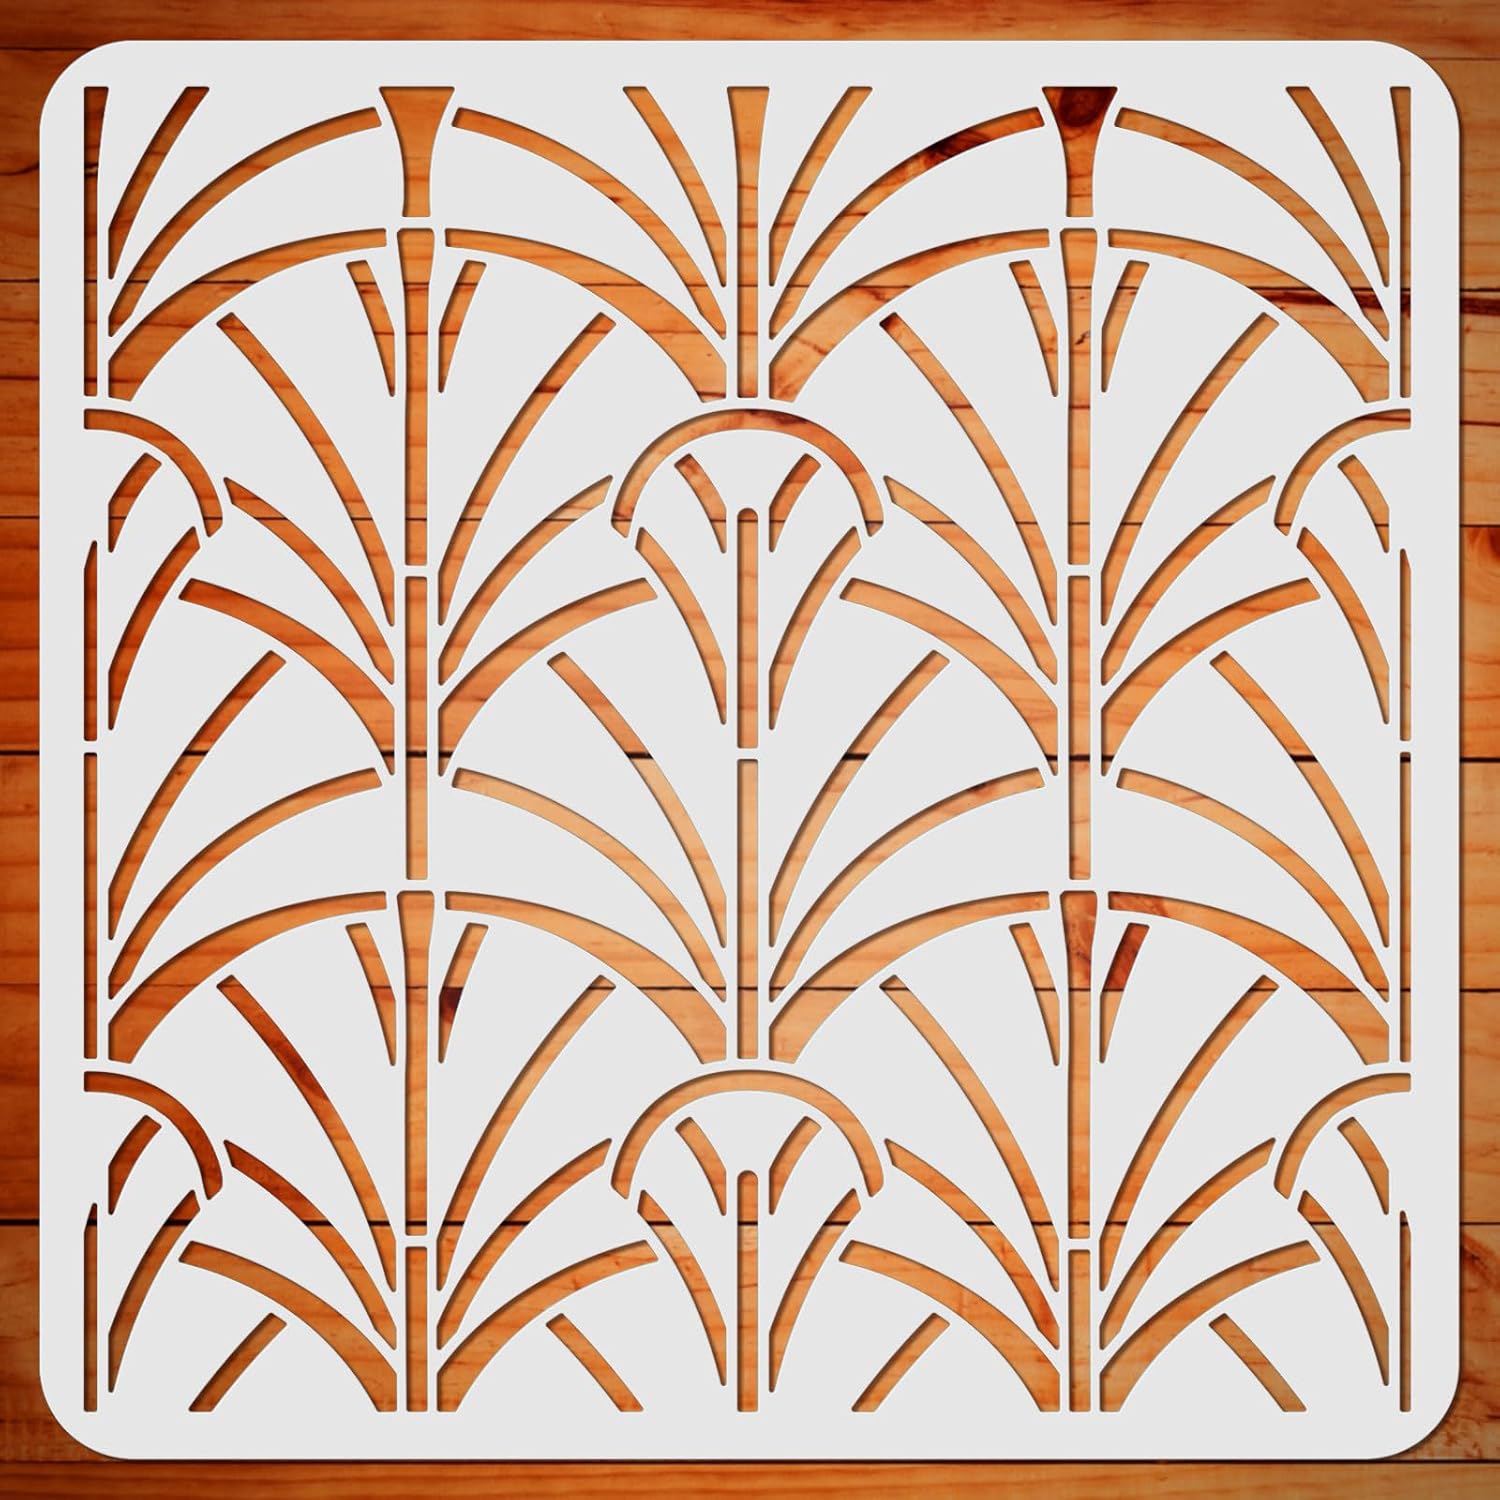
BENECREAT Crackle Drawing Stencils | Measures 11.8″x11.8″ (30×30 cm), perfect for home décor and everyday craft projects. Simply place on a clean surface and apply paint, brushes, crayons, or sprays for instant designs. orks on canvas, walls, wood, paper, and other craft surfaces. |
Check Price |
 |
ORIGACH Outline Furniture Stencil for Painting | Flexible, non-toxic, tasteless, and resistant to oil, fat, dilute acid, alkali, and most solvents. Strong construction prevents breaking or deforming, ensuring repeated use over time. Great for upgrading cushions, furniture, and feature walls with personalized designs. |
Check Price |
 |
STENCILOGY® / KARASU – 23.6″ x 39.4″ XL Wall Stencil | Includes 1 extra-large stencil and 1 edging stencil (2 pieces total). Large stencil size covers more surface area quickly, saving time and effort. Works with water-based paints such as latex and acrylic for flexible use. |
Check Price |
What to Check Before You Choose a Wall Stencil
The design is the first thing you notice, but the following details usually determine whether the project feels controlled or frustrating.
Decide whether you want a repeat or isolated motifs
Some stencils are designed to interlock into one continuous wall pattern. DANUBE, KARASU, Starburst, and the large forest pattern make the most sense when you want a repeated decorative field.
The pine-tree set, TIAMECH sheets, crackle stencil, and furniture-outline stencil can be used more freely. You can repeat them, rotate them, overlap them, or use them as separate accents. That flexibility is useful if you do not want the wall to read like wallpaper.
Match the sheet size to the wall, not the room size
A large room does not automatically require the largest stencil. What matters is the uninterrupted wall area you can actually reach. A dining room wall with no windows may be ideal for an XL stencil. A hallway broken up by several doors can be easier with a medium sheet because you will spend more time near trim than in open space.
Measure the usable wall width and height before ordering. Also note outlets, switches, thermostats, shelves, radiators, and built-ins. These interruptions tell you whether a dedicated edge piece is likely to save time.
Consider the wall texture
Smooth or lightly textured walls are easiest. Deep orange-peel, knockdown, rough plaster, brick, and heavily textured surfaces create gaps under the stencil. Paint can bridge those gaps and soften the edge.
That does not mean stenciling is impossible on texture. It means you should reduce the paint load, use a more vertical pouncing action with a stencil brush where needed, and accept that the edge may look more handcrafted than razor-sharp. A flexible stencil can follow gentle texture, but no plastic sheet can eliminate deep surface relief.
Choose a pattern scale that suits viewing distance
Small patterns look detailed up close but can become visually busy across an entire wall. Large patterns read from farther away and can make a room feel calmer because fewer repeats are visible at once.
For an accent wall behind a bed or sofa, XL botanical or geometric repeats usually have enough scale to remain legible. For a narrow powder room, cabinet side, furniture panel, or section above wainscoting, a 12-inch or A4 stencil may feel more proportionate.
Look at bridges and open areas
A stencil bridge is the small connection that keeps an enclosed piece of plastic attached to the rest of the sheet. Fine patterns often need more bridges. Those bridges affect the final look, but they also keep delicate parts stable.
Wide open designs are usually quicker for a roller. Fine linework rewards a lighter hand. If you are new to wall stenciling, a pattern with larger openings and fewer fragile details is generally easier to control.
Think about cleanup before choosing the most detailed design
Water-based wall paint is relatively easy to clean while it is fresh. Once layers of paint dry on the stencil, small openings can become narrower and registration can become harder to see.
A simple rule helps: clean when buildup begins to affect the edges, not after every single placement. Over-cleaning slows the project; under-cleaning lets dried paint distort the design. The right interval depends on paint thickness and pattern density.
Planning the Pattern Before Paint Touches the Wall
The most expensive-looking stencil jobs usually have one thing in common: the layout was decided before painting started.
Find the visual center rather than automatically starting in a corner
Starting in a corner feels logical, but it can leave an awkward half-pattern at the most visible part of the wall. For a feature wall, find the center line and test how the repeat will land toward both sides.
Some patterns look best centered on a bed, fireplace, console, or vanity rather than on the wall itself. That small shift can make the finished design feel intentional even if the wall is not symmetrical.
Make a dry layout with the stencil sheet
Hold the stencil against the wall and mark its outer dimensions with small pieces of painter’s tape. Move it through several repeat positions without paint. This reveals whether the pattern will collide awkwardly with trim or leave a tiny sliver at the ceiling.
For large stencils, this dry run also tells you whether you can comfortably reach the top while keeping the sheet flat. It is much easier to adjust the starting point before paint is involved.
Test color contrast on a board first
A stencil can look completely different depending on contrast. Soft beige over warm white can read almost like texture. Black over white becomes graphic. Two colors only a few values apart may disappear across the room even though they look attractive in a paint chip comparison.
Paint a sample board using the actual stencil if possible. Step back to the normal viewing distance. The sample should answer both a design question and a technique question: do you like the contrast, and can you produce clean edges with your chosen paint and tool?
Use a level for patterns with obvious horizontal or vertical rhythm
Geometric, sashiko, fan, and starburst repeats expose crooked alignment quickly. A small error grows as the pattern moves across the wall. Establish one level reference line and keep returning to it rather than trusting the ceiling or baseboard, which may not be perfectly level.
Organic patterns such as forest scenes and flowers hide small alignment errors better, but a reference line still helps prevent gradual drift.
TIAMECH 6 Pcs A4 Reusable Geometric Stencils for Painting — Flexible Small Sheets for Mixed Designs
The TIAMECH set takes a different approach from the large wallpaper-style stencils. Instead of one oversized repeating pattern, it includes six A4 sheets measuring about 8.3 by 11.7 inches. The patterns mix hollow leaves, abstract geometry, curves, and texture-like shapes, which makes the set better for varied compositions than for covering a wall as quickly as possible.
That smaller scale has real advantages. One person can hold or tape an A4 sheet easily, and the stencil fits into places where a three-foot sheet becomes awkward. It can work above shelving, beside a doorway, on a furniture panel, or as a scattered accent across a larger wall. You can also rotate the individual patterns rather than committing to one strict repeat.
The sheets are plastic and reusable. Their compact size makes rinsing and drying simple, and there is less wet stencil surface to manage between placements. The limitation is speed: covering an entire large accent wall with A4 sheets requires many more moves than using DANUBE, KARASU, Starburst, or the 36-by-24-inch forest stencil.
Key features translated into practical benefits
Six separate designs provide more creative freedom than one repeating motif. That matters if you want an organic arrangement, a layered mural effect, or different accents in several rooms. The downside is that you have to create your own spacing logic if you want a continuous wall pattern.
Each sheet is approximately A4 size, so it is easy to position around trim and small wall sections. The smaller footprint also reduces sagging and makes one-handed adjustment more realistic while the other hand handles tape.
The flexible plastic is suited to repeated craft use and can be cleaned after water-based paint. Because these are smaller sheets, they also make sense beyond walls on boxes, cabinets, tiles, wood signs, and furniture.
The abstract and botanical mix can create a handmade mural effect. If your goal is a perfectly regular wallpaper substitute, however, the lack of a single XL repeat means more measuring and planning.
- Six patterns in one set give you more design variety without buying several separate stencils.
- A4 sizing is easy to handle alone and fits well near shelves, corners, trim, and small wall sections.
- Flexible reusable plastic works on walls as well as furniture, wood, tile, and craft surfaces.
- The mixed leaf and geometric motifs are useful for loose compositions that do not need rigid registration.
- Covering a full wall takes much longer because each A4 placement covers a relatively small area.
Who It’s Best For
This set suits DIYers who want several compact patterns for accents, furniture, mixed-media walls, or small spaces rather than one uninterrupted wallpaper-style repeat.
Not Ideal For
It is less convenient for a large open feature wall where fast coverage and automatic repeat alignment are the main priorities.
Forest Pattern Wall Stencil — A 36×24-Inch Mylar Sheet for Large Nature-Inspired Repeats
This forest stencil is built for bigger coverage. The current product information identifies an overall size of 36 by 24 inches and 12-mil Mylar construction. That combination gives it enough scale to move quickly across a wall while remaining flexible and reusable.
The woodland design is more illustrative than geometric. Trees, plants, and animal details create a storybook effect rather than a strict grid. That makes it especially useful where you want a nursery, children’s room, reading nook, or creative space to feel decorative without looking like conventional wallpaper.
Registration marks are a particularly valuable feature on a stencil this large. Instead of measuring the full sheet after every move, you can use those marks to keep the repeat consistent. Organic imagery hides tiny errors better than a geometric lattice, but good alignment still matters if the pattern is meant to flow continuously.
Key features translated into practical benefits
The 36×24-inch format covers open wall space much faster than compact craft stencils. Fewer placements can shorten the project and reduce cumulative alignment error. The large sheet is more cumbersome near ceilings and trim, so plan edge work before starting.
The 12-mil Mylar construction gives the stencil a durable reusable body. It is thick enough to feel substantial while still bending for positioning and cleaning.
Registration marks help create a continuous repeat. This is one of the most important practical differences between a true large wall stencil and a generic decorative template.
The forest pattern can work with low-contrast neutrals for a soft mural effect or higher contrast for a more illustrative result. Because the motif contains natural irregularity, it is visually forgiving compared with a rigid geometric repeat.
- The large 36×24-inch sheet reduces the number of placements needed on an open wall.
- mil Mylar is durable, washable, and well suited to repeated wall use.
- Registration marks make it easier to continue the forest pattern without constantly remeasuring.
- The organic design hides tiny positioning differences better than highly geometric patterns.
- The oversized sheet can be awkward around tight corners, ceiling lines, and wall fixtures if you are working alone.
Who It’s Best For
Choose it for a large nature-inspired accent wall, nursery, creative room, or anyone who wants a mural-like repeating forest rather than a formal geometric design.
Not Ideal For
It is not the most convenient choice for a wall broken up by many doors, shelves, switches, or narrow sections.
STENCILOGY DANUBE XL Palm Leaf Wall Stencil — Fast Botanical Repetition With a Dedicated Edge Piece
DANUBE is a large fan-leaf pattern designed to create a continuous decorative field. STENCILOGY’s current specifications list a design area of about 20.9 by 35.8 inches, made from 250-micron DuPont Mylar, with a separate matching edging stencil for corners and borders.
That two-piece system is the main reason it stands apart from a basic large stencil. Open wall coverage is only half of a successful repeated pattern. The edge piece gives you a practical way to continue the motif near ceilings, baseboards, trim, and tight spaces without sharply folding the main sheet.
The palm-inspired geometry sits between organic and structured. It has enough repetition to look deliberate from across the room, but the leaf form softens the grid. This works well in modern, boho, Japandi, tropical, and art-deco-influenced interiors depending on the paint colors you choose.
Key features translated into practical benefits
The XL design area means fewer repeats across a typical feature wall. Fewer placements reduce project time and make consistency easier once the first row is aligned.
The separate edging stencil solves one of the most annoying parts of wall stenciling. Instead of trying to force a large sheet into a narrow strip, you can use the smaller companion piece to finish boundaries more cleanly.
The 250-micron Mylar is washable and reusable. It has enough stiffness to move as one sheet but remains flexible enough for repositioning.
DANUBE works with acrylic paint and a dense foam roller or stencil brush. Like most repeated wall stencils, it rewards a nearly dry roller. Too much paint is more likely to create bleed than too little.
- The XL format covers a substantial area with each placement and suits full-wall repeats.
- A dedicated edging stencil makes corners, ceiling lines, and narrow border areas easier to finish.
- Durable Mylar construction supports cleaning and repeated projects.
- The fan-leaf motif can look graphic or soft depending on contrast, so it adapts to several interior styles.
- The large main sheet needs careful support and alignment, especially near the top of a wall or when one person is working alone.
Who It’s Best For
DANUBE suits anyone who wants a polished botanical wallpaper effect and values a complete system for both open wall areas and edges.
Not Ideal For
It is less suitable if you want scattered motifs or a loose mural where each placement can be rotated independently.
Large Stencils for Painting — Six Pine-Tree Templates for Flexible Nature Arrangements
This six-piece set is built around large pine-tree silhouettes rather than one interlocking wallpaper repeat. Each tree stencil is sold at roughly 13.8 inches, and the sheets use flexible 0.25 mm plastic that can be washed and reused.
The biggest advantage is composition freedom. A fixed all-over stencil tells you where the next motif goes. Separate pine-tree templates let you create a forest line, stagger the trees at different heights, overlap them, space them widely, or use them on a fence and wall in the same project.
That makes the set useful for rustic rooms, cabins, children’s spaces, mural work, garden fences, furniture, windows, and seasonal decorating. It also means you need to make your own layout decisions. If you want the trees to feel naturally distributed, mark a few anchor points before painting instead of placing every stencil by eye.
Key features translated into practical benefits
Six separate pine-tree designs let you build a composition rather than repeat one identical tree. Variation is especially helpful for forest scenes because perfect repetition can look artificial.
The roughly 13.8-inch scale is large enough to read clearly from across a room but still manageable with one hand. It also works well on fence boards and furniture panels.
Flexible 0.25 mm plastic is easy to rinse and store flat. Rounded or non-sharp edges make handling simpler during repeated moves.
Because the stencils are separate, you can use one or two designs for a subtle wall border or combine all six for a denser woodland effect.
- Six tree designs create more natural variation than repeating one identical silhouette.
- The 13.8-inch scale is large enough for walls and fences without becoming difficult to handle.
- Separate templates make it easy to vary spacing, height, and overlap for a custom forest scene.
- Washable flexible plastic supports repeated indoor and outdoor decorative projects.
- There is no built-in registration system, so a balanced full-wall composition requires more planning and measuring.
Who It’s Best For
This set is a good fit for DIYers creating pine forests, cabin decor, fence art, nature-themed rooms, or flexible mural layouts.
Not Ideal For
It is not the fastest choice for a perfectly uniform all-over repeat where every element needs identical spacing.
STENCILIT Starburst Stencil for Painting — Two Large Mylar Sheets for Fast Geometric Coverage
The STENCILIT Starburst system uses two large stencils, each about 16.5 by 31.5 inches, plus a smaller support piece for edges and awkward areas. The main sheets are made from reusable 10-mil Mylar and are designed to connect into a seamless geometric repeat.
Having two large sheets is more useful than it may sound. On a long wall, one stencil can rest or dry while the other is being positioned. It also reduces the temptation to move a sheet while the paint on its back is still wet. The starburst pattern itself has relatively broad openings, which makes it more forgiving with a roller than very fine crackle or lace-like designs.
The visual effect is strongly geometric and mid-century or Scandinavian in character. High contrast makes each starburst obvious; softer tonal combinations can make the repeat feel more like textured wallpaper.
Key features translated into practical benefits
Two 16.5×31.5-inch main sheets help maintain momentum on larger walls. You can alternate them during a project and avoid waiting for one wet stencil to become safe to move.
The 10-mil Mylar balances flexibility with durability. It can be washed and reused if paint is cleaned before heavy buildup develops.
Seamless connection points help maintain the repeat. That reduces measuring once the initial row has been established.
The set is designed for water-based, chalk, or latex paints and works especially well with a lightly loaded high-density or flocked roller. A repositionable spray adhesive can improve contact if the product instructions and wall finish allow it.
- Two large main sheets can speed up full-wall work and make paint management easier.
- The starburst design has broad openings that are relatively friendly to controlled roller application.
- mil Mylar is washable and reusable for multiple decorative projects.
- A smaller companion piece helps with touch-ups and awkward spaces where a full sheet will not lie flat.
- The strong geometric rhythm makes alignment errors more noticeable than they would be in an irregular botanical design.
Who It’s Best For
Choose Starburst for a modern geometric accent wall, laundry room, office, bedroom, or any space where you want a clear wallpaper-like repeat without actual wallpaper.
Not Ideal For
It is less suitable for someone who wants a subtle organic mural or intentionally random placement.
GSS Designs Large Flower Wall Stencil — 10-Mil Mylar for Medium-Scale Floral Repeats
GSS Designs offers this floral wall stencil in reusable translucent 10-mil Mylar. The 12-by-16-inch format is a useful middle ground between compact A4 sheets and the very large wall stencils.
That size is easy to control around furniture and trim while still covering enough wall to build a repeating floral design efficiently. The translucent Mylar also helps with positioning because you can see some of the previous repeat and wall marks through the sheet.
The pattern is detailed enough to feel decorative without becoming as technically demanding as a fine crackle texture. It can also move easily from walls to furniture, floors, canvas, and wood, which makes it a practical choice if you like repeating one motif across several pieces in a room.
Key features translated into practical benefits
The 12×16-inch size is manageable for one person and works well on walls that have frequent interruptions. You lose some speed compared with an XL sheet, but gain control around corners and trim.
The 10-mil translucent Mylar provides a durable reusable surface while allowing easier visual placement over previous motifs.
The floral design can be repeated tightly for a wallpaper effect or spaced more widely as a decorative accent. That gives it more layout flexibility than a strict interlocking geometric stencil.
GSS Designs recommends washing the stencil with warm soapy water after use and avoiding harsh ammonia-based cleaners that can damage the plastic.
- The medium 12×16-inch format balances coverage with easy handling.
- Translucent 10-mil Mylar helps you see alignment marks and previous pattern edges during placement.
- The reusable floral motif works on walls, furniture, floors, canvas, and wood.
- Its scale is large enough for feature walls but still practical around windows, trim, and cabinets.
- A full-room repeat takes more placements than the XL wall-stencil systems.
Who It’s Best For
This is a strong fit for floral feature walls, furniture makeovers, mixed wall-and-furniture projects, or anyone who prefers a medium stencil that is easier to manage alone.
Not Ideal For
It is less efficient for a large uninterrupted wall where the fastest possible coverage is the priority.
BENECREAT Crackle Drawing Stencils — Fine Irregular Texture for Distressed and Layered Effects
The BENECREAT Crackle stencil measures about 11.8 by 11.8 inches and is made from reusable PET plastic. Instead of a flower, tree, or geometric motif, it creates irregular fracture-like lines that imitate a crackled surface.
That difference changes how you should use it. The goal is texture rather than a recognizable repeated symbol. You can rotate the square between placements, offset it, or overlap sections to reduce obvious repetition. It works especially well as a background treatment behind larger decorative elements or as a distressed effect on furniture and craft surfaces.
Fine channels make paint control more important. A heavy spray or wet roller can force paint under the narrow bridges and blur the crack lines. A lightly loaded stencil brush, sponge, or foam roller gives you more control.
Key features translated into practical benefits
The 11.8-inch square format is easy to rotate, which helps disguise repetition in a crackle pattern. A rigid repeating orientation can look stamped; rotation makes the effect feel more irregular.
Reusable PET plastic provides enough flexibility for wall, canvas, furniture, wood, and paper projects. It can be washed after water-based paint.
The fine crackle openings are useful for layered backgrounds and faux-aged effects. They are not as fast to paint as large open motifs, because too much paint can soften the linework.
This stencil is particularly useful when you want texture without adding physical raised material to the wall.
- The irregular crackle design creates visual texture without needing plaster or specialty texture products.
- Its square size is easy to rotate and overlap to reduce obvious repetition.
- Reusable PET makes it practical for walls, furniture, canvas, and craft projects.
- The pattern works well as a background beneath larger motifs or as a distressed finish by itself.
- The fine linework is more sensitive to excess paint and can bleed more easily than broad geometric openings.
Who It’s Best For
Choose it for distressed walls, layered mixed-media effects, furniture accents, or anyone who wants irregular texture rather than a conventional repeating motif.
Not Ideal For
It is not the easiest first stencil for someone who tends to load a roller heavily or wants very fast full-wall coverage.
ORIGACH Outline Furniture Stencil for Painting — A 12-Inch PET Template With Broad Multi-Surface Use
This outline furniture stencil is approximately 11.8 by 11.8 inches and uses flexible reusable PET. Its pattern is intended for decorative wall and furniture work rather than fast large-scale coverage.
The square format is practical around doors, cabinets, cushions, and smaller wall areas. PET also gives the sheet enough flexibility to handle repeated placement without the brittle feel of a rigid template. It can be cleaned with soap and water after suitable water-based paints.
One unusual material detail is the chemical resistance commonly listed for this PET sheet: it resists contact with oils, fats, dilute acids, dilute alkalis, and many solvents. For normal home wall painting, you do not need that resistance. The more useful takeaway is simply that PET is a durable reusable plastic when it is cleaned and stored flat.
Key features translated into practical benefits
The 11.8-inch square is small enough for furniture and wall details while remaining large enough to create a visible decorative motif. This makes it more flexible than an XL wall stencil if your project includes many small surfaces.
The PET material is flexible and reusable. It can be positioned on flat walls, wood, canvas, paper, fabric, floors, and tile depending on the paint used.
The pattern can be repeated on a feature wall or used as a single decorative element on furniture. That flexibility is useful if you want several coordinated pieces rather than one full wallpaper-style wall.
Its smaller size reduces handling difficulty, but it also means more placements if you decide to cover a large wall.
- The 11.8-inch size is easy to position on furniture, cabinets, and broken-up wall areas.
- Flexible PET can be washed and reused across multiple projects.
- The same stencil can coordinate wall details with furniture or fabric accents for a repeated room motif.
- The compact sheet is easier to manage alone than an XL stencil near trim and corners.
- It is slower for large walls because the square sheet covers much less area per placement than an XL system.
Who It’s Best For
This option suits furniture painters, crafters, and decorators who want one reusable motif for walls and smaller home-decor surfaces.
Not Ideal For
It is not the best fit for someone whose only goal is covering a large feature wall as quickly as possible.
STENCILOGY KARASU XL Sashiko Wall Stencil — A Large Dot-Fan Pattern With an Edge System
KARASU is an XL dotted fan pattern inspired by sashiko-style repetition. STENCILOGY currently lists a main design area of about 22 by 37.8 inches on a 23.6-by-39.4-inch sheet, plus a separate edging stencil. The material is 250-micron DuPont Mylar.
The pattern feels lighter than a solid geometric stencil because much of the design is made from small dots. From a distance those dots form semicircular fans and create rhythm without covering as much wall color as a broad solid motif.
That makes KARASU especially useful when you want the base wall color to remain visually important. A low-contrast combination can feel quiet and textural; a high-contrast combination makes the dot geometry much more graphic.
The dot pattern also changes paint technique. Each opening is small, so an overloaded roller can push paint beneath many edges at once. The best results come from a roller that has been loaded evenly and then blotted until it feels almost dry.
Key features translated into practical benefits
The large 22×37.8-inch design area reduces the number of placements needed for a full wall. That speeds up open-wall coverage and helps maintain rhythm.
A dedicated edging stencil is included for narrow borders and finishing work. It reduces the need to bend the large main sheet sharply at corners or ceiling lines.
The 250-micron Mylar is washable and reusable. Its semi-rigid feel helps the large dotted design stay organized during repeated moves.
The small-dot fan design leaves more background visible than many solid motifs. That can make a patterned wall feel lighter and less visually dense.
- The XL sheet covers large wall areas efficiently while maintaining a delicate dotted appearance.
- The separate edging stencil makes boundary work much easier than forcing the main sheet into tight spaces.
- Reusable Mylar supports repeated cleaning and future projects.
- The sashiko-inspired fan motif works especially well in calm modern, Japandi, Nordic, and boho interiors.
- The many small openings demand careful paint loading because bleed can soften several dots at once.
Who It’s Best For
KARASU is ideal for a full patterned wall where you want large-scale repetition without the visual weight of a solid geometric motif.
Not Ideal For
It is less forgiving for a painter who prefers a heavily loaded roller or does not want to spend time controlling paint quantity.
Comparing the Nine Stencils
The best choice becomes much clearer once you decide whether speed, flexibility, edge handling, or fine detail matters most.
For the fastest wallpaper-style coverage
The XL wall systems have the advantage. DANUBE and KARASU cover large sections with each placement and include dedicated edging stencils. The Forest Pattern stencil is even larger at 36 by 24 inches and adds registration marks for repeated positioning.
STENCILIT Starburst is also designed for large-scale repetition, but its two-sheet system changes the workflow. Alternating between the large sheets can be useful if the back of one stencil becomes damp with paint.
For the easiest handling in a broken-up room
TIAMECH, GSS Designs, BENECREAT, and ORIGACH are easier to maneuver around windows, shelves, doors, and furniture because their sheets are much smaller. You will make more placements, but each move is simpler.
If your wall has more interruptions than uninterrupted surface, a medium stencil can be faster in practice even if it is slower on paper. You spend less time wrestling a large sheet around obstacles.
For corners and ceiling lines
DANUBE and KARASU are the clearest choices because the manufacturers supply dedicated edging stencils. Starburst’s smaller companion piece is also helpful for awkward spaces and touch-ups.
With the other stencils, you may need to bend the sheet, mask part of the pattern, or complete a partial motif manually. That is completely manageable, but it adds time.
For a nature-inspired wall
The Forest Pattern Wall Stencil creates the most mural-like continuous scene. The pine-tree set gives you more freedom to build your own forest arrangement. DANUBE uses a botanical fan-leaf pattern, while the GSS Designs stencil produces a more conventional floral repeat.
The deciding question is whether you want the wall to look like one repeating surface or a hand-arranged collection of motifs.
For a geometric statement
Starburst is the most obvious bold geometric choice. KARASU is also geometric, but the dotted fan construction makes it feel lighter. TIAMECH includes several abstract geometric sheets that are better for smaller accents and mixed compositions.
For texture rather than a recognizable motif
BENECREAT Crackle stands apart. It is useful when the pattern should read as surface texture rather than flowers, leaves, trees, or geometry. Rotating the stencil between placements helps keep the crackle effect from looking mechanically repeated.
For furniture and wall coordination
TIAMECH, GSS Designs, BENECREAT, and ORIGACH are especially practical because their compact sheets move easily between walls, cabinet doors, furniture fronts, canvas, and craft surfaces. The pine-tree set is similarly flexible for fences and furniture.
How to Stencil a Wall With Cleaner, More Consistent Edges
Good technique matters more than expensive tools. Paint manufacturers and stencil makers consistently emphasize the same principle: use less paint than feels natural. A roller or brush that is almost dry is much safer than a wet tool that floods the cut edges.
1. Clean and inspect the wall
Remove dust, grease, and loose material. A stencil follows the wall surface, so bumps, flaking paint, and thick debris can lift the sheet and create gaps.
If you are applying a fresh base coat, let it dry fully before taping or stenciling. Rushing onto soft paint can cause tape marks or lift the base finish.
2. Establish the first reference line
Use a level to mark a light vertical or horizontal reference line depending on the pattern. Do not assume the ceiling or baseboard is perfectly level.
For a centered feature wall, establish the center first, then test how the repeat will land toward each side. This prevents a very narrow partial motif from ending up in a visually awkward place.
3. Secure the stencil without distorting it
Low-tack painter’s tape works on most smooth painted walls. Apply enough tape to keep the stencil from shifting, but do not pull the plastic tight enough to distort the pattern.
If you use repositionable spray adhesive, follow both the stencil maker’s and adhesive maker’s directions. Test it on the wall finish first, particularly on fresh or delicate paint.
4. Load the roller, then unload it
Coat a small foam or dense roller evenly, then roll off the excess on a tray or paper towel. Benjamin Moore’s stencil guidance describes the roller as almost dry to the touch, which is a useful target.
If the first pass looks slightly translucent, that is safer than a wet pass that bleeds. You can build color with a second light layer while the stencil remains in place.
5. Use light pressure and several directions
Roll gently across the openings rather than pressing hard. Excess pressure can force paint under the stencil and can also flex delicate bridges.
For fine designs, a stencil brush with pouncing or light swirling motions can give better control than a roller. Work from the stencil edge toward the opening where possible rather than brushing paint underneath the plastic.
6. Remove the stencil carefully
Lift the stencil away rather than dragging it sideways across fresh paint. If the design has delicate narrow bridges, support the sheet as you peel it back.
Inspect the back before the next placement. If wet paint has transferred to the back, wipe it before pressing the stencil onto a clean part of the wall.
7. Register the next repeat
Use built-in registration marks where provided. Otherwise, align repeated elements and confirm the sheet against your level reference.
Do not correct a growing alignment error by twisting each new placement slightly. Stop, re-establish the reference line, and make a deliberate adjustment. Gradual twisting is how a pattern ends up visibly sloping across a long wall.
8. Treat edges as a separate stage
Finish the main open wall first, then handle ceilings, corners, baseboards, and trim. This keeps the efficient part of the project moving and lets you switch to smaller tools for edge work.
For DANUBE and KARASU, use the dedicated edging stencil. For other products, mask off unwanted parts of the stencil or use a smaller brush for partial motifs.
9. Touch up after the pattern is dry
A tiny amount of base-wall paint on an angled artist brush can clean a soft edge. A small amount of stencil color can fill a missed spot.
Do not chase every minor irregularity. A stenciled wall is hand-applied, and slight variation disappears quickly once you step back and view the pattern as a whole.
Cleaning and Storing Reusable Stencils
A stencil that stays flat and clean is easier to use on the next project.
Clean before paint buildup closes fine openings
Water-based paint is easiest to remove while still fresh. Rinse or soak according to the stencil maker’s directions and use a soft cloth or brush rather than scraping aggressively across delicate bridges.
GSS Designs specifically advises warm soapy water and cautions against ammonia-based cleaners on its Mylar. Similar care is sensible for other reusable plastic stencils unless their instructions say otherwise.
Support large sheets while washing
A wet XL stencil can fold under its own weight. Support it with both hands or place it on a flat surface while cleaning. Avoid sharply creasing Mylar, because a permanent fold can make the sheet lift from the wall during later use.
Dry flat before stacking
Lay stencils flat on towels or hang them without creating a hard crease. Store them flat between sheets of cardboard, foam board, or in their shipping sleeve.
Do not store a large stencil rolled tightly if the manufacturer supplied it flat. A strong curl makes the next wall placement more difficult because the edges try to lift.
Label multi-piece systems
Keep edging pieces with their main stencil. A labeled envelope or folder prevents a small companion piece from disappearing into general craft supplies.
Where Wall Stenciling Usually Goes Wrong
A few recurring errors create most of the frustration in wall stenciling. They are easy to prevent once you know what to watch for.
Loading the roller like you are painting a normal wall
A wall roller should carry enough paint to cover quickly. A stencil roller should carry very little. The stencil edge is a barrier, and excess liquid paint will look for a way underneath it.
Load evenly, then remove most of the paint before touching the wall. Several light passes are safer than one wet pass.
Trusting the ceiling as a level guide
Rooms are rarely perfectly square. If you align a geometric stencil to a slightly sloping ceiling, the pattern may amplify that slope across the wall.
Use a level to establish your own reference. Let the final partial repeat absorb small differences at the boundary.
Moving the stencil while paint is still wet on the back
Wet paint on the back of a stencil can print unwanted marks onto the next section. This is especially common when working quickly with two colors or when paint is allowed to build around openings.
Check the back periodically and wipe it before repositioning.
Cleaning too aggressively
Scraping dried paint with a sharp tool can nick stencil edges or break narrow bridges. That damage then repeats on every future impression.
Soak or soften paint using the cleaning method the manufacturer recommends, and use gentle tools around fine cutouts.
Trying to force a full sheet into a corner
Large stencils rarely lie flat when folded sharply into an inside corner. Paint then bleeds where the plastic lifts.
Use an edging piece if supplied. Otherwise, stencil as close as the full sheet can sit flat, then complete the remaining partial motif with masking and a smaller brush.
Making every touch-up while the paint is wet
Wet paint is easy to smear. Complete a section, let it dry, then evaluate it from normal viewing distance before touching up.
Many tiny inconsistencies disappear once the wall is seen as one pattern instead of a series of close-up edges.
Safety and Surface Notes
Wall stenciling is generally a straightforward decorating project, but paint, ladders, adhesives, and surface preparation still deserve sensible precautions.
Ventilate for sprays and adhesives
If you use spray paint or repositionable spray adhesive, follow the product label and provide appropriate ventilation. Keep ignition sources away from flammable aerosols and protect nearby surfaces from overspray.
Use a stable step ladder
XL stencils often reach near the ceiling. Use a stable ladder or platform and reposition it instead of leaning sideways while holding a stencil. A helper can make top-row placement much easier.
Be careful when preparing older painted surfaces
If sanding, scraping, or disturbing older paint, consider the possibility of lead-containing coatings, especially in older homes. Follow local lead-safe renovation guidance rather than dry-sanding unknown paint without precautions.
Protect the base coat
Fresh paint can be damaged by strong tape or adhesive. Let the base coat dry properly and test low-tack tape in an inconspicuous spot before applying it across the whole wall.
Frequently Asked Questions
Are Mylar stencils better than PET stencils for walls?
Both can work well. Thicker Mylar is common in premium large wall stencils because it balances flexibility with enough stiffness for repeated positioning. PET is also durable, washable, and practical, especially for medium and smaller templates. The design, thickness, registration, and sheet size usually matter more than the plastic name alone.
What paint works best for wall stencils?
For most interior walls, water-based acrylic or latex wall paint is the easiest choice because it matches common wall coatings and cleans up with water. The key is not the brand of paint but the amount on the tool. A lightly loaded foam roller or stencil brush is much less likely to bleed than a wet one.
Should I use a stencil brush or a roller?
Use a small dense foam roller for large open patterns and full walls. A stencil brush is better for fine details, small motifs, textured surfaces, and areas near corners. Many projects use both: roller for the main wall and brush for edges and touch-ups.
Do I need spray adhesive?
Not always. Painter’s tape is enough for many smooth walls and smaller stencils. A repositionable adhesive can help a large or detailed stencil sit closer to the wall, but you should test it first and follow the adhesive directions so it does not affect the base paint.
How do I keep a repeating stencil straight?
Start with a level reference line and use registration marks if the stencil provides them. Check alignment every few repeats rather than assuming the previous placement was perfect. For a long wall, small corrections made early are much less visible than a large correction near the end.
Can I stencil over a textured wall?
Yes, but the result will usually be softer. Texture creates small gaps under the stencil where paint can creep. Use less paint, apply it more vertically with a stencil brush, and choose broader patterns if you want the cleanest possible result.
How long should I wait before stenciling over a fresh base coat?
Follow the base paint manufacturer’s dry and recoat guidance, and give the surface additional time if tape or adhesive will be applied. Paint that feels dry on the surface can still be soft underneath. Waiting longer reduces the risk of lifting or marking the base coat.
Which stencil is easiest for a first full-wall project?
A large repeat with broad openings and clear registration is generally easier than a very fine texture. Forest Pattern, DANUBE, and Starburst all reduce the number of placements compared with compact sheets. If handling a very large stencil feels intimidating, the medium GSS Designs floral stencil offers a good balance between coverage and control.
Choosing the Right Stencil Comes Down to the Way You Want to Work
The best stencils for wall painting are not simply the ones with the largest sheets or the most detailed patterns. A successful choice fits the wall, the motif, and the amount of control you want during installation.
For fast wallpaper-style coverage, the XL systems from STENCILOGY and STENCILIT are the strongest fits, especially when edge pieces and repeat alignment matter. The 36×24-inch Forest Pattern stencil offers similarly fast coverage with a softer nature-inspired look.
GSS Designs gives you a manageable middle size, while TIAMECH, BENECREAT, and ORIGACH are easier to maneuver when the wall is broken up by trim or when the same stencil will be used on furniture too. The six pine-tree templates are the most flexible choice for building a custom forest rather than following a fixed repeat.
Whichever design you choose, the practical rule that matters most is simple: establish the layout carefully, keep the stencil flat, and remove far more paint from the roller than you think you need. That combination does more for crisp edges than rushing toward the most complicated stencil or the most expensive tool. Compare the options above against the size and shape of your own wall, then choose the pattern you will still enjoy repeating after the first few placements.