DIY Bottle Cap Magnets
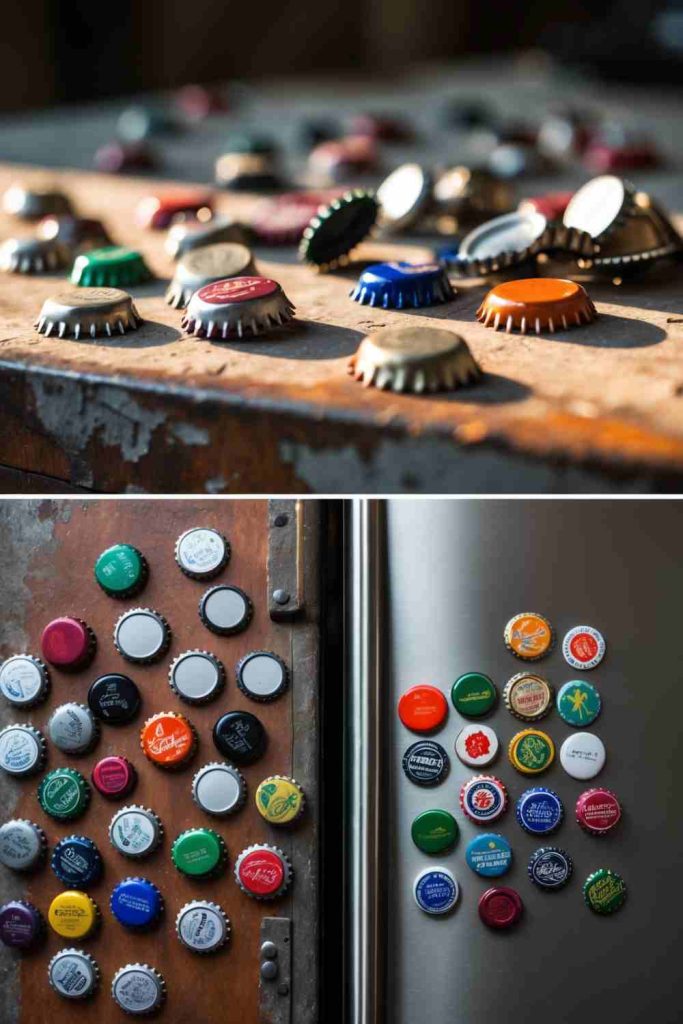
4 Steps to Create Bottle Cap Magnets
- Gather Your Supplies
Collect bottle caps, small round magnets, strong adhesive glue, and any optional decorations like paint, glitter, or stickers. Clean the bottle caps thoroughly to remove any residue. - Decorate the Bottle Caps
Get creative! Paint, draw, or add embellishments to make the caps match your style. Personalizing them adds a fun touch to your magnets. - Attach the Magnets
Apply a small dab of strong adhesive glue to the back of each bottle cap. Press a magnet onto the glue and hold it for a few seconds to set. Be sure to center it for balance. - Display Your Creations: Once the glue dries completely, stick your new bottle cap magnets onto your fridge, a magnetic board, or any metal surface. Enjoy your unique upcycled decoration!
DIY Button Art
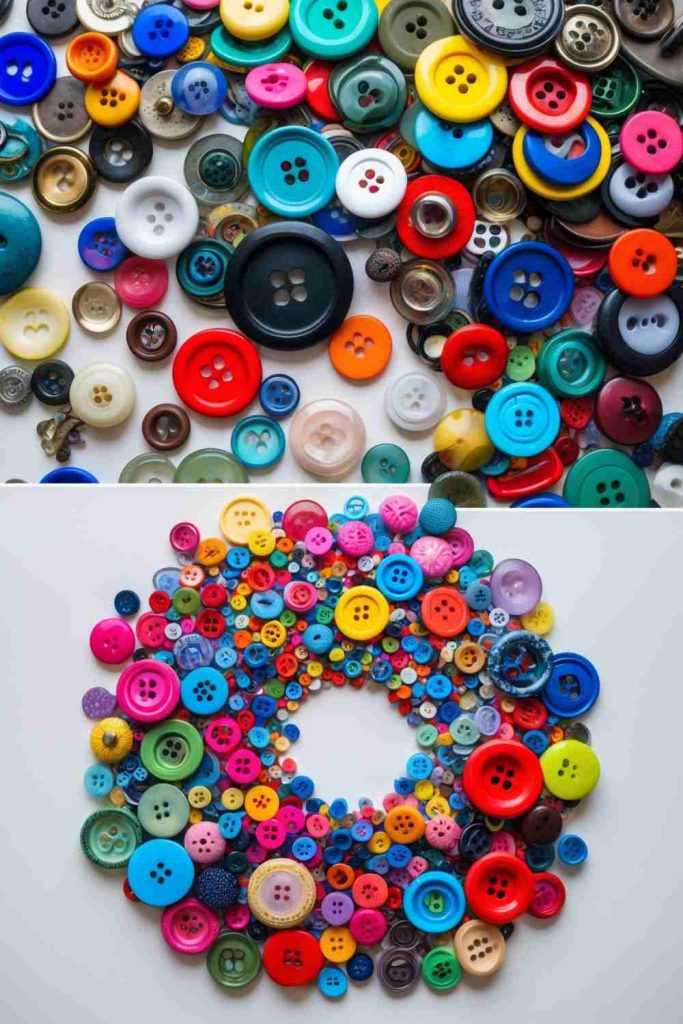
4 Steps to Create Button Art
- Gather Your Materials
Collect assorted buttons, a sturdy canvas or thick cardboard, strong adhesive glue, and any optional items like paint, glitter, or fabric for background customization. - Plan Your Design
Decide on the pattern or shape you’d like to create. You can go for a bright gradient, a random abstract design, or even a specific shape like a heart or star. Outline your design lightly on the canvas with a pencil. - Attach the Buttons
Begin gluing the buttons to your canvas, following your design. Start with the larger buttons and fill in the gaps with smaller ones for depth and texture. Press each button firmly to ensure it sticks well. - Add Final Touches
Once the glue is dry, add embellishments if desired, such as glitter accents or a background color. Display your finished button art proudly on a wall or shelf!
DIY Tin Can Candle Holders
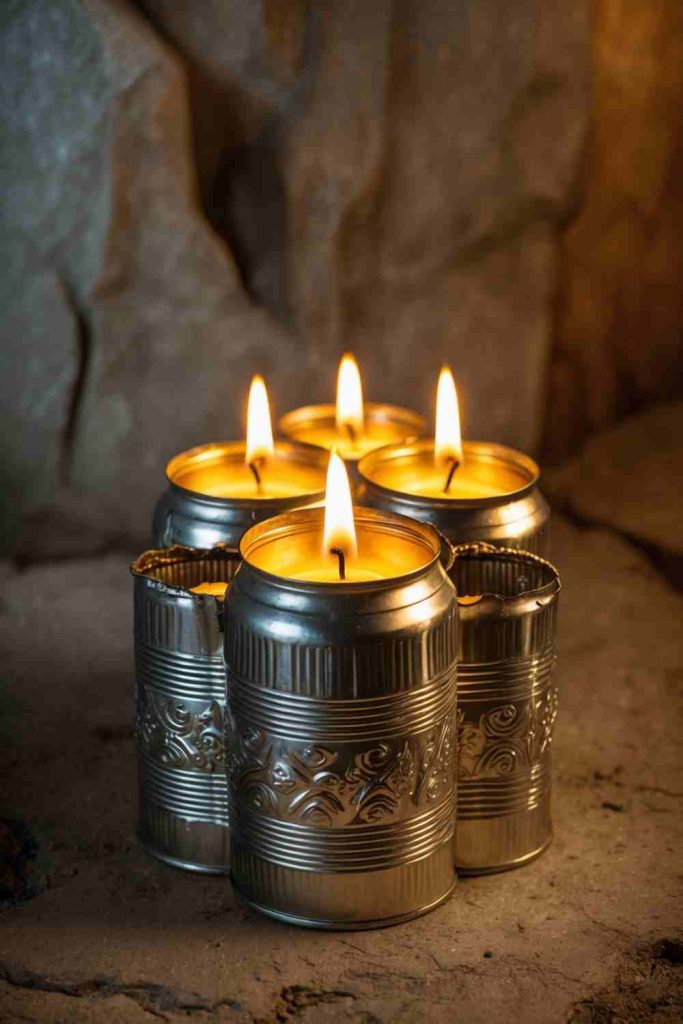
4 Steps to Create Tin Can Candle Holders
- Prepare the Tin Cans
Clean your tin cans thoroughly to remove any labels and residue. Use a can opener or metal file to smooth out the edges for safety. - Create Decorative Patterns
Use a hammer and nail (or a metal punch tool) to carefully make small holes or patterns around the surface of the can. These will create beautiful light effects when the candle is lit. - Add Finishing Touches
Paint the cans in your favorite colors, or leave them silver for an industrial look. You can also sandpaper the surface to give them a rustic, vintage vibe. Allow them to dry completely. - Insert the Candles
Place tea lights or small candles inside the cans. Light them up and enjoy the warm, glowing ambiance from your handmade candle holders.
DIY CD Mosaic Mirror
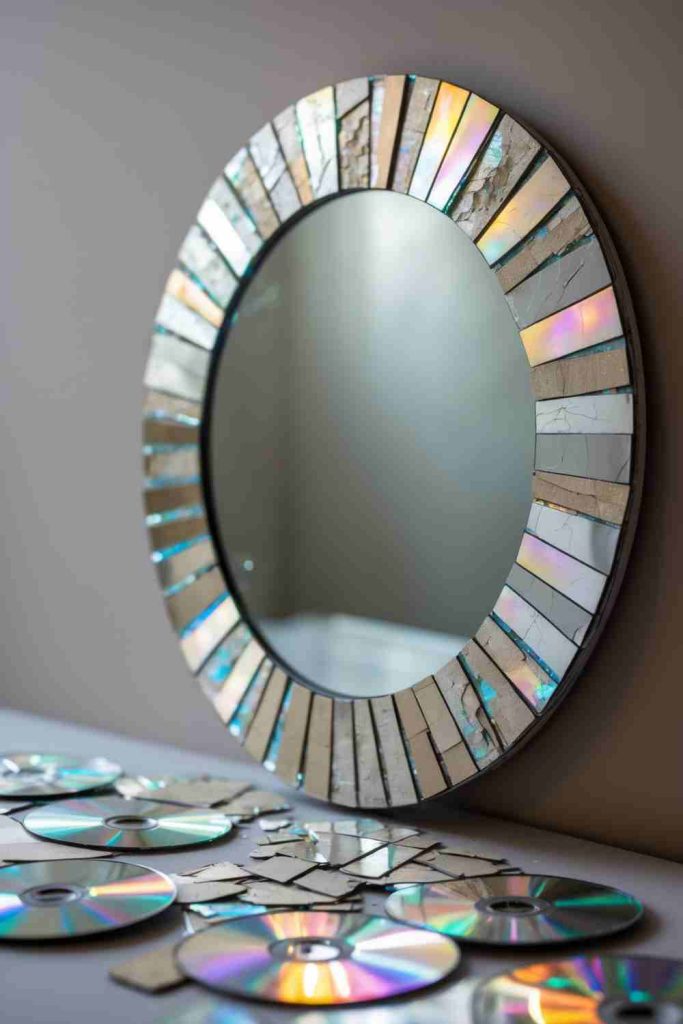
4 Steps to Create a CD Mosaic Mirror
- Prepare Your Materials
Gather a plain circular mirror, old CDs or DVDs, strong glue, scissors, and protective gloves. Ensure the mirror is clean and free from dust. - Cut the CDs into Pieces
Carefully cut the CDs into small mosaic-like pieces. Use scissors and wear gloves for safety, as the edges can be sharp. Vary the shapes for a dynamic and creative look. - Arrange and Glue the Pieces
Create a design by arranging the CD pieces around the frame of the mirror. Once satisfied with the layout, glue each piece securely onto the mirror’s edge. Allow the adhesive to dry completely. - Display Your Mosaic Mirror
Once dry, hang your new CD mosaic mirror in a well-lit area to highlight its rainbow reflections. Enjoy the vibrant, upcycled centerpiece that you’ve created!
DIY Wooden Crate Shelves
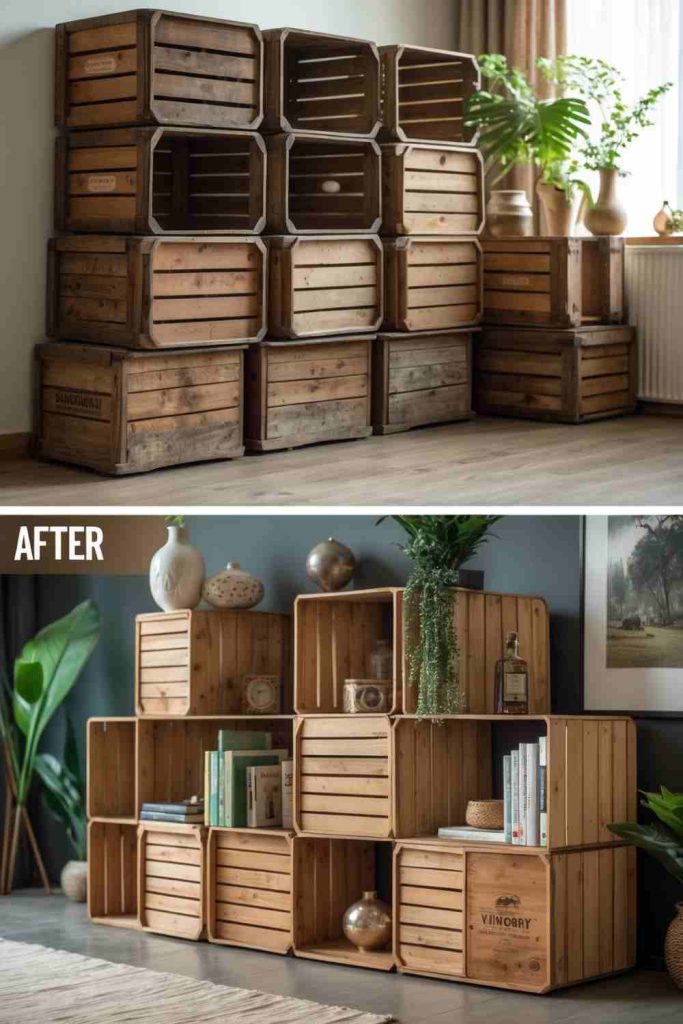
4 Steps to Create Wooden Crate Shelves
- Gather Your Materials
Collect wooden crates, sandpaper, wood stain or paint (optional), screws, and a drill. Make sure the crates are clean and sturdy. - Sand and Paint/Stain the Crates
Sand down the crates to smooth rough edges and prevent splinters. Paint or stain them in your desired color, or leave them natural for a rustic look. Allow them to dry completely. - Arrange and Secure the Crates
Plan the layout of your shelving unit by stacking and arranging the crates. Once satisfied with the design, use screws and a drill to secure the crates together for stability. - Decorate Your Shelves
Organize the shelves with books, plants, decorative objects, or anything you need to store. Customize the design to fit your space and style!
DIY Drawer Pull Coat Rack
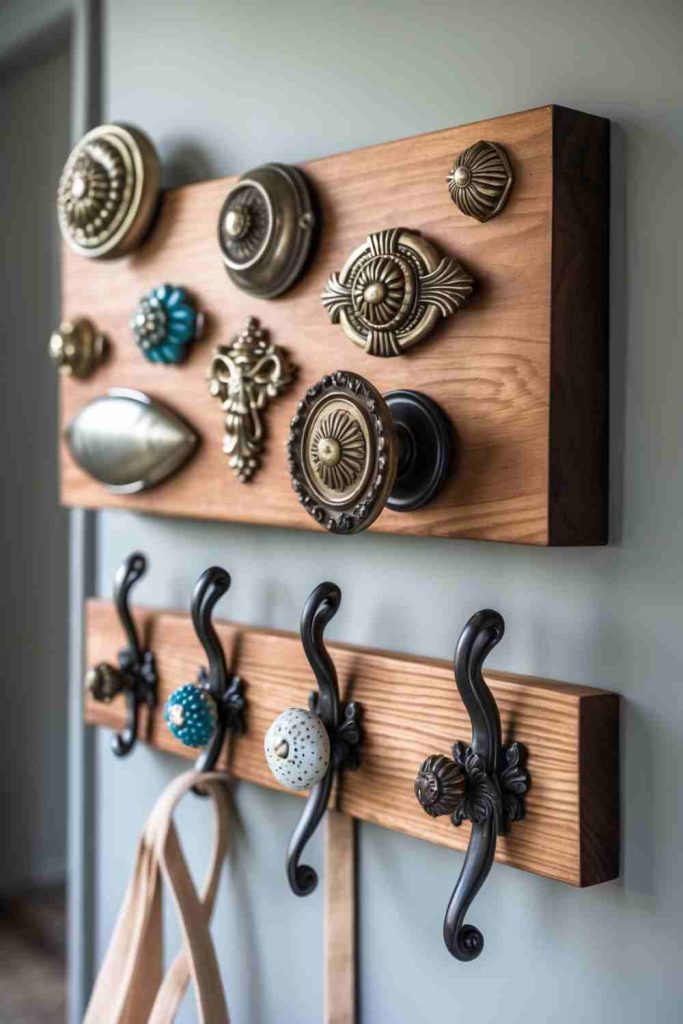
4 Steps to Create a Drawer Pull Coat Rack
- Gather Your Materials
Collect a wooden board, a variety of decorative drawer pulls, screws, a drill, sandpaper, and paint or wood stain (optional). Prep your materials by ensuring the board and pulls are clean. - Prepare the Wooden Board
Sand the wooden board to smooth out any rough edges. Paint or stain it to your preferred finish, or leave it natural for a rustic look. Allow it to dry completely. - Attach the Drawer Pulls
Decide on the layout of the drawer pulls, marking each spot for accuracy. Use a drill to create holes in the marked spots, then securely attach each pull with screws. - Mount and Use the Coat Rack
Mount the finished coat rack on your wall using appropriate wall brackets or mounting hardware. Hang your coats, bags, or scarves on it and admire your upcycled creation!
DIY Egg Carton Flower Art
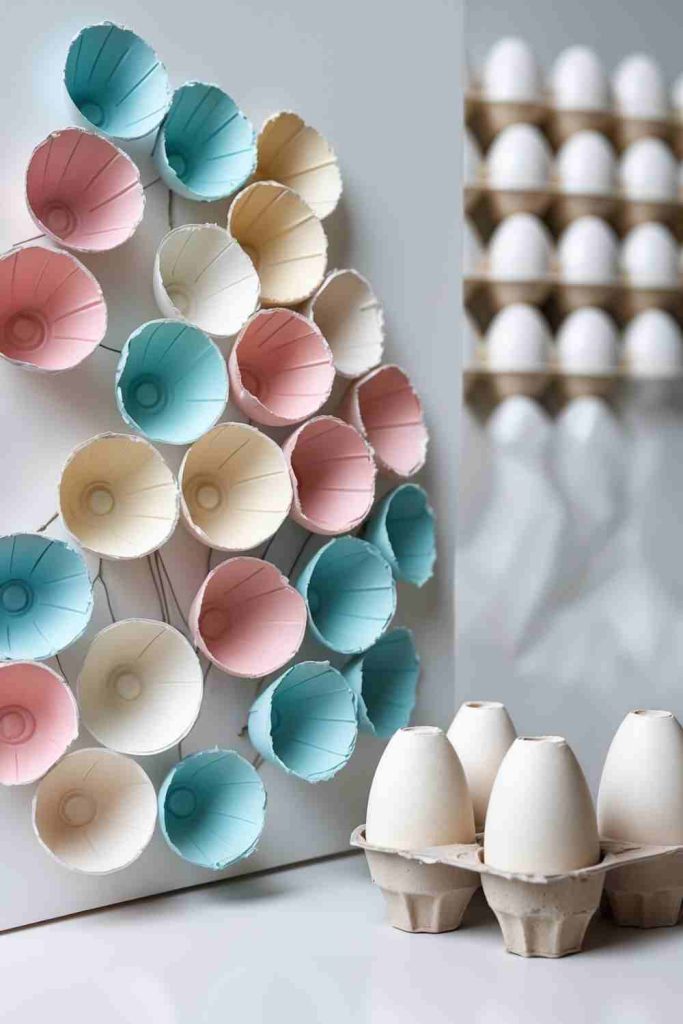
4 Steps to Create Egg Carton Flower Wall Art
- Prepare Your Materials
Gather empty egg cartons, scissors, craft paint, a paintbrush, and strong adhesive or a hot glue gun. Clean the cartons if needed. - Cut Out the Flower Shapes
Cut each egg cup out of the carton, trimming them into petal shapes. Experiment with different designs to create unique flowers. - Paint the Flowers
Paint the egg carton flowers in pastel or bold colors, blending shades if desired. Allow them to dry completely before the next step. - Arrange and Assemble
Arrange the painted flowers on a canvas, wooden board, or directly on the wall in a creative pattern. Once satisfied with the design, glue them in place to complete your art piece!
DIY Mason Jar Herb Garden
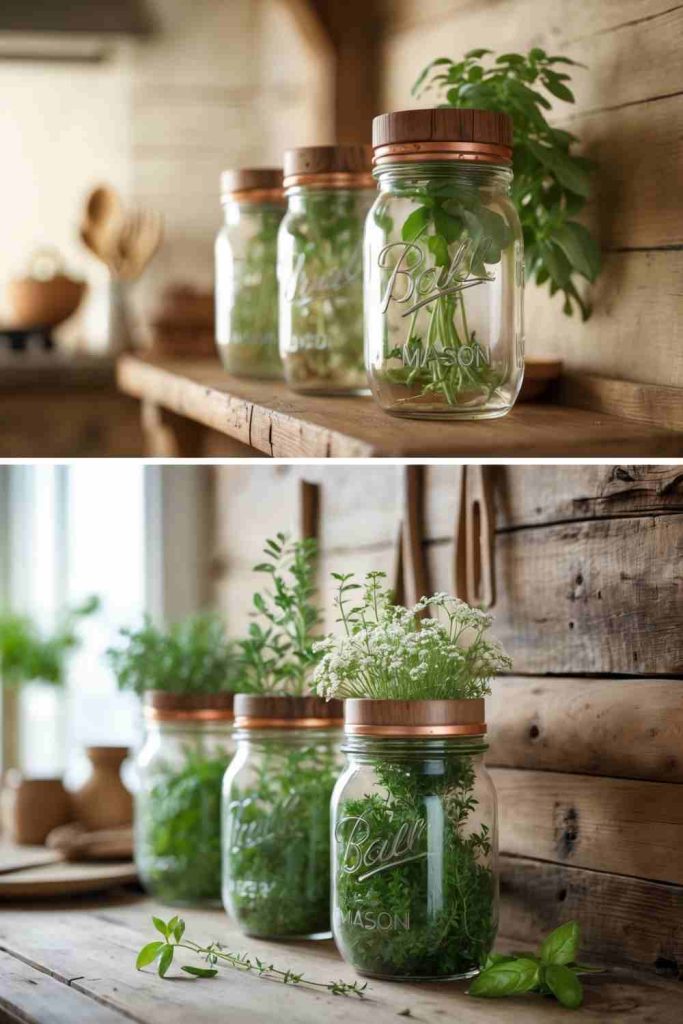
4 Steps to Create a Mason Jar Herb Garden
- Prepare Your Materials
Gather mason jars, small pebbles, potting soil, herb seeds or small plants, and optional labels or chalk paint for decoration. - Layer the Jars
Add a layer of pebbles to the bottom of each jar to help with drainage. Fill the jar halfway with potting soil. - Plant the Herbs
Plant herb seeds or transfer small herb plants into the jars. Add more soil as needed, leaving space at the top for watering. - Decorate and Arrange
Customize your jars with labels or a splash of paint if desired. Place them on a sunny windowsill, shelf, or counter, and water as required.
DIY Wooden Pallet Coffee Table
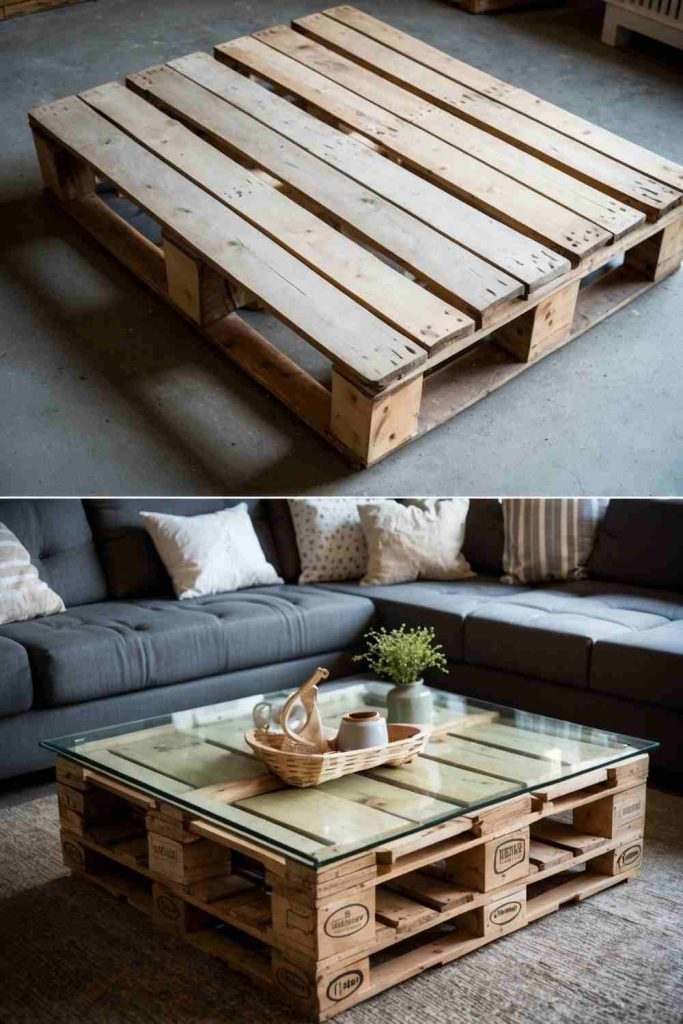
4 Steps to Create a Wooden Pallet Coffee Table
- Gather Your Materials
Get a wooden pallet, sandpaper, a glass tabletop, screws, caster wheels (optional), and wood stain or paint to match your home’s style. - Prepare the Pallet
Sand the entire pallet to smooth out rough edges and splinters. Stain or paint the wood for a polished or rustic look and allow it to dry completely. - Add Functional Features
Attach caster wheels to the bottom for easy mobility. Securely place or fix a glass top over the pallet for added functionality and a modern finish. - Style and Decorate
Position your new coffee table in the living room and decorate it with books, plants, or cozy baskets. Enjoy your practical and aesthetic masterpiece!
DIY Plastic Bottle Plant Watering System
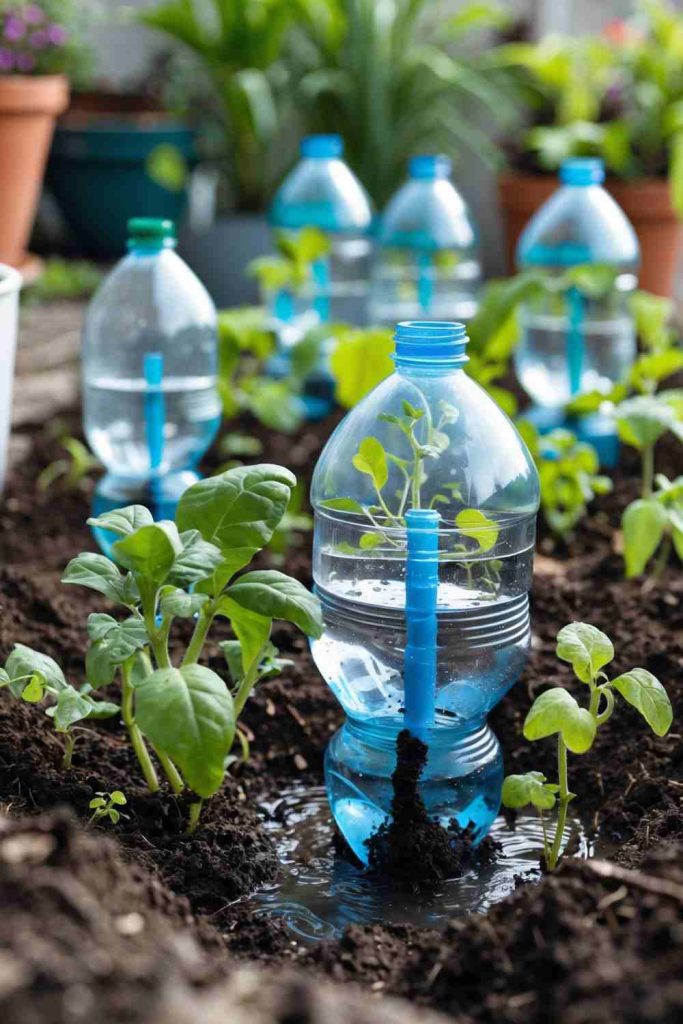
4 Steps to Create a Plastic Bottle Plant Watering System
- Gather Your Materials
Find empty plastic bottles (any size works), a pair of scissors or a knife, and a small nail or pin for making holes. - Prepare the Bottles
Wash the bottles thoroughly. Use a nail or pin to poke small holes around the cap or at the base of the bottle for water to slowly seep out. - Fill and Position
Fill the bottle with water, screw the cap back on securely, and bury the capped end a few inches into the soil near your plants. - Adjust and Refill
Monitor the water release and adjust the positioning if needed. Refill the bottles when they’re empty to keep your plants happy and hydrated.
DIY Cozy Pillow Covers from Old Sweaters
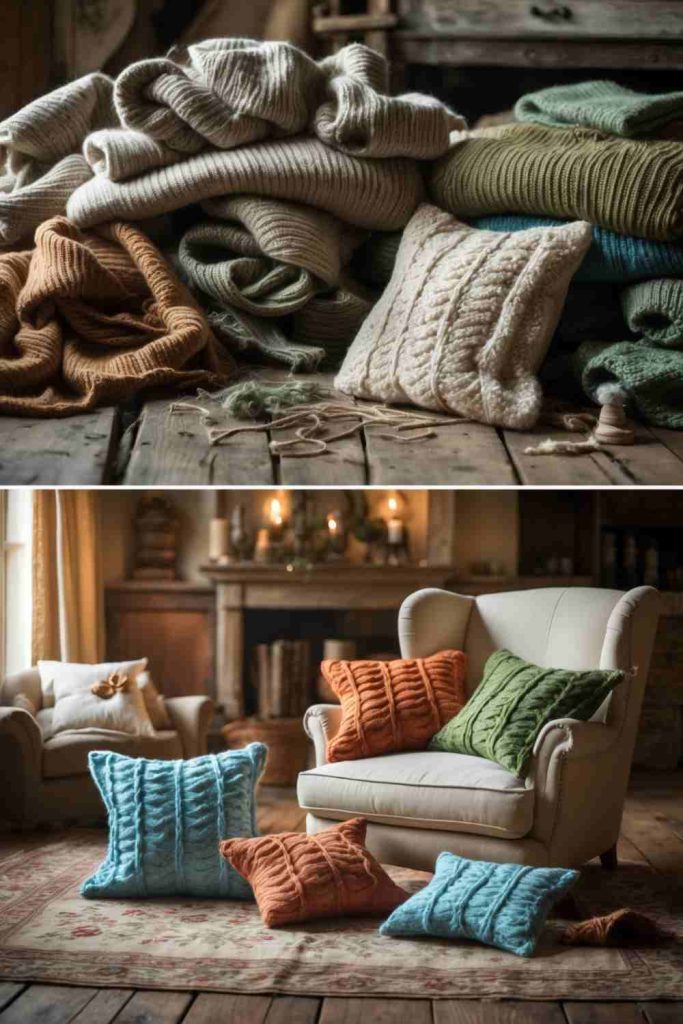
4 Steps to Create Cozy Pillow Covers from Old Sweaters
- Choose a Sweater
Pick an old sweater with a pattern or texture you love. Ensure it’s clean and matches the color palette of your room. - Cut to Size
Lay the sweater flat and cut a section slightly larger than your pillow insert. Use the bottom hem or other design elements for the opening. - Sew the Edges
Turn the material inside out and sew along three sides to create a pocket. Leave one side open for inserting the pillow. - Insert and Finish
Flip it right-side out, insert your pillow, and either sew the last edge shut or add buttons, snaps, or ties for an easy-to-remove cover.
DIY Vintage Teacup Bird Feeder
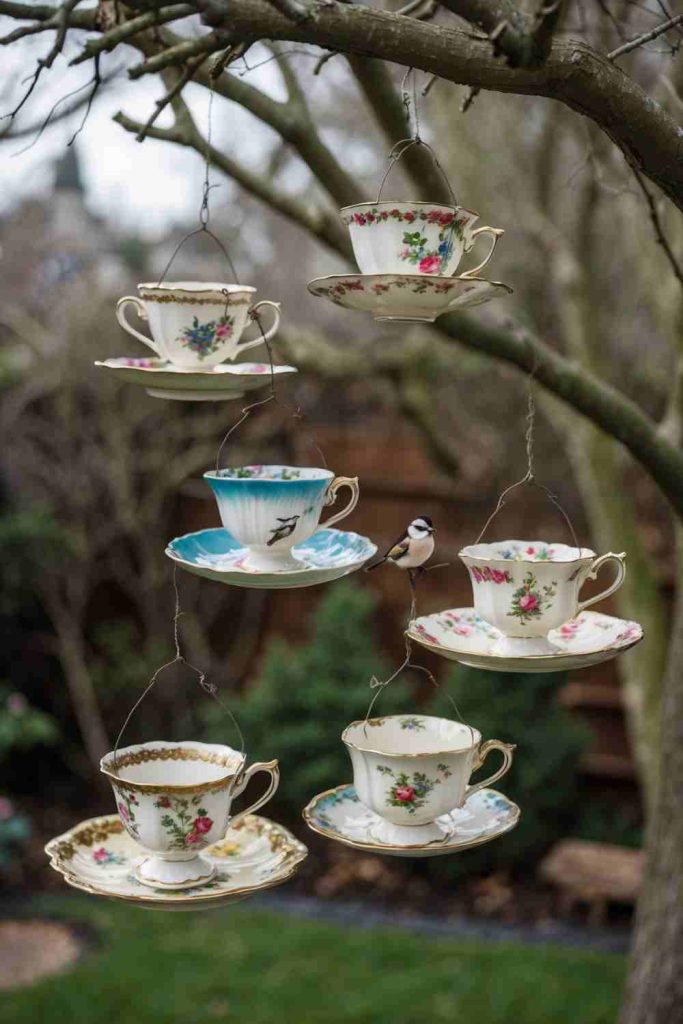
4 Steps to Create a Vintage Teacup Bird Feeder
- Gather Your Materials
Choose vintage teacups and saucers with pretty designs, strong metal wire or chains, pliers, and glue suitable for ceramics. - Attach the Teacup to the Saucer
Use the glue to fix the teacup to the saucer at an angle, ensuring it faces slightly upward to hold birdseed. Allow it to dry completely. - Add Hanging Hardware
Wrap or attach metal wire or chains securely around the middle of the cup handle or saucer bottom. Form sturdy loops for hanging. - Install and Fill
Hang the teacup bird feeders on tree branches or hooks in your garden. Fill the cups with birdseed and watch the birds flock to your charming creation!
DIY Ottoman from an Old Tire
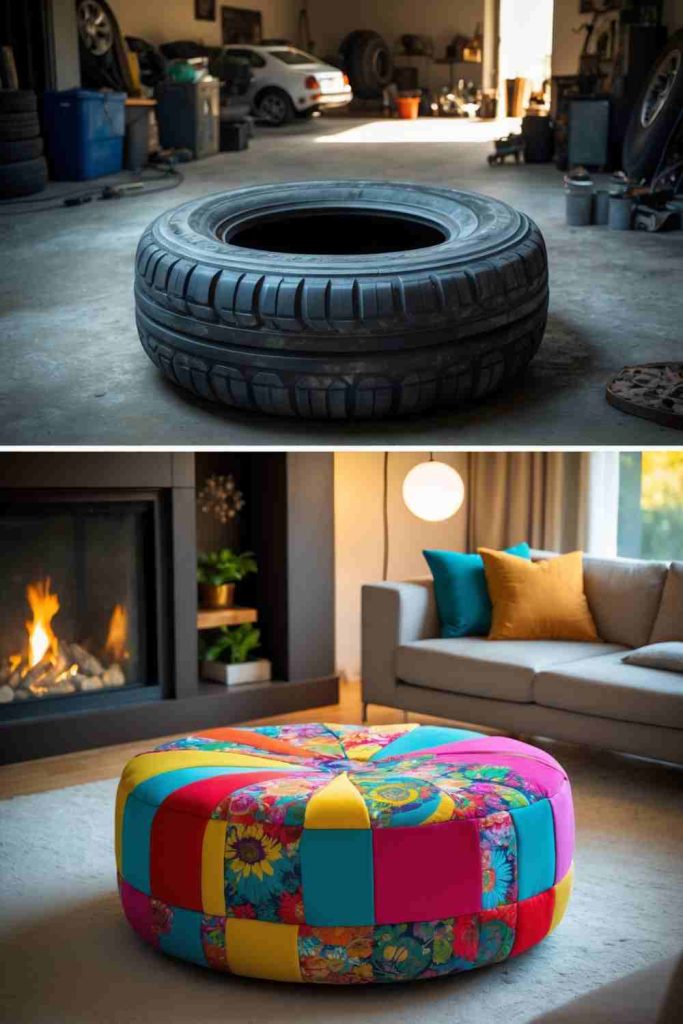
4 Steps to Create an Ottoman from an Old Tire
- Prepare the Tire
Clean the old tire thoroughly with soap and water. Allow it to dry completely before moving to the next step. - Attach a Base
Cut a circular piece of plywood to fit one side of the tire and screw it securely in place to create a sturdy base. - Wrap It Up
Use rope, fabric, or colorful materials like patchwork to cover the tire. Wrap it tightly and secure with glue, ensuring a smooth, even finish. - Add Cushion and Legs
Attach a cushion to the top for comfort, and screw in wooden legs or wheels for added functionality. Your tire ottoman is now ready for use!
DIY Colorful Rug from Old T-Shirts
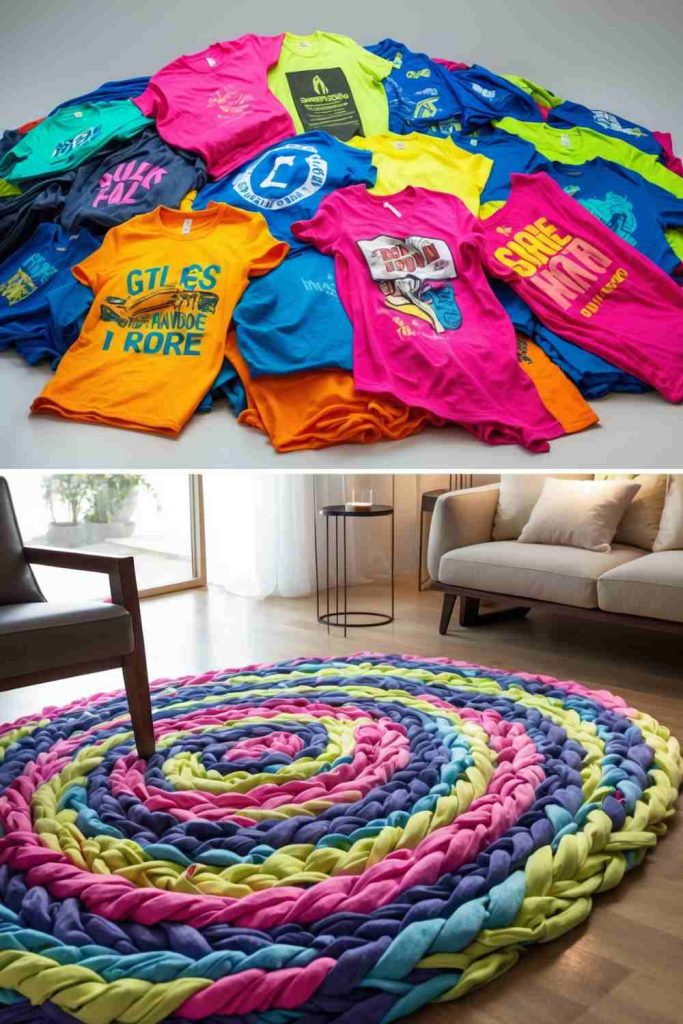
4 Steps to Create a Braided Rug from Old T-Shirts
- Gather and Prep Materials
Collect old t-shirts in various colors and patterns. Wash them and cut them into long strips, about 1-2 inches wide. - Braid the Strips
Group the strips into threes and braid them tightly. Secure the ends of each braid with a knot or small rubber band. - Shape the Rug
Start coiling the braids into a circular or oval shape, stitching them together as you go using a needle and strong thread. - Finish the Edges
Once your rug reaches the desired size, secure the final braid with stitches and trim any excess material. Lay it flat and enjoy your cozy, upcycled masterpiece!
DIY Rustic Bookshelf from a Vintage Ladder
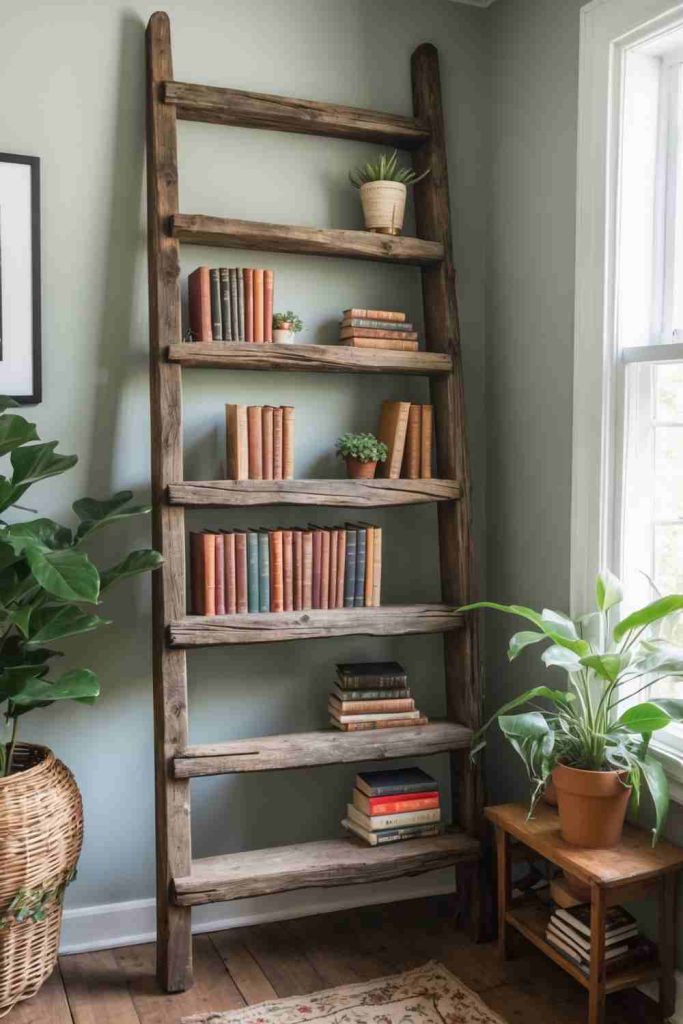
4 Steps to Create a Bookshelf from a Vintage Ladder
- Clean and Prepare the Ladder
Clean the vintage ladder thoroughly and sand any rough edges. Apply a coat of wood polish or paint if desired. - Add Shelving Boards
Cut wooden planks to fit each rung’s width. Place the planks horizontally across the rungs to act as shelves, ensuring they’re sturdy. - Secure the Shelves
Use screws or brackets to secure the wooden planks to the ladder for added stability. - Style and Decorate
Lean the ladder against the wall and arrange your books, plants, or decorative items on the shelves. Enjoy your one-of-a-kind bookshelf!
DIY Picture Display from a Vintage Window Frame
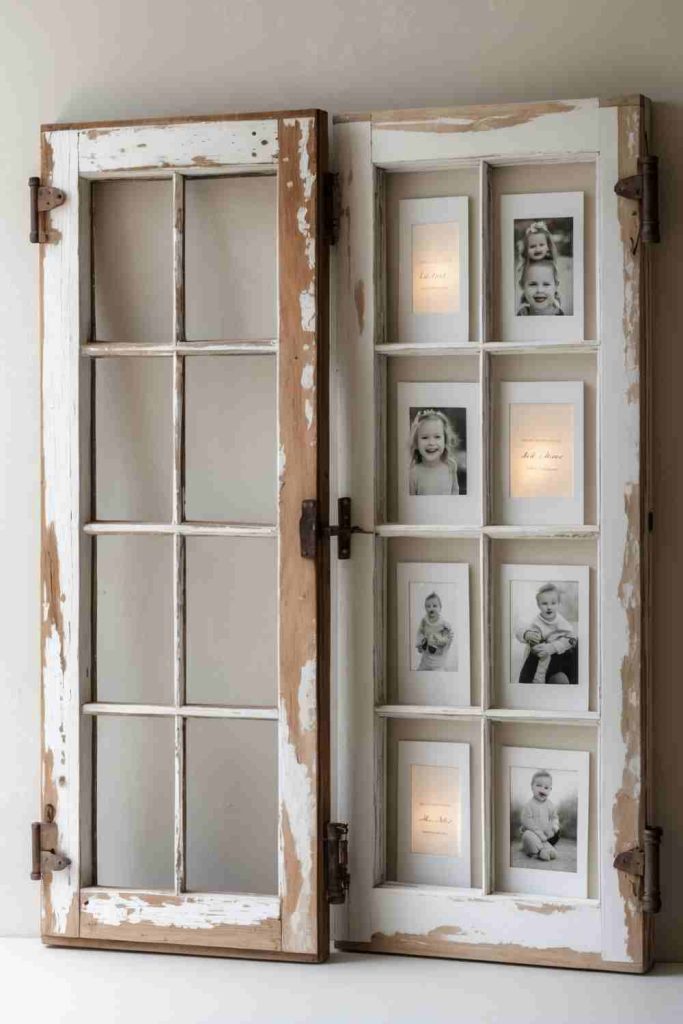
4 Steps to Create a Picture Display from a Vintage Window Frame
- Clean and Prep the Frame
Wipe down the frame to remove dirt. Sand any rough edges while maintaining its rustic charm. Consider applying a clear sealant to preserve the weathered wood. - Add Strings or Placeholders
Attach small hooks along the top and bottom of each pane. String twine or cable across the panes to create rows for hanging photos. - Select Your Photos
Print your favorite memories or quotes on photo-quality paper. Mix black-and-white pictures with heartfelt sayings for a classic look. - Decorate and Hang
Clip the photos onto the twine using mini clothespins. Hang the frame on a wall or lean it against a surface for a cozy statement piece. Enjoy your new sentimental decor!
Transform Old Shutters into a DIY Memo Board
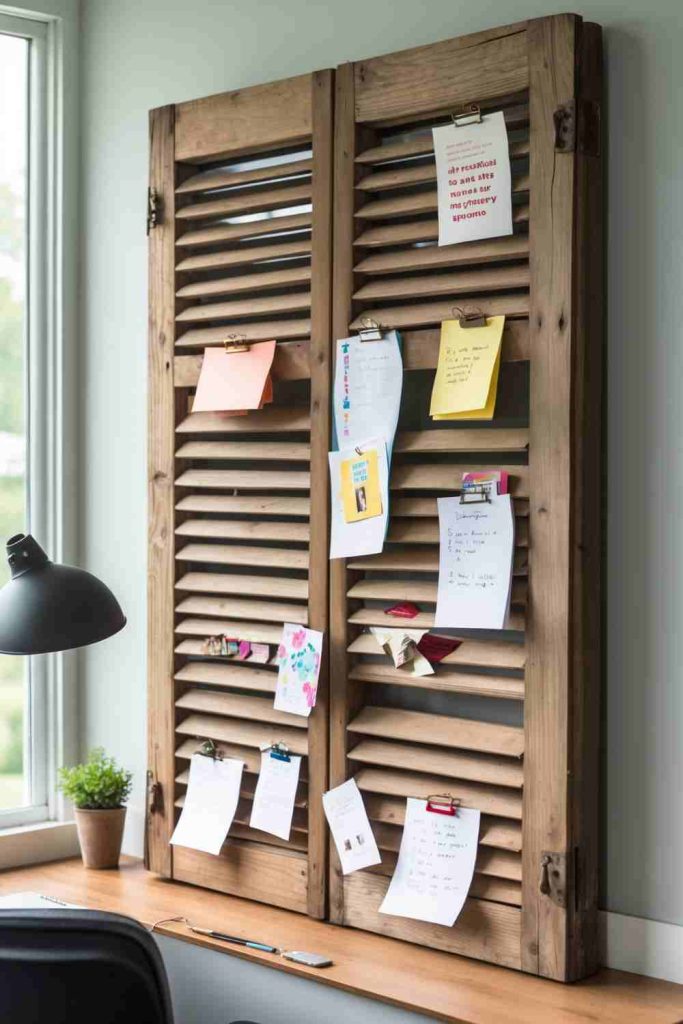
4 Steps to Create DIY Memo Board
- Clean and Prepare the Shutters: Sand down the shutters to remove dirt and smooth out rough edges. Add a fresh coat of paint or stain to match your desired aesthetic.
- Attach Clips and Hooks: Use screws or strong adhesive to secure metal clips and hooks onto the slats of the shutters for holding notes or decorations.
- Mount on the Wall: Using wall anchors and screws, securely attach the shutters to your chosen wall. Make sure they’re level before fastening.
- Decorate and Organize: Clip on your favorite photos, small potted plants, or inspirational notes to personalize your upcycled memo board.