Old pajama pants often reach the end of their wearable life unevenly. The knees may become thin while the upper fabric remains strong, the waistband may stop feeling comfortable, or a once-loved print may belong to a size nobody in the house wears anymore.
That does not make the whole garment useless. Pajama fabric is usually soft, lightweight, and already washed many times, which makes it useful for bags, relaxed clothing, pet bedding, and small household projects.
I don’t think every pair needs to become another complicated sewing challenge. Sometimes shortening damaged legs is enough. A larger patterned pair, however, can provide more usable fabric than it first appears to, especially once the waistband, pockets, cuffs, and strongest leg sections are considered separately.
Before cutting, identify what still works. Keep strong elastic, intact pockets, wide leg panels, drawstrings, buttons, and decorative piping where they can contribute to the new piece. Remove worn areas rather than trying to hide them inside seams that will receive regular strain.
Check the Fabric Before Choosing a Project
Pajama pants can be made from cotton, flannel, fleece, satin-like polyester, jersey, rayon blends, or lightweight woven fabric. Each material behaves differently after cutting.
Cotton and flannel are usually easy to mark and sew, although their raw edges may fray. Jersey stretches and may curl, while silky polyester can slide away from pins and become difficult to cut accurately.
Inspect the garment for:
- Thin knees and seat areas
- Open inner-leg seams
- Stretched elastic
- Damaged drawstrings
- Loose buttons
- Torn pockets
- Faded sections
- Permanent stains
- Fabric pilling
- Weak hems
- Shrinkage or twisting
- Decorative piping
- Strong reusable cuffs
Hold the fabric up to a bright window. Areas that appear much lighter may be too thin for handles, fitted clothing, pet bedding seams, or other places that will receive pressure.
A faded pattern is not automatically a problem. It may suit a soft gift bag or patchwork project, but brittle fibres and spreading holes need to be cut away.
Wash and Prepare the Pajama Pants
Wash and dry the pants according to their care label before measuring them. This removes storage dust and ensures the fabric has completed any likely shrinkage before you begin.
Empty every pocket and remove tissues, labels, drawstring tangles, and loose decorations. Repair any small section you intend to keep, but do not spend time mending fabric that will be removed during cutting.
Useful preparation includes:
- Washing and drying the garment
- Pressing the fabric when suitable
- Removing lint
- Reinforcing useful pockets
- Checking the elastic
- Testing the fabric stretch
- Marking damaged sections
- Measuring both legs
- Saving reusable buttons
- Removing unsafe loose trims
- Testing fabric adhesive
- Preparing matching thread
- Protecting the work surface
Use tailor’s chalk or a washable fabric marker rather than a permanent pen. Mark the pants while they lie naturally instead of pulling the fabric flat under tension.
Gather a Basic Pajama-Pants Upcycling Kit
- Sharp fabric scissors
- Small thread scissors
- Measuring tape
- Ruler
- Tailor’s chalk
- Washable fabric marker
- Seam ripper
- Pins or fabric clips
- Hand-sewing needles
- Strong thread
- Stretch-friendly thread when needed
- Sewing machine, if available
- Suitable machine needle
- Safety pins
- Elastic
- Drawstring cord
- Fabric scraps
- Stuffing
- Interfacing
- Lining fabric
- Paper for templates
- Iron and pressing cloth
- Decorative trim, if appropriate
Keep the removed fabric until the main project is complete. A narrow strip may become a tie, handle reinforcement, loop, patch, or small closure.
Turn Pajama Pants Into Reusable Gift Bags
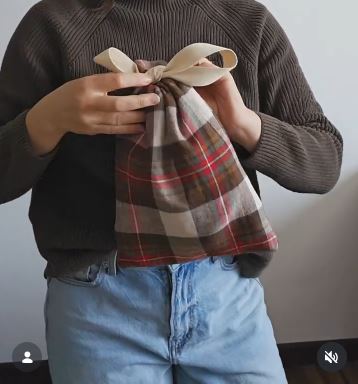
@moth.on.the.wall @goodwillwny
Patterned pajama pants can provide enough fabric for several gift bags, especially when both legs remain reasonably strong. The existing hem, waistband, or drawstring may also save part of the finishing work.
Reusable bags are most practical when they can lie flat between uses and survive gentle washing. Keep the shape simple and avoid adding decorations that make the bag difficult to fold or clean.
Materials and Tools
- Clean patterned pajama pants
- Fabric scissors
- Ruler
- Tailor’s chalk
- Strong thread
- Sewing machine or hand-sewing needle
- Drawstring or saved pajama cord
- Safety pin
- Optional fabric lining
Sew the Gift Bags
- Select the strongest fabric. Cut away thin knees, damaged hems, and badly worn seat sections. Decide how many bags the remaining leg panels can provide before making the first permanent cut.
- Create simple rectangles. Open the inner-leg seams when wider pieces are needed, then mark matching front and back panels. Use one folded piece where possible because the fold can become the base of the bag.
- Sew the body and channel. Join the sides with secure seams while leaving the top open. Fold the upper edge to form a drawstring channel, keeping a small opening where the cord can enter and leave.
- Add the cord and finish the bag. Pull the drawstring through with a safety pin, then knot or stitch the ends securely. Turn the bag right side out and check that the bottom corners hold their shape.
I’d make the bags in several sizes rather than forcing every scrap into one large sack. Small offcuts are useful for jewellery, gift cards, homemade soap, or tiny presents that otherwise disappear inside oversized wrapping.
A button-and-loop closure can replace the drawstring. Plain fabric can also be decorated with removable tags so the same bag works for birthdays, holidays, and other occasions.
Make a Soft Pet Bed From a Large Pair
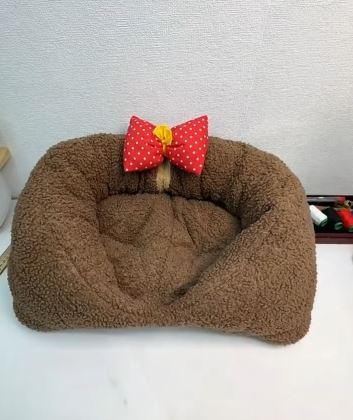
A roomy pair of pajama pants can provide the fabric for a small pet bed, particularly when the legs and upper section remain strong. The finished bed needs dependable seams because pets may scratch, turn, pull, or repeatedly step across the same areas.
Avoid loose buttons, beads, long cords, zips, and decorations that could be chewed or swallowed. The filling should also be clean, dry, and suitable for the animal.
Materials and Tools
- Large clean pajama pants
- Fabric scissors
- Strong thread
- Sewing machine or hand-sewing needle
- Washable stuffing
- Clean fabric scraps
- Pins or clips
- Optional removable inner cushion
- Non-slip base fabric
Build the Pet Bed
- Remove damaged and unsafe parts. Cut away the waistband hardware, loose buttons, drawstrings, thin knees, and any torn sections. Keep the strongest leg fabric for the padded outer ring.
- Form the cushioned sides. Open or reshape the legs into long fabric tubes, then join them if needed. Add stuffing gradually so the ring stays flexible rather than becoming hard and overfilled.
- Create the centre pad. Use the upper pajama section or another strong panel to form a flat cushion. Add a washable filling layer and secure it with strong seams that the pet cannot reach easily.
- Join and inspect the bed. Attach the cushion to the padded ring or leave it removable for easier washing. Check every seam, knot, and fabric edge before allowing the pet to use it.
The part I would check most often is the seam nearest the pet’s usual digging spot. Even a calm little dog can suddenly approach bedding as though searching for buried treasure.
A smaller version can become a cat cushion, while several pajama legs may be joined for a wider bed. Use a removable cover when frequent washing is likely.
Reshape Torn Pajama Pants Into a Butterfly Top

Loose pajama pants can contain enough width for a draped top, particularly when the outer legs remain strong. Opening the inner seams creates broad panels that can be arranged around the shoulders and body.
This transformation works better with lightweight woven fabric than very thick fleece. The material needs to hang softly rather than standing away from the body.
Materials and Tools
- Wide pajama pants
- Loose top for reference
- Fabric scissors
- Seam ripper
- Tailor’s chalk
- Measuring tape
- Pins or clips
- Matching thread
- Bias binding or narrow hem tape
Shape the Butterfly Top
- Open the useful fabric. Remove the inner-leg and crotch seams carefully rather than cutting through several layers at once. Spread both panels flat and mark any damaged areas that need to remain outside the pattern.
- Plan the neckline and side shape. Fold or overlap the panels to create a wide upper body. Use a loose top as a guide and mark a modest neckline before cutting.
- Join the shoulders and sides. Sew secure shoulder seams, then shape the side openings while leaving enough room for the arms and body. The loose edges should fall naturally rather than pulling beneath the arm.
- Finish the exposed edges. Bind or narrow-hem the neckline, sides, and lower edge according to the fabric. Try the top on before removing any final width.
I know it can feel tempting to narrow the sides immediately, but the drape is the main feature here. Too much shaping can turn a flowing top into an awkward fitted rectangle.
A beginner can create a simple poncho-style top with fewer seams. Lightweight drawstring ties may also be added at the waist when a more adjustable shape is preferred.
Rebuild Whimsical Pajama Pants Into a Halter Top
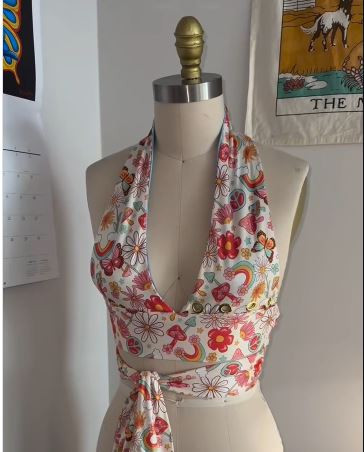
A halter top can make good use of a large print, especially when the strongest fabric lies below damaged knees or away from a worn waistband. The central front section should be planned first so the pattern appears balanced.
Wraparound straps and grommets may add adjustability, but every attachment point needs reinforcement. Lightweight pajama fabric can tear when narrow ties pull directly against one small hole.
Materials and Tools
- Patterned pajama pants
- Fitted halter top for reference
- Paper for a pattern
- Fabric scissors
- Tailor’s chalk
- Lining fabric
- Interfacing
- Strong thread
- Bias binding or straps
- Optional grommets and setting tools
Construct the Halter Top
- Position the main print. Open the strongest leg section and place the paper pattern over it. Centre the most important motif before cutting the outer shape.
- Add support to the fabric. Cut a lining piece and use suitable interfacing around strap, tie, or grommet areas. The outer pajama fabric should not carry all the tension alone.
- Join the outer layer and lining. Sew the main edges with the right sides together, then turn and press the piece carefully. Keep the final closure area open until the fit has been checked.
- Attach the straps and closures. Secure ties across a wide reinforced area or install grommets according to the hardware instructions. Try the top on over another layer first and adjust the tension before trimming anything.
I’d rather use slightly wider fabric ties than very thin cords. They spread the pressure more comfortably and are less likely to pull through soft fabric.
The same panels can become a tie-front crop top without grommets. A simple elastic-backed design may also be easier for a beginner than multiple wraparound straps.
Turn Leopard-Print Pajama Pants Into a Hobo Bag
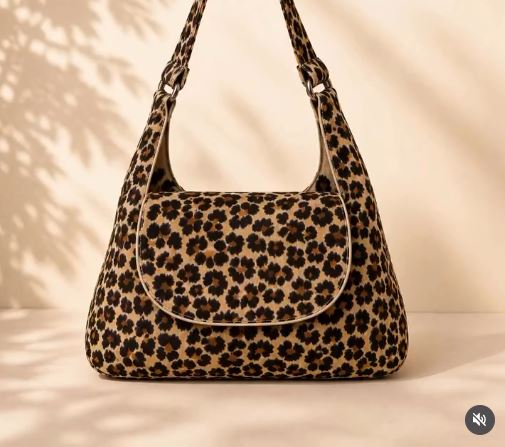
A soft hobo bag suits pajama fabric because the relaxed shape does not require a rigid outer surface. The original print can remain visible across the main body, while a stronger lining carries the everyday strain.
Pajama fabric alone may not support a phone, wallet, keys, and other belongings. Interfacing, lining, and reinforced strap joins are therefore more important than decorative additions.
Materials and Tools
- Printed pajama pants
- Paper bag template
- Fabric scissors
- Strong lining fabric
- Interfacing
- Pins or clips
- Strong thread
- Sewing machine or hand-sewing needle
- Magnetic closure or zip, if suitable
- Pocket fabric
Sew the Hobo Bag
- Cut matching bag panels. Open the strongest pajama sections and place the template so the print falls evenly. Cut matching lining and interfacing pieces at the same time.
- Stabilise the outer fabric. Attach suitable interfacing to the wrong side of the pajama panels. Keep the reinforcement smooth so the lightweight fabric does not wrinkle or bubble.
- Build the outer bag and lining. Join the curved outer seams securely, then construct the lining separately with an internal pocket if useful. Reinforce the base and the upper corners where the strap will begin.
- Attach the strap and closure. Use a wide strap made from layered fabric or another dependable material. Join the lining and outer bag neatly, add the chosen closure, then test the bag with light contents before regular use.
For me, a soft bag benefits from one practical internal pocket. Otherwise, every small item settles at the bottom and begins a private search-and-rescue exercise.
A shorter strap can create a shoulder bag, while two separate straps can form a tote. Plain pajama fabric can be combined with stronger denim scraps around the base and handles.
Pajama-Pants Projects That Go Wrong at the First Cut
Cutting Before Planning All the Pieces
One pair may need to provide a bag body, handles, lining details, and ties. Mark every major section before removing fabric from the legs.
Ignoring Thin Knees and Seat Fabric
Worn material may tear once it becomes part of a handle, fitted top, pet bed, or bag base. Hold the fabric up to light and remove weak sections.
Using Stretch Fabric With a Woven Pattern
Jersey pajama pants and woven flannel need different seam allowances, needles, and finishing methods. Match the method to the actual fabric.
Forgetting to Prewash the Pants
Pajama fabric may shrink, twist, or release colour during washing. Clean and dry it before measuring the new project.
Making Clothing From One Flat Measurement
A garment needs movement, seam allowances, closures, and comfort. Compare the fabric with a loose existing item rather than relying only on body measurements.
Reusing Weak Elastic
Old waistband elastic may look intact but fail after being stretched. Test its recovery and replace it when it remains loose.
Leaving Pet-Bed Decorations Attached
Loose buttons, cords, zips, beads, and trim may become chewing or swallowing hazards. Remove anything that is not essential to the bed’s construction.
Making Bag Handles From One Thin Layer
Soft pajama fabric can stretch or tear under weight. Layer it, reinforce it, or combine it with a stronger material.
Overfilling Soft Toys or Pet Beds
Excess stuffing places pressure on the seams and makes washing difficult. Add filling gradually and keep the finished piece flexible.
Cutting Necklines Too Deep
Fabric can stretch or shift after cutting. Begin with a smaller neckline and enlarge it only after trying the garment on.
Depending on Fabric Glue for Structural Seams
Adhesive may help hold decorative edges, but bags, clothing, and pet beds usually need secure stitching in high-stress areas.
Throwing Away the Remaining Scraps
Small strips can become drawstrings, gift tags, patches, stuffing, hair accessories, pocket linings, or reinforcement pieces.
Frequently Asked Questions
What is the easiest way to upcycle pajama pants?
Shortening damaged pants into lounge shorts or making a simple drawstring bag are usually manageable first projects. Both retain much of the original garment structure.
Which pajama fabrics are easiest to sew?
Cotton and flannel are often easier for beginners because they stay relatively stable while cutting. Slippery satin-like fabric and stretchy jersey may require more practice.
Can pajama pants be turned into bags?
Yes, but soft fabric usually needs lining and reinforcement. Pay particular attention to the base, closure, and handle attachment points.
Can I upcycle pants without a sewing machine?
Many projects can be hand sewn, although they may take longer. Use strong, closely spaced stitches and reinforce areas that will be pulled or carry weight.
What can I make from only one pajama leg?
One wide leg can become a gift bag, cushion cover, narrow tote, bottle bag, scarf, small top panel, or several fabric accessories.
How should I finish fraying edges?
Use a zigzag stitch, overcast hand stitch, binding, enclosed seam, or suitable seam finish. The best method depends on the fabric and how often the item will be washed.
Are old pajama pants suitable for children’s clothing?
They can be when the fabric remains strong, clean, and comfortable. Avoid weak sections, loose embellishments, scratchy seams, and tight elastic.
Let the Strongest Part of the Pajamas Choose the Project
Learning how to upcycle pajama pants starts with separating the useful fabric from the damage.
Wide leg panels can become bags, tops, dresses, and reusable wrapping. A larger pair may provide enough material for a pet bed, while an old drawstring or pocket can return as a practical detail in a completely different project.
Begin with one pair and one realistic purpose. Wash the fabric, mark the weak sections, and plan every major piece before cutting. Then keep the remaining scraps until the finished item has been tested.
Which pair would you work on first: the patterned flannel pants for gift bags, the oversized pair for a pet bed, or the whimsical print waiting to become a bag or top?