We all have that one drawer or section in our closet where old, faded tank tops seem to accumulate.
Whether it’s from a past summer, a workout routine that has since been abandoned, or a favorite that has worn out its welcome, tank tops can often feel like a forgotten piece of clothing.
But what if I told you that instead of tossing them in the donation bin or the trash, you could turn those old tank tops into something fresh, trendy, and totally new?
In this blog post, I’m going to walk you through a step-by-step guide on how to upcycle tank tops into creative, usable items.
Whether you’re a crafting newbie or a seasoned DIYer, this article will offer you several methods, from simple refashioning projects to more advanced ones that will give your old tank tops new life.
So grab those tank tops, a pair of scissors, and some basic supplies, and let’s get started on making your wardrobe more sustainable!
Upcycling Tank Tops into Clothing
One of the easiest ways to breathe new life into your old tank tops is by turning them into new wearable items. Whether you want to refresh your wardrobe with a unique piece or create something completely original, here are a few ideas:
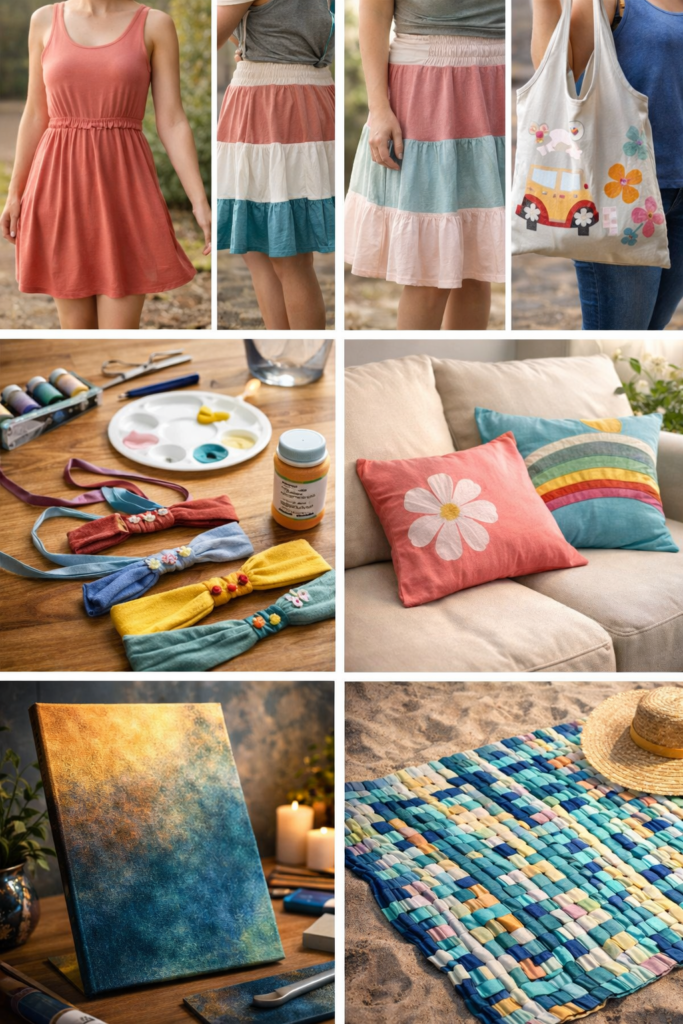
Tank Top Dress
Materials Needed:
- Old tank top (preferably a larger size)
- Scissors
- Sewing machine or needle and thread (optional)
- Elastic (for waistband)
Instructions:
- Select Your Tank Top: Choose a tank top that has a fun design or vibrant color. If it’s a bit too small, consider using a larger size to create a flowy, relaxed fit.
- Cut the Tank Top: Cut off the bottom hem of the tank top to create a straight edge. You can also choose to crop it if you want a shorter dress.
- Add an Elastic Waistband: To give your dress some shape, sew in an elastic waistband. Simply measure your waist and cut the elastic accordingly, then sew it into the fabric of the tank top.
- Final Touches: Adjust the length as needed, and add any embellishments or accessories. A belt or some buttons can add a touch of personality.
- Try It On: Now it’s time to test out your new tank top dress. It’s perfect for a summer day or an easygoing evening out.
Tank Top Skirt
If you have multiple tank tops lying around, why not turn them into a stylish skirt? This simple method requires a little creativity, but the result is a cute and comfy skirt you can wear all day.
Materials Needed:
- 2-3 tank tops
- Scissors
- Elastic band (or fabric belt)
- Needle and thread or sewing machine
Instructions:
- Cut the Tank Tops: Cut the top portion off each tank top (just below the armholes) to leave the bottom hem intact. Depending on the size of your tank top, you can use one or two strips to create a layered effect.
- Join the Pieces: If you’re using multiple tank tops, sew or tie the fabric together to create a continuous piece. You can even layer them for an added boho chic vibe.
- Add the Elastic Waistband: Cut a piece of elastic to fit your waist, and sew it onto the top of your skirt piece. This will create a gathered, stretchy waistband that will make the skirt easy to wear.
- Final Details: Add any final touches, like sewing a ribbon, fabric flowers, or embroidery for a unique look.
Turn Tank Tops into Fun Accessories
Tank tops aren’t just for clothing – you can also transform them into stylish accessories that can add personality to your outfit or home.
Tank Top Tote Bag
Repurpose a tank top into a practical and eco-friendly tote bag. This project is great if you’re looking for a reusable bag for grocery runs or beach trips.
Materials Needed:
- 1 tank top
- Scissors
- Needle and thread (or a sewing machine)
- Handles (optional)
Instructions:
- Cut the Tank Top: Lay the tank top flat, then cut off the sleeves and the neck area, leaving only the body of the shirt.
- Shape the Bag: Fold the bottom of the tank top inwards, about 3-4 inches, and sew the edges together to form a pocket for your bag.
- Add Handles: If you want longer handles, you can cut two strips from the fabric or use an old belt or ribbon to create straps. Attach them to the sides of the bag.
- Decorate the Bag: Personalize your tote bag by adding patches, embroidery, or fabric paint for a truly one-of-a-kind accessory.
- Ready to Go: Your tank top tote bag is now ready for use. It’s perfect for holding books, groceries, or anything you need to carry in style.
Tank Top Headbands
Headbands are a great way to use up smaller pieces of fabric from old tank tops. Whether you’re wearing one for a workout or as a fashion statement, they’re simple and quick to make.
Materials Needed:
- Tank top fabric (cut into a strip)
- Scissors
- Needle and thread or sewing machine
Instructions:
- Cut the Fabric: Cut a strip of fabric from the tank top. The length will depend on how wide you want the headband to be.
- Sew the Edges: Fold the fabric strip in half lengthwise, then sew the edges together.
- Add Elastic (Optional): If you want the headband to stretch, you can sew a small piece of elastic into the back for a better fit.
- Decorate: Feel free to add beads, small fabric flowers, or even paint to make the headband uniquely yours.
Craft Household Items from Tank Tops
Don’t stop at fashion you can use upcycled tank tops to make cool items for your home as well. Here are a few ideas:
Tank Top Pillow Covers
Pillow covers made from tank tops can be a fun, colorful addition to your couch or bed. This is an easy DIY that can help refresh your living space in no time.
Materials Needed:
- 1-2 tank tops
- Scissors
- Needle and thread (or sewing machine)
- Pillow insert
Instructions:
- Cut the Tank Tops: Cut the sides and bottom of the tank top to create one large piece of fabric.
- Sew the Edges: Fold the fabric inwards, and sew along the three edges to form a pouch. Leave one side open.
- Insert the Pillow: Stuff the pillow insert into the pouch, then sew the open edge shut.
- Decorate: Add embellishments, like fabric paint, lace, or buttons, to make the pillow covers more personalized.
Beach Mat
If you have a few tank tops lying around, you can make a simple and eco-friendly beach mat for your next outdoor adventure.
Materials Needed:
- 4-6 tank tops
- Scissors
- Needle and thread (or sewing machine)
Instructions:
- Cut the Tank Tops: Cut the body of each tank top into long, narrow strips.
- Weave the Strips Together: Begin weaving the strips in an alternating pattern to create a larger fabric piece.
- Sew the Strips Together: Once you have a large enough mat, sew the edges together to prevent fraying.
- Use It: Roll it up for easy transport to the beach, park, or any outdoor event.
Common Mistakes to Avoid When Upcycling Tank Tops:
While upcycling tank tops can be an enjoyable process, there are some common mistakes you’ll want to avoid:
- Not Measuring Properly: It’s tempting to dive in and start cutting without thinking, but a little planning will go a long way. Always measure and mark your cuts before going at it with scissors.
- Forgetting to Reinforce Seams: If you’re creating an item that will bear weight or stretch (like a tote bag), make sure to reinforce your seams. Otherwise, your creation might unravel after a few uses.
- Using Too Small a Tank Top: When upcycling, size does matter! Be sure to select a tank top that will allow enough fabric for the project you have in mind. A too-small shirt may leave you with limited options.
Conclusion:
Upcycling old tank tops is not only a fun and creative way to refresh your wardrobe or home but also a fantastic way to contribute to sustainability. By reimagining what’s possible with a few cuts and stitches, you can create unique, practical items that are one-of-a-kind.
Remember to experiment, get creative, and try different methods until you find what works best for you. Whether it’s turning your old shirts into a dress, tote bag, or pillow cover, you’ll be amazed at the possibilities. So, what are you waiting for? Dig out those old tank tops, get crafting, and share your creations with us!
FAQs:
Can I upcycle any tank top?
Yes! Most tank tops are made from cotton or jersey fabric, making them easy to work with. Just make sure the fabric isn’t too worn or damaged.
Do I need a sewing machine?
Not necessarily. Many of these projects can be done by hand with a needle and thread. However, using a sewing machine can make the process faster and more professional-looking.
Can I make a tank top dress from a small tank top?
Yes, but be mindful of the fabric. A small tank top will make a tighter dress, while a larger one will give you more room to work with for a flowy style.