Have you ever looked at an empty glass bottle and thought, “This could be so much more than just a container”? Whether you’re an experienced crafter or a DIY enthusiast, transforming glass bottles with acrylic paint can be a fun and rewarding project.
Acrylic paint is versatile, easy to use, and can turn an ordinary glass bottle into a stunning decorative piece for your home, garden, or special events. From vases and lamps to unique home décor, the possibilities are endless!
In this guide, I’m going to walk you through everything you need to know about using acrylic paint on glass bottles, including the tools and materials, step-by-step instructions, and tips to avoid common mistakes.
By the end of this post, you’ll have all the knowledge and inspiration to start your own acrylic paint project.
Why Use Acrylic Paint on Glass Bottles?
Acrylic paint is an excellent choice for painting on glass bottles due to its versatility and durability. It adheres well to glass surfaces, dries quickly, and offers a range of finishes from matte to glossy depending on your preference.
Plus, it’s incredibly forgiving, so if you make a mistake, you can always wipe it away and start over.
Let’s explore why acrylic paint is perfect for glass bottle crafts:
- Adhesion: Acrylic paint bonds well to smooth glass surfaces, especially when prepared properly. This makes it ideal for various glass objects such as bottles, jars, and even mirrors.
- Variety of finishes: You can achieve a matte, satin, or glossy finish, allowing you to customize your project based on your desired look.
- Easy to clean up: Acrylic paint is water-based, which makes it easy to clean off brushes and tools with soap and water.
If you’re looking to create something that will stand the test of time, acrylic paint is the way to go. It also allows for a variety of techniques and color blending, making it an incredibly adaptable medium for any type of design.
Materials You’ll Need
Before jumping into the painting process, let’s first gather all the materials you’ll need to successfully paint your glass bottle. Here’s a list of the essentials:
| Material | Purpose |
| Glass Bottle | The base for your artwork. Can be a wine bottle, mason jar, etc. |
| Acrylic Paint | Choose high-quality acrylic paint that is suitable for glass. |
| Primer | Optional, but it helps paint adhere better. |
| Paintbrushes | Various sizes (flat and round) for different techniques. |
| Painter’s Tape | To create clean lines or borders. |
| Sponge or Stencil | For texture or specific designs. |
| Mod Podge (optional) | For sealing the paint and adding a glossy finish. |
| Palette or Mixing Tray | For mixing colors and creating custom shades. |
| Rags or Paper Towels | For cleaning spills and mistakes. |
Having these materials ready before you start will make the process smoother, and you won’t have to stop midway to grab something you missed.
Preparing the Glass Bottle
Now that you have your materials ready, it’s time to prepare your glass bottle for painting. Preparation is crucial to ensure the paint adheres well and gives a smooth, long-lasting finish.
1. Clean the Bottle Thoroughly
The first step is to clean the bottle. Dirt, oils, or any residue can prevent the paint from sticking properly, so it’s important to wash the bottle thoroughly with soap and water. After washing, dry the bottle completely using a lint-free cloth or paper towel.
2. Apply a Primer (Optional)
Applying a primer is an optional but highly recommended step. A primer designed for glass helps the paint stick better and can make the color more vibrant. If you want your paint to adhere strongly and last longer, give the bottle a coat of glass primer. Let the primer dry completely before moving on to the painting process.
3. Use Painter’s Tape for Clean Lines
If you plan to create geometric designs or clean edges, use painter’s tape to mask off areas that you want to remain unpainted. This will help you achieve sharp lines and prevent smudging.
Step-by-Step Painting Instructions
Now comes the fun part: painting your glass bottle! Below are the steps to follow, as well as some tips to make sure your design turns out beautifully.
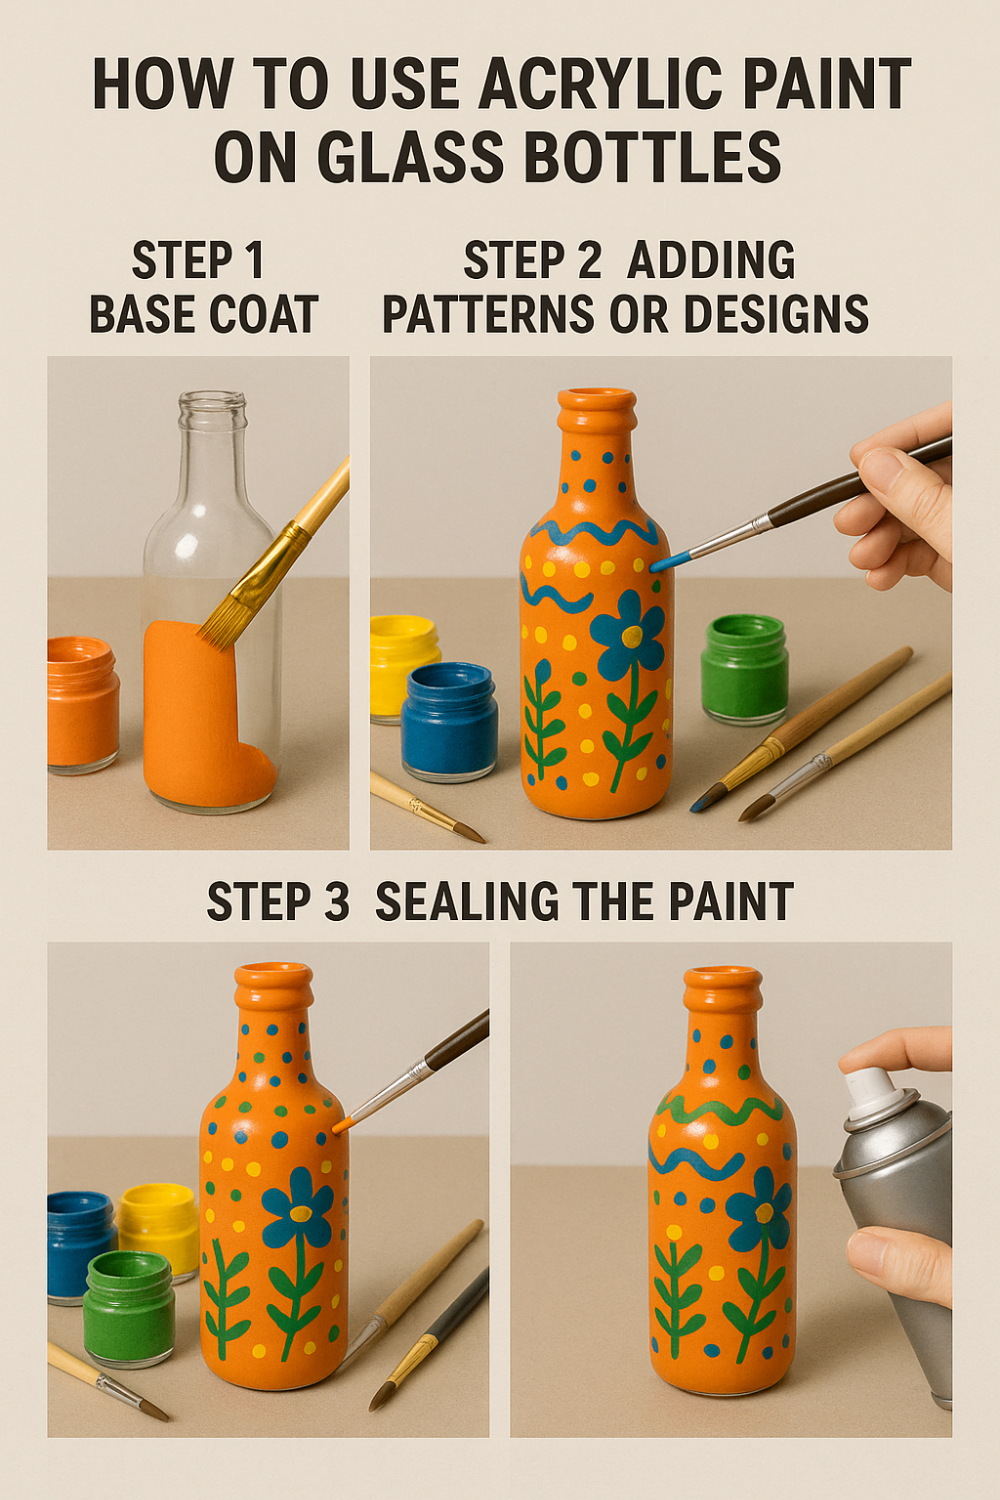
Step 1: Base Coat
If you’re using a solid color or a more uniform design, start with a base coat. Dip your brush into the acrylic paint and apply a thin layer to the bottle. Allow it to dry completely before adding additional coats. For smooth coverage, apply 2-3 coats, letting each layer dry before applying the next.
Step 2: Adding Patterns or Designs
Once your base coat is dry, it’s time to get creative! You can use a variety of techniques to add designs to your glass bottle, such as:
- Freehand painting: Using a fine-tip paintbrush, create custom patterns or designs by painting directly onto the bottle. Whether it’s flowers, geometric shapes, or abstract art, this is where you can really express your creativity.
- Stenciling: For more precise designs, use stencils. Simply place the stencil over the bottle, then fill in the design with your acrylic paint.
- Sponge or Textured Effects: Use a sponge to dab paint onto the bottle’s surface for a textured, mottled effect. This is ideal for rustic or vintage-inspired designs.
Step 3: Sealing the Paint
Once your paint is fully dry and you’re happy with the design, it’s time to seal it. Use Mod Podge or another acrylic sealer to protect the paint and give your glass bottle a glossy finish. Apply a thin coat, and allow it to dry completely. If desired, you can apply additional coats for a thicker, more durable finish.
Common Mistakes to Avoid
While painting glass bottles is a fun and straightforward process, there are a few common mistakes that can impact your project’s outcome. Here are some to watch out for:
1. Skipping the Cleaning Step
Not cleaning your bottle thoroughly can lead to paint peeling off over time. Be sure to wash the bottle and let it dry before you start painting.
2. Using Low-Quality Paint
Cheap acrylic paint can often lead to uneven coverage, dull colors, or cracking. Invest in high-quality paint for the best results.
3. Applying Paint Too Thick
If you apply the paint too thickly, it can take a long time to dry and may result in uneven texture. Always apply thin coats and let each layer dry before adding more.
4. Not Using a Sealer
Skipping the sealer may cause the paint to chip or fade over time, especially if the bottle is exposed to moisture or frequent handling. A good sealer will keep your design intact.
5. Not Letting the Paint Dry Properly
Be patient and let each layer of paint dry fully before moving on to the next step. Rushing through the process may result in smudging or uneven textures.
Conclusion
Transforming a glass bottle with acrylic paint is a simple yet rewarding DIY project that allows you to express your creativity and create beautiful home décor pieces. With a few basic materials, some practice, and a little patience, you can turn ordinary glass bottles into extraordinary works of art.
Remember, the key to success is preparation. Clean your bottles thoroughly, use high-quality paint, and take your time with each layer. Don’t forget to seal your design for longevity, and avoid common mistakes like skipping the cleaning or using thick layers of paint.
If you’ve enjoyed this guide, I encourage you to try it out for yourself and share your creations with friends and family.
FAQs
Q1: Can I use regular paint for glass bottles?
A1: While you can use regular paint, it’s best to use acrylic paint designed specifically for glass surfaces. This type of paint adheres better and is more durable.
Q2: How long does it take for the acrylic paint to dry on glass?
A2: Acrylic paint typically dries in 15-30 minutes between coats, but it’s best to wait 1-2 hours before handling the painted bottle.
Q3: Can I wash the painted glass bottle after it dries?
A3: If you used a sealer, you should be able to wash the bottle gently by hand. However, avoid scrubbing the painted area to prevent damaging the design.
Q4: Can I use this technique for glass jars or mason jars?
A4: Absolutely! The same techniques apply to any glass containers, including mason jars, making them perfect for creating custom gifts, vases, or storage containers.