If you’ve ever been fascinated by the magical, glowing effect of objects that seem to come alive under the darkness of night, you’re not alone. Glow-in-the-dark acrylic paint has become a staple in a variety of creative projects, from glowing murals to custom-designed T-shirts.
But how exactly can you make the most of this unique medium? Whether you’re a seasoned artist or a curious DIYer, I’ve got you covered with this complete guide on how to use glow-in-the-dark acrylic paint.
In this blog post, I’ll take you through everything you need to know about glow-in-the-dark acrylic paint, from the basics to step-by-step instructions, plus a few helpful tips and common mistakes to avoid. Let’s dive into this glow-tastic world and light up your projects like never before!
What is Glow in the Dark Acrylic Paint?
Glow-in-the-dark acrylic paint is a special type of paint that absorbs light during the day and emits a soft, glowing effect in the dark.
This glow happens due to the presence of phosphorescent pigments in the paint, which store energy from light and release it slowly over time, creating a glowing effect.
There are two main types of glow-in-the-dark paint: phosphorescent and fluorescent. While both types glow in the dark, the difference lies in how they react to light. Phosphorescent paints store light and glow for longer periods, while fluorescent paints only glow when exposed to a UV or black light.
Glow-in-the-dark acrylic paint is available in a variety of colors, including neon green, blue, purple, and even orange. It can be used on various surfaces like canvas, wood, fabric, glass, and plastic. It’s also water-based, non-toxic, and easy to work with, making it perfect for all kinds of creative projects.
How to Use Glow in the Dark Acrylic Paint Step-by-Step
Using glow-in-the-dark acrylic paint is fairly simple, but there are a few tips and tricks that will ensure your work glows as brightly as possible. Let’s break it down step-by-step:
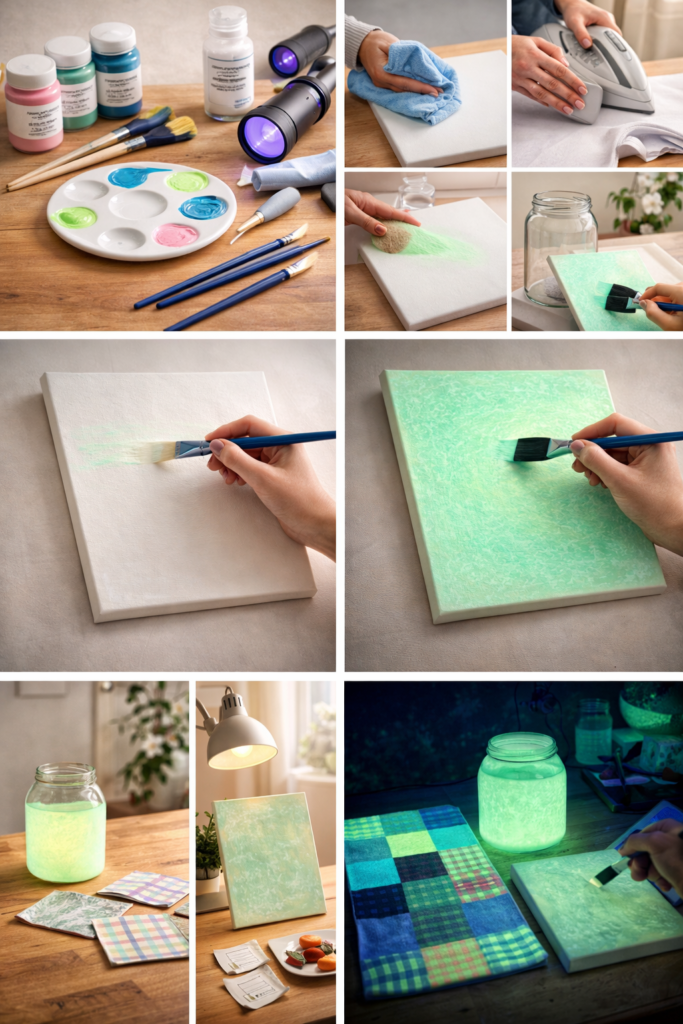
Step 1: Gather Your Materials
Before you start, make sure you have everything you need:
- Glow-in-the-dark acrylic paint (choose the color you want)
- Acrylic paintbrushes (if you’re painting on canvas or a similar surface)
- A clean surface to paint on (canvas, wood, fabric, etc.)
- Blacklight or UV flashlight (optional but helpful for testing the glow effect)
- Acrylic paint sealer (to protect your work once it’s dry)
- Palette for mixing (if you plan on mixing colors)
- A well-lit workspace
Step 2: Prepare Your Surface
The first step in any painting project is preparing your surface. Make sure the surface you’re painting on is clean and dry. If you’re painting on fabric, you may need to iron it beforehand to smooth out any wrinkles.
For non-porous surfaces (such as glass or plastic), use a mild abrasive like sandpaper or a scouring pad to create a rough texture that helps the paint adhere better.
Step 3: Apply the First Coat
Using your acrylic paintbrush, apply the first thin layer of glow-in-the-dark acrylic paint to your surface. Don’t worry if it looks faint or streaky at this stage—this is completely normal. Allow the first coat to dry fully, which can take anywhere from 30 minutes to 1 hour depending on the thickness of the coat.
Step 4: Add More Layers
For a brighter glow, you’ll need to build up layers. Once the first coat has dried, apply another thin layer of paint, and allow it to dry before applying a third layer. Repeat this process until you’re satisfied with the coverage.
It’s important to note that glow-in-the-dark paint often requires multiple layers to achieve a noticeable glow, so be patient!
Step 5: Charge the Paint
After the paint has dried, it’s time to charge it. Place your painted object in direct light for at least 30 minutes (sunlight is ideal). The more light the paint absorbs, the longer and brighter it will glow in the dark.
Step 6: Test the Glow
Once your paint is charged, turn off the lights or wait until it’s dark outside. You should see the glow begin to emerge. You can also use a blacklight to check how vibrant the glow is.
Step 7: Protect Your Work
Once you’re happy with your glowing creation, apply a clear acrylic sealer over the paint to protect it from wear and tear. This will help preserve both the color and the glowing effect.
Tips for Getting the Best Glow Effect
Now that you know the basics, here are some tips that will help you get the brightest and most consistent glow possible:
- Use Light During the Day: Make sure your painted object gets plenty of sunlight or artificial light to “charge” the glow-in-the-dark paint. The more light it absorbs, the better it will glow at night.
- Apply Multiple Layers: As mentioned, glow-in-the-dark paint typically requires more than one layer. Build up the layers to achieve the best possible glow.
- Choose the Right Surface: Some surfaces absorb light better than others. If you’re working on fabric, use a white or light-colored fabric for the best glow. For darker surfaces, the glow might not be as intense.
- Use Blacklight for Extra Glow: If you want to intensify the effect, try shining a blacklight over your artwork. This will amplify the glow, especially for fluorescent paints.
- Mix Paints for Different Effects: Don’t be afraid to mix different colors of glow-in-the-dark acrylic paint for unique effects. This can create a layered, multicolored glow when exposed to light.
Common Mistakes to Avoid
Even though glow-in-the-dark acrylic paint is relatively easy to use, there are a few common mistakes to avoid:
Mistake 1: Skipping the Pre-Painting Prep
One of the most common mistakes people make is skipping the surface preparation. Whether it’s cleaning or sanding the surface, this step ensures that the paint adheres well and lasts longer.
Mistake 2: Using Too Much Paint at Once
Glow-in-the-dark acrylic paint can be thick, and if you try to apply too much paint at once, it can take longer to dry and result in a clumpy finish. Instead, apply several thin layers, letting each layer dry completely before adding the next.
Mistake 3: Not Allowing Enough Drying Time
It’s tempting to rush the process, but giving each layer of paint enough time to dry will ensure a smooth and glowing finish. Make sure you wait at least 30 minutes to an hour between each layer.
Mistake 4: Not Charging the Paint Enough
If the paint doesn’t get enough light exposure, it won’t glow as brightly. Make sure you give your painted object ample time in direct light for the best glowing effect.
Mistake 5: Skipping the Sealer
Many people forget to apply a sealer to their finished project, but doing so will help preserve the glow and the vibrancy of the colors. Don’t skip this step if you want your artwork to last longer.
Conclusion and Next Steps
Glow-in-the-dark acrylic paint is an exciting and fun medium to work with. Whether you’re creating glowing artwork, custom designs for T-shirts, or a nightlight for kids, the possibilities are endless.
By following the steps outlined in this guide, you can create stunning glowing pieces that will impress and add a bit of magic to your space.
To recap, here are the key takeaways:
- Always prepare your surface for the best adhesion.
- Build up layers for a brighter glow.
- Charge your painted object with enough light to get the most out of the glow effect.
- Don’t forget to apply a sealer to protect your work.
Now it’s your turn! I encourage you to experiment with glow-in-the-dark acrylic paint and see what unique creations you can come up with. Don’t forget to share your glowing artwork with me in the comments below. Have fun painting!
FAQs
Can I use glow-in-the-dark acrylic paint on fabric?
Yes! Glow-in-the-dark acrylic paint works well on fabric, but make sure to choose a light-colored fabric for the best glow effect. Also, use fabric medium mixed with the paint to make it more flexible and durable.
How long does the glow effect last?
The glow effect usually lasts for a few hours, depending on how much light the paint absorbed. The more light it gets, the longer it will glow. You can charge the paint multiple times to extend the glow duration.
Can I mix glow-in-the-dark paint with regular acrylic paint?
Yes, you can mix glow-in-the-dark paint with regular acrylic paint. This is a great way to create custom colors or textured effects while still keeping the glow feature intact.
Can I use glow-in-the-dark paint outdoors?
Yes, you can use glow-in-the-dark paint outdoors, but it’s essential to use a good sealer to protect your artwork from the elements. Outdoor exposure might cause the glow to fade more quickly, but a good sealer will help preserve it.
How do I make glow-in-the-dark paint brighter?
The key to making your glow-in-the-dark paint brighter is to apply multiple layers of paint and ensure it gets plenty of light exposure. Using a blacklight or UV light can also enhance the glow.