
If you’ve ever had an old piano gathering dust in your home, you’ve probably thought about getting rid of it or letting it sit there indefinitely. But what if I told you there’s a much more creative and sustainable option?
Upcycling a piano can breathe new life into the instrument, transforming it into something beautiful and functional whether as a unique piece of furniture, a decorative accent, or even a creative art project.
In this guide, I’ll walk you through the entire process of upcycling a piano, from choosing the right piano to repurposing its parts. We’ll cover everything you need to know, with step-by-step instructions and plenty of tips to help you avoid common mistakes.
Why Upcycle a Piano?
Let’s face it, pianos are big, bulky, and can be hard to sell. Many people inherit them or find them in abandoned homes, only to have no idea what to do with them.
Instead of letting it take up valuable space or heading straight to the landfill, why not try something more exciting?
Upcycling a piano is not just a sustainable choice; it’s a chance to make something truly unique. Whether you’re an artist looking for inspiration, a DIY enthusiast, or someone looking to decorate your home with something truly one-of-a-kind, an upcycled piano could be your next creative project.
Pianos are full of materials that can be reused in numerous ways wood, metal, strings, and even the keys themselves. In this post, I’ll show you exactly how to take your old piano and transform it into a stunning, functional piece of art.
How to Choose the Right Piano for Upcycling
Before you start, you need to pick the right piano for your project. Not every piano is a good candidate for upcycling, so let’s go over what to look for.
Things to Consider:
- Condition: The condition of the piano is important. You don’t need to worry if it’s out of tune or missing a few keys, as these parts can be repurposed. However, avoid pianos with severe damage to the frame or structure, as it might be difficult or expensive to repair.
- Size: Pianos come in many sizes grand pianos, upright pianos, and console pianos. An upright piano is usually the most accessible for upcycling due to its size, but if you’re working with a grand piano, you’ll have more wood and materials to work with.
- Material: Pianos are typically made of wood and metal, with some parts that could be valuable for upcycling (such as the strings, hammers, and pedals). Look for a piano with solid wood that can be repurposed.
- Sentimental Value: If you’re planning to upcycle a piano that’s been passed down through your family, consider preserving certain elements like the keys or a plaque that can be incorporated into your new design—to keep the connection to the past alive.
Step-by-Step Guide: Upcycling a Piano
Disassembling the Piano
The first step in any upcycling project is carefully disassembling your piano. Depending on the type of piano you have, this process may look slightly different, but the general principles remain the same.
Materials You’ll Need:
- Screwdriver
- Hammer
- Pliers
- Safety gloves
- Safety glasses
- Dust mask
Disassembly Process:
- Remove the Pedals and Legs: Start by unscrewing the pedals and legs. The legs are typically attached to the base with screws or bolts. Carefully remove them and set them aside.
- Remove the Lid and Keyboard: Next, remove the top lid. This can usually be unscrewed from the body of the piano. Then, remove the keyboard by unscrewing the bolts holding it in place.
- Take Out the Strings and Soundboard: The strings and soundboard are often what make the piano too heavy to move easily, so they’ll need to be removed carefully. Use pliers to unwind the strings, and be sure to wear protective gear, as the strings can be sharp.
- Disassemble the Action Mechanism: The action mechanism of the piano contains many delicate components, including hammers and dampers. Remove these carefully, as some of these parts can be repurposed for other projects.
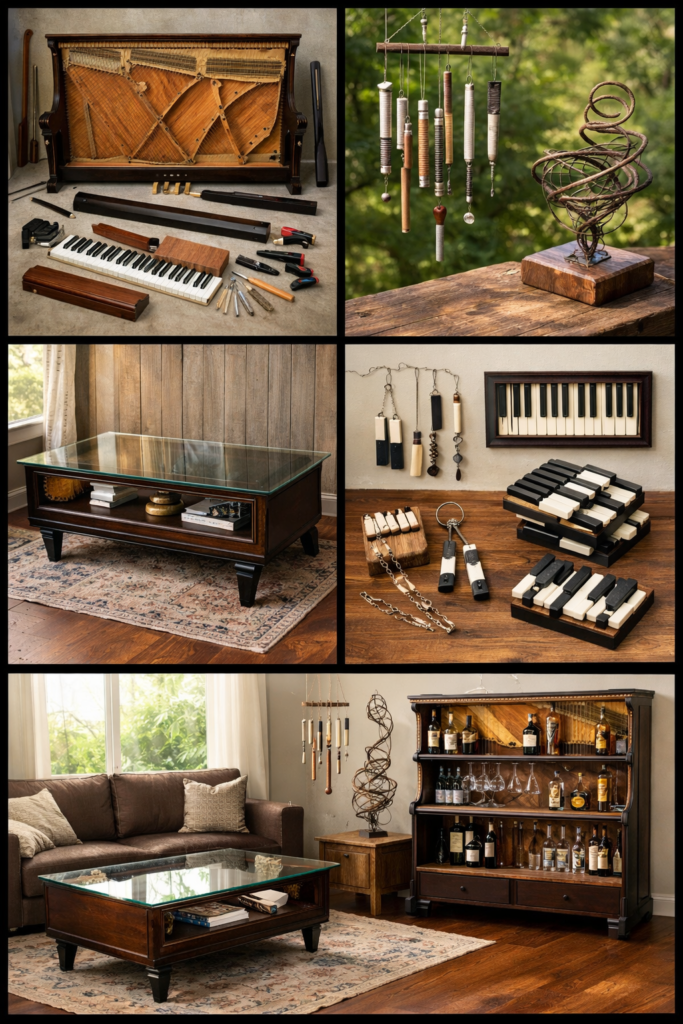
Repurposing the Piano’s Keys and Strings
Once the piano is disassembled, it’s time to get creative with the individual components.
1. Repurposing the Keys
The piano keys themselves are often made from ivory or plastic, which can be used for smaller craft projects or upcycled into unique decorative pieces.
Ideas for Upcycled Piano Keys:
- Jewelry: Piano keys make excellent materials for creating necklaces, bracelets, or keychains. You can paint or carve them for a more personalized touch.
- Art: Use the keys to create an artistic wall piece or a picture frame.
- Coasters: For a functional and stylish addition to your home, make coasters out of piano keys by attaching them to a wooden base and sealing them for protection.
2. Upcycling the Strings
The metal strings can be used for a variety of projects. Here are a few ideas:
- Wind Chimes: Hang the strings from a piece of driftwood or an old hanger to create a beautiful, musical wind chime.
- Sculptures: The metal strings can be shaped and twisted to form interesting sculptures or wall decor.
- Jewelry: Use the strings for making bracelets, rings, or other metal-based jewelry.
Transforming the Piano Body
With the smaller components taken care of, it’s time to focus on the main body of the piano. Here are some unique ways to transform the piano’s frame into something entirely new.
1. Turn the Piano Into a Coffee Table
A popular option for upcycling an upright piano is to turn it into a statement coffee table. The frame and legs of the piano can serve as the base, while the top can be used to create a stylish surface.
- How-To: Remove the internal components of the piano, leaving only the frame. Attach a large glass or wood panel to the top to create a sleek coffee table.
- Personal Insight: I’ve seen this done in several homes, and it’s always a conversation starter. It’s functional and adds a touch of class to any room.
2. Repurpose the Piano as a Bar or Storage Cabinet
Another idea is to convert the piano into a bar or storage unit. The internal compartments of the piano can be repurposed to hold bottles, glasses, or other items.
How-To: Remove the keyboard and strings. You can keep the pedals for a rustic touch and use the body for shelves or cabinets.
Mistakes to Avoid When Upcycling a Piano
Upcycling a piano is an exciting project, but there are some common mistakes that you should be aware of to ensure your success.
Mistake 1: Not Checking the Piano’s Stability
Before beginning any upcycling project, it’s essential to check the stability of the piano. If the frame is cracked or warped, it may not be worth the effort to upcycle. Always test the sturdiness before beginning disassembly.
Mistake 2: Overlooking Safety
Removing strings and hammers from a piano can be dangerous, especially if you’re not wearing protective gear. Make sure to always wear gloves, goggles, and a dust mask when working with piano parts.
Mistake 3: Not Having a Clear Plan
Upcycling a piano involves creativity, but it’s important to have a clear vision of what you want to achieve. Make sure to map out your plan before beginning any major steps to avoid wasting time and resources.
Conclusion: The Final Touch
Upcycling a piano is a fun, creative way to turn a forgotten piece of furniture into something beautiful and functional. Whether you’re creating a one-of-a-kind coffee table or making artistic jewelry from the keys, the possibilities are endless. Plus, by upcycling, you’re helping reduce waste and giving new life to an old instrument.
So, what are you waiting for? Grab that old piano and get started on your next creative project!
FAQs
How long does it take to upcycle a piano?
The time it takes depends on your project’s complexity. A simple coffee table could take a weekend, while more intricate projects like sculptures or furniture could take longer.
Can I sell an upcycled piano?
Absolutely! Many people are willing to buy unique, upcycled items. You could sell it locally or through online platforms like Etsy.
Can I upcycle a grand piano?
Yes! A grand piano provides more materials and can make for a more impressive project, but it requires more space and effort.