Geometric Patterns

Materials Needed
- Needlepoint canvas (choose a mid-sized grid to capture the details)
- Embroidery thread in navy blue, pink, orange, yellow, and beige
- Embroidery needles
- Hoop frame
- Scissors
- Pattern grid (draw the shapes on graph paper to guide your stitching)
Steps
- Sketch the Layout
Start by transferring the geometric pattern onto your needlepoint canvas. You can sketch lightly with pencil or use a fabric marker. Focus on replicating the random arrangement of triangles, zigzags, and rectangles. It’s okay if it’s not perfect; the charm lies in the asymmetry. - Color Blocking
Choose one color and fill in all the areas it occupies before moving on to the next. Begin with dark tones, like navy blue, as they provide a good base and make the brights pop. Use a satin stitch for bold coverage. Take your time – watching the colors come alive is half the fun! - Add Texture and Dimension
Experiment with layering stitches. For zigzags, try a backstitch to create base lines before filling in. This adds dimension to your work. Be patient and adjust tension as needed for a neat finish.
Pro Tip
Always start stitching from the center of your canvas and work outward to prevent tugging or warping. I’ve found using subtle variations in thread shades makes the final design extra dynamic.
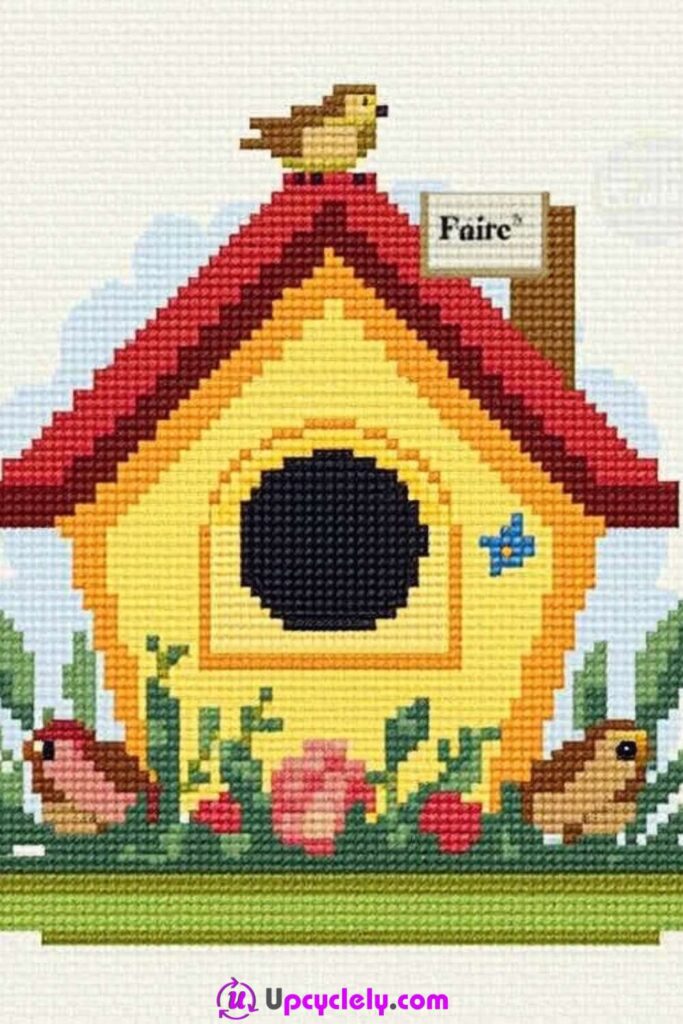
Birdhouse Design
Materials Needed
- Needlepoint canvas
- Thread colors (yellow, red, blue, green, pink, and brown)
- Embroidery needle
- Small hoop frame
- Pattern outline (you can sketch or print one based on the image)
- Fabric glue (optional, for added embellishments)
Steps
- Outline and Block the Birdhouse
Begin with the base structure of the birdhouse. Use a long-and-short stitch to create texture for the yellow body. For the roof, choose a red thread and apply satin stitching to achieve its smooth, contrasting surface. - Craft the Details
Add the circular opening and the small blue flower next to it using chain and French knot techniques. Stitch the “Faire” sign with care. This detail adds a story to the piece, giving it a timeless, crafted charm. - Bring Life with Nature
Surround the birdhouse with green leaves, adding red and pink flowers for vibrancy. Use lazy daisy stitches for the leaves and French knots for the flower centers. Finish by stitching the three birds using brown shades with touches of white for feathers.
Pro Tip
Don’t stress over perfect stitches! There’s beauty in a handmade look. Tilt your threads where needed to add a soft, organic feel.
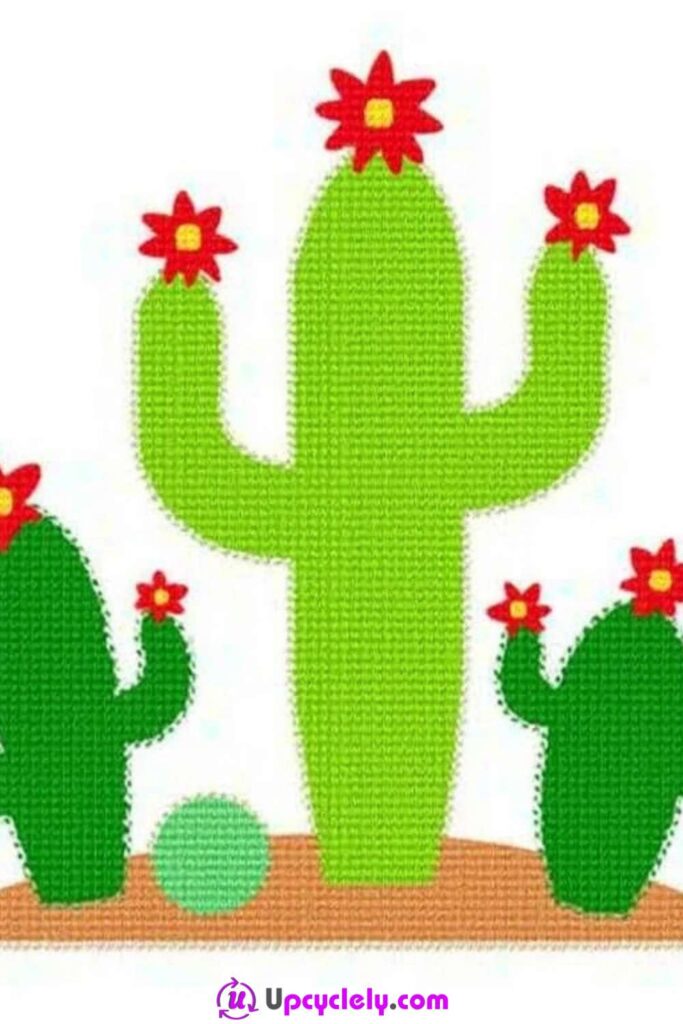
Cactus Designs
Materials Needed
- Embroidery frame
- Canvas or pre-meshed needlepoint grid
- Green, brown, red, and yellow threads
- Graph paper (for preliminary sketches)
- Scissors and needles
Steps
- Shape Your Cacti
Start with the largest central cactus. Use a chain stitch to form the body, ensuring its texture mimics a desert vibe. For the cacti arms, use a satin stitch that curves as it follows the outline of the shape. Outline the other two smaller cacti as complements. - Add Some Blooms
Create the flowers using red thread with yellow centers. Use layered French knots or spider stitches, depending on how dimensional you want them to feel. Position them beautifully atop each cactus like tiny crowns. - Finish with the Desert Ground
Stitch a light brown oval for the base, keeping the texture smooth yet earthy. Add details like a “rock” in light green to create an overall playful desert scene.
Pro Tip
Layer your lighter and darker green thread to create depth in the cactus textures. This subtle play with shades makes them feel alive.
Cute Coffee Cups

Materials Needed
- Needlepoint grid or canvas
- Colors needed (teal, pink, white, and orange threads)
- Needle
- Hoop frame
- Marker for transferring the pattern
Steps
- Outline the Cup and Saucer
Begin with the basics. Stitch the rounded coffee cup with smooth curves using chain stitches in teal thread. Fill in the saucer below with satin stitches. These details create the foundation for the entire piece. - Steam Hearts and Details
Use pink thread to stitch the hearts into the steam rising above the cup. This part can be tricky but so satisfying! A backstitch works well for the flowing steam lines, while satin stitches give the hearts a solid, whimsical look. - Final Touches
Add subtle details, like shadows or highlights on the saucer, by doubling back with slightly lighter or darker teal threads. Tiny touches like these make the final image pop.
Pro Tip
Keep your tension loose when stitching the steam lines. This helps them appear soft and natural, just like real steam.
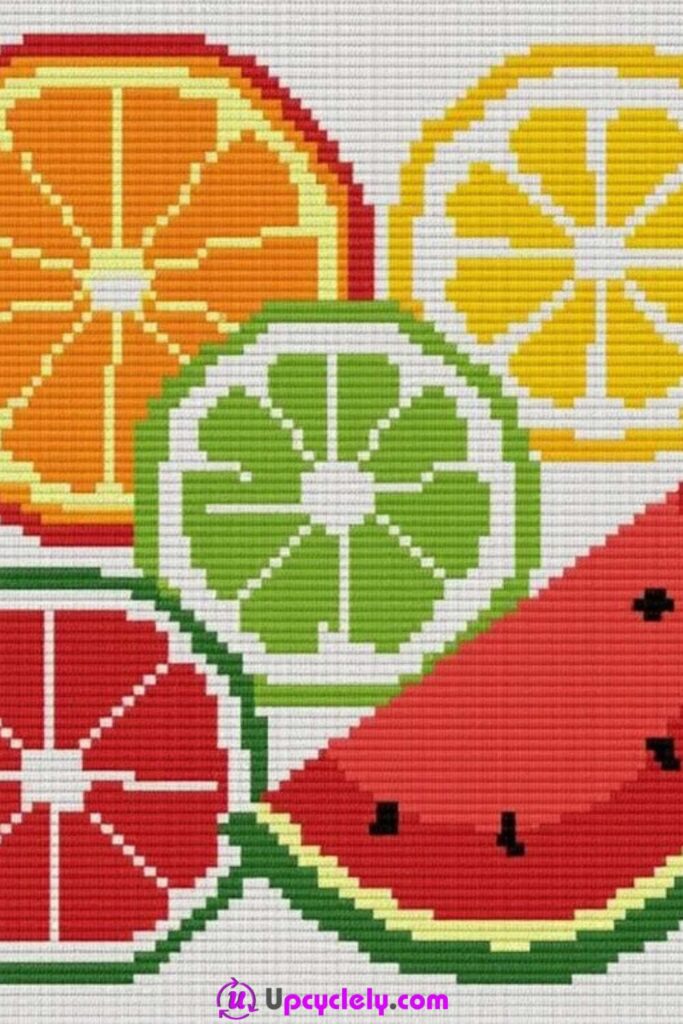
Fruit Slices
Materials Needed
- Needlepoint canvas
- Bright thread colors (orange, yellow, green, red, and white)
- Needle
- Embroidery scissors
- Small round hoop
Steps
- Plan the Layout
Draw or lightly trace the composition of the overlapping fruit slices. Start with the largest fruit (the watermelon) and then work back to the smaller ones like lime or lemon. - Create Vibrant Slices
For each slice, use backstitches to create the sections in the pulp. Use bold satin stitches for the solid parts, like the watermelon rind or the thick edge of the orange peel. Don’t forget to add seeds to the watermelon with black French knots! - Overlay and Blend
Overlap the fruits slightly for that layered effect. Use lighter or darker shades of the same thread on adjacent pieces to create contrast and visual interest.
Pro Tip
Mix gloss and matte threads to enrich the texture; this works especially well for the juicy look of citrus pulp.
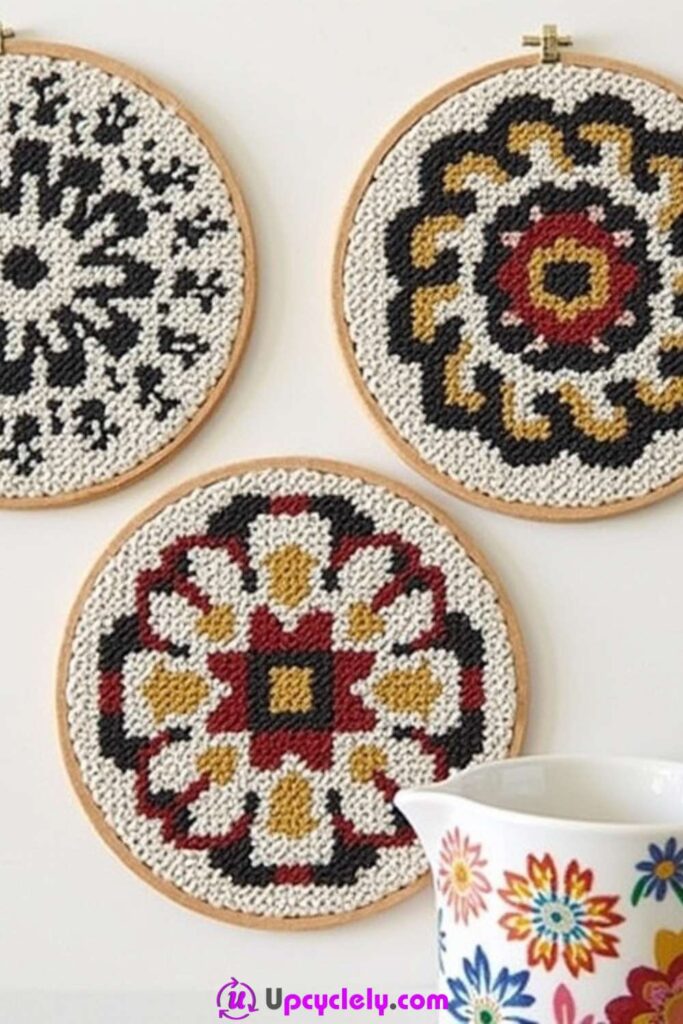
Simple Patterns on Coasters
Materials Needed
- Embroidery hoops (small, 4-inch diameter)
- Needlepoint canvas
- Embroidery thread in black, white, red, yellow, and blue
- Needles for embroidery
- Scissors
- Graph paper (optional)
- Cork sheets or felt backing
Steps
- Prepare the Canvas
Start by securing your canvas in an embroidery hoop. Make sure it’s pulled tight to give you the cleanest surface possible for stitching. Each small hoop design is unique, so sketch or imagine individual patterns that fit your style. Think simple elegance for the black-and-white design, bold for the red-centered one, and complex symmetry for the floral-like motif. - Stitch Each Pattern
Divide your time among the hoops, starting with the simpler patterns. For the black-and-white symmetrical design, use straight stitches for the geometric effect. The red-and-yellow design can come alive with cross stitches for the circular shape and smooth satin stitches for the lines. Finally, tackle the floral-inspired hoop by layering your stitches for a dimensional touch. - Back and Finish
Once all the patterns are complete, carefully cut your fabric to fit the hoop’s size. Attach a cork or felt backing with fabric glue to transform these hoops into coasters. This small detail ensures they’re functional and beautifully finished for everyday use.
Pro Tip
Keep a damp cloth nearby to clean your hands as you work. It prevents oils from transferring to the pure white areas and keeps your threads vibrant.
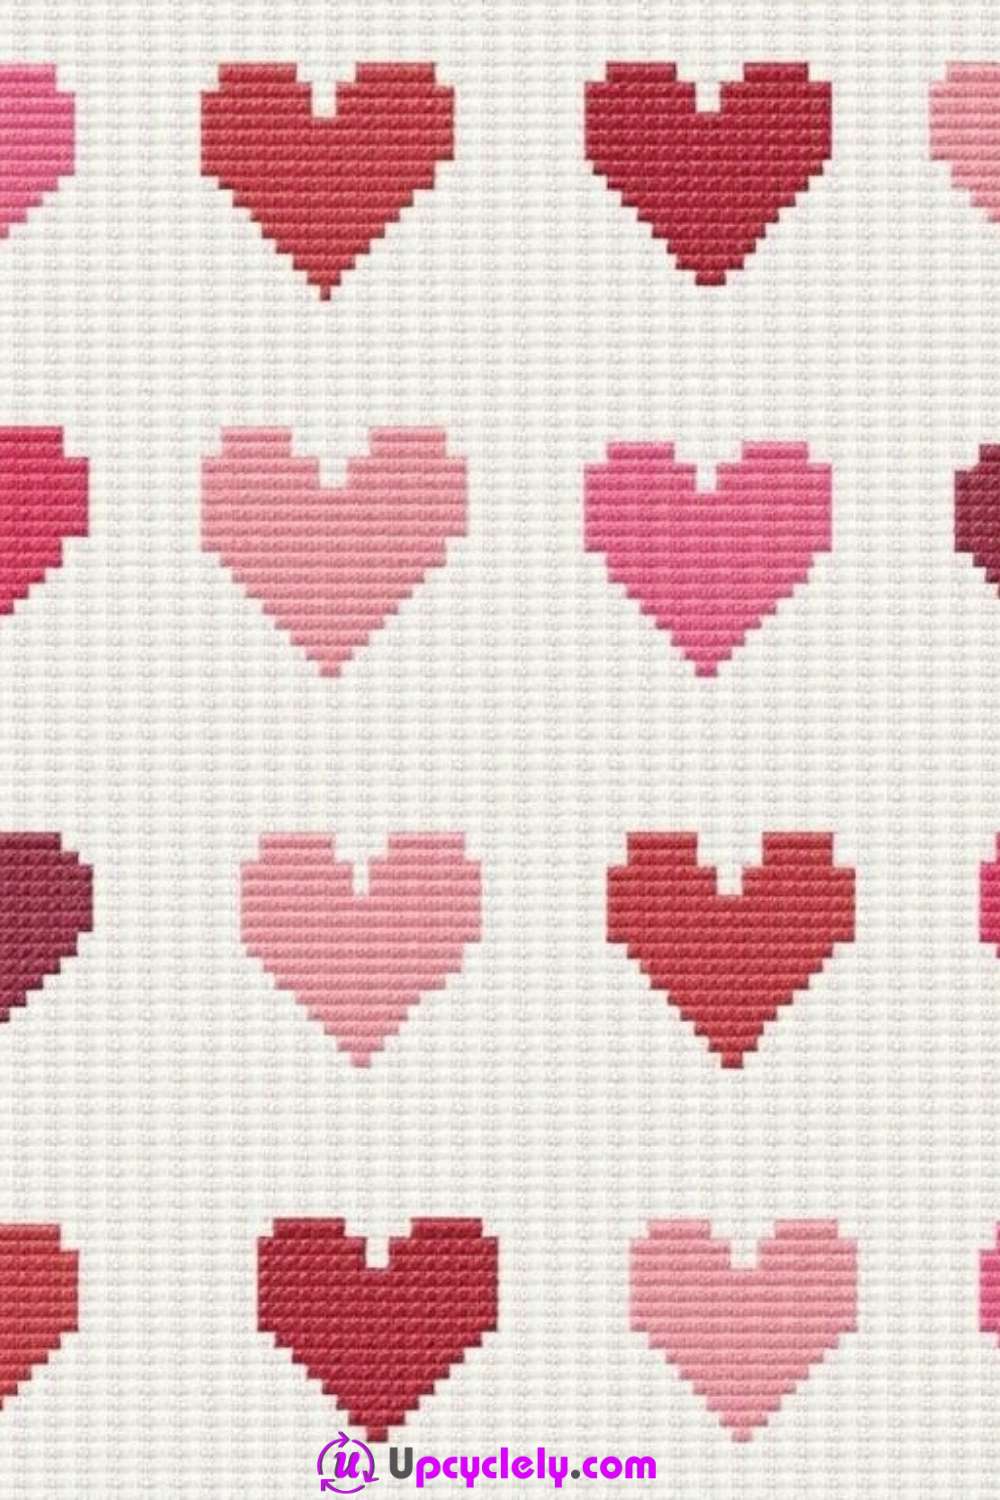
Heart-Shaped Motifs
Materials Needed
- Pre-gridded needlepoint canvas
- Threads in various shades of red and pink
- Embroidery needles
- Embroidery scissors
- Small square frame (optional, for display)
Steps
- Draw Your Grid
Begin by sketching out the 3×5 heart grid on your canvas. Measure evenly so each heart has adequate space and an identical size. Transfer the light grid as faintly as possible to prevent it from outshining the thread. - Create the Pixel Effect
Start by stitching the hearts row by row. Use a cross-stitch to mimic the pixelated appearance. Experiment with blending threads from two pink tones or two reds to create a gradient effect within the hearts. Watch how each stitch adds volume and life to the design. - Customize Your Design
Use the gaps between the hearts as a blank canvas. Add tiny white stitches to create stars or sprinkle in light pink dots for extra detail. This customization adds personality and transforms a simple design into something truly yours.
Pro Tip When framing this piece, use a deep shadow box to prevent squashing and preserve the texture of the stitches. It’s a small touch that makes the hearts pop beautifully.
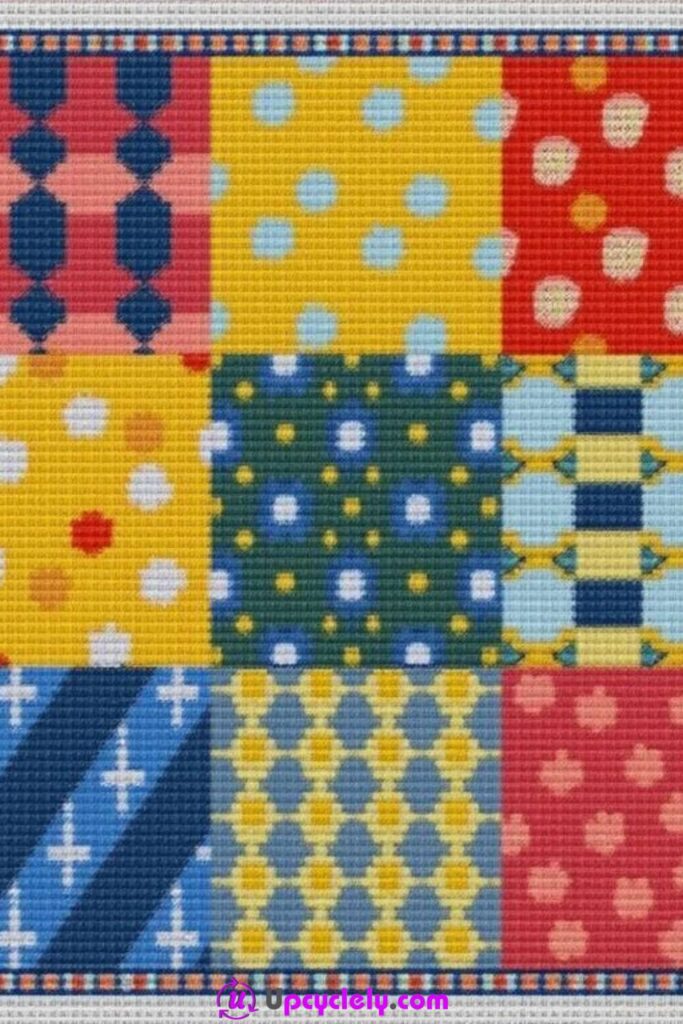
Patchwork Patterns
Materials Needed
- Needlepoint canvas
- Threads in pink, yellow, blue, red, and white
- Embroidery needles
- Small hoop or flat frame for stitching
- Fabric glue (if creating a functional quilt or pillow)
Steps
- Divide Your Canvas
Using a fabric-safe marker, section off a 3×3 grid to imitate the organization of patchwork squares. Keep your lines faint and precise to guide your stitching without becoming a distraction. - Stitch Individual Squares
Each square in the design is like its own mini project. Use backstitches for clear lines in the geometric and polka dot patterns. For the striped areas, layer your colors for texture. This part requires patience, but seeing every square come together feels like watching art unfold. - Create a Unified Feel
Once all the squares are stitched, carefully add the checkered blue-and-orange border frame. If framing, stitch the edge directly. If sewing onto fabric, glue or sew your finished needlepoint onto a bigger textile piece for pillows or wall decor.
Pro Tip
Mix matte and metallic threads for an extra luxurious touch. Metallic accents on squares like polka dots make them shimmer subtly.
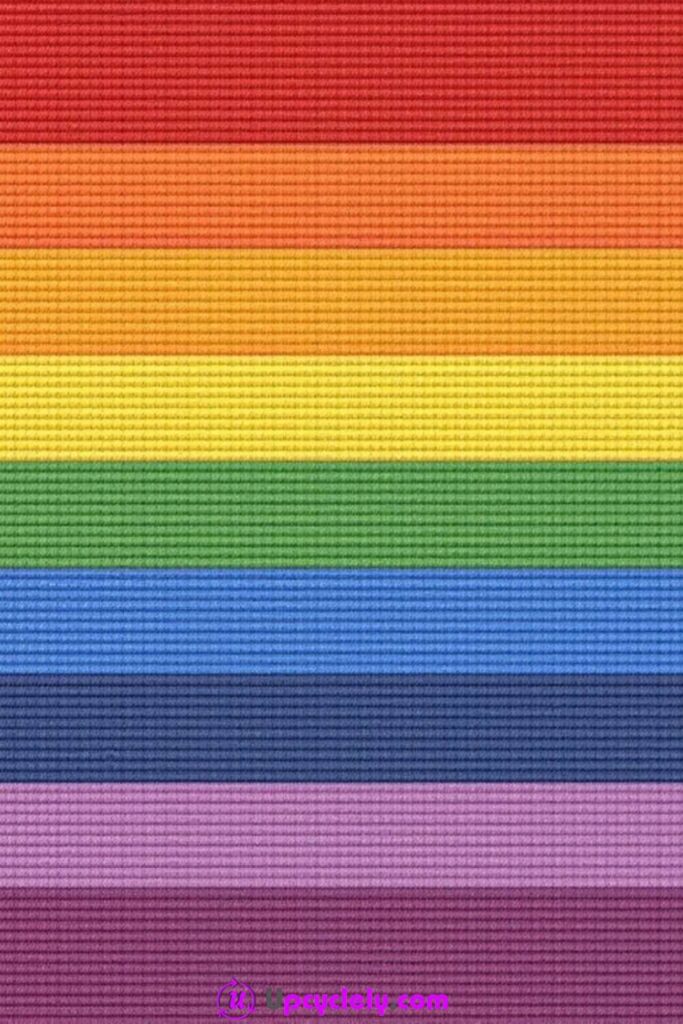
Rainbow Stripes
Materials Needed
- Needlepoint canvas
- Threads in red, orange, yellow, green, blue, pink, and purple shades
- Embroidery needle
- Hoop or frame
- Scissors
Steps
- Guide Your Stripes
Mark horizontal lines evenly spaced across your canvas. These lines will guide the thickness of each stripe, ensuring symmetry throughout your design. - Stitch Each Color
Work from top to bottom, organizing your colors in the rainbow order or personalizing the sequence. Use a long satin stitch to keep the stripes smooth, and be consistent with the thread tension. This keeps the finished look clean and continuous. - Add Texture and Detail
To make it extra creative, you can add subtle patterns within the stripes, like diagonal stitches in the red or crisscross shapes in the purple. It’s a fun way to put your personal touch on a classic look.
Pro Tip
Always start with clean, vibrant threads. Dull or older threads lose their sheen and result in dull stripes.
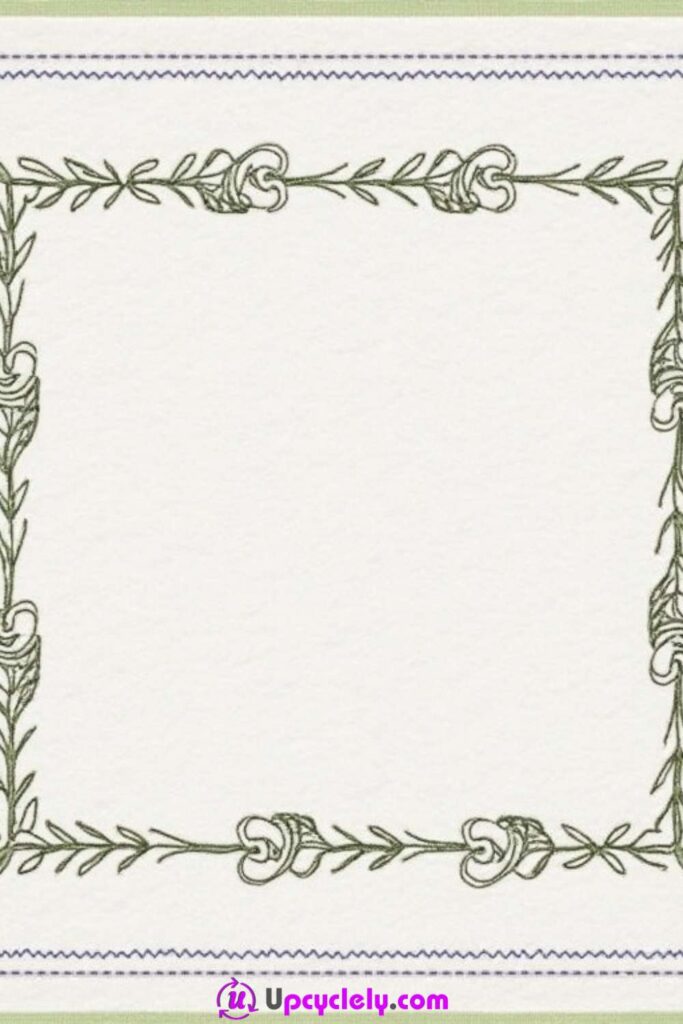
Simple Borders and Frames
Materials Needed
- Needlepoint grid or blank canvas
- Green, blue, yellow, and white thread
- Needle and scissors
- Printable or sketched design for guidance
Steps
- Outline Your Frame
Lightly trace the rectangular shape onto the canvas. Begin stitching the thin blue inner line first as a guide. Use basic stitches to get clean, straight edges. - Create the Vine Design
Follow the vine’s intertwining curves, adding the leaves and flowers as you go. Use lazy daisy stitches for leaves and add French knots for floral centers. The symmetry is what makes this piece stand out, so work slowly and double-check placement. - Finish with Class
Complete the outer thicker green line for a polished and secure edge. Once finished, you can use this as a border for text, photos, or even reserve it as a gift!
Pro Tip
When stitching vines, turn your canvas frequently to find the comfiest stitching angle. It makes the vines flow naturally.
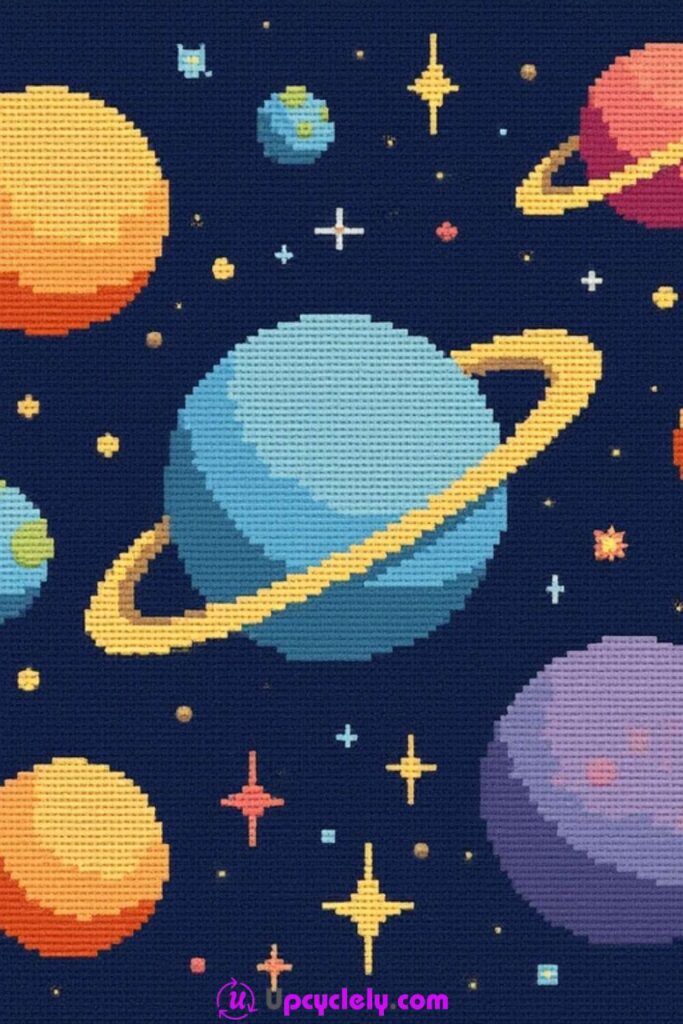
Space-Themed Design
Materials Needed
- Needlepoint canvas or pre-gridded fabric
- Embroidery threads in navy blue, yellow, orange, purple, green, and red
- Embroidery needles
- Fabric pencil or marker for outlines
- Circular hoop frame
- Scissors
Steps
- Design the Cosmos
Start by outlining the positions of your planets and stars on the canvas using a fabric-safe pencil. Place the largest planet in the center, and arrange the others around it in varying positions. Add stars using small dots to guide your stitches. It’s like crafting your own constellation! - Fill in the Planets
Use satin stitching to envelop the larger planets in bold, smooth colors, like blue and orange. For the ringed planets, stitch the planetary body first, then layer the rings using long-and-short stitches to give them dimension. Create texture for the smaller planets with cross-stitches or French knots to differentiate them. - Craft the Cosmic Background
Finally, fill in the navy blue background with careful, consistent stitches. This brings your galaxy to life while making the colorful planets pop. Take your time here; the repetitive motion can be meditative and satisfying.
Pro Tip
To give the stars their sparkle, use metallic or iridescent thread for a glowing effect. It brings an extra bit of magic to the finished piece.
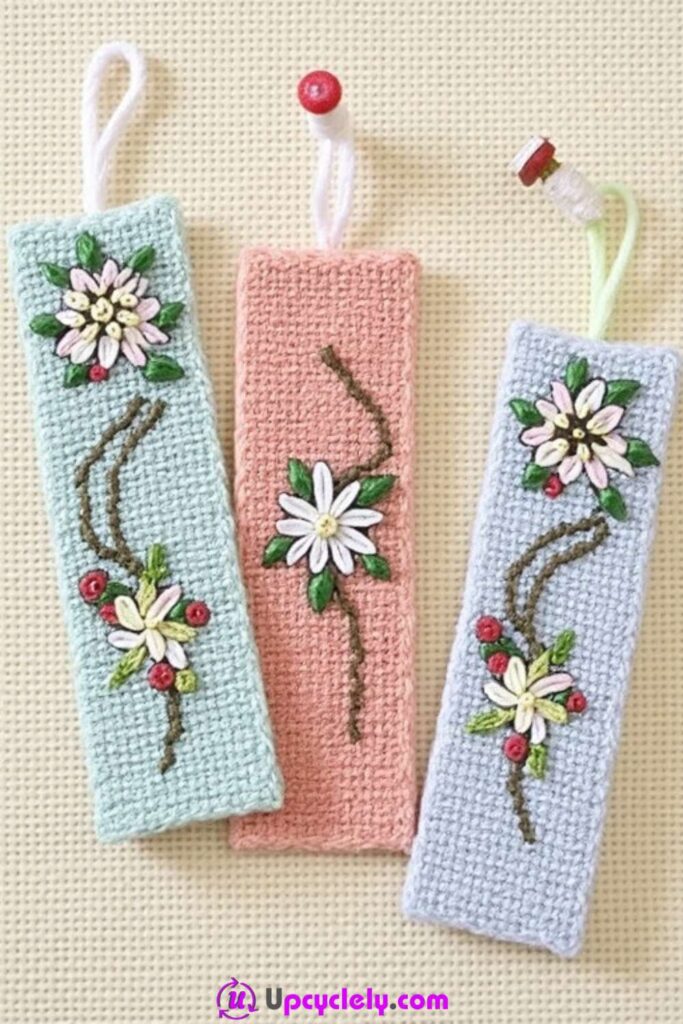
Stitched Bookmarks
Materials Needed
- Narrow needlepoint canvas strips (approximately 2–3 inches wide)
- Threads in green, white, yellow, red, and pastel shades (pink, blue, or green for the background)
- Embroidery needle
- Ribbons or loops for the top (optional)
- Beads for decoration
- Scissors
Steps
- Create the Base
Choose a pastel background color for each bookmark and stitch it across the entirety of the base strip. Use simple basketweave or diagonal stitches for a clean and consistent look. - Add the Florals
Once your base is finished, sketch floral patterns onto your canvas with a faint, fabric-safe marker. Begin stitching the white petals around a sunny yellow center, and use varying greens for the leaves. Small red berries can be added effortlessly using French knots. - Attach the Final Touches
Trim the edges of your bookmark for a clean finish. Add matching loops or ribbons at the top for hanging and sew the beads onto these loops for a polished, pretty detail. These personal additions make your needlepoint bookmarks truly one-of-a-kind.
Pro Tip
Be generous with your stitching tension when working on narrow bookmarks; loose stitches allow for better flexibility and don’t warp the shape of the bookmark.
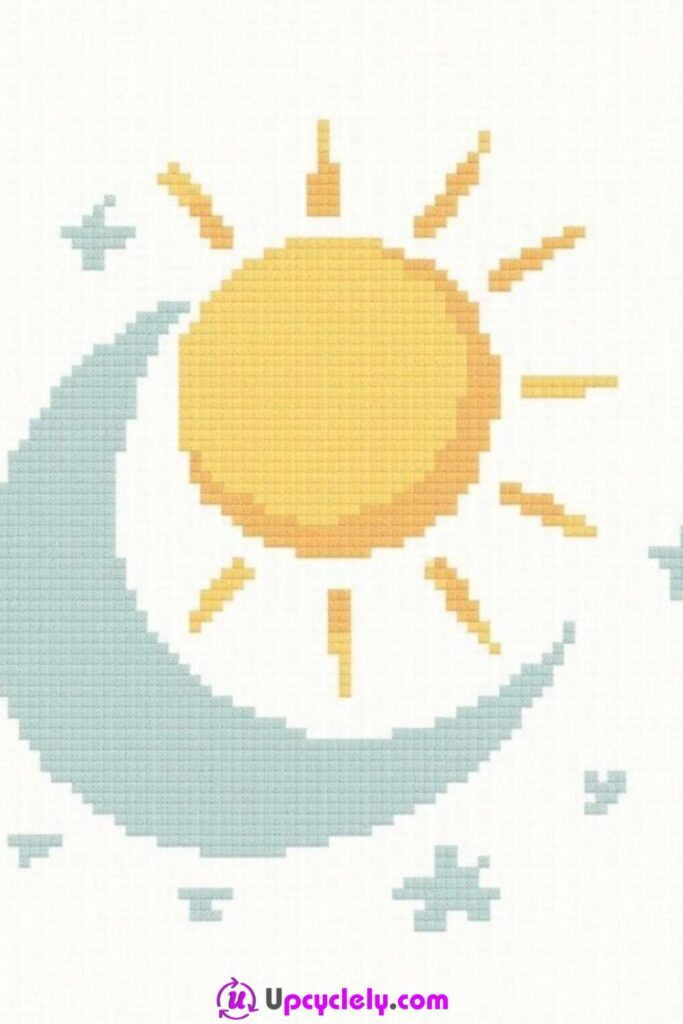
Sun and Moon Designs
Materials Needed
- Needlepoint canvas
- Threads in yellow, orange, blue, and white
- Embroidery needles
- Small hoop or frame for stitching
- Fabric-safe pencil
- Scissors
Steps
- Sketch and Place the Celestials
Lightly draw the sun, moon, and stars on your canvas. Keep the sun in the center with its rays radiating outward, and position the crescent moon slightly overlapping the sun for harmony. Scatter tiny stars around for added dimension. - Stitch the Sun and Moon
Start with the sun! Use a mix of satin and long-and-short stitches for a glowing, textured effect. Transition to the moon with a soft blue thread, stitching its crescent outline before filling it in. The blending of these vibrant and serene colors is where their beauty lies. - Starry Accents
Use small stitches or French knots to form the stars. Scatter them unevenly for a natural, whimsical look that mimics the night sky. Take your time with these details; they bring your stitching to life.
Pro Tip
Position a small light source on top of your canvas while you work. This prevents shadows and lets you see the finer details of your stitches.
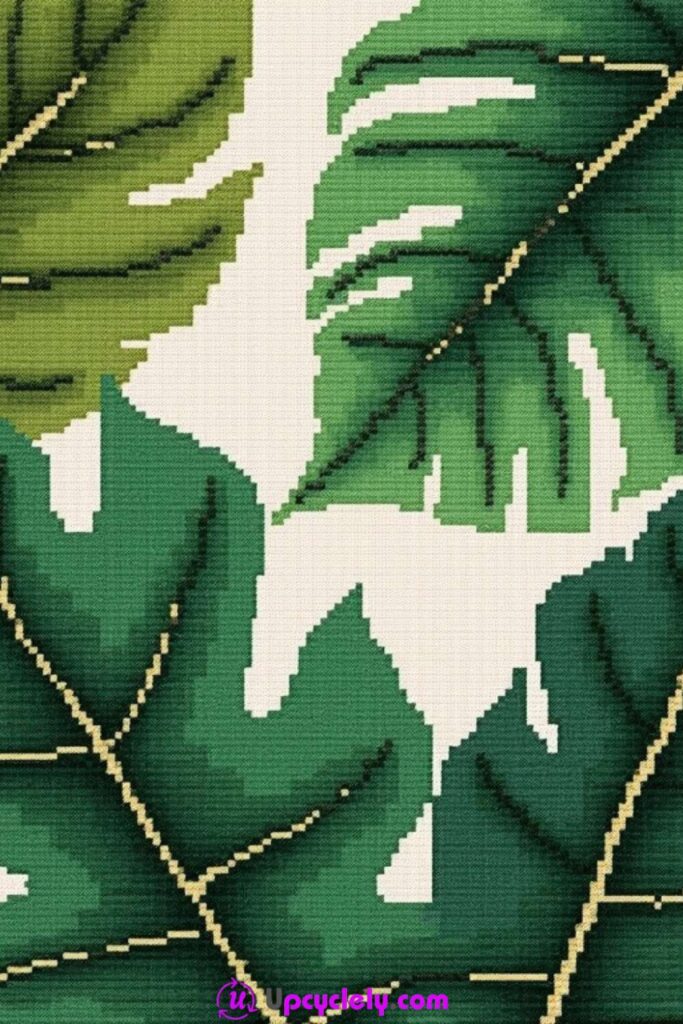
Tropical Leaves
Materials Needed
- Needlepoint fabric
- Threads in light green, dark green, yellow-green, and beige
- Fabric pencil for sketching
- Embroidery hoops
- Needles and scissors
Steps
- Frame the Canvas and Sketch the Leaves
Secure your canvas in a hoop, pulling it taut to work cleanly. Sketch the outlines of the tropical leaves, ensuring slight overlaps for a natural, layered effect. Try to keep the vein details faint but visible. - Craft the Leaves
Start with the lightest green thread for the first leaf and move to darker shades for the others, stitching each leaf individually. Use long satin stitches for the body and backstitches to emphasize the veins. Watching these shades blend is so satisfying! - Detail the Background
Fill in the beige background around the leaves using small, uniform stitches. It’s the perfect contrast to make the greens pop. Work slowly here to keep the fabric even, as the background is just as important as the foreground.
Pro Tip
Blend two shades of green in the same needle for added texture and realism to your leaves. This trick is a game-changer for depth and dimension.