Scandinavian folk art has long been admired for its intricate designs, vivid colors, and deep cultural roots.
Whether you’re a seasoned painter or a complete beginner, learning how to paint Scandinavian folk art can be a fun, rewarding journey that connects you with centuries of tradition.
But where do you begin? How do you infuse your personal touch into this iconic art form while still staying true to its roots?
In this blog post, I’ll walk you through the steps of creating beautiful Scandinavian folk art, from understanding its history to picking the right tools and techniques.
This post is designed to help you step into the world of Scandinavian folk art, no matter your skill level. So, grab your paintbrush, and let’s get started!
Why Should You Try Scandinavian Folk Art?
Before we dive into the technicalities of creating Scandinavian folk art, let’s take a moment to explore what makes this art style so captivating.
The heart of Scandinavian folk art lies in its simplicity, geometric shapes, and the connection to nature. This art form was born from the rural traditions of Scandinavia, where artists often painted everyday items such as furniture, utensils, and tools, turning the mundane into something beautiful.
The iconic motifs, like flowers, leaves, birds, and geometric patterns, were often inspired by nature and the everyday life of Scandinavian people.
If you’ve ever been enchanted by the timeless charm of Scandinavian decor or the rustic appeal of traditional furniture, painting Scandinavian folk art might just be the creative outlet you’ve been looking for!
The History of Scandinavian Folk Art
Scandinavian folk art has a rich and long history, deeply intertwined with the culture and traditions of the region. This art form is characterized by its use of simple motifs, often inspired by nature and daily life.
It’s rooted in rural areas, where artisans and farmers would decorate their everyday possessions to brighten their homes.
In the 18th and 19th centuries, Scandinavian folk art began to flourish, especially in Sweden, Norway, and Denmark. It wasn’t just a form of decoration it was also a symbol of identity and pride in one’s heritage.
Many Scandinavian folk art pieces were painted on furniture, household items, and even walls, often using bright colors and floral patterns that were both visually striking and rich in symbolism.
Scandinavian Folk Art Design Elements:
- Floral motifs: Flowers are a dominant theme in Scandinavian folk art, symbolizing beauty, growth, and life.
- Geometric patterns: Circles, diamonds, and triangles are common, creating balance and harmony in the designs.
- Nature-based elements: Birds, animals, and trees often appear in the artwork, reflecting the deep connection to the natural world.
By understanding the origins and elements of this art, you can more easily incorporate its timeless charm into your own paintings.
Step-by-Step Guide: How to Paint Scandinavian Folk Art
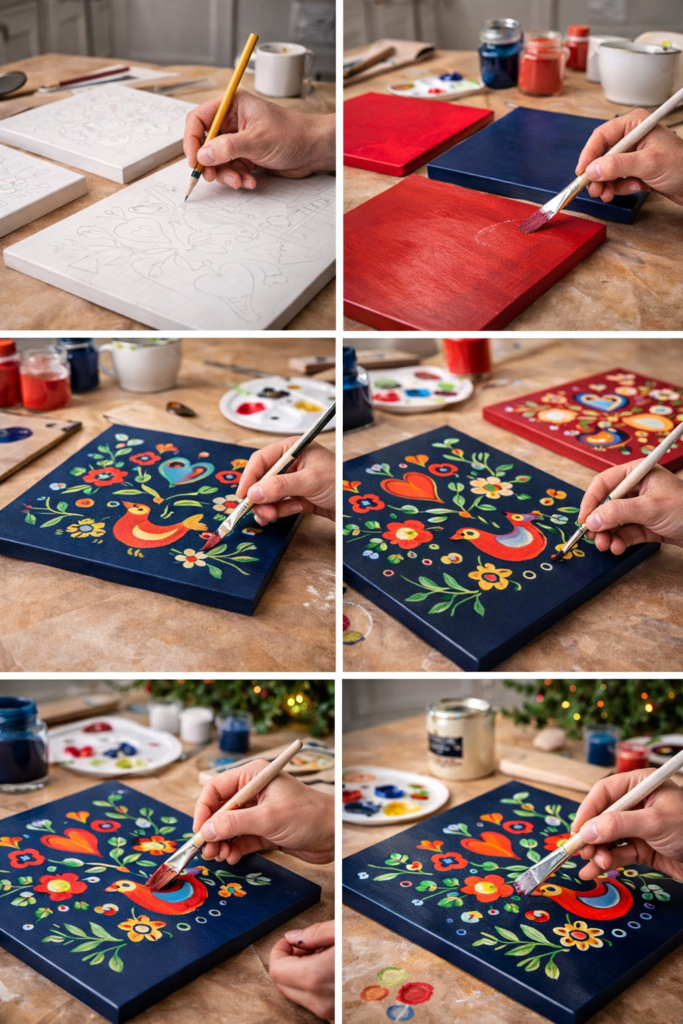
Step 1: Choose Your Design and Sketch It Out
Start by choosing a traditional Scandinavian folk art design. Classic motifs include floral patterns, birds, hearts, or geometric shapes. You can also create a design that reflects your personality don’t be afraid to experiment!
Once you’ve selected your design, lightly sketch it on your canvas or wooden panel with a pencil. Take your time with this step having a rough outline will guide your painting process.
If you’re painting flowers, for example, mark the stems and petals in pencil first so you can perfect the shape as you go.
Step 2: Paint the Background
Before adding any details, start by painting the background of your design. Scandinavian folk art often uses rich, solid colors for the background, such as red, blue, or black. Apply a coat of paint that will serve as the base for your design.
Let the background dry completely before moving on to the next steps.
Step 3: Add the Main Motifs
Now, it’s time to start painting the main elements of your folk art. For a floral design, start by painting the petals and leaves, working your way around the sketch.
Use the finest brush you have for the delicate details, and don’t worry about getting everything perfect the beauty of folk art is in its charm and imperfection.
Pro Tip: Use several layers of paint for depth and vibrancy. Allow each layer to dry before applying the next to avoid smudging.
Step 4: Add the Fine Details
Once your main motifs are painted, you can start adding the finer details. For example, you could add veins to the leaves, texture to the flowers, or accentuate the edges with contrasting colors. These little touches bring the artwork to life.
Step 5: Final Touches and Varnishing
Once you’re happy with the design, step back and take a look at your artwork. Are there any areas that need more detail? Is the color balance just right? Once you’re satisfied, allow the painting to dry completely.
For added protection and shine, apply a layer of varnish. This will seal your painting and protect it from dust and fading. It also adds a nice glossy finish, making the colors pop.
Common Mistakes to Avoid in Scandinavian Folk Art
While painting Scandinavian folk art can be incredibly rewarding, there are a few common mistakes that beginners often make. Here’s what you should watch out for:
- Overcomplicating the Design: Scandinavian folk art is known for its simplicity. Stick to basic shapes and patterns. Less is more in this style.
- Choosing the Wrong Colors: While Scandinavian folk art is vibrant, it’s important to choose colors that complement each other. Avoid using too many clashing colors, which can overwhelm the viewer.
- Rushing the Drying Process: Allow each layer of paint to dry completely before adding another. Rushing can lead to smudging and uneven color application.
- Neglecting the Background: A solid, contrasting background can make your design pop. Don’t skip this step!
- Not Using Enough Layers: To get the rich, vibrant colors typical of Scandinavian folk art, don’t be afraid to use multiple layers of paint.
Conclusion: Your Scandinavian Folk Art Journey
Painting Scandinavian folk art is more than just creating a beautiful piece of art it’s about connecting with a centuries-old tradition and infusing it with your own creativity.
As you go through the process, take the time to appreciate the history and meaning behind the designs. Remember, folk art is as much about expressing yourself as it is about following tradition.
Now it’s time to grab your paints and start creating your own Scandinavian folk art masterpiece! And remember there’s no right or wrong way to approach it. What matters most is that you enjoy the process.
FAQs: Your Scandinavian Folk Art Questions Answered
What is the best surface to paint Scandinavian folk art on?
Traditional Scandinavian folk art is often painted on wood, such as furniture, but canvas works just as well for a modern approach. Choose a surface that suits your project.
Can I create my own folk art designs, or should I stick to traditional motifs?
While traditional motifs are a great starting point, feel free to add your own personal touch! Folk art is about expressing creativity, so make it your own.
How do I avoid mistakes when painting intricate details?
Start with a light pencil sketch, use fine-tipped brushes, and don’t rush the process. Take your time and build up the layers of paint for the best results.
Can I use different colors than the traditional ones?
Yes, you can experiment with colors! Traditional Scandinavian folk art uses bold colors like red, blue, and yellow, but feel free to add your personal twist with modern shades that match your style.