Leaves are easy to overlook because they appear everywhere for part of the year, then dry, curl, and disappear almost as quickly. Yet their veins, stems, serrated edges, and gradual colour changes already contain the kind of detail people often try to draw or print by hand. Leaf craft ideas work best when the material is treated gently and the project allows those natural features to remain visible.
I am Stella Eve Louise, and I enjoy turning ordinary materials into useful or displayable pieces without disguising where they came from. A pressed leaf can become a bookmark, a card, or part of a framed arrangement; a flexible fresh leaf can print its own veins; and paper or fabric leaves can step in when a project needs more durability. I do not think every leaf has to be preserved forever, but the right preparation can give a small seasonal object a thoughtful second role.
Choose Leaves for Colour, Shape, and Strength
Match the leaf to the work it needs to do. Flexible fresh leaves are suitable for stamping, while flat pressed leaves are easier to seal inside bookmarks, cards, coasters, and clear window crafts. Dry textured leaves can suit garlands and frames, but they should still have a firm central vein and enough strength to be handled without crumbling.
Collect only where it is allowed and avoid leaves with insects, mould, sticky residue, or heavy road dirt. Take a few more than the project requires because natural materials change as they dry. Sort them by size and colour before starting so a damaged edge does not force a complete layout change halfway through the craft.
Clean, Press, and Dry Natural Leaves Properly
Most leaves need less cleaning than people expect. Brush away loose soil, blot slight moisture with plain absorbent paper, and avoid soaking delicate autumn leaves unless there is a specific reason to wash them. A wet leaf sealed under film or glue may darken, develop spots, or release moisture into the finished project.
Press leaves between absorbent sheets under even weight in a dry indoor place, changing damp paper when necessary. Remove them only when they feel flat and fully dry. Store finished leaves between clean sheets or in labelled envelopes, and lift thin pieces by the centre rather than pulling a fragile tip or stem.
Match Adhesives, Finishes, and Display Methods to the Craft
A light paper card, a cork coaster, a glass jar, and a wall panel do not need the same adhesive or protective finish. Test products on a spare leaf and a hidden part of the base before committing to the full project. Use thin layers, allow materials to cure properly, and avoid finishes that remain tacky or cloud the leaf surface.
Safety matters most where heat, glass, magnets, sharp tools, or children are involved. Use battery lights in leaf lanterns, supervise cutting and painting, keep small magnets away from young children and pets, and hang wall art from proper hardware rather than from twigs or decoration. A leaf craft should remain enjoyable after it is finished, not become a fragile object everyone is nervous to touch.
Leaf Embroidery
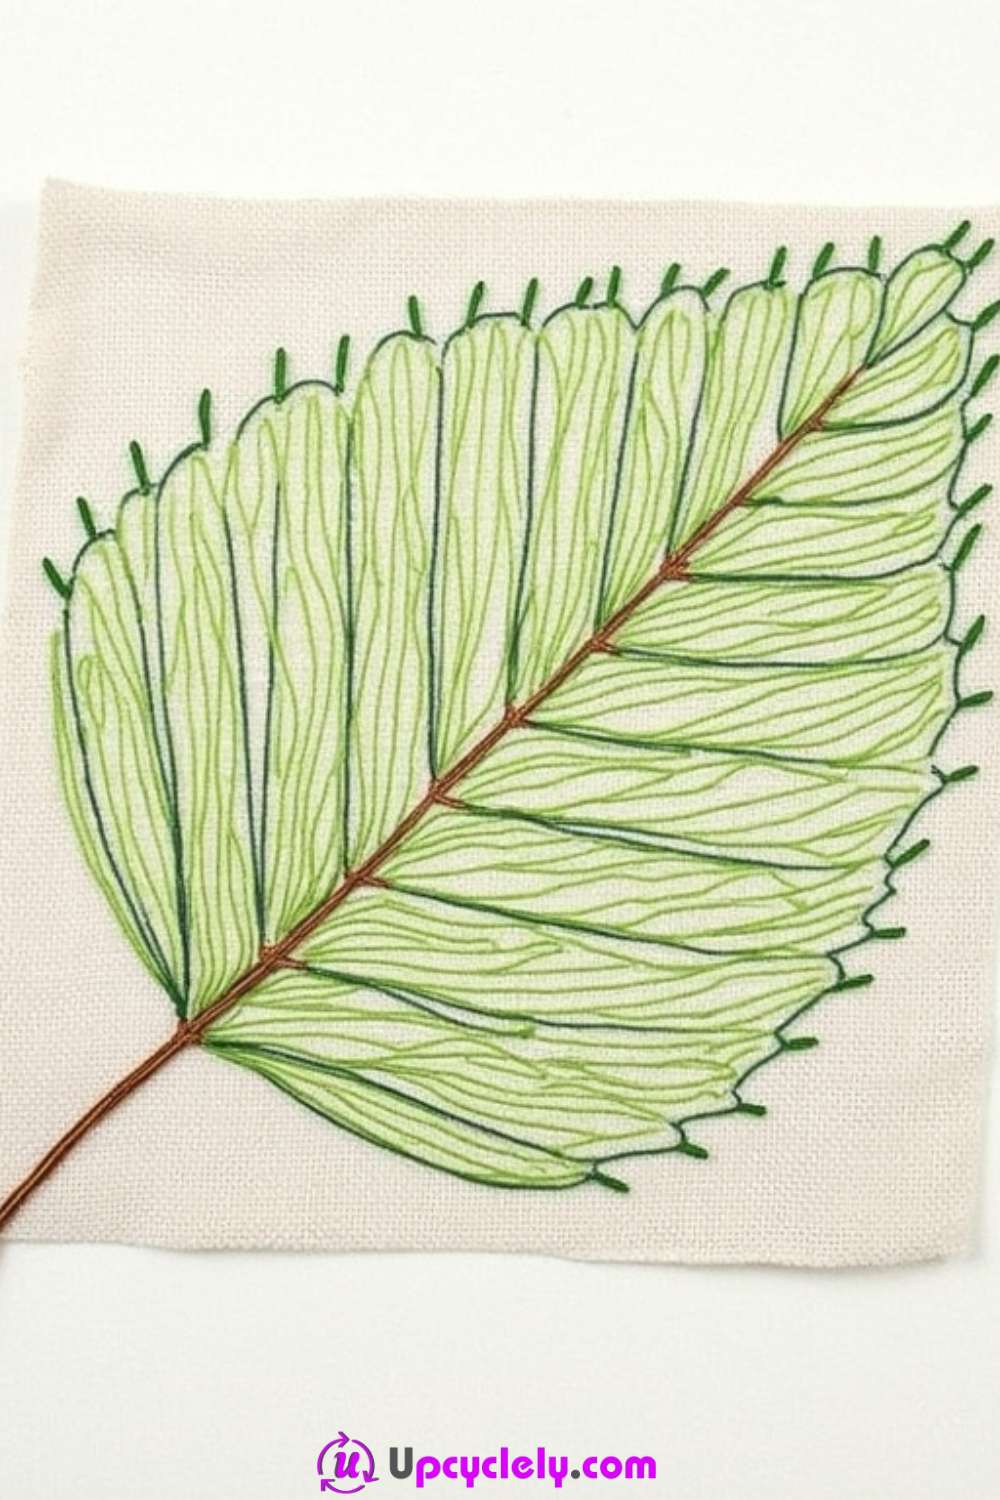
A single embroidered leaf can hold far more detail than a busy floral pattern. The stitched example uses a pale fabric ground, a brown central stem, and several green thread weights to describe the veins, folded areas, and uneven outer edge. Keeping the palette narrow allows the direction of the stitches to create most of the movement.
This is also a useful way to reuse a small offcut of linen, cotton, or an old plain napkin that is too good to discard. The fabric needs enough strength to hold repeated stitches without stretching. I would avoid a loose, worn weave unless it is backed with a stable layer, because delicate thread work cannot rescue fabric that is already pulling apart.
Materials and Tools
· A clean cotton or linen fabric offcut
· Embroidery hoop sized to the fabric
· Embroidery floss in brown and several greens
· Embroidery needle and small sharp scissors
· Washable fabric pencil or a lightly drawn paper template
· Optional backing fabric for a thin or reused textile
Steps for This Leaf Craft
1. Plan the leaf before threading the needle. Place a real leaf or a simple printed outline beside the fabric and study the main stem, side veins, and outer edge. Transfer only the essential lines with a washable fabric pencil; too many marks can make the stitching feel cramped before it begins.
2. Secure and test the fabric. Centre the design in the hoop and tighten the fabric until it is firm but not distorted. Test one or two stitches near the edge of the spare fabric to check that the thread, needle, and tension suit the weave.
3. Build the structure first. Stitch the stem and strongest veins in brown or dark green using a backstitch or another secure line stitch. Then add the outer edge, following the small natural changes in the leaf rather than forcing both sides to become perfectly symmetrical.
4. Fill the leaf with directional stitches. Work outward from the central vein and change green shades gradually so the sections remain connected. Finish the thread neatly on the reverse, remove visible guide marks, and press the fabric from the back under a clean cloth rather than flattening the stitches directly.
For me, the most convincing part is the change in stitch direction. I do not think every space needs dense filling; a few open areas can make the fine vein work easier to see.
A beginner version can use one outline stitch for the whole leaf, while a bolder adaptation could place the finished embroidery on a repaired tote bag, cushion panel, or framed fabric scrap.
Leaf and Twig Frame
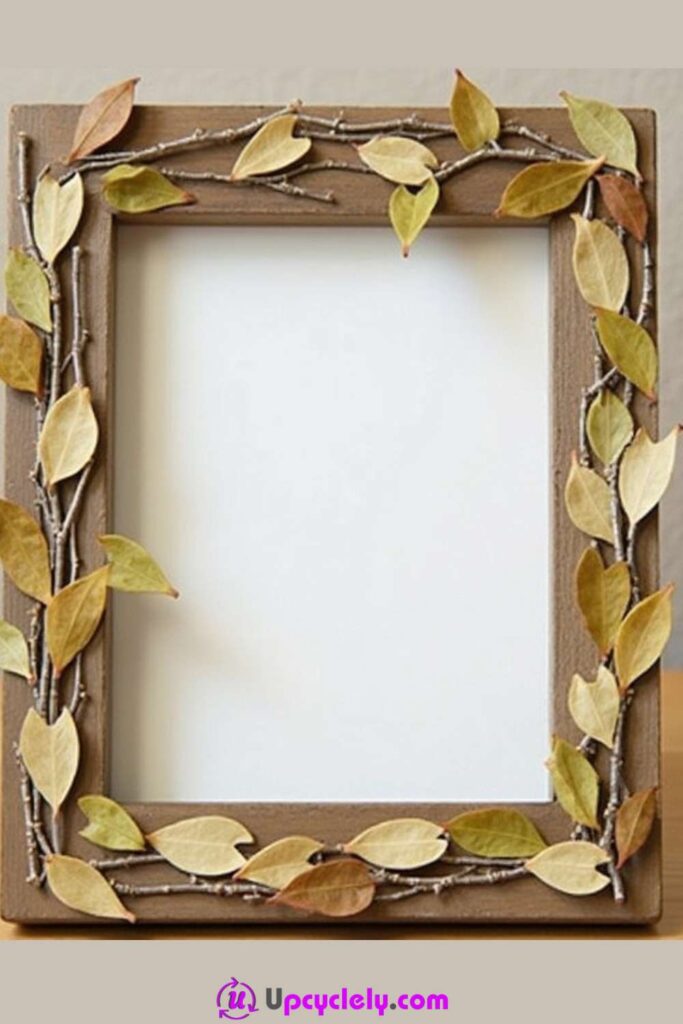
A plain wooden frame becomes more interesting when thin twigs follow its edges and small dried leaves sit between them. The narrow branches in this design create a second irregular border without covering the useful inner opening. Muted yellow, tan, olive, and brown leaves keep the surface varied but calm.
This craft suits a frame with cosmetic marks that do not affect its structure. The natural pieces can disguise small scratches while leaving the shape recognisable. Check the frame corners and backing first, because adding decoration to a loose joint only makes the weakness harder to repair later.
Materials and Tools
· A sound reused picture frame
· Dry, clean twigs with no soft or flaking bark
· Pressed or fully dried small leaves
· Craft adhesive or a low-temperature glue gun used carefully
· Small pruning snips or strong scissors
· Optional matte clear finish compatible with the materials
Steps for This Leaf Craft
1. Prepare the frame and natural pieces. Remove the glass and backing, clean the frame, and tighten any loose hardware. Trim the twigs over a protected surface and reject leaves that feel damp, brittle at every edge, or marked by mould.
2. Arrange the border without glue. Lay the longest twigs along the vertical sides, then add shorter pieces across the top and bottom. Move the leaves between the branches until their sizes and colours feel balanced, keeping the inner picture opening clear.
3. Attach the twigs in a stable order. Fix the main branches first with small amounts of adhesive at several contact points. Hold each piece until it is secure, then add lighter twigs over the gaps rather than building one thick ridge of glue.
4. Add leaves and check the finished frame. Attach leaves at their strongest central areas and let the adhesive cure with the frame lying flat. Replace the backing and glass only after loose fibres and dried glue threads have been removed, then use an optional finish sparingly if the leaves genuinely need protection.
One detail I would keep simple is the number of leaf colours. The twigs already create plenty of line, so a limited palette stops the border from competing with the photograph or artwork inside.
A lighter version can use paper leaves cut from old book pages or packaging. For a temporary seasonal frame, attach artificial leaves with removable ties instead of permanent adhesive.
Leaf Bookmarks
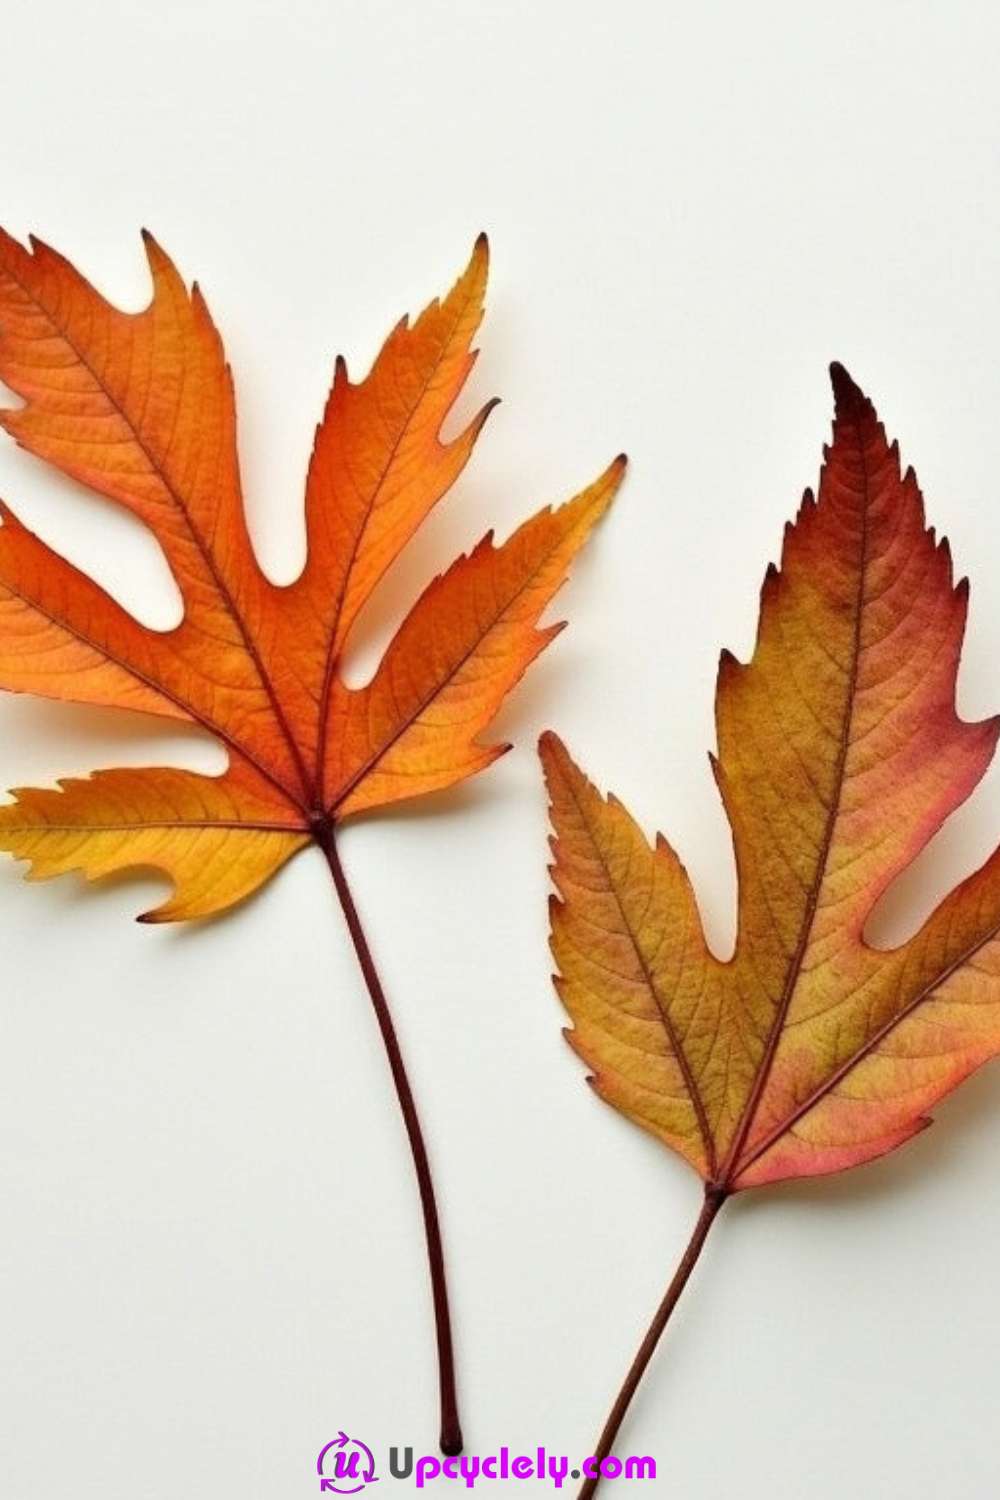
Pressed autumn leaves already have the long, flat shape a bookmark needs. The pair shown keeps the natural lobes, stems, orange tones, and visible veins rather than cutting the leaves into rectangles. A transparent protective layer allows those details to remain visible while keeping fragile edges away from the pages.
The important choice is whether the leaf is dry enough to seal. Fresh leaves can trap moisture, darken unevenly, or mark a book. I know it can feel tempting to laminate the brightest leaf immediately, but pressing it first gives a flatter result and makes the finished bookmark easier to slide between pages.
Materials and Tools
· Flat, fully pressed leaves with intact stems
· Clear laminating pouches or two sheets of clear self-adhesive film
· Scissors with a clean, sharp edge
· Bone folder, ruler, or soft cloth for smoothing
· Optional hole punch and narrow ribbon or reused thread
Steps for This Leaf Craft
1. Select leaves that can survive handling. Choose leaves without wet spots, loose fragments, or thick stems that prevent the layers from closing. Brush away dust gently and place each leaf on plain paper to make sure it does not release moisture or stain.
2. Position the leaf inside the clear layer. Leave enough transparent space around the entire outline to form a sealed border. Straighten the stem and smooth the leaf from the centre outward without forcing curled edges that may crack.
3. Seal and remove trapped air. Close the laminating pouch or add the second sheet of clear film, following the material instructions. Work slowly from one side to the other with a soft cloth or bone folder so bubbles do not collect around the veins.
4. Trim and finish the bookmark. Cut around the natural shape while leaving an unbroken clear margin. Round any sharp plastic corners, then add a small ribbon near the stem only when the sealed area is wide enough to accept a hole without opening the edge.
I would rather leave a slightly wider clear border than trim too close and lose the seal. The leaf is the interesting part, so the transparent edge does not need to disappear.
Artificial leaves, leaf-shaped fabric scraps, or paper prints can create the same form when real leaves are unavailable. A child-friendly version can use clear contact paper instead of a heated laminator, with adult help for cutting.
Leaf Coasters
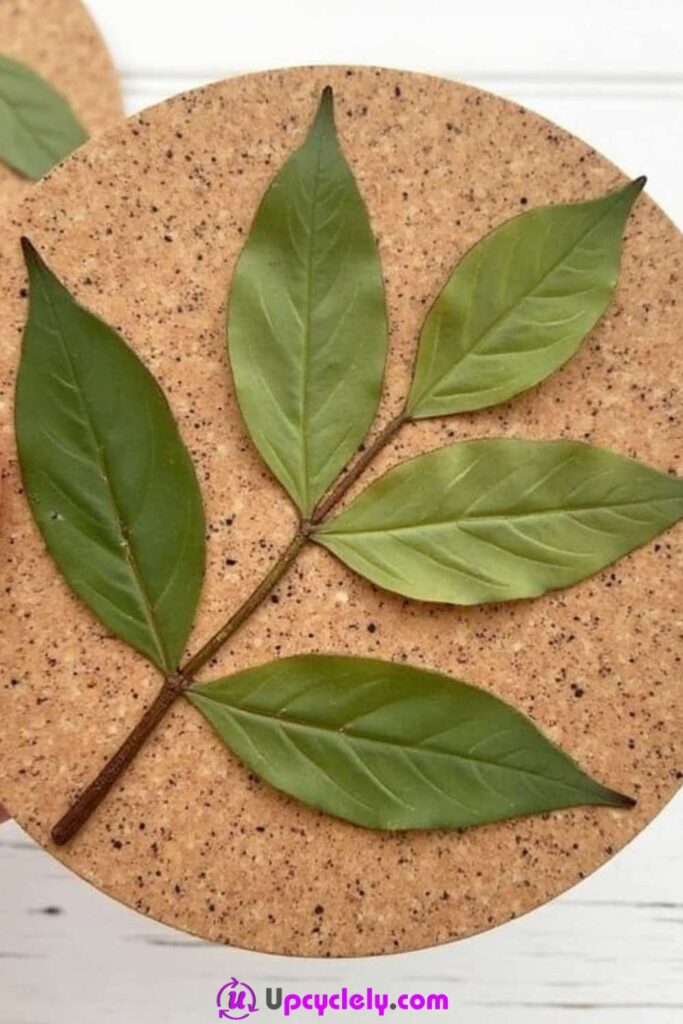
Round cork bases give small leaf sprigs a clear background and a useful purpose. The visible designs use one short branch on each coaster, allowing the differences in leaf shape and colour to become the decoration. The natural tan cork also suits both green and autumn-toned leaves without requiring a painted base.
A coaster has to tolerate handling and occasional moisture, so the leaves cannot simply rest on the surface. They need to be fully dry, attached flat, and protected with a finish suitable for the intended use. These are decorative drink coasters rather than trivets; very hot cookware needs a material specifically rated for heat.
Materials and Tools
· Clean cork coaster blanks or reused cork cut into circles
· Small pressed leaf sprigs or individual leaves
· Clear-drying decoupage adhesive
· Soft flat brush and tweezers
· Protective finish suitable for a coaster surface
· Wax paper or a reusable mat for the work area
Steps for This Leaf Craft
1. Prepare the cork and leaf pieces. Wipe loose cork dust from each base and sand only rough outer edges. Test the leaf sprigs on the circles, trimming unnecessary stem length so no sharp section projects beyond the edge.
2. Choose a simple layout. Place one main sprig or a small group of leaves on each coaster and rotate the pieces until the composition feels balanced. Keep the thickest part away from the rim, where cups are more likely to catch it.
3. Attach the leaves gradually. Brush a thin layer of adhesive onto the cork and lower the leaf into place with tweezers. Smooth from the central vein outward, adding only enough adhesive to secure the surface without soaking the leaf or creating ridges.
4. Seal and let the surface cure. Add several thin protective layers as directed by the chosen product, allowing each layer to settle before the next. Check that the final surface is even, the leaf edges are enclosed, and the coasters no longer feel tacky before stacking or using them.
The part I would check carefully is the raised stem. If a cup rocks, the design is too thick or uneven, no matter how attractive the leaf looks.
A more durable alternative is to stamp or paint the leaf shape onto cork instead of attaching a real leaf. Leftover ceramic tiles can also become coasters when backed with felt and finished with a suitable protective coating.
Leaf Collage Art
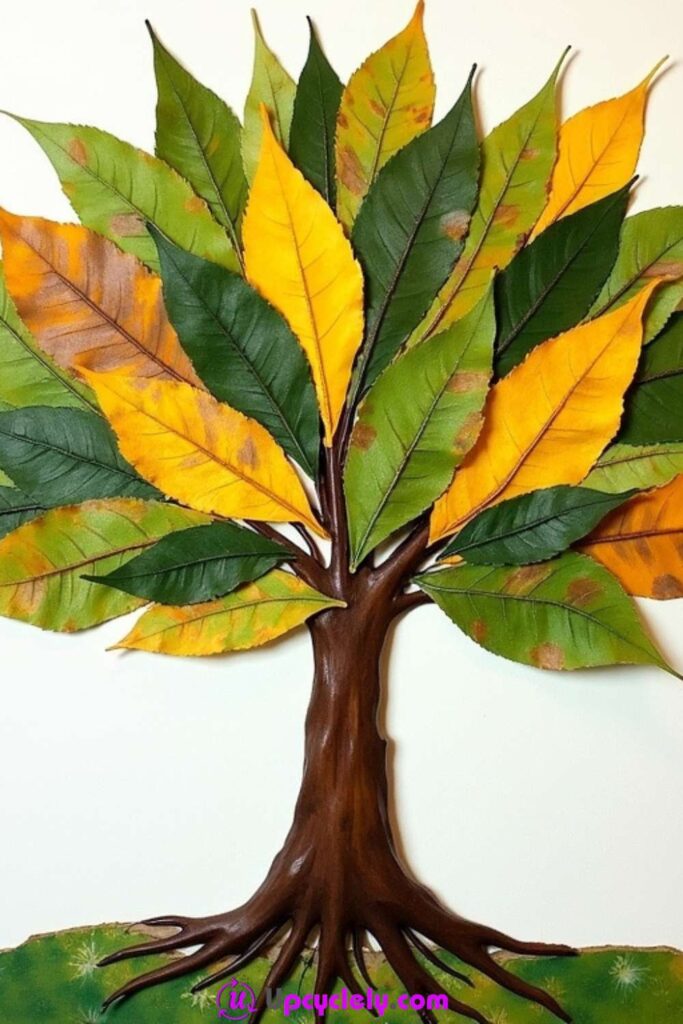
A painted tree trunk gives loose leaves a structure they would not have on a blank page. In this collage, green, yellow, and warm brown leaves spread outward from a dark trunk, creating a broad canopy with natural variation in size and direction. The overlapping edges provide depth without needing complicated drawing.
This is a useful project for leaves that are attractive but not perfect enough for close-up display. Small marks and colour changes can disappear into the canopy, while broken pieces may fill narrow gaps. A sturdy backing matters because a thin sheet can curl under the combined weight of paint, adhesive, and plant material.
Materials and Tools
· Sturdy cardboard, canvas board, or a reused picture backing
· Pressed leaves in several sizes and related colours
· Brown paint, marker, or paper scraps for the trunk
· Clear-drying craft adhesive and a small brush
· Tweezers and small scissors
· Optional frame or deep display box
Steps for This Leaf Craft
1. Map the tree shape lightly. Sketch a trunk with several large branches, leaving wide areas where the leaf canopy can spread. Keep the drawing simple because much of it will sit behind the collage, then test the backing inside its future frame before adding raised material.
2. Sort the leaves before attaching them. Group the largest leaves, medium fillers, and small pieces, then place darker colours near the trunk and lighter colours toward the outer canopy if you want a gradual effect. Move everything several times; the first arrangement rarely needs to be permanent.
3. Build the trunk and main canopy. Paint or assemble the trunk first and let the surface become touch-dry. Attach the largest leaves along the main branches, overlapping them enough to connect the shape while leaving parts of the branch visible.
4. Fill gaps and protect the collage. Add smaller leaves around the outer edge and in spaces that look too open, then remove any piece that makes the canopy heavy on one side. Let the artwork dry flat and frame it behind a spacer when possible so the leaves are not crushed against glass.
For me, balance matters more than making the two sides match. A real tree grows unevenly, but the visual weight should still feel supported by the trunk.
The same method can form an animal, wreath, or family tree. Paper leaves cut from old magazines are a reliable option for classrooms or humid homes where natural leaves may not remain stable.
Leaf Garland
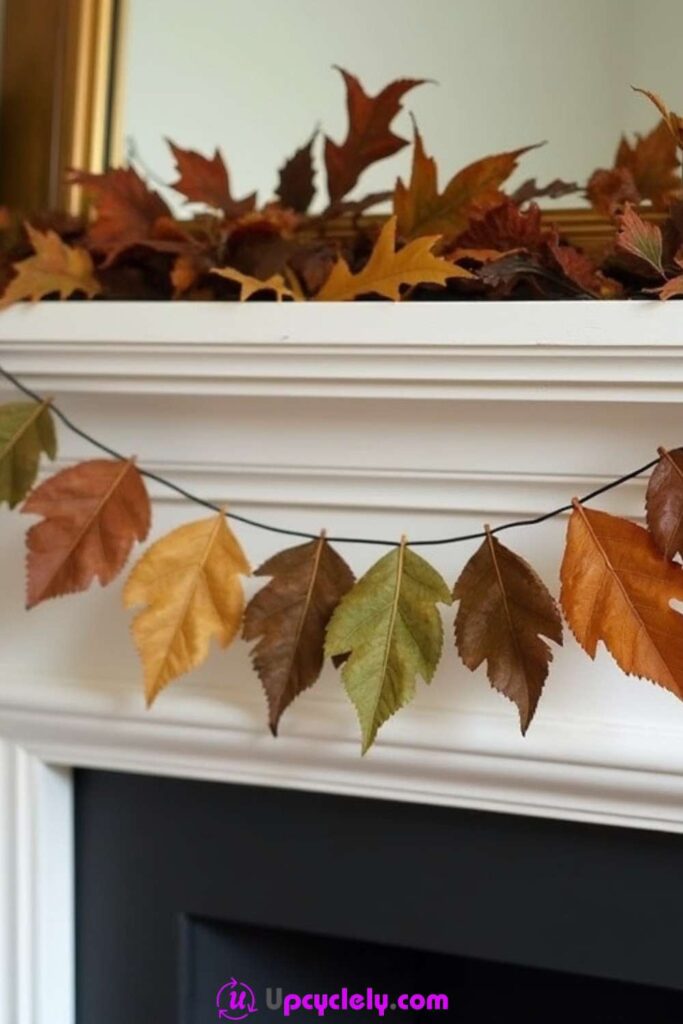
A line of individual autumn leaves can decorate a mantel without the bulk of a thick wreath. The leaves hang from a dark cord in a loose sequence of orange, brown, yellow, and green, while their varied lengths create a gentle uneven rhythm. Because each leaf remains separate, the garland still looks light across a long horizontal space.
Real leaves need support at the stem or central vein, not only at a brittle tip. The hanging method should also suit the display area. Keep dried plant material away from flames, hot lamps, heaters, and working fireplaces; a battery candle on a nearby shelf is a safer companion than an open flame.
Materials and Tools
· Pressed or carefully dried autumn leaves
· Jute twine, cotton cord, or reused ribbon
· Mini wooden clips, paper tabs, or small amounts of adhesive
· Scissors and measuring tape
· Removable wall hooks or another suitable hanging method
· Optional beads, seed pods, or paper leaves for gaps
Steps for This Leaf Craft
1. Measure the display area with hanging space included. Run the cord loosely across the mantel, doorway, or wall and decide how much curve you want. Add enough length for knots or loops at both ends, then test the placement away from heat and moving doors.
2. Prepare more leaves than the final garland needs. Sort the leaves by colour and size and remove loose fragments. Reinforce fragile stems with a small paper tab on the back if necessary, keeping the repair hidden from the front.
3. Plan the colour rhythm on a table. Lay the cord flat and arrange the leaves beside it before attaching anything. Alternate large and small shapes, repeat one or two colours across the length, and leave enough space for each leaf to hang without covering the next one completely.
4. Attach and hang the garland gently. Clip, tie, or adhere each leaf at a strong point, then lift the garland with support from both ends. Secure it to appropriate hooks, adjust any leaves that turn backward, and store it flat between sheets of paper after the season.
I do not think every gap needs a leaf. A little open cord keeps the shapes readable and makes the whole garland easier to handle.
Faux leaves are sensible for a garland that will be reused for several years. You could also mix leaf-shaped scraps from brown paper bags, fabric remnants, or old maps with a few real pressed leaves.
Leaf Greeting Cards
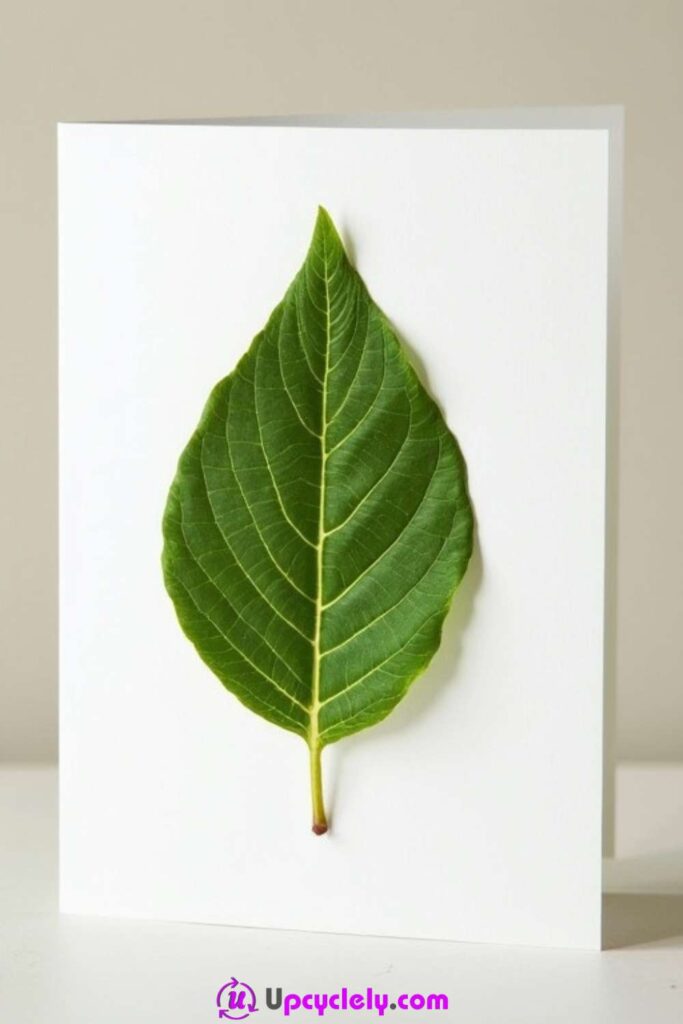
One leaf centred on a plain folded card can say more than a crowded arrangement. The broad green leaf in this idea has clear veins, a strong stem, and generous white space around it, so the natural structure becomes the complete front design. That restraint also leaves room for a short handwritten message without competing decoration.
Fresh leaves may look bright for a day but can curl and discolour after attachment. A pressed leaf, a skeleton leaf, or a carefully made paper version is more suitable for a card that needs to travel or be kept. Use a card weight strong enough to support the leaf without bending when the card stands.
Materials and Tools
· Blank folded cards made from sturdy cardstock
· Pressed leaves with flat stems
· Clear-drying paper or craft adhesive
· Tweezers, soft brush, and scrap paper
· Fine pen, pencil, or reused paper label
· Optional protective sheet for posting
Steps for This Leaf Craft
1. Pair each leaf with the right card. Place the leaf on several card colours and orientations before choosing the final combination. A large simple leaf often needs only a plain background, while a smaller leaf can sit beside a short word or narrow border.
2. Test the placement with the card folded. Stand the card upright and check that the leaf feels centred in the visible front area. Keep thick stem ends away from the fold and outer edge, where they may catch inside an envelope.
3. Attach the leaf with minimal moisture. Apply small amounts of adhesive to the central vein, strongest side veins, and stem rather than coating every fragile edge. Lower the leaf with tweezers, cover it with clean paper, and add light pressure until it stays flat.
4. Add the message and prepare the card for use. Write inside only after the front is secure, and avoid pressing hard enough to mark the leaf. Slip a smooth sheet over the front before placing the card in an envelope so raised edges do not snag during handling.
The part I like is the open space. I know extra lettering, ribbon, and glitter can feel tempting, but this design works because the leaf remains the single clear subject.
A stamped leaf print is easier to mail and can be repeated across a set of cards. Old seed packets, book pages, or fabric scraps can also be cut into leaf shapes for a completely dry version.
Leaf Handprint Craft
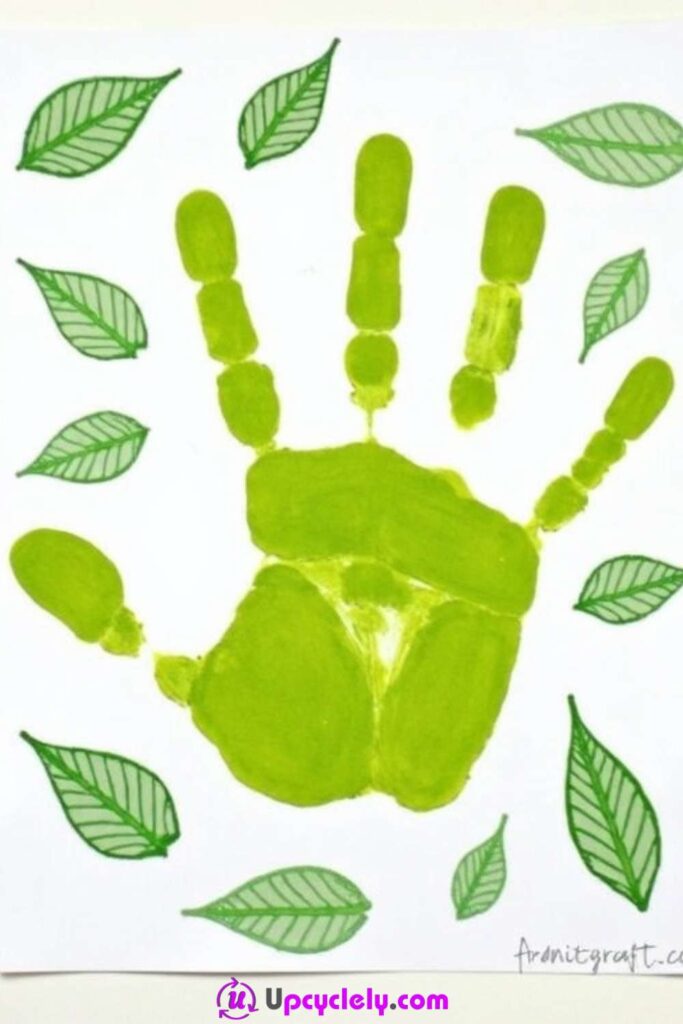
A green handprint already resembles a plant when the fingers spread like narrow leaves. The visible craft adds small outlined leaves around the print, turning an ordinary painted hand into a cheerful nature study. The uneven finger marks and gaps are part of the result, which makes this especially suitable for children and family keepsakes.
Use washable, non-toxic materials and supervise the painting and cleanup. Cover the table before opening the paint, keep wipes and water nearby, and make sure children do not touch their eyes or mouth while their hands are coated. The finished page should dry completely before names or dates are added.
Materials and Tools
· Heavy white paper or reused light-coloured cardstock
· Washable non-toxic green paint
· Wide soft brush or sponge
· Fine green marker, crayon, or leaf stamp
· Apron, table cover, wipes, and water for cleanup
· Optional frame or scrapbook page
Steps for This Leaf Craft
1. Set up the paper and cleanup area first. Tape the corners of the paper lightly so it does not slide, and place wipes within reach before painting begins. Roll up sleeves and test the paint on scrap paper to check the amount needed for a clear print.
2. Apply paint evenly to the hand. Brush a thin, complete layer across the palm and fingers, filling dry gaps without creating dripping pools. Spread the fingers naturally, then press the hand straight down and lift it directly upward to reduce smearing.
3. Turn the print into a leaf design. Once the handprint no longer transfers paint, draw small leaves around it or add leaf stamps in the open spaces. Follow a limited colour palette so the main hand shape remains easy to recognise.
4. Finish it as a keepsake. Add the maker’s name, age, or date beneath the print using a separate pen. Let the page dry flat, remove loose tape carefully, and place it in a frame or scrapbook pocket rather than folding the painted surface.
The best handprints are rarely the most perfect ones. A missing fingertip or small smudge can make the finished keepsake feel more personal, provided the overall shape remains clear.
A family version can combine several hand sizes into one tree. For less mess, trace hands onto leftover green paper, cut the shapes with adult help, and draw leaf veins on top.
Leaf Lanterns
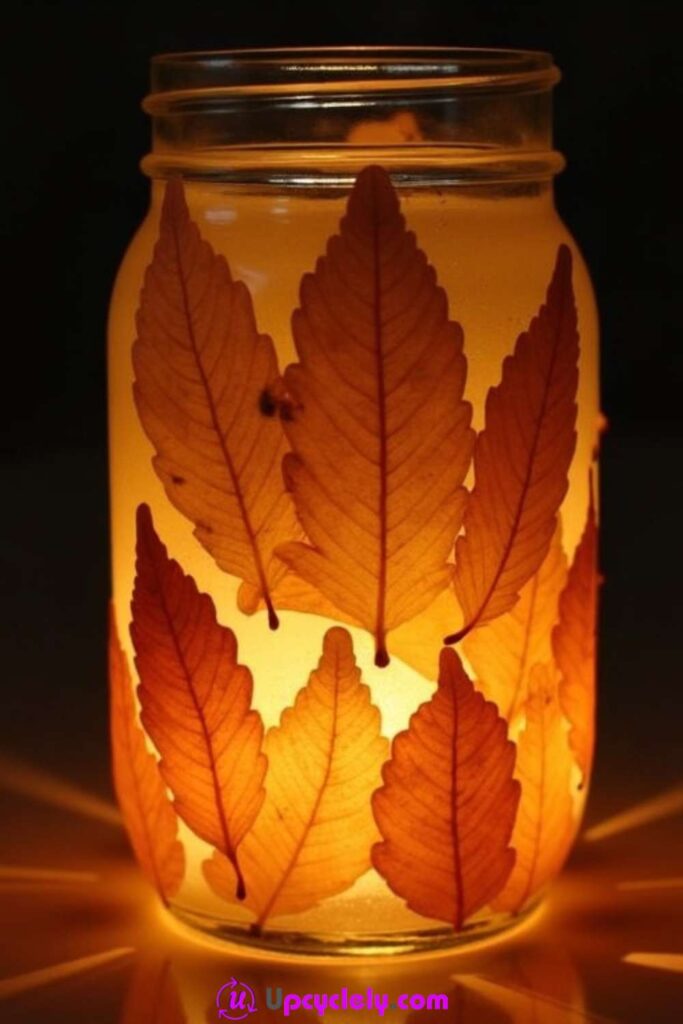
Thin autumn leaves become warm silhouettes when light passes through a glass jar. The lantern shown layers pointed red and orange leaves around the outside, allowing the central veins to stand out against the glow. An undecorated rim keeps the jar easy to handle and stops extra trim from hiding the simple shape.
A battery-operated tea light is the most practical light source for this craft. Dried leaves, paper, twine, and many craft adhesives should not sit close to an open flame. Check the battery light for heat during its first use, and never seal the jar with a lid while a light is operating inside.
Materials and Tools
· A clean glass jar with no cracks or sharp chips
· Thin pressed leaves or translucent paper leaves
· Clear-drying decoupage adhesive
· Soft brush and lint-free cloth
· Battery-operated tea light or small rechargeable light
· Optional twine kept away from the light source
Steps for This Leaf Craft
1. Clean and inspect the jar. Remove labels and adhesive residue, wash the glass, and dry it thoroughly. Run a cloth around the rim and base to check for chips, then choose the smoothest side as the front of the lantern.
2. Arrange the leaves before applying adhesive. Stand the jar on a folded towel and hold the leaves against the glass to test spacing. Overlap only the thinnest edges so light can pass through each shape and the veins remain visible.
3. Attach the leaves in small sections. Brush adhesive onto one area of glass, place a leaf, and smooth it from the centre toward the points. Continue around the jar, supporting the opposite side with your hand and avoiding thick drips at the leaf edges.
4. Seal, cure, and add the light. Apply a light protective coat over the decorated area according to the adhesive instructions. Let the jar become fully dry and clear before placing the battery light inside, then check that the base is stable and the switch remains easy to reach.
I would keep the top of the jar mostly plain. That clear band gives the eye somewhere to rest and makes it easier to pick up the lantern without rubbing the leaves.
Tissue paper leaf shapes create a similar glow and are less brittle than real leaves. A wide drinking glass can work for a temporary table light, provided it is used only with a cool battery light.
Leaf Magnets
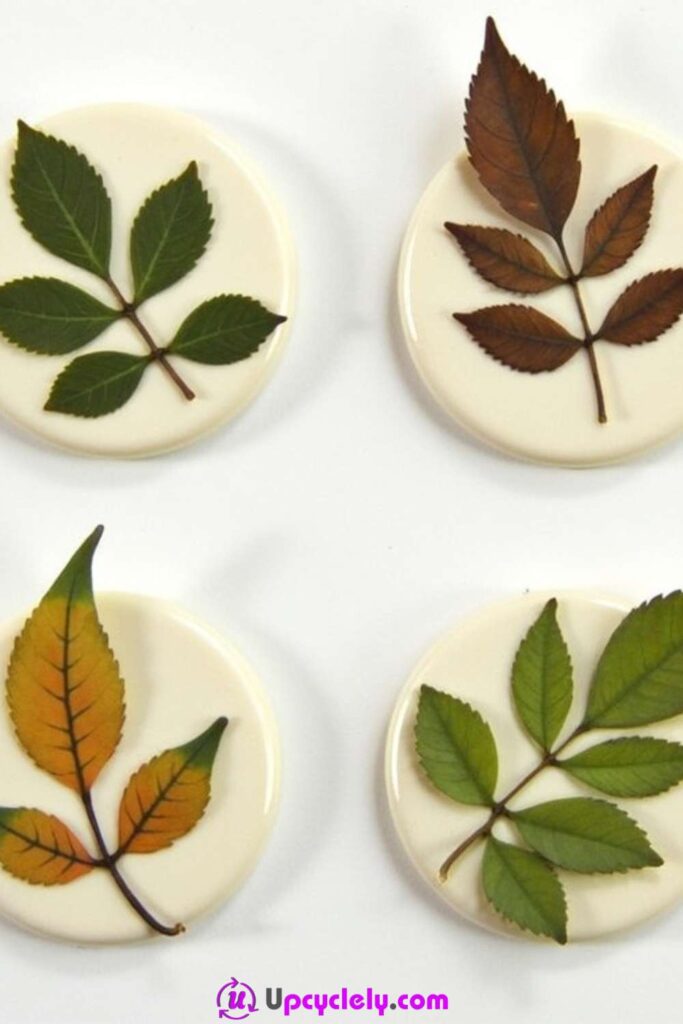
Small round bases turn individual leaf sprigs into useful fridge or notice-board decorations. The light backgrounds in this idea make green, brown, and yellow leaves easy to see, while the circular form keeps each piece consistent even though the plant shapes vary. A thin sealed surface is important so the leaves do not catch on fingers or nearby papers.
The base may be wood, cork, air-dry clay, or another light craft material, but it should be flat and strong enough to hold the magnet securely. Small magnets can be dangerous if swallowed, so keep loose pieces and finished magnets away from young children and pets.
Materials and Tools
· Small flat wooden, cork, or fully dried clay circles
· Tiny pressed leaves or leaf sprigs
· Clear-drying adhesive and a fine brush
· Protective clear finish compatible with the base
· Strong craft magnets sized for the finished piece
· Sandpaper, ruler, and protected work mat
Steps for This Leaf Craft
1. Prepare a flat, lightweight base. Smooth rough edges and wipe away dust before decorating. Place the undecorated base against the intended metal surface to confirm its size will not make the finished magnet awkward or top-heavy.
2. Arrange one clear leaf motif. Choose a leaf or sprig that fits inside the circle without projecting over the edge. Rotate it until the stem and outer leaves feel balanced, then mark the position lightly or take a quick reference photo.
3. Attach and seal the leaf. Use a thin adhesive layer and press the strongest parts of the leaf flat with a soft brush or clean paper. Once secure, add protective coats gradually so the surface stays level rather than forming a thick dome around the leaf.
4. Fix the magnet to the back. Roughen the contact area when the adhesive requires it, centre the magnet, and hold it in place until stable. Let the bond cure fully, then test the magnet with a light sheet of paper before asking it to hold heavier notes.
One detail I would not skip is centring the magnet on the back. A magnet placed too close to one edge can make the whole piece twist or slide.
Painted leaf motifs or small leaf stamps can replace real leaves for a flatter finish. Bottle caps, jar lids, and leftover tile samples may also become bases when their edges are smooth and the magnet is securely enclosed.
Leaf Stamps
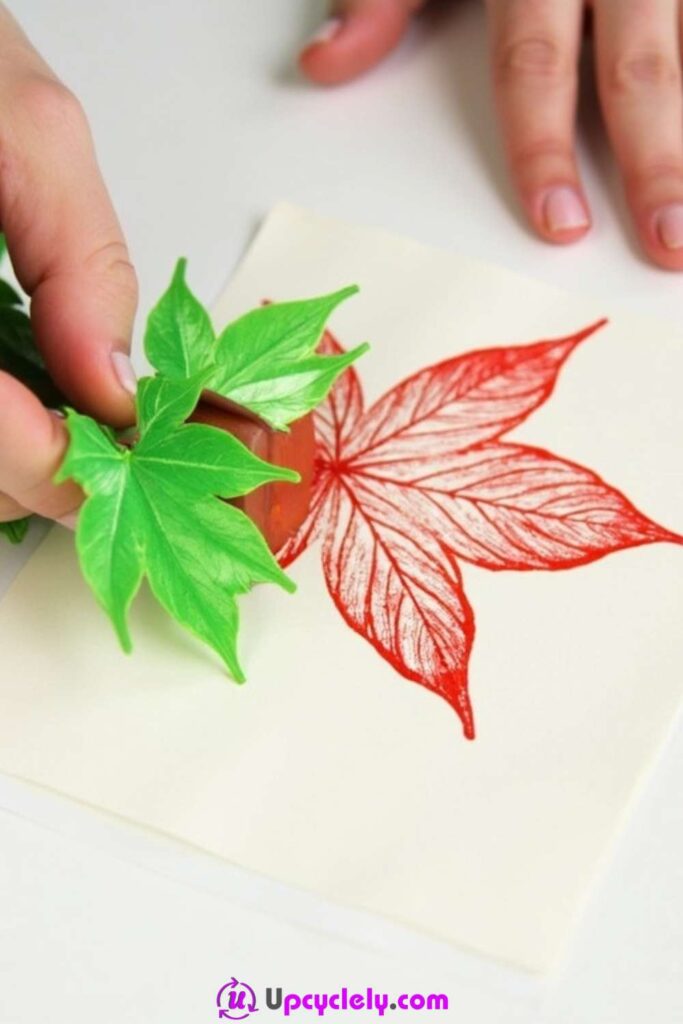
The underside of a flexible leaf works like a ready-made printing block because its raised veins hold paint. In the visible example, a green leaf produces a crisp red impression on pale paper, with the central stem and branching lines forming the most recognisable details. A thin paint layer gives a better print than a heavily coated surface.
Fresh but firm leaves usually print more clearly than dry brittle ones. Choose leaves that can bend without splitting, wash away dust, and dry both sides before adding paint. Reused paper bags, plain wrapping paper, old notebook covers, and fabric scraps can all become printing surfaces when the paint suits the material.
Materials and Tools
· Fresh flexible leaves with strong visible veins
· Washable paint or paint suitable for the chosen surface
· Flat brush, sponge, or small roller
· Scrap paper for testing
· Cardstock, reused paper, notebook cover, or fabric
· Protective table covering and water for cleanup
Steps for This Leaf Craft
1. Choose and test the printing side. Turn the leaf over and feel which side has the most raised veins, usually the underside. Make one dry test press on scrap paper to see how the stem and lobes meet the surface.
2. Apply a thin, even coat of paint. Brush or roll paint across the veined side, reaching the edges without leaving thick pools. Blot once on scrap paper if the layer looks glossy and heavy; too much paint can fill the fine lines.
3. Press without sliding. Place the painted leaf face down, cover it with clean paper, and press across the entire shape with fingertips or a flat palm. Hold the stem steady, then lift the leaf from one edge so the print does not smear.
4. Repeat with controlled changes. Reapply paint for each impression and rotate the leaf to build a border, scattered pattern, or layered composition. Let one colour dry before overlapping another when you want the vein details to remain clear.
For me, the first test print is part of the project, not wasted paper. It shows whether the paint needs thinning, blotting, or a different leaf before the final surface is marked.
Use fabric paint for a washable tote or table runner, following the paint instructions for setting the design. Foam or carved eraser leaves are better when the same exact print is needed many times.
Leaf Notebooks
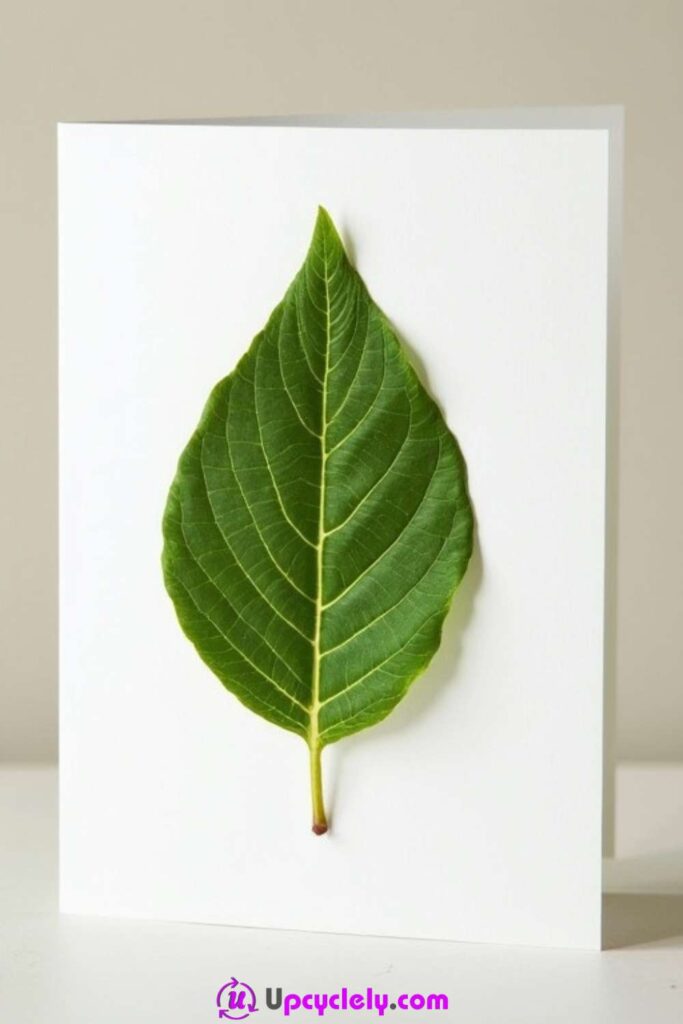
A plain notebook cover gives one or two pressed leaves enough space to become a lasting design. The natural veins and asymmetrical outline bring interest to an otherwise simple surface without making the notebook difficult to carry. A clear protective layer is especially useful on a cover that will be handled, stacked, and placed inside a bag.
The binding affects the method. A hardbound notebook offers a broad flat area, while a spiral notebook needs extra clearance along the punched edge. I would plan the design with the book open and closed so no leaf stem sits across a hinge or catches beneath the spiral.
Materials and Tools
· A plain notebook with a clean, firm cover
· Flat pressed leaves or paper leaf cut-outs
· Clear-drying adhesive
· Clear self-adhesive film, book-cover film, or another suitable protector
· Scissors, ruler, and smoothing tool
· Optional small label cut from reused paper
Steps for This Leaf Craft
1. Clean and measure the cover. Wipe the surface according to the notebook material and remove loose labels or residue. Measure the usable area, leaving space around the spine, elastic strap, closure, and spiral binding.
2. Arrange the leaves with the notebook in use position. Place the notebook upright and flat to see how the design reads from both angles. Keep thick stems away from the fold and let the main leaf sit slightly inside the cover edge so the protector can seal around it.
3. Attach the design lightly. Use small amounts of adhesive along the central vein and broad sections, then smooth the leaf through clean paper. Add a simple name label only after the leaf placement feels complete; too many small pieces can make the cover difficult to protect evenly.
4. Cover and trim the surface. Apply clear film slowly from one side, pushing out air as you move toward the other edge. Trim excess material neatly, check that corners are sealed, and open the notebook several times to make sure the cover still bends freely.
The good thing about a leaf notebook is that the design can be very quiet. One strong shape often looks more deliberate than a cover filled edge to edge.
A no-leaf version can use a stamped print, photocopied leaf skeleton, or leaf shape cut from old wrapping paper. Removable transparent covers are useful when the notebook itself should not be permanently altered.
Leaf Painted Rocks
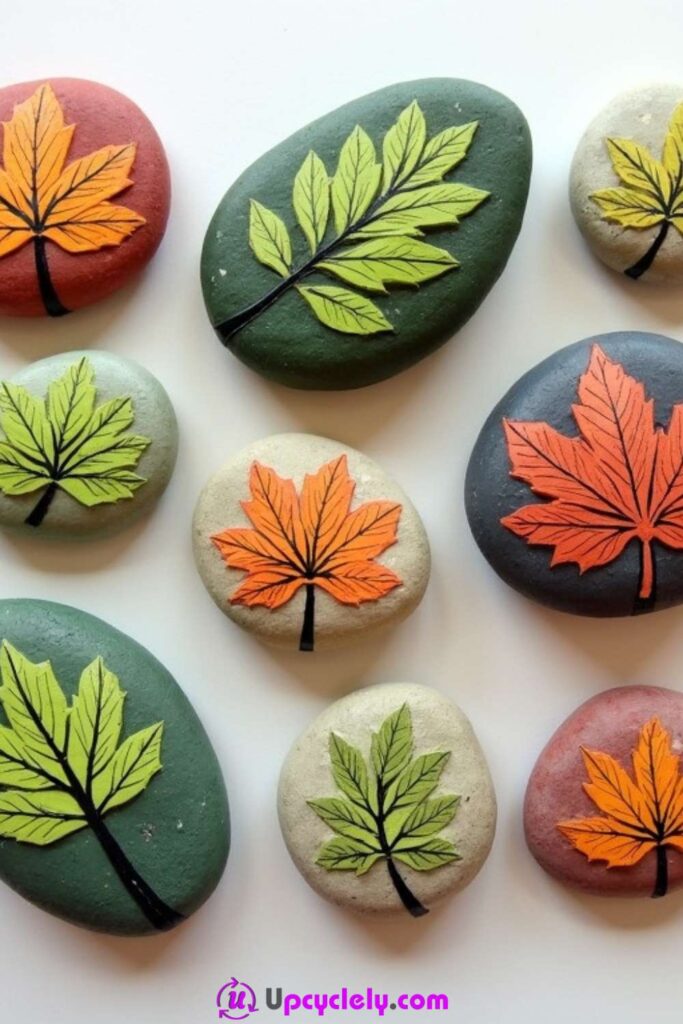
Smooth stones create compact backgrounds for leaf silhouettes, veins, and colour blocks. The collection shown uses muted green, cream, charcoal, and earthy red bases with orange or pale green leaves, making each rock different while keeping the group connected. Strong dark stems and veins help the motifs remain clear on small surfaces.
Painted rocks work best when the natural shape supports the design. A long oval stone can hold a narrow branch, while a round stone suits a broad maple leaf. Clean stones responsibly and use ones already available for craft rather than removing rocks from protected places, landscaped areas, or habitats.
Materials and Tools
· Clean smooth stones in several sizes
· Acrylic or craft paint suitable for the intended location
· Pencil, chalk pencil, or transfer paper
· Small flat and fine detail brushes
· Clear protective finish suitable for indoor or outdoor display
· Soap, water, and a drying cloth
Steps for This Leaf Craft
1. Wash and sort the stones by shape. Scrub away dirt, rinse thoroughly, and let the stones dry completely. Set aside any piece with loose layers or sharp fractures, then match each sound stone with a leaf design that fits its outline.
2. Create a simple background. Leave the natural stone visible or apply a thin base colour, following the paint instructions between coats. A calm background makes the veins easier to read, especially when several rocks will be displayed together.
3. Paint the leaf from large shapes to fine lines. Sketch the main outline lightly, fill the leaf colour, and add the stem and branching veins after the larger area has dried. Turn the stone as you work so the brush follows the curve instead of fighting it.
4. Protect and place the finished rocks. Apply a compatible finish only after the paint is fully dry, coating all exposed areas needed for the intended use. Let the finish cure before grouping the stones in a bowl, on a shelf, or outdoors in a sheltered spot.
I would keep the vein pattern simpler on the smallest stones. Tiny lines can become muddy very quickly, while one central stem and a few side veins remain readable.
Leaf stamping can replace freehand painting: coat the underside of a small leaf, press it onto the stone, and strengthen the print with a brush. For indoor use, unsealed chalky finishes can give a softer appearance.
Leaf Pressing
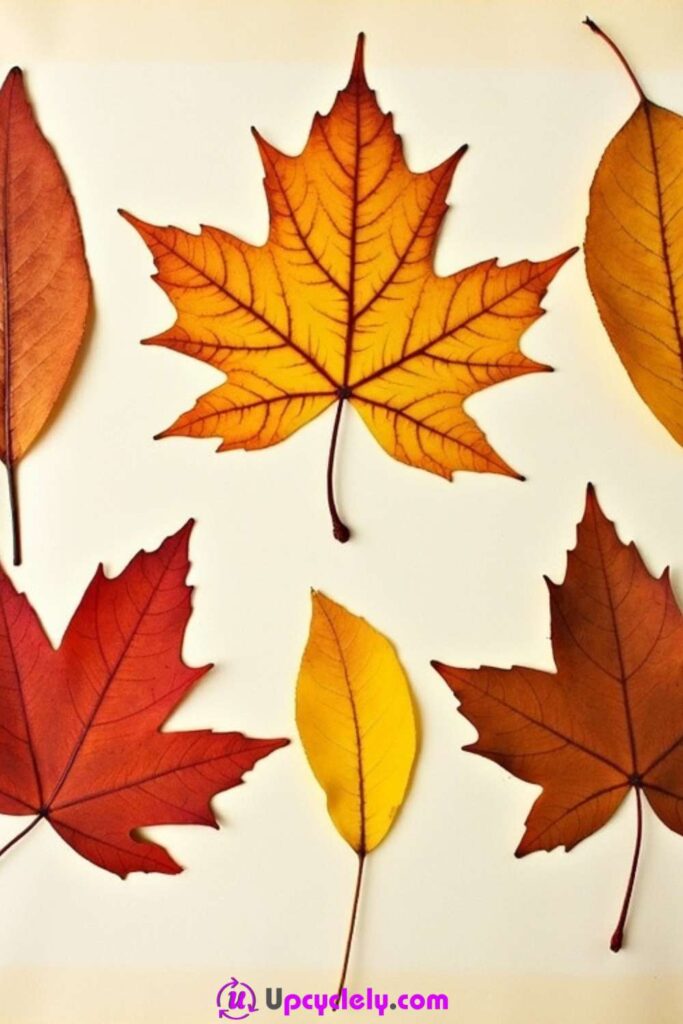
Pressed leaves are useful materials in their own right, not merely preparation for another craft. A group of flat red, orange, gold, and brown leaves can be arranged in a frame, studied in a nature journal, or stored for later cards and collages. The best pressed examples keep their outline and vein structure without feeling damp or curled.
Choose recently fallen leaves that are clean and still flexible. Very wet leaves may stain the pressing paper, while dry crumbly ones can break before they become flat. Collect only where permitted, take a modest amount, and leave damaged or inhabited material outdoors.
Materials and Tools
· Fresh flexible leaves in several shapes
· Absorbent plain paper or unprinted blotting sheets
· Heavy books or a simple leaf press
· Flat cardboard sheets for extra support
· Weights and a dry indoor storage place
· Tweezers and labelled envelopes for finished leaves
Steps for This Leaf Craft
1. Clean and blot the leaves gently. Brush away soil and check both sides for insects or damaged areas. If a leaf is slightly damp, place it between absorbent sheets and blot rather than rubbing the surface or washing it unnecessarily.
2. Arrange leaves without overlap. Lay each leaf flat on clean paper, straighten the stem, and give the edges enough space that they will not touch neighbouring pieces. Add another paper layer and a sheet of cardboard before creating the next level.
3. Press with even weight in a dry place. Close the book or press and add steady weight across the full surface. Keep the stack away from humidity and direct heat, and replace damp papers when necessary without bending the soft leaves.
4. Check, sort, and store the finished leaves. Remove leaves only when they feel flat and dry, lifting them by the central area with tweezers. Place them between clean sheets or in labelled envelopes, storing the largest pieces flat so their tips are not crushed.
I press more leaves than a project seems to need because a few will change colour or split at the edge. That is normal, and the imperfect pieces can still become collage fillers.
For a reusable setup, make a simple screw press from two flat boards and absorbent layers, or place heavy books over cardboard sheets. Avoid glossy magazine pages because their coatings may not absorb moisture well.
Leaf Stained Glass

Translucent reds, oranges, yellows, and greens can form a bold leaf silhouette when they are arranged against a window. The backlit effect is similar to stained glass, but a safe craft version uses tissue paper, pressed leaves, or coloured transparent scraps between clear sheets rather than sharp glass pieces. A dark outline helps the colours read as one complete leaf.
This project depends on light passing through, so thick card, heavy adhesive, and opaque paint should be used only for the outer frame or main veins. Small irregular colour pieces are useful because their overlaps create deeper tones without requiring perfect cutting.
Materials and Tools
· Black construction paper or reused dark cardstock
· Coloured tissue paper or thin translucent scraps
· Clear contact paper or a laminating pouch
· Pencil, scissors, and craft knife for adult use only
· Leaf template or a large real leaf for tracing
· Removable window-safe hanging material
Steps for This Leaf Craft
1. Create the leaf outline and inner veins. Trace a large leaf onto dark paper and draw a strong central vein with a few side divisions. Cut away the inner spaces while keeping the outer edge and vein structure connected; adults should handle any craft knife work.
2. Prepare a varied colour selection. Tear or cut tissue into small pieces, mixing warm and cool shades rather than making every section the same. Place darker scraps near the central vein and lighter pieces toward the outer edge if you want a gradual glow.
3. Build the colour layer on a clear surface. Lay the dark frame onto the sticky side of contact paper and fill the openings with tissue. Overlap the edges enough to avoid empty gaps, but keep the layers thin so window light can still pass through.
4. Seal, trim, and display the leaf. Cover the front with a second clear sheet, smooth out air, and cut around the outer silhouette with a narrow transparent margin. Hang it with a window-safe method and keep it away from condensation, heaters, and places where the clear film may overheat.
For me, uneven tissue shapes improve this craft. Straight rows can make the colour look rigid, while irregular overlaps produce the shifting tones associated with glass.
Pressed petals or very thin leaves can replace some tissue sections. A simpler child-friendly version uses one solid leaf outline and large tissue pieces, with all cutting prepared by an adult.
Leaf Wall Art
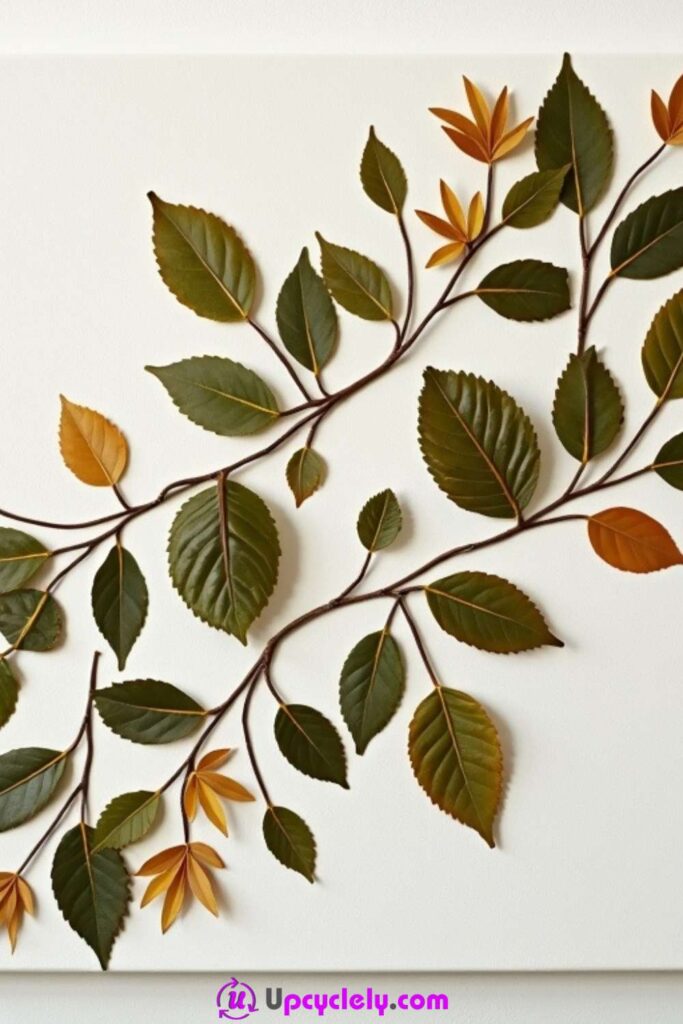
Thin branches arranged diagonally across a pale background create a natural framework for dark green and warm orange leaves. The design shown leaves a generous amount of blank space between the branches, so each group appears to grow across the surface rather than forming one dense block. Small pointed leaf clusters add contrast to the broader leaves.
This type of wall art can reuse a spare canvas, cabinet backing, or a sound frame panel. The twigs and leaves must be dry and light enough for the chosen adhesive, and the finished piece needs appropriate wall hardware. A decorative panel should never be hung from the plant material itself.
Materials and Tools
· A firm canvas board, wood panel, or reused frame backing
· Dry slender twigs and pressed leaves
· Clear-drying strong craft adhesive
· Small scissors, pruning snips, and tweezers
· Optional paint for the background
· Picture-hanging hardware suitable for the finished weight
Steps for This Leaf Craft
1. Prepare the backing and hanging method. Clean or repaint the panel and let the surface settle before arranging natural materials. Fit or mark the hanging hardware early so later drilling or pressure does not loosen the completed design.
2. Lay out the main branches. Place two or three twigs diagonally and test how they relate to the panel edges. Keep the branches separated enough that their leaf groups have room, then trim only after the complete arrangement has been considered.
3. Attach the structure before the details. Secure the twigs at several contact points and allow them to become stable. Add larger leaves along the main branches, following the natural direction of growth, then use smaller leaves and pointed clusters to fill selected gaps.
4. Review the negative space and finish the panel. Stand the artwork upright before adding the final pieces and remove anything that makes one area crowded. Let the adhesive cure flat, shake the panel gently over a work surface to find loose material, and hang it from the proper hardware.
The open background is doing useful work here. I would rather keep one branch sparse than cover every gap and lose the graceful direction of the design.
Painted paper leaves provide a longer-lasting option for sunny rooms. A rental-friendly variation can be made inside a deep frame that hangs from one existing picture hook.
Leaf Sun Catcher
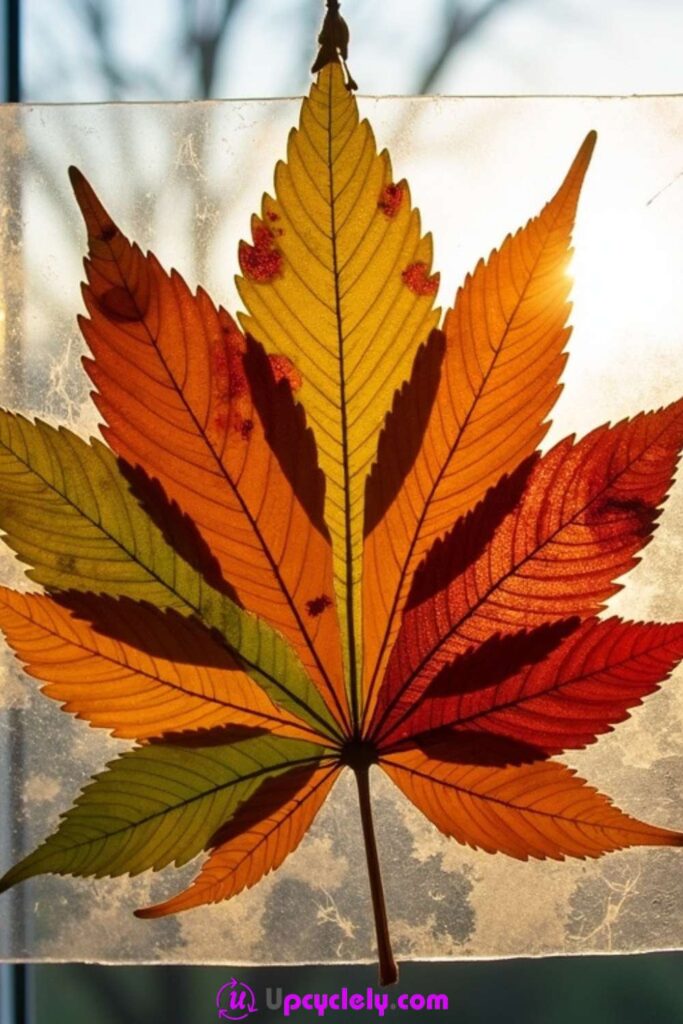
A leaf sun catcher becomes most interesting when daylight reveals the veins and colour changes that are less obvious on a table. The visible design uses a large symmetrical leaf form with yellow, orange, red, and green sections held inside a clear layer. A strong central stem keeps the coloured areas connected and readable from a distance.
Real leaves must be fully pressed before they are enclosed, while tissue paper and translucent scraps can be used immediately. Keep the finished piece lightweight and use a window-safe hanging method. It should not block a latch, touch a heater, or remain pressed against a window where condensation regularly collects.
Materials and Tools
· A large pressed leaf, several thin leaves, or a paper leaf template
· Clear self-adhesive film or laminating pouch
· Translucent tissue paper in related colours
· Scissors and a hole punch
· String, ribbon, or a removable suction hook
· Soft cloth or smoothing tool
Steps for This Leaf Craft
1. Decide whether the leaf itself or the outline will lead the design. Use one large pressed leaf as the centre, or trace a large silhouette and fill it with smaller leaf and tissue sections. Keep the form broad enough that narrow tips will not tear when the piece is trimmed.
2. Arrange the translucent colours on the first clear layer. Place the film sticky side up and build the design from the central stem outward. Mix colours across the lobes and let a few edges overlap so the sunlight creates deeper shades.
3. Seal and define the outer shape. Apply the second clear layer slowly, smoothing from the centre to the edges. Trim around the leaf with a transparent border, round any sharp points, and reinforce the hanging area before making a hole.
4. Hang it where the light can pass through safely. Choose a clean window area away from handles and condensation, then hang the sun catcher with a removable hook or loop. Step back at different times of day and turn the design if the brighter side faces the room rather than the glass.
I know it can feel tempting to add glitter everywhere, but the veins and layered colour already catch the light. A few small metallic tissue pieces are enough when extra shine is wanted.
A reusable version can be made entirely from translucent packaging scraps or coloured film. Smaller leaf shapes also work well as a row across a child’s window, provided the hanging pieces remain out of reach.
Leaf Craft Choices That Can Spoil a Thoughtful Project
Sealing leaves before they are fully dry. Moisture trapped beneath film, glue, or varnish can cause dark patches, curling, or an uneven finish. Press and check the leaves first, and use a paper alternative when there is not enough time to prepare real material properly.
Choosing brittle leaves for projects that will be handled. A fragile leaf may work inside a protected frame but not on a bookmark, notebook, magnet, or coaster. Match the material to the amount of contact and use stamped, painted, fabric, or artificial leaves where durability matters more than authenticity.
Applying a thick layer of adhesive. Too much glue can soak the leaf, hide the veins, wrinkle paper, and create raised edges. Use a fine brush, work in thin sections, and press through clean paper rather than pushing directly on delicate surfaces.
Forcing both sides of a natural design to match. Leaves and branches are rarely perfectly symmetrical, and correcting every difference can make a collage or wall piece feel stiff. Aim for balanced visual weight while allowing variations in size, angle, and spacing to remain.
Using an open flame inside a decorated jar. Dried leaves, tissue paper, twine, and common craft finishes may be flammable or damaged by heat. Use a cool battery-operated light and keep the jar open, stable, and away from curtains or other materials.
Hanging heavy wall art from the decoration. Twigs and leaf clusters are not structural hanging points. Fit suitable hardware to the backing, check the total weight, and make sure adhesive has cured before the piece is lifted upright.
Ignoring small parts in children’s crafts. Magnets, beads, clips, leaf fragments, and sharp cut film can create risks for young children or pets. Supervise the activity, prepare difficult cutting in advance, and store loose parts securely after the table is cleared.
Adding more decoration after the leaf is already clear. Extra ribbon, glitter, lettering, and paint can hide the veins and outline that made the material worth using. Step back before adding the final detail and remove anything that competes with the leaf rather than supporting it.
Frequently Asked Questions
What are the best leaves to use for crafts?
Choose clean leaves with a clear shape and a firm central vein. Flexible leaves work well for printing, while fully pressed leaves suit flat crafts; very brittle or damp leaves are better left out of projects that need handling.
How do I stop real leaves from curling in a craft?
Press them between absorbent paper under even weight before attaching or sealing them. Use thin adhesive layers and let the finished piece dry flat, because a wet or uneven coating can make the edges lift again.
Can I use fresh leaves without pressing them?
Yes for temporary activities such as stamping or short-lived displays. For cards, bookmarks, notebooks, coasters, and enclosed window crafts, pressing and drying usually gives a more stable result.
What can I use instead of real leaves?
Paper cut-outs, fabric scraps, artificial leaves, leaf stamps, photocopied veins, and painted shapes can all work. Choose the substitute according to the project: paper is light, fabric is flexible, and stamped or painted motifs are usually easier to protect.
Which glue works for leaf crafts?
The right adhesive depends on the base and whether the project will be handled. Use a clear-drying product intended for paper, fabric, cork, glass, or wood as appropriate, and test a spare leaf first because some adhesives darken or wrinkle natural material.
How can I make leaf crafts last longer?
Start with fully dry materials, protect them from moisture and strong direct sunlight, and use a finish that suits the base. Framed pieces benefit from a spacer, while handled items need their leaf edges completely enclosed or replaced with a printed design.
Are leaf crafts safe for children?
Many are suitable with washable non-toxic paint, blunt tools, and adult supervision. Adults should handle craft knives, hot glue, sharp scissors, glass inspection, and small magnets, and battery lights should replace open flames in lantern projects.
Let One Leaf Become the Start of Something Useful
The strongest leaf craft ideas do not require a large pile of supplies. One clear print can decorate a notebook, a pressed leaf can become a card or bookmark, and a handful of carefully chosen pieces can form a garland or wall arrangement. Good preparation matters more than adding extra decoration: clean the material, let it dry, test the adhesive, and choose a project that suits its strength.
Begin with the leaf already in front of you and decide what its shape does naturally. A broad leaf may become a sun catcher, a delicate sprig may suit a coaster or magnet, and a flexible veined leaf may be ready to stamp. Which of these 17 leaf craft ideas would give your next walk, table project, or quiet afternoon a useful purpose?