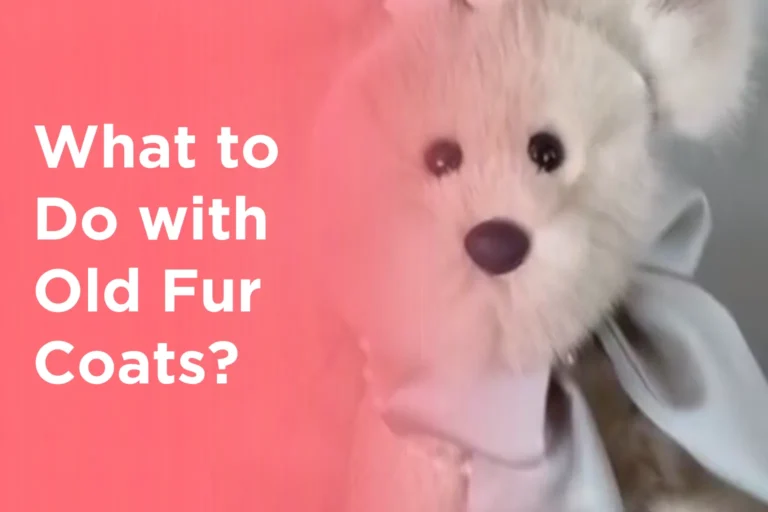
Old teddy bears are rarely just pieces of fabric and stuffing. One may have slept beside you for years, travelled between homes, or arrived as a gift from someone you still associate with it. Even a bear found in a charity shop can have an appealing shape, worn fur, or slightly lopsided expression that makes it difficult to treat as ordinary rubbish.
I think the first question should be whether the bear needs changing at all. A sentimental teddy with one split seam may only need a careful repair. A damaged secondhand bear could become a small bag, planter, backpack, or decorative sculpture instead.
I don’t think an irreplaceable childhood bear should be cut apart simply because a project looks entertaining. Photograph it, check its condition, and begin with the least permanent option.
Altered teddy bears also need a clearly defined purpose. A repaired bear may return to gentle use, while one fitted with zips, straps, adhesive, cement, or small decorative pieces should usually become a display object or adult accessory rather than a child’s toy.
Decide Whether the Bear Needs Repair, Preservation, or Transformation
Place the teddy on a clean surface and examine it in good natural light. Look beneath clothing, around the neck, under the arms, and along the inner-leg seams, where damage may remain hidden.
Check for:
- Open seams
- Loose stuffing
- Detached ears or limbs
- Worn paw pads
- Loose plastic eyes or noses
- Rusty internal joints
- Exposed wire
- Brittle synthetic fur
- Insect damage
- Mould or musty odours
- Sticky residue
- Stains of unknown origin
- Previous repairs
- Batteries, speakers, or mechanical parts
- A maker’s label or collectible marking
Photograph sentimental bears from several angles before removing any stitches. The images can guide you when replacing an ear, adjusting the face, or returning a limb to its original position.
Older bears may contain materials that do not respond well to ordinary washing. Their stuffing could include wool, wood wool, foam, or other materials that dry differently from modern polyester filling. A valuable or fragile bear may need advice from a textile or toy conservator rather than a washing-machine cycle.
For a washable modern bear, follow the care label when it remains readable. Remove detachable clothing and repair open seams before cleaning so the stuffing does not escape. Allow the bear to dry completely, including the centre of the body.
Small detachable eyes, noses, buttons, magnets, beads, and accessories can present choking hazards to young children. Official toy-safety guidance advises checking plush toys for loose parts and sharp or broken areas. An altered bear should be treated as display-only unless its construction and materials are genuinely appropriate for play.
Useful Materials and Tools
- Old teddy bear
- Soft clothes brush
- Clean cloths
- Mild cleaner suited to the material
- Seam ripper
- Fabric scissors
- Hand-sewing needles
- Curved upholstery needle
- Strong polyester thread
- Embroidery thread
- Polyester stuffing
- Small amount of original stuffing, when reusable
- Matching fur or felt
- Fabric lining
- Zip
- Bag webbing
- D-rings or swivel clips
- Pattern paper
- Tailor’s chalk
- Sewing clips
- Sewing machine
- Strong fabric adhesive
- Cement mixture for an outdoor planter project
- Protective gloves
- Eye protection
- Dust mask where appropriate
- Small waterproof plant pot
- Acrylic paint suitable for the finished project
Keep needles, loose toy eyes, zips, clips, stuffing, adhesive, and cut plastic pieces away from children and pets. Do not place altered plush toys near stoves, heaters, fireplaces, or open flames.
Turn an Unwanted Teddy Bear Into a Garden Planter
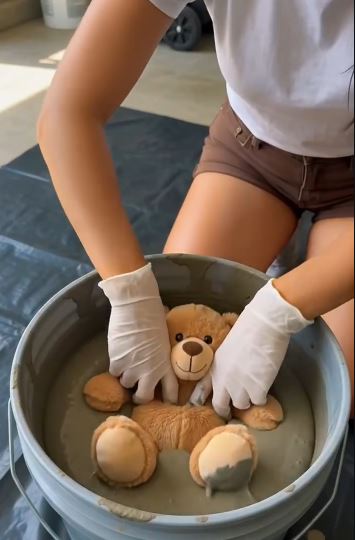
This project takes a bear that is no longer suitable for cuddling and turns it into a rigid garden planter. Layers of cement cover the fabric, preserving the teddy’s outline while changing its surface completely.
The finished piece should be treated as outdoor sculpture, not as a toy. Cement makes the bear heavy and hard, while the plant pot and drainage introduce more weight around the body.
Choose a low-value synthetic bear rather than a sentimental or collectible one. Avoid bears containing electronic parts, metal mechanisms, or materials that cannot be removed safely.
Materials and Tools
- Unwanted teddy bear
- Small waterproof plant pot
- Cement or suitable outdoor sculpting mixture
- Mixing container
- Stirring tool
- Protective gloves
- Eye protection
- Dust mask
- Plastic sheet
- Strong support wire or internal form, if required
- Outdoor paint or sealer when compatible
- Small plant
- Potting mix
- Gravel for the planter, if appropriate
Build the Planter in Five Steps
- Remove unsuitable internal parts. Take out batteries, sound boxes, wires, and loose plastic accessories. Decide where the plant pot will sit and test its size before applying any wet material.
- Shape and support the teddy. Arrange the limbs and body in the position you want the sculpture to keep. Add an internal support only when necessary, keeping sharp wire fully enclosed and away from the planter opening.
- Apply the cement gradually. Wear suitable protection and work over a covered surface. Build several controlled layers rather than dropping one heavy mass onto the fabric, and keep the pot opening clear.
- Refine and cure the form. Smooth unstable ridges without erasing every trace of the original teddy shape. Let the sculpture cure according to the material instructions before lifting or painting it.
- Add the plant separately. Place the plant in a removable pot with proper drainage rather than filling the teddy directly with loose soil. Position the sculpture on a firm surface where it cannot fall onto someone.
One detail I wouldn’t skip is the removable plant pot. It makes watering easier and prevents soil from sitting directly inside an awkward cement cavity.
A simpler version can become a garden statue without a plant. You could also add moss around the feet or use a shallow succulent pot that does not make the sculpture top-heavy.
Add a Small Pocket and Clip to Make a Teddy Keychain
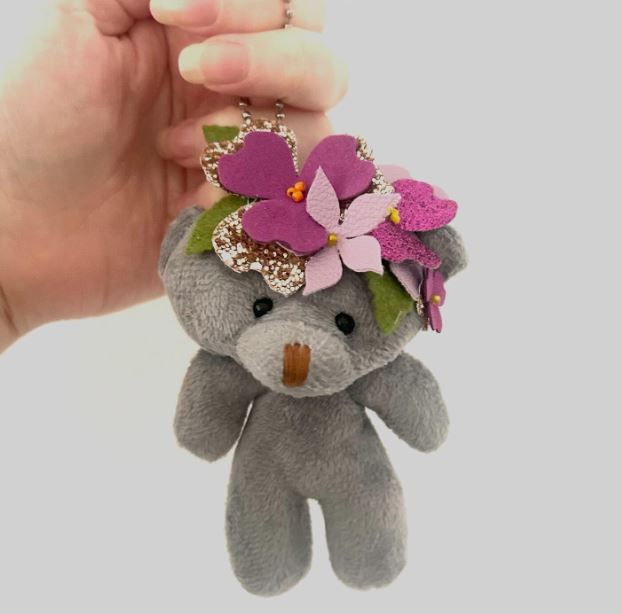
A small teddy bear can become a pocket keychain for earbuds, lip balm, coins, or another tiny item. This works best with a lightweight bear that already has a firm body and compact limbs.
The storage section may be added to the back, hidden inside the body, or made as a separate lined pouch attached behind the teddy. Adding a complete pouch is often easier than asking the original plush fabric to support a zip by itself.
Materials and Tools
- Small teddy bear
- Lightweight lining fabric
- Short zip or press-stud flap
- Strong thread
- Hand-sewing needle
- Small scissors
- Seam ripper
- Keyring or swivel clip
- Short webbing loop
- Lightweight interfacing
- Sewing clips
Make the Pocket Keychain in Four Steps
- Choose the pocket position. Place the bear against the object you intend to store and mark an opening on the back. Keep the cut away from facial seams, joints, and areas where stuffing provides the bear’s shape.
- Create a separate fabric pouch. Sew a small lined pocket with a zip or secure flap. Its finished size should fit inside or behind the teddy without distorting the body.
- Attach the pouch and clip. Remove only enough stuffing to make room, then hand-sew the pocket around its strongest edges. Add the keyring loop through a reinforced fabric section rather than a single layer of fur.
- Test the finished accessory. Add one lightweight item and carry the bear around the home before attaching it to a bag. Check that the zip, loop, and original seams do not stretch.
I know it can feel tempting to fit a surprisingly large pocket inside a small bear, but the teddy should not look as though it swallowed a suitcase.
A no-zip version can use a small drawstring pouch attached behind the bear. Mini bears may also become coin holders, cable organisers, or decorative bag charms without storage.
Convert a Plush Teddy Into a Small Handbag
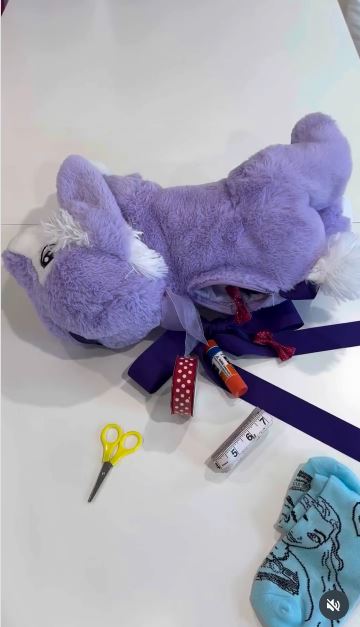
A plush purse keeps the teddy recognisable while giving the body a practical lined compartment. It can hold a phone, keys, tissues, or other light belongings, depending on the bear’s size.
The lining is important. Loose objects pushed directly into the teddy can catch on stuffing or pull against the original seams. A separate inner bag carries the contents while the teddy acts as the outer shape.
Materials and Tools
- Medium teddy bear
- Strong lining fabric
- Zip
- Bag strap
- D-rings or fabric loops
- Seam ripper
- Fabric scissors
- Sewing machine
- Hand-sewing needle
- Strong thread
- Lightweight interfacing
- Small amount of stuffing
Construct the Teddy Purse in Five Steps
- Plan the opening and strap points. Decide whether the zip will sit along the back or across the top of the body. Mark the strap attachments near strong internal seams rather than the ears or narrow limbs.
- Remove part of the stuffing. Open an existing seam when possible and take out enough filling to create usable space. Keep the stuffing clean in case some is needed later to reshape the head and limbs.
- Sew the internal bag. Make a lined pouch that fits inside the torso and attach the zip to it. Reinforce the areas where the strap loops will connect.
- Fit the pouch inside the teddy. Position the lining so the zip sits neatly in the prepared opening. Hand-sew it to the surrounding plush with small secure stitches, then add stuffing around it where the body looks hollow.
- Attach the strap and inspect the bag. Pull firmly on each attachment point before adding belongings. Keep the contents light and stop using the bag if the fur or seams begin stretching.
For me, the face should stay soft rather than becoming part of the storage compartment. Keeping the head lightly stuffed preserves the bear’s expression and makes the bag more comfortable to carry.
A removable chain can turn the purse into a shelf display when it is not being worn. Another version could use only the bear’s head as a small pouch, provided the alteration does not affect a sentimental toy.
Give a Larger Stuffed Bear a Second Life as a Backpack
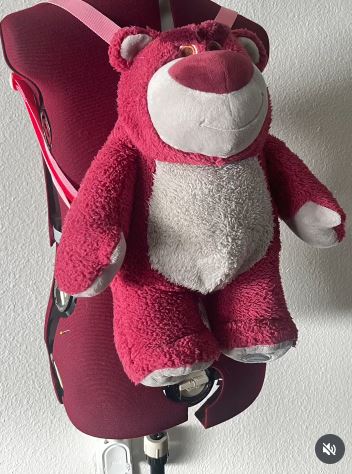
A larger stuffed bear offers more room for a backpack compartment than a small purse, but the load also increases. The straps must connect to a strong internal structure rather than pulling against the outer plush alone.
This works best as a novelty backpack for lightweight belongings. Books, water bottles, tools, and laptops can place too much strain on the old fabric and may make the teddy uncomfortable to carry.
Materials and Tools
- Large clean stuffed bear
- Strong lining or lightweight canvas
- Long zip
- Bag webbing
- Strap adjusters
- Interfacing
- Sewing machine
- Heavy-duty thread
- Hand-sewing needle
- Seam ripper
- Fabric scissors
- Optional foam padding
- Reclaimed backpack straps
Make the Backpack in Five Steps
- Check the bear’s size against the wearer. Hold it against the back and decide whether the limbs will interfere with walking or arm movement. Mark the zip and strap positions before removing any stuffing.
- Create the internal compartment. Sew a separate lined bag that fits inside the torso. Add a stable back panel so objects do not press directly through the stuffing.
- Install the zip. Open the bear along a suitable back seam and secure the lined compartment around the opening. Keep the zip teeth clear of long fur, trimming only small hidden areas when necessary.
- Reinforce and attach the straps. Connect the webbing to the internal back panel and bring it through neat openings in the plush. Then stitch the outer fabric around each point to prevent fraying.
- Adjust the stuffing and test the load. Replace enough filling to support the head and limbs without crowding the storage space. Test with a scarf or empty pencil case before carrying anything heavier.
The part I would check repeatedly is the lower strap attachment. If that point shifts, the bear may tip backwards or hang unevenly.
A one-strap sling bag requires less hardware. A very large bear could become a wall-mounted pyjama-storage pouch instead of a backpack, avoiding the stress of carrying it.
Where Teddy-Bear Upcycles Become Unsafe or Regrettable
Cutting a Sentimental Bear Too Quickly
Photograph the bear, speak to family members, and consider repair before permanent alteration. Copies and cheap secondhand bears are better for testing new methods.
Washing an Unknown Vintage Teddy
Older fur, stuffing, dyes, joints, and internal materials may not tolerate soaking. Begin with gentle surface cleaning or ask a specialist when the bear has financial or emotional value.
Leaving Loose Eyes, Noses, or Buttons
Loose toy parts can become choking hazards. Reattach them securely or treat the finished bear as adult display décor kept away from young children.
Treating an Altered Bear as a Normal Toy
Zips, straps, cement, magnets, adhesive, and decorative hardware change the bear’s safety and function. Clearly separate display pieces and accessories from toys intended for children.
Attaching Bag Straps Only to Fur
The outer plush may tear under load. Connect handles and straps to reinforced lining, webbing, or an internal support panel.
Making the Storage Compartment Too Large
Removing most of the stuffing can collapse the bear’s face and limbs. Keep the head and defining areas supported while limiting the pouch to a practical size.
Using Heat Near Synthetic Plush
Synthetic fur can melt, scorch, or burn. Keep altered bears away from heaters, flames, candles, and hot tools, and use only carefully controlled pressing methods.
Placing a Cement Bear on an Unstable Surface
A coated bear may become much heavier than expected. Use a level base and keep it away from ledges, play areas, and places where it can fall.
Donating a Dirty or Damaged Bear Without Checking
Donation organisations have different requirements. Clean the bear, remove unsafe parts, and ask whether used plush toys are currently accepted before leaving them.
Frequently Asked Questions
Should I repair or repurpose my old teddy bear?
Repair is usually the better choice when the teddy remains emotionally important or needs only minor work. Repurposing suits duplicate, damaged, unwanted, or inexpensive secondhand bears.
Can I wash an old teddy in a washing machine?
Only when its care label and construction allow it. Older bears, jointed bears, electronic toys, and fragile synthetic fur may require surface cleaning or specialist care.
Can an altered teddy still be given to a child?
Treat bears fitted with zips, straps, cement, loose accessories, or decorative hardware as display pieces unless their construction genuinely meets the needs of safe play. Small detachable parts are particularly unsuitable for children under three.
What can I do with stuffing removed from a teddy?
Clean polyester stuffing may be reused inside the same project or another adult craft. Discard stuffing that smells musty, feels damp, contains pests, or has an unknown composition.
How can I repair a bald area?
A small bald patch can be covered with matching fabric, felt, embroidery, or a visible-mending patch. Avoid pulling new stitches tightly through weak surrounding fur.
What is the easiest teddy-bear project for a beginner?
A simple seam repair or small lined pocket is easier than a backpack, cement planter, or stone sculpture. Practise on an inexpensive bear before altering a sentimental one.
Can old teddy bears be donated?
Some charities, shelters, community groups, and toy-reuse organisations accept clean plush toys, while others do not. Check their current rules and do not donate bears with mould, loose parts, strong odours, or unsafe damage.
Keep the Part of the Teddy That Matters Most
Deciding what to do with old teddy bears begins with understanding why each bear has been kept. Sometimes the familiar face and worn fabric matter more than creating something new, and a careful repair is enough.
A less sentimental bear can become a pocket keychain, plush purse, backpack, garden planter, or stone-effect sculpture. The strongest projects keep something recognisable—the face, paws, colour, or original shape—while giving the bear a clearly different role.
Begin with one manageable change. Mend a seam, add a removable accessory, or test a bag pattern on a secondhand bear before cutting the teddy you have known since childhood.
Which old teddy would you work with first: one that needs a gentle repair, an unwanted charity-shop bear, or a damaged plush toy ready for a complete transformation?