Boho wall décor often looks relaxed because it brings together materials that already carry texture: worn wood, leftover yarn, faded fabric, woven baskets, old frames, beads, photographs, and dried natural pieces. The best arrangements do not depend on buying a matching set. They feel collected slowly, with enough repetition to connect the different objects without making every colour and shape identical.
This is exactly the kind of decorating I enjoy because forgotten materials can become useful again. A spare embroidery hoop can support a wall hanging, a chipped-looking but structurally sound frame can hold patchwork fabric, and leftover cord can become tassels or macramé. I don’t think handmade wall décor needs perfect symmetry. Slight differences in knot length, fibre texture, and spacing often make the result feel more personal.
Even so, relaxed styling still needs careful construction. Mirrors, shelves, plates, plant pots, and wooden pieces require fixings suited to their real weight. Feathers and loose fibres should stay away from flames, trailing cords need thoughtful placement, and anything hung above a bed, sofa, cot, or walkway deserves an extra safety check. I know it can feel tempting to decorate first and solve the hanging method later, but deciding how the piece will be supported usually makes the whole project easier.
Check the Wall, Weight, and Fixing Point
Before choosing colours or knots, decide where the finished piece will hang and what the wall can safely support. A lightweight fabric panel and a mirror may occupy the same amount of visual space, but they need completely different hardware. Planning the fixing point first prevents decorative elements from covering the places where screws, hooks, or hanging loops must go.
· Identify whether the surface is plasterboard, masonry, timber, tile, panelling, or another material, then choose fixings intended for that surface.
· Weigh or realistically estimate the complete project, including mirrors, shelves, plant pots, plates, wet soil, beads, frames, and any objects displayed on it.
· Avoid hanging heavy or breakable décor directly above beds, seating, cots, pet areas, or narrow walkways unless the fixing method has been professionally verified.
· Check for hidden pipes and electrical cables before drilling, and use suitable detection equipment or qualified help when the wall is uncertain.
· Use two fixing points where a wide piece could rotate, tilt, or pull unevenly from one central hook.
· Test removable adhesive products on the wall finish and follow their weight limits; rental-friendly does not mean every surface will release without damage.
· Keep the final arrangement clear of switches, vents, opening doors, curtains, heaters, open flames, and places where children or pets can pull dangling parts.
Sort Reclaimed Fibres, Wood, Frames, and Decorative Pieces
Boho projects often combine materials with very different strengths. Soft cotton cord may be washable, old feathers may be fragile, driftwood can hide loose fibres, and second-hand frames may have weak joints. A short inspection keeps the project from relying on an attractive material that cannot safely perform its new job.
· Shake, brush, or gently clean reclaimed wood, baskets, frames, fabric, and cord before bringing them into the main work area.
· Reject wood with active pests, deep rot, mould, crumbling sections, sharp splinters, or an unknown chemical treatment that makes indoor use questionable.
· Check frames, hoops, dowels, shelves, mirror backs, and plate hangers for loose joints, cracked corners, bent hardware, or missing retaining pieces.
· Wash suitable fabric and cord before cutting, but test vintage, dyed, feathered, or delicate materials rather than assuming they can be soaked.
· Sort beads, tassels, buttons, shells, and small decorations into shallow containers so they remain visible and away from children and pets.
· Separate purely decorative materials from structural ones; yarn and hot glue can add texture, but they should not replace screws, wire, brackets, or load-rated cord.
· Keep sentimental, collectible, culturally significant, or potentially valuable textiles and objects intact until their origin and safe treatment are understood.
Plan Colour, Scale, and Safe Placement
A boho wall can hold many textures without feeling crowded when the scale and colour rhythm are planned. The easiest approach is to choose one dominant material, repeat two or three colours, and leave some visible wall around the arrangement. Empty space is not a missing craft supply; it helps the handmade details remain readable.
· Measure the wall and mark the intended outer boundary with removable tape so the project does not quietly expand beyond the available space.
· Choose one large anchor piece, such as a textile, mirror, shelf, basket group, or macramé hanging, then support it with smaller objects.
· Repeat a limited set of tones through cord, wood, fabric, beads, pots, frames, or photographs instead of matching every item exactly.
· Lay grouped pieces on the floor first, photograph the arrangement, and then transfer the spacing to the wall with paper templates when useful.
· Keep candles unlit on crowded shelves or use battery-operated alternatives; fibres, dried plants, feathers, paper, and photographs are flammable.
· Place real plants where their watering routine will not drip onto electrical fittings, untreated wood, photographs, fabric, or the wall surface.
· Step back from several distances before fixing everything permanently, because a balanced close-up arrangement can look surprisingly dense across the room.
Dreamcatcher Wall Hanging
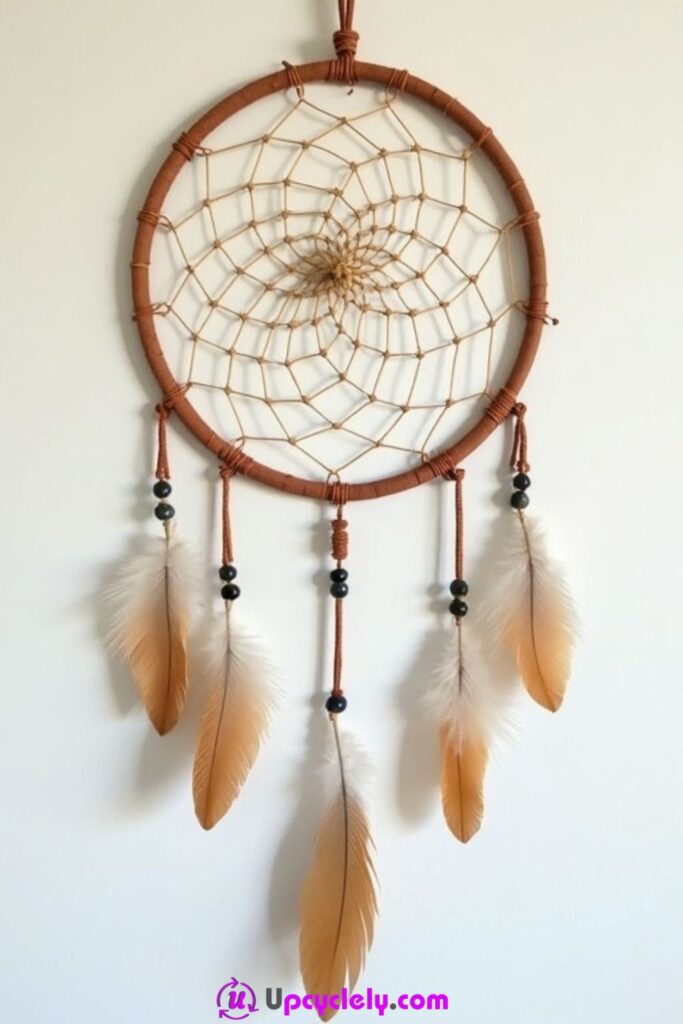
Materials Needed:
- A circular hoop (wood or metal)
- Natural brown wrapping material (yarn or leather cord)
- String or thread
- Light brown and white feathers (5 or more)
- Small black beads
- Scissors
- Hot glue gun (optional)
Step-by-Step Instructions:
- Wrap the Hoop: Start by wrapping the hoop with the natural brown cord until it’s completely covered. Secure the cord at the end with a knot or a dab of hot glue for extra hold.
- Create the Web: Use the thread to weave a web inside the hoop. Begin by tying one end of the thread to the hoop, then move it across the circle, looping it to the hoop at intervals. Continue weaving inwards in a spiral pattern until you have a web-like effect.
- Add Feathers: Cut five pieces of string and tie each one to the bottom of the hoop. Attach a bead to each string, then tie a feather to the end so it hangs freely.
- Final Touches: Adjust the feather spacing and trim the strings to ensure everything looks balanced. You can add extra beads or tiny charms to enhance the design.
Pro Tip:
To make the dreamcatcher more colorful, try incorporating dyed feathers or beads in different colors for a playful twist.
Boho Fabric Wall Art
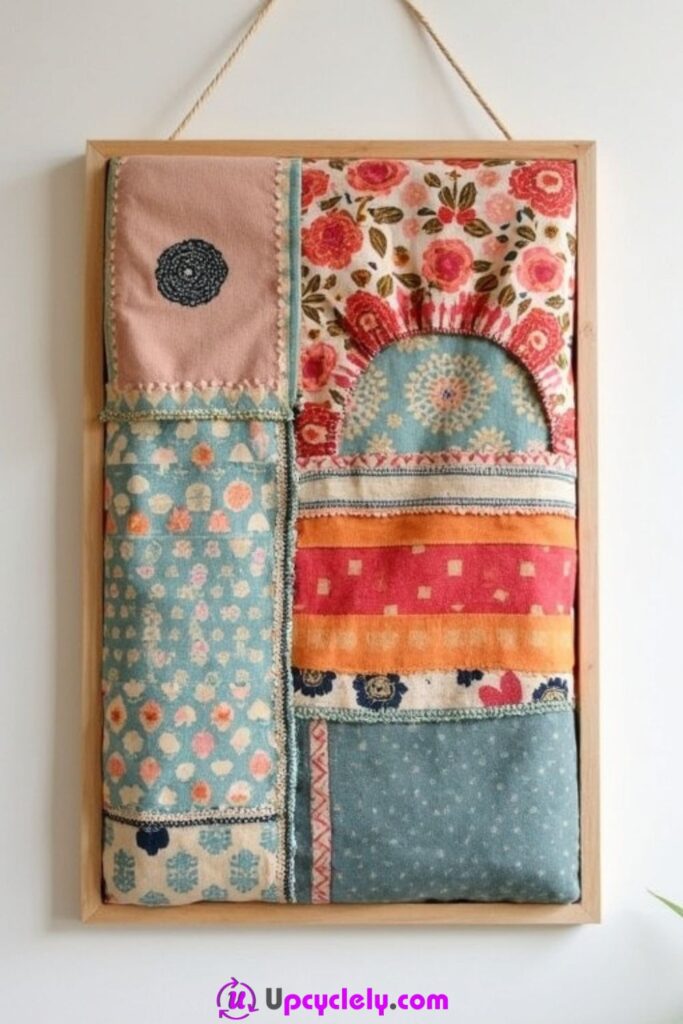
Materials Needed:
- A wooden frame
- Assorted fabric pieces in boho-inspired patterns (florals, stripes, dots)
- Embroidery thread
- Sewing needle
- Fabric glue or stitching tools
- Rope for hanging
Step-by-Step Instructions:
- Select Fabrics: Choose four or more fabric pieces with contrasting but complementary patterns and colors. Think warm pinks, blues, and earthy tones for a perfect boho look.
- Create the Patchwork: Cut the fabrics into sections, varying their size and shape for an asymmetrical look. Use fabric glue or sew them together to form a quilt-like piece that’s slightly larger than the wooden frame.
- Mount the Fabric: Stretch the finished fabric over the wooden frame and secure it tightly at the back using glue, staples, or stitching. Make sure there are no wrinkles.
- Add Decorative Stitches: Use embroidery thread to outline patterns or add small, eye-catching details. This makes the craft feel truly handmade.
Pro Tip:
Layer sheer fabrics over opaque ones for added texture and depth, giving your wall art more visual interest.
Boho Mirror Frame with Tassels
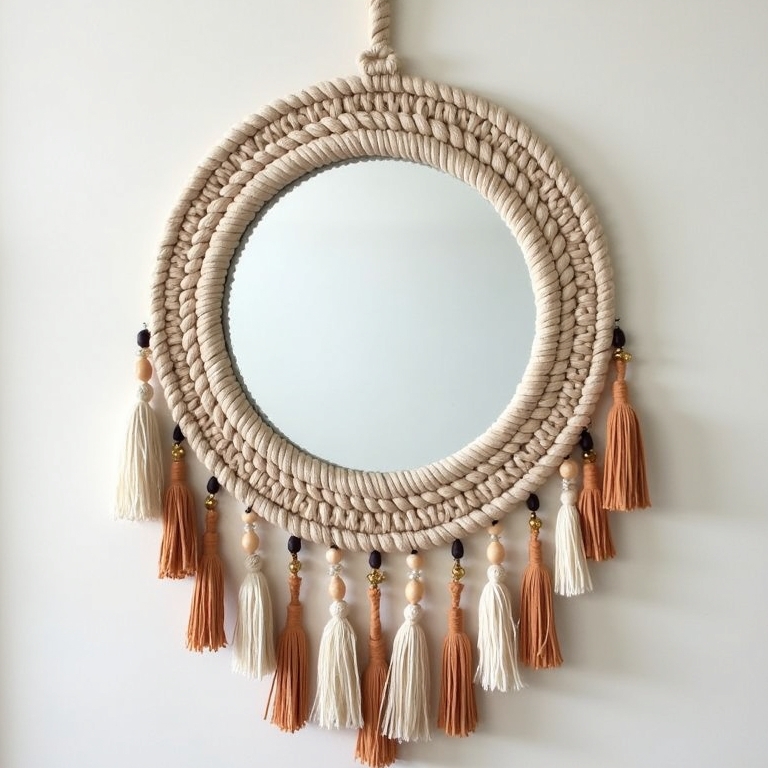
Materials Needed:
- A circular mirror
- Natural beige rope
- Tassels in cream, white, and terracotta
- Beads in varying sizes and colors (gold, dark brown, wood tones)
- Hot glue gun
- Scissors
- Hanging loop or hook
Step-by-Step Instructions:
- Wrap the Mirror: Measure and cut your rope to fit around the mirror’s edge. Securely glue the rope in place around the frame, wrapping multiple layers for a chunky, boho feel.
- Prepare the Tassels: Attach beads to your tassels for added flair. Arrange them in a pattern where colors alternate for a balanced design.
- Fix the Tassels to the Frame: Glue the tassels to the bottom half of the rope frame. Evenly space them apart to keep the design symmetrical and pleasing to the eye.
- Attach a Hanging Loop: Before hanging your mirror, glue or tie a loop of rope to the top of the frame for easy wall mounting.
Pro Tip:
For an extra touch, braid smaller sections of rope and use them as trim along the frame for added texture..
Boho Typography Wall Art

Materials Needed:
- A blank canvas or piece of wood
- Paints in earthy tones (black, brown, beige, terracotta)
- Paintbrushes
- Pencil and eraser
- Small stencils for decorative elements (feathers, leaves, sunbursts)
Step-by-Step Instructions:
- Sketch Your Design: Lightly sketch the words “yoho in boho” on your canvas. Stack the words vertically and add rough outlines for decorative elements like leaves and feathers.
- Paint the Typography: Use a bold paint color like black or terracotta for the text. Go slow and steady to ensure clean lines.
- Add the Embellishments: Paint the decorative accents around the text. Stick to organic shapes and a natural color palette to keep the boho theme intact.
- Touch Up and Finish: Once the paint is dry, make touch-ups and erase any remaining pencil marks. Your typography art is ready to hang!
Pro Tip:
Add metallic accents (like gold details) to certain elements for a modern-boho blend that catches the light beautifully.
Boho Wall Shelf
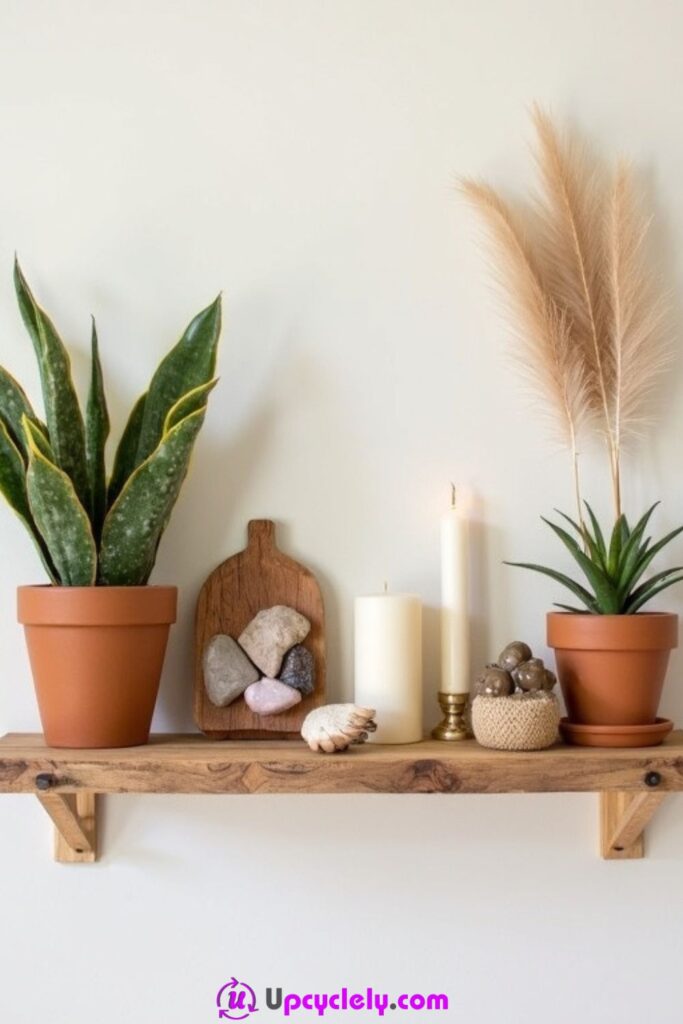
Materials Needed:
- A wooden shelf
- Screws and wall mounts
- Terracotta pots
- Indoor plants (e.g., succulents, snake plants)
- Candles (varied sizes)
- A wooden board or tray
- Decorative stones or knick-knacks
- A small basket
Step-by-Step Instructions:
- Mount the Shelf: First, install the shelf securely on your wall using screws and mounts. Choose a natural wood shelf that has a visible grain for a rustic touch.
- Arrange the Plants: Pot your plants in terracotta pots and place them on either end of the shelf. Arrange the tallest plant on one side and a shorter one on the other for balance.
- Add Decorative Elements: Place candles, a wooden board, or small baskets between the potted plants. You can fill the board with decorative stones or trinkets to add character.
- Finish with Accessories: Add small touches like string lights or a macramé hanging behind the shelf for depth and extra boho flair.
Pro Tip:
Switch up the plants and accessories seasonally to keep the look fresh and exciting throughout the year.
Hand-Painted Wall Art
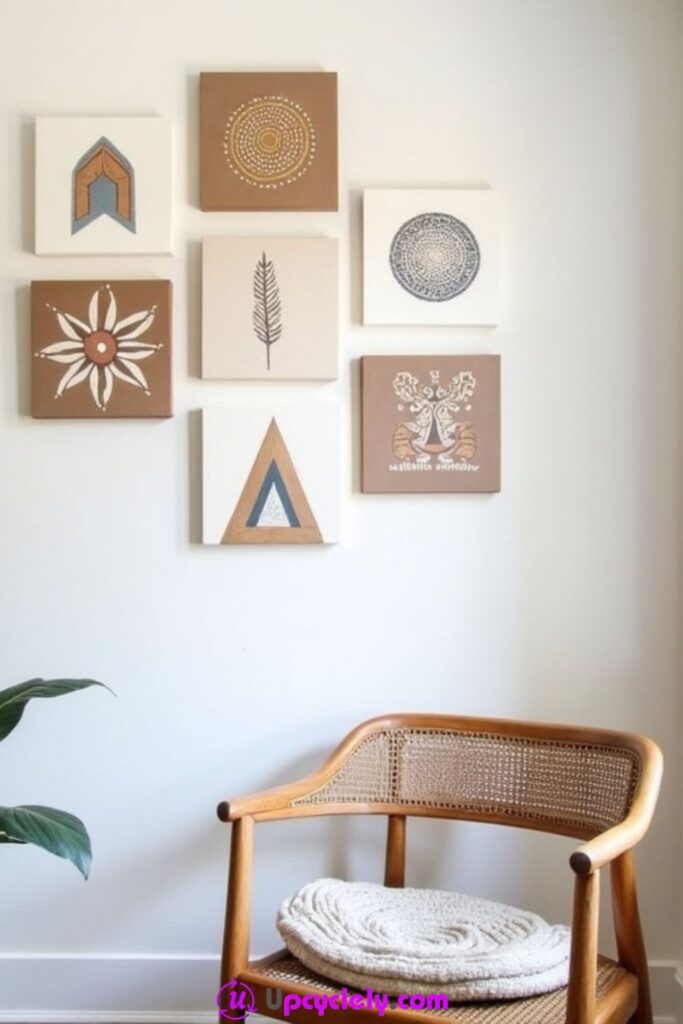
Materials Needed:
- Multiple square canvases (recommended 7 for a grid layout)
- Acrylic paints in earthy tones (brown, cream, muted blue, gold, red, etc.)
- Small and medium-sized paintbrushes
- Cotton rags or paper towels
- Stencils (optional)
- Wall hooks or adhesive strips to hang canvases
Step-by-Step Instructions:
- Plan Your Design
I like to begin by deciding on a theme or color palette. For boho wall art, I stick to neutral, earthy tones. Sketch rough ideas for each canvas, mixing geometric patterns, florals, and mandalas. By planning ahead, you ensure the artwork has a cohesive look when arranged on the wall. - Paint Each Canvas
Start with a base layer on each canvas using light, warm colors like tan or cream. Once dry, I add patterns such as mandalas, feathers, or abstract shapes. Use small paintbrushes for intricate details. Don’t worry about perfection; unevenness often adds a handmade touch. - Add Metallic Highlights
To give it that extra boho flair, I incorporate metallic paints like gold or bronze in accents. For example, painting circular mandala outlines or dots. These metallic touches catch the light and elevate the overall look. - Arrange and Hang
After the canvases dry, I play around with the grid arrangement on the floor. Once satisfied, I secure them on the wall using wall hooks or adhesive strips. For a dynamic look, vary the size or spacing slightly between canvases.
Pro Tip:
Combine freehand designs with stencils to balance creativity and precision. Stencils are great for creating symmetrical shapes or patterns without too much effort.
Driftwood Wall Art
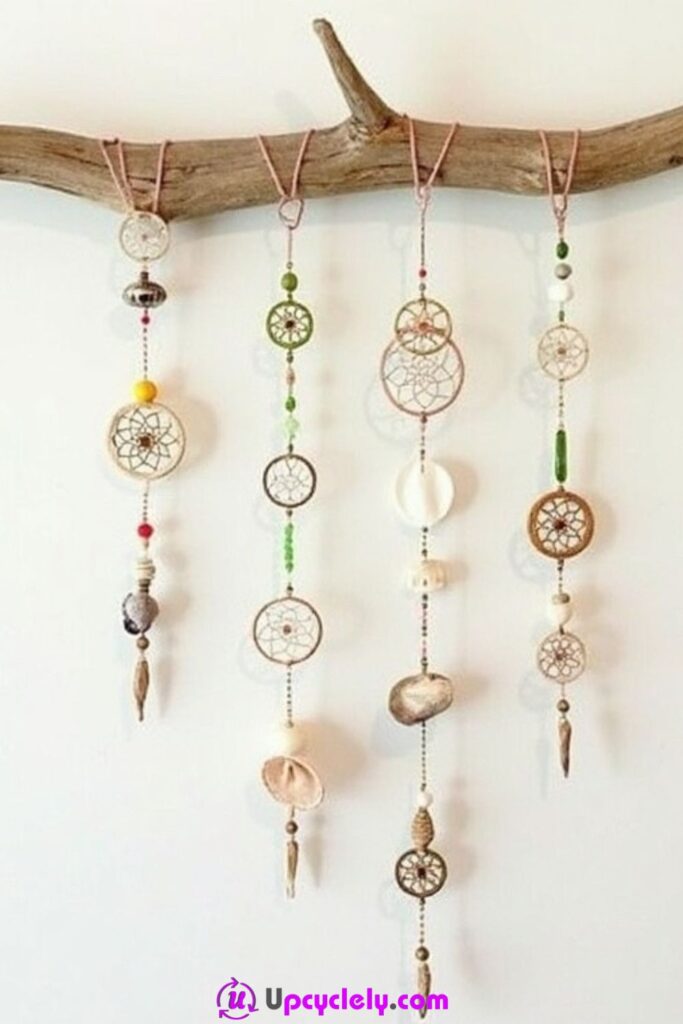
Materials Needed:
- A piece of driftwood or natural branch
- String or twine
- Small dreamcatcher kits or DIY dreamcatcher materials (metal hoops, threads, beads, feathers, etc.)
- Hot glue gun
- Scissors
Step-by-Step Instructions:
- Prepare the Driftwood
Start by cleaning the driftwood and sanding it lightly if needed. This ensures it’s smooth and free of dirt. I also like to decide the orientation of the wood, whether horizontal or slightly angled, depending on the wall space. - Create Dreamcatchers
Using the dreamcatcher kits or hoops, I weave webs using thread or yarn. Add beads, feathers, or shells at the ends to give each dreamcatcher its unique design. The great thing about this step is how customizable it is. - Attach the Dreamcatchers
Once completed, I cut strings to the desired length and tie each dreamcatcher to the driftwood. Vary the lengths to create a cascading effect. Use a hot glue gun to secure the strings in place, if needed. - Hang the Driftwood
Finally, attach a strong piece of twine to the ends of the driftwood to hang it on the wall. The natural material blends beautifully into any boho-inspired decor.
Pro Tip:
Mix dreamcatchers with other elements, such as small macramé hangings, to add more texture and dimension.
Fabric Wall Tapestry
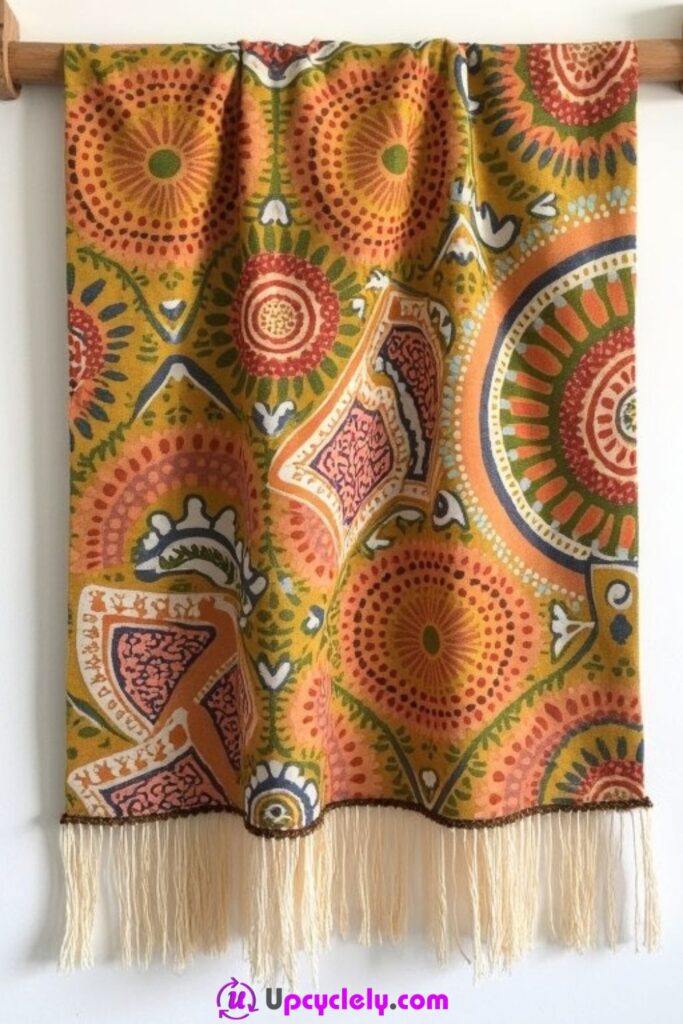
Materials Needed:
- A large piece of patterned fabric or tapestry
- Wooden dowel or curtain rod
- String or rope
- Scissors
- Fringes or tassels (optional)
Step-by-Step Instructions:
- Choose the Fabric
Look for a piece of fabric with intricate patterns in warm, earthy colors like red, mustard yellow, or orange. I usually opt for tapestries with circular designs or paisley patterns for that authentic boho feel. - Secure the Dowel
Fold the top edge of the fabric over the dowel and glue or sew it in place to create a loop for hanging. Adding a rod gives the tapestry structure and ensures it hangs flat against the wall. - Add Decorative Touches
If the fabric feels plain, I incorporate fringes or tassels at the bottom. It’s a small detail that adds a lot of character to the piece. Attach these using a sewing kit or a spot of hot glue. - Hang with Rope
Tie a piece of rope or string to each end of the dowel, creating a loop to hang the tapestry. Adjust the length based on your wall space. I love the simplicity of this process–it takes just minutes!
Pro Tip:
For maximum visual appeal, choose fabrics made of natural materials like cotton or linen. These textures align perfectly with the boho aesthetic.
Feather Wall Decor
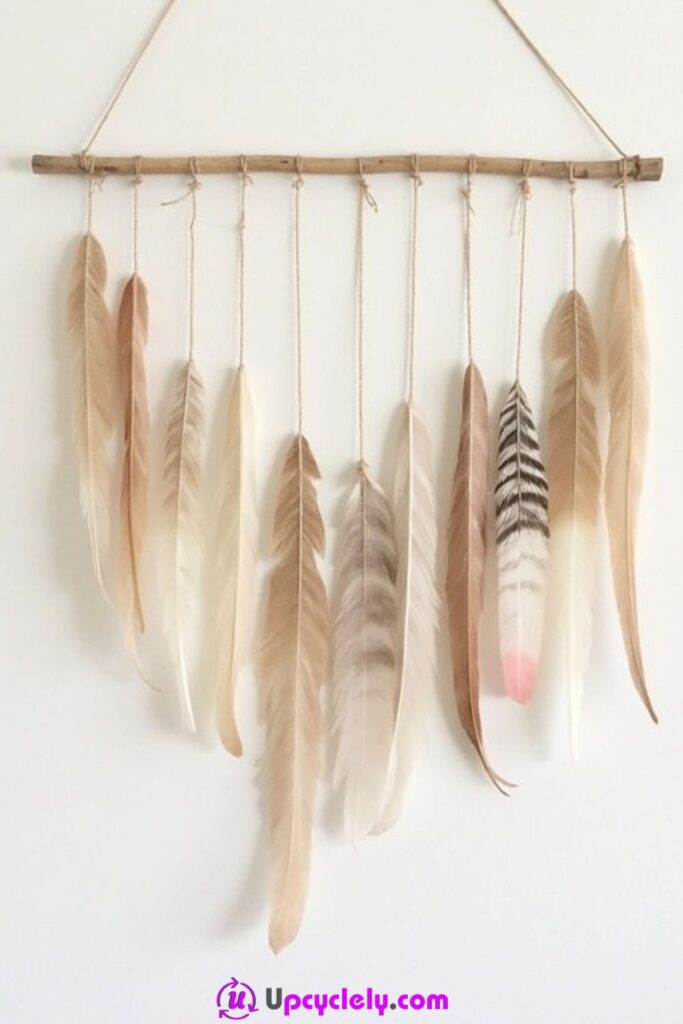
Materials Needed:
- A small wooden stick or rod
- Natural or decorative feathers in varying colors
- String or thread
- Scissors
- Beads (optional)
- Hot glue gun
Step-by-Step Instructions:
- Source the Feathers
I look for a mix of natural feathers and colorful options. Try to find some with patterns, like striped or dipped ends, to keep things visually interesting. - Attach the String
Cut multiple pieces of string in different lengths. Tie each string to the stick, spacing them evenly. I like to vary the lengths a little for a staggered effect. - Add Feathers and Beads
Attach feathers to the ends of the strings using a knot or a drop of glue. Slide beads onto the strings to add extra details. This part is super fun since no two strings will look exactly alike once you’re done. - Finish and Hang
With the strings complete, tie another piece of string to either end of the stick to act as a hanger. Hang your creation on the wall and admire the natural, ethereal beauty!
Pro Tip:
Use feathers in complementary shades from your room’s color palette to create a sense of harmony..
Geometric Wall Design with Tape
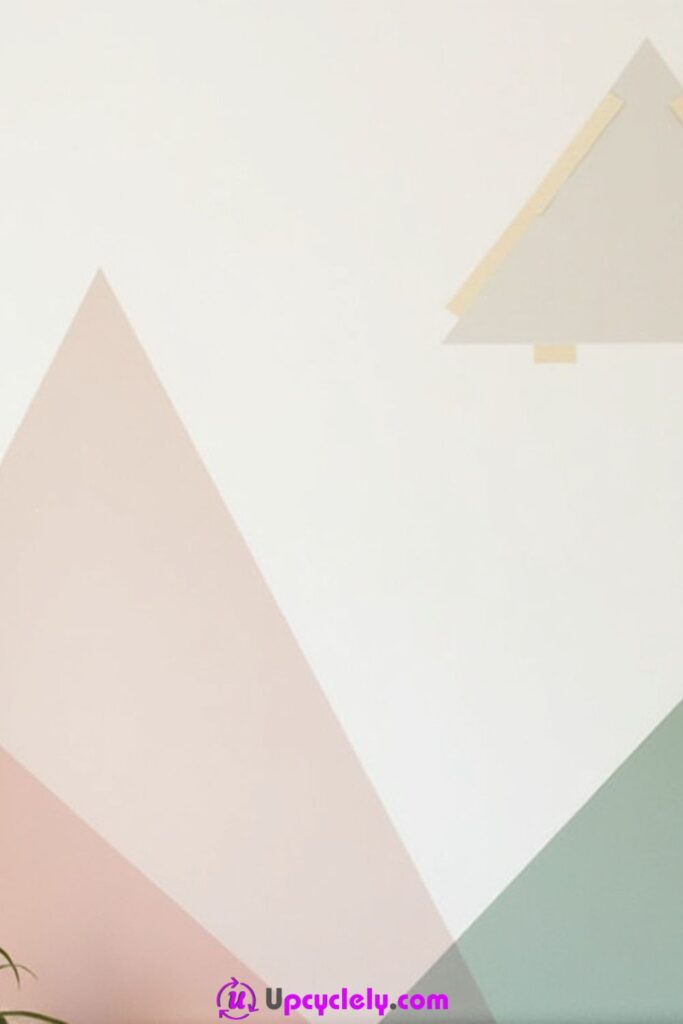
Materials Needed:
- Washi tape in pastel shades (pink, green, gray, etc.)
- A ruler
- Pencil
- Scissors
- Small potted plant for decoration (optional)
Step-by-Step Instructions:
- Plan Your Design
Before sticking anything on the wall, I draft the triangle layout lightly using a pencil. Use a ruler to ensure straight lines and perfect edges. - Apply the Tape
Begin adhering the washi tape to outline the triangles. Press down firmly as you work to ensure the tape sticks securely. I always overlap tape edges slightly for clean corners. - Add Layers and Overlaps
Once the base shapes are complete, I layer additional small triangles on top to add depth. This step adds complexity and visual interest to the design. - Finalize the Decor
Finish the look by placing a small potted plant or a similar boho-inspired object near the design. It’s a simple way to tie the geometric shapes into the larger room decor.
Pro Tip:
Use removable wall-safe tape so you can easily make adjustments or replace colors as your style evolves.
Pompom Wall Hanging
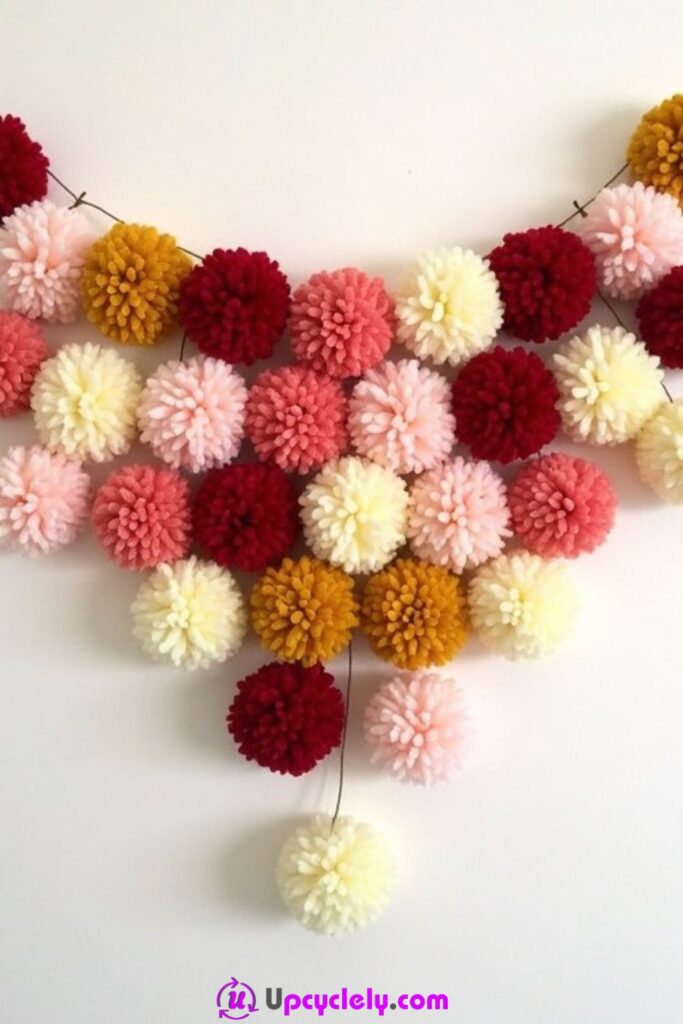
Materials Needed:
- Yarn in various colors (red, pink, yellow, white, etc.)
- A small wooden dowel or stick
- Scissors
- A fork (optional for making pom-poms)
- Craft glue (optional for securing knots)
Step-by-Step Instructions:
- Create the Pom-Poms
Start by wrapping yarn around your fingers or a fork about 50–60 times, depending on how fluffy you want your pom-poms to be. Once you’ve wrapped enough, slide the yarn off carefully and tie its center with a separate piece of yarn. Cut through the loops at both ends, fluff it up, and trim as needed. - Choose a Formation
I like to layout my pom-poms first to figure out the arrangement. For a triangular or V-shaped structure, start with more pom-poms at the top and gradually decrease the number as you move downward. This helps you visualize how it will hang. - Attach to the Stick
Tie each pom-pom to its string and attach them to the wooden dowel by knotting securely. Vary the string lengths slightly; this adds charm to the cascading design. Ensure they’re evenly spaced along the stick. - Arrange and Hang
Once completed, tie a piece of twine or string to the two ends of the wooden dowel, creating a loop for hanging. Now find the perfect spot to showcase your pom-pom masterpiece!
Pro Tip:
Use yarn in complementing shades to create an ombré effect or mix and match colors for a playful vibe.
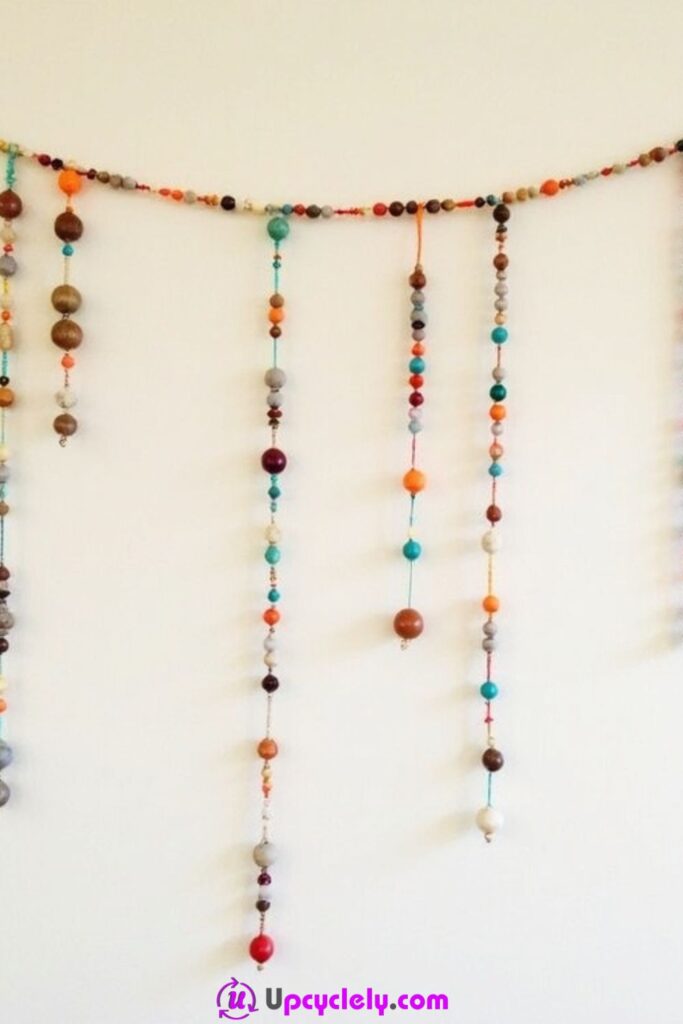
Hanging Beaded Garland
Materials Needed:
- Various beads in different shapes and sizes
- A sturdy piece of string or twine
- A thin wooden branch or dowel
- Scissors
- Tape (to make threading easier)
Step-by-Step Instructions:
- Sort Your Beads
I recommend laying out the beads to create a pattern. Alternate sizes, shapes, and colors like turquoise, orange, or brown for a dynamic, boho vibe. - Thread the Beads
Wrap tape around the end of your string to create a makeshift needle. Thread the beads onto the string in your chosen pattern. Repeat this process for several strands. - Attach the Strands to the Dowel
Once the strands are ready, tie them securely to the wooden branch or dowel. Vary the string lengths to create a tiered or draped effect. I always double-knot to make sure they stay in place. - Finish and Hang
Add a loop of twine at both ends of the dowel for hanging. Your beaded garland is now ready to bring life to your walls!
Pro Tip:
Glue the first and last bead on each strand to ensure they don’t slide off.
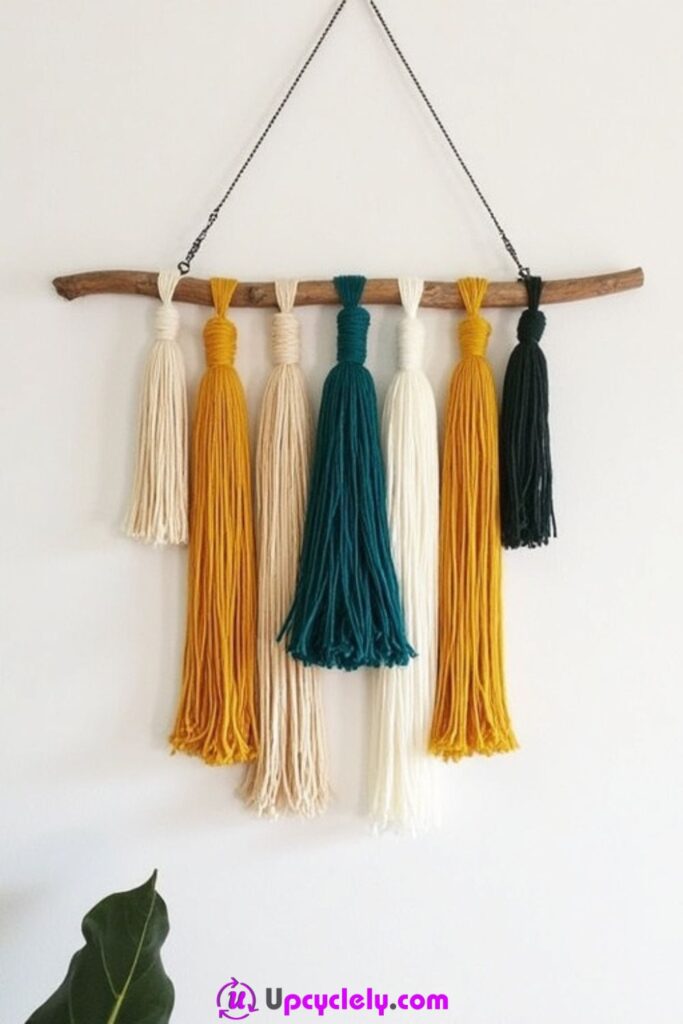
Hanging Tassel Wall Decor
Materials Needed:
- Yarn in multiple colors (cream, teal, mustard yellow, etc.)
- A wooden branch or rod
- Scissors
- String or twine
Step-by-Step Instructions:
- Make the Tassels
Take a book or cardboard piece, wrap yarn around it 40–50 times, then cut across one side to create loops. Tie the top tightly to create the tassel’s head, then trim the bottom to even out the ends. - Decide the Arrangement
Lay the tassels on a flat surface to plan the order. I like to create symmetry by arranging colors around a central focal point, like the teal tassel in the provided image. - Attach to the Branch
Use string or twine to attach each tassel to the branch. Ensure they’re evenly spaced and secure each knot well to avoid slipping. - Hang and Style
Tie a length of string to both ends of the branch to create a hanger. Place it on your wall and adjust the tassels to fan them out nicely.
Pro Tip:
Mix different yarn textures for added depth and character.
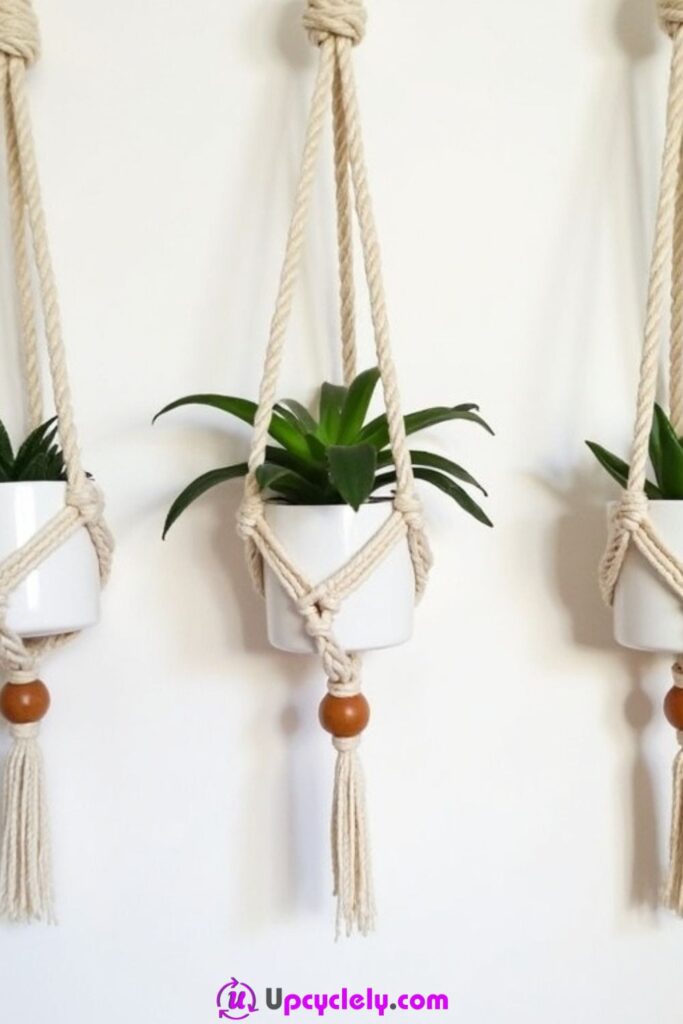
Macramé Plant Hangers
Materials Needed:
- Cotton rope
- Wooden beads
- A pair of scissors
- Potted plants or succulents
- Ceiling hooks (for hanging)
Step-by-Step Instructions:
- Cut and Arrange the Rope
Cut four pieces of rope approximately three times the desired hanging length. Fold them in half and tie them together into a large loop at the top. - Knot the Ropes
Divide the rope into pairs and tie knots about four inches below the starting loop. Next, switch the pairs and tie another row of knots slightly below the first. Repeat this step until the net design begins to take shape. - Add Beads and Place the Pot
Slide decorative wooden beads onto select strands for embellishment. Place a potted plant into the center of the hanger, ensuring the knots hold it securely. - Hang the Planters
Attach the top loop to a ceiling hook and adjust as needed. The simplicity of this structure makes it perfect for showcasing multiple plants.
Pro Tip:
Paint the wooden beads to match your room decor for a pop of color!
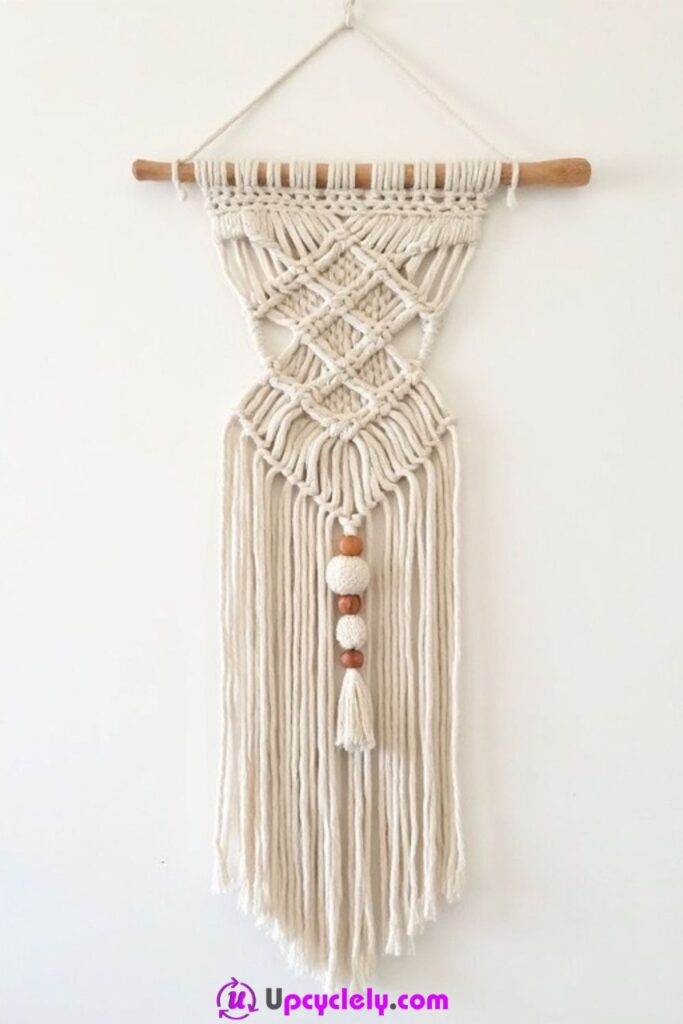
Macramé Wall Hanging
Materials Needed:
- Cotton macramé cord
- A wooden dowel
- Wooden beads
- Scissors
- Comb (optional for tassel fluffing)
Step-by-Step Instructions:
- Prepare the Cord
Cut several pieces of cord, each twice the desired length of your hanging. Measure and fold them in half, then attach them to the dowel using a lark’s head knot. - Create Patterns with Knots
I love combining square knots and diagonal clove hitch knots to form diamonds or chevrons. Adjust the tension for a more dynamic design. - Add Embellishments
Incorporate wooden beads into the design. Tie them into the center of certain patterns, or use them as dividers between knots for extra intrigue. - Finish the Fringe
Trim the bottom cords to form a sleek V-shape or leave them straight for a minimalist look. Comb out the ends for a softer finish.
Pro Tip:
Combining cream-colored cords with natural wood beads gives the macramé piece a timeless boho charm.
Woven Wall Basket Display
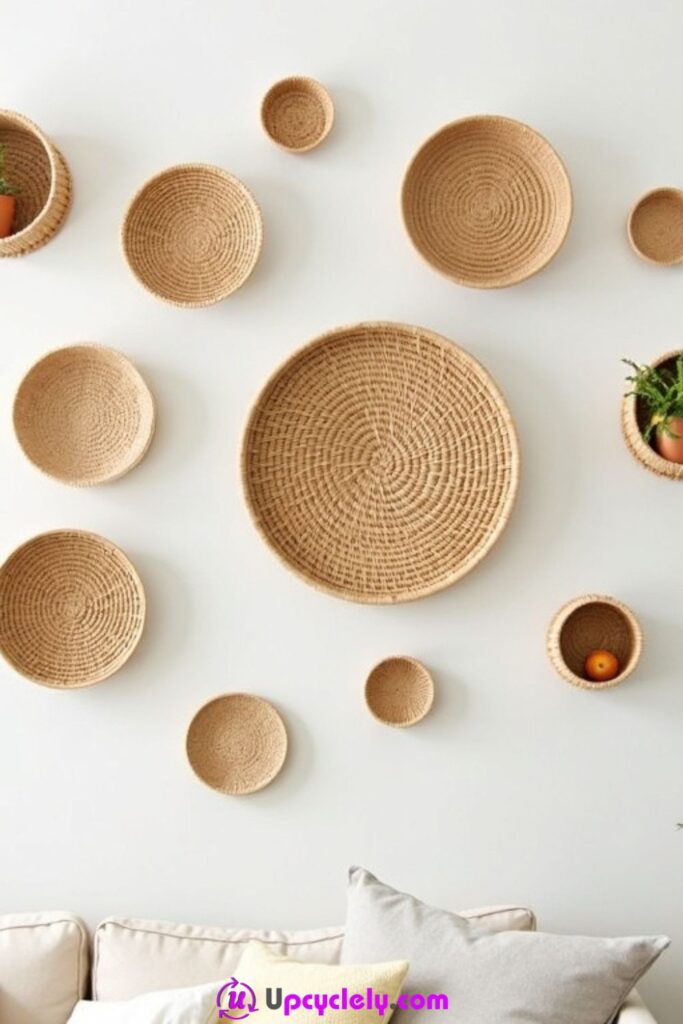
Materials Needed:
- Woven baskets of varying sizes (you can find these in thrift stores or online)
- Command hooks or small nails for wall mounting
- Optional greenery (small potted plants or artificial leaves)
- A level to ensure straight mounting
Step-by-Step Instructions:
- Source Your Baskets
I love starting this project by picking out a collection of woven baskets. Aim for natural tones like beige, cream, or brown, and mix in a few with interesting patterns or darker accents for contrast. The variation in sizes and designs will add depth and visual interest. - Plan Your Layout
Before placing anything on the wall, I arrange the baskets on the floor to experiment with different layouts. You can go for a circular arrangement, a cascading design, or even an asymmetrical collage. This planning makes installation much easier. - Mount the Baskets
Using command hooks or nails, secure each basket to the wall. If a basket has no natural hole or string for hanging, you can attach a small hook or loop to the back using hot glue. I like to start with the largest basket at the center and build outward. - Add Greenery
To add a touch of life to your display, include small potted plants or sprigs of greenery in some of the baskets. You can use faux plants to make upkeep easier or go for small succulents if real plants are more your style.
Pro Tip:
Group baskets in odd numbers, such as three, five, or seven. This creates a more harmonious and natural look for the display.
Vintage Plate Wall Art
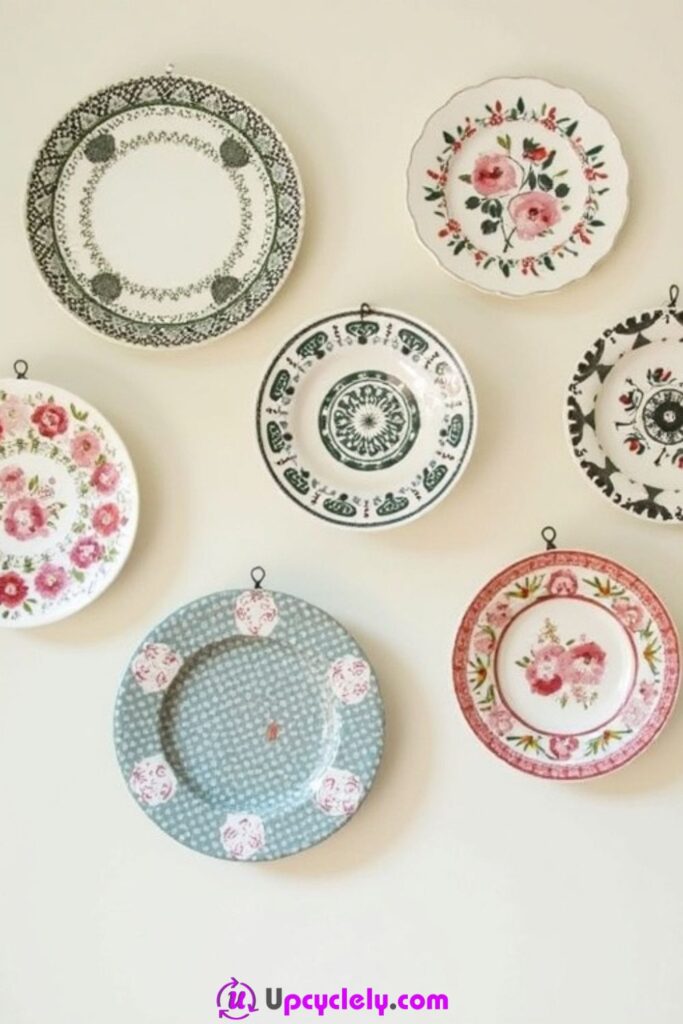
Materials Needed:
- Decorative plates in various designs (vintage-style florals, geometric patterns, etc.)
- Plate hangers or adhesive plate hooks
- A soft cloth for cleaning the plates
- A tape measure and pencil for marking placement
Step-by-Step Instructions:
- Select Your Plates
I recommend choosing plates with a mix of floral, geometric, and bold colors for a cohesive but varied look. Thrift stores and flea markets are treasure troves for finding one-of-a-kind vintage designs. - Draft Your Layout
Arrange the plates on a large sheet of paper or the floor to figure out the spacing. I prefer a loose grouping where the plates are close but not touching. Use a tape measure to estimate where each plate will go on the wall. - Attach Plate Hangers
If your plates don’t already have hardware, add adhesive plate hooks or spring-loaded hangers to the back. Ensure they’re secure so the plates don’t fall. This step may take a bit of patience, but trust me, it’s worth it! - Hang the Plates
Use a pencil to lightly mark the wall for each plate’s placement, and double-check with a level to avoid crooked lines. Start by hanging the centerpiece plate and work your way outward. Step back frequently to ensure everything lines up visually.
Pro Tip:
To avoid chipping or falling, always test the strength of the plate hangers before mounting them. Safety first!
Wall of Polaroids
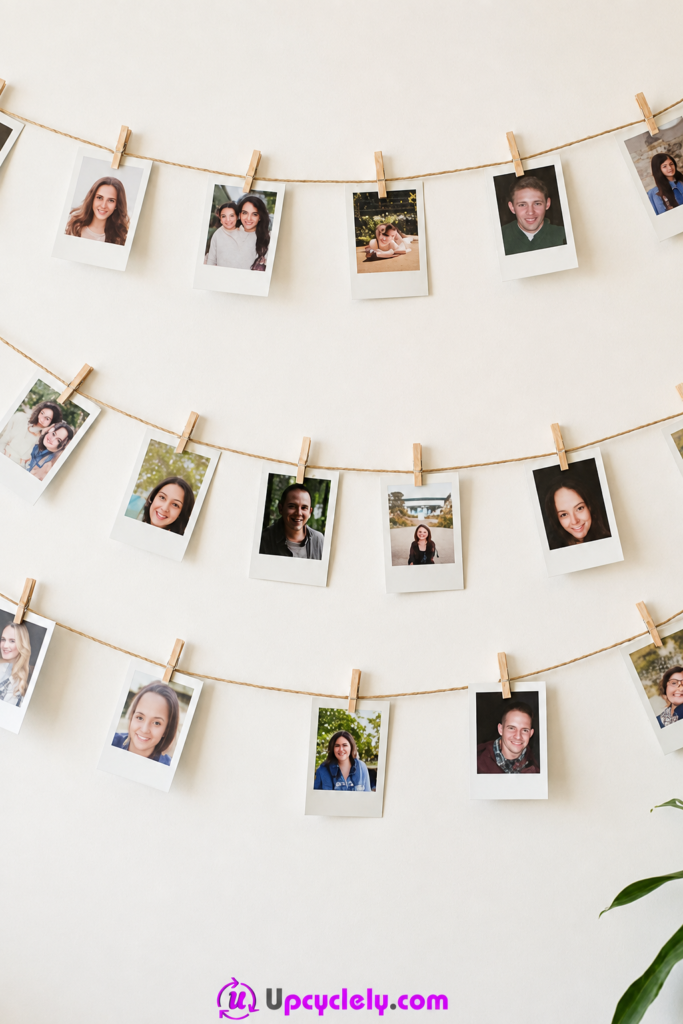
Materials Needed:
- Printed Polaroid-style photos (real Polaroids or printed replicas on photo paper)
- String or twine (natural jute twine works beautifully for a boho vibe)
- Mini wooden clothespins
- Small nails, tacks, or adhesive hooks
- Scissors
Step-by-Step Instructions:
- Print Your Photos
Start by selecting your favorite photos that evoke happy memories. I like mixing candid shots of family and friends with scenic travel photos. If you don’t have Polaroids, you can print photos in a Polaroid-like format using online services or at home. - Prepare the Layout
Cut the string or twine into equal lengths for hanging rows. I usually aim for three rows, but adjust depending on your wall space. Tie a small loop at each end of the strings for easy hanging. - Set Up the Rows
Attach nails, tacks, or adhesive hooks to the wall for each row of twine. Space them evenly to create clean, straight lines. Loop the twine over the hooks and pull it taut so it doesn’t sag once photos are clipped on. - Clip the Photos
Use mini wooden clothespins to attach the photos to the strings. Alternate landscapes and portraits for variety, and feel free to add personal touches like small sprigs of dried flowers or handwritten notes clipped alongside the photos.
Pro Tip:
Position the display near a cozy corner with a plant nearby to complete the boho aesthetic. Fairy lights woven around the twine add a dreamy, magical touch!nt shapes and finishes (such as matte, glossy, or metallic) to add depth and character to your design.
Boho Wall Decor Choices That Can Create Sagging, Cluttered, or Unsafe Displays
Boho styling can look informal, but informal does not mean unsupported. The most serious mistake is allowing decorative material to perform a structural job. Tassels, glued rope, thin twine, old basket loops, and macramé fringe may look strong in a photograph while offering little protection against a falling mirror, shelf, plant pot, plate, or branch.
· Choosing wall fixings by appearance instead of matching them to the wall type and complete finished weight.
· Hanging breakable or heavy objects above beds, seating, cots, pet areas, or narrow routes without an appropriate safety margin.
· Using reclaimed wood, baskets, feathers, fabric, or cord before checking for mould, pests, rot, sharp edges, odour, or unstable dye.
· Treating hot glue as a universal structural fastener for shelves, mirrors, hanging plants, hooks, or pieces exposed to heat and repeated movement.
· Crowding every section of wall, which hides handmade details and makes cleaning, watering, or removing individual pieces difficult.
· Placing candles, hot bulbs, or heaters near feathers, yarn, tassels, paper, dried plants, photographs, or fabric.
· Ignoring practical movement: doors hit shelves, curtains catch garlands, plants drip, cords swing in drafts, and long strands attract pets.
· Cutting, gluing, drilling, or permanently altering valuable textiles, plates, baskets, or culturally significant objects without understanding them.
· Skipping a final pull, level, and stability test because the project looked balanced while lying flat on the table.
A better approach is to separate the design into two systems. The first system safely supports the weight with brackets, hooks, wire, stitched sleeves, plate hangers, or load-rated cord. The second system supplies the visible texture through tassels, beads, yarn, fabric, or paint. When the support remains reliable and accessible, the boho details can be changed without rebuilding the whole wall.
Frequently Asked Questions
Can beginners make boho wall crafts?
Yes. A fabric panel, small tassel hanging, taped geometric design, or framed photograph display can be manageable for a beginner. Start with a lightweight project that does not require drilling or load-bearing knots, then move to shelves, mirrors, plates, and hanging plants after learning the relevant fixing methods.
How can I make boho wall décor from items I already own?
Look for sound frames, scarves, baskets, curtain offcuts, embroidery hoops, leftover yarn, buttons, wooden beads, photographs, cabinet panels, and small shelves. Choose one main piece and a limited palette before collecting every textured object in the house. Reuse works best when each item remains safe and still performs a clear role.
Do all boho wall pieces need neutral colours?
No. Earthy neutrals make mixed textures easier to combine, but rich blue, green, pink, ochre, red, or black can work when a few colours repeat through the arrangement. The important part is creating a rhythm rather than using every available colour once.
What is the safest way to hang a heavy mirror, shelf, or plate display?
Use hardware selected for the exact wall surface and the complete load, not the decorative outer material. Heavy or breakable items may require structural fixing, two support points, or professional installation. Avoid placing them above beds, cots, or seating when a safer wall is available.
How do I make boho wall décor rental-friendly?
Use freestanding picture ledges where permitted, light textile hangers, existing picture rails, or removable products within their stated limits after testing the wall finish. Heavy mirrors, shelves, plates, and plants should not be forced into a temporary adhesive solution. A decorated board or frame can carry the design while leaving the wall mostly untouched.
How should I clean fibre, basket, and macramé wall décor?
Dust gently with a soft brush or low-suction vacuum attachment while supporting the piece. Do not wash mixed or vintage fibres unless their care requirements are known, and keep baskets and natural wood dry. Remove individual items for careful cleaning rather than spraying the entire wall arrangement.
Can real plants and candles be included in a boho wall display?
Real plants can work when the shelf or hanger is designed for the watered weight and drips cannot reach the wall, fabric, photographs, or electrical fittings. Open flames should stay away from yarn, feathers, tassels, paper, dried plants, wood, and trailing leaves. Battery-operated lights or candles are usually the simpler option for a crowded display.
Let Reused Texture Lead the Wall Arrangement
The most convincing boho wall craft ideas usually begin with one material that already has character. It might be the curve of a branch, the weave of a basket, the pattern of a scarf, the grain of an old shelf, or a collection of photographs that deserves to be seen. From there, repeated colour and texture can connect the other pieces without making them look as though they came from one boxed set.
Begin with a manageable lightweight project, prepare the material properly, and decide how it will hang before adding decoration. Then leave enough space around the finished piece to notice the knots, fibres, paint, and reused details. Which overlooked object in your home could become the starting point for your own boho wall arrangement?