Scandinavian folk art often begins with something very ordinary: a wooden drawer front, a scrap board, a round tray, a piece of fabric, or a small cut-out shape. The surface becomes interesting through repeated leaves, balanced flowers, curling stems, birds, and carefully placed dots. It does not need to look machine-perfect. In fact, a little variation in the brushwork often makes the pattern feel warmer and more personal.
I’m always drawn to projects that let an older object keep some of its original character. Natural wood can remain visible around painted motifs, while a worn tray or unused panel can become wall art instead of being discarded.
The useful part of learning how to paint Scandinavian folk art is that you can begin with one simple shape and build the design gradually rather than planning every tiny detail at once.
The strongest results usually come from a clear colour palette, a central motif, and enough empty space for the pattern to breathe. I don’t think every stem needs a matching twin, but the overall weight should feel balanced when you step back from the surface.
Before You Begin Painting
Clean the surface before sketching. Old furniture may carry polish, hand oils, dust, wax, or cleaning residue that prevents paint from bonding properly. Remove loose hardware where practical, repair unstable joints, and sand only as much as the material needs. Veneer and thin decorative surfaces can be damaged by aggressive sanding.
Decide whether the original material will remain visible. A natural-wood dresser needs a different plan from a fully painted panel. When wood grain forms part of the design, test the paint on the back or underside because some colours may sink into porous timber and appear duller than they do in the pot.
Work in good light and keep a piece of scrap card nearby for testing brush pressure. Use paints and protective finishes that suit the object and its location. Ventilate the room when using primers, strong cleaners, spray products, or sealers, and keep paint away from food-contact surfaces unless the product is specifically made for that purpose.
Set Aside Surfaces That Are Unsafe to Paint
Before planning a Scandinavian folk-art design, separate surfaces that may be unsafe, unstable or unsuitable for decorative painting.
Set aside objects previously used around:
- Fuel, oil, pesticides or strong household chemicals
- Mould, mildew or serious water damage
- Pest infestations or animal waste
- Smoke, fire or excessive heat
- Unknown industrial materials or chemical coatings
- Food preparation where the paint is not food-safe
- Flaking old finishes that may require specialist testing
- Damaged electrical parts or exposed wiring
Do not paint furniture with collapsing joints, wooden panels with deep rot, fabric with permanent contamination or cut-out shapes with badly splintered edges. A decorative pattern cannot make an unsafe object suitable for regular household use.
Round plates and trays with unknown finishes should be treated as decorative pieces rather than food-contact items. Objects that cannot be cleaned, repaired or handled safely should be disposed of responsibly.
Inspect the Surface Before Choosing a Design
For ordinary, clean surfaces, inspect:
- Loose furniture joints, drawers and hardware
- Scratches, dents, cracks and rough wooden edges
- Lifting veneer or thin surfaces that may not tolerate heavy sanding
- Wax, polish, grease or cleaning residue
- Knots or stains that may show through pale paint
- Fabric that stretches, shifts or allows paint to bleed through
- Splinters around wooden cut-outs and hanging holes
- The position of handles, drawer gaps and tray borders
- Whether the object will be touched, cleaned or handled regularly
- Whether the original wood grain should remain visible
Choose a design that works with the shape of the object. Keep important birds and flowers away from drawer gaps, handles and heavily rubbed edges. Circular trays suit curved stems and floral medallions, while square panels are easier for symmetrical arrangements.
Test the paint on an unseen area or a piece of similar scrap material. Natural wood, primer, fabric and coloured backgrounds can all change how the final colours appear.
Useful Materials and Tools
The exact supplies will depend on whether you are painting furniture, fabric, a wooden panel, a tray or a decorative cut-out, but these items are useful for most Scandinavian folk-art projects:
- Surface cleaner and soft cloths
- Fine sandpaper and a dust-removal cloth
- Wood filler, wood glue and replacement screws
- Screwdriver and labelled container for hardware
- Primer suited to wood, veneer or the existing finish
- Acrylic craft paint or furniture paint
- Fabric paint or acrylic paint with fabric medium
- A coordinated selection of light, dark and accent colours
- Flat brushes for backgrounds and broad shapes
- Round brushes for flowers, birds and leaves
- Liner brushes for stems, outlines and fine details
- Chalk pencil or removable guide pencil
- Ruler, compass and measuring tape
- Paper templates for repeated or symmetrical motifs
- Low-tack tape or clips for holding fabric flat
- Protective card or plastic for preventing paint bleed-through
- Wooden hanging rail, frame or suitable hanging hardware
- Compatible clear protective finish
- Protective gloves, dust mask and table covering
Prepare the surface before drawing the pattern and test brush pressure on scrap card. Paint the largest flowers, birds and leaves first, then add stems, dots, veins and fine decorative marks after the main composition feels balanced.
Paint Birds and Flowering Vines Across a Natural-Wood Dresser
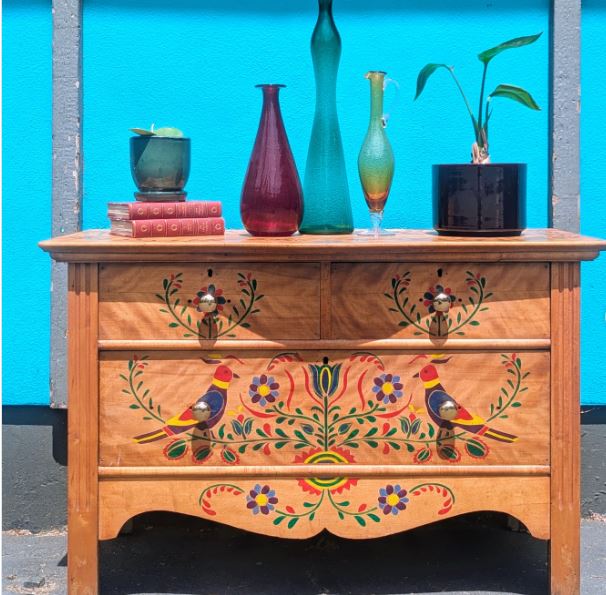
A natural-wood dresser gives Scandinavian folk motifs plenty of room without requiring a solid background colour. Here, two colourful birds sit among red, yellow, purple, and green flowers across the lower drawers. Smaller circular arrangements decorate the upper drawers, while a loose vine runs around the top and connects the front to the piece as a whole.
Leaving much of the timber visible keeps the design from becoming heavy. The wood grain acts as a warm neutral colour, so the painted details can stay bright without covering every panel. This approach suits a dresser that is structurally sound but feels too plain for the room.
The drawer breaks need planning. A stem that crosses from one drawer to another can look awkward if the gap interrupts an important flower or bird. I’d keep the main figures inside individual drawer fronts and let only narrow vines or small leaves approach the edges.
Materials and Tools
· Sound wooden dresser with removable drawers and hardware
· Cleaner, cloths, screwdriver, and labelled hardware container
· Fine sandpaper and dust-removal cloth
· Optional clear primer or stain-blocking primer for difficult areas
· Acrylic paint in a small coordinated palette
· Round, flat, and liner brushes
· Chalk pencil or removable guide pencil
· Compatible clear furniture finish when needed
Build the Pattern Around the Drawer Layout
1. Prepare the dresser and map the usable areas. Remove the drawers and hardware, clean away polish and dirt, and repair anything loose. Place the drawers back in the frame temporarily so you can mark where the gaps, knobs, and edges interrupt the front.
2. Sketch the main birds and large flowers first. Use light guide marks and keep the focal motifs away from handles and drawer gaps. Then add the larger stems that connect the composition, checking the pattern from across the room before moving to small leaves.
3. Block in colour from large to small. Paint the birds, main flowers, and broad leaves with thin controlled layers. Let the shapes settle visually before adding line work, dots, feather marks, and tiny petals. This order prevents the details from becoming crowded too early.
4. Finish each drawer as an individual panel. Open the drawers before painting close to the edges so wet paint does not bridge the gaps. Once everything is fully dry, protect the surface with a compatible finish if the dresser will be handled regularly, then reinstall the hardware carefully.
For me, the natural wood is doing half the visual work here. I wouldn’t cover it with extra motifs simply because an area is empty. The open grain gives the flowers and birds somewhere to stand out.
A beginner-friendly version could place one bird and one curved branch on the centre drawer only. Another option is to paint the top-edge vine without decorating the drawer fronts, which still gives the dresser a clear folk-art identity.
Practise a Bright Folk Bird on a Small Wooden Panel
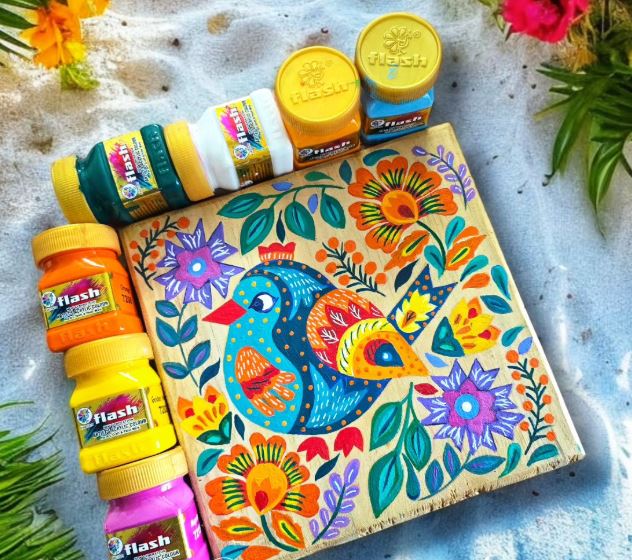
@soumyas_art @flashpaints_official/
A small square panel is a sensible place to learn how to paint Scandinavian folk art because the scale keeps the project manageable. The central blue bird has a simple rounded body, a fan-shaped tail, and bright patterned wings. Large flowers fill the corners, while dark stems and leaves hold the colours together.
The design feels lively because the colours repeat. Blue appears in the bird, leaves, and flower centres; orange moves between the wing, beak, and petals; and small yellow dots break up darker areas. Repetition matters more than using a large number of paint colours.
You could use a scrap cupboard door, an old box lid, or a leftover piece of smooth timber. The panel may become wall art, a tray insert, a jewellery-box lid, or a decorative section on a larger piece later.
Materials and Tools
· Small smooth wooden panel, box lid, or reused cabinet door
· Cleaner and fine sandpaper
· Primer or pale base coat when the wood needs an even ground
· Acrylic paints in five to seven coordinated colours
· Medium round brush, small detail brush, and liner brush
· Light pencil or chalk pencil
· Optional clear protective coat
Paint the Bird Before Filling the Corners
1. Prepare and lightly draw the main silhouette. Clean and smooth the panel, then mark a simple oval body, small head, tail fan, and wing. Keep the bird slightly off-centre if the surrounding stems need more room on one side.
2. Paint the large colour shapes. Fill the body, wing, tail, and largest flowers first. Use thin coats and let each colour dry enough to remain clean where shapes meet. Then add the main green stems and leaves around the bird.
3. Add the decorative marks last. Use dots, short lines, scallops, teardrops, and small leaf veins to give the bird and flowers their folk-art rhythm. Step back often; a few well-placed marks usually read better than many tiny decorations competing for attention.
4. Tidy and protect the finished panel. Correct small edges with the background colour after the design is dry. Apply a compatible finish if the panel will be touched, used as a lid, or placed where dust needs regular wiping.
I know it can feel tempting to outline every shape in the same dark colour. A few strong outlines help, but leaving some petals edge-to-edge keeps the surface from looking like a colouring book.
For a quieter version, keep the bird blue and use only cream, rust, mustard, and green around it. Children or complete beginners could simplify the tail and replace the detailed flowers with repeated five-petal shapes.
Scale Oversized Flowers for a Fabric Wall Hanging
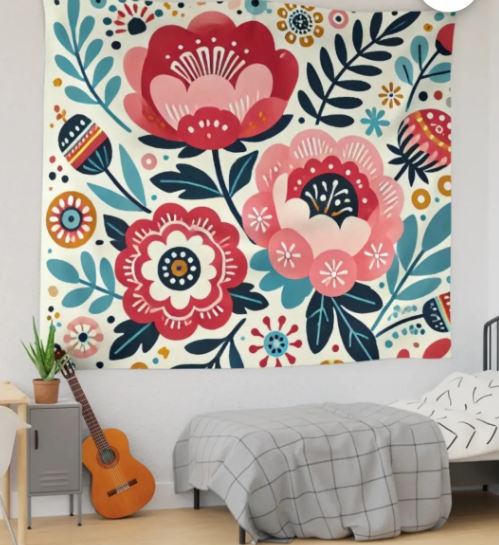
Large Scandinavian-style flowers work well on fabric because the shapes can stay broad and readable. The wall hanging uses coral, blush pink, teal, navy, cream, and mustard across a pale background. Each flower has a strong central shape, repeated petal layers, and simple white marks that create detail without making the design fussy.
Fabric wall art is also a practical option for renters or anyone who does not want to paint directly onto a wall. An old curtain panel, sturdy cotton sheet, or plain canvas drop cloth can become a large decorative piece. The edge can be hemmed, clipped to a wooden rail, or stretched over a lightweight frame.
The difficulty is keeping the fabric flat while painting. Thin material may shift or allow paint to seep through, so secure it to a protected backing and test the chosen fabric paint before beginning.
Materials and Tools
· Heavy cotton, canvas, drop cloth, or another stable reused fabric
· Protective plastic or card backing larger than the fabric
· Fabric paint or acrylic paint prepared with a suitable fabric medium
· Large flat brush, medium round brush, and small detail brush
· Chalk, washable fabric pencil, or paper templates
· Low-tack tape or clips for holding the fabric flat
· Wooden hanging rail, clips, or a lightweight frame
Arrange the Largest Flowers Before the Small Fillers
1. Wash, press, and secure the fabric. Clean the fabric without heavy softener, let it dry, and press out deep creases. Stretch it flat over a protected surface so the weave does not move while you paint.
2. Place the main flowers across the panel. Sketch or trace three to five large flower shapes first, leaving breathing space near the edges. Add the bold stems and leaves next, using the largest forms to guide the balance of the whole hanging.
3. Layer the colour and pattern marks. Paint the broad petal sections, then add inner petals, centres, white lines, dots, and small surrounding flowers. Let the fabric dry flat and avoid repeatedly brushing an area that has started to set.
4. Finish the edges and hang it safely. Follow the paint instructions for setting or curing the design. Hem or neatly fold the edges, then use a rail, clips, or a light frame that supports the fabric without stretching it out of shape.
The part I like most is the change in scale. Folk-art shapes that would feel delicate on a box become bold enough to fill a bedroom wall. There’s no need to make every white line identical; small variations help the painted fabric feel handmade.
A smaller alternative could use one large flower on an old cushion cover. You could also paint only the lower half of a curtain panel and leave the upper section plain.
Build a Symmetrical Hen-and-Flower Panel
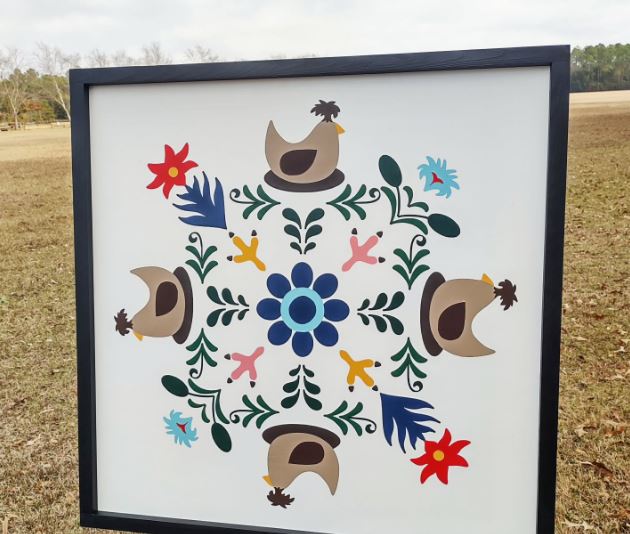
Symmetry gives this framed panel its calm structure. Four stylised hens face around a central blue flower, with dark green stems repeating between them. Small red, coral, yellow, and pale-blue motifs fill the spaces without disturbing the main arrangement.
A design like this is easier to manage when you plan the centreline and quarter points first. The birds do not need to be exact copies, but their size and distance from the centre should remain similar. That shared spacing is what makes the panel feel deliberate.
This idea could be painted on an old framed board, a cupboard-door insert, a table mat, or a square tray base. A pale background helps the darker leaves and birds remain clear.
Materials and Tools
· Square panel, framed board, or reused cabinet insert
· Pale base paint and suitable primer
· Acrylic paint in dark green, blue, taupe, brown, red, coral, yellow, and pale blue
· Ruler, removable pencil, and paper templates
· Medium round brush and small detail brush
· Optional compatible clear finish
Use the Centre Point to Control the Repetition
1. Prepare the panel and mark the centre. Clean, prime, and paint the background if needed. Draw very light horizontal and vertical centre lines, then mark equal positions around the centre for the four birds.
2. Paint the central flower and repeated hens. Begin with the blue flower because it establishes the scale. Add one hen, trace or mirror its basic silhouette for the remaining positions, and vary only the small details such as comb angle or wing shape.
3. Connect the figures with stems and leaves. Paint the dark green branches between the birds, keeping their visual weight similar in each quarter. Then add the smaller coloured flowers and simple three-pronged motifs in the remaining gaps.
4. Remove guide marks and frame the work. After the paint is dry, erase or cover visible pencil lines. Touch up the pale background, apply a compatible protective coat when needed, and fit the panel back into its frame.
For me, symmetry is a guide rather than a punishment. The four hens can differ slightly, but one should not suddenly become twice as large as the others. A paper template removes most of that worry.
You could replace the hens with horses, deer, fish, or simple tulips. A beginner can also paint two birds facing each other above one central flower instead of filling all four quarters.
Paint a Layered Rosemaling-Inspired Round Plate
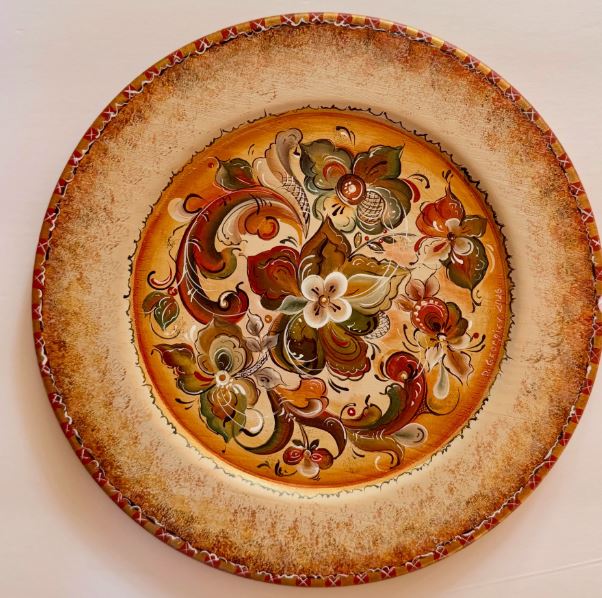
A round plate or tray naturally suits curling floral decoration because the stems can follow the curve of the surface. This piece uses a warm amber centre, cream and red flowers, olive and deep-green leaves, and fine dark line work. The outer area remains lighter and more textured, while a narrow patterned rim finishes the circle.
The design has more depth than the earlier projects because the petals are shaded and overlapped. You do not need to copy every flourish. The useful lesson is to build one main flower, add two or three supporting flowers, and let the leaves curve around them in a loose circular movement.
An old wooden plate, tray, charger, or round box lid could work. Avoid painting a food-contact surface unless the materials are specifically suitable for that use; a decorative wall plate is the safer purpose for an uncertain item.
Materials and Tools
· Wooden plate, tray, charger, or round lid intended for decoration
· Cleaner, fine sandpaper, and suitable primer
· Warm background paint plus cream, red, green, brown, and dark line colours
· Round brushes in several sizes and a liner brush
· Compass, paper circle, or light radial guide marks
· Optional glazing medium for transparent shading
· Compatible decorative protective finish
Layer the Flowers from the Centre Outward
1. Prepare the round surface and establish the border. Clean and smooth the plate, then paint the base colours. Mark a light inner circle so the floral design remains separate from the outer rim and does not drift toward one edge.
2. Place the largest flower and sweeping leaves. Paint one main flower slightly off-centre, then add two or three supporting blooms around it. Use large curved leaves to lead the eye around the centre rather than pointing every stem outward.
3. Add shading and fine line work. Build lighter and darker colour along the petal edges with controlled strokes. Once the larger forms are dry, add veins, curls, small berries, and thin outlines that clarify the overlaps.
4. Finish the rim and protect the decoration. Repeat a simple border mark around the edge instead of introducing another complicated motif. Let the complete surface dry properly, then protect it with a compatible finish if it will be handled as decorative ware.
I’d keep the rim pattern much simpler than the centre. The floral arrangement already contains enough movement, and an equally complicated border can make the plate feel restless.
A beginner could paint one cream flower with two green leaves on a solid amber background. Another lower-cost option is to practise the same circular arrangement on a piece of cardboard before working on the plate.
Decorate a Cut-Wood Bird in Blue and White
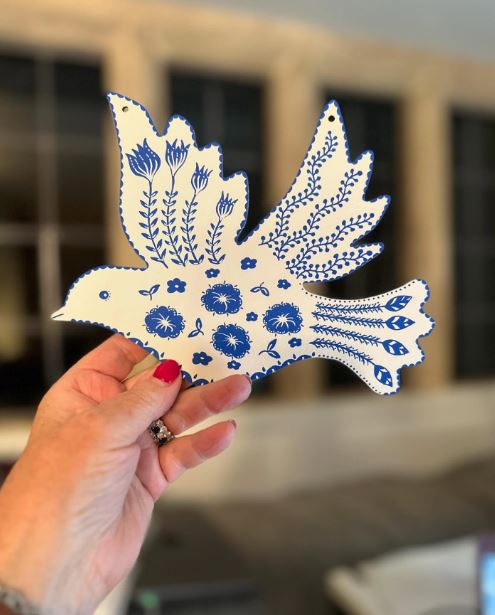
A bird-shaped cut-out changes the way the pattern is planned because the outline already provides the main subject. Rather than painting a bird onto a rectangle, the floral marks become its body, wings, and tail. Blue flowers sit across the centre, while fine stems and feather-like lines fill the wings and tail.
The two-colour palette keeps a detailed surface readable. Deep blue appears in solid shapes and fine lines, while the cream background gives every mark a clear edge. Small dots around the outline create a border without adding another colour.
This could begin with a leftover plywood shape, an old unfinished craft ornament, or a cut-out salvaged from seasonal décor. Check every edge for splinters before painting or hanging it.
Materials and Tools
· Smooth wooden bird cut-out or another simple silhouette
· Fine sandpaper and dust-removal cloth
· Cream base paint and one strong blue paint
· Small round brush and very fine liner brush
· Light pencil for dividing body, wings, and tail
· Drill and eye protection only if a hanging hole must be added
· Compatible clear finish when needed
Use Different Mark-Making for Each Part of the Bird
1. Smooth and base-paint the cut-out. Sand the front, back, and especially the shaped edges until they feel safe to handle. Apply an even cream base and let it dry before drawing any pattern.
2. Divide the silhouette into visual sections. Mark the body, upper wings, and tail lightly. Place the largest flowers across the body, then reserve the narrow feather and branch patterns for the wings and tail so each area has its own texture.
3. Paint the blue motifs with varied brush pressure. Use solid blue for the main flowers and lighter line work for stems, leaves, and feathers. Add the small dotted edge last, following the silhouette without forcing perfectly equal spacing around every curve.
4. Finish both sides when the object will hang freely. If the back will be visible, add a simpler version of the pattern there or paint it one solid colour. Protect the surface as appropriate and use secure hanging hardware that matches the weight of the cut-out.
The good thing about a limited palette is that the brushwork becomes the decoration. Thick petals, thin stems, short feather marks, and tiny dots can all feel different even though they use the same blue paint.
Try red on cream, black on pale wood, or white on dark green for another two-colour version. A smaller cut-out could become a cupboard ornament or gift tag rather than wall décor.
Use a Coral Ground for a Layered Floral Medallion
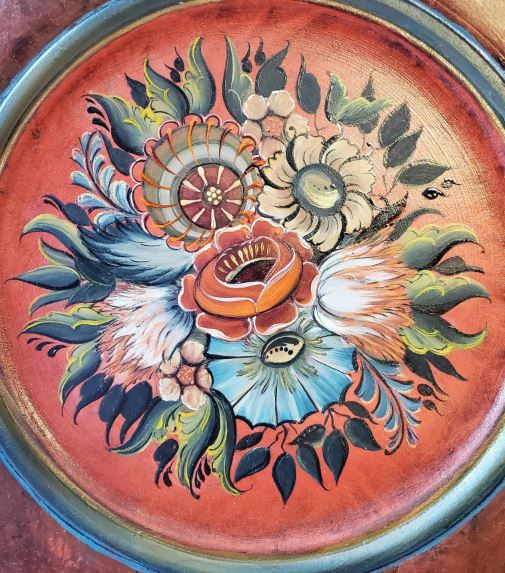
A coloured background changes the mood of folk art immediately. The coral ground on this round panel sits behind blue, cream, orange, pale-green, and dark leaves, allowing the lighter petals to glow while the navy shapes add depth. The flowers overlap tightly in the centre, but the circular border keeps the composition contained.
This design works well on an old tray, stool top, table insert, or round framed panel. The large flower heads carry most of the colour, while narrow dark leaves fill the outer spaces. Fine warm outlines around selected petals help separate similar tones.
Because the centre is dense, paint order matters. Background, rear leaves, large flowers, foreground petals, and final line work should be completed in that sequence. Then each layer remains visible instead of becoming a muddled group of equally strong shapes.
Materials and Tools
· Round wooden panel, tray, stool top, or framed insert
· Cleaner, sandpaper, and primer suited to the surface
· Coral background paint with blue, cream, orange, green, navy, and warm outline colours
· Flat brush, several round brushes, and a liner brush
· Light circular guides or paper flower templates
· Compatible clear protective finish for handled surfaces
Paint the Rear Leaves Before the Main Flowers
1. Prepare and paint the coral ground. Clean and smooth the round surface, then apply the background in thin even coats. Mark a light inner boundary so the flower cluster remains centred and leaves a narrow edge around the panel.
2. Block in the rear foliage. Paint the darkest leaves and larger green shapes first because they sit behind the flowers. Keep their tips visible around the outer half of the design and avoid filling the centre with too many competing stems.
3. Add the large flower heads in layers. Paint the blue, cream, and orange blooms from the broad outer petals toward the centres. Let overlapping sections dry before adding pale feathered strokes, scalloped edges, and smaller inner petals.
4. Clarify the composition with line work. Use dark and warm outlines only where two similar colours need separation. Add final veins, dots, centres, and the painted border, then protect the panel according to how it will be displayed or used.
One detail I wouldn’t skip is the dark foliage. Without it, the pale flowers could merge into the coral ground. The strongest dark shapes sit behind the blooms rather than outlining every petal equally.
For a simpler medallion, paint three large flowers and a ring of dark leaves. The same arrangement could also refresh a scratched round tabletop, provided the final paint and protective system suit regular use.
Painting Choices That Can Make Folk Art Feel Flat
Filling Every Empty Space
Small gaps let the eye separate one motif from the next. When every area receives a flower, dot, or leaf, the pattern can lose its main subject. Paint the focal shapes first and stop before the surface feels completely full.
Skipping the Main Centreline or Anchor Motif
Symmetrical panels and circular arrangements need a reliable centre. Without one, birds and flowers may drift gradually to one side. Use light removable guides, then cover or erase them after the larger shapes are established.
Adding Tiny Details Before the Large Shapes Work
Dots and fine lines are enjoyable, but they cannot rescue an unbalanced layout. Complete the main flowers, birds, leaves, and stems first. Then step back before deciding where the smaller marks are actually needed.
Using the Same Brush Weight Everywhere
Equal outlines around every petal and leaf can flatten the layers. Combine solid shapes, medium strokes, fine lines, and unoutlined edges so the surface contains clear foreground and background areas.
Choosing Colours That Are All Equally Bright
A pattern needs quiet colours as well as strong ones. Pair one or two lively colours with darker leaves, pale background space, and repeated neutrals. This helps the focal motif remain readable.
Sealing Before the Paint Has Settled
A clear finish can drag colour, trap softness, or change pale tones if the paint is not ready. Follow the guidance for the products you use and test the complete paint-and-finish system on scrap material first.
Forgetting the Object Still Has a Job
Drawer gaps, handles, tray edges, fabric folds, and chair surfaces affect how the decoration will wear. Keep heavy detail away from rubbing points and use a finish suited to cleaning and handling when the object remains functional.
Frequently Asked Questions
Is Scandinavian folk art suitable for beginners?
Yes. Begin with a small board and use a few repeatable shapes such as teardrop leaves, five-petal flowers, dots, and one simple bird. A limited colour palette also makes corrections easier.
What paint works best on wood?
Acrylic craft paint works well for decorative motifs on a properly prepared surface. For a frequently handled piece of furniture, use a paint and protective system intended for that level of use rather than relying on decorative paint alone.
Do I need to sand before painting?
Glossy, damaged, or dirty surfaces usually need cleaning and light preparation. Sand only enough to smooth defects and improve adhesion, and use a gentle approach on veneer, thin plywood, or delicate old finishes.
How can I make a symmetrical design without drawing well?
Fold paper to make simple templates, trace one motif several times, or mark a centreline and equal quarter points. The finished brushwork can vary slightly while the overall spacing stays balanced.
Can Scandinavian folk art be painted on fabric?
Yes, especially on stable cotton or canvas. Use paint suited to fabric, protect the work surface from bleed-through, and follow the product instructions for setting and washing the finished design.
Should folk-art painting be sealed?
Wall panels and low-touch decorative objects may need less protection than drawers, trays, or table surfaces. Use a compatible finish when regular handling or cleaning is expected, and test it over the same colours first.
How do I choose a colour palette?
Start with one dominant colour, one dark colour for structure, one pale colour, and two or three accents. Repeat each colour in more than one area so the design feels connected rather than assembled from unrelated parts.
Let the Pattern Grow from One Clear Motif
Learning how to paint Scandinavian folk art becomes much easier when the first goal is not a completely filled surface. Begin with one bird, one flower, or one curved stem. Add the larger supporting shapes, then decide whether the object actually needs more detail.
Old furniture, scrap wood, unused fabric, round trays, and small cut-outs all offer useful starting points. The surface does not have to be flawless before it becomes worth keeping; it simply needs to be clean, stable, and suitable for the new finish. Reusing what you already own also encourages the pattern to respond to the object rather than forcing every project into the same template.
Which surface would you paint first: a small practice panel, a natural-wood drawer front, or a round tray with one layered floral medallion?