Old greeting cards have a habit of gathering quietly. One birthday card becomes a small stack, Christmas cards fill a shoebox, and wedding or anniversary messages remain tucked inside drawers because throwing them away feels far too final.
Some cards deserve to stay exactly as they are. A handwritten message from someone important can matter more than the printed picture on the front. Other cards may have blank backs, repeated designs, damaged envelopes, or decorative covers that could become useful paper for another project.
I prefer sorting greeting cards by meaning before reaching for the scissors. A sentimental message can be photographed and stored, while a colourful card front can become a gift tag, bookmark, ornament, garland, box, or part of another handmade card.
I don’t think reusing a card means erasing the occasion it came from. The original handwriting, date, illustration, or slightly worn edge can remain part of the new object. What matters is choosing a project that suits both the strength of the card and the memory attached to it.
Sort the Messages Before Reusing the Artwork
Read every card before cutting it. A plain-looking cover may contain a message you would regret losing, while an elaborate card may have only a printed greeting inside.
Divide the collection into groups:
- Cards to preserve completely
- Cards to photograph or scan before altering
- Cards with reusable decorative fronts
- Cards with blank sections suitable for labels
- Duplicate cards
- Damaged cards for small paper pieces
- Envelopes that can be reused separately
- Cards containing photographs or personal information
- Musical or light-up cards requiring careful dismantling
- Cards with heavy glitter, foil, plastic, ribbon, or magnets
Write the sender’s name and year lightly on the back of anything you want to remember. When the handwriting matters but the complete card takes up too much space, scan the inside and outside before separating the panels.
Store important originals flat in a supportive box or suitable enclosure rather than bending them into a container that is too small. Preservation guidance for paper records recommends correctly sized storage that supports the material without forcing it to fold or curve.
For particularly meaningful cards, use preservation-quality folders, photo corners, or paper enclosures from a trusted supplier. Protect them from strong light, dampness, dust, and pest damage.
Check both sides before punching, folding, or gluing. A card front may contain a useful picture, but the reverse could hold a signature, date, or personal note.
Useful Materials and Tools
- Old greeting cards
- Saved envelopes
- Scissors
- Craft knife
- Cutting mat
- Metal ruler
- Pencil
- Eraser
- Shape punches
- Hole punch
- Ribbon, twine, or cord
- Glue stick
- Paper adhesive
- Double-sided tape
- Bone folder
- Cardstock
- Reclaimed cardboard
- Decorative-edge scissors
- Corner-rounding punch
- Clear ruler
- Paper clips or small clamps
- Photo corners
- Wax seals or stickers
- Blank card bases
- Small beads
- Needle or awl for paper
- Protective storage box
Use craft knives, awls, and sharp paper-cutting tools on a proper cutting mat and away from your hands. Remove batteries, wires, sound modules, magnets, and bulky plastic parts before cutting specialised cards, and keep all small parts away from children and pets.
Cut Decorative Card Fronts Into Gift Tags
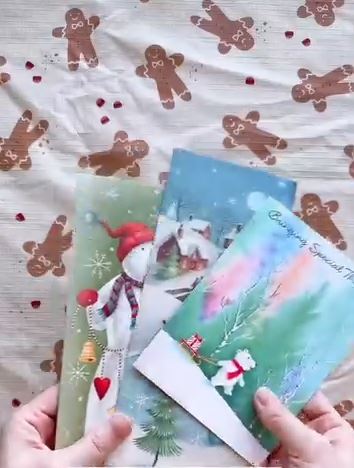
Thicker card usually holds up better than ordinary wrapping paper. The printed side supplies the design, while the reverse gives you space to write the recipient’s name.
Materials and Tools
- Old greeting-card fronts
- Scissors
- Craft knife and cutting mat
- Tag-shaped punch or paper template
- Hole punch
- Ribbon, cord, or twine
- Blank paper for covering old writing
- Glue stick
- Optional stickers or wax seals
Make the Gift Tags in Four Steps
- Choose the strongest sections. Look for complete pictures that still make sense after cutting. Avoid creased folds, torn corners, and areas where thick glitter falls away when touched.
- Cut the tag shape. Use a paper template, large punch, or ruler to create rectangles, circles, arches, or traditional luggage-tag shapes. Leave enough blank space on the back for a short message.
- Cover unwanted wording. Glue a small piece of plain paper over any old printed text that remains visible. Then punch a hole near the top, keeping enough distance from the edge so the card does not tear.
- Add the hanging tie. Thread ribbon or twine through the hole and test it around a gift handle. Store finished tags flat with your wrapping supplies so they do not bend before the next occasion.
For me, the best tags do not look as though every available centimetre had to be saved. One clear flower or character is usually more effective than a crowded piece containing half a sentence and three unrelated borders.
Small offcuts can become mini labels for party favours, storage jars, plant gifts, or handmade products. Cards with darker backs can be layered onto a plain paper tag instead of being written on directly.
Fold Card Panels Into Dimensional Paper Ornaments
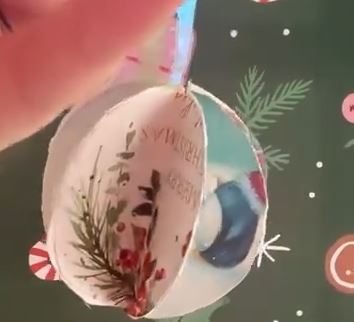
Several card fronts can be cut into matching circles, hearts, stars, or bauble shapes and joined into a dimensional ornament. The card’s thickness helps the finished object keep its form, while different designs create a patchwork effect.
Choose cards of a similar weight. Very thin paper may collapse beside stiff laminated card, and heavily raised decorations can stop the folded sections from meeting cleanly.
Materials and Tools
- Several old card fronts
- Shape template or large paper punch
- Pencil
- Scissors
- Metal ruler
- Bone folder
- Paper adhesive
- Ribbon or thread
- Small bead, if desired
- Paper clips for holding glued sections
Build the Ornament in Five Steps
- Select related colours or images. The pieces do not need to match exactly, but one repeated shade helps the ornament feel connected. Check that each chosen area is large enough for the complete template.
- Cut identical shapes. Trace and cut an even number of circles, hearts, stars, or baubles. Place the most attractive part of each illustration near the centre rather than along a fold that may hide it.
- Score and fold each piece. Use a ruler and bone folder to create a neat central fold. Fold printed sides inward or outward depending on which surfaces you want visible after assembly.
- Join the folded sections. Glue one half of a shape to the half of the next piece, continuing until the ornament forms a full circle. Add the hanging cord through the centre before closing the final join.
- Check the balance. Fan out the sections evenly and let the adhesive dry fully. Trim only tiny uneven edges because heavy cutting after assembly can distort the shape.
I know it can feel tempting to use every bold pattern in one ornament, but the piece still needs somewhere for the eye to rest. Alternating a detailed card with a simpler colour usually creates a clearer result.
Small circles can become a lightweight garland. Larger folded stars can be displayed in a window, provided prolonged sunlight will not matter to the card images you chose.
Display Family Cards as a Ribbon Memory Timeline
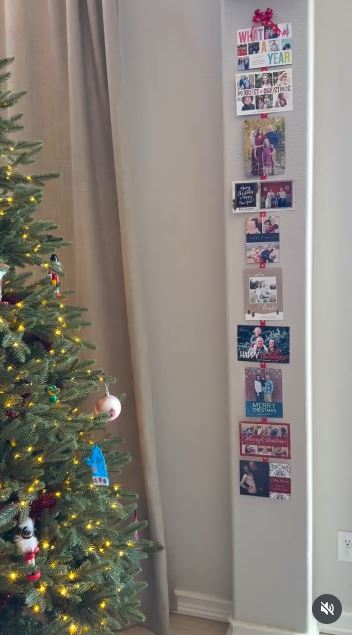
Photo cards and handwritten family cards can form a timeline instead of being cut into craft pieces. Arranged by year along a ribbon, they show changing faces, growing children, new homes, and the small details people tend to forget.
This is a good option for cards that matter emotionally but do not need permanent archival storage. The hanging method can remain removable, allowing the cards to return to a box after the display period.
Materials and Tools
- Family greeting cards
- Wide ribbon, cord, or fabric tape
- Removable clips
- Small wooden pegs
- Paper-safe tape when appropriate
- Pencil
- Small date labels
- Wall hooks suited to the finished weight
- Optional decorative greenery or paper shapes
Arrange the Timeline in Four Steps
- Sort the cards by date. Look for printed years, postal marks, children’s ages, or handwritten clues. Add a discreet removable date label when the year is not obvious.
- Choose the display order. Arrange the oldest card at one end and the newest at the other, or hang the years vertically. Lay the complete sequence on the floor before attaching anything.
- Connect the cards without damaging them. Use small clips or pegs rather than punching sentimental originals. Keep the pressure away from raised decorations, delicate photographs, and weakened folds.
- Hang the display securely. Support the ribbon at more than one point when the cards create significant weight. Keep it away from candles, radiators, damp windows, and busy doorways.
The part I like is that the handwriting can remain hidden until someone lifts a card to read it. The display shows the visual history without turning every private message into wall text.
Birthday cards can form a yearly family timeline, while wedding cards may be displayed temporarily around an anniversary. A tabletop version can use cards placed upright in a long wooden holder.
Make Sturdy Bookmarks From Illustrated Cards
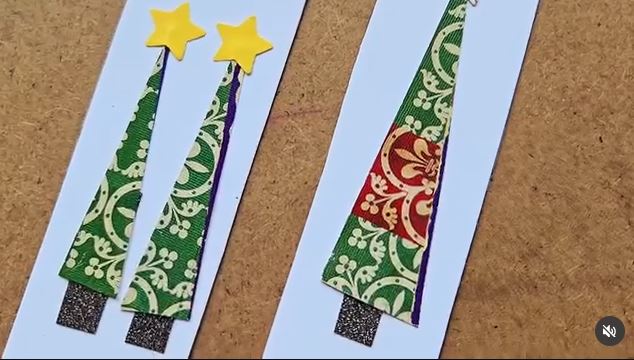
Bookmarks work particularly well when a card has a tall flower, border, character, or strip of repeated pattern. They also make use of narrow sections left after larger shapes have been cut for another project.
The finished bookmark should remain fairly flat. Large beads, thick bows, and raised embellishments may press against book pages or damage the spine.
Materials and Tools
- Greeting-card panels
- Ruler
- Pencil
- Paper trimmer or scissors
- Corner-rounding punch
- Hole punch
- Thin ribbon or embroidery thread
- Plain cardstock for backing
- Glue stick
- Optional clear paper-safe protective film
Cut the Bookmarks in Four Steps
- Find a vertical design. Move a paper template across the card until the illustration fits comfortably inside the narrow shape. Check the reverse for personal writing before cutting.
- Trim and strengthen the strip. Cut the bookmark with straight sides and back it with plain cardstock when the original card feels thin or creased. Press the layers flat beneath a book while the adhesive dries.
- Finish the edges. Round the corners or trim them neatly so they do not catch on pages. Punch a hole only when the card remains strong enough above it.
- Add a flat tassel. Use thin ribbon or several strands of embroidery thread. Keep the knot compact and test the bookmark inside a closed book before gifting it.
I’d rather make a shorter bookmark from a complete picture than a long one that cuts straight through the main illustration. The shape should serve the artwork, not the other way around.
Several matching bookmarks can become a small handmade gift. Tiny card strips can also be used as page flags, recipe markers, or labels for seed packets.
Use Card Illustrations to Make a New Collage Card
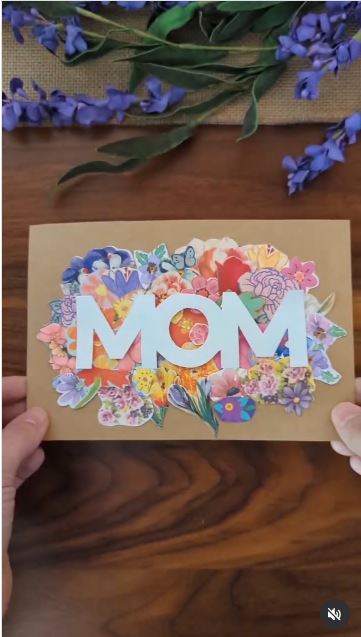
A greeting card can become another greeting card without simply covering the old message and sending it again. Cut flowers, leaves, lettering, borders, or small characters from several cards and arrange them on a fresh base.
This approach works well when the original cards are damaged around the fold but retain useful printed details. Combining several small elements also allows you to change the colour scheme and occasion.
Materials and Tools
- Old greeting-card illustrations
- Blank card base
- Small scissors
- Craft knife
- Glue stick or paper adhesive
- Reclaimed envelope paper
- Coloured paper scraps
- Foam pads, if a raised layer is wanted
- Pen or letter stamps
- Ruler
- Optional ribbon or paper lace
Create the New Card in Five Steps
- Choose one main theme. Gather flowers, animals, cakes, stars, leaves, or another group of related images. Avoid mixing every attractive piece simply because it is available.
- Cut the reusable details. Leave a thin printed border around intricate images when close cutting would damage them. Separate large elements from small fillers before beginning the layout.
- Arrange the full card without glue. Place the largest illustration first, then add smaller pieces around it. Leave room for the new greeting and check that the card can still fold flat.
- Attach the layers in order. Glue the background pieces first and the main image last. Use raised foam only in a few places so the card remains suitable for an envelope.
- Add a completely new message. Cover any accidental old wording and write the new greeting clearly. Let every adhesive layer dry before closing the card.
For me, the new composition should look intentional rather than like a collection of rescued scraps. Repeating one colour or leaf shape can connect pieces taken from completely different cards.
The same method can create postcards, thank-you notes, scrapbook embellishments, or framed paper collages. Children can make a simpler version using large pre-cut shapes and a glue stick.
Where Greeting-Card Crafts Tear, Fade, or Lose the Memory
Cutting Before Reading Both Sides
A decorative section may have meaningful handwriting behind it. Read the complete card, photograph important content, and mark the safe cutting areas first.
Altering the Only Sentimental Original
Use a scan, photocopy, or removable display method when a card cannot be replaced. Cutting is better reserved for duplicates, damaged cards, and pieces without important messages.
Forcing Thick Card Into Sharp Folds
Laminated, embossed, or heavily coated cards can crack. Score the fold first or choose a project that keeps the card flat.
Using Too Much Wet Glue
Thin paper may wrinkle, while coated card may allow glue to slide before setting. Apply a controlled amount and test unfamiliar adhesives on an offcut.
Combining Too Many Decorative Features
Glitter, foil, ribbon, raised flowers, and printed text can compete with one another. Choose one main feature and let the remaining details support it.
Punching Too Close to an Edge
Ribbon holes can tear through the card when there is too little paper above them. Reinforce a weak area with another layer of card before punching.
Storing Important Cards in Bright Light
Printed colours and photographs may change after prolonged light exposure. Display copied images when preserving the original appearance matters.
Ignoring Personal Information
Cards and envelopes may contain addresses, family photographs, signatures, and private messages. Remove or cover identifying details before donating, selling, or sharing a project publicly.
Assuming Every Card Belongs in Paper Recycling
Cards may contain batteries, plastic, foil, magnets, fabric, and heavy glitter. Separate reusable components and check the rules of your local recycling service for anything you cannot craft with.
Frequently Asked Questions
Should I keep every greeting card I receive?
You do not have to keep every card to appreciate the person who sent it. Preserve the messages that matter most, photograph others, and reuse decorative cards that no longer need to remain intact.
How can I save the message without storing the complete card?
Scan or photograph the inside and outside, record the sender and date, and organise the digital files in clearly named folders. You can also cut out the handwritten message and store it in a memory book.
What is the easiest greeting-card project for a beginner?
Gift tags and bookmarks require only measuring, cutting, and a hole punch. They are also useful for small decorative areas and cards with damaged folds.
Can glittery cards be reused?
Yes, but seal or avoid areas where glitter sheds heavily. Keep loose glitter away from children, pets, food, and surfaces where it will be difficult to clean.
Can I use greeting cards in a scrapbook?
Yes. Use photo corners or suitable paper adhesive when the card has sentimental value. Avoid covering important dates, signatures, or handwriting permanently.
How do I flatten a bent card?
Place the card between clean sheets of plain paper and beneath a flat, moderate weight. Do not use heat or moisture on glossy photographs, metallic finishes, or unknown inks.
What should I do with the envelopes?
Reuse clean envelopes for paper storage, templates, seed packets, collage backgrounds, shopping lists, or scrap-paper pockets. Cover addresses before using them publicly.
Let the Message Continue in Another Form
Deciding what to do with old greeting cards becomes easier once you separate the message from the material.
A meaningful handwritten card may remain safely stored, while its scanned image keeps the memory accessible. Decorative cards can become gift tags, ornaments, bookmarks, boxes, garlands, and new collage cards without pretending the original occasion never happened.
Begin with one card that has no irreplaceable writing. Make a tag or bookmark, then save the smaller offcuts for another project rather than trying to use the entire card at once.
Which old greeting cards would you reuse first: birthday cards, wedding cards, family photo cards, thank-you notes, or the Christmas cards that seem to multiply every year?