Have you ever opened an old jewelry box and felt a wave of nostalgia? Maybe it’s the soft whisper of the hinges, the smooth texture of the wood, or the way it holds your most cherished pieces of jewelry.
Over the years, jewelry boxes can accumulate dust, show signs of wear, or even become damaged. However, instead of letting them gather dust in a forgotten corner of your home, consider refurbishing them.
Whether you found an antique jewelry box at a flea market or inherited one from a loved one, restoring it can breathe new life into both the box and your collection.
In this blog post, I’ll walk you through the process of refurbishing a jewelry box, from basic repairs to advanced refinishing, and give you tips to make sure your box looks as good as new.
Preparing Your Jewelry Box for Refurbishment
Before diving into the repairs, you must assess the condition of your jewelry box. The first step is to decide whether it needs a simple clean-up or a complete overhaul. Here’s how to begin:
Clean and Declutter
The first thing you should do is clean the exterior and interior of the jewelry box. Take out all the jewelry, and make sure you remove any items or small trinkets from compartments. A thorough cleaning will give you a clear view of what repairs are necessary.
- Exterior Cleaning: Use a soft cloth with a gentle wood cleaner (if the box is wooden) or a fabric cleaner (if the box has a velvet or cloth surface). Avoid harsh chemicals or abrasive materials that can scratch the surface.
- Interior Cleaning: Velvet interiors are prone to dust and dirt buildup. A handheld vacuum with a soft brush attachment can help clean the compartments without damaging the fabric. For any stubborn spots, a lint roller can work wonders.
Assess the Condition
Now that your jewelry box is clean, take a closer look at its condition. Does it have broken hinges or locks? Is the wood scratched or chipped? Are the velvet linings damaged? Identifying these issues will help you plan the repairs.
- Broken Hinges/Locks: These are some of the most common issues, and thankfully, they’re relatively easy to fix.
- Scratched or Worn Wood: Wood can easily be restored with the right tools and finish.
- Damaged Velvet or Fabric: If the velvet is stained or torn, you may need to replace it or reline the compartments.
Step-by-Step Refurbishment Process
Now that you’ve cleaned your jewelry box and gathered your tools, let’s walk through the refurbishment process step by step. This is where the fun begins!
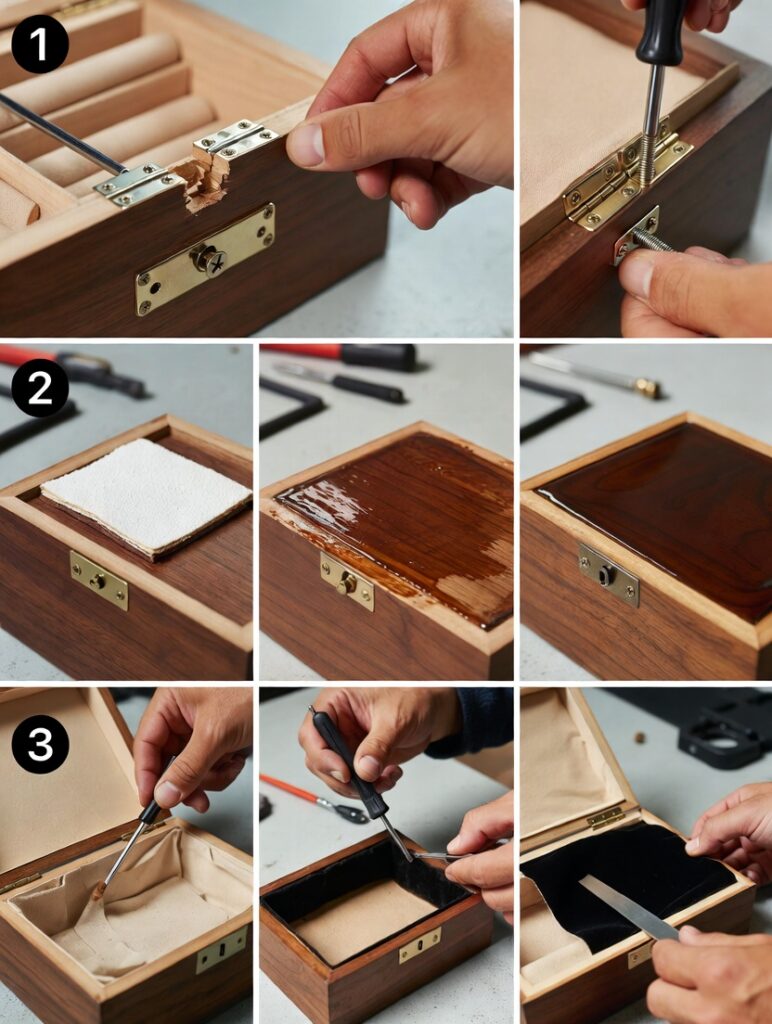
Fixing Broken Hinges or Locks
The hinges and locks of your jewelry box are essential for both functionality and security. Over time, these parts may become loose or broken. Here’s how to fix them:
- Step 1: Remove the damaged hinge or lock using a screwdriver. If the screws are rusted or stripped, you might need to use a drill to remove them carefully.
- Step 2: Replace the broken hardware with new hinges or locks. Make sure you get the correct size and style to match the existing screw holes.
- Step 3: Attach the new hinges or lock, and make sure everything aligns properly. Tighten the screws until they’re secure, but be careful not to overtighten and risk cracking the wood.
Restoring Scratched or Chipped Wood
Wooden jewelry boxes are often subjected to wear and tear. If your box has scratches, chips, or worn-down areas, here’s how to restore the wood:
- Step 1: Sand down the scratched area using fine-grit sandpaper. Sand with the grain of the wood to avoid damaging it further.
- Step 2: After sanding, wipe away the dust using a clean cloth.
- Step 3: Apply a wood stain or finish to restore the box’s color and texture. Choose a stain that matches the original color of the box. Apply a thin layer and allow it to dry, repeating if necessary to get an even finish.
- Step 4: Once the stain is dry, apply a wood finish or protective coat to seal the wood and give it a polished look.
Replacing Velvet or Fabric Linings
Over time, the velvet lining of your jewelry box may become stained, torn, or simply lose its plush texture. Here’s how to replace it:
- Step 1: Remove the old lining carefully. If it’s glued in place, use a gentle adhesive remover to lift it.
- Step 2: Measure the compartments to ensure you get the correct size of fabric. Cut the new velvet or fabric to fit each compartment precisely.
- Step 3: Apply a fabric glue or spray adhesive to the back of the new velvet, and carefully place it inside the compartment. Press down gently to ensure it sticks evenly.
- Step 4: Let the adhesive dry completely before placing your jewelry back into the box.
Common Mistakes to Avoid
Refurbishing a jewelry box is a rewarding process, but it’s easy to make mistakes along the way. Here are some common pitfalls to avoid:
Over-Sanding the Wood
Sanding is essential for smoothing out rough areas or scratches on the wood, but it’s easy to go overboard. Over-sanding can weaken the structure of the box or remove too much of the original finish. Always use fine-grit sandpaper, and focus on only the damaged areas.
Using the Wrong Adhesives
Choosing the wrong adhesive for repairs can result in unsightly messes or, worse, weakened joints. Always use wood glue for wooden repairs and fabric adhesive for velvet linings. Check the product recommendations to ensure they’re compatible with the material you’re working with.
One of the most common mistakes is not allowing enough drying time between steps. Whether you’re working with glue, stain, or paint, always give each layer enough time to dry before moving on to the next step. This ensures the best possible finish and durability.
Conclusion: Giving Your Jewelry Box a New Life
Refurbishing a jewelry box can be an incredibly rewarding experience. Not only do you restore a piece of furniture, but you also create a functional and sentimental item that will last for years to come. By following these simple steps, you can give your old, worn-out jewelry box a new lease on life.
If you’re ready to start refurbishing your jewelry box, I encourage you to take the plunge and get started today!
If you’ve refurbished a jewelry box yourself, I’d love to hear your experience share your thoughts in the comments below, and don’t forget to share this post with your friends who might be in need of some jewelry box TLC.
FAQs:
How long does it take to refurbish a jewelry box?
The time it takes to refurbish a jewelry box depends on the amount of damage it has and the level of restoration needed. Simple cleaning and minor repairs can be done in a couple of hours, while more extensive restoration projects (like refinishing wood or re-lining velvet compartments) may take a couple of days to complete.
Can I refurbish a jewelry box without removing the old lining?
If the lining is only slightly damaged, you can sometimes refurbish the jewelry box without removing it. However, if it’s significantly worn or stained, it’s best to replace it to achieve the best results.
Can I paint my jewelry box for a new look?
Absolutely! Painting your jewelry box is a great way to give it a fresh look. Use acrylic paints for wood or fabric paints for velvet linings. Be sure to apply a protective coat to seal the paint and preserve your hard work.
Is it necessary to re-stain the wood?
Staining is not always necessary, but it helps restore the color and texture of the wood. If your box’s wood has faded or been damaged by wear and tear, applying a new coat of stain can bring it back to life.