If you have a bookcase, dresser, or desk made from pressed wood with a laminate skin and you want to paint it, you’re in the right place. This surface is notorious for rejecting paint.
The laminate is basically plastic, the core hates moisture, and the edges swell if you look at them wrong.
Still, you can get a clean, durable finish if you approach it like a small renovation rather than a quick craft.
I’ve painted a lot of budget furniture over the years. Some projects went perfectly. A few chipped within a month because I rushed prep or used the wrong primer.
The difference between a finish that fails and one that looks store-bought usually comes down to three things: the right primer, careful surface prep, and thin, patient coats with proper cure time.
In this guide I’ll break down exactly what to do, what not to do, and how to fix the common “it’s peeling already” problems.
What You’re Actually Painting: Pressed Wood + Laminate
Pressed wood (often particleboard) is wood particles glued together under pressure. It’s dense but very vulnerable to water.
The outer shell is a thin laminate, basically a plastic veneer with a printed pattern that looks like wood. Paint doesn’t love sticking to plastic, and the pressed core under it will swell if it gets wet.
That means your approach needs to:
- Clean off waxes, polish, and kitchen oils so primer can bite.
- Slightly scuff the laminate without sanding through it.
- Lock down edges and chips with filler or epoxy so they stop wicking moisture.
- Use a bonding primer designed for slick surfaces.
- Paint in thin coats and let each coat cure.
If you do those five things, you can expect a finish that’s tough enough for daily use.
Tools, Materials, and Setup
Core supplies
- Cleaner: A degreasing cleaner or TSP substitute. I avoid soaking the surface. Spray on a cloth, not the furniture.
- Scuffing tools: 220-320 grit sandpaper, a fine sanding sponge, and a tack cloth or vacuum.
- Filler: High-quality wood filler for small chips. For deep damage or corners, a two-part epoxy putty is miles better.
- Caulk: Paintable caulk for tiny gaps at seams or wall-to-furniture lines.
- Primers: One of the following
- Acrylic bonding primer labeled for laminate or glossy surfaces
- Shellac-based primer if you need maximum adhesion and stain block (ventilate well)
- Paint:
- Waterborne alkyd enamel, cabinet-grade acrylic enamel, or high-quality 100% acrylic latex.
- Sheen: satin or semi-gloss for durability and cleanability.
- Applicators: High-density foam roller for smooth surfaces, good quality synthetic brush for edges. A small sprayer is great if you have a place to spray.
- Topcoat (optional): Water-based polyurethane or polycrylic if you want extra protection. Not always necessary with waterborne alkyds.
- Other: Painter’s tape, drop cloth, respirator or mask, nitrile gloves.
Workspace
- Work somewhere dust-lite and well ventilated.
- Elevate doors or drawer fronts on painter’s pyramids so you can roll edges.
- Keep humidity moderate if possible. High humidity slows cure and can cause a gummy feel.
Time planning
- Day 1: Cleaning, scuff sanding, repairs, first primer coat.
- Day 2: Sand primer, second primer coat, first color coat.
- Day 3: Second color coat. Optional third coat or topcoat.
- After: Gentle use for a few days. Full cure for most paints is 7 to 30 days.
I’ve done it in one weekend many times. The key is to let each layer fully dry before moving on.
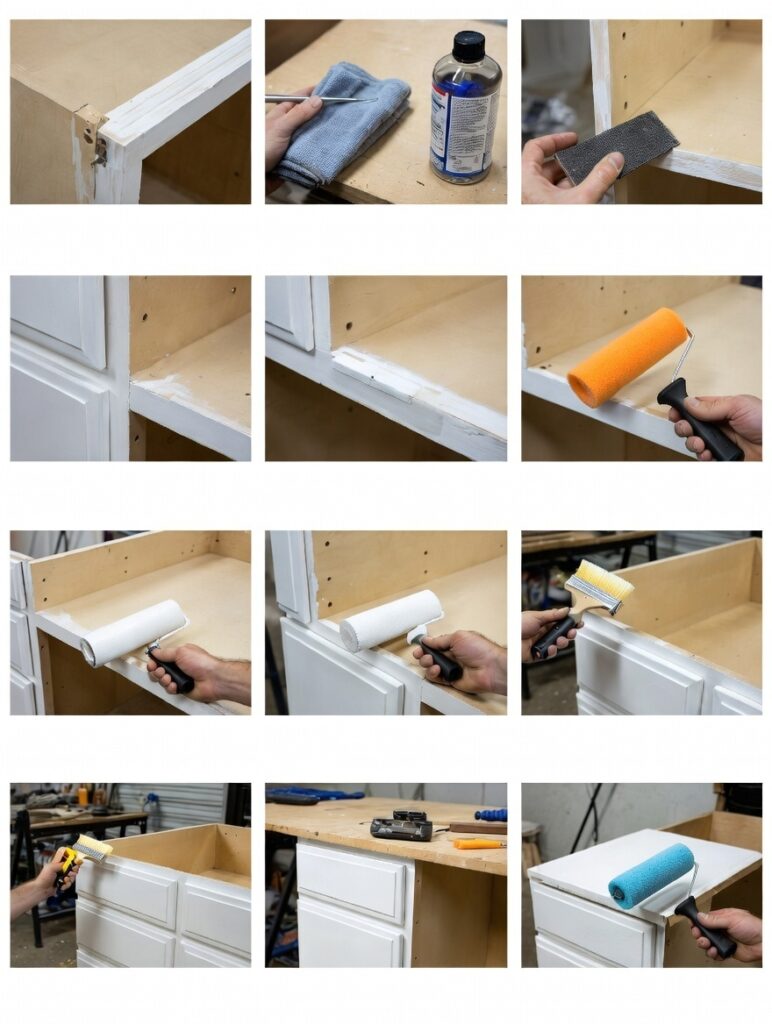
Step-by-Step: From Glossy Laminate to Painted and Durable
1) Inspect and decide how far to go
- Look for swelling along edges and around screw holes. Pressed wood swells into a fuzzy, raised lip.
- Check for delamination. If the laminate is lifting, you might need to reglue it before paint.
- Pick your battles. A dresser with a few chips is fine. A desk that has a soggy, bulging edge might need epoxy rebuild or a new edge band.
My take: If more than 20% of the edges are blown out, I either replace the edging or use iron-on veneer before paint. It looks better and stays crisp.
2) Deep clean
- Wipe with a damp microfiber and a degreasing cleaner. Food grease, silicone furniture polish, and hand oils ruin adhesion.
- Don’t flood the surface. Spray the cloth, not the piece. Dry immediately with a separate towel.
Tip: If your rag keeps getting brown or waxy, keep cleaning until it wipes clean. That residue is what causes fisheyes and peeling later.
3) Light scuff sand
- Use 220-320 grit to dull the shine. You’re not trying to remove the laminate. You just want microscopic scratches so primer can grab.
- Keep pressure even. Corners burn through quickly.
- Vacuum or wipe with a tack cloth to remove dust.
Personal insight: When I rushed this step in the past, I could scrape the paint off with a fingernail a week later. After a proper scuff, the primer feels like it fused to the surface.
4) Repair chips and edges
- Shallow chips: Press in wood filler, slightly proud of the surface. Let dry fully.
- Deep damage or swollen corners: Carve away the loose, puffy fibers with a sharp chisel or utility knife. Mix and apply a two-part epoxy putty, shape it, and sand smooth once cured.
- Screw holes you won’t reuse: Fill twice, sanding between, to prevent later dimples.
Edge sealing trick: I often run a bead of thinned wood filler along raw edges, then sand it back to crisp. It acts like a pore sealer so those edges don’t guzzle primer unevenly.
5) Caulk seams
- If your piece meets a wall or has visible gaps at trim seams, run a thin bead of paintable caulk. Smooth with a damp finger. Let it skin over before priming.
6) Prime for adhesion
- Choose a bonding primer explicitly labeled for laminate or glossy surfaces.
- Apply a thin, even coat with a foam roller on flats and a brush on edges.
- Let it dry per the label. If the surface still looks patchy or you sanded through to raw particleboard in spots, apply a second thin coat.
When to use shellac primer: If you suspect stains, ink, or you sanded into the brown core, shellac blocks bleed-through and grabs like crazy. It dries fast but smells strong. I use it under light colors to keep tan edges from ghosting.
7) Sand the primer
- A quick pass with 320 grit knocks down dust nibs and leaves a silky base.
- Vacuum and tack cloth again.
8) Paint in thin, patient coats
- First color coat: roll thin, then tip off lightly with a brush on long runs to level. Don’t overwork it.
- Check for holidays (missed spots) at a shallow angle.
- Wait the full recoat time, then apply the second coat. Two coats usually cover. A third can help with whites and very dark colors.
Sprayer note: If you spray, strain your paint, do light passes, and keep moving. Spraying can produce a glassy finish on laminate that looks factory.
9) Optional topcoat
- If you used a waterborne alkyd or cabinet enamel, you may not need a topcoat.
- For soft acrylics, kid furniture, or desktops, a water-based polyurethane adds toughness.
- Apply two light coats, sanding very lightly between with 400 grit.
10) Cure and reassemble
- Resist the urge to load drawers immediately. Let parts sit flat and cure.
- Reinstall hardware with care so you do not scratch the fresh paint.
- Gentle use for a few days. Avoid setting heavy or rubber-footed items on top for a week to prevent impressions.
Real-World Examples and What I Learned
Case study 1: Thrifted laminate dresser
- Issue: Two swollen top corners and peeling laminate on one drawer front.
- Fix: I injected wood glue under the lifted laminate, clamped overnight, and rebuilt the corners with epoxy putty.
- Primer: Shellac-based because of a water stain ghosting through.
- Paint: Waterborne alkyd enamel in satin. Two coats.
- Result: After a year, zero chips. The epoxy corners look crisp, and the sheen is easy to wipe.
- Lesson: Epoxy on corners is worth the extra hour. Wood filler would have cracked the first time the drawer bumped something.
Case study 2: Laminate desk with keyboard wear
- Issue: Shiny, greasy wear spot and tiny pits from years of typing.
- Fix: Degreaser took several passes. I skimmed the worn area with a flexible putty knife and filler, sanded to dead flat.
- Primer: Dedicated bonding acrylic primer.
- Paint: Cabinet-grade acrylic enamel. I added a water-based polyurethane topcoat because of heavy daily use.
- Result: Smooth writing surface that feels like a new desk.
- Lesson: On desktops, the topcoat is cheap insurance against coffee mugs and notebooks.
Case study 3: Quick-turn bookcase
- Issue: None beyond the slick surface.
- Fix: Minimal repairs. I just scuff-sanded and primed.
- Paint: One thin coat of primer, two thin coats of paint. No topcoat.
- Result: Great after six months, but I wouldn’t trust it in a kid’s room without a topcoat.
- Lesson: You can keep it simple when the piece is low-traffic.
Choosing Primer and Paint: What Works on Laminate
You have options, and they all work if used correctly. Here is how I decide:
- Shellac-based primer if I need maximum adhesion or I’m seeing stains or tannin bleed. Downsides: strong smell, alcohol cleanup. Upside: it grabs like a barnacle.
- Acrylic bonding primer for most jobs. Look for language like “for laminate, glossy, or hard-to-coat surfaces.” Easy cleanup, low odor, reliable results.
For the color coats:
- Waterborne alkyd enamel is my go-to for dressers and cabinets. It levels well, cures hard, and cleans like a dream.
- Cabinet-grade acrylic enamel is also great. It is slightly softer at first but becomes tough with a proper cure.
- Standard acrylic latex can work on decor pieces or bookcases. Pair with an optional topcoat for durability.
Sheen matters. Satin hides minor flaws and cleans well. Semi-gloss is harder and brighter but shows imperfections. I use semi-gloss on doors and trim, satin on furniture.
Troubleshooting and Repairs After the Fact
Peeling at corners
Likely cause: poor cleaning or skipped scuff sanding.
Fix: Feather-sand the failed area, wipe clean, spot prime with shellac primer, repaint in thin coats.
Bubbles or blisters
Likely cause: moisture trapped under paint or painting in high humidity.
Fix: Let it fully dry. Sand flat. Prime again. Avoid heavy coats and try to paint in a drier window.
Fisheyes or craters
Likely cause: silicone contamination from furniture polish.
Fix: Deep clean again with a degreaser. Shellac primer helps bridge over silicone. Then repaint.
Rough, sandpaper feel
Likely cause: dust nibs or over-rolling as paint tacked up.
Fix: Lightly sand with 320-400 grit to smooth. Wipe dust and recoat. Work faster and roll thinner next time.
Visible seams telegraphing through
Likely cause: seams not caulked or filled before paint.
Fix: Score the paint lightly, apply paintable caulk, let it cure, spot prime, repaint.
Common Mistakes to Avoid
- Skipping the deep clean. A shiny surface covered in polish will laugh at your paint.
- Aggressive sanding. Sanding through the laminate exposes the thirsty core. Keep it light and even.
- Using the wrong primer. A general-purpose wall primer is not the same as a bonding primer.
- Thick coats. Thick paint traps solvents, takes forever to cure, and chips more easily. Thin, even coats win.
- Painting in a damp garage. Humidity extends dry time and invites bubbles.
- Ignoring edges. They are the first to chip. Seal, prime, and handle them carefully between coats.
- Reassembling too early. Fresh paint dents and sticks. Give it time.
Maintenance after You Paint
- For the first week, clean with a barely damp cloth, no harsh cleaners.
- Avoid rubber feet or pads that can bond to fresh finishes. Felt pads are safer.
- If a chip happens, don’t panic. Feather-sand, spot prime, and touch up in small, thin layers.
Conclusion
Painting pressed wood with a laminate surface is all about preparation and patience. The material wants to fight you, but you can absolutely win with the right sequence.
Clean it like you mean it, scuff just enough, prime with something designed for slick surfaces, and apply paint in thin, confident passes. If you run into problems, most are fixable with a bit of sanding and spot priming.
I’ve taken beat-up, unloved laminate pieces and turned them into sturdy, nice-looking furniture that holds up for years. You can do the same.
FAQs
Can I paint laminate without sanding at all?
You can get away with minimal sanding if you use a top-tier bonding primer, but I always do a quick scuff. It takes ten minutes and saves you from chipping later.
Is chalk paint a shortcut for laminate?
Chalk paint sticks better than basic wall paint, but it still needs a good clean and usually a bonding primer to be reliable on laminate. I treat chalk paint as a style choice, not a prep shortcut.
What if the laminate is peeling off?
Peel back the loose section, scrape old glue, and re-adhere with wood glue or contact cement. Clamp flat with a caul. After it cures, prime and paint. If the layer is shattered or missing, rebuild the area with epoxy putty and sand it flush.
Do I need a topcoat on every project?
No. Waterborne alkyd enamel or cabinet-grade acrylic is tough by itself. I add a water-based polyurethane on desktops, tabletops, and kids’ furniture for extra insurance.
How long until I can use it normally?
You can handle it lightly after a day, but full hardness can take 7 to 30 days depending on the paint. During that time, avoid heavy objects, rubber pads, and strong cleaners.