
In the age of minimalism and sustainability, upcycling has become a popular way to breathe new life into old items, especially furniture. And what better way to start than by turning an old magazine rack into something both functional and aesthetically pleasing for your home?
We all have that forgotten, dusty magazine rack lying around, usually collecting more dust than magazines, right? But what if I told you that with a little creativity, you could transform it into a piece that adds style, storage, and personality to your space?
In this post, I will guide you through step-by-step instructions on how to upcycle a magazine rack. Whether you want to keep it simple or go for a more ambitious project, I’ve got you covered with different techniques, tips, and creative ideas. Let’s dive into the fun world of upcycling!
Why Should You Upcycle Your Magazine Rack?
Before we get into the specifics, you might wonder: why should I bother upcycling an old magazine rack? Well, there are several compelling reasons.
- Environmental Impact: Upcycling is an eco-friendly way of reusing materials and items, reducing waste. Rather than throwing away something you no longer use, you can repurpose it into something functional or decorative.
- Cost-Effective: Why spend money on a new storage solution when you can transform something old you already have? Upcycling is a budget-friendly way to refresh your home without breaking the bank.
- Personalization: Upcycling allows you to put your unique touch on your home decor. Whether you’re going for a rustic, modern, or vintage look, the possibilities are endless.
- Sentimental Value: Maybe that magazine rack was a gift or holds some memories for you. Upcycling gives you a way to keep it around in a new, functional form.
Now, let’s get into the how!
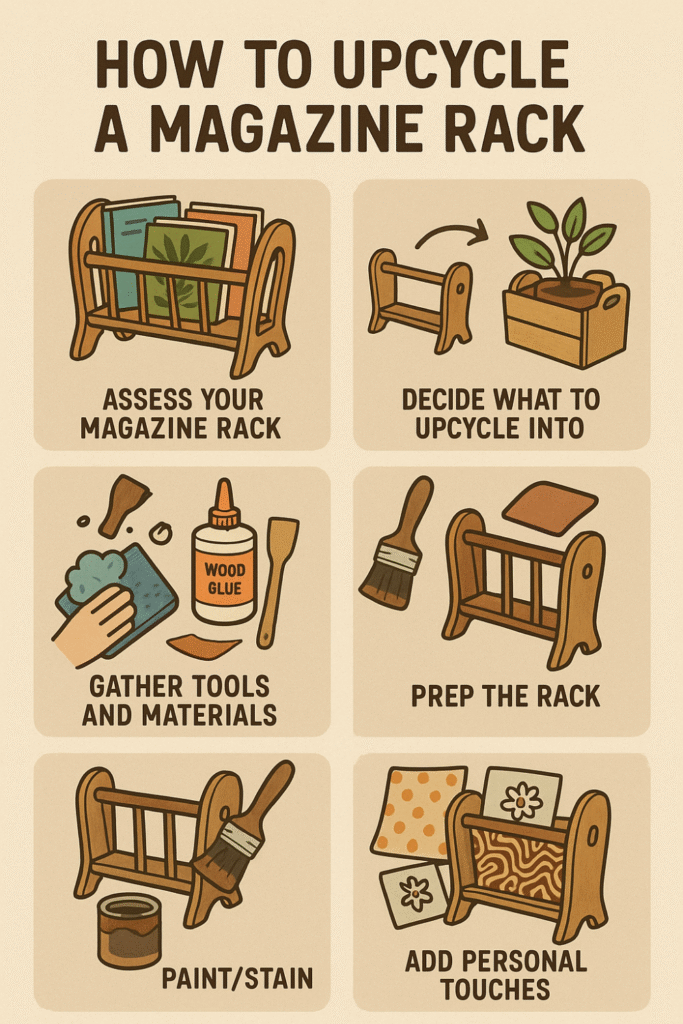
Step 1: Assess Your Magazine Rack
Before you dive into any upcycling project, it’s important to take a good look at what you’re working with. The first step is to inspect your magazine rack closely.
- Condition: Is it sturdy? Does it need repairs, such as fixing wobbly legs or tightening screws? A little repair work might be needed before you start the upcycling process.
- Material: Is it made of wood, metal, or plastic? Knowing the material helps you decide on the appropriate upcycling technique and finishes.
- Size: Consider the size of the rack and what you might want to turn it into. Will it be a small accent piece, or do you want to create something larger, like a bookshelf or side table?
Step 2: Decide What You Want to Upcycle It Into
One of the best things about upcycling a magazine rack is the variety of possibilities you have. Here are a few ideas to spark your creativity:
1. Wall-Mounted Shelves
If you have a small magazine rack made of wood or metal, you can convert it into a chic, wall-mounted shelf. This is perfect for storing smaller items like books, plants, or decorative trinkets.
2. Side Table
For a larger rack, you can use the existing structure to support a tabletop, turning your magazine rack into a stylish side table. You can add a glass top, wooden slab, or even an old drawer for a more rustic look.
3. Planter Holder
Another fun idea is transforming your magazine rack into a planter holder. You can use the individual slots for small potted plants, or remove a few sections to create space for larger planters. It’s an easy way to bring some greenery into your home.
4. Entryway Organizer
A magazine rack with multiple compartments can easily be converted into an entryway organizer. It’s a great way to store your keys, mail, and other essentials in a neat, accessible manner.
5. Serving Tray
For smaller, lightweight racks, you can repurpose them into a cute serving tray. Just add handles and a fresh coat of paint, and you’ve got yourself a functional and stylish tray for serving drinks or snacks.
Step 3: Tools and Materials You’ll Need
Once you’ve chosen your project idea, it’s time to gather the materials. Depending on your vision, the tools and materials will vary. Here’s a general list of supplies you might need for most upcycling projects:
- Sandpaper: To smooth out rough surfaces and prepare the rack for painting or finishing.
- Paint: Choose your preferred paint type based on the material of your magazine rack. For wood, a good acrylic or chalk paint works great. For metal, consider spray paint or enamel paint.
- Primer: If you’re painting over a darker color or metal, using a primer will help the paint adhere better.
- Screws, Nails, or Wood Glue: Depending on the repairs or modifications needed, you might need extra fasteners or glue to hold parts together.
- Wood Stain (optional): If you want a natural wood look, wood stain can be used to enhance the appearance.
- Handles (optional): If you’re turning your rack into a serving tray or organizer, handles will be a must-have.
- Cushioning (optional): For a more luxurious touch, consider adding padding or a soft surface to parts of the rack.
Step 4: Upcycling Your Magazine Rack (Step-by-Step Instructions)
1. Prep Your Magazine Rack
The first step is to clean your magazine rack thoroughly. Dust off any dirt, remove old labels, and wipe down the surface to make sure the paint or finish sticks properly. If you’re working with a wooden rack, make sure it’s free of any grease or oils.
Next, sand the surface lightly. If your rack is painted, sanding will remove the old layer and help the new paint adhere better. If you’re working with metal, be sure to remove any rust before proceeding.
2. Repair and Reinforce
If your magazine rack is wobbly or broken, now is the time to make any necessary repairs. Tighten screws or nails, and if necessary, use wood glue or a similar adhesive to hold parts together. For metal racks, you may need to reinforce connections with metal brackets.
3. Paint or Stain
Once your rack is prepped and repaired, it’s time to add some color or texture. If you’re painting the rack, apply a primer first, then paint in thin, even layers.
Let each layer dry completely before applying the next one. You can get creative with color, but keep in mind the overall aesthetic of your space. Neutral colors work well in most settings, but bold colors can make the rack a statement piece.
If you’re staining the wood, apply the stain evenly with a brush or cloth. Wipe away excess stain to achieve the desired shade.
4. Add Personal Touches
Here’s where you can get really creative. Depending on your project, you can add additional features, such as handles for a serving tray or brackets for a shelf. You might also want to add a protective coating like polyurethane to give it a shiny, durable finish.
For a rustic look, consider adding a distressed finish by lightly sanding areas after the paint has dried. This will give the piece an aged, vintage feel.
Quick Overview of Steps
| Step | Action | Tools/Materials Needed | Notes |
| 1. Assess Your Magazine Rack | Inspect for condition, material, and size. | None | This step ensures you know what you’re working with before starting. |
| 2. Decide What to Upcycle Into | Choose what you want the magazine rack to become (e.g., shelf, side table, planter holder). | None | Base your decision on the rack’s size and condition. |
| 3. Gather Tools and Materials | Collect necessary tools and supplies based on your project choice. | Sandpaper, primer, paint, screws, handles, wood glue, wood stain | Choose tools according to your specific upcycling project. |
| 4. Prep the Rack | Clean, sand, and fix any issues with the rack (loose screws, broken parts). | Cleaning supplies, sandpaper, wood glue | Proper prep ensures a smoother finish and durability. |
| 5. Paint/Stain | Apply paint or stain based on the look you want. | Primer, paint, brushes, wood stain | Be sure to use the right paint/stain for the material (wood/metal). |
| 6. Add Personal Touches | Customize with handles, cushioning, or other decorative features. | Handles, extra paint, fabric, polyurethane | Personalizing your rack adds character and functionality. |
| 7. Avoid Common Mistakes | Take care to avoid skipping steps or using the wrong materials. | N/A | Prep work and the right materials are essential for a lasting result. |
| 8. Final Assembly | Attach any additional elements like handles or shelves. | Screws, brackets, handles | Ensure everything fits well and is securely attached. |
| 9. Enjoy Your Upcycled Piece | Display your newly upcycled magazine rack in your home. | None | Enjoy the new functionality and style it brings to your space. |
Common Mistakes to Avoid
While upcycling is a fun and creative process, there are a few common mistakes that can derail your project. Here’s what to keep in mind:
- Skipping the Prep Work: Proper preparation is key to a successful upcycle. Don’t skip the cleaning, sanding, and priming stages, as they ensure that your finish will be smooth and durable.
- Using the Wrong Paint: Always choose the right type of paint for the material you’re working with. Using the wrong kind of paint can cause it to peel or not adhere properly.
- Not Testing the Fit: If you’re adding new features, such as handles or shelves, make sure to test the fit before attaching them. You don’t want to get to the final step only to realize that something doesn’t align.
- Overloading the Rack: Whether you’re turning it into a shelf or planter holder, remember to take the weight limit into account. Be mindful of the materials you use to avoid overloading the rack.
Conclusion
Upcycling a magazine rack is not just about transforming an old item into something useful; it’s about unleashing your creativity and personalizing your space.
With the right tools, a little effort, and a bit of imagination, you can turn a forgotten piece of furniture into a stylish, functional addition to your home. Whether you decide to make a side table, wall shelves, or even a planter holder, the possibilities are endless.
So, the next time you look at that old magazine rack sitting in your home, remember that it could be the start of your next DIY masterpiece. Grab your tools and start transforming today!
FAQs
Can I upcycle a magazine rack that’s made of plastic?
Yes! Plastic magazine racks can be painted and transformed into something stylish. You’ll need to make sure to use the appropriate primer and paint designed for plastic surfaces.
How long does the upcycling process take?
The timeline depends on the complexity of your project. Simple upcycling tasks like painting or staining can take a few hours, while larger projects might take a couple of days, especially with drying times.
What tools do I need to upcycle a magazine rack?
You’ll need basic tools like sandpaper, a screwdriver, paint or stain, brushes, and possibly screws or nails for reinforcement. Depending on the type of upcycle, you might need extra tools like wood glue or brackets.