
If you’ve ever looked at your old teapot gathering dust on the shelf and thought, “I can’t just throw this out!” you’re not alone.
Teapots, whether they’re chipped, outdated, or simply not being used anymore, hold sentimental value and can be transformed into something entirely new and useful.
Instead of discarding these beloved objects, why not breathe new life into them by upcycling?
Upcycling is a wonderful way to reimagine the things we already own and give them a fresh purpose.
In this blog post, I’ll walk you through some creative and easy ways to upcycle your teapot into stunning decor pieces, functional items, or even fun projects.
By the end, you’ll have a variety of ideas to turn your teapot into something completely new, and you might just look at your collection of teapots in a whole new light!
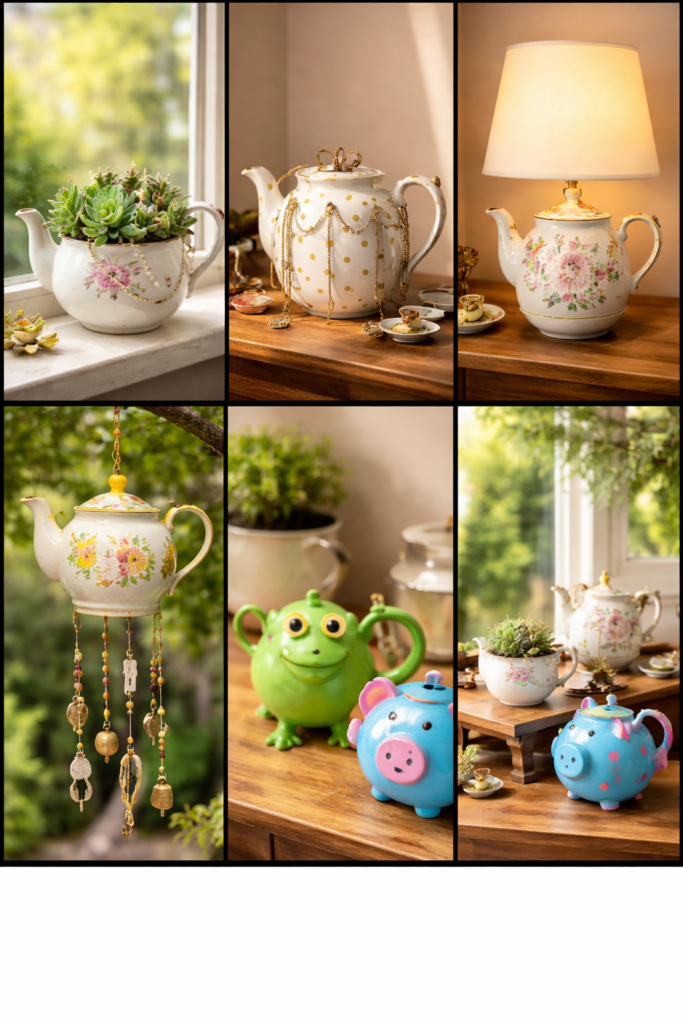
How to Turn Your Teapot into a Unique Planter
Teapot Planter: If you’ve got a teapot lying around, it can make an excellent base for a small indoor plant. Here’s a step-by-step guide:
Materials Needed:
- An old teapot
- Small stones (to create drainage)
- Potting soil
- Your favorite small plant (succulents, herbs, or flowers)
Instructions:
- Clean the Teapot: Start by giving your teapot a good clean to ensure there’s no residue or dirt. If it’s old and chipped, don’t worry it adds to the charm!
- Drill a Drainage Hole: If your teapot doesn’t already have a hole at the bottom, you’ll need to drill one to allow water to drain. You can use a small drill bit for ceramics or a sharp object.
- Add Stones for Drainage: Place a small layer of pebbles or stones at the bottom of the teapot to prevent soil from clogging the drainage hole.
- Fill with Soil: Add potting soil to about two-thirds of the teapot, leaving enough room for your plant to settle in comfortably.
- Plant It: Carefully place your plant into the teapot. Succulents work best because of their small root systems, but you can also plant small flowers or herbs.
- Care for Your Plant: Now, simply place your new teapot planter in a sunny spot and water it as needed.
Personal Insight:
Turning an old teapot into a planter is one of my favorite upcycling projects. It’s incredibly satisfying to see a plant thrive in an unexpected container, and it’s a great way to repurpose something that might otherwise go to waste.
Plus, it’s perfect for those of us with limited space a small teapot can make a lovely, space-saving garden addition!
Teapot Jewelry Holder: A Perfect Storage Solution
Have you ever had a collection of necklaces, bracelets, and rings scattered across your dresser? A teapot can be transformed into an elegant jewelry holder that’s both functional and decorative.
Materials Needed:
- An old teapot
- Small tray (optional)
- Decorative knobs or hooks
- Craft glue or screws
Instructions:
- Prepare the Teapot: If the teapot has a lid, you can either keep it on or remove it, depending on your aesthetic preference.
- Add Knobs or Hooks: Attach small decorative knobs or hooks to the spout and handle of the teapot using craft glue or screws. These will hold necklaces, bracelets, or rings.
- Use the Lid (Optional): If you have a lid for your teapot, consider adding a small tray or base beneath it. You can store rings, earrings, and smaller items in the tray while hanging necklaces and bracelets on the teapot itself.
- Arrange and Display: Place your jewelry on the hooks, and use the teapot as a charming focal point on your vanity or bedside table.
Mistakes to Avoid:
- Not Securing Hooks Properly: Ensure that the hooks or knobs are properly attached to avoid jewelry from falling off. If you’re using screws, make sure they’re tight and secure.
- Using Heavy Jewelry: Teapots may not be able to hold very heavy jewelry without risking damage. Stick to lightweight pieces for the best results.
Making a Teapot Lamp: Add Some Charm to Your Home
Transform your old teapot into a quirky and elegant lamp. A teapot lamp is a perfect blend of vintage charm and modern functionality.
Materials Needed:
- Old teapot
- Lamp kit (socket, cord, and lightbulb)
- Drill with ceramic drill bit
- Lampshade (optional)
Instructions:
- Drill a Hole: Using a ceramic drill bit, carefully drill a hole in the bottom of the teapot where the lamp cord will pass through.
- Prepare the Lamp Kit: Follow the instructions that come with your lamp kit to assemble the socket and cord.
- Insert the Lamp Kit: Thread the lamp kit’s cord through the hole in the teapot and secure it in place.
- Add a Lampshade (Optional): If you want to add a lampshade, make sure it fits the style of the teapot. A simple, neutral lampshade works well, but a floral or patterned one could add a fun touch.
- Insert the Lightbulb and Test: Once everything is secure, add the lightbulb and test your new teapot lamp.
Personal Insight:
This is such a creative way to incorporate a functional piece of decor into your home. Not only does it serve as a light source, but it also tells a story each teapot lamp has its own charm. Plus, it’s a great conversation starter!
Teapot Wind Chimes and Garden Decor
Teapot wind chimes can add a touch of whimsy to your garden or patio, combining both beauty and sound. Here’s how to make your own.
Materials Needed:
- Old teapot(s)
- Small metal or ceramic objects (keys, spoons, bells)
- Strong string or wire
- Drill
- Beads or decorative items (optional)
Instructions:
- Prepare the Teapot: Clean your teapot and drill small holes in the spout, handle, and bottom.
- Create the Chimes: Using string or wire, attach small objects like old keys, spoons, or bells to create the chimes. Vary the length of the string to achieve a balanced sound.
- String Them Together: Attach each chime to the teapot. Make sure they’re evenly spaced to allow for a pleasant sound when the wind blows.
- Add Decorative Elements: Beads, small stones, or even tiny flowers can be added for extra charm.
- Hang and Enjoy: Hang your new wind chime in a breezy spot in your garden or patio and listen to the lovely sounds.
Mistakes to Avoid:
- Overloading the Teapot: Be careful not to add too many heavy items to the chimes, as it could make the teapot unstable or break it.
- Using Weak String: Make sure the string or wire you use is strong enough to support the chimes.
Teapot Crafts for Kids: Fun and Educational Projects
If you have kids, upcycling a teapot can be a fantastic project for them. Here are a couple of ideas to keep them engaged.
Materials Needed:
- Old teapot(s)
- Paint, markers, or craft supplies
- Glue, googly eyes, and other craft materials
Instructions:
- Teapot Animal Craft: Turn your teapot into an animal by painting it and attaching features like googly eyes, felt ears, and a paper nose.
- Teapot Piggy Bank: With a little creativity, your teapot can turn into a fun piggy bank! Simply cut a slit in the lid and paint the teapot to make it look like a pig, a cat, or whatever animal your child loves.
Mistakes to Avoid:
- Using Non-Washable Paints: If your kids are involved in the project, make sure the paints you use are washable, so cleanup is easier.
- Too Many Decorations: Keep it simple kids will love the process, but too many details can make the project too complicated.
Conclusion
Upcycling a teapot is a fun and sustainable way to add personal touches to your home while keeping old items out of the landfill.
Whether you’re turning it into a planter, a lamp, or a piece of decor, the possibilities are endless.
The key is to think outside the box and let your creativity flow. Don’t be afraid to experiment and make mistakes that’s part of the fun of upcycling!
So, why not try one of these projects today? Don’t forget to share your creations with friends and family or on social media! The more, the merrier!
FAQs AboutUpcycling Teapots
Can I upcycle any teapot?
Yes! Whether your teapot is chipped or just sitting unused, it’s perfect for upcycling. The more unique the teapot, the more personality your project will have.
Do I need special skills to upcycle a teapot?
Not at all! Most of these projects are beginner-friendly and require basic tools. Just take your time and follow the steps carefully.
What if my teapot has a lot of cracks?
Cracks can actually add character to the project! You can also fill in the cracks with decorative elements, or turn them into an intentional feature of your design.