If you’ve ever marveled at the elegance of marble but were deterred by the cost or maintenance involved, faux marble painting might just be the solution you’re looking for.
Faux marble techniques allow you to replicate the stunning appearance of real marble without the hefty price tag.
Whether you’re decorating your home, redesigning a commercial space, or simply looking for a DIY project that adds sophistication to any room, faux marble painting is a versatile and rewarding technique that can transform ordinary surfaces into luxurious masterpieces.
In this guide, we’ll walk you through the step-by-step process of faux marble painting, explore the various techniques you can use, highlight common mistakes to avoid, and share tips for achieving a professional finish.
By the end of this blog post, you’ll have all the tools you need to create your own faux marble finishes like a pro.
Faux Marble Painting: What You Need to Know
Before diving into the how-to’s, it’s essential to understand what faux marble painting is and why it works so well for creating realistic marble effects.
Faux marble painting is an artistic technique used to imitate the appearance of natural marble on surfaces such as walls, furniture, or even ceilings.
The goal is to mimic the color, veining, and texture found in marble, giving a high-end aesthetic at a fraction of the cost of real marble.
The process typically involves applying base coats, creating veining with different colors, and using various tools to simulate the texture of marble.
With the right tools and techniques, you can recreate a variety of marble types, including classic white, black, and even more exotic varieties like green or red marble.
Tools and Materials You’ll Need
To get started, you’ll need to gather a few essential tools and materials. Having the right equipment will make the process easier and help you achieve a flawless result.
Essential Tools:
- Paint Brushes: A variety of brushes is essential for different stages of the process. A large, flat brush is ideal for applying base coats, while smaller, finer brushes are needed for the veining and detailing.
- Foam Rollers: These are great for applying smooth base coats and spreading paint evenly across large surfaces.
- Feathers or Sponges: Used for creating the veins that mimic the natural streaks and swirls found in real marble.
- Glazing Medium: This is essential for extending the drying time of the paint and allowing you to blend colors and create a more natural look.
- Marble Veining Stencils (optional): If you’re new to faux marble painting, stencils can help guide the veining process and provide structure.
Materials:
- Base Paint: Choose a paint that mimics the color of your desired marble. For example, white, black, or gray for a classic marble effect.
- Glaze: A transparent, shiny finish that gives your marble a polished, realistic look.
- Vein Colors: These could be different shades depending on the type of marble you’re replicating. For example, gold, black, or gray veining.
- Primer: To ensure proper adhesion to your surface and to prevent any underlying colors from affecting your faux marble finish.
Step-by-Step Faux Marble Painting Techniques
Now that we’ve covered the basics, let’s break down the process step by step. Whether you’re working on a small piece of furniture or an entire wall, this technique will guide you through the journey to create stunning faux marble finishes.
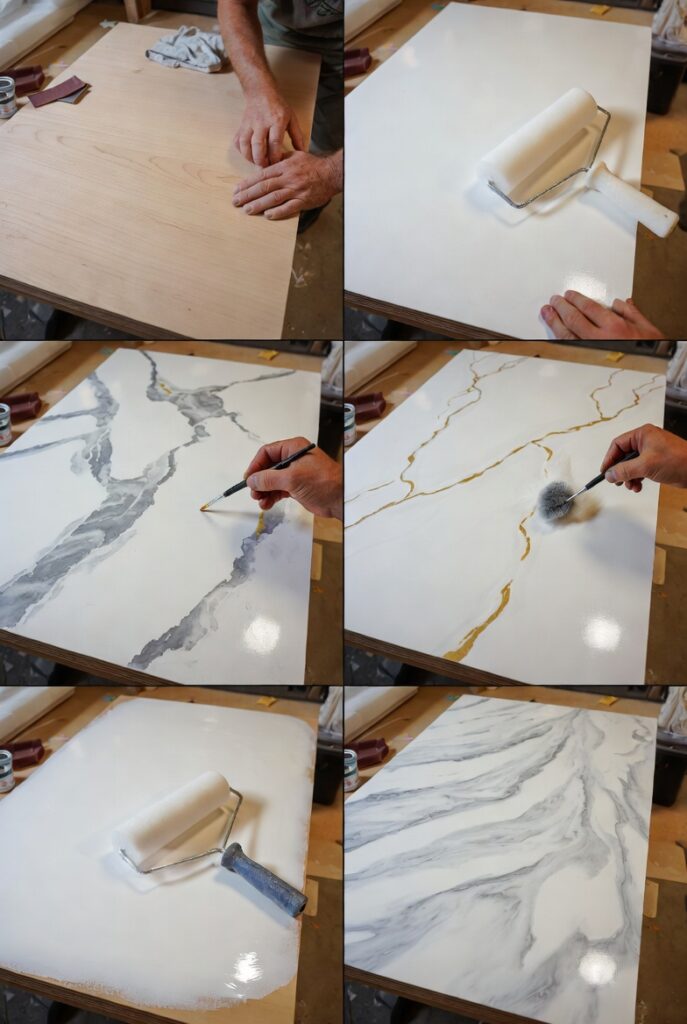
Step 1: Prep Your Surface
Proper surface preparation is essential for achieving a smooth, durable faux marble finish. Whether you’re painting a countertop, wall, or piece of furniture, start by cleaning the surface thoroughly. Remove dust, dirt, and grease.
If necessary, lightly sand the surface to ensure a smooth finish. Apply a high-quality primer to create a solid base for the paint to adhere to. Allow the primer to dry completely before moving on to the next step.
Step 2: Apply the Base Coat
Start by applying your base coat of paint. The base coat color will depend on the type of marble you’re trying to replicate. For classic white marble, use a white or light gray paint. For black marble, use a solid black paint.
Apply the base coat using a foam roller for even coverage. Don’t worry about imperfections this layer will be covered with additional layers later.
Step 3: Create the Marble Veining
The veins are what truly make the faux marble finish stand out. To create realistic veining, you’ll need to blend multiple colors of paint.
Using a small brush, lightly apply thin veins in the pattern you want. Use an additional color, such as gold, gray, or black, to simulate natural streaks.
You can either create random, natural veins or follow a more structured pattern depending on the type of marble you’re mimicking.
Step 4: Blend the Veins
Once you’ve applied the veins, it’s time to blend. This is where your sponges or feathers come in handy. Use a feather or sponge to gently blend the veins into the base coat.
Be careful not to overdo it you’re aiming for a soft, realistic appearance, not smudging the entire surface.
Step 5: Add Glaze for a Polished Finish
Once you’re happy with the veining, add a layer of glaze to the entire surface. This will give your faux marble a polished, shiny appearance.
Apply the glaze evenly using a foam roller, and allow it to dry for several hours. You can add additional layers of glaze for a deeper shine, depending on your preference.
Tips for Creating Different Types of Faux Marble Effects
While the basic process remains the same, you can tweak your technique to replicate different types of marble. Here are a few tips to help you create various marble effects:
White Marble: Use a pale gray or off-white base coat and add subtle gray veins. Blend the veins lightly for a soft, natural effect.
Black Marble: Use a solid black base coat, then add gold or white veins for a striking contrast. For a more dramatic look, use larger, bolder veins.
Green Marble: Start with a mint green or pale blue base, then use darker shades of green for the veins. You can also add a little gold to give it a luxurious touch.
Red Marble: For a rich, dramatic look, use a deep red or burgundy base coat. Add veins in gold, white, or black for contrast.
Common Mistakes to Avoid
While faux marble painting is a fun and rewarding project, there are a few common mistakes that can ruin your results. Here are some pitfalls to avoid:
Skipping Surface Prep: Never skip the prep work. Skipping this step will result in a finish that’s uneven and likely to peel or chip over time.
Overdoing the Veins: Less is more when it comes to creating veins. Overloading the surface with too many veins can make it look unrealistic.
Rushing the Drying Process: Allow each layer to dry completely before moving on to the next. Rushing through the process can cause smudging or uneven textures.
Choosing the Wrong Paint: Always choose high-quality paint designed for faux finishes. Cheap paint can make it harder to achieve a realistic effect.
Not Blending Properly: The key to a great faux marble finish is smooth, natural blending. If you don’t blend the veins properly, they may appear harsh or unrealistic.
Conclusion:
Faux marble painting is a rewarding and cost-effective way to transform any surface into a luxurious marble look.
With a bit of practice and the right materials, you can create stunning marble finishes that rival the real deal.
By following the step-by-step instructions outlined in this guide, experimenting with different colors and textures, and avoiding common mistakes, you’ll be well on your way to creating your own faux marble masterpieces.
If you’re ready to take on your faux marble painting project, gather your supplies and dive in! Don’t be afraid to experiment and make it your own. And remember, every great marble piece starts with a little creativity and patience.
- Faux marble painting is a budget-friendly way to replicate the luxurious look of marble.
- Prep work, proper blending, and choosing the right tools are essential for a professional-looking finish.
- Avoid common mistakes like overloading the surface with veins or skipping the drying time.
Frequently Asked Questions (FAQs)
Can faux marble painting be done on any surface?
Yes! Faux marble painting can be done on a variety of surfaces, including wood, drywall, furniture, and even countertops. Just make sure to properly prep the surface before you start.
How long does faux marble painting take?
The process typically takes a few days, including drying time. Each layer of paint or glaze must dry thoroughly before applying the next layer.
Can I use any type of paint for faux marble?
It’s best to use high-quality acrylic or latex paints for faux marble painting. These paints are durable, easy to blend, and provide a smooth finish.
Is faux marble painting durable?
Yes, with proper application and care, faux marble finishes can be very durable. Be sure to seal the surface with a protective coat of glaze or polyurethane for added longevity.
Can I create a faux marble finish on a budget?
Absolutely! Faux marble painting is an affordable alternative to installing real marble. By choosing the right materials and tools, you can achieve a luxurious look without breaking the bank.