Silver trays often spend years stacked in a cupboard because they feel too formal for ordinary meals but too decorative to discard. Even a tray with worn plating, darkened edges, or a few scratches still has useful qualities: a broad flat surface, a raised rim, and detailed metalwork that already acts like a frame. Those features can become part of storage, wall décor, or small furniture rather than staying hidden.
I like to decide which part of an old object deserves to remain visible before changing it. With silver trays, the answer is usually the border.
Scalloped edges, engraved centres, pierced handles, and soft tarnish give each tray its character, so the new construction should support those details instead of covering them.
The most important question is whether the tray is decorative or strong enough to carry weight. Thin plated trays can bend when drilled or tightened, while heavier serving trays may support a mirror insert or a properly reinforced table top. I know it can feel tempting to begin with polish and hardware, but checking the metal first saves a great deal of frustration later.
Check the Tray Before Drilling, Mounting, or Loading It
A tray may look solid from above while hiding weak soldered handles, hairline cracks, or a thin centre that flexes under pressure. Inspect both sides in good light before choosing a project.
· Press the centre gently to see whether it remains flat or bends with light hand pressure.
· Check handles, feet, decorative rims, and soldered joints for movement, splits, or previous repairs.
· Look for sharp burrs, peeling plating, deep pitting, and corrosion around the underside or drilled areas.
· Measure the flat usable centre separately from the full outside width, especially for mirror inserts or tabletop supports.
· Decide whether the tray is strong enough to drill or whether it needs a removable, no-drill method.
· Check that the tray sits level. A warped base can make a tiered stand lean or a side table wobble.
· Treat unknown metal and plating carefully. Aggressive polishing or abrasive cleaning may remove more finish than intended.
· Avoid using a decorative tray for direct food contact unless its material and surface condition are confirmed suitable.
Gather Hardware That Spreads Pressure Across Thin Metal
The success of these projects depends less on decorative fittings and more on how the load is distributed. Wide washers, backing plates, and stable bases protect thin tray centres from tearing or buckling.
· Soft cloths, mild cleaner, cotton swabs, and a non-scratch brush for detailed edges
· Metal polish only when it suits the tray and the finish you want to retain
· Painter’s tape, a ruler, a square, a centre finder, and a permanent marker for layout
· Drill, suitable metal bits, clamps, scrap wood backing, gloves, and eye protection
· Threaded rod, spacers, wide washers, nuts, and a top handle for tiered stands
· Backing discs or plates for supporting drilled tray centres
· Mirror cut to the tray’s inner shape, a rigid backing board, and secure retaining clips
· A stable pedestal base, mounting plate, and mechanical fasteners for a tray side table
· Felt pads, rubber washers, or cork protection for surfaces and contact points
· Wall fixings selected for the finished mirror’s full weight and the wall type
Match the Tray’s Shape to a Practical New Use
Round, oval, shallow, and fluted trays behave differently once they leave the dining table. Let the tray’s proportions guide the idea instead of forcing it into a structure that does not suit the metal.
· Use two or three related trays for a tiered stand when the lower tray is wide enough to create a stable footprint.
· Choose matching or visually connected trays when the finished stand will be used on a formal table.
· Turn an oval handled tray into a mirror when the engraved rim creates a complete frame around a clear centre.
· Use a broad round tray as a side-table top only when it receives a rigid support plate beneath the centre.
· Keep shallow shell-shaped trays for jewellery, wrapped sweets, keys, ornaments, or craft materials.
· Preserve handles when they add balance, but remove only loose or unsafe parts rather than cutting sound decorative metal.
· Leave some tarnish when you want an aged finish; polish more evenly when separate trays need to look like one set.
· Choose a no-drill display arrangement for thin trays that flex easily or hold sentimental value.
Build a Multi-Level Display Stand from Fluted Silver Trays
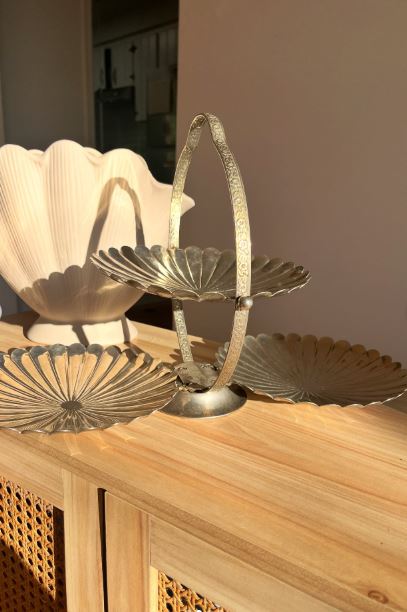
Several shallow silver trays with radiating flutes and scalloped edges have been brought together around a tall central support. The trays sit at different heights and angles, which makes the structure feel more like a decorative centrepiece than a standard stacked stand. The repeated shell pattern connects the separate pieces even though their sizes and positions vary.
This arrangement works well for wrapped treats, small ornaments, jewellery, paper decorations, or craft supplies. It is less suitable for heavy objects because the side trays place uneven force on the central support. The lower connection and base must therefore do more than hold the stand upright; they need to resist twisting.
Materials and Tools
· Three or more lightweight silver trays with related fluted or scalloped patterns
· Central support, decorative handle, or a purpose-made tiered-stand hardware set
· Rigid base plate or heavy lower tray
· Threaded rod, spacers, locking nuts, wide washers, and rubber washers
· Drill and metal bit sized for the chosen rod
· Clamps, scrap wood backing, ruler, centre punch, gloves, and eye protection
· Felt pads for the underside
· Optional removable liners for delicate objects
Detailed Steps for the Multi-Level Stand
1. Arrange the trays before making any holes. Place every tray around a temporary upright support and test several positions. Keep the widest or strongest piece lowest, then distribute the smaller trays so their weight feels balanced from every side. Mark each tray and its final orientation once the arrangement stops leaning.
2. Strengthen the main support point. A thin tray centre may need a metal or plywood backing disc hidden underneath. Clamp the tray over scrap wood, mark the true centre, and drill slowly with eye protection. Deburr the hole and add a rubber washer so the metal hardware does not scrape the tray surface.
3. Attach side trays with reinforced brackets. Use small metal arms or purpose-made supports that connect securely to the main stem. Each tray should receive a broad washer or hidden plate rather than one small bolt pulling against thin metal. Tighten enough to stop movement, but stop before the fluted centre begins to flatten.
4. Assemble from the base upward. Secure the central rod to a stable base, then add the lowest tray, spacers, and remaining supports in order. Turn the structure slowly after each connection and correct any lean immediately. Then fit the decorative top handle and locking nut without using it to force the stand straight.
5. Test with light objects before styling it fully. Place a few small items on opposite trays and watch for twisting or sagging. Add felt beneath the base and keep the stand where it cannot be knocked easily. When moving it, support the base with one hand instead of lifting a loaded structure only by the handle.
The part I would check most carefully is the balance between the side trays. A stand can look centred while one decorative arm carries more weight than the others. Keeping the contents light and evenly spread protects both the hardware and the old metal.
A beginner-friendly alternative is a simple vertical three-tier stand with every tray centred on one rod. It loses the unusual side arrangement, but it is easier to reinforce and far less likely to twist.
Join Two Ornate Trays into a Compact Treat Stand

Two related silver trays form a straightforward serving stand with a broad lower level, a smaller upper level, and a decorative ring handle. The scalloped edges and pierced detailing already suit a formal table, so the new hardware only needs to connect the trays cleanly. Wrapped chocolates fill both levels without hiding the pattern completely.
Compared with the multi-level stand, this version places the weight directly above the centre. That makes it easier to assemble and more stable, provided the lower tray is wider and the central holes are accurate. It can also hold jewellery, sewing notions, wrapped guest soaps, or small festive ornaments when it is not being used on a dining table.
Materials and Tools
· One wide lower tray and one smaller upper tray
· Tiered-stand rod with ring handle
· Spacers sized to leave usable room between the trays
· Wide metal and rubber washers
· Locking nuts or hardware supplied with the stand fitting
· Drill, metal bit, clamp, scrap wood, ruler, and centre punch
· Protective liner for wrapped treats or delicate jewellery
· Felt pads for the bottom tray
Detailed Steps for the Two-Tier Stand
1. Compare the two trays and choose their orientation. Set the smaller tray above the larger one using a temporary spacer. Check that the rims do not clash and that your hand can still reach the lower level. Position decorative patterns so the two trays feel related when viewed from the front.
2. Find and mark both centres accurately. Measure across several directions rather than trusting one line. Apply painter’s tape over the drilling area to make the mark easier to see, then place each tray on scrap wood. If the centre is deeply embossed, use a small support block so the tray does not rock under the drill.
3. Drill slowly and protect the finish. Wear eye protection, clamp the tray securely, and use a bit suited to metal. Let the bit cut without heavy downward force, then smooth any sharp burrs. Add rubber washers on both sides of the tray before the metal washers and nuts are installed.
4. Stack and tighten the hardware gradually. Attach the lower tray first, add the spacer, then fit the upper tray and ring handle. Hold the trays level while tightening each connection in small stages. The hardware should prevent rotation without pulling the decorative centres into a visible dip.
5. Line and load the stand sensibly. Use a removable paper, fabric, or food-safe liner appropriate to the contents. Keep heavy items on the lower level and lift a loaded stand by supporting the base as well as the handle. Store it without pressure on the ring so the central rod stays straight.
I know the decorative handle makes the stand look ready to carry, but it is still wiser to support the bottom when it is full. The handle is useful for guiding and repositioning; it should not be treated like luggage when the trays are loaded.
For a no-drill version, place a removable metal or wood riser between the trays and use the stand only for lightweight display. It will not be suitable for carrying, but it preserves valuable or sentimental trays.
Frame a Mirror with an Ornate Oval Silver Tray
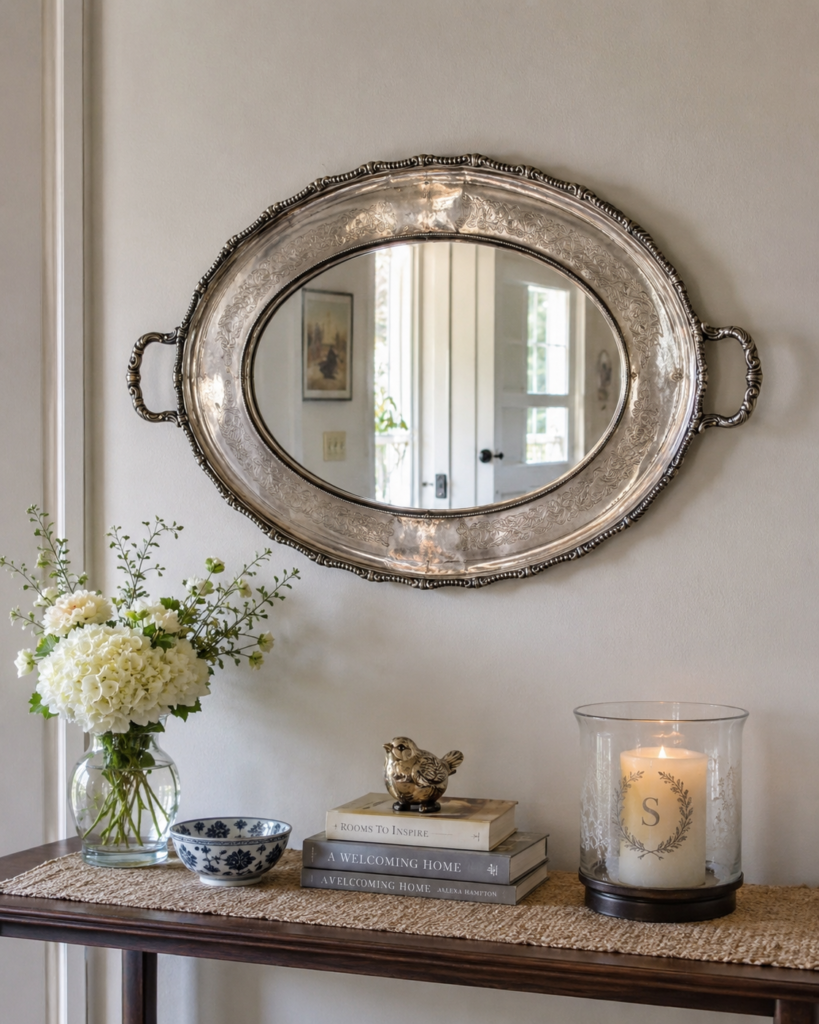
An oval serving tray already has the proportions of a traditional wall mirror. In this version, the centre has been replaced or covered with a fitted mirror, leaving the engraved silver border and both handles visible. Hung above a narrow console, it reads as an intentional wall piece rather than a serving object placed upright.
The mirror insert should sit against a rigid backing rather than rely on adhesive applied directly to weak plating. The safest construction keeps the original tray intact where possible, supports the glass from behind, and uses mechanical retainers or a professionally prepared insert. This is also a useful approach when the tray centre is scratched but the border remains attractive.
Materials and Tools
· Oval silver tray with a sound rim and secure handles
· Mirror cut to fit the flat inner area
· Rigid backing board cut slightly smaller than the tray
· Mirror-safe adhesive for securing the mirror to the backing board
· Small retaining clips, brackets, or a hidden support frame
· Picture wire, D-rings, or a cleat fixed to structural points
· Wall anchors suited to the finished weight and wall type
· Protective gloves, eye protection, measuring tools, and felt pads
Detailed Steps for the Tray Mirror
1. Measure the inner opening rather than the outside edge. Trace the usable centre onto paper or card and test the template inside the tray. Leave a small, even reveal around the mirror so the engraved border remains visible. Have the mirror cut by someone equipped to finish the edges safely.
2. Create a rigid mirror-and-backing assembly. Cut a backing board that sits flat behind the mirror and does not extend beyond the decorative rim. Bond the mirror to the board with mirror-safe adhesive, following the product instructions. Keep pressure even while it sets so the glass does not shift or twist.
3. Secure the assembly to the tray without stressing the rim. Use small clips, a hidden frame, or existing structural points on the tray. Do not depend on ordinary craft glue applied to tarnish or loose plating. The mirror unit should be removable for repair and should not place its weight on decorative handles.
4. Add wall hardware to strong backing points. Fit D-rings, wire, or a cleat to the rigid backing structure rather than thin tray ornament. Check that the mirror hangs level and that the handles do not touch or scrape the wall. Add felt pads at contact points to protect both surfaces.
5. Mount the mirror with suitable wall fixings. Weigh the complete piece or estimate conservatively, then choose anchors for the wall material. Use two fixing points when possible to stop rotation. Keep the mirror away from locations where a door, bag, or shoulder could strike the projecting handles.
For me, the best detail is the narrow band of aged silver left around the glass. There is no need to polish every dark mark away; a slightly uneven patina makes the tray’s original age visible.
A lower-cost variation uses an acrylic mirror sheet fixed to a rigid board. It is lighter and easier to handle, although the reflection may not feel as crisp as glass.
Turn a Round Silver Tray into a Pedestal Side Table
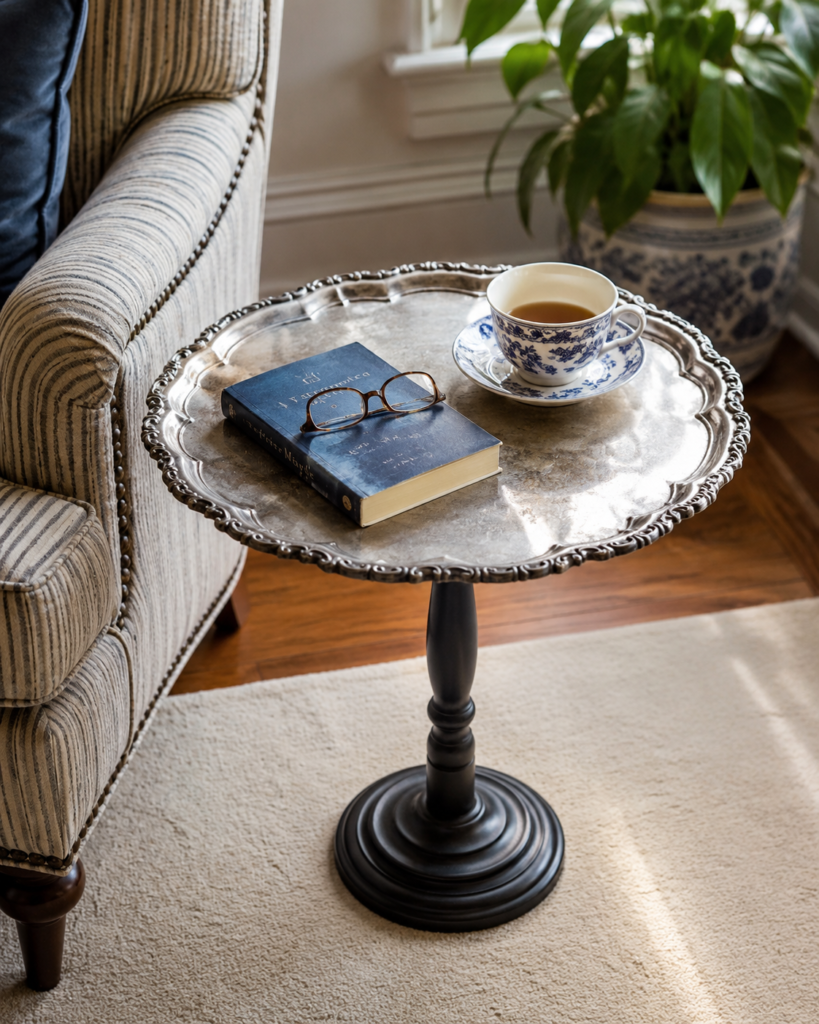
A broad round tray can become a useful side table when it receives support across the centre rather than being balanced on one small screw. The aged silver surface acts as the tabletop, while a dark turned pedestal gives the piece enough visual weight beside an upholstered chair. A teacup, book, and glasses show the scale clearly: this is a small accent table, not a heavy-duty stand.
The construction beneath the tray matters more than the pedestal style. A rigid disc or plate should sit under the tray and connect to the base, spreading pressure across a wide area. That support also stops cups and books from rocking when the tray centre is slightly flexible.
Materials and Tools
· Large round or scalloped silver tray with a level centre
· Stable pedestal base with a wide foot
· Rigid wood or metal support disc sized to fit beneath the tray
· Mounting plate, machine screws, bolts, washers, and locking nuts
· Rubber or felt layer between the tray and support disc
· Drill, suitable bits, clamps, square, and measuring tools
· Protective finish for the pedestal where needed
· Floor protectors and optional removable tray liner
Detailed Steps for the Pedestal Table
1. Check the tray and base as a pair. Place the tray on the pedestal temporarily and compare their proportions. The base should be wide enough that the table does not tip when light pressure is placed near the rim. Correct a loose or uneven pedestal before attaching the decorative top.
2. Make a hidden support disc. Cut a rigid disc that fits beneath the tray without showing beyond the edge. Add a thin rubber or felt layer between the metal and the disc to reduce slipping and scratches. Mark the centre of the support disc and the tray only after both pieces sit level together.
3. Connect the pedestal to the support, not just the tray. Use a mounting plate or strong central bolt to secure the pedestal to the rigid disc. Test this structure without the tray first. It should stand straight and resist gentle side pressure before any force is transferred to the old metal.
4. Fix the tray with broad pressure points. Attach the tray to the support disc using several small clips or carefully placed bolts with wide washers. Avoid one central fastener if the tray flexes. Tighten each point gradually in a crossing pattern so the scalloped edge remains level.
5. Test the finished table conservatively. Place it on a level floor, add felt protectors, and begin with light objects near the centre. Check for wobble when a cup is set down and avoid sitting, leaning, or placing heavy equipment on it. Retighten hardware if normal use creates movement.
The detail I would not skip is the hidden support disc. Without it, a decorative tray can slowly dish downward around the fixing and make every cup feel slightly adventurous, which is not the mood most of us want beside an armchair.
A simpler alternative is to place the tray on a ready-made folding tray stand without permanent attachment. That keeps the tray removable and avoids drilling, provided the stand supports the rim securely and cannot fold unexpectedly.
How to Clean and Preserve an Aged Silver Finish
Not every dark area needs polishing. Tarnish can make engraved lines easier to see, while aggressive rubbing may leave bright patches on raised details and dull areas in the recesses.
· Dust the tray first so grit is not rubbed across the surface.
· Test cleaner on the underside or another hidden area.
· Use cotton swabs or a soft brush around pierced and embossed details.
· Stop polishing when the finish looks balanced rather than chasing a completely new appearance.
· Keep moisture away from wooden backing discs and electrical or wall-mounting hardware.
· Use removable liners when jewellery, wrapped sweets, or wet objects may mark the surface.
Silver Tray Alterations That Lead to Bending, Wobble, or Damage
Drilling without supporting the underside. Thin metal can buckle as the bit breaks through. Clamp the tray over scrap wood and use a backing block beneath embossed centres.
Tightening a small nut directly against the tray. A narrow fitting concentrates force and can pull through the metal. Add rubber washers, wide metal washers, or a rigid backing plate.
Using the decorative handle to carry a heavily loaded stand. The rod and tray centres receive unnecessary strain. Support the lower tray or base whenever the stand contains more than a few light objects.
Mounting a mirror from the tray handles. Handles may be decorative or weakly soldered. Fix wall hardware to a rigid backing structure that supports the mirror and tray together.
Building a side table without a support disc. The tray centre may flex or slowly deform around one mounting point. Spread the load across a hidden rigid plate.
Assuming an old tray is suitable for uncovered food. Plating condition and previous use may be unknown. Use wrapped items or a removable food-safe liner unless the material is confirmed appropriate.
Polishing away every trace of age. Uneven or overworked polishing can flatten engraved detail and expose worn plating. Clean gently and keep a balanced patina.
Frequently Asked Questions
Can I repurpose a silver-plated tray?
Yes, provided the tray remains structurally sound and the project suits its thickness. Treat worn plating gently, avoid aggressive abrasives, and use backing plates when drilling.
Do I have to drill a silver tray to reuse it?
No. A tray can sit on a removable stand, hold a mirror assembly with hidden clips, or serve as a shallow organiser without permanent changes. No-drill methods are especially useful for sentimental pieces.
How can I find the centre of an ornate tray?
Measure across the widest points in several directions and mark the intersecting lines on painter’s tape. Deep embossing can distort measurements, so confirm the mark by rotating a paper template.
Can a tiered tray stand hold cakes or heavy dishes?
Only when the trays, hardware, and base are designed for that weight. Decorative vintage trays are safer for wrapped treats and light objects unless a skilled maker has reinforced the structure.
What is the safest way to hang a silver tray mirror?
Attach the mirror to a rigid backing and connect the hanging hardware to that structure. Use wall anchors selected for the complete weight and avoid relying on decorative handles.
How do I stop a tray side table from wobbling?
Level the pedestal first, use a wide support disc beneath the tray, and tighten several fixings evenly. A wider base also reduces tipping when an object is placed near the rim.
Should I remove all tarnish before repurposing the tray?
No. Keep as much patina as suits the finished piece and clean only enough to remove dirt and unstable residue. The darkened recesses often make engraved details easier to appreciate.
Let the Silver Border Become Part of the New Design
The strongest silver tray projects begin by respecting what the tray already offers. A fluted edge can connect several display levels, an oval rim can frame a mirror, and a broad scalloped surface can become a small tabletop once the weight is supported correctly.
Learning how to repurpose silver trays is not about hiding every scratch or forcing delicate metal to behave like structural steel. Check the tray, spread pressure across wide areas, keep loads realistic, and preserve the details that made the piece worth saving.
Begin with the least permanent idea that solves a real need. A two-tier organiser or no-drill stand is a manageable first project, while a mirror or side table can follow when you are comfortable measuring and reinforcing old metal. Which forgotten tray would work better on display than at the back of a cupboard?