Solar stake lights often keep working long after their plain plastic stems stop looking interesting. The small panel, lamp head, and removable stake form a compact lighting unit that can sit inside a vase, bowl, lantern, or another container without requiring an outdoor socket.
That simple construction is what makes solar lights useful for upcycling. A thrifted vase can become a miniature table lamp, two clear serving bowls can form a glowing garden globe, and an ordinary porch container can hold a softer frosted light. The finished pieces still need direct daylight, drainage awareness, and a secure base, but the decorative part can come from objects already at home.
I don’t think the light needs to disappear completely inside every project. The solar panel has a job to do. Covering it with fabric, paint, or a solid shade may create a lovely object that never charges, which is rather less useful once evening arrives.
Begin with a working light and one manageable container. Test the components before adding glue or paint, then keep the light removable whenever possible. That small decision makes cleaning, battery replacement, and future repairs much easier.
Check the Solar Light Before Changing Its Purpose
Wipe dirt from the panel and place the light in full daylight before assuming that it has stopped working. Make sure the switch is in the on position, then cover the panel after charging to see whether the lamp turns on. A cloudy panel may simply need cleaning, while a damaged housing or swollen battery needs more careful disposal.
Inspect these parts before beginning:
· The solar panel for cracks, deep scratches, or a cloudy coating
· The lamp housing for gaps that may admit water
· The stake connection for splits or looseness
· The rechargeable battery compartment for corrosion or swelling
· The on-and-off switch for stiffness or damage
· The LED cover for cracks
· Any wires exposed by previous repairs
· The container that will support the light
· The charging position once the project is assembled
· The way rainwater will drain or escape
Do not open, puncture, crush, or glue over a swollen rechargeable battery. Take damaged batteries and electronic parts to an appropriate local collection point.
Remove the long ground stake only when the project does not need it. Many lights twist or pull apart, but forcing a fixed component may crack the weather-resistant housing. Keep every removed piece until the new design is complete; the original stake may still be useful for charging or testing.
Outdoor adhesive should match the materials and expected weather. Hot glue may help with temporary positioning, but heat, cold, and moisture can weaken it. A mechanical fit, removable insert, or outdoor-rated adhesive is usually more dependable for a project that will stay outside.
Turn a Small Vase Into a Solar Table Lamp
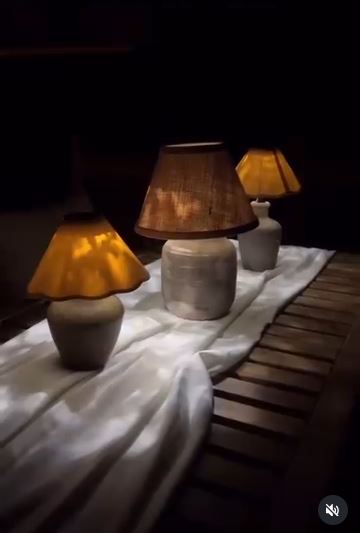
A small vase already provides the weight and shape needed for a compact lamp base. Once the stake is removed, the solar light can stand inside the opening while pebbles hold it upright. A miniature shade softens the appearance without requiring wiring.
The most important detail is the top of the shade. The solar panel must still receive daylight, so a closed or heavily lined shade may prevent charging. A light, open shade with a suitable upper fitting gives the panel a clearer path to the sun.
Materials and Tools
· Working solar stake light
· Small ceramic, metal, or weather-resistant vase
· Clean pebbles or decorative stones
· Miniature lampshade with an open top
· Small rubber pads for the vase base
· Optional outdoor-rated removable putty
· Soft cloth and mild soapy water
· Measuring tape
Assemble the Solar Table Lamp
1. Test the proportions. Place the light head above the vase and hold the shade in position before adding stones. Check that the panel remains visible from above and that the shade does not make the narrow base top-heavy.
2. Prepare the vase. Wash and dry the vase, then inspect the rim for chips or rough edges. Add small rubber pads underneath when the base could scratch an outdoor table or slide on a smooth surface.
3. Support the light. Remove the stake only if it separates without damage. Place the light in the vase and add pebbles gradually around it, keeping the panel level and the lamp head centred.
4. Fit the shade. Slide or clip the shade onto the lamp head without pressing the solar panel. Then turn the lamp from several angles and make sure the shade cannot fall against the panel or trap rainwater.
5. Charge and test it. Place the complete lamp in direct daylight, then move it to the table after dark. If it glows weakly, test the bare light again to see whether the shade or location is blocking the panel.
For me, the vase should look substantial enough to support the shade before any decoration is added. A light plastic pot may need so many stones that the simple project becomes surprisingly heavy.
A beginner can skip the lampshade and use a translucent vase around the light head instead. That version is easier to charge and has fewer parts to loosen in the wind.
Make a Solar Garden Globe From Clear Bowls
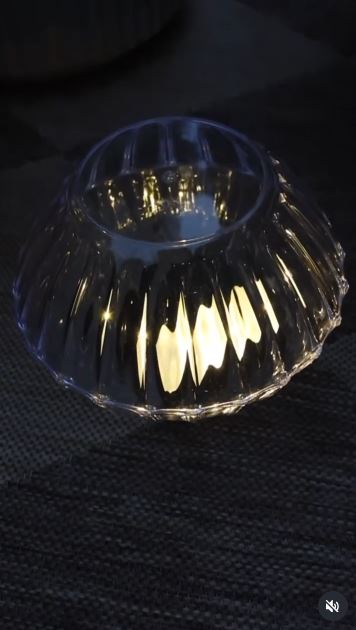
Two lightweight bowls can create the shape of a decorative globe without glass cutting or electrical work. Clear ridges scatter the LED light, while a light frosting on the inside can soften the view of the lamp unit.
The challenge is access. Permanently sealing the bowls may make it impossible to reach the switch, battery, or light when something needs cleaning. I would plan a removable join rather than gluing the entire rim closed.
Materials and Tools
· Two matching clear plastic serving bowls
· Compact solar light with an exposed panel
· Clear outdoor-rated tape or removable clips
· Optional frosted-effect spray suitable for plastic
· Mild detergent and soft cloth
· Marker
· Small clear spacers or adhesive pads
· Eye protection and gloves if drilling ventilation holes
Build the Garden Globe
1. Clean and match the bowls. Remove stickers and wash away adhesive before placing the rims together. Rotate one bowl until the ridges or decorative pattern align in a way that looks balanced.
2. Test the light position. Place the light inside the lower bowl and check that the solar panel can still face daylight. A stair light or puck-style solar unit may sit more naturally than a tall stake light inside this shape.
3. Soften the plastic if desired. Apply a light frosted finish to the inside only, following the coating instructions and working in a ventilated area. Keep the solar panel, switch, and lamp unit completely separate from the spray.
4. Create a serviceable join. Use clear outdoor tape around part of the rim, small removable clips, or another method that allows the globe to reopen. Avoid sealing moisture inside; add discreet drainage or ventilation only when the bowl material can be drilled safely.
5. Choose a stable position. Set the globe where it cannot roll into a path, pond, or planting bed. Charge it in strong daylight and check the inside after rain for condensation or trapped water.
I know it can feel tempting to glue the two rims together for a perfectly neat seam, but a replaceable light is more useful than an ornament that has to be broken open later.
For a simpler version, use one patterned bowl as a shade over a solar puck light placed on a flat stone. Keep enough space beneath the edge for drainage and air movement.
Build a Frosted Solar Lantern for the Porch
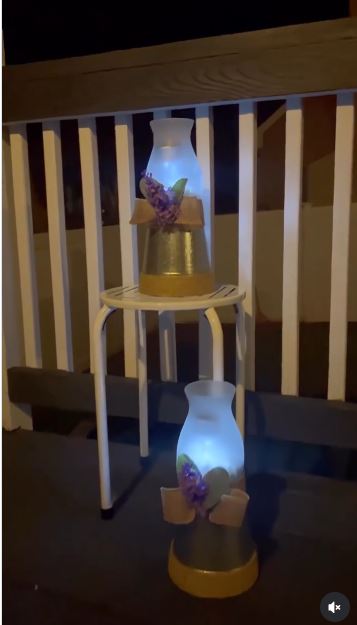
A tall vase gives a solar light more room to glow, while a small planter or metal container can create a raised base. Frosting diffuses the light and hides the plastic lamp body, and stones keep the centre upright.
This project benefits from keeping the vase removable. A loose but stable fit lets you lift it for cleaning and move the solar light into full sun when the porch itself remains shaded during the day.
Materials and Tools
· Working solar stake light
· Glass or plastic vase in sound condition
· Small metal planter, bucket, or stable base
· Pebbles or clean decorative stones
· Frosted-effect coating suitable for the vase material
· Outdoor-rated adhesive or removable mounting method
· Optional twine, burlap, or faux greenery
· Gloves and eye protection
Put the Porch Lantern Together
1. Plan the stack. Turn the base over or place it upright according to its shape, then centre the empty vase on top. Check the contact area and make sure the combined lantern does not rock before adding weight.
2. Prepare the diffuser. Clean and dry the vase. Apply a frosted finish only where it will not cover the solar panel, and keep the coating light enough for the LED glow to pass through.
3. Secure the base. Attach the vase with an outdoor-suitable method or use a fitted removable ring. Let the bond cure fully before filling the vase, even when patience suddenly feels like the least exciting tool on the table.
4. Position the solar light. Add stones to the vase, then settle the light among them with the panel facing upward. Keep the switch accessible and avoid packing stones tightly against a thin plastic housing.
5. Add restrained decoration. Wrap a small amount of twine around the base or attach lightweight faux greenery away from the panel. Then place the lantern where it can charge or move it into sunlight during the day.
The part I would check most carefully is the join between the vase and the base. Decorative stones add useful weight, but they also make a weak connection more dangerous if someone lifts the lantern by the top.
A no-glue option uses a vase that nests securely inside a heavy planter. Fill the gap with stones so every piece remains removable for cleaning and winter storage.
Match the Project to the Light You Already Have
Stake Lights
Stake lights are useful when the stem can be removed and the lamp head remains intact. They suit vases, planters, lanterns, and raised outdoor lamps. Keep the original stake if you may return the light to the garden later.
Puck and Stair Lights
Compact lights fit inside bowls, jars, and shallow lanterns. Their flat panels often need to face upward, so test the final angle before fixing them in place.
String and Rope Solar Lights
These work better in baskets, wire frames, and larger transparent containers. Do not pinch or cut the cable, and keep the separate solar panel where it receives daylight.
Old Lights That No Longer Work
A failed light may still provide a useful globe, stake, or outer shell, but remove the battery and electronic parts responsibly before using the housing as an ordinary craft material. Do not place dead electronic components inside soil or water features.
Where Solar-Light Upcycles Usually Go Wrong
Covering the Solar Panel
A solid shade, thick paint, fabric, or dense decoration may stop the panel from charging. View the project from above before finishing it and keep the complete panel exposed to daylight.
Testing the Light Only After Gluing
A switch may be off, the battery may be exhausted, or the charging location may be too shaded. Test the bare light first, then test it again inside the unfinished container.
Sealing the Battery Inside
A permanently closed globe may prevent cleaning and battery replacement. Use clips, tape, screws, or a fitted insert that allows the project to reopen.
Depending on Hot Glue Outdoors
Heat and rain may weaken a bond that felt strong indoors. Use a mechanical fit or adhesive rated for the actual materials and outdoor conditions.
Creating a Top-Heavy Lamp
A shade or tall vase can make a small base unstable. Add weight low in the design and test it on a level surface before placing it near a path or table edge.
Trapping Water Around the Electronics
Bowls and vases can collect rain or condensation. Plan drainage, ventilation, or a covered location without drilling through the light housing itself.
Painting the Wrong Surface
Spray can block the panel, switch, seams, and transparent LED cover. Remove the light before painting the container and mask any functional areas that must stay clear.
Using Cracked Glass Outdoors
Small chips can worsen with handling and temperature changes. Retire damaged glass rather than building a weighted or hanging project around it.
Forgetting the Charging Route
A lantern placed on a shaded porch may look ideal but receive too little daylight. Keep the light removable so it can charge elsewhere, or choose a sunnier location.
Ignoring End-of-Life Batteries
Rechargeable cells do not belong in ordinary craft waste or garden soil. Remove damaged batteries safely and follow local electronic-waste guidance.
Frequently Asked Questions
Can I paint a solar light?
You can paint the non-functional outer parts when the paint suits the material. Keep the solar panel, LED cover, switch, seams, and battery access free from paint.
Why does my repurposed solar light glow weakly?
The panel may be shaded, dirty, covered by the design, or receiving too little charging time. Test the bare light in direct daylight before changing the container.
Can I use an indoor vase outside?
Only in a covered area when the material and finish are not intended for weather. Bring the piece indoors during strong wind, frost, or heavy rain, and check the glass for cracks.
What adhesive works for outdoor solar projects?
Choose an outdoor-rated product compatible with both materials being joined. A removable mechanical fit is often better because it allows cleaning and battery access.
Can I replace the rechargeable battery?
Some solar lights have accessible replaceable cells, while others are sealed. Follow the light manufacturer’s instructions and use the correct battery type rather than substituting an ordinary disposable cell.
How do I stop water collecting inside a solar globe?
Use a serviceable join, discreet ventilation, and a position protected from direct rain. Check the globe after wet weather and reopen it to dry whenever condensation appears.
Should I throw away a solar light that has stopped working?
Test the switch, clean the panel, and check whether the approved rechargeable battery can be replaced. If the electronics are damaged, separate reusable outer parts and take the battery or electronic unit to an appropriate collection point.
Let the Solar Panel Stay Part of the Design
Creative ways to repurpose solar lights work best when the lighting unit remains accessible, chargeable, and easy to remove. The vase, bowls, stones, and shades provide the new appearance, but the panel still needs clear daylight and the housing still needs protection from trapped water.
Start with the project that requires the fewest permanent changes. A weighted vase lamp can come apart in minutes, while a garden globe needs more thought about access and condensation. The frosted porch lantern sits somewhere between the two and adapts easily to containers you may already own.
I’d rather see one dependable solar lamp used every evening than several sealed ornaments that stop working after the first wet week. Test first, decorate second, and keep future cleaning in mind.
Which solar light would you repurpose first: the small stake waiting for a vase, the flat light suited to a garden globe, or the porch light that needs a softer frosted cover?