Laminate furniture often reaches the “almost useful” stage long before it truly needs replacing. The surface may feel dated, one drawer may have broken, or the shiny finish may no longer suit the room, yet the cabinet underneath can still provide perfectly practical storage.
I like laminate furniture because its plain shapes leave plenty of room for change. A basic dresser can gain an open shelf, a flat cabinet can take fluted trim, and a damaged top can be given a painted faux-wood finish instead of pretending it is solid timber.
The important part is recognising what you are working with. Laminate is a decorative surface bonded to another material, often particleboard, fibreboard, or a similar manufactured panel. It should not be treated exactly like solid wood. You can paint laminate successfully, but ordinary wood stain will not soak into it as it would into real timber.
I don’t think every makeover needs complicated building work. Sometimes thorough cleaning, the right bonding primer, restrained colour, and better hardware are enough. In other cases, changing one damaged section can make the whole piece useful again.
Identify the Surface and Test the Furniture
Remove drawers, shelves, doors, and hardware where practical. Label each part so it returns to the correct position, especially when older furniture has slightly uneven openings.
Inspect the piece for:
- Peeling or lifting laminate
- Swollen particleboard
- Chipped corners
- Loose edge banding
- Scratches and dents
- Grease or furniture-polish residue
- Wobbly legs
- Loose hinges
- Damaged drawer runners
- Missing screws
- Water marks
- An unstable back panel
- Areas that rub when drawers or doors move
A small chip can often be filled and painted. A broad area of swollen or crumbling substrate is more serious because paint cannot restore material that has lost its strength.
Check whether the finish is laminate, veneer, melamine, painted wood, or plastic-coated board. Veneer is a thin layer of real wood and may allow limited wood-finishing methods. Laminate is a non-porous decorative layer, so direct staining is not the correct approach.
Clean the furniture thoroughly before sanding or priming. Grease, polish, dust, and cleaning-product residue can prevent the new coating from bonding.
Whether you need to sand depends on the exact primer and paint system. Some bonding primers are designed for dense glossy surfaces and may reduce or eliminate sanding, while other systems still require light scuffing. Follow the instructions supplied with the products you choose rather than mixing advice from several unrelated systems.
When scuffing is required, sand lightly. The aim is usually to dull the slick finish, not remove the entire laminate layer. Heavy sanding can expose the weaker board underneath.
Useful Materials and Tools
- Screwdrivers
- Labelled containers for hardware
- Suitable cleaner or degreaser
- Clean lint-free cloths
- Fine sanding sponge
- Dust mask and eye protection
- Filler compatible with the damaged area
- Filling knife
- Strong adhesive for loose edge banding
- Clamps
- Bonding primer suitable for laminate
- Furniture or cabinet paint
- Fine-finish roller
- Synthetic paintbrush
- Small detail brush
- Painter’s tape
- Moulding, fluted trim, bamboo strips, or other decorative material
- Mitre shears, hand saw, or suitable cutting tool
- Wood glue or construction adhesive suited to both surfaces
- Furniture legs or a replacement base
- New handles or knobs
- Protective topcoat when required by the paint system
Work with good ventilation and follow the safety instructions for cleaners, primers, paints, adhesives, and fillers. Wear eye protection when cutting trim or drilling hardware holes, and secure tall furniture to the wall when tip-over could be a risk.
Paint a Plain Laminate Cabinet With a Bonding Primer
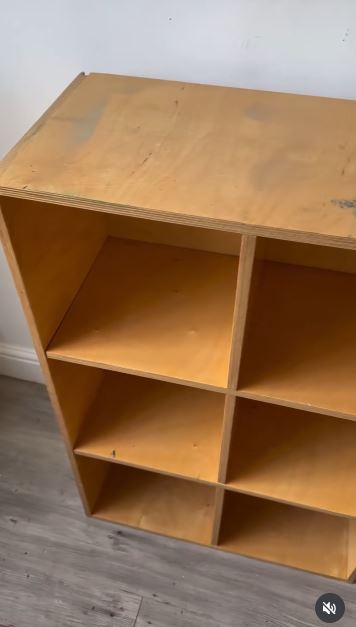
Painting is the most direct way to change laminate furniture, but the visible colour is only the final layer. The selected cabinet makeover emphasises thorough degreasing and an adhesion primer designed for slick surfaces.
A bonding primer creates an anchor between the non-porous laminate and the decorative paint. Paint manufacturers also recommend specialised primers for laminate furniture and other difficult glossy surfaces.
Materials and Tools
- Laminate cabinet or dresser
- Degreasing cleaner
- Fine sanding sponge, when required
- Bonding primer
- Furniture or cabinet paint
- Fine-finish roller
- Synthetic brush
- Painter’s tape
- New hardware, if desired
Repaint the Cabinet in Five Steps
- Take the furniture apart where practical. Remove doors, drawers, shelves, handles, and hinges. Label every component and keep the screws together so reassembly does not become a small furniture-themed mystery.
- Clean the surface carefully. Remove dust first, then clean away grease, polish, and residue. Rinse or wipe the surface as directed by the cleaner and allow it to dry fully.
- Prepare for the chosen primer. Lightly scuff the laminate only when the coating instructions require it. Remove every trace of sanding dust, then test the primer on a hidden section.
- Prime and paint in controlled layers. Apply the bonding primer evenly and allow it to cure according to its directions. Follow with thin coats of furniture paint, using a small brush around corners and a fine roller across larger panels.
- Reassemble without rushing. Let the finish reach the handling or curing stage stated by the manufacturer. Refit the hardware carefully and avoid dragging doors or drawers across freshly coated edges.
The part I would watch closely is the paint around the door and drawer openings. A finish can look smooth across the front but still chip where two newly painted surfaces rub against each other.
For a quieter makeover, paint only the doors and leave the outer frame unchanged. You could also use one colour outside and a softer contrasting shade inside the cabinet.
Turn a Broken Bottom Drawer Into an Open Shelf
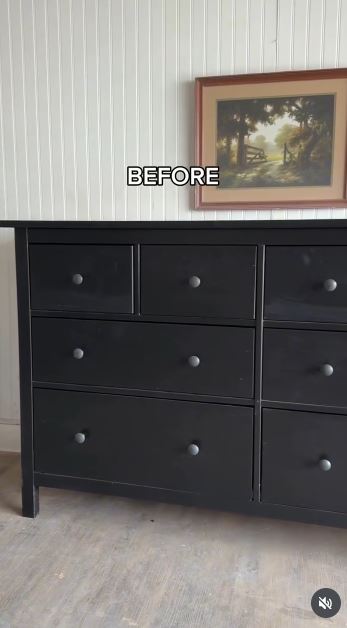
A broken drawer does not always mean the complete dresser has failed. This makeover removes the damaged bottom drawer and turns the empty space into an open shelf, allowing the remaining storage to continue working.
The opening needs a finished base and clean side edges. You may also need to remove unused runners, fill screw holes, or add a panel so the new compartment looks intentional.
Materials and Tools
- Laminate dresser with one damaged drawer
- Screwdriver
- Pliers
- Measuring tape
- Shelf panel or reclaimed board
- Fine sanding sponge
- Filler
- Bonding primer
- Paint
- Edge banding or decorative trim
- Suitable screws or adhesive
- Optional storage basket
Create the Open Shelf in Five Steps
- Remove the damaged drawer and its hardware. Take out runners, stops, and loose screws that no longer serve a purpose. Check that removing the drawer does not weaken the cabinet frame.
- Measure the opening accurately. Record the width and depth at several points rather than assuming the cabinet is perfectly square. Decide whether the existing base can remain visible or needs a new shelf panel.
- Repair the interior. Fill unwanted holes, secure loose edges, and add the shelf or base panel. Cover exposed raw board with edge banding, trim, or a properly prepared painted finish.
- Coordinate the new compartment with the dresser. Prime and paint the opening to match the exterior or choose a contrasting colour. Keep coating away from moving runners belonging to the remaining drawers.
- Test the new use. Place light items inside first and watch for sagging or movement. A fitted basket can hide smaller objects and make the open section easier to keep tidy.
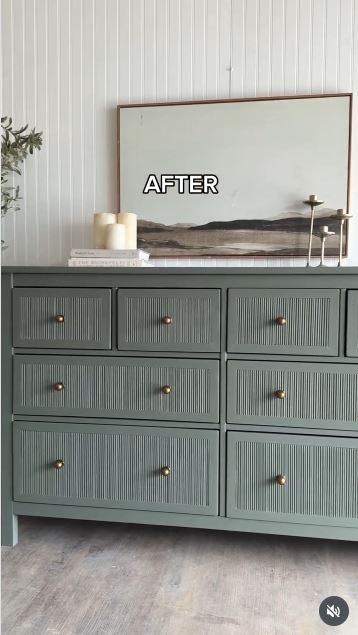
For me, the shelf should look like a design decision, not simply the space where a drawer disappeared. Finishing the interior corners and exposed edges makes the largest difference.
The same idea could turn two failed drawers into a taller compartment for books, shoes, baskets, or folded blankets.
Add Fluted Detail to a Flat Laminate Cabinet
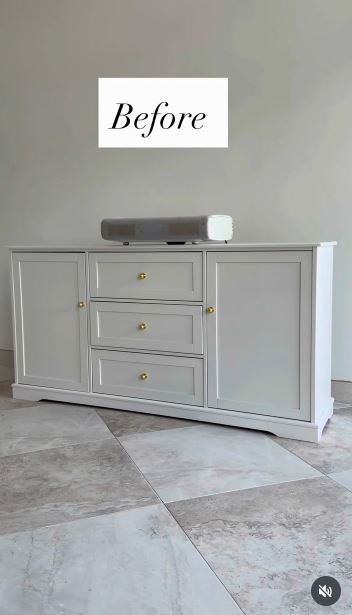
Flat laminate doors make a useful base for applied texture. The selected makeover combines two simple cabinets and adds a high-end fluted design across their fronts.
The narrow strips need consistent spacing and secure attachment. A small measuring error repeated across an entire cabinet can make the final section noticeably narrower than the first.
Materials and Tools
- Plain laminate cabinet
- Wooden half-rounds, narrow moulding, or fluted panels
- Measuring tape
- Straightedge
- Pencil
- Mitre shears or suitable saw
- Fine sandpaper
- Adhesive suitable for laminate and trim
- Clamps or painter’s tape
- Filler or caulk suited to the project
- Bonding primer
- Paint
Build the Fluted Front in Five Steps
- Plan the complete arrangement. Measure each door and lay several strips across it without glue. Calculate the spacing so the first and last pieces finish evenly.
- Cut and label the trim. Prepare the strips for one door at a time and lightly smooth rough ends. Keep them organised in order when the door edges or measurements vary.
- Prepare the laminate and attach the pieces. Clean the surface and follow the adhesive manufacturer’s preparation instructions. Secure each strip with consistent spacing and keep it from sliding while the adhesive sets.
- Refine the applied design. Fill only the gaps that should disappear and remove excess adhesive. Prime both the laminate and added trim with products suited to their different surfaces.
- Paint and rehang the doors. Build the finish with light coats and inspect the grooves for drips. Reinstall the doors only after the surface can tolerate handling.
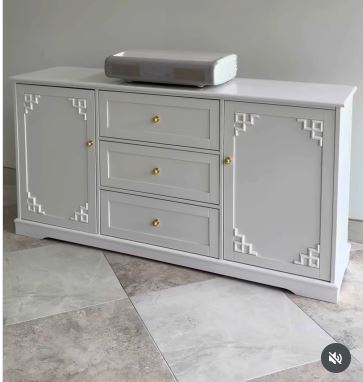
I know it can feel tempting to add narrow fluting everywhere, but doors still need to open comfortably. Keep the trim clear of hinges, meeting edges, and areas where fingers regularly grip the cabinet.
Wider battens create a simpler panelled look. You could also add fluting only to the centre of each door and leave a plain border around it.
Create a Faux-Wood Finish Over Damaged Laminate
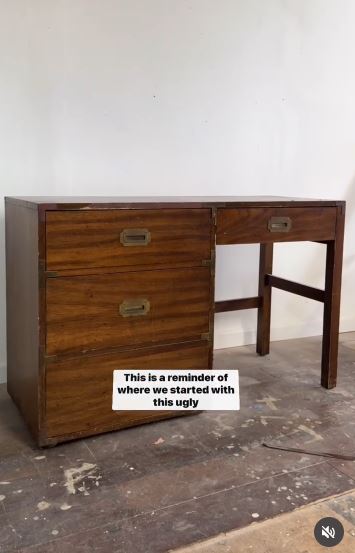
You cannot stain laminate in the same way as bare wood because the surface is not real timber. A faux-wood treatment solves that problem by applying colour over a painted base instead of expecting stain to soak into the laminate.
The selected project uses gel stain over light-coloured paint to create a wood-like finish when the underlying surface cannot be restored naturally.
Materials and Tools
- Laminate furniture
- Cleaner
- Repair filler
- Bonding primer
- Light-coloured base paint
- Gel stain, glaze, or faux-finish product
- Flat brush
- Soft blending brush
- Wood-graining tool, if desired
- Clean cloths
- Compatible protective coating
Build the Faux Grain in Five Steps
- Repair the underlying surface. Fill chips and level damaged edges before applying colour. A faux grain may disguise colour differences, but it will not conceal deep dents or raised laminate.
- Prime and paint the base. Use a bonding primer and an opaque base colour suited to the wood tone you want to imitate. Let the paint reach the stage required before applying another decorative product over it.
- Practise on a sample. Apply the gel stain or glaze to a spare board painted with the same base colour. Test brush pressure, wiping, and a graining tool until the marks look natural rather than repetitive.
- Work across one panel at a time. Apply the decorative colour in the direction that a real board might run. Vary the lines slightly, then soften harsh marks before the product begins setting.
- Protect the final effect. Let the faux finish cure according to its instructions and add a compatible topcoat when needed. Test the protective product first because it may deepen or alter the colour.
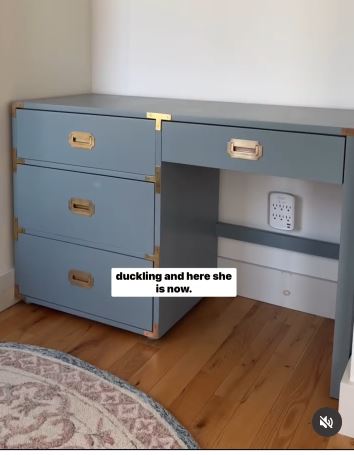
The grain does not need to be perfectly identical across every drawer. Real wood contains variation, and a little controlled difference usually makes the finish more believable.
A beginner can use a simple paint wash instead of a detailed grain. Another option is to create a wood effect only on the top while painting the rest of the furniture in a solid colour.
Add Reclaimed Bamboo Texture to a Charity-Shop Cabinet
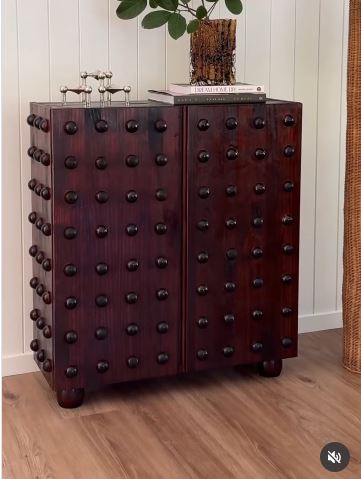
A plain laminate cabinet does not need to rely on paint alone. This charity-shop IKEA piece uses old bamboo bindings to add a warmer, more tactile surface to the simple form.
The bamboo should be treated as applied decoration rather than structural reinforcement. Loose bindings, splinters, and rough ends need attention before they are placed on furniture that will be handled regularly.
Materials and Tools
- Laminate cabinet
- Reclaimed bamboo strips or bindings
- Soft brush and cloth
- Measuring tape
- Cutting tool suited to bamboo
- Fine sandpaper
- Adhesive compatible with both materials
- Painter’s tape or clamps
- Bonding primer and paint for uncovered areas
- Clear finish suited to bamboo, if needed
Add the Textured Surface in Four Steps
- Clean and sort the reclaimed bamboo. Remove dust, damaged sections, and loose fibres. Arrange the pieces by colour and width so the finished pattern feels balanced.
- Plan the placement on the cabinet. Test vertical, horizontal, or framed arrangements before cutting. Keep the bamboo clear of hinges, door edges, handles, and ventilation openings.
- Cut and attach each section. Smooth sharp ends and apply an adhesive suited to the laminate and bamboo. Hold the pieces securely while they set, checking frequently that the pattern has not drifted.
- Finish the surrounding surfaces. Paint or repair any exposed laminate as needed, then protect the bamboo only with a product appropriate for it. Test every door and drawer after the added thickness is in place.
For me, the reclaimed material should remain recognisable. Slight variations in tone can make the cabinet more interesting, while painting every bamboo strip may remove the reason for using it.
Cane webbing, wooden blinds, narrow cork strips, fabric-covered panels, or leftover timber battens could create a related textured finish.
Why Laminate Makeovers Peel, Chip, or Look Uneven
Confusing Laminate With Solid Wood
Laminate does not absorb stain like timber. Use paint, a coating designed for laminate, or a decorative faux-wood system instead of applying ordinary stain directly.
Painting Over Grease or Polish
Furniture sprays and hand oils can leave invisible residue. Clean the surface thoroughly before any sanding, primer, or adhesive is applied.
Using an Unsuitable Primer
Ordinary primer may not grip a slick non-porous surface. Choose a bonding primer that lists laminate, Formica, glossy finishes, or similar difficult surfaces among its intended uses.
Sanding Through the Laminate
Aggressive sanding can expose particleboard or fibreboard beneath the decorative layer. Scuff lightly only when required and repair exposed edges before painting.
Ignoring Swollen Substrate
Paint cannot restore board that has expanded and crumbled after water damage. Replace or reinforce severely damaged sections rather than covering them cosmetically.
Applying Thick Paint Around Moving Parts
Heavy coating on drawer edges, door edges, and cabinet openings can cause rubbing and chips. Keep these areas smooth and test the movement between coats.
Attaching Trim With the Wrong Adhesive
An adhesive may hold wood well but fail on laminate, or vice versa. Select a product compatible with both surfaces and test it before covering the full cabinet.
Reassembling the Piece Too Soon
Paint may feel dry while remaining soft underneath. Follow the coating’s handling and curing instructions before tightening hardware or loading shelves.
Mounting New Legs to Weak Board
Thin particleboard may split around screws. Add reinforcement or a supporting base so the furniture’s weight is spread safely.
Frequently Asked Questions
Can laminate furniture really be painted?
Yes. The surface needs to be clean and prepared with a system intended for slick or laminate surfaces. Bonding primer is often the most important layer.
Must I sand laminate furniture?
Not always. Some specialised bonding primers are formulated for glossy surfaces without sanding, while other paint systems require light scuffing. Follow the exact instructions for your selected products.
Can I stain laminate to make it look like wood?
Ordinary stain will not penetrate laminate like real wood. You can create a faux-wood finish by applying decorative glaze or gel stain over a properly prepared painted base.
How can I repair chipped laminate corners?
Secure any loose surface first, fill the missing area with a suitable repair compound, and shape it carefully after curing. Prime the repaired section before painting.
Can I add wooden moulding to laminate?
Yes, provided the laminate is clean and sound and the adhesive is compatible with both materials. Avoid placing trim where it prevents drawers or doors from opening.
Which paint finish is suitable for frequently used furniture?
Choose a furniture, cabinet, or trim paint intended to tolerate regular handling. Follow its primer, recoat, and curing instructions rather than judging durability only by sheen.
Should I apply a separate topcoat?
That depends on the paint system and expected use. Some furniture paints are designed as complete finishes, while others recommend a compatible protective coating.
Keep the Cabinet and Change What Is Not Working
Learning how to refurbish laminate furniture begins with separating the useful structure from the tired surface. A cabinet can remain sturdy even when its colour, handles, doors, or drawer arrangement no longer suit the room.
Paint offers the simplest visual change, while fluted trim and reclaimed bamboo add texture. A broken drawer can become open storage, added legs can lighten a heavy dresser, and a decorative faux grain can give damaged laminate a warmer appearance without falsely treating it as bare wood.
Begin by solving the practical problem first. Repair the edge, strengthen the base, or remove the failed drawer. Then clean, prime, paint, and decorate with materials suited to the actual surface.
Which laminate piece would you update first: a flat IKEA cabinet, a damaged dresser, a plain bookshelf, or a tired bedside table?