Metal patio furniture can remain strong long after its finish begins looking tired. A chair may develop orange rust around its feet, a table may lose paint along the edges, or an entire set may fade unevenly after years of sun and rain. Those changes can make useful furniture appear ready for disposal when the frame itself still has plenty to offer.
I prefer checking whether outdoor furniture can be repaired before replacing it. Metal frames are often worth keeping because their main structure is already built, proportioned, and suited to the space. The work may involve cleaning and repainting, but some pieces need more specific attention, such as repaired welds, replacement straps, fresh outdoor cushions, or professional powder coating.
The condition of the frame should guide the makeover. Light surface rust can often be handled at home, while widespread corrosion or structural damage deserves professional assessment. I don’t think a bright new coating should hide a weak joint or rusted-through leg. Refurbishing works best when appearance, comfort, and safe function are treated as parts of the same project.
Before You Start Refurbishing Metal Patio Furniture
Remove cushions, glass tops, umbrellas, loose straps, and detachable accessories before cleaning the frame. Keep bolts, caps, clips, and other hardware in labelled containers so the pieces do not quietly migrate across the garden while you work.
Inspect every chair and table carefully. Look underneath seats, around welds, inside decorative scrollwork, near bolts, and along feet that have remained in contact with damp paving. Surface rust usually appears rough or discoloured, while more serious corrosion may create holes, thinning metal, cracked joints, or areas that flex unexpectedly.
Do not continue using furniture with broken welds, rusted-through supports, unstable legs, or cracked load-bearing parts. Have damaged frames repaired professionally or remove them from use.
Useful Materials and Tools
- Work gloves
- Safety glasses
- Dust protection suitable for the work
- Mild detergent or suitable degreaser
- Bucket, sponge, and scrub brush
- Garden hose
- Wire brush
- Paint scraper
- Sandpaper or sanding sponge
- Clean cloths
- Exterior metal primer
- Exterior paint intended for metal furniture
- Spray paint or brush-on coating, depending on the project
- Painter’s tape
- Drop cloths
- Replacement bolts, feet, straps, or glides when required
- Outdoor fabric and cushion filling for seating updates
Restore a Rusted Vintage Wrought-Iron Patio Set
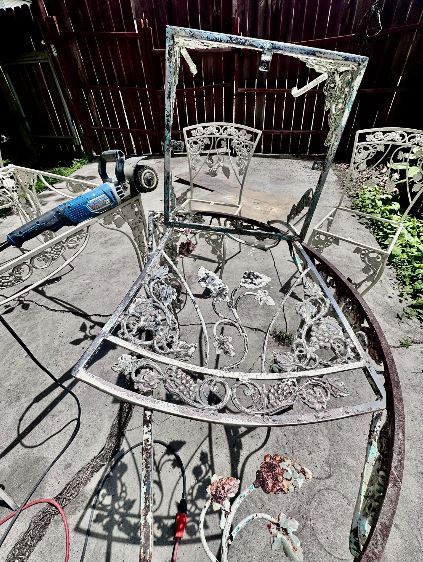
This vintage set includes elongated wrought-iron seating and a central glass-top table. The makeover retains the original mid-century form while addressing the rusted and tired finish through cleaning, rust treatment, priming, and spraying.
Mesh, scrollwork, and narrow metal bars create plenty of places for rust and dirt to hide. A quick spray across the visible front will not protect the underside, leg joints, or inner curves. Turning each piece several times during preparation makes the difference between a surface update and a more complete refurbishment.
Materials and Tools
- Wrought-iron furniture
- Mild cleaner or degreaser
- Stiff brush
- Wire brush and sandpaper
- Rust-removal or conversion product suitable for the metal
- Exterior metal primer
- Exterior metal spray paint
- Painter’s tape
- Drop cloth
- Replacement furniture feet, if necessary
- Glass cleaner for the detached tabletop
Restore the Set in Five Steps
- Remove the glass and inspect the frames. Lift the tabletop out with help when it is large or heavy, then store it safely away from the work area. Check every weld, support, and mesh section before spending time on cosmetic preparation.
- Clean the furniture from several directions. Scrub the frames with an appropriate cleaner, working underneath the seats and around narrow joints. Rinse away residue and allow the metal to dry completely before brushing or sanding rust.
- Remove loose paint and unstable rust. Work with a wire brush and sandpaper until flaking material no longer lifts from the surface. Rust-Oleum advises that metal furniture should be clean and dry and that loose paint should be removed before repainting.
- Prime exposed and prepared metal. Apply a compatible exterior metal primer, reaching the undersides and inner curves as well as the obvious areas. Keep each coat controlled so primer does not collect in the mesh or form drips beneath decorative bars.
- Apply the finish and reassemble carefully. Spray or brush on thin coats according to the product instructions, rotating the furniture as required. Let the coating harden before replacing the glass and dragging the furniture across the patio.
The part I would check twice is the underside. It is quite easy to admire the freshly painted seat and then discover an untouched rusty crossbar when the chair is moved.
A classic black finish preserves the traditional wrought-iron look, while deep green, muted blue, warm white, or bronze can change the character without altering the frame.
Use Professional Powder Coating for a Severely Failing Finish
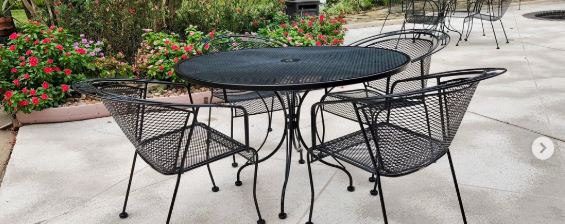
Some furniture has moved beyond a practical hand-sanding project. This wrought-iron set was stripped to bare metal and professionally powder coated, allowing the original frame to remain in use after the failing surface was removed.
Powder coating is particularly worth considering for a well-made vintage set, intricate furniture with many inaccessible corners, or frames covered in several layers of peeling paint. It is a professional process rather than a simple substitute for a can of outdoor spray paint.
Before requesting the work, decide which components need to be removed and whether the furniture requires welding, replacement bolts, new feet, straps, slings, or cushions after coating.
What to Discuss With a Restoration Specialist
- The type and condition of the metal
- Rust-through or cracked welds
- Removal of old paint and corrosion
- Whether the furniture can be disassembled safely
- Protection of threads, holes, and moving joints
- Available outdoor coating colours and textures
- Replacement feet or glides
- Reinstallation of straps, slings, glass, or cushions
- Care instructions for the completed finish
Prepare for Professional Restoration in Four Steps
- Decide whether the frame justifies professional work. Consider the furniture’s construction, comfort, size, and replacement difficulty. A strong vintage set with surface deterioration may be a better candidate than thin metal already weakened by corrosion.
- Inspect and document the damage. Photograph rust, broken welds, missing hardware, and bent areas before delivery. Ask whether repairs will be completed before the new coating is applied.
- Remove non-metal components as instructed. Cushions, glass, plastic feet, straps, and some fasteners may need separate treatment. Label anything that must be returned to a specific chair or location.
- Reassemble without damaging the coating. Follow the specialist’s curing and care instructions. Use suitable protective tools around bolts and add glides before placing the furniture back on rough paving.
I’d ask to see a physical colour sample rather than choosing from a phone screen. Outdoor light can make a dark bronze, charcoal, and black finish appear surprisingly different.
Powder coating does not have to mean plain glossy black. Textured dark finishes, soft neutrals, muted greens, or brighter colours can preserve the original design while changing how it sits in the garden.
Give Decorative Metal Chairs a Textured Black Finish
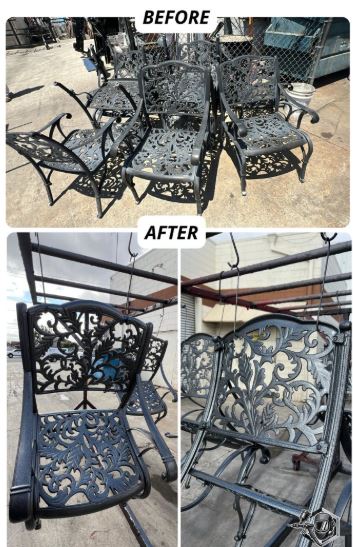
These decorative chairs were restored through rust and old-coating removal, priming, and a textured black finish. The slight surface texture suits detailed metalwork because it creates a consistent appearance without demanding a mirror-smooth result across every curve.
A textured finish may visually soften minor pitting that remains after stable rust has been removed. It should not be used to conceal loose scale, active corrosion, or structural thinning.
Materials and Tools
- Decorative metal chairs
- Cleaner
- Small wire brushes
- Abrasive pads
- Exterior metal primer
- Textured exterior metal coating
- Small detail brush, if brush application is permitted
- Spray protection and drop cloths
- Replacement feet
Refinish Detailed Chairs in Four Steps
- Clean between every decorative element. Use narrow brushes to reach scrolls, intersections, and patterned backs. Dirt trapped in those areas may loosen later and take the fresh coating with it.
- Remove loose corrosion without flattening the design. Work with smaller brushes and folded abrasive pads rather than forcing a large power tool into narrow curves. Stop and seek repair when a decorative section feels thin or begins breaking.
- Prime from several angles. Turn the chair upside down and sideways so the underside of each curve receives coverage. Thin, repeated passes usually reach intricate shapes more evenly than one heavy coat.
- Apply the textured finish consistently. Keep the application distance and movement controlled so some sections do not become much rougher than others. Let the finish harden before stacking or placing cushions on the chairs.
I know textured paint can feel as though it will forgive everything underneath, but preparation still matters. Texture can soften small visual imperfections; it cannot glue unstable rust back onto the chair.
Deep bronze, graphite, or muted green can provide a similar effect. A slight texture can also help traditional furniture feel less stark than a high-gloss black coating.
Replace Cracked Vinyl Straps on Metal Patio Chairs
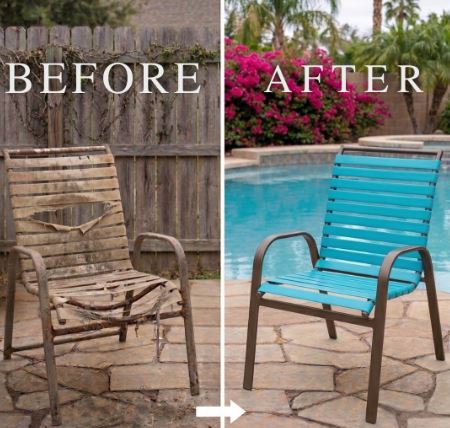
A strong frame does not need to be discarded because its vinyl straps have cracked, stretched, or faded. This project replaces the worn support material, restoring both the chair’s comfort and its appearance.
Strap replacement requires accurate sizing and the correct fastening method. Different furniture designs use clips, rivets, pegs, or hidden attachments, so record the original construction before removing everything.
Materials and Tools
- Metal chair frame
- Replacement outdoor vinyl straps compatible with the chair
- Correct replacement fasteners
- Screwdriver or fastening tools
- Measuring tape
- Pliers
- Gloves
- Cleaner
- Container for old hardware
- Manufacturer’s installation instructions
Replace the Straps in Five Steps
- Photograph the existing pattern. Record how every strap crosses, wraps, overlaps, and attaches beneath the frame. Measure several intact sections before removing them because badly stretched straps may no longer represent the original size.
- Remove the old material carefully. Release the fasteners without bending the frame or enlarging attachment holes. Clean the exposed rails and inspect them for corrosion hidden beneath the straps.
- Refinish the frame before installing new straps. Remove rust, prime exposed metal, and apply the selected finish while the frame is unobstructed. Let the coating harden fully so the new straps do not cut into soft paint.
- Install the replacement system as directed. Use the correct strap dimensions and approved fasteners for the furniture design. Maintain even tension from one section to the next rather than pulling individual straps as tightly as possible.
- Test the chair gradually. Check every connection and press the seat by hand before sitting. Stop using the chair if a rail, fastener hole, or structural part shows movement or damage.
The part I would not guess is the strap length. A small measuring mistake repeated across a whole chair can create a seat that is either loose or extremely difficult to assemble.
You can reproduce the original colour or introduce contrast against the newly painted frame. Alternating two compatible strap colours can create a more graphic finish without changing the chair’s structure.
Update the Cushions on a Restored Wrought-Iron Set
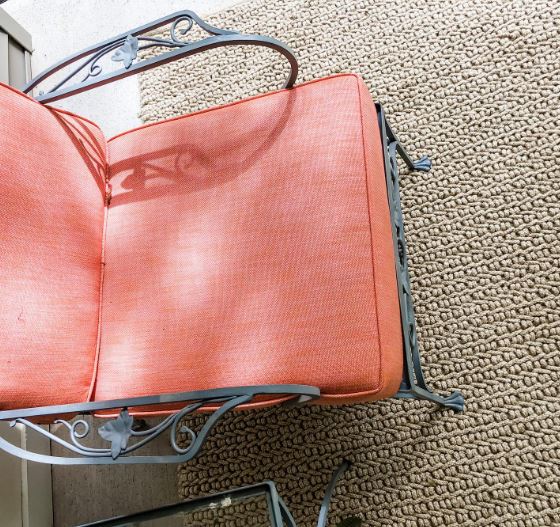
Once the metal frame is sound and freshly finished, worn cushions can still make the set look unfinished. This vintage wrought-iron makeover pairs the restored furniture with new outdoor fabric, keeping the original set while improving its softness and colour.
Outdoor cushions need fabric and internal materials appropriate for the environment where they will be used. Ordinary indoor fabric may fade quickly or hold moisture, while old filling may remain compressed or carry odours even after the cover is changed.
Materials and Tools
- Existing cushions or correctly sized replacements
- Outdoor upholstery fabric
- Outdoor-suitable thread
- Sewing machine or upholstery service
- Fabric scissors
- Measuring tape
- Pins or clips
- Replacement foam or filling when necessary
- Zips, hook-and-loop tape, or ties
- Paper for pattern pieces
Refresh the Cushions in Four Steps
- Evaluate the complete cushion, not only the cover. Check the filling for compression, crumbling, moisture damage, and odour. Reuse it only when it remains clean, supportive, and suitable for outdoor seating.
- Measure before taking the old cover apart. Record the length, width, depth, seam positions, ties, and closure. The existing cover can become a pattern, but allow for distortion if it has stretched over time.
- Cut and sew the new covers. Position the pattern carefully when using stripes or large motifs. Use strong seams, reinforce the ties, and include a closure so the covers can be removed for cleaning when practical.
- Fit and secure the cushions. Insert the filling evenly, close the cover, and attach the cushion to the chair without wrapping ties around sharp or rusty areas. Store or protect the cushions according to the fabric’s care requirements.
For me, fabric is where the personality of the finished set becomes clearest. A black frame can support florals, stripes, warm neutrals, or strong solid colours without needing another decorative treatment.
A lower-cost variation is to make simple removable slipcovers for sound cushions. You could also keep neutral seat cushions and add smaller patterned back cushions that are easier to replace later.
A Practical Five-Step Refurbishing Method
The individual projects require different repairs, but most metal patio-furniture refurbishments follow the same overall order.
- Inspect the structure and separate the components. Remove cushions, glass, straps, slings, feet, and hardware where appropriate. Repair broken welds, rust-through, and unstable joints before preparing the finish.
- Clean and dry the metal. Remove outdoor grime, oils, pollen, and loose dirt using a suitable cleaner. Rinse thoroughly and wait until water has left the joints, tubes, and decorative recesses.
- Remove unstable paint and rust. Use a wire brush, scraper, or sandpaper to reach a firm surface. Official metal-furniture instructions from Rust-Oleum and Krylon both emphasise cleaning, drying, and removing flaking paint or rust before recoating.
- Prime and paint with compatible exterior products. Protect threaded sections and moving parts, then apply controlled coats from several angles. Read the product label for application distance, weather limits, recoating, safety precautions, and curing requirements.
- Replace the comfort and finishing components. Reinstall glass, straps, slings, cushions, glides, and hardware only after the coating is ready. Inspect the finished furniture carefully before returning it to regular use.
Common Mistakes to Avoid
Painting Over Active Rust
Paint may temporarily hide rust, but loose corrosion can continue lifting the new finish. Remove unstable material and use a preparation and primer system intended for exterior metal.
Skipping the Structural Inspection
A fresh coating does not repair broken welds, weakened legs, or rusted-through supports. Test the stability before beginning and again before using the furniture.
Sanding Unknown Old Paint Without Testing
Older or unidentified coatings may create hazardous dust. Determine whether lead paint may be present and follow appropriate lead-safe methods before scraping or sanding.
Painting Damp Metal
Water can remain inside joints, tubing, mesh, and decorative details after the visible surface looks dry. Give the furniture enough time to dry before priming.
Applying Heavy Spray Coats
Heavy paint may run, collect beneath rails, and remain soft around joints. Apply several controlled passes rather than trying to create complete coverage immediately.
Forgetting the Underside
Rust commonly develops beneath seats, table edges, feet, and lower supports. Turn the furniture during cleaning, preparation, priming, and painting.
Reassembling Too Early
Straps, glass, cushions, and hardware can mark a coating that has not hardened sufficiently. Follow the curing instructions for the selected products.
Using Indoor Fabric Outdoors
Indoor upholstery fabric and filling may not cope well with moisture and sunlight. Choose materials intended for the furniture’s actual location and storage conditions.
Replacing Straps Without Recording the Pattern
Once all the old straps have been removed, the original crossing and attachment sequence may be difficult to reconstruct. Photograph and measure first.
Frequently Asked Questions
Can badly rusted metal patio furniture be saved?
Surface rust can often be removed and refinished. Furniture with deep corrosion, holes, fractured welds, or weakened load-bearing parts needs professional repair or replacement rather than cosmetic painting.
Do I need to remove all the old paint?
Remove paint that is loose, flaking, poorly bonded, or incompatible with the planned coating. Sound existing paint may remain when the selected primer or finish permits it, but glossy areas may require preparation for adhesion.
Should I use spray paint or brush-on paint?
Spray paint can reach narrow bars, mesh, and decorative metal evenly, while brush-on products may offer more control in some settings. Choose an exterior metal coating suitable for the furniture and follow its application instructions.
Is primer necessary on metal patio furniture?
Bare metal, rust-treated sections, repairs, and major finish changes commonly benefit from a compatible metal primer. Some all-in-one products may have different requirements, so rely on the selected system’s directions.
Can aluminium patio furniture rust?
Aluminium does not develop the same red iron rust seen on steel or wrought iron, but its surface can still oxidise, corrode, stain, or lose coating adhesion. Identify the metal and select preparation products made for it.
Is powder coating better than ordinary paint?
Powder coating may be useful for valuable furniture with widespread finish failure or intricate frames that are difficult to prepare by hand. It requires professional equipment, so the decision depends on the furniture’s condition, value, and intended use.
Can I reuse the original cushions?
Yes, when the filling remains clean, supportive, dry, and undamaged. Replace it when it has broken down, remained wet, developed odours, or no longer supports the user comfortably.
How should I care for refurbished patio furniture?
Clean it gently, repair chips before rust spreads, and avoid leaving feet in standing water. Protect or store cushions during unsuitable weather and follow the coating manufacturer’s maintenance advice.
Keep the Strong Frame and Renew What Has Worn Out
Learning how to refurbish metal patio furniture begins with separating surface wear from structural failure. Faded paint, light rust, cracked straps, and tired cushions can often be addressed. Weak welds, rusted-through supports, and unstable frames need proper repair before appearance becomes the priority.
Begin with one chair rather than dismantling the complete patio at once. Clean it, inspect it, test the preparation method, and see how the chosen coating behaves across the curves and joints. Then you can approach the remaining pieces with a clearer process.
The finished furniture does not need to copy its original appearance. A vintage wrought-iron set can become charcoal, green, cream, or bronze. Old straps can introduce colour, and new cushions can connect the frames to the rest of the outdoor space.
Which part of your patio set needs attention first: the rusted metal frame, the straps, or the cushions?