Loose buttons have a habit of gathering in tins, sewing boxes, and forgotten drawers because each one feels too useful or interesting to throw away. A single button may not seem like much, but a mixed collection offers colour, texture, shine, pattern, and ready-made holes for stitching or threading. That makes buttons especially useful for small upcycling projects where the materials can guide the design instead of requiring everything to match perfectly.
I’m drawn to button crafts that reuse more than the buttons themselves. An empty jar can become storage, an old frame can become wall décor, fabric scraps can support a brooch, and leftover cord can turn a handful of buttons into jewellery.
I don’t think a button collection needs to be sorted into flawless sets before it becomes useful. The odd shapes and slight colour differences often give the finished piece its character.
The practical part matters too. Buttons can be small choking hazards, strong magnets need careful handling, jewellery findings must be closed securely, and hot adhesive is not the right tool for every material. Once the future use is clear, the craft becomes easier to plan.
A decorative jar can be densely covered, a bracelet needs flexible and comfortable spacing, and a wall hook board must rely on proper hardware rather than decorative glue alone.
Sort the Buttons by Structure, Not Just Colour
A quick sort prevents a surprising number of problems. Flat buttons behave differently from shank buttons, brittle vintage pieces may not tolerate pressure, and heavy metal buttons can pull on fabric or jewellery cord. Organising by structure first makes it easier to select an attachment method that suits the actual object.
· Separate flat two-hole and four-hole buttons from shank buttons, covered buttons, novelty shapes, metal pieces, and unusually heavy buttons.
· Check every button for cracks, sharp chips, rust, loose fabric covering, unstable shanks, or edges that could catch on clothing or skin.
· Wash washable modern buttons gently when needed, but avoid soaking unknown vintage, painted, wooden, shell, or fabric-covered buttons without testing.
· Sort a small working palette by size and colour so the main project can stay balanced without emptying the entire button tin onto the table.
· Set aside sentimental, collectible, or potentially valuable buttons until their history and condition are understood.
· Keep tiny buttons, beads, magnets, pins, and jewellery findings away from young children and pets throughout the project and after use.
· Count matching pieces before starting earrings, hair clips, napkin rings, or shoe decoration so the pair can be planned evenly.
Choose Sewing, Threading, or Adhesive for the Final Use
The strongest attachment is not always the same for every craft. Sewing works well on flexible fabric, wire can connect jewellery components, and a surface-compatible adhesive may suit a rigid frame or jar. What matters is how much movement, weight, moisture, and handling the finished item will receive.
· Use stitching where the finished item will flex, be worn, or experience repeated movement, provided the base material can be pierced safely.
· Choose cord, wire, jump rings, or thread that passes comfortably through the button holes without forcing or cracking them.
· Match adhesive to both surfaces rather than assuming one glue will bond glass, metal, fabric, plastic, wood, and ceramic equally well.
· Test adhesive on a hidden area when working with painted frames, shoes, coated clips, delicate fabric, or vintage finishes.
· Avoid relying on hot glue alone for load-bearing hooks, frequently worn shoes, washable textiles, or jewellery parts that may warm against the body.
· Allow the selected adhesive to cure according to its instructions before testing, wearing, filling, hanging, or packaging the craft.
· Use ventilation and skin or eye protection whenever the product label calls for it, and keep hot tools on a stable heat-resistant surface.
Plan Comfort, Weight, and Safe Everyday Use
A button craft can look successful but still be awkward to use. A bracelet may pinch, earrings may feel too heavy, a jar may become difficult to clean, and a wall hook board may fail if the decorative layer blocks the screws. Testing the practical details before final attachment keeps the finished object useful rather than purely photographic.
· Hold wearable arrangements against the wrist, ear, hair, shoe, or garment before fixing them to check weight, comfort, movement, and sharp edges.
· Keep magnets fully secured and out of reach of children and pets; loose or swallowed magnets require urgent professional attention.
· Leave access for screws, hook plates, frame backs, jar lids, keyring connectors, and other functional parts that still need to move or be serviced.
· Avoid placing buttons where they will scrape a table, catch on hair, press into skin, or sit directly beneath the foot inside a shoe.
· Use washable or removable attachment methods only when the materials genuinely suit cleaning; many button crafts are better gently wiped or dusted.
· Test wall-mounted and hanging projects with light loads first, using appropriate fixings for the wall and the intended weight.
· Photograph the dry layout before gluing or sewing, because a balanced arrangement can be surprisingly hard to reconstruct once the buttons are moved.
Button-Covered Jar
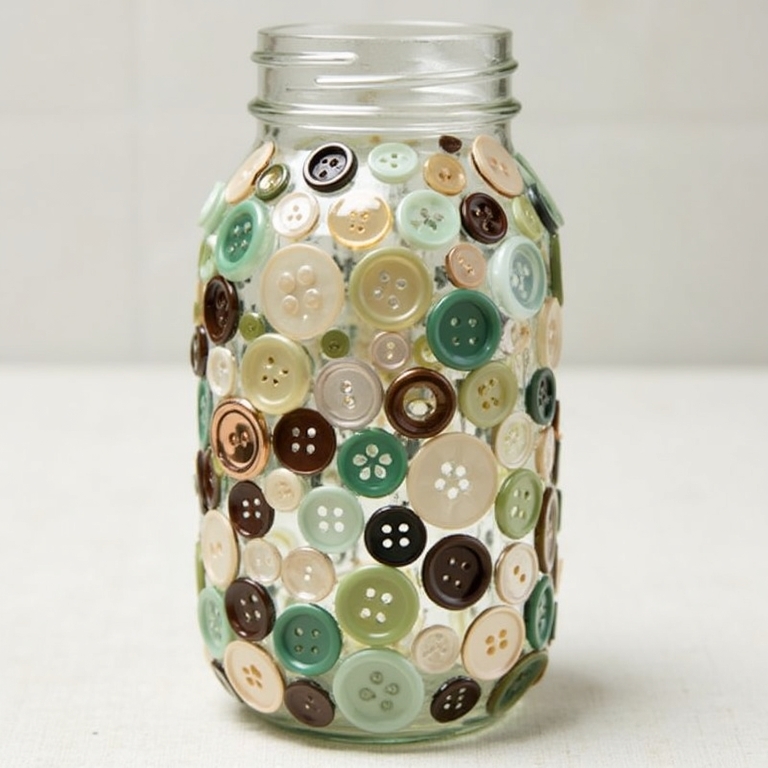
A plain jar becomes a textured storage container when its outer surface is covered with buttons. The project works especially well with a jar already kept for pens, brushes, wrapped sweets, or small craft tools, because the decoration gives an existing container a clearer purpose without requiring a new base.
The practical challenge is keeping the jar stable and the rim usable. Dense button coverage adds weight, so I would avoid a very narrow or cracked jar. Leave the base flat, keep the lid threads clear, and treat the finished piece as decorative storage rather than a washable food container unless every material suits that use.
Materials Needed
- A glass jar (any size)
- Variety of buttons in different sizes, colors, and patterns
- Strong adhesive (such as E6000 glue or a hot glue gun)
- Tweezers or toothpicks for detailed placement
- Protective newspaper or drop cloth
Steps
- Prepare Your Workspace
Begin by laying down a newspaper or drop cloth to protect your table. Wash and dry the jar thoroughly to ensure the surface is free of dirt or grease. This will help the adhesive bond securely. - Sort Your Buttons
Organize your buttons by size and color. This step isn’t just practical; it also makes designing easier. Decide whether you want a random, colorful look or a more symmetrical pattern for your jar. - Apply Glue and Place Buttons
Starting at the bottom edge of the jar, apply a thin layer of glue in small sections. Press buttons onto the glued area one by one, using tweezers for precision. Mix large, small, and patterned buttons for a textured, artistic effect. - Continue Layering Until Complete
Work your way up the jar surface, ensuring no gaps are left. Once you’ve covered the entire jar, allow it to dry overnight in a ventilated area.
Pro Tip
Use a clear or neutral adhesive for a clean finish. If you want your jar to shine under light, mix in some metallic or glittery buttons!
For me, the best jars still show a little breathing space between some buttons. Covering every tiny gap can make the surface bulky and harder to clean, while a few controlled spaces let the glass remain part of the design.
Variation: Cover only a wide central band, use one colour family for a calmer look, or decorate a reused metal tin after smoothing every sharp edge.
Button Animal Shapes
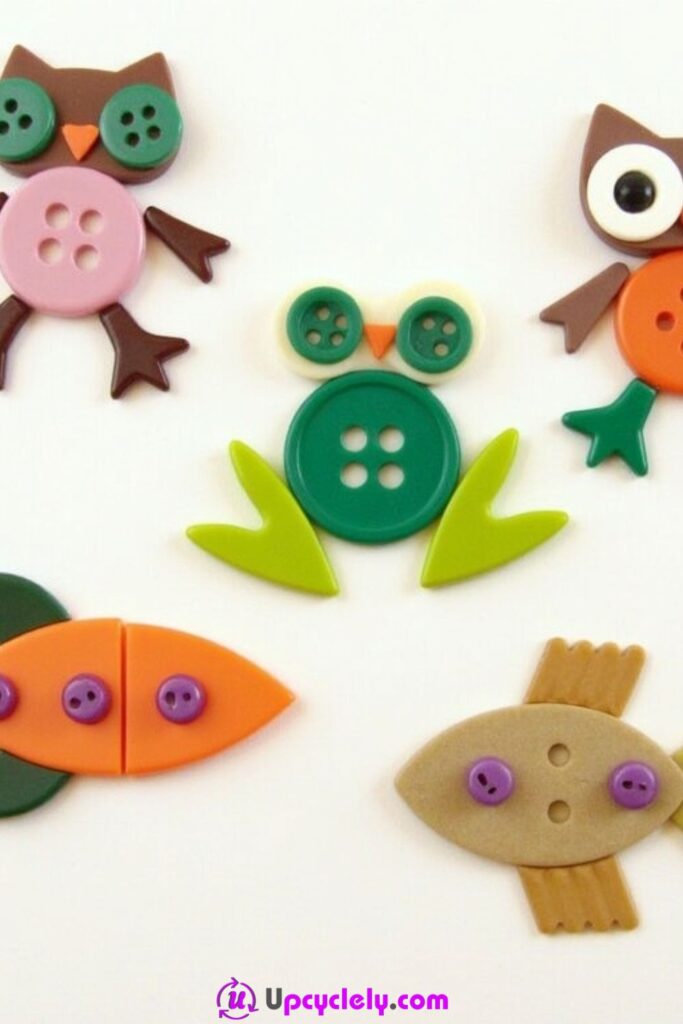
Buttons can fill simple animal silhouettes on card, canvas board, or reclaimed packaging, creating pictures with strong colour and touchable texture. Rounded bodies, wide eyes, fins, wings, and shells translate easily into circles and small novelty buttons, so the project suits beginners when the outline remains uncomplicated.
A sturdy base matters because a button-filled picture can become surprisingly heavy. Thin paper may buckle under adhesive, while thick card or a shallow panel gives the arrangement support. Small parts should remain supervised during making, and finished pieces intended for children need securely attached buttons and age-appropriate display.
Materials Needed
- Buttons in assorted colors and shapes
- Thin colored paper or white cardstock
- Craft glue or glue dots
- Craft scissors
- A pencil
Steps
- Draw Your Animal Outlines
Start by sketching simple animal shapes (like owls, frogs, and fish) onto your cardstock. Keep the designs basic so they can be easily filled with buttons. - Gather the Right Buttons
Spend a little time selecting buttons that will match your animals. For example, use round green buttons for the frog’s body or small black buttons for the eyes. - Glue the Buttons in Place
Apply glue along your animal outline first, then press buttons down one by one to form the shape. Use small buttons for fine details like eyes, legs, and fins, and larger ones for main body sections. - Fill in Any Gaps
Once the buttons are in place, cut small bits of paper to fill in any gaps or areas that aren’t covered nicely. This’ll help make your animals look polished.
Pro Tip
For a 3D effect, layer buttons on top of each other! You’ll add depth and texture that sets your animals apart.
I know it can feel tempting to add every animal feature with another button, but a few painted lines often keep the shape readable. The buttons should form the main character, not hide the outline beneath too many competing details.
Variation: Make one oversized fish or owl, create a set of small matching panels, or use muted vintage buttons for a more restrained nursery or craft-room display.
Button Bracelet
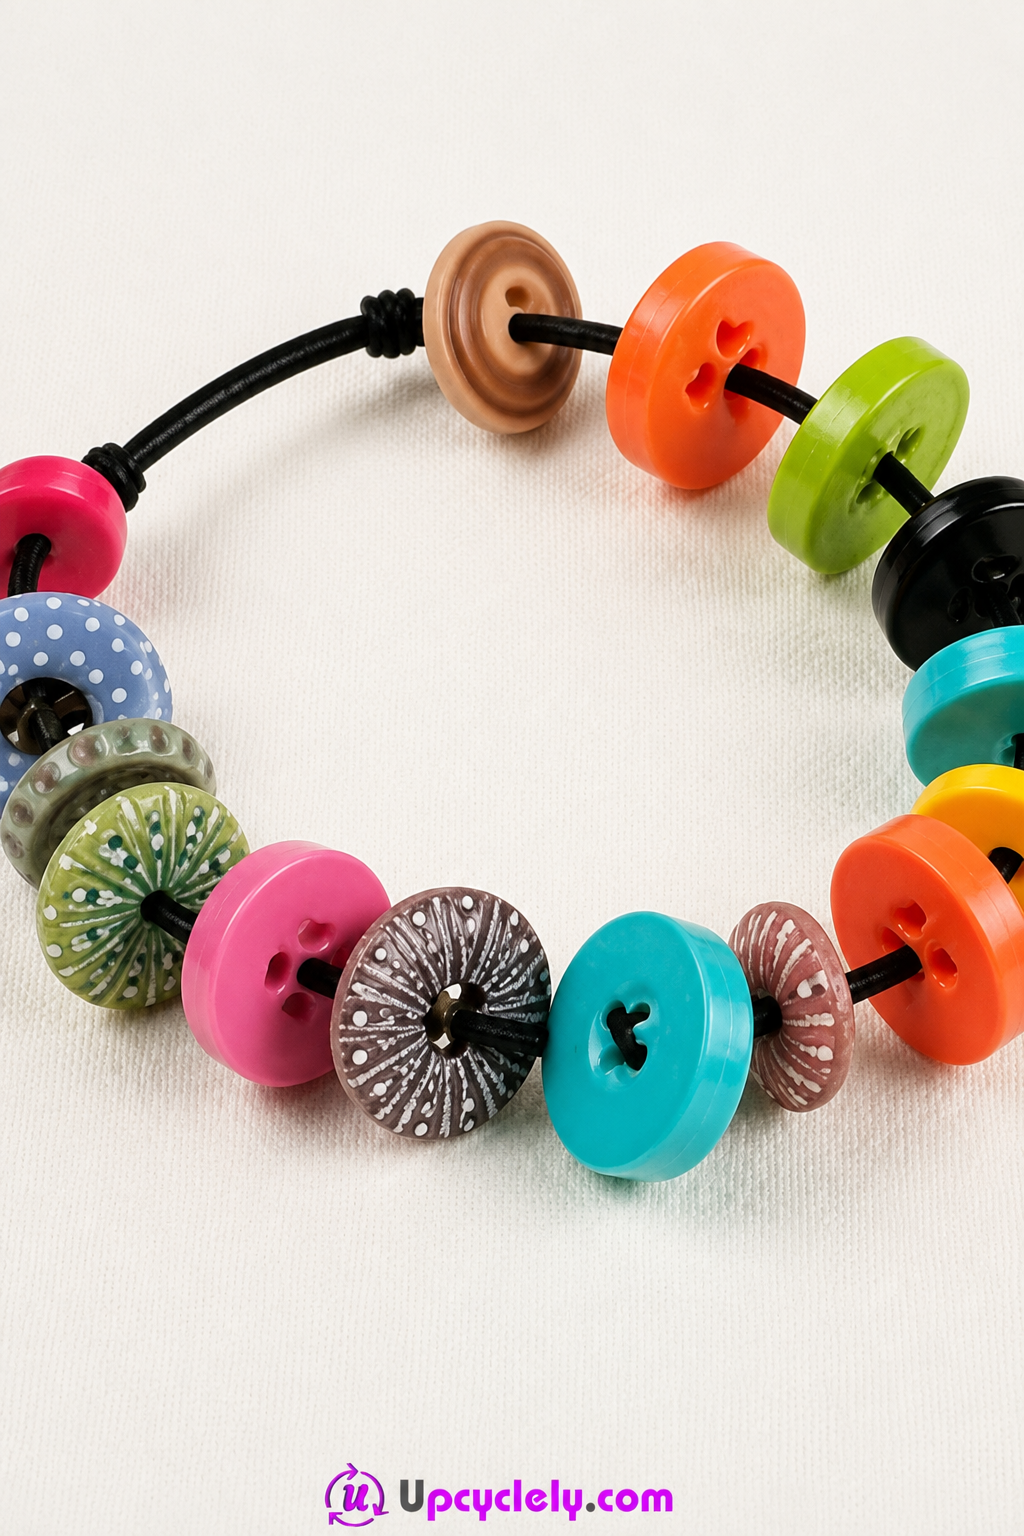
A button bracelet turns light, smooth buttons into a flexible accessory that can be threaded, stitched, or linked together. Two-hole and four-hole buttons create different rhythms, and the design can range from a simple single row to overlapping pieces that resemble scales.
Comfort is more important than filling every space. Heavy metal buttons, rough backs, or large shanks may press into the wrist. I would test the bracelet during construction and keep the closure easy to operate. Jewellery made with small parts is not suitable for anyone likely to mouth, pull apart, or swallow the components.
Materials Needed
- Stretchy elastic cord (such as jewelry-making cord)
- Assorted buttons in colors and designs you love
- Scissors
- Tape or a clip to hold the string end
Steps
- Measure and Cut the Cord
Wrap the elastic cord around your wrist to measure the length you need, leaving an extra two inches. Cut it and secure one end using tape or a clip to keep buttons from sliding off. - Choose Your Buttons
Pick a variety of buttons that complement each other. Use a mix of plain and patterned ones for visual interest. Ensure each button has holes large enough for your cord to pass through. - Thread the Buttons
Start threading buttons onto the elastic cord. Slide them through their holes until they sit snugly next to each other. Alternate colors and shapes as you go for a fun pattern. - Secure the Ends
Once the bracelet is full, tie a firm knot at the end of the cord. Pull tightly to ensure the buttons don’t shift. Trim excess elastic, leaving just a short tail.
Pro Tip
Double up the cord for extra durability and less chance of breakage, especially if you plan to wear the bracelet often.
The part I would check most carefully is the underside. A bracelet may look balanced from above while one raised shank or rough knot makes it uncomfortable within minutes.
Variation: Use small matching shirt buttons for a narrow bracelet, attach buttons to a reused fabric cuff, or combine only three statement buttons with braided cord.
Button Brooch
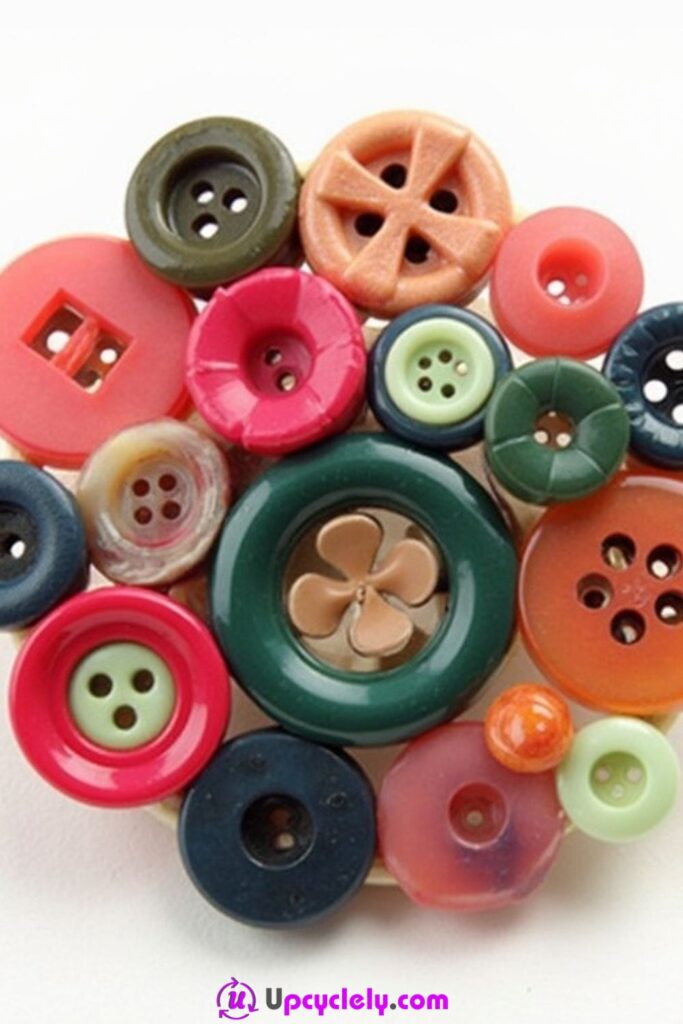
A cluster of buttons can become a small brooch when it is supported by a firm backing and a secure pin finding. Layered circles naturally form flowers, sunbursts, or abstract shapes, while one unusual vintage button can serve as the centre without needing many additional materials.
The backing should carry the weight rather than relying on button edges alone. Felt, firm fabric, leather offcuts, or a lightweight rigid disc may work depending on the design. The pin must sit high enough for balance and close fully so it does not open against clothing.
Materials Needed
- Selection of small and medium-sized buttons
- A brooch pin
- Strong craft glue
- A cardboard disc slightly smaller than your desired brooch size
- Paint or fabric (optional, for covering the cardboard base)
Steps
- Create a Base
If desired, paint or cover your cardboard disc to match your button theme. This will be the base of your brooch. - Arrange Buttons
Lay the buttons out on the disc without glue to determine the design. Place a standout button in the center, and arrange smaller ones around it to make a flower-like pattern. - Glue Buttons to Base
Starting from the center, glue each button to the cardboard base. Press down gently to secure them in place. Allow everything to dry completely. - Attach the Brooch Pin
Flip the brooch over and carefully attach the pin with glue. Place it near the middle of the back for balance. Once dry, your brooch is ready to wear!
Pro Tip
Experiment with unique buttons, like vintage or flower-shaped ones, for a one-of-a-kind accessory.
I’d rather make a slightly smaller brooch that sits neatly than a large cluster that tips forward. Button weight builds quickly, even when each individual piece feels light.
Variation: Create a monochrome flower, use one fabric-covered button on an embroidered felt leaf, or mount the cluster on a removable scarf clip instead of a pin.
Button Christmas Ornaments
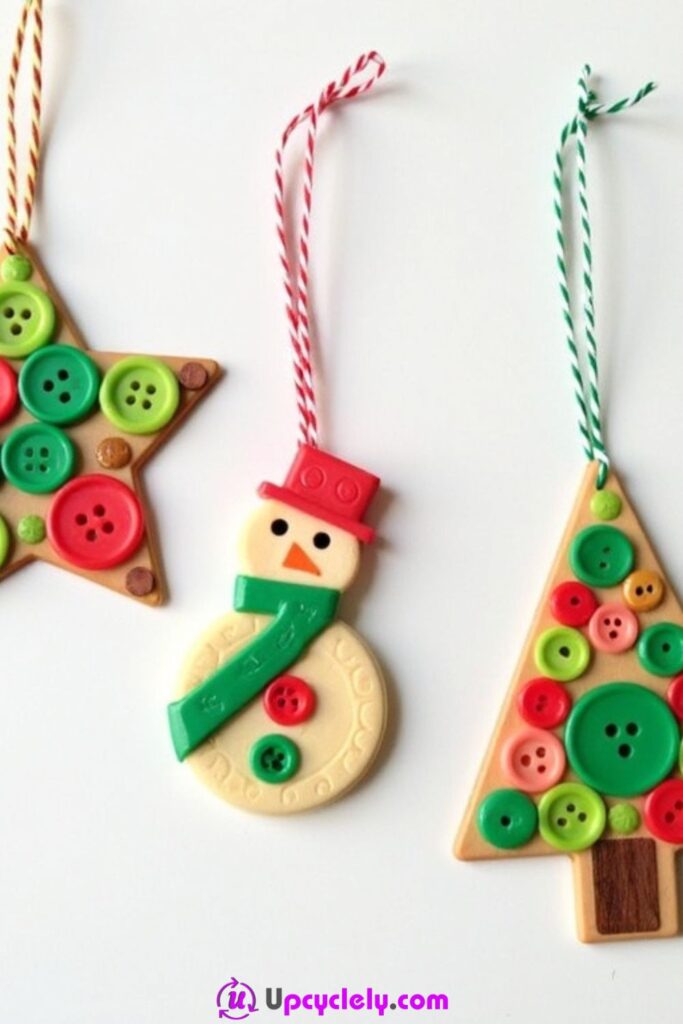
Buttons can decorate flat wooden shapes, reused card, fabric circles, or small twig frames to make lightweight seasonal ornaments. Green stacks suggest trees, white buttons resemble snow, and red or metallic pieces create simple festive accents without needing a complicated pattern.
An ornament must remain secure while hanging overhead or near busy walkways. Keep small detachable pieces away from children and pets, use a reliable hanging loop, and avoid placing paper, fabric, glue, or plastic buttons close to candles, heaters, or hot decorative bulbs.
Materials Needed
- Wooden ornament bases (star, tree, or snowman shapes)
- Red, green, and brown buttons
- Twine or decorative string
- Craft glue
- Acrylic paint (optional)
Steps
- Prepare the Ornament Base
Paint the wooden shapes to act as a background (such as white for the snowman). Allow the paint to dry before adding buttons. - Sort Buttons by Shape and Size
Group your green buttons for the tree, red ones for accents, and mix brown buttons for detailing the star or snowman features. - Decorate with Buttons
Apply glue to the wooden base in small sections. Press buttons into place in a random or patterned arrangement. Use the buttons to mimic ornaments or facial features for the snowman. - Attach Twine for Hanging
Once dry, thread a piece of twine through the ornament’s hole and tie it securely in a loop. Your ornament is now ready to hang!
Pro Tip
Add small sparkly gems or glitter alongside the buttons for an extra festive touch that catches the light beautifully.
The hanging loop deserves as much attention as the front. A lovely ornament with a weak loop usually announces the problem by falling at the least convenient moment.
Variation: Make a reusable gift tag, stitch pearl buttons onto an old felted-wool circle, or create small button trees on reclaimed cork.
Button Keychain
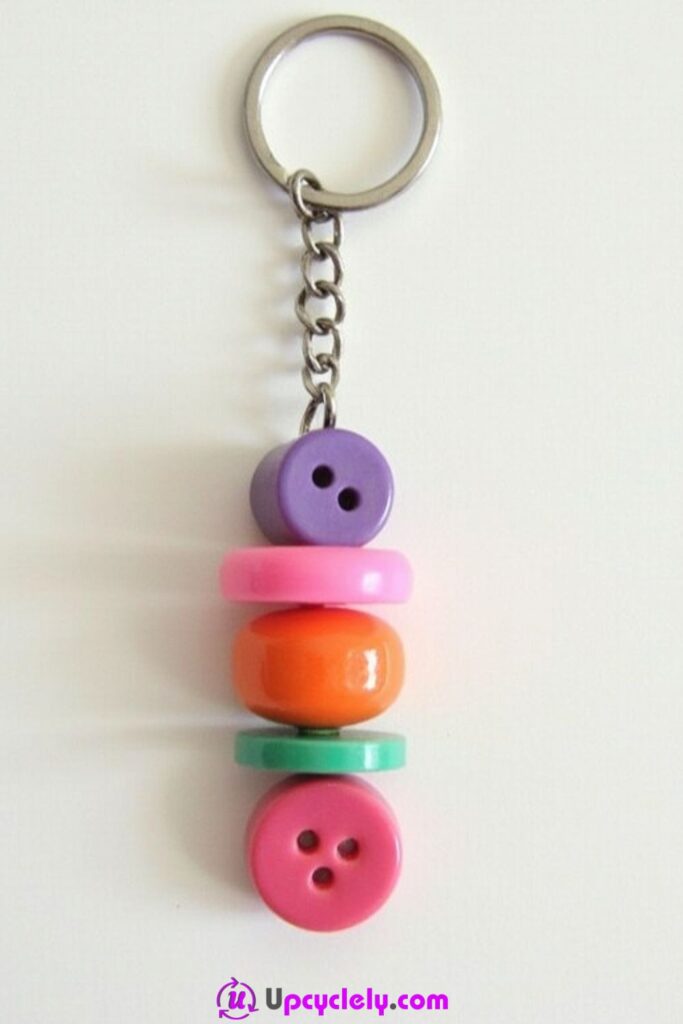
A button keychain can be made from a small stacked cluster, a short threaded strand, or buttons stitched onto a strong fabric tab. It is a useful way to reuse a few durable pieces rather than an entire collection, and the colours make keys easier to identify inside a bag.
Keys experience constant pulling and abrasion, so the connector matters more than decorative glue. Thread, wire, jump rings, or a sewn tab should carry the load. Avoid brittle, sharp, or sentimental buttons that could be damaged by repeated contact with metal keys.
Materials Needed:
- A metallic keyring with a short chain
- 5-6 colorful buttons in different sizes and colors
- Strong craft glue or needle and thread
- Small beads (optional)
- Thin jewelry wire or string
Steps to Create:
- Select and Plan
I begin by picking out my buttons. I like to choose ones in contrasting colors and sizes to create a layered effect. Plan their order in a stack that looks visually appealing. - Stack and Secure
Use craft glue to secure the buttons in a stack. Place the largest button at the bottom and build upwards. If you prefer a more durable craft, thread the buttons through a thin jewelry wire, looping at the bottom to hold them in place. - Attach Wire or String
Once my button stack is ready, I thread the top of my wire or string through the chain of the keyring, securing it tightly. You can twist the wire or knot the string to make sure it doesn’t come undone. - Finishing Touches
Add small beads or charms between the buttons for extra flair. Cut any excess wire or string, and your keychain is ready!
Pro Tip:
For a polished and professional look, use metallic or glittery buttons as accents in your stack.
A keychain is one place where I would choose strength over extra decoration. Three well-connected buttons are more useful than a long cluster that tangles with every key in the ring.
Variation: Stitch one large button onto a reclaimed denim loop, create colour-coded keychains for different doors, or add reflective ribbon for easier visibility in a bag.
Button Earrings
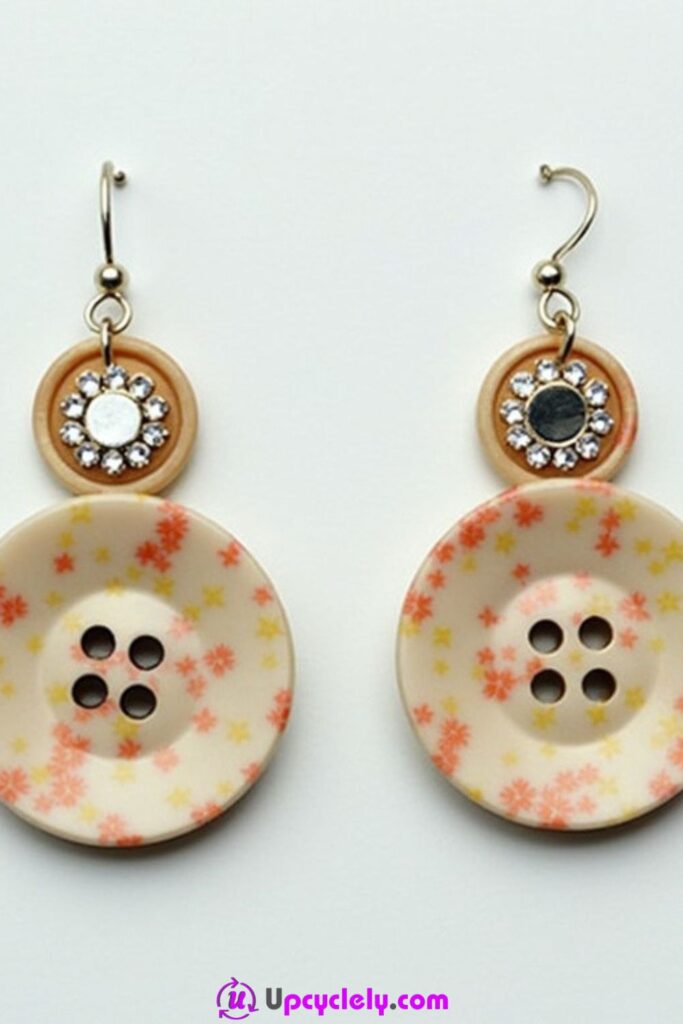
Matched buttons can become earrings when their weight, backs, and attachment points suit comfortable wear. Flat buttons work for simple studs or drops, while shank buttons can connect naturally to jump rings. The design can remain minimal or include one small bead beneath each button.
Only clean jewellery findings intended for wear should pass through the ear. Unknown metal buttons or findings may irritate sensitive skin, and heavy buttons can pull uncomfortably. I would keep the decorative button separate from the part that enters the piercing and test the finished pair for balance before extended wear.
Materials Needed:
- Two earring hooks
- Two large buttons with pretty patterns
- Small rhinestones or beads
- Strong adhesive or glue
- Jewelry pliers
Steps to Create:
- Choose Your Focal Buttons
I pick two large, beautiful buttons with intricate patterns or colors. These will be the focal piece of my earrings. - Decorate the Buttons
Add small rhinestones, beads, or embellishments to the buttons using adhesive to make them look stylish and eye-catching. It’s important to wait for the glue to dry completely before moving on. - Attach Hooks
Using jewelry pliers, attach a small jump ring to the top of each button. Then, connect the jump ring to the earring hooks. Ensure everything is secure to avoid any mishaps. - Balance and Test
Hold up the earrings to check their balance and appearance. Adjust the position of decorations if needed, then give them a final wipe to remove adhesive smudges.
Pro Tip:
For a more cohesive design, match the button color to the metal tone of your earring hooks.
Matching colour is less important than matching weight. A coordinated pair can use different buttons, but one earring should not pull noticeably more than the other.
Variation: Make clip-on earrings, use tiny fabric-covered buttons as studs, or create asymmetrical drops with the same colour palette and equal finished weight.
Button Flowers
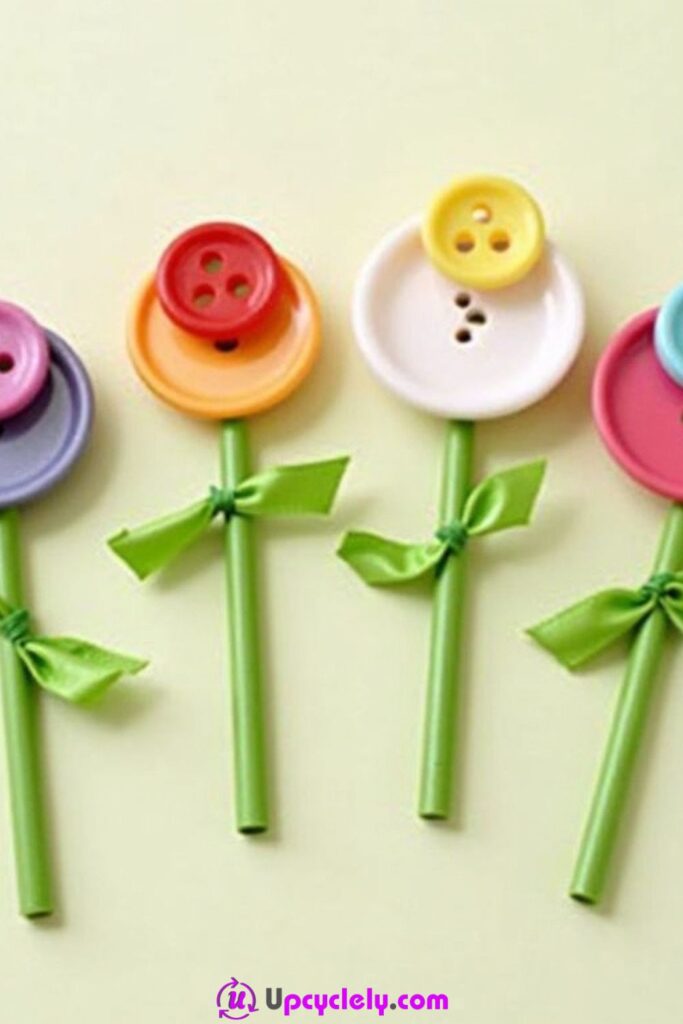
Layered buttons form cheerful flower heads when they are attached to wire, reused straws, twigs, or narrow fabric stems. The ready-made circles make the project quick to recognise, while different hole patterns and finishes add detail without requiring painted petals.
The stem connection must be enclosed so sharp wire cannot remain exposed. Decorative button flowers should also be kept away from very young children and pets because the small pieces can detach. For a long-lasting indoor bouquet, use dry display materials rather than placing ordinary craft components in water.
Materials Needed:
- Large and small colorful buttons
- Green straws or floral wire
- Thin green ribbon
- Hot glue gun or craft adhesive
Steps to Create:
- Layer Your Flowers
Start by stacking a smaller button on top of a larger one to create the flower’s center and petals. Glue them together firmly. - Create Stems
Cut the straws to your preferred stem length or use floral wire if you want flexibility. Attach the stems to the back of the stacked buttons with a hot glue gun. - Add Leaf Ribbons
Tie a green ribbon around each stem to mimic leaves. Secure the knot close to the button base and trim the edges for neatness. - Arrange and Display
Gather the flowers together in a vase or tie them into a bouquet. Position them on your table or hang them as wall decor.
Pro Tip:
To make the flowers more lifelike, use textured buttons or mix matte and glossy finishes for a unique feel.
I especially like button flowers when each head has its own small colour story. A bouquet feels more collected and less chaotic when every flower does not try to contain the entire button box.
Variation: Sew flowers onto a fabric wall hanging, create single-stem gift toppers, or use wooden skewers only after safely blunting and covering the exposed points.
Button Garland
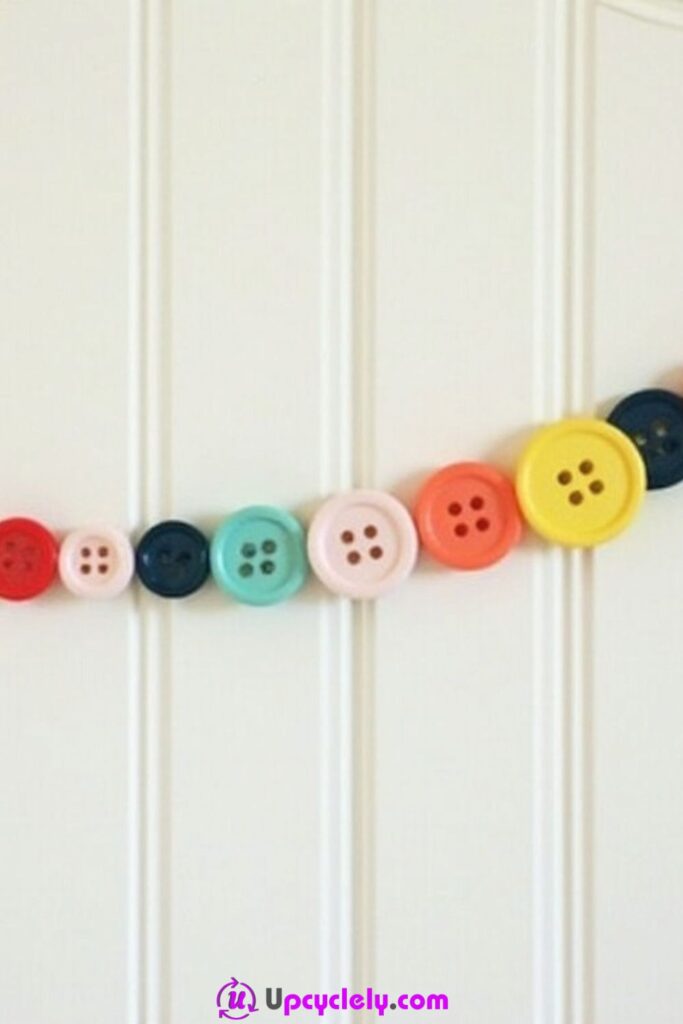
A button garland uses the holes already built into the material, turning assorted pieces into a hanging line for a shelf, window, craft room, or seasonal display. Closely spaced buttons create a dense strand, while knots between pieces produce a lighter rhythm and help stop the entire row sliding together.
The cord must suit the button holes and the hanging location. Heavy buttons can stretch weak thread, and long loose loops can create entanglement risks around children or pets. Keep garlands decorative, securely anchored, and away from candles, heaters, and moving fan blades.
Materials Needed:
- A variety of colorful buttons
- Thick thread or thin twine
- Needle
- Scissors
Steps to Create:
- Plan the Design
I lay out my buttons in a rough sequence on the table. This helps me visualize how the garland will look once strung together. - Thread the Needle
Thread a large embroidery needle with twine. Make sure the twine’s length matches the desired size of your garland, with extra for knots. - String the Buttons
Carefully thread buttons onto the twine, alternating colors, shapes, and sizes. I like to use a mix of large and small buttons to add dimension. Knot the twine after each button to keep them spaced evenly. - Secure and Finish
Once all the buttons are in place, tie secure knots at both ends of the twine. Cut off any excess and hang your garland where it can shine.
Pro Tip:
Use buttons with shiny or metallic finishes to make your garland pop, especially when hung under lights.
The empty cord between buttons is part of the design. I would not crowd every section, especially when the buttons are large or strongly patterned.
Variation: Make a short seasonal swag, alternate buttons with felt leaves, or use one neutral colour family for a subtle shelf edge.
Button Hair Clips
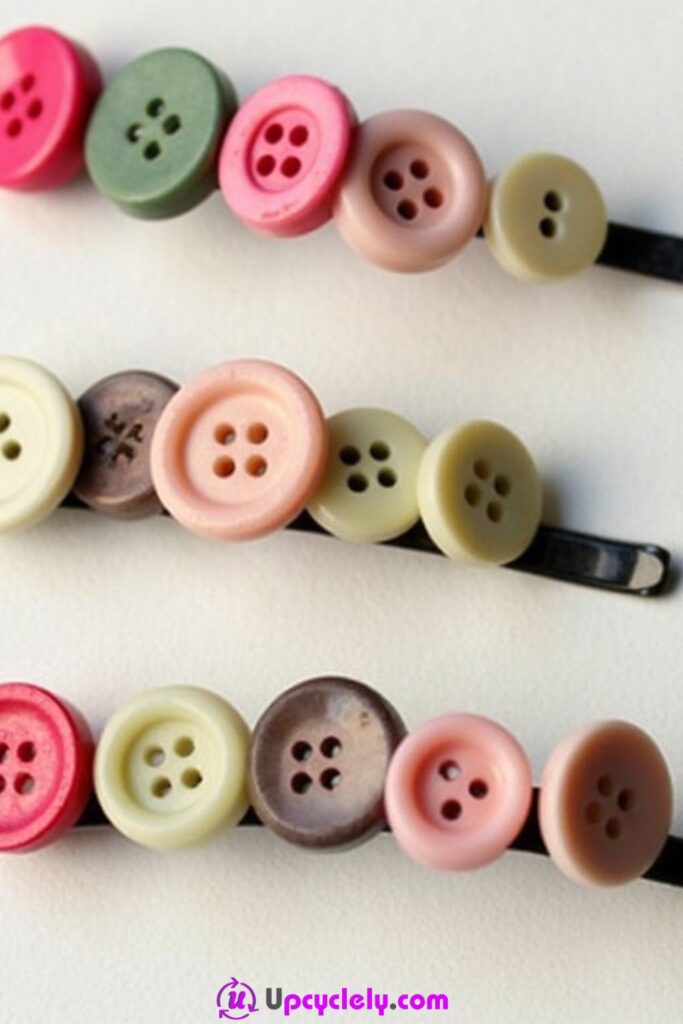
Plain hair clips can be refreshed with one focal button or a small layered arrangement. Flat-backed clips, snap clips with attachment holes, and fabric-covered barrettes each require a different method, so the hardware should be examined before choosing the buttons.
The finished decoration must not expose rough glue, sharp wire, or a button edge that catches hair. Heavy clusters can make a clip slide out, while decorations placed over the hinge can stop it opening. I would keep the first pair simple and test it gently before wearing it outside.
Materials Needed:
- Plain hair clips
- A selection of buttons in soft, pastel colors
- Strong craft glue or needle and thread
- Small gems or beads (optional)
Steps to Create:
- Choose Buttons
Pick buttons in complementary pastel shades to match the style of the hair clips. I aim for a mix of sizes but keep the palette harmonious. - Prepare Hair Clips
Clean the surface of the clips to ensure the glue sticks well. For a sewn approach, use clips with holes or fabric that you can pass needles through. - Attach Buttons
Securely attach the buttons to the clips using glue or by sewing them. Place the largest button first, then layer smaller ones if you prefer a stacked look. Allow the adhesive to dry completely before using. - Add Accents
To elevate the design, add small gems or beads between the buttons. These accents create sparkle and give the clips an extra decorative touch.
Pro Tip:
To make a cohesive set, design all the clips with a similar theme or color palette.
A single striking button often works better than a tall stack. Hair clips need to stay light and smooth, and the hardware already provides plenty of structure.
Variation: Make a coordinated pair with different buttons in the same colour, stitch a button onto a fabric bow, or decorate a wide comb only where the teeth remain fully usable.
Button Picture Frame
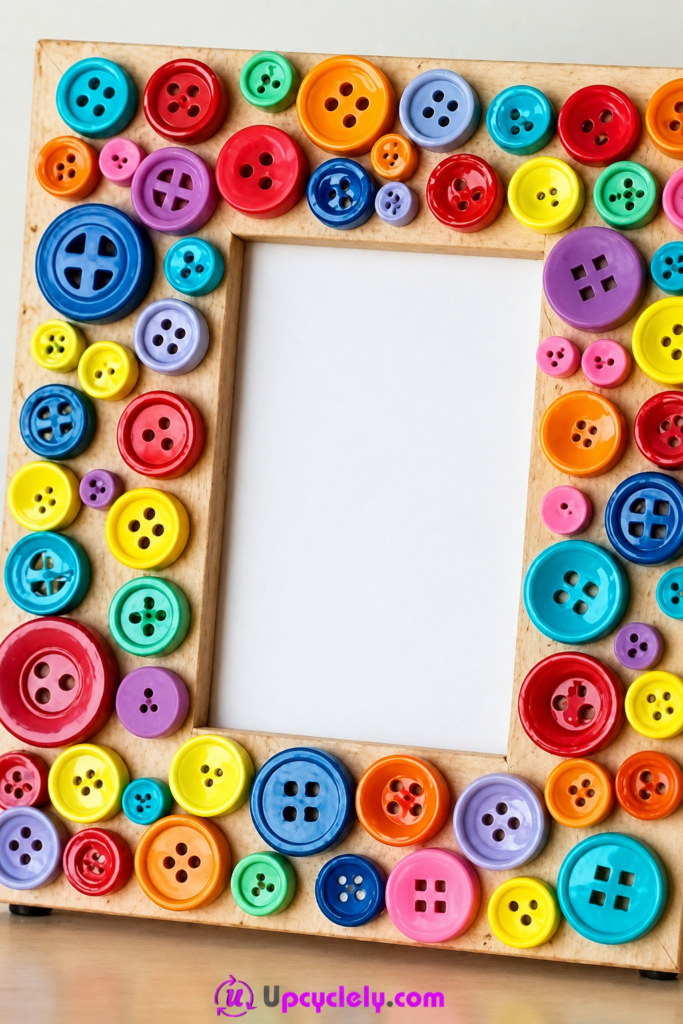
A tired picture frame can be refreshed with buttons arranged along its border. The project suits frames with scratched finishes or plain profiles, and the button layer can either cover the full face or concentrate at the corners to leave more of the original material visible.
The frame still needs to open, stand, or hang safely. Remove the glass and photograph before decorating, keep hardware and tabs accessible, and avoid adding so much weight that a lightweight stand or wall hook becomes unreliable.
Materials Needed:
- A plain photo frame (wood or plastic)
- Variety of colorful buttons in different sizes
- Hot glue gun and glue sticks
- Tweezers (optional for precise placement)
Steps to Create:
- Prepare Your Frame
I start by cleaning the surface of the photo frame to ensure the glue sticks easily. If the frame has removable glass, I take it out to avoid accidentally getting glue on it. - Plan the Button Layout
Next, I arrange the buttons around the edges of the frame without gluing them yet. This helps me experiment with the colors and sizes to find the perfect arrangement. - Glue the Buttons
Once satisfied with my layout, I use a hot glue gun to attach the buttons, starting with the larger ones at the corners and building out with the smaller buttons. I quickly press each button in place before the glue sets. - Add Final Touches
For gaps or empty spaces, I add smaller buttons for a finished look. After the glue dries, I reassemble the frame and insert a photo.
Pro Tip:
For a cohesive design, stick to a color theme or use buttons with similar finishes, such as glossy or matte.
I would leave a narrow clean line around the photograph opening. That small pause keeps the buttons from visually crowding the image they are meant to frame.
Variation: Use pearl buttons around a wedding photograph, cluster mixed buttons at two opposite corners, or attach buttons to a removable fabric frame wrap.
Button Love Sign
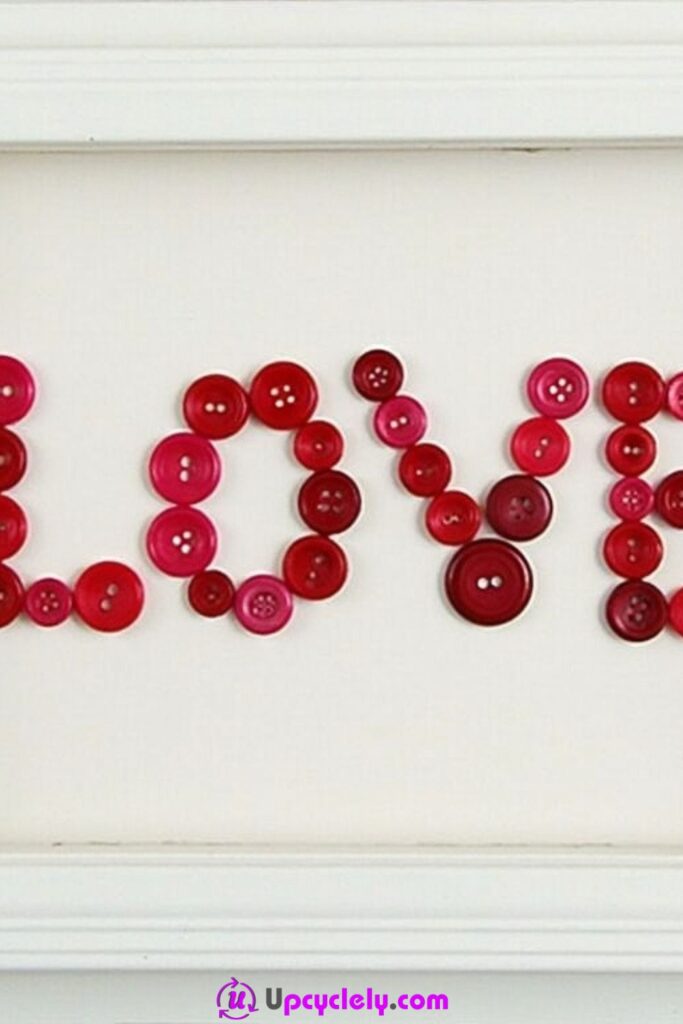
Buttons can fill the letters of a word such as LOVE on canvas, reclaimed wood, or sturdy card. The rounded shapes soften bold lettering, and a restricted palette helps the text remain readable even when button sizes and finishes vary.
Large letter projects benefit from a clear outline and a strong base. If the word is intended for a wedding, nursery, or seasonal display, the colours can be adapted without changing the method. Keep button coverage inside the main letter shapes so the message does not disappear into a textured block.
Materials Needed:
- Blank canvas or wooden board
- Buttons in red and pink shades
- Pencil
- Strong craft glue
Steps to Create:
- Sketch the Letters
I use a pencil to lightly sketch the word “LOVE” in large, bold letters on the canvas or board. The letters should be big enough to fit multiple buttons inside them. - Sort Your Buttons
I sort the red and pink buttons by size. Large buttons can form the base while smaller ones can fill in gaps or form details. - Glue the Buttons on Canvas
Starting with the letter “L,” I glue buttons according to the sketch. I carefully overlap some buttons and make sure every inch of the letters is covered. - Refine the Design
I step back after each letter to adjust spacing or add smaller buttons where needed, ensuring a neat and full appearance.
Pro Tip:
For added dimension, layer a second row of buttons over gaps or use glitter buttons as accents.
Readable spacing matters more than total coverage. I don’t think every gap inside a letter needs another button if the word already reads clearly from across the room.
Variation: Spell a name or short initial, create a heart silhouette instead of text, or use neutral buttons over a bright reclaimed-wood background.
Button Magnets
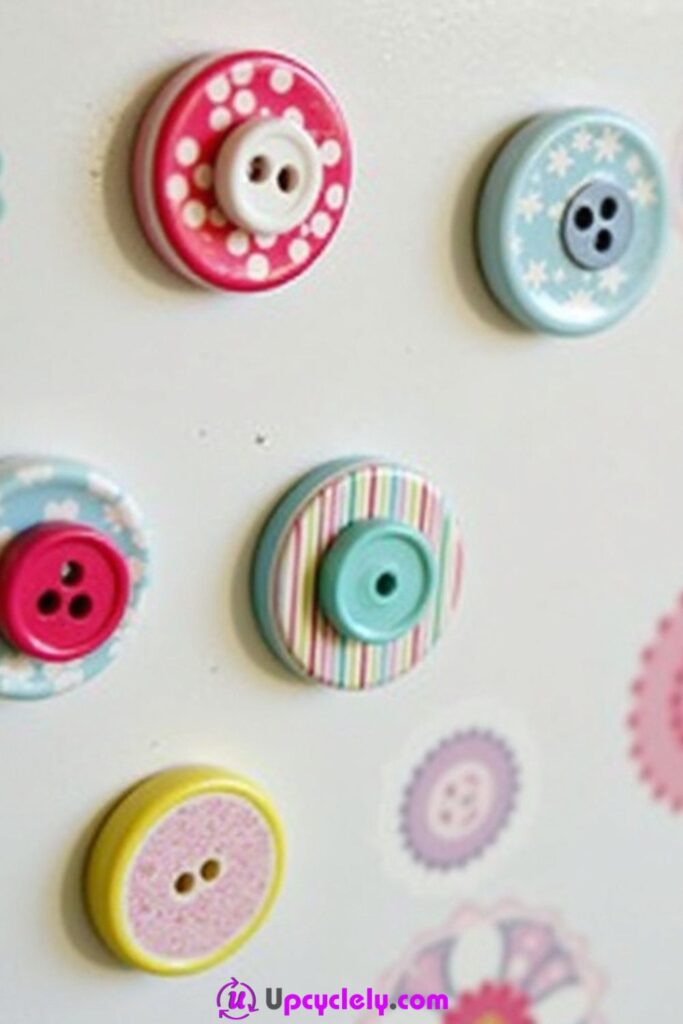
A strong flat magnet can turn a button into a small refrigerator or notice-board accessory. One decorative button creates a clean result, while layered buttons can form flowers or colour-coded sets for different papers and reminders.
Magnets require particular care because loose or swallowed magnets can cause severe harm. Keep all components and finished magnets away from young children and pets, use only sound magnets without chips, and test the bond before placing the craft where it could fall unnoticed.
Materials Needed:
- Button-shaped flat magnets (or plain magnets and buttons)
- Colorful buttons
- Strong adhesive
- Optional paints and rhinestones
Steps to Create:
- Prepare the Buttons
I choose vibrant buttons and make sure they are clean and free of dust. If the buttons have a dull finish, I paint or decorate them beforehand and allow them to dry. - Attach the Magnets
I use strong adhesive to glue the flat side of each magnet to the back of a button. If I’m working with pre-decorated magnetic shapes, I ensure the magnets securely hold the decoration in place. - Add Embellishments
Once the glue dries, I embellish the magnets further with small rhinestones or paint designs. This step adds a touch of personality to each piece. - Test the Strength
Finally, I test the magnets on a metal surface to confirm they hold securely and adjust any decorations if needed.
Pro Tip:
Use high-quality magnets for better strength, especially if you plan to use them to hold papers on a refrigerator.
This is one project where a larger button is not automatically better. A light button with a properly matched magnet usually performs more reliably than a heavy layered cluster.
Variation: Create colour-coded planning magnets, use one vintage button on a display-only magnetic board, or attach buttons to reusable magnetic clips rather than directly to loose magnets.
Button Napkin Rings
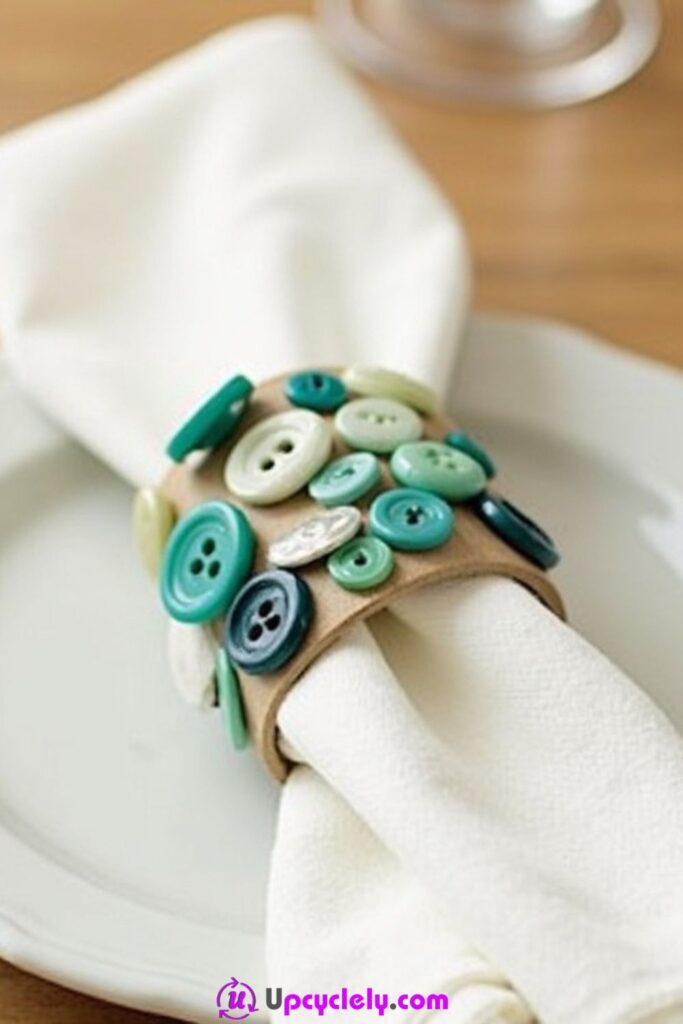
Buttons can decorate reusable napkin rings made from existing rings, stitched fabric bands, or sturdy reclaimed cardboard wrapped in cloth. A small cluster adds colour to a table without requiring a full matching dinner set, and the rings can be adapted for seasons or celebrations.
The decorative materials should stay away from direct food contact and remain easy to wipe or store. Cardboard versions are best kept dry, while washable fabric bands need sewn buttons and materials that genuinely tolerate laundering. Avoid loose small pieces at tables where young children may handle them.
Materials Needed:
- Basic napkin rings or thick strips of sturdy cardboard
- Buttons in green, teal, blue, and white shades
- Hot glue gun
- Fabric strips (optional for a base)
Steps to Create:
- Prepare the Base
If I’m using cardboard, I cut it into rectangular strips and shape them into circular bands, securing the ends with glue. For a classier look, I cover them with fabric first. - Arrange Your Buttons
I lay out the buttons in the color scheme I want, mixing different sizes for an eclectic look. - Glue Buttons Onto the Ring
Once I’m happy with the layout, I glue the buttons onto the rings one by one, overlapping them slightly to create depth and interest. - Set Dry
After fully covering each ring in buttons, I allow them to dry for a few hours before inserting napkins to ensure everything holds perfectly.
Pro Tip:
For a more uniform napkin ring, use buttons that are the same size, but mix glossy and matte finishes.
A napkin ring does not need a full button mosaic. One well-placed cluster usually leaves more room for the napkin and feels easier to handle at the table.
Variation: Stitch one wooden button onto a linen band, make removable button charms that tie around existing rings, or use seasonal colours without changing the reusable base.
Button Paperclip Holder
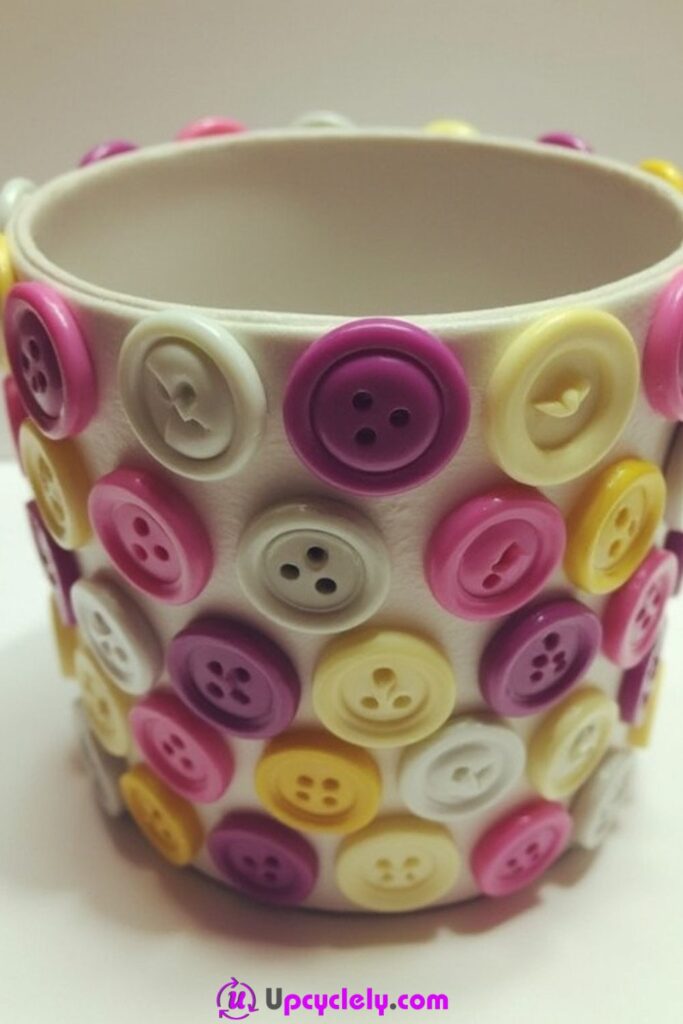
A small tin, jar, or sturdy cardboard tube can become a paperclip holder when buttons are added to the outside. The project is similar to a covered jar but usually smaller, making it a manageable way to use leftover buttons from several other crafts.
The container should have smooth edges and a stable base. A reused metal can needs a safely finished rim, while glass should be free from chips. If the holder will contain metal clips, a button-covered exterior adds grip, but the inner surface should remain clean and free from protruding wire or adhesive.
Materials Needed:
- Cylindrical container (e.g., tin can or small jar)
- Variety of colorful buttons
- Hot glue gun
- Small sheet of felt (optional for inner lining)
Steps to Create:
- Clean and Prep the Container
I clean the container thoroughly and optionally line the inside with felt to give it a softer look and texture. - Sort and Position Buttons
I choose buttons in a colorful mix and play with different arrangements, deciding whether to keep a pattern or make them random. - Glue Buttons to the Surface
Starting from the base, I glue the buttons onto the container in horizontal rows. It’s important to press each button firmly so it adheres well. - Fill Gaps and Finish Edges
I fill any gaps with smaller buttons and ensure the edges are finished cleanly for a polished appearance.
Pro Tip:
For added utility, make separate holders for pens, markers, and paperclips with matching button designs!
The holder works best when the top remains simple. Buttons placed too close to the opening can catch sleeves and make it awkward to reach the smallest clips.
Variation: Create matching holders for pens and clips, decorate only the front of a small tin, or use button motifs on a removable fabric sleeve.
Button Wall Hooks
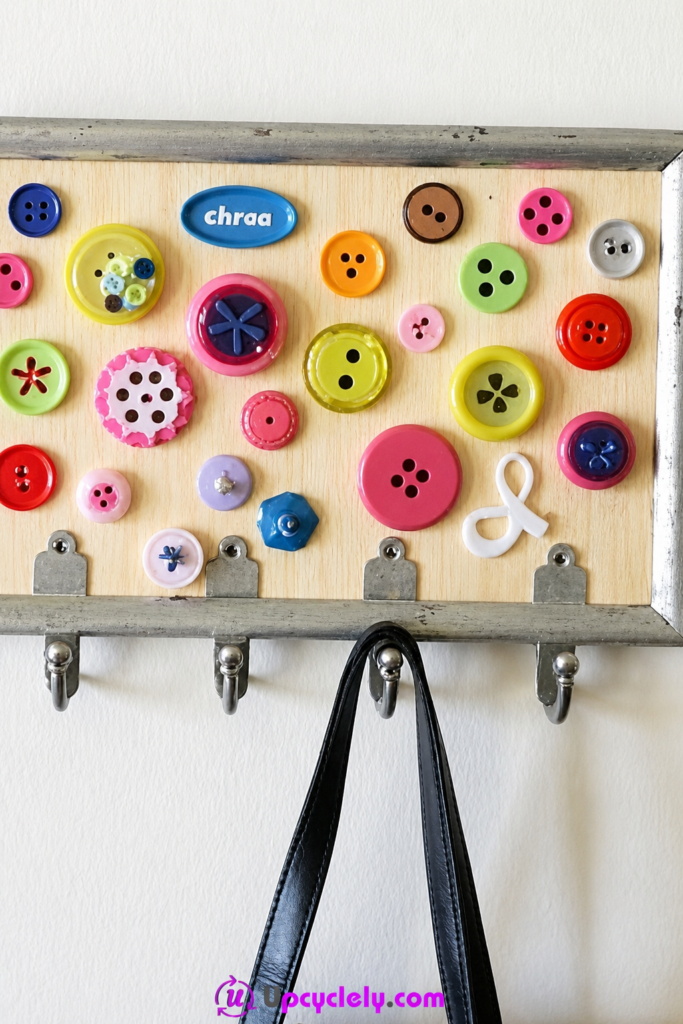
A reclaimed board can combine decorative buttons with practical hooks for keys, light accessories, or small tools. Buttons can form a border, colour bands, or labels above each hook, but the actual load must be carried by screws, hook plates, and appropriate wall fixings.
This project moves beyond decoration into light construction. Inspect reclaimed wood for splits, nails, pests, and weak sections; wear eye protection when drilling; and choose wall anchors for the wall type and intended load. Decorative adhesive must never substitute for structural hardware.
Materials Needed:
- Wooden plank or rectangular frame
- Variety of colorful buttons
- Strong adhesive or hot glue gun
- Metallic hooks for keys or bags
- Nails and a hammer (for wall mounting)
Steps to Create:
- Prepare Your Base
I start with a clean wooden plank or rectangular frame. If you prefer a polished look, paint your base in a complementary color and allow it to dry completely. - Arrange Buttons Creatively
Lay out your buttons on the wooden plank in a random arrangement. I like to mix bright and muted colors for a balanced, eye-catching design. Play with the layout until it feels right. - Glue the Buttons
Secure each button to the plank using a strong adhesive or hot glue. Press them firmly to make sure they stick well. Leave enough space at the bottom to attach the hooks. - Add Hooks
Measure and mark equal distances for where the hooks will go. Drill small pilot holes if necessary, then screw in the hooks tightly. Test their durability by hanging a lightweight item.
Pro Tip:
For extra durability, consider sealing the buttons with a clear spray lacquer to protect them from wear and tear.
The buttons should decorate the storage system, not disguise how it works. I would keep every important screw visible enough to inspect and tighten later.
Variation: Use buttons as labels above key hooks, mount vintage buttons on removable tags, or decorate a freestanding jewellery rail that does not require wall drilling.
Button Shoes
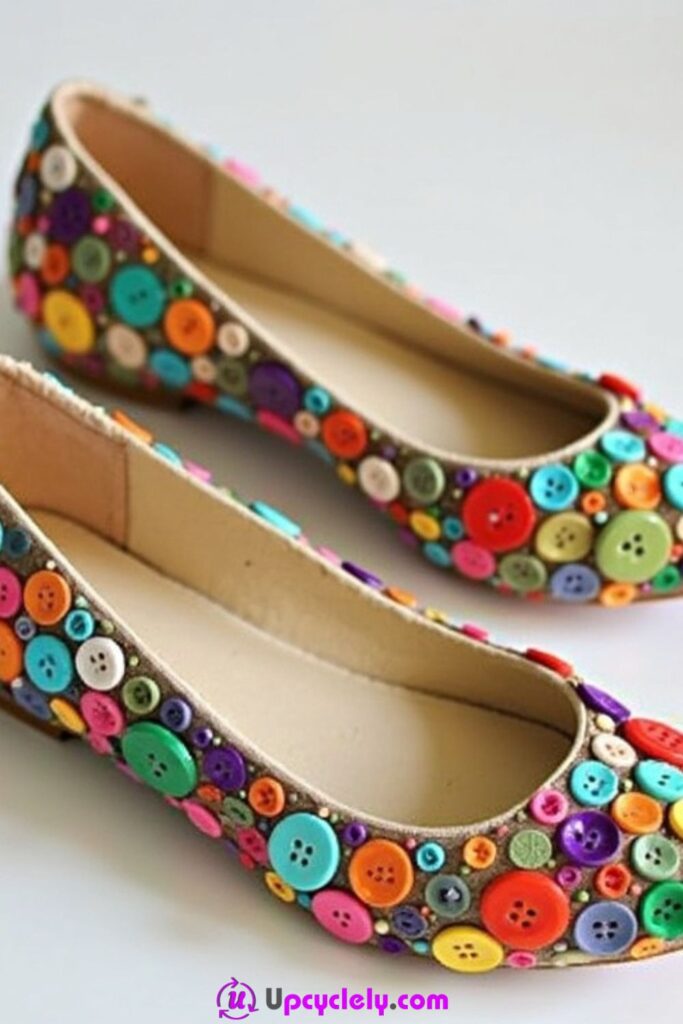
Buttons can refresh plain shoes when they are concentrated on low-stress areas such as the toe box, outer side, or a removable shoe clip. The method works best on clean, flexible uppers and with lightweight flat buttons that will not strike the ground or interfere with walking.
Shoes bend, rub, and encounter moisture, so a decorative bond may fail faster than it would on a frame. Test the material, avoid soles and flex lines, and consider removable clips for valuable or frequently worn shoes. Any sharp or loose button should be repaired before the shoes are used again.
Materials Needed:
- A plain pair of ballet flats
- Buttons of various colors and sizes
- Hot glue gun or fabric glue
- Tweezers for precise placement
Steps to Create:
- Prepare the Shoes
Before gluing anything, I clean the surface of the shoes thoroughly. If the fabric is delicate, I test a small patch with the glue to make sure it doesn’t damage the material. - Design the Layout
Plan how the buttons will be arranged on the shoe. You can cover the entire surface or stick to specific sections like just the toes. I find placing the larger buttons first makes the design process simpler. - Glue the Buttons
Starting at the front of one shoe, I apply glue on the back of each button and press it firmly onto the fabric. Work in small sections to avoid the glue drying out before placement. - Repeat and Finish
Once the first shoe is done, repeat the process on the second shoe. Allow the glue to dry for several hours before wearing or displaying the shoes.
Pro Tip:
Use waterproof adhesive if you plan to wear these shoes outdoors, ensuring the buttons stay secure even in damp conditions.
The toe area can look inviting, but it also receives knocks. I would use fewer, flatter buttons and leave a clean margin around the most exposed edge.
Variation: Create removable button shoe clips, stitch buttons onto the tongue of canvas shoes, or decorate only one side panel for an asymmetrical pair.
Button Tree
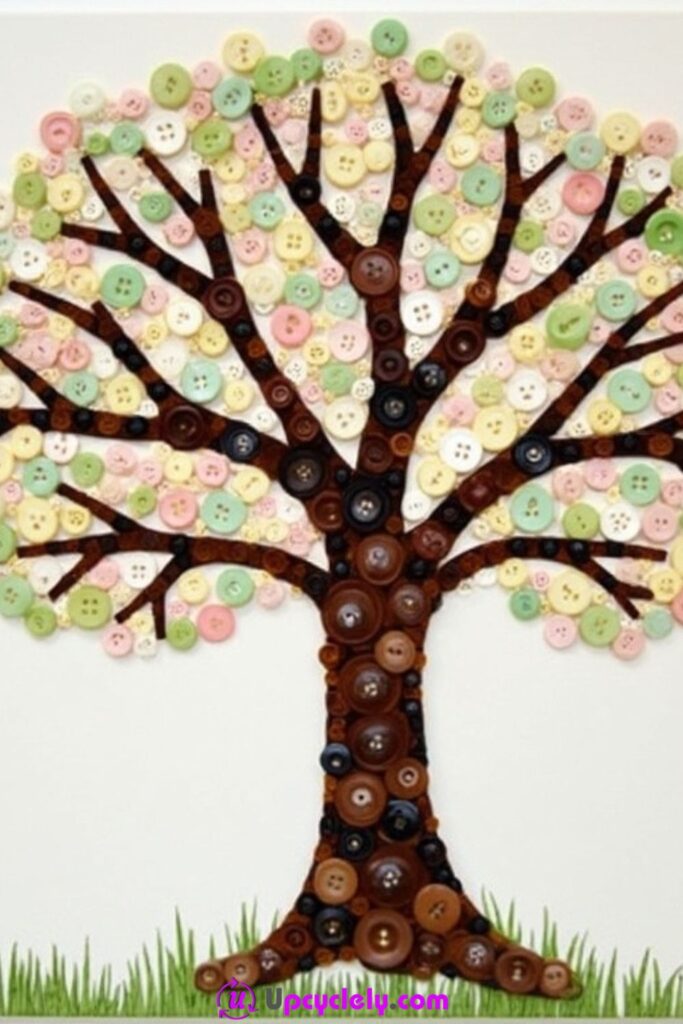
A button tree uses painted, stitched, or paper branches beneath a canopy of round buttons. The design can represent spring blossoms, autumn leaves, a family tree, or a simple abstract landscape, and it works on canvas, reclaimed wood, thick card, or fabric.
The tree reads most clearly when the trunk remains visible and the canopy has an intentional outline. Buttons do not need to form a solid block. I would leave small spaces between clusters and vary sizes near the branch tips so the shape feels lighter toward the edges.
Materials Needed:
- Blank canvas
- Buttons in browns for the trunk and assorted pastels for leaves
- Strong craft glue
- Pencil for sketching
Steps to Create:
- Sketch the Tree
On a blank canvas, I draw a simple outline of a tree with a sturdy trunk and branching arms. Don’t worry about perfection; this will be covered with buttons. - Create the Tree Trunk
Using brown buttons of varying sizes and shades, I glue them along the trunk and branches, filling every part of the outline. - Form the Leaves
For the foliage, I switch to pastel-colored buttons. Starting at the ends of the branches, I glue the buttons densely to mimic fluffy clusters of leaves. - Fill in the Grass
To finish, I add green buttons along the base of the tree to create the appearance of grass. This step pulls the whole piece together.
Pro Tip:
Add an occasional shiny or glitter button among the leaves for a whimsical look!
For me, the strongest button trees still show their branches. If every line disappears beneath the leaves, the canopy can look like a floating circle rather than part of a tree.
Variation: Use white buttons as blossoms, arrange family initials beneath selected leaves, or create a four-panel seasonal set from one mixed button collection.
Button Craft Choices That Can Lead to Loose Pieces, Snags, or Uncomfortable Results
Most button crafts fail for practical reasons rather than visual ones. A weak connector, an unsuitable adhesive, or an overlooked sharp edge can turn an attractive object into something difficult to wear or unsafe to use. The following decisions are especially worth checking before the finished craft is displayed, gifted, worn, or handled regularly.
Using Cracked or Sharp Buttons
A damaged button can split under thread tension or leave a rough edge against skin and fabric. Inspect both sides under good light and remove unstable pieces before they become part of a wearable or frequently handled project.
Choosing Colour Before Structure
A perfect shade is not useful if the shank prevents the button sitting flat or the holes are too small for the cord. Sort by attachment type, weight, and condition first, then refine the palette.
Relying on One Adhesive for Every Surface
Glass, metal, coated plastic, wood, fabric, magnets, and shoes place different demands on a bond. Match the adhesive to both materials and the final movement, moisture, and load instead of assuming one craft glue will do everything.
Testing Wearables Only by Looking at Them
Bracelets, earrings, clips, brooches, and shoes need movement and comfort tests. Check the underside, wear the item briefly at home, and remove any part that pinches, catches hair, irritates skin, or feels unexpectedly heavy.
Leaving Wire, Knots, or Glue Exposed
A neat front can hide a rough back. Cover wire ends, flatten knots, remove hardened adhesive ridges, and add a backing layer where necessary so clothing, skin, pages, and furniture are protected.
Treating Decorative Hardware as Structural
Buttons and adhesive cannot carry the load of wall hooks, frames, or key connectors. Screws, appropriate findings, proper knots, and suitable wall fixings must support the practical function.
Ignoring Small-Part and Magnet Safety
Buttons, beads, pins, and magnets can be hazardous if detached or swallowed. Keep materials and completed objects out of reach where appropriate, supervise children closely, and do not use loose magnets in children’s crafts.
Crowding Every Gap
Dense coverage can add unnecessary weight, block hinges or lids, and make cleaning difficult. Leave functional margins and use smaller buttons only where they improve the design rather than simply filling space.
Washing or Wearing Before the Attachment Is Ready
A surface may feel dry while the bond remains weak. Follow curing instructions, then test gently before washing, filling, hanging, or wearing the object.
Failing to Recheck Frequently Used Crafts
Keychains, jewellery, shoes, clips, magnets, and hooks experience repeated stress. Inspect them periodically and repair loose components before they fall, snag, or become lost.
Frequently Asked Questions
Can beginners make these button crafts?
Yes. A picture frame, simple tree, jar band, bookmark, or single-button hair clip can be started with a small collection and basic tools. Choose one attachment method, test it on scrap material, and keep the first layout simple enough to inspect easily.
Should old buttons be washed before crafting?
Clean buttons when their material and finish can tolerate it, but do not automatically soak unknown vintage, wooden, shell, painted, metal, or fabric-covered pieces. Dust them gently, test one inconspicuous piece, and let every button dry fully before adhesive or thread is added.
Is sewing stronger than glue for buttons?
Sewing is often better for flexible, washable, or wearable fabric because the attachment can move with the material. Adhesive may be appropriate for rigid frames, jars, or magnets when it matches both surfaces. Some projects use both, but neither method is automatically strongest in every situation.
How can I keep button crafts from looking cluttered?
Limit the palette, repeat a few sizes, and leave intentional background space. Place large focal buttons first, then use smaller pieces only where they clarify the outline or balance the composition.
Are button magnets safe for children?
Loose or swallowed magnets can cause serious harm, so button magnets should be kept away from young children and pets. Use secure construction, supervise access, inspect the bond regularly, and avoid presenting loose magnets as children’s craft materials.
Can button-decorated items be washed?
That depends on the weakest material and attachment in the project. Sewn washable buttons on suitable fabric may tolerate gentle care, while decorated jars, frames, cardboard rings, shoes, and adhesive-based crafts may need wiping or dry dusting instead. Follow product instructions and test cautiously.
What should I do with valuable or sentimental buttons?
Avoid permanent adhesive until the button’s history, material, and value are understood. A reversible stitched display, shadow box, removable brooch arrangement, or carefully labelled storage card can keep the button visible without making an irreversible change.
Let the Button Tin Become Useful Again
Button crafts work because the material already contains so much design information. Each piece has a colour, edge, finish, size, and set of holes that can suggest how it wants to be used. A few flat buttons may suit a bracelet, one decorative piece can become a bookmark tab, and a mixed handful can turn a plain frame or jar into something worth keeping in view.
The most successful approach is to choose the future use before deciding how densely to decorate. Wearables need comfort, magnets need secure handling, wall hooks need structural hardware, and jars need stable bases and clear rims. Once those practical limits are respected, the irregularity of a reclaimed button collection becomes an advantage rather than a problem.
Begin with one manageable project and a small working selection instead of emptying the entire tin. Sort the buttons, test the attachment, photograph the layout, and then build the craft in stages. Which forgotten buttons would you most like to turn into something useful first?