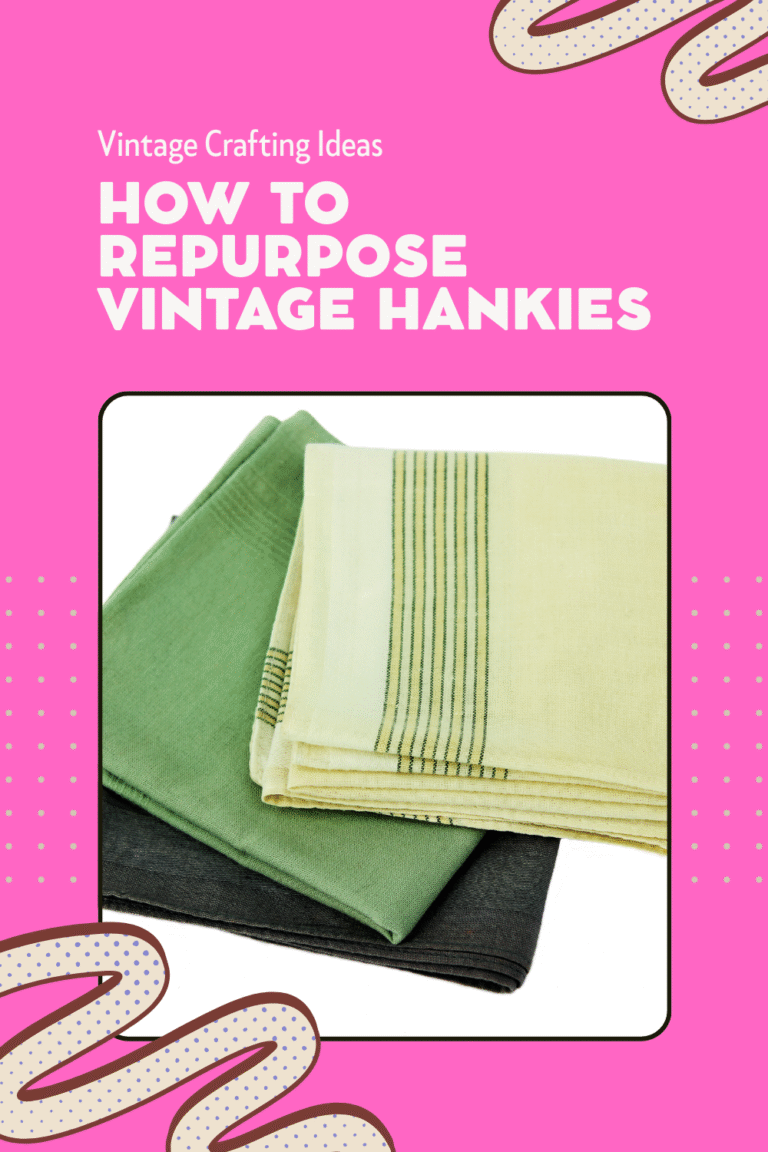
Old handkerchiefs have a habit of staying in drawers long after anyone uses them for their original purpose. The fabric may be soft, the embroidered corner may still be lovely, or the print may remind you of a relative, yet the square itself can feel too delicate for everyday use. I don’t think that means it has to remain folded away forever.
Handkerchiefs are exactly the sort of small textile I like to look at twice. They already have finished edges, varied prints, and a manageable size, which makes them useful for patchwork projects that would feel wasteful to cut from new fabric.
A group of handkerchiefs can become a quilt, while individual pieces or damaged sections can turn into storage, a tissue cover, a bookmark, or even a soft wrap for an ordinary clothes hanger.
The important part is to work with the condition of the fabric rather than forcing every piece into the same project. Strong squares can carry seams and quilting. Fragile embroidered pieces may be better as decorative panels. Once you sort them carefully, repurposing handkerchiefs becomes less about saving scraps and more about giving useful fabric a role that suits it now.
Before You Cut or Stitch
Wash only when the fabric is strong enough to handle it. Vintage cotton can usually be cleaned gently, but weak lace, old embroidery, colour that may run, or fabric with thin worn patches needs more caution.
Test a hidden corner with a damp white cloth, and use a mesh laundry bag or hand washing when machine movement could pull the edges out of shape.
Press the handkerchiefs on a suitable heat setting and measure them after cleaning, not before. Older pieces are rarely identical squares, even when they look similar in a pile. I know it can feel tempting to trim everything immediately, but arranging the full layout first often shows which original borders are worth keeping.
Separate the collection into three groups: strong whole handkerchiefs, smaller usable sections, and fragile decorative pieces. Reinforce thin areas with lightweight interfacing when a project needs structure, and avoid using delicate vintage fabric for anything that will be scrubbed, pulled, or washed constantly.
Sort Handkerchiefs Before Repurposing Them
Before beginning a project, separate any handkerchiefs that may be unsafe or unsuitable for reuse.
Set aside handkerchiefs previously used for:
- Cleaning paint, bleach or strong household chemicals
- Wiping oil, grease or other difficult substances
- Handling bodily fluids or contagious illnesses
- Cleaning areas affected by mould or mildew
- Tasks that have left permanent odours or heavy stains
These handkerchiefs should not be used for scarves, hair accessories, pillow covers, gift wrapping or other projects that may come into contact with skin, food or personal belongings. If the fabric cannot be cleaned safely, dispose of it responsibly instead of repurposing it.
Check Your Handkerchiefs Before Starting
For ordinary, clean handkerchiefs, inspect:
- Stains, discolouration or unpleasant smells
- Small holes, tears and frayed edges
- Loose hems, embroidery, lace or decorative stitching
- The fabric type, such as cotton, linen or silk
- Weak or thinning areas that may tear during sewing
- Whether the colours bleed or fade when washed
- The size and pattern to ensure they suit your chosen project
Wash the handkerchiefs gently and allow them to dry completely. Ironing them before measuring or cutting will also make the fabric easier to handle. Delicate or sentimental handkerchiefs may be better suited to framed art, while stronger cotton pieces can work well for tote bags, coasters or cleaning cloths.
Handy Supplies for Handkerchief Upcycling
The exact materials will depend on your chosen project, but these basic items are useful for most handkerchief crafts:
- Mild detergent and fabric-safe stain remover
- Iron and ironing board
- Fabric scissors
- Measuring tape or ruler
- Sewing pins or fabric clips
- Hand-sewing needles and matching thread
- Sewing machine for larger projects
- Fabric glue for simple no-sew crafts
- Felt or interfacing for extra strength
- Ribbon, elastic or spare fabric for handles and ties
- Buttons, beads, lace or embroidery thread for decoration
- Picture frames, pillow inserts or hanging rods
- Fabric-safe protective coating for handmade coasters
Prepare all your supplies before starting so you can complete the project neatly without damaging the handkerchief’s fabric or design.
Repurpose Vintage Handkerchiefs into a Patchwork Quilt
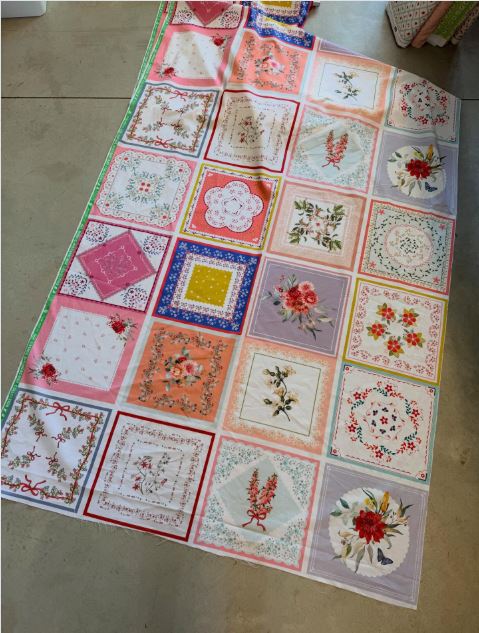
A handkerchief quilt lets a whole collection remain visible instead of cutting the prettiest pieces into tiny fragments. The arrangement uses floral, embroidered, printed, and lace-edged squares in a broad grid, with colour moving gently across the surface rather than repeating in a strict pattern. Narrow joining strips and a simple outer border help handkerchiefs of slightly different sizes sit together.
This type of quilt works best as a lightweight cover, display quilt, or memory piece. Many handkerchiefs are finer than quilting cotton, so a stable backing and careful handling matter more than heavy quilting. Pieces with distinctive corners can be turned so their embroidery faces inward and becomes part of the overall rhythm.
Materials and Tools
· A collection of clean, sound vintage handkerchiefs
· Lightweight cotton backing fabric
· Thin batting or flannel if a padded finish is wanted
· Lightweight fusible interfacing for fragile squares
· Coordinating thread, pins or clips, and sewing machine
· Rotary cutter or fabric scissors, ruler, and cutting mat
· Binding fabric for the outer edge
A Practical Way to Build the Quilt
1. Sort and stabilise the handkerchiefs. Lay every piece flat and check for weak corners, tiny holes, and loose embroidery. Apply lightweight interfacing only where support is needed, keeping it away from lace edges that you want to remain soft.
2. Plan the complete grid. Arrange the strongest and largest handkerchiefs first, then use smaller pieces with narrow fabric borders so the rows reach a consistent size. Move the colours around until no one area feels much heavier or brighter than the rest.
3. Join the handkerchiefs into rows. Pin or clip the edges carefully and use a seam width that does not swallow decorative borders. Press the seams gently, then join the rows while checking that the main grid lines remain reasonably straight.
4. Add the backing and optional padding. Baste the layers together on a flat surface and quilt lightly around the squares, through the joining strips, or along selected printed borders. Dense quilting can make fine fabric look puckered, so I’d keep the stitching supportive rather than busy.
5. Finish the outside edge. Square the quilt only as much as necessary, attach the binding, and add a hanging sleeve if the piece will be displayed on a wall. Then check every decorative corner and reinforce any seam that carries more tension than expected.
One Detail Worth Keeping in Mind
For me, the original borders are part of the story. I would rather add a narrow joining strip than trim away a scalloped edge or embroidered corner just to make every square identical.
Variations and Alternatives
A smaller collection can become a lap quilt, table topper, or framed textile panel. For very delicate pieces, mount the handkerchiefs onto larger cotton squares first and quilt through the stronger foundation.
Turn Handkerchief Scraps into a Patchwork Fabric Basket
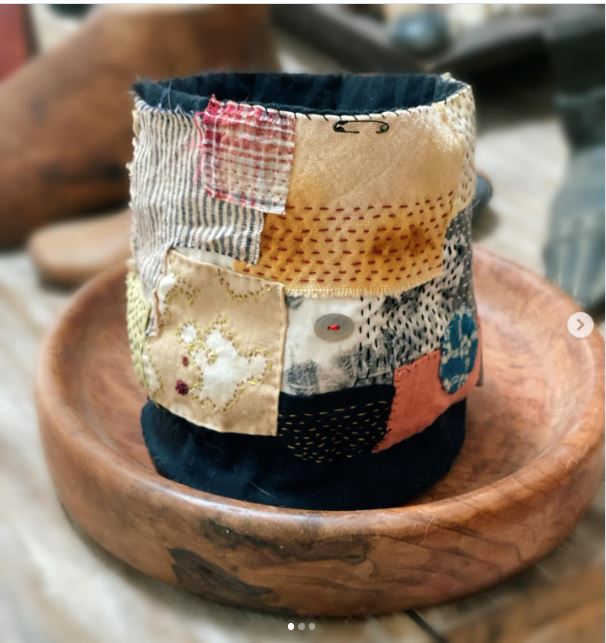
A soft fabric basket is a sensible use for handkerchief sections that are too small or uneven for a larger patchwork layout. The cylindrical shape uses mixed rectangles, visible running stitches, and a dark lining that gives the opening a clean edge. A button and contrasting patches make the irregular surface feel intentional rather than pieced together at random.
Because handkerchief fabric is light, the basket needs a strong inner layer. It can hold thread, fabric clips, small craft supplies, wrapped toiletries, or other lightweight items. I wouldn’t use it for sharp tools or heavy objects unless the lining and base were reinforced accordingly.
Materials and Tools
· Handkerchief scraps and small decorative sections
· Sturdy cotton or canvas for the foundation and lining
· Fusible fleece, batting, or firm interfacing
· Hand-sewing thread or embroidery thread for visible stitches
· Sewing machine, needle, pins or clips, and fabric scissors
· Optional button or small decorative patch
· A circular template for the base
How to Make a Similar Storage Basket
1. Build the patchwork outer panel. Arrange handkerchief sections on a firm cotton foundation, overlapping weak edges slightly or turning them under. Secure the pieces with machine stitching, hand stitching, or a mixture of both, then trim the panel into a neat rectangle.
2. Add structure to the outer fabric. Fuse or baste fleece, batting, or firm interfacing to the wrong side. Quilt through the layers lightly so the handkerchief scraps cannot shift when the basket is filled or folded.
3. Form the cylinder and base. Join the short ends of the outer panel, press the seam, and attach a circular base cut from reinforced fabric. Clip the curved seam carefully, then turn the basket and check that it stands evenly.
4. Sew the lining separately. Use sturdy cotton, leave a turning opening, and join it to the upper edge of the outer basket. Pull the project through the opening, close it neatly, and topstitch around the rim so the lining does not creep upward.
5. Shape and finish the basket. Press the rim, add a button or extra visible stitches if the surface needs one focal detail, and test the base with light contents. Then remove anything that makes the sides collapse or pull out of shape.
One Detail Worth Keeping in Mind
The part I like most is the visible stitching. It gives small, mismatched pieces a reason to sit together and lets you strengthen the fabric without pretending the repairs are invisible.
Variations and Alternatives
Make a lower, wider basket for fabric offcuts or a narrow version for knitting needles. A drawstring top can be added when the basket needs to travel, though the casing should be made from stronger fabric than a fragile handkerchief.
Repurpose Vintage Handkerchiefs into a Floral Tissue-Box Cover
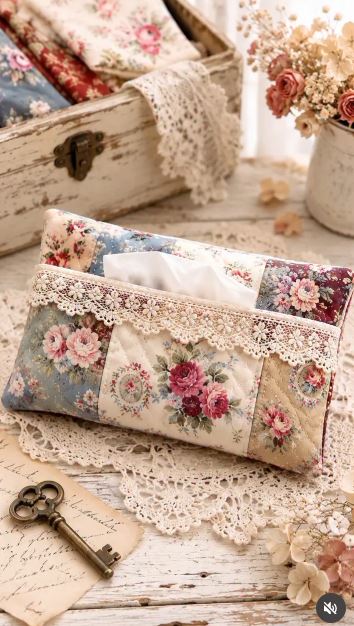
A tissue-box cover suits handkerchiefs because the project needs small panels rather than large uninterrupted lengths of fabric. Floral pieces in blue, cream, pink, and rose tones are joined around a rectangular form, while lace trim softens the opening. The result hides a cardboard box without making tissue access awkward.
This project is decorative, but it still needs to fit properly. A cover that is too tight can tear fine fabric or make the tissue opening bunch up. One that is too loose may slide every time a tissue is pulled, so measuring the actual box before cutting matters.
Materials and Tools
· Vintage handkerchiefs or floral handkerchief sections
· Light cotton lining fabric
· Lightweight interfacing
· Lace trim or narrow fabric binding
· Paper for making a simple box-cover pattern
· Sewing machine, thread, pins, scissors, and ruler
· Optional thin padding for a softer shape
A Practical Sewing Method
1. Measure the tissue box and draft the cover. Record the length, width, height, and top opening, then add sensible seam allowances and a little ease. Make a paper mock-up first so the finished cover will lift on and off without dragging against the cardboard.
2. Plan the floral panels. Place the most decorative handkerchief sections on the front and top, then use quieter fabric at the sides or back. Stabilise thin sections with interfacing and avoid positioning a weak embroidered area directly beside the tissue opening.
3. Join the outer cover. Sew the patchwork pieces into larger panels, then assemble the side seams and top. Create the opening with a faced edge, narrow binding, or neatly turned seam before adding lace so the functional edge remains strong.
4. Make and attach the lining. Sew a matching inner cover from light cotton and join it to the outer layer around the lower edge or opening, depending on the construction. Keep bulky seams away from the corners so the cover sits smoothly over the box.
5. Finish the lower edge and test the fit. Add a narrow hem, binding, or soft trim, then slide the cover over the box and pull several tissues through. If the cover lifts or twists, adjust the opening or add a small amount of hidden grip at the base.
One Detail Worth Keeping in Mind
I know it can feel tempting to use the prettiest flower in the centre of the opening, but that is often where the fabric receives the most pulling. I’d place the best motif nearby and keep the opening itself well reinforced.
Variations and Alternatives
Use one complete handkerchief on the front and plain cotton for the remaining panels. The same method can make a soft cover for a small storage box, provided the fabric is kept away from anything damp or difficult to clean.
Turn Handkerchief Scraps into Quilted Bookmarks
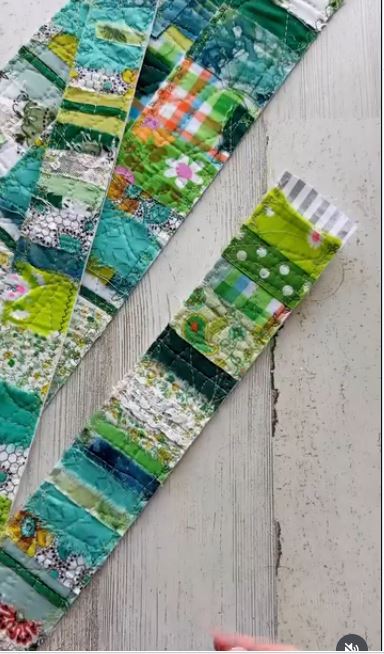
Bookmarks are useful for the smallest handkerchief offcuts, including strips left after squaring larger projects. These narrow patchwork pieces mix florals, checks, stripes, and solid greens, with quilting holding everything onto a firm backing. A short contrasting tab makes the top easier to find between pages.
The finished bookmark should remain thin enough for a book to close comfortably. That means choosing light batting, trimming seam allowances carefully, and avoiding thick buttons or beads. The project is small, but it rewards neat stitching because every edge remains visible.
Materials and Tools
· Tiny handkerchief strips and scraps
· Firm cotton backing fabric
· Very thin batting or lightweight interfacing
· Coordinating thread
· Sewing machine or hand-sewing needle
· Rotary cutter or sharp fabric scissors and ruler
· Optional fabric tab or ribbon loop
How to Sew the Bookmarks
1. Create a longer patchwork strip. Sew small handkerchief pieces together in a random or planned order, pressing each seam as you go. Make the strip wider and longer than the finished bookmark so you can trim it accurately after quilting.
2. Layer the strip with a thin support. Place the patchwork over lightweight batting or interfacing and a backing fabric. Baste the layers, then quilt with straight lines, gentle curves, or stitching that follows the patch shapes.
3. Trim the bookmark to size. Use a ruler and sharp cutter so the sides are straight and the corners are square or softly rounded. Keep the finished width comfortable for a book and remove bulky seam intersections where possible.
4. Finish the edges. Bind the bookmark with narrow fabric strips, use a close zigzag, or turn the edges through a small opening if the layers are thin enough. Add a short fabric tab at the top before closing the final edge.
5. Press and test it inside a book. Make sure no pin, hard knot, or thick decoration remains hidden in the layers. Then check that the pages close flat and the tab is long enough to find without becoming distracting.
One Detail Worth Keeping in Mind
I’d rather make several slim bookmarks than one thick, heavily padded piece. The handkerchief prints provide enough interest without turning the bookmark into a tiny mattress for the book.
Variations and Alternatives
Use a single embroidered corner as the centre of one bookmark, backed with plain cotton. A wider version can become a fabric page marker for a journal, sketchbook, or recipe book.
Repurpose Old Handkerchiefs into Fabric-Wrapped Clothes Hangers
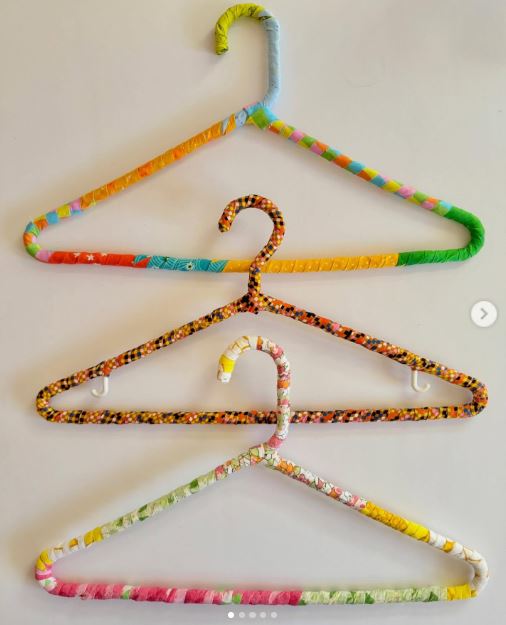
Fabric-wrapped hangers give narrow handkerchief strips a practical purpose without requiring precise patchwork. The wrapping covers the hook and frame with overlapping bands of colour, creating a softer grip for lightweight clothing and a much more cheerful look inside an open wardrobe.
Use sturdy hangers that are already safe and straight. Fabric cannot repair bent wire, cracked plastic, or loose wooden joints. This project also works best with cotton strips that can be pulled firmly without tearing, so save the most fragile embroidered handkerchiefs for gentler uses.
Materials and Tools
· Plain sturdy wire, plastic, or wooden hangers
· Handkerchiefs cut into narrow fabric strips
· Fabric-safe adhesive or small hand stitches
· Fabric scissors
· Clips or pegs to hold strip ends while they set
· Optional thin batting or ribbon for extra padding on the shoulder area
A Simple Wrapping Method
1. Prepare the hangers and strips. Clean the hanger frames and remove rough tape, rust, or loose coatings. Cut the handkerchief fabric into narrow strips, joining short lengths with small diagonal seams if you need a smoother continuous wrap.
2. Secure the first end near the hook base. Use a tiny amount of adhesive or several tight stitches, then begin wrapping with each turn overlapping the previous one. Keep the fabric firm but not so tight that it twists the hanger out of shape.
3. Work around the frame in sections. Smooth the strip over curves and corners, adding a new length where necessary with the join hidden underneath. Then wrap the hook separately if that gives you better control and a cleaner finish.
4. Finish the final end securely. Turn the raw edge under and glue or stitch it on the underside of the hanger. Clip it in place while the adhesive sets, and remove any loose threads that could catch delicate clothing.
5. Test the hanger with a lightweight garment. Check that the surface is smooth, the wrap does not slide, and no adhesive has soaked through into a hard patch. Use reinforced hangers for heavier clothing rather than expecting the fabric to strengthen the frame.
One Detail Worth Keeping in Mind
For me, mixed prints look best when the wrapping changes at natural points, such as the hook base or shoulder corners. There’s no need to hide every join if the colours already feel related.
Variations and Alternatives
Wrap only the shoulder sections to help slippery tops stay in place, or use one complete handkerchief per hanger for a coordinated set. A small fabric bow can cover the final join, provided it does not snag clothing.
Handkerchief Projects That Can Go Wrong Before the First Stitch
Cutting before checking the whole collection
Once an embroidered corner or original rolled hem has been cut away, it cannot be restored. Arrange the full project first, photograph the layout, and cut only the pieces that truly need reshaping.
Using fragile fabric in a high-stress area
Thin vintage cotton may look sound until a seam is pulled or a tissue opening is used repeatedly. Place weak fabric on decorative surfaces, add a stable foundation, and keep sturdy cotton at openings, bases, rims, and hanging points.
Skipping colour-fastness checks
Older dyes can bleed into pale fabric during washing or pressing with steam. Test a hidden area before cleaning, separate doubtful colours, and avoid combining unstable red or blue pieces with valuable white embroidery.
Adding heavy structure to fine handkerchiefs
Thick batting, rigid interfacing, and dense quilting can overwhelm soft fabric. Choose the lightest support that still gives the project enough shape, then let the original texture remain visible.
Forgetting how the finished item will be cleaned
A decorative quilt, basket, or tissue cover will collect dust and may eventually need washing. Use washable backing and thread where possible, and avoid adhesives or trims that cannot tolerate the same care as the handkerchief fabric.
Trying to make every piece match perfectly
Vintage handkerchiefs vary in size, weave, print, and condition. A measured border, shared thread colour, or repeated backing fabric creates order more naturally than trimming every piece until its character disappears.
Frequently Asked Questions
Should vintage handkerchiefs be washed before sewing?
Wash them when the fabric is strong enough and the dye appears stable. Very fragile, embroidered, or lace-edged pieces may need gentle hand cleaning or careful spot cleaning instead of a normal machine cycle.
How can I strengthen a thin handkerchief?
Use lightweight fusible or sew-in interfacing on the back, or mount the handkerchief onto a larger cotton square. The support should be light enough to preserve the original softness while preventing seams from pulling through weak fabric.
Can I sew handkerchiefs without cutting them?
Yes. Whole squares work especially well in quilts, table toppers, curtains, and framed panels. Joining strips can help pieces of different sizes fit together while keeping their original hems and embroidered corners intact.
What can I make with only one handkerchief?
One strong handkerchief can become the front panel of a tissue cover, a small pouch, a framed textile piece, or fabric wrapping for one hanger. A damaged handkerchief may still provide enough usable sections for bookmarks or patchwork details.
Are handkerchief projects suitable for beginners?
The wrapped hanger and simple bookmark are approachable starting points. A quilt or fitted tissue cover needs more measuring and sewing accuracy, but the work can still be divided into manageable stages.
How do I stop handkerchief fabric from puckering?
Use a fine needle, suitable thread tension, and lightweight stabilisation. Avoid pulling the fabric while sewing, press seams gently, and test the stitch on a scrap before working on an embroidered or valuable section.
Can repurposed handkerchief items be machine washed?
That depends on the weakest material in the project. New cotton backing may be washable, but vintage lace, unstable dyes, old embroidery, buttons, and adhesives may require gentle hand care. Plan the cleaning method before choosing the construction materials.
Give Old Handkerchiefs a Useful Place Outside the Drawer
The best way to repurpose handkerchiefs is to let their condition guide the project. Strong whole squares can create a patchwork quilt, smaller pieces can build a basket or tissue cover, and the tiniest strips can still become bookmarks or fabric-wrapped hangers. Nothing has to be forced into a role it cannot handle.
Start with one piece that you are comfortable cutting or stitching, then choose a project that keeps its best detail visible. I’d rather see one carefully made item used for years than a whole collection rushed into something that hides the fabric’s character. Which handkerchief would you rescue first: an embroidered square, a bright floral print, or a small pile of worn but useful scraps?