Vertical blinds are awkward things to store once they come down. The long slats bend around boxes, the little weights disappear, and even a neat bundle seems determined to slide apart the moment you turn your back. Yet those straight, lightweight strips can be more useful than they first appear, especially when the material is still clean and flexible.
I like to look at the shape of an old item before deciding what it could become. A vertical blind slat is already narrow, evenly cut, and easy to repeat. That makes it suitable for dividers, labels, woven surfaces, lightweight frames, and simple garden supports without needing expensive materials.
The important part is identifying what the slats are made from. Fabric vanes, flexible vinyl, and rigid plastic do not cut, bend, or accept glue in the same way.
I don’t think every slat needs saving, either. Keep the pieces that are flat, clean, and strong enough for their new job, then use the offcuts for smaller details instead of forcing damaged material into a project it cannot support.
Check Which Blind Parts Are Safe to Reuse
Lay the blind components out before cutting anything. A quick inspection separates genuinely useful material from brittle slats and damaged hardware that may create problems later.
· Identify whether each vane is fabric, flexible vinyl, or a more rigid plastic. Test one hidden offcut before cutting the full set.
· Reject slats that feel chalky, crack when bent gently, have sharp splits, or carry stubborn mould or greasy residue.
· Wash reusable vanes with a mild method suited to their material, then let them dry flat so trapped moisture does not affect glue or paint.
· Remove chains, weights, clips, and hooks carefully. Keep sound parts together because some may help suspend a memo board or connect lightweight pieces.
· Measure the width and usable length of the slats after damaged ends have been trimmed away.
· Check both sides. One face may be marked from years of sun exposure while the reverse remains suitable for display.
· Keep stiff slats for dividers and labels; reserve flexible strips for weaving or gently curved forms.
· Use eye protection when drilling or cutting rigid plastic, and smooth every sharp edge before the finished project is handled.
Gather Simple Tools for Cutting and Joining the Slats
Most projects need measuring and careful joining rather than specialist equipment. The exact tools depend on how thick the vanes are, so test each method on one spare section first.
· Tape measure, metal ruler, square, pencil, and fine marker
· Strong scissors for thin flexible vanes or a utility knife and cutting mat for rigid material
· Fine saw or snips only when the material requires them and they can be used safely
· Fine abrasive paper or a small file for smoothing cut edges
· Hole punch, awl, or drill with a small suitable bit for connection holes
· Cable ties, split pins, small screws, washers, clips, or strong thread depending on the project
· Adhesive compatible with the vane material, used only where mechanical fixing is unnecessary
· Paint or marker that bonds to the surface after a small test
· Gloves, eye protection, a stable cutting surface, and ventilation when coatings or adhesive are used
Sort Full-Length Slats and Small Offcuts by Use
The longest pieces are not automatically the most valuable. Sorting by size helps you plan efficiently and prevents useful offcuts from being swept away before the smaller projects begin.
· Keep full-length straight vanes for a memo board, screen, or long garden trellis pieces.
· Set medium sections aside for drawer dividers, basket walls, frames, and short cross braces.
· Use narrow strips from flexible vanes for weaving, lacing, or covering the edge of a rigid base.
· Save short rectangular pieces for labels, tags, spacers, and small repair patches.
· Group similar colours and textures when several pieces will sit side by side.
· Mark the original top and bottom when the vane curves slightly, because matching orientation creates a neater surface.
· Store cleaned slats flat beneath light weight until you are ready to use them.
· Plan the project around the material you have rather than buying new plastic simply to make every section identical.
Make a Reconfigurable Memo Board from Full-Length Slats
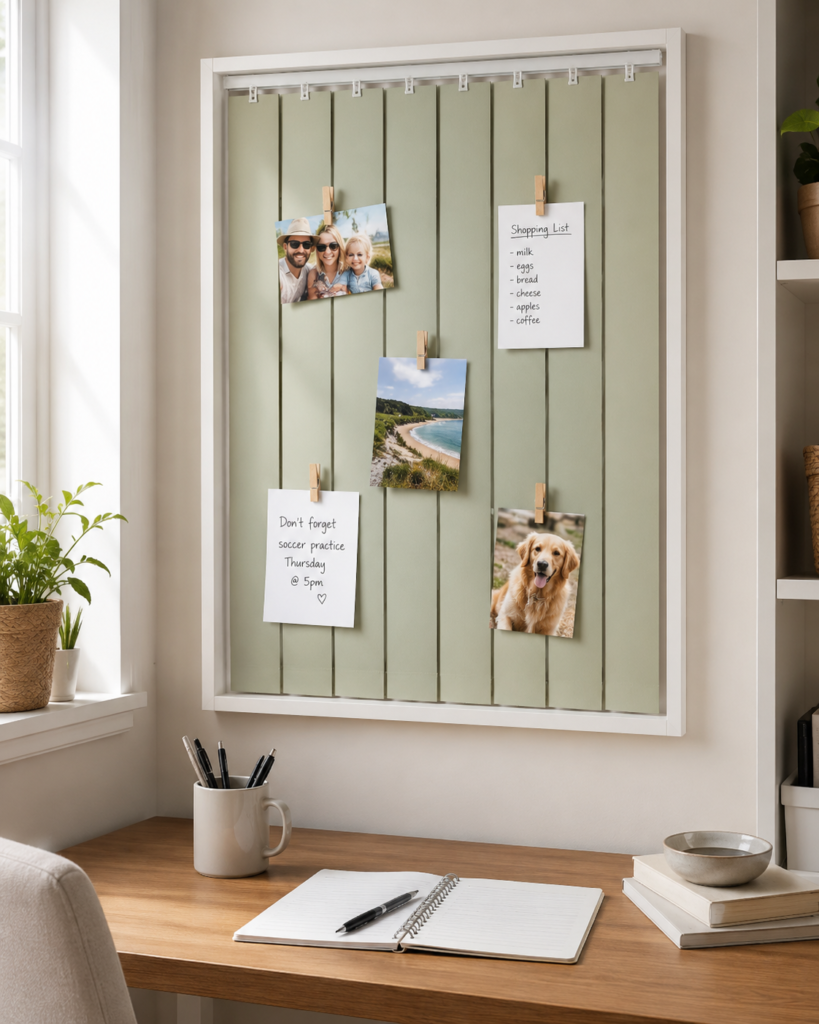
A row of pale green slats fills a simple white frame above a desk. Their narrow vertical gaps keep the structure recognisable, while small wooden clips hold photographs, shopping lists, and reminders. The board works because the papers can move without pins going into the wall or adhesive being stuck directly to photographs.
This project suits a home office, family command area, craft corner, or student desk. The frame prevents the slats from swinging independently, and the original top clips can be reused when they remain sound. A softer fabric vane may need a backing board, while rigid slats can usually hold their shape with fewer supports.
Materials and Tools
· Enough straight vertical blind slats to fill the planned frame
· Shallow wooden frame or simple battens for making one
· Rigid backing board when the slats are soft or flexible
· Original vane clips, small screws with washers, staples, or strong cord
· Small wooden pegs or lightweight clips
· Paint suitable for the slat surface, if a colour change is wanted
· Measuring tools, cutting tool, drill or hole punch, and edge-smoothing supplies
· Wall fixings selected for the finished board and wall type
Detailed Steps for the Memo Board
1. Plan the frame and slat spacing. Measure the wall area and lay the slats side by side on the floor. Leave small, even gaps so the separate vanes remain visible without allowing notes to slip behind them. Mark the final top and bottom line before cutting every piece to a consistent length.
2. Clean, trim, and finish the vanes. Remove damaged ends and smooth all cuts. If you want colour, test the coating on one offcut and finish the slats before assembly. Let them rest flat so curling or tacky paint does not affect the spacing later.
3. Secure the slats inside the frame. Attach the top ends with original clips or small mechanical fixings, then add a lower rail or hidden backing strip to stop the vanes swinging. Keep the fasteners clear of the visible centre. Check each slat with a square before tightening the next one.
4. Add clips and safe hanging hardware. Place lightweight pegs at useful heights rather than covering every slat. Fit the frame with wall hardware that supports its full weight, then hang it level. Test the board with paper notes first before adding heavier card or small objects.
I know it can feel tempting to fill the whole board immediately, but a little empty space makes the reminders easier to notice. Rotating a few photographs each month also stops the surface from becoming permanent visual clutter.
For a simpler version, fasten five or six slats to two horizontal wooden strips and lean the panel against a wall on a desk. Renters could also use a smaller framed version that hangs from one existing picture hook.
Cut Sturdy Slats into Custom Drawer Dividers
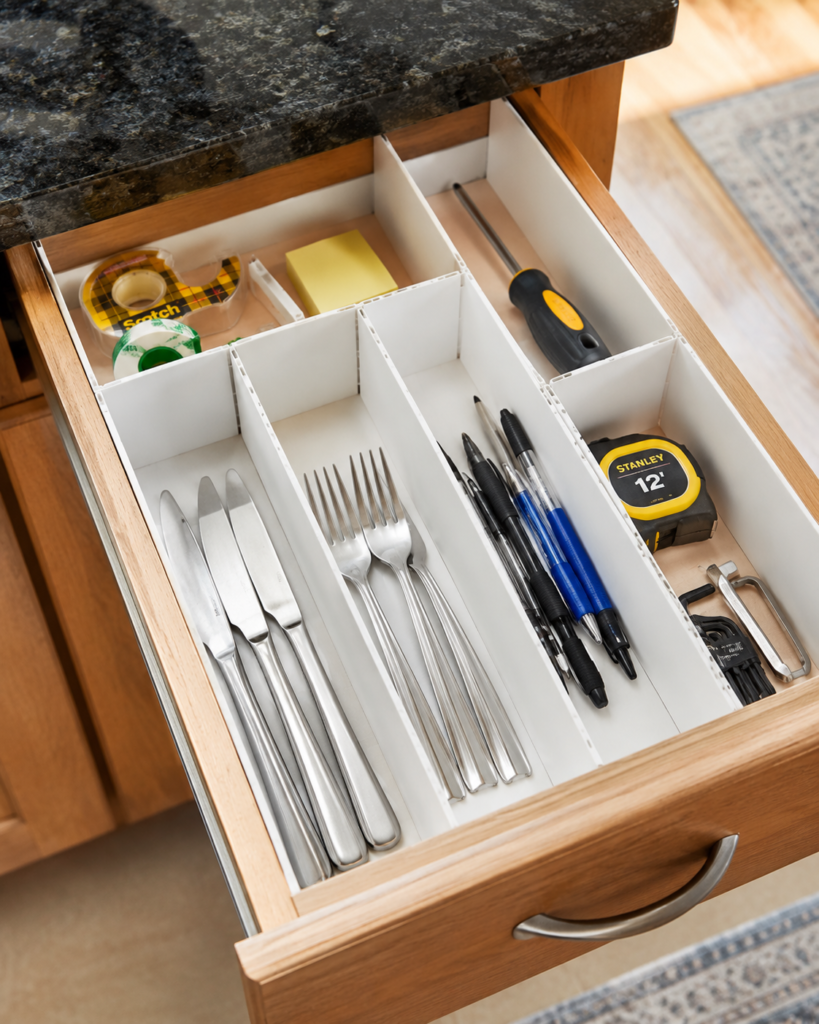
Rigid white blind slats form a fitted grid inside a deep wooden drawer. Long compartments separate knives, forks, pens, and a screwdriver, while shorter cross pieces create smaller spaces for tape, notes, and measuring tools. The layout is practical because it follows the contents instead of forcing everything into equal boxes.
This is one of the easiest ways to repurpose vertical blinds when the vanes are firm and flat. The drawer itself supports the dividers, so the slats do not need to carry much weight. Removable connections also make the layout adjustable when the contents change.
Materials and Tools
· Clean rigid plastic or vinyl slats
· Paper for making a drawer plan
· Tape measure, ruler, square, and marker
· Cutting mat and a tool suited to the slat material
· Fine file or abrasive paper
· Small interlocking slots, removable clips, or compatible adhesive
· Optional thin liner for the bottom of the drawer
· Eye protection when cutting brittle or rigid pieces
Detailed Steps for the Drawer Grid
1. Empty the drawer and group its contents. Measure the clear internal width, depth, and height, then sort the objects by length and frequency of use. Sketch the divider positions on paper. Allow extra finger space around items such as cutlery and pens so they are easy to lift.
2. Cut the long divider pieces first. Transfer the drawer measurements to the slats and cut the pieces slightly long, then trim gradually for a neat friction fit. Smooth each edge before testing it in the drawer. The dividers should sit upright without bowing the drawer sides.
3. Add cross pieces with simple joints. Mark where the shorter dividers meet the long sections. Cut shallow matching slots halfway through each piece so they slide together, or use removable clips where the material is too brittle for notches. Assemble the grid outside the drawer before fitting it as one unit.
4. Test the compartments and adjust them. Place the main items in their spaces and check that handles, drawer runners, and the drawer top remain clear. Then shorten or move the cross pieces where a compartment feels cramped. A small amount of removable putty can stop light dividers rattling without making the layout permanent.
The part I would keep flexible is the small-compartment area. Pens become scissors, tape becomes batteries, and somehow every drawer changes jobs when nobody is watching. Removable joints make that normal household migration much easier to manage.
For fabric vanes, use them as washable drawer liners rather than structural dividers. A beginner can also make only three long channels and skip the smaller grid completely.
Weave Flexible Blind Strips into an Entryway Catchall
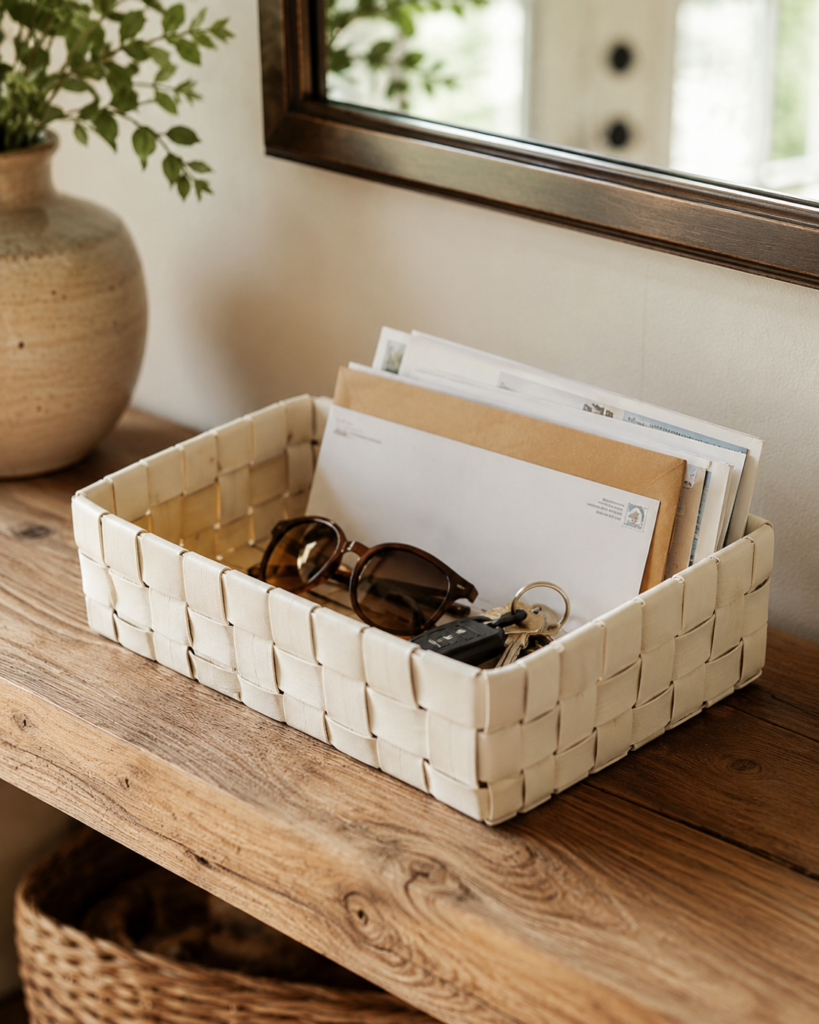
Cream strips are woven into a shallow rectangular basket that holds letters, keys, sunglasses, and a car fob. The repeated over-and-under pattern makes the original blind material look closer to a soft woven storage piece, while the low sides keep mail visible and easy to collect.
This method needs flexible vanes that bend without whitening, cracking, or springing sharply out of position. The basket is intended for light objects, not heavy tools or wet items. A rigid base inside the weaving helps the finished shape stay square on a console table.
Materials and Tools
· Flexible vertical blind vanes with a clean, unbroken surface
· Rigid cardboard, thin plywood, or reused plastic sheet for the base
· Ruler, cutting mat, strong scissors or suitable knife
· Hole punch or awl for controlled connection points
· Strong thread, small split pins, cable ties, or staples for hidden joins
· Clips for holding the weave while working
· Optional fabric liner for hiding the base and protecting small items
· Felt pads for the underside
Detailed Steps for the Woven Catchall
1. Prepare equal strips and a stable base. Cut the flexible vanes into strips of matching width and smooth the ends. Make a rectangular base slightly smaller than the planned basket. Mark the centre of each side so the woven pattern stays balanced as it grows.
2. Form the first horizontal band. Wrap several strips around the base to establish the lower edge, overlapping their ends on the least visible side. Secure the band to the base with discreet mechanical fixings or a tested adhesive. Keep the corners square rather than pulling the strips tightly around them.
3. Weave the upright and horizontal strips. Attach evenly spaced vertical strips around the base, then pass longer pieces over and under them. Alternate the pattern on each row so the structure locks together. Use clips to hold the work, and pause often to compare the height and tension on opposite sides.
4. Finish the rim and protect the table. Fold or trim the upper ends into a neat level rim, then secure every loose strip from inside. Add a light liner if the woven gaps could catch keys or paper corners. Fit felt pads underneath and test the basket with mail before adding anything heavier.
For me, even tension matters more than perfectly identical strips. A slightly varied weave feels natural, but one over-tight row can pull the whole basket out of square.
A simpler option is to wrap strips around an existing shallow cardboard box instead of building a free-standing weave. You still reuse the blind material, while the hidden box provides all the strength.
Build a Lightweight Trellis for a Climbing Container Plant
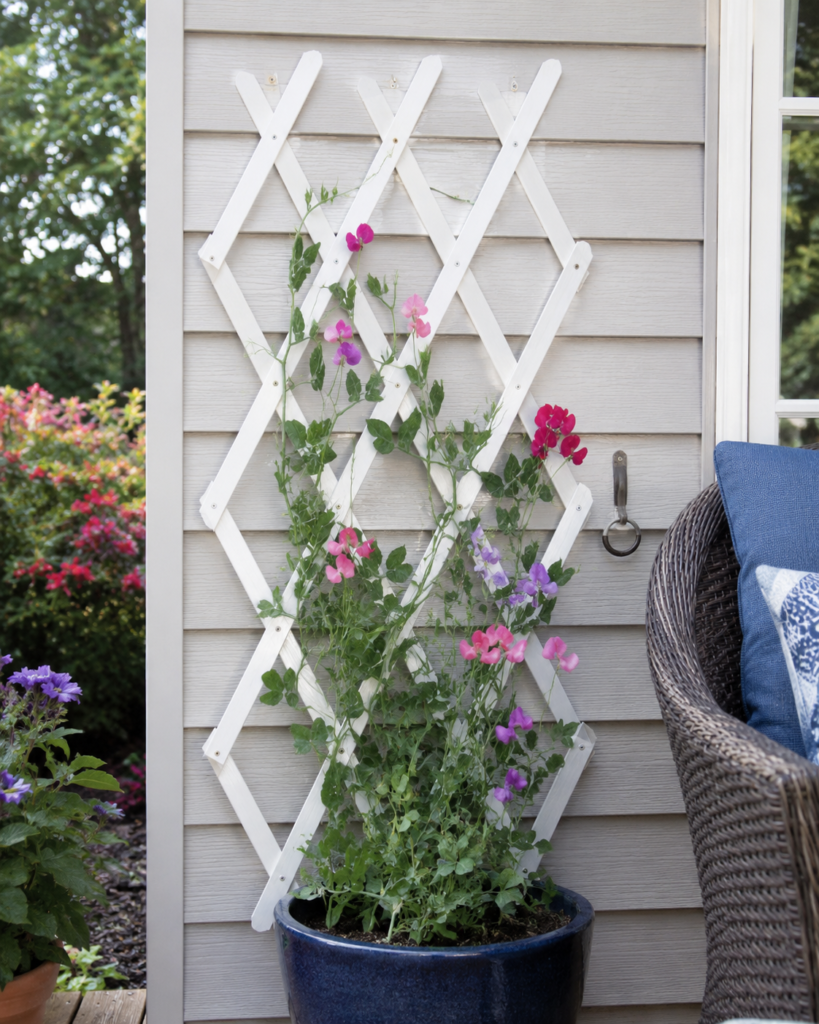
Long white slats cross one another in a repeated diamond pattern behind a pot of sweet peas. Small fasteners hold each intersection, creating a light trellis that guides the stems upward without visually overwhelming the plant. The slim profile makes it useful on a porch or beside a door where a thick timber structure would feel heavy.
Outdoor use is demanding, so choose only slats that remain strong after weather exposure and use fixings that will not loosen quickly. The trellis must be attached independently to a wall, fence, or sturdy frame. Plant stems should never be expected to stabilise it.
Materials and Tools
· Long rigid or semi-rigid vertical blind slats
· Exterior-compatible paint or protection only if suitable for the material
· Measuring tape, straightedge, marker, and cutting tool
· Drill or punch for small connection holes
· Exterior screws with washers, rivets, or corrosion-resistant cable ties
· Wall spacers or battens to keep the trellis slightly clear of the surface
· Fixings appropriate to the wall, fence, or frame
· Soft plant ties for guiding stems
Detailed Steps for the Trellis
1. Lay out the diamond pattern on the ground. Arrange one set of slats diagonally in the same direction, then place a second set across them. Keep the spacing wide enough for stems and fingers to pass through. Mark every intersection and the final outside shape before drilling.
2. Join the slats without crushing them. Make small holes at the marked crossings and use fasteners with washers to spread pressure. Tighten only until the pieces stop sliding. Then lift the panel carefully and check that it remains flat rather than twisting into a shallow curve.
3. Prepare secure mounting points. Attach spacers or narrow battens to the wall or fence so air and stems can move behind the trellis. Choose structural fixings for the surface and position them near strong intersections. Do not rely on one screw at the top of a large panel.
4. Mount the trellis and guide the plant gradually. Fasten the empty trellis first and test it with gentle hand pressure. Place the pot close enough for new stems to reach the lower diamonds, then use soft ties loosely. Recheck the mount as the plant gains weight and after strong weather.
I would keep the trellis fairly narrow for a container plant. A huge sheet of plastic lattice can catch more wind than the little pot below can justify, and the plant should remain the interesting part of the arrangement.
For an indoor climbing plant, make a smaller version attached to a freestanding wooden base behind the pot. It avoids wall holes and does not need exterior hardware.
Turn Short Blind Offcuts into Reusable Plant Labels
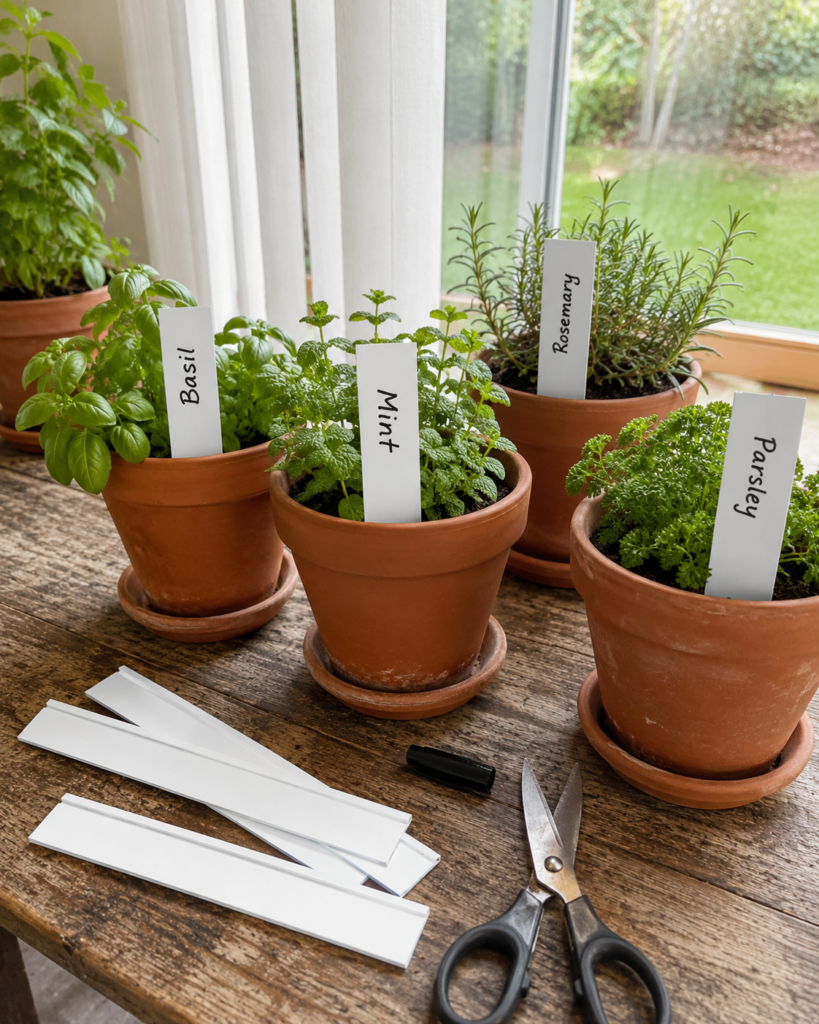
Short white pieces sit neatly in terracotta pots labelled basil, mint, rosemary, and parsley. Their smooth surface gives the writing plenty of contrast, and the narrow shape fits beside small herbs without taking over the pot. This project uses the ends left after larger cuts, so almost every sound piece can have a purpose.
The label method should suit the marker and growing conditions. A permanent marker may be fine indoors, while outdoor pots may need a paint pen or removable label strip that handles moisture better. The slat edge should be rounded or pointed carefully so it enters the soil without cutting roots unnecessarily.
Materials and Tools
· Clean short blind-slat offcuts
· Ruler and marker for consistent label length
· Strong scissors or another cutting tool suited to the material
· Fine abrasive paper or file
· Permanent marker, paint pen, or removable waterproof label tape
· Optional hole punch and string for hanging tags
· Cloth for wiping the labels between uses
Detailed Steps for the Plant Labels
1. Choose flat offcuts and standardise their size. Select pieces long enough to remain visible after part of the label enters the soil. Mark a consistent length and trim away any original holes or damaged ends. A matching set looks calmer even when the herbs are in different pots.
2. Shape and smooth the soil end. Cut the lower end into a shallow point or rounded taper, depending on how stiff the material is. Smooth every edge with fine abrasive paper. Test one label in loose soil before preparing the rest, because brittle material may split when pushed downward.
3. Add clear, replaceable lettering. Clean the writing area and add the plant name in large simple letters. Leave space beneath it for a sowing date or variety when useful. If the labels will change often, write on removable tape rather than marking the plastic permanently.
4. Place and maintain the labels. Insert each marker near the pot edge to avoid the densest roots. Wipe soil and water marks away occasionally so the names remain readable. At the end of the season, clean the labels, remove temporary tape, and store them flat for reuse.
I don’t think these labels need decorative flourishes. The plants provide enough texture already, and clear writing is much more useful when you are trying to remember which pot contains mint before making tea.
Smaller offcuts can become seed-tray tags, while longer pieces can carry care notes such as “full sun” or “water lightly.” Fabric vanes are not suitable for pushing into damp soil, but they can become hanging tags for baskets or indoor planters.
Vertical Blind Upcycling Errors That Make Projects Flimsy
Using brittle sun-damaged slats. A vane that cracks during a gentle bend test will not become stronger after cutting. Keep it out of structural, woven, and garden projects, and recycle or dispose of it through an appropriate local route.
Cutting every piece before testing one. Different blind materials react differently to scissors, knives, drills, paint, and glue. Make one complete sample first, then repeat the measurements only after the edge and finish look clean.
Relying on adhesive for high-stress joints. Glue may release from a smooth or flexible surface. Use screws, clips, ties, slots, or backing plates where the project will carry weight or be exposed to movement.
Leaving sharp corners and drilled burrs. Small plastic edges can scratch hands, snag fabric, and cut plant stems. File or sand every cut and drilled opening before assembly.
Using indoor slats outside without checking them. Sun, rain, temperature changes, and wind can weaken finishes and joints. Keep outdoor projects light, securely mounted, and easy to inspect or replace.
Making drawer dividers too tight. An over-tight grid can bow the drawer sides or become impossible to remove. Trim gradually and leave only enough tension to stop movement.
Overloading a woven basket or memo board. These projects reuse lightweight furnishing material, not structural sheet. Keep the contents light and let a rigid frame or base carry the real load.
Frequently Asked Questions
Can all types of vertical blind slats be repurposed?
No. Fabric, vinyl, and rigid plastic vanes behave differently, and damaged or brittle slats may be unsafe to cut or bend. Test one piece and match the project to the material.
How should I clean old vertical blinds before crafting?
Use a mild cleaning method appropriate to the vane material and avoid soaking components that may warp or separate. Let every piece dry flat before painting, gluing, or weaving.
Can I paint vertical blind slats?
Some surfaces accept suitable paint after cleaning and light preparation, while others resist coatings. Test an offcut, allow it to settle fully, and bend it gently to check whether the finish cracks.
What can I make without drilling the slats?
Plant labels, simple drawer dividers, wrapped box covers, and some woven projects can be made with cutting, slots, clips, or ties. A no-drill method is also helpful when the plastic is thin or brittle.
Are reused vertical blinds safe for food storage?
Do not assume unknown blind materials are suitable for direct food contact. Use them for drawer organisation or cover them with an appropriate removable liner rather than placing unpackaged food against the surface.
Can a vertical blind trellis stay outdoors all year?
That depends on the vane material, fixings, exposure, and condition. Inspect it regularly, keep the plant load light, and bring it in or replace it when cracking, warping, or loose connections appear.
What should I do with the original chains, weights, and clips?
Keep sound clips and connectors for lightweight hanging projects. Weights can be stored for repairs or taken to an appropriate recycling route when their material is known; avoid adding unknown heavy pieces to children’s crafts or plant pots.
Give Straight Blind Slats a More Useful Second Job
The easiest way to repurpose vertical blinds is to work with what makes the slats distinctive: they are long, narrow, repeatable pieces. Keep them straight for dividers and labels, overlap them for a trellis or board, and weave only the material that bends comfortably. A rigid base or frame can provide strength while the reused slats provide the surface and pattern.
Begin with the least complicated project that matches your material. Plant labels and drawer dividers need little hardware, while a memo board, basket, or garden support asks for more careful joining. Then save the clean offcuts until the end; those small pieces often solve the final spacing or labelling problem.
Which unused set of vertical blinds could leave the storage cupboard first: the full-length slats for a board, or the shorter pieces for a drawer or herb pots?