Old door knobs often outlast the doors they once belonged to. A solid brass knob, a cloudy glass pair, or a painted wooden handle may sit in a box for years because it feels too interesting to discard but too incomplete to reinstall.
The useful part is not limited to the round front. Many knobs still have a threaded opening, a backplate, a short spindle, or enough weight to become a stable decorative base. Those details can support curtain tiebacks, tiny flower holders, seasonal displays, canister lids, and other small home projects.
I’m Stella Eve Louise, and I don’t think every old knob needs to be scrubbed until it looks new. A little wear can give a project its character. What matters more is whether the hardware is secure, clean enough for its new purpose, and attached in a way that suits its weight.
Glass, ceramic, metal, and wooden knobs all behave differently. Before reaching for glue or a drill, check what you have and decide whether the finished piece will be handled often, mounted to a wall, exposed to moisture, or used only as decoration.
Sort and Prepare the Door Knobs First
Separate complete knob sets from loose single knobs. Keep any backplates, screws, threaded rods, spindle pieces, and small fittings together until you know which project you are making. An awkward-looking metal part may become exactly the spacer or mounting piece you need later.
Inspect each knob for:
· Cracks or chips in glass and ceramic
· Sharp edges around the stem or threaded opening
· Loose decorative caps
· Flaking paint or powdery surface coatings
· Rust that has weakened the metal
· Bent or damaged spindle sections
· A threaded opening that no longer grips hardware
· Old adhesive around the base
· A shape that cannot sit or mount securely
· Enough strength for the weight it will carry
Do not dry-sand flaking paint on old hardware unless you know the coating is safe. Wear eye protection when drilling, cutting, or shortening metal parts, and secure the knob before applying force.
Clean sound metal knobs with a soft cloth first. Mild soapy water may be enough for ordinary dirt, while a small brush can reach carved details. Avoid soaking wooden knobs, and keep moisture away from cracked glass or ceramic.
If you want to preserve an aged finish, stop once loose dirt has gone. Over-polishing can remove the darker areas that make carved details easier to see. I’d rather keep an honest patina than end up with one unnaturally bright patch.
Turn Flat-Faced Knobs Into Bottle-Brush Tree Bases
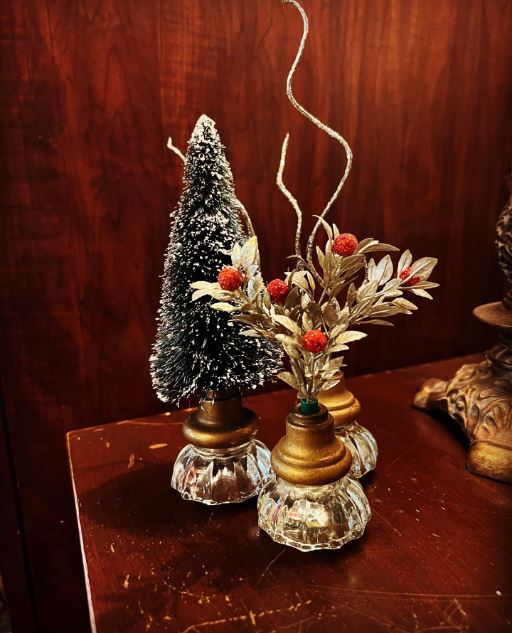
A loose knob can become a ready-made pedestal when its front face sits flat on a shelf. The opening at the back then holds the wire stem of a bottle-brush tree, a faux greenery sprig, or another lightweight seasonal decoration.
Balance matters more than height here. A narrow knob and a tall tree may look charming for three seconds, right before it leans into the next decoration. Shorter trees and wider knobs are much easier to live with.
Materials and Tools
· Flat-faced door knobs
· Small bottle-brush trees
· Wire cutters
· Pliers
· Strong craft adhesive, if needed
· Wooden skewers or short dowels for spacers
· Small brush for cleaning
· Optional ribbon or miniature ornaments
· Protective work surface
Build the Miniature Tree Bases
Match each tree to a knob. Set the knob on its face and place the tree above the rear opening. Choose a tree whose height and width do not make the base look undersized.
Remove the original tree base. Use wire cutters or pliers to detach the plastic or wooden stand while preserving enough of the central stem to enter the knob. Wear eye protection because clipped wire can move unexpectedly.
Adjust the fit. Insert the stem without glue first. If the opening is too wide, wrap the stem with a narrow paper strip or add a short dowel spacer. If it is too long, trim it gradually rather than cutting away too much at once.
Secure only when necessary. A snug removable fit lets you change the decoration later. If the tree remains loose, add a small amount of suitable adhesive inside the opening and keep it away from the visible outer finish.
Check the finished balance. Place the tree on a level shelf and gently tap the surface nearby. Shorten or lighten the decoration if the knob tips instead of adding large amounts of glue underneath.
I know it can feel tempting to decorate every branch, but these small trees usually look better with very little added. The old knob is part of the display, not something that needs to disappear beneath ribbon.
The same method can hold a dried seed head, a small paper flower, or a name card for a winter table. Keep every insert light and avoid using the knob as a candle base.
Make Tiny Flower Vases From Hollow Door Knobs
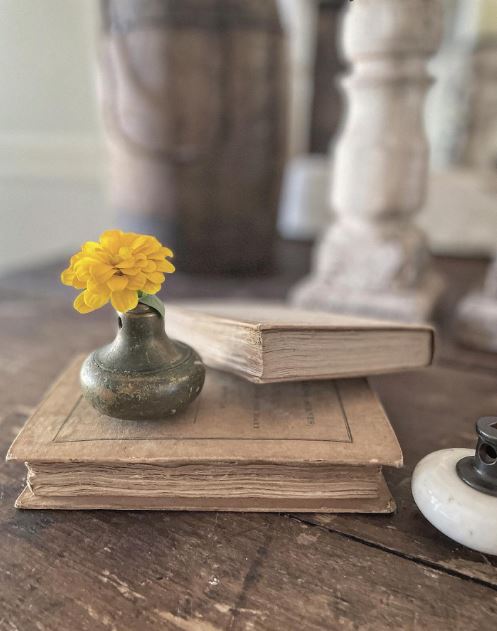
Some knobs have an opening deep enough to hold a little water and one or two fine stems. Grouped together, they create a low arrangement that suits a windowsill, place setting, or narrow shelf where an ordinary vase would feel too large.
Not every knob is watertight. Metal seams may leak, old internal residue may discolour water, and wooden knobs should remain dry. A removable inner tube is the most dependable way to recreate the idea.
Materials and Tools
· Hollow door knobs with stable flat faces
· Very small glass or plastic water tubes
· Short flower stems
· Leaves or fine branches
· Small funnel or pipette
· Soft cleaning brush
· Clear removable putty, if needed
· Tray or waterproof saucer
· Clean cloth
Arrange the Miniature Vases
Test the knob for stability. Place it on a level tray and check whether the face sits securely. Do not use a rounded knob that rolls or rocks unless you add a separate support.
Protect the interior. Insert a narrow water tube when one fits. If you plan to place water directly inside a metal knob, test it over a waterproof tray first and avoid using any piece with rust, cracks, wood, or loose internal material.
Prepare short stems. Choose flowers with fine stems and trim them to different heights. Remove leaves that would sit inside the opening so they do not crowd the small space.
Build a light arrangement. Add water with a pipette, then place one main bloom and one or two smaller stems. Turn the knob until the strongest side of the flower faces the room.
15. Refresh the display often. Top up or replace the water and remove wilted stems promptly. Dry the knob after use, especially around threaded openings and old metal seams.
For me, one slightly imperfect flower suits this project better than a tightly packed bouquet. The scale is what makes the old hardware interesting.
A completely dry variation can hold preserved flowers, paper stems, feathers, or a single place card. That version works with wooden knobs and avoids concerns about leaks.
Give a Plain Birdhouse a Door-Knob Detail
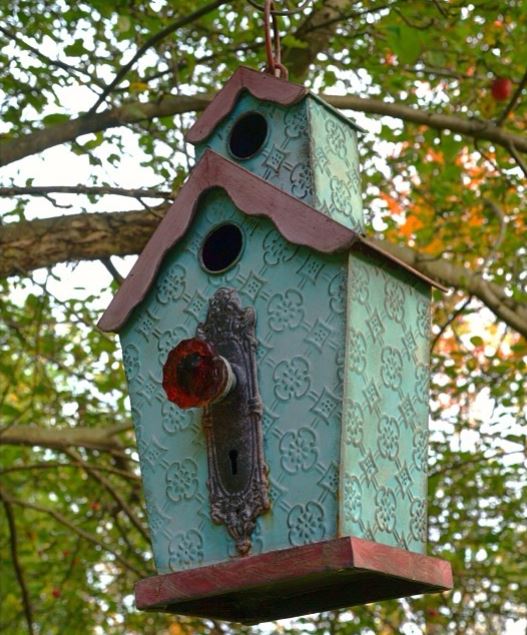
A decorative knob beneath a birdhouse entrance can make the front look like a miniature house façade. This works especially well on a decorative birdhouse, garden ornament, or indoor shelf piece.
For a functional nesting box, keep the hardware away from the entrance, ventilation, drainage, and cleaning access. The knob should not create a perch that helps predators reach the opening, so practical birdhouses need more restraint than decorative ones.
Materials and Tools
· Wooden decorative birdhouse
· Small or lightweight door knob
· Exterior-suitable screw or threaded fitting
· Water-resistant adhesive only as secondary support
· Drill and small bit
· Screwdriver
· Pencil
· Exterior finish for exposed wood
· Eye protection
Attach the Knob to the Birdhouse
Choose the right birdhouse. Decide whether the piece is decorative or intended for birds. Keep structural, ventilation, and cleaning needs untouched on a functional box.
Check the knob size. Hold it against the front and make sure it does not dominate the entrance or pull the thin wood forward. Lightweight knobs are easier to support on small birdhouses.
Mark a safe fixing point. Choose solid wood rather than a thin seam or removable panel. Check the inside so the screw will not create a sharp point in an occupied space.
Attach the hardware. Drill a small pilot hole and use a threaded fixing suited to the knob. Tighten until secure, then cover or remove any internal sharp end.
Protect the outdoor finish. Seal exposed wood around the fixing and inspect the attachment after wet or windy weather. Bring a decorative-only birdhouse indoors when its materials are not suitable for constant exposure.
One detail I wouldn’t skip is the view from inside. A neat front can hide a long screw point, and small birds are not especially interested in our decorative intentions.
For an indoor version, attach the knob to a painted wooden house block or miniature façade. You can add a tiny wreath or house number without needing to consider nesting safety.
Use a Door Knob as a Handle for a Canister Lid
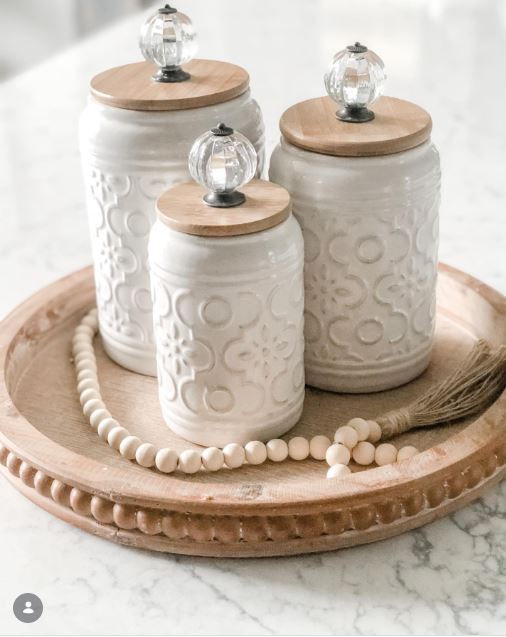
A plain metal or wooden canister can take on a completely different character when the lid gains a glass, brass, ceramic, or painted knob. The knob also gives fingers a clear lifting point, provided the lid and attachment are strong enough.
This project is best for dry household storage or sealed packets. Unknown vintage finishes, adhesive, and exposed hardware should not touch loose food.
Materials and Tools
· Large canister with a firm removable lid
· Door knob suited to the lid size
· Threaded rod, bolt, or screw compatible with the knob
· Washers and nut
· Drill and suitable bit
· Ruler
· Pencil or centre punch
· Screwdriver and spanner
· Food-safe inner container if storing food
· Eye protection
Convert the Canister Lid
Check the lid strength. Press gently around the centre. Thin flexible metal may distort under a heavy knob, while a domed lid may need a washer or spacer to create a stable connection.
Find the true centre. Measure across the lid in several directions and mark the intersection. A visibly off-centre knob can make the whole canister look crooked even when the lid closes correctly.
Drill a controlled opening. Secure the lid on scrap wood and wear eye protection. Use a bit matched to the fixing rather than making a large hole that depends on the washer to hide it.
Attach the knob mechanically. Pass the compatible screw or threaded rod through the lid, add washers where needed, and tighten the nut beneath. Avoid overtightening glass or ceramic knobs.
Check the inside and closure. Cover any rough hardware edge, confirm that the lid still sits flat, and lift the empty canister by the knob several times. Hand-wash the altered lid and keep loose food inside a separate suitable liner.
The proportion matters here. A full-sized door knob looks comfortable on a wide canister but rather determined on a tiny jar. Test the balance before making the hole.
A lower-commitment version uses a wooden box or storage tin that never holds food. The same method can also refresh a lidded bathroom container for cotton pads or wrapped soaps.
Match the Knob to the New Job
Glass and Ceramic Knobs
Use these where their colour and shine remain visible, such as curtain tiebacks or canister lids. Avoid impact-prone locations and tighten fixings gently so pressure does not crack the material.
Metal Knobs
Metal works well for wall-mounted projects, birdhouse details, and frequently handled lids. Check for sharp edges, weak corrosion, and finishes that may leave marks on fabric or hands.
Wooden Knobs
Wood is lighter and easier to paint, but it does not suit water-filled vase projects. Seal it appropriately when it will be handled often or used in a sheltered outdoor setting.
Knobs With Backplates
Keep the backplate whenever possible. It can hide the fixing, distribute visual weight, and make a single knob look like a deliberate piece of hardware rather than something attached at the last minute.
Door-Knob Details That Can Make or Break the Project
Choosing a Cracked Knob
A hairline crack can widen when the knob is tightened, drilled, dropped, or exposed to temperature changes. Keep damaged glass and ceramic pieces for a protected display only, or retire them completely.
Using Glue as the Only Structural Fixing
Adhesive may suit a lightweight seasonal tree, but a curtain tieback or handled lid experiences repeated pulling. Use screws, threaded rods, washers, or another mechanical connection when the project carries weight.
Overtightening Glass or Ceramic
More force does not always create a safer connection. Add a washer or soft spacer where appropriate and tighten only until the knob no longer moves.
Ignoring the Back of the Project
A screw tip, rough washer, or unfinished hole may sit inside a canister or birdhouse. Check every hidden surface before the item goes into use.
Making a Miniature Base Too Top-Heavy
Tall trees, large flowers, and heavy decorations can tip a knob that looks stable when empty. Test the complete arrangement on a level surface before adding glue.
Letting Old Paint Flake Into the Workspace
Do not dry-sand or scrape an unknown old coating casually. Isolate loose paint, use suitable protective methods, and choose a different knob when the finish cannot be handled safely.
Mounting Into Weak Wall Material
Curtain tiebacks receive sideways pulling that decorative glue strips may not handle. Use a stud or a suitable wall anchor and check the fixing after repeated use.
Allowing Metal to Touch Loose Food
Vintage finishes, adhesive, and exposed hardware are not suitable food-contact surfaces. Keep food sealed in packets or inside a separate appropriate container.
Removing Every Sign of Age
Aggressive polishing can erase the darker areas and worn finish that made the knob interesting. Clean for safety and function, then stop before the surface loses its character.
Frequently Asked Questions
Can any old door knob be repurposed?
No. Choose knobs that are structurally sound and appropriate for the new use. Cracked glass, badly corroded metal, loose caps, and flaking unknown coatings may make a project unsafe or unreliable.
How do I remove a spindle from an old knob?
The method depends on the hardware. Look for a set screw, release hole, threaded connection, or removable collar before applying force. Use penetrating oil and suitable tools when the metal is stuck, and stop if the decorative part begins to twist.
Can I glue a door knob directly to a wall?
Glue alone is not a dependable choice for a tieback, coat hook, or any part that will be pulled. Use a proper screw, threaded fixing, stud, or wall anchor suited to the wall and load.
Should I polish an antique brass knob?
Only if a bright finish suits the project. Begin with gentle cleaning, because heavy polishing may remove patina and make decorative details look flatter.
Can a door knob vase hold water safely?
Some metal knobs may leak, rust, or contain residue. A narrow removable water tube is the safer option. Keep wooden knobs dry and do not use cracked ceramic or glass.
How do I attach a knob to a canister lid?
A bolt or threaded rod with washers and a nut creates a stronger connection than glue. Drill a centred hole, protect rough edges, and check that the altered lid still closes correctly.
Can these projects stay outdoors?
Only when the knob, fixing, paint, adhesive, and base object all suit outdoor conditions. Inspect the project regularly for rust, movement, water damage, and loose parts.
Let Old Hardware Work Somewhere New
Creative ways to repurpose door knobs begin with recognising what the hardware already offers. A rounded grip can hold a curtain, a hollow opening can support a stem, and a threaded base can secure the knob to wood or metal.
There is no need to force every knob into the same project. Save matching pairs for a window, use flat-faced singles as miniature bases, and keep the strongest pieces for lids or wall-mounted work.
Begin with one clean, sound knob and choose a purpose that suits its material and shape. Make the connection mechanically secure when the item will be pulled or lifted, and keep decorative hardware away from loose food and unsafe outdoor exposure.
Which old knob would you reuse first: the glass pair waiting beside a window, the flat brass one suited to a tiny flower, or the sturdy metal knob that could finish a plain canister lid?