Used tea bags have a delicate, almost fabric-like quality once they’ve been emptied and dried. Their uneven stains, fine fibres, folded seams, and translucent surfaces are difficult to reproduce with new craft paper. Even two bags brewed from the same box rarely dry in exactly the same way.
I’m Stella Eve Louise, and this is one of those everyday materials I’d rather examine before throwing away. A clean used tea bag can become collage paper, a miniature frame, a pressed-flower bookmark, part of a lantern, or even a page in a tiny handmade book.
The tea itself matters less than the condition of the bag. A bag that has been left wet for several days may smell unpleasant or develop mould, while one that has been opened, emptied, and dried promptly can become surprisingly useful craft material.
I don’t save every tea bag. Some contain plastic fibres, staples, heavy glue, or synthetic mesh that does not suit the project I have in mind. The most successful reuse begins with sorting, drying, and choosing only the bags that remain clean and structurally sound.
Dry, Empty, and Identify the Bag Material First
Remove the tea bag from the cup with clean utensils and let excess liquid drain. Do not leave damp bags piled in a saucer or sealed container, as trapped moisture can create unpleasant smells and visible deterioration.
For paper crafts, open each bag carefully once it is cool enough to handle. Depending on its construction, you may be able to unfold a seam, cut one narrow edge, or remove the staple and string without tearing the main sheet.
Empty the leaves into an appropriate food-waste or compost container when suitable. Then spread the opened bag on a non-stick surface, clean tray, or sheet of reusable baking liner. Let it dry fully on both sides before placing it with other craft materials.
Sort the dried bags by:
- Shape and size
- Paper or fabric-like construction
- Colour of the tea stain
- Strength around the seams
- Presence of string or tags
- Printed marks
- Tears or holes
- Synthetic mesh
- Staples or plastic closures
- Suitability for composting
Not every bag should go into a home compost system. Some products contain plastic fibres or plastic sealing materials, so check the manufacturer’s packaging rather than assuming the complete bag will break down. Paper tea bags without staples may be suitable for compost or worm bins, while plastic or fabric-like bags should be separated from the tea leaves.
Tea bags intended for artwork should be completely dry before they are glued, painted, stacked, or stored. Discard any bag with mould, a sour smell, grease, milk residue, or an ingredient that has made the material sticky.
Useful Materials and Tools
- Clean used tea bags
- Small scissors
- Craft knife
- Cutting mat
- Tweezers
- Soft paintbrushes
- Watercolour paper
- Scrap cardstock
- Paper adhesive
- PVA glue
- Matte acrylic medium
- Reusable non-stick sheet
- Bone folder
- Pressed flowers and leaves
- Old photographs or printed copies
- Decorative paper scraps
- Needle and thread
- Small hole punch
- Bamboo skewers or lightweight wooden strips
- Battery-operated LED light
- Metal ruler
- Protective work covering
Never use mouldy tea bags for crafts or gardening. Keep staples, loose threads, needles, sharp tools, adhesives, and small decorative pieces away from children and pets.
Frame Tiny Photographs Inside Dried Tea Bags
An emptied tea bag already resembles a tiny paper pocket. Its stitched or folded edges can surround a photograph, printed portrait, handwritten word, or small collage without requiring a conventional frame.
The featured project uses tea bags to hold vintage-style photographs and paper compositions, then stiffens the finished pieces so they can be displayed as miniature framed artwork.
Printed copies are safer than irreplaceable original photographs. Tea stains, glue, wax, and paper acidity may affect an image over time, so preserve the original elsewhere and use a duplicate inside the craft.
Materials and Tools
- Dried, emptied tea bags
- Small printed photographs
- Paper scraps
- Fine scissors
- Tweezers
- Paper adhesive or matte medium
- Cardstock backing
- Small frame or shadow box
- Optional thread and tags
Assemble the Miniature Frames
- Prepare the tea-bag pockets. Open the bags carefully and brush away every loose tea leaf. Press them beneath clean paper and a light book until they lie reasonably flat without losing all their natural wrinkles.
- Resize the photographs. Print or cut small images that fit comfortably inside the bags. Leave a narrow border around each face or subject so it does not feel squeezed against the original seams.
- Build the internal collage. Slide the photograph into place and add one or two lightweight paper details. Then attach the layers with a controlled amount of paper adhesive, keeping wet medium away from areas that might bleed excessively.
- Strengthen the finished piece. Mount the tea bag on cardstock or coat it lightly with a compatible clear medium when more rigidity is needed. Let both sides dry completely before framing or stacking it with another piece.
- Arrange the display. Group several tea-bag frames inside a shadow box or attach them to a firm background. Keep the arrangement away from damp rooms and prolonged direct sunlight.
For me, the stained paper should remain visible around the photograph. If the picture fills every corner, the project begins to look like an ordinary printed miniature rather than an upcycled tea-bag frame.
A pressed flower, handwritten initial, ticket fragment, or tiny landscape can replace the portrait. Several pieces could form a family timeline or a wall display based on one shared colour.
Build a Pressed-Flower Tea-Bag Lantern
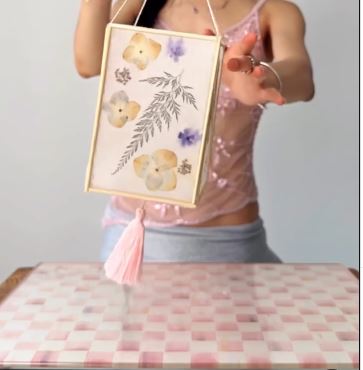
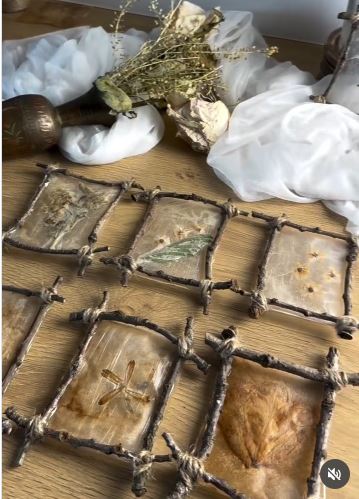
Tea-bag paper becomes especially noticeable when light passes through it. The uneven brown and amber stains soften a bright LED, while pressed flowers and leaves create darker shapes across the illuminated panels.
The selected lantern uses dried tea bags, pressed plant material, lightweight supports, and a handmade tassel to create a decorative light.
Use a battery-operated LED only. Tea-bag paper, dried flowers, glue, thread, and bamboo are all unsuitable near a candle or open flame.
Materials and Tools
- Eight or more dried tea bags
- Pressed flowers or leaves
- Diluted PVA glue or matte medium
- Paintbrush
- Reusable non-stick sheet
- Bamboo skewers or narrow wooden strips
- Strong craft adhesive
- Thread or cord
- Battery-operated LED light
- Scissors
- Ruler
Construct the Lantern
- Create the translucent panels. Open the tea bags into flat sheets and place them on a non-stick surface. Brush on a thin layer of diluted adhesive, arrange pressed flowers over the paper, and cover with another tea-bag sheet when you want the plants enclosed.
- Let the sheets dry flat. Smooth major air pockets gently without crushing the flowers. Once dry, trim the panels into matching rectangles while keeping the most attractive stained and botanical details inside the cutting lines.
- Build a lightweight frame. Join bamboo skewers or narrow wooden strips into four equal wall sections. Check that the structure stands squarely before attaching any paper.
- Attach the tea-bag panels. Fix one sheet to each wall using small amounts of adhesive along the frame. Then join the walls and add a simple base that leaves access to the LED switch and batteries.
- Finish and test the lantern. Add a tassel or hanging detail only if it does not make the frame unstable. Switch on the LED and confirm that no section becomes warm or collapses toward the light.
I know it can feel tempting to cover every panel with flowers, but the plain stained areas are what allow the lantern to glow. Leave some open space around the plant shapes.
A flat light screen is easier than a full lantern. You could also mount one pressed tea-bag panel inside a small frame and place an LED light behind it.
Use Tea-Bag Paper as Translucent Collage Material
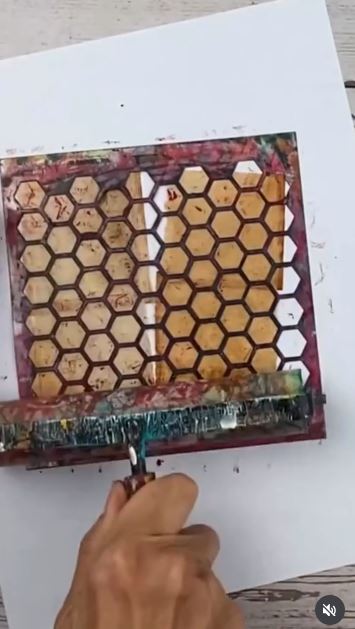
Tea-bag paper works well in collage because it can soften an image without hiding it. The fibres create texture, while the stains introduce warm browns, pale greens, and muted yellow tones.
The selected project uses cleaned and dried tea bags as translucent collage layers, preserving the irregular marks created during brewing.
This material is thin, so it needs gentle handling. Dragging a stiff glue stick across it may produce tears, while too much wet adhesive can make the paper stretch and wrinkle.
Materials and Tools
- Dried tea-bag sheets
- Art journal or cardstock
- Old book pages
- Printed photographs
- Matte medium or paper adhesive
- Soft brush
- Tweezers
- Coloured pencils
- Ink or paint
- Protective paper
Layer the Collage
- Create the background first. Arrange printed paper, handwriting, paint marks, or a copied photograph on the page. Secure these stronger materials before adding the delicate tea-bag layer.
- Choose the stained sections deliberately. Hold each tea bag over the composition and rotate it. A dark tea mark can frame one area, while a pale section can soften a face, line of writing, or patch of colour.
- Attach the paper gently. Brush a thin layer of medium onto the background and lower the tea bag into place. Smooth it with the brush rather than your fingers, then add only enough medium on top to secure loose edges.
- Connect the layers after drying. Add pencil, ink, stitching, or a few painted marks across both the original background and tea-bag paper. This prevents the translucent sheet from looking as though it was placed on top at the last moment.
For me, wrinkles are part of the material. Flattening every crease can remove the slightly worn, layered quality that makes used tea bags interesting in the first place.
Tea-bag collage paper can also cover tags, bookmarks, journal pockets, handmade cards, or the lid of a small decorative box.
Make Painted Creatures From Tea-Bag Stain Prints
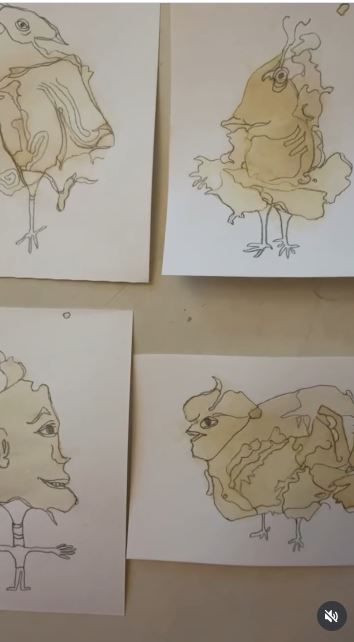
A used tea bag can act like a soft printing tool before it is dried for another project. Pressing it onto absorbent paper leaves an uneven shape with darker edges, pale centres, and occasional drips.
The featured artwork develops those marks into playful creatures rather than planning the complete drawing in advance.
Use an unsweetened tea bag that has cooled to a comfortable temperature. Protect the table, as tea may stain wood, fabric, and porous surfaces.
Materials and Tools
- Freshly used and cooled tea bags
- Watercolour or mixed-media paper
- Protective table covering
- Paper towel
- Fine drawing pen
- Watercolour paint
- Coloured pencils
- Small brush
Turn the Stains Into Drawings
- Control the amount of moisture. Press the tea bag gently onto a paper towel first when it is dripping heavily. The bag should remain damp enough to leave a mark without soaking through the drawing paper.
- Print several shapes. Press, twist, drag, or lightly drop the tea bag onto different areas. Vary the pressure so some marks remain pale and others develop stronger outlines.
- Let the page dry completely. Do not decide what every stain represents while it is still spreading. Once dry, turn the paper around and look for possible faces, bodies, wings, ears, plants, or landscapes.
- Develop the strongest forms. Add a few pen lines, watercolour details, or coloured-pencil marks. Keep much of the original stain visible instead of drawing over the entire shape.
- Reuse or discard the bag responsibly. Open and compost the leaves when appropriate, or dry the empty paper for collage. Do not store the bag while it remains damp.
The first idea is not always the best one. A stain that looks like a bear from one direction may become a much better bird after the page is turned sideways.
Children can try this with adult supervision and cooled tea bags. The marks can also become backgrounds for handmade cards, wrapping paper, or a small illustrated story.
Bind Dried Tea Bags Into a Tiny Handmade Book
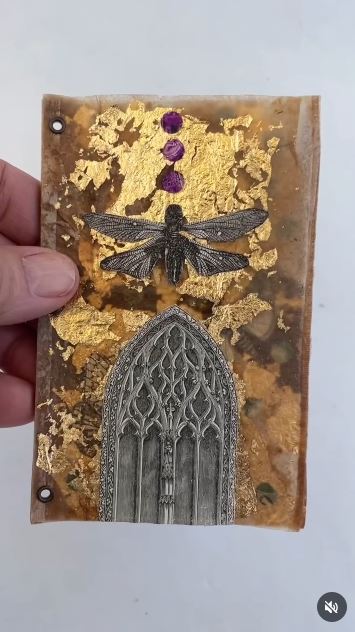
A tiny tea-bag book treats each opened bag as an individual page. The folds, stains, and original seams remain visible, giving the finished book a softer structure than conventional paper.
The selected golden tea-bag book uses dried, emptied bags coated for strength and then assembled into a miniature format.
The pages cannot carry heavy decoration. Small drawings, fine stitching, printed words, and thin paper scraps are better choices than beads or thick cardboard.
Materials and Tools
- Dried tea-bag sheets
- Matte medium or paper coating
- Soft brush
- Gold paint or ink, if desired
- Needle
- Strong thread
- Small awl
- Cardstock covers
- Paper clips
- Fine pen
- Lightweight collage scraps
Bind the Mini Book
- Prepare the individual pages. Open, empty, and dry each tea bag before brushing it with a thin protective medium. Let the sheets dry separately so they do not bond into one solid stack.
- Trim and arrange them. Cut the pages to a similar size without removing every original edge. Place the strongest sheets at the beginning and end, and turn stained areas in different directions for visual variation.
- Decorate lightly. Add small words, painted marks, fine thread, or tiny pieces of paper. Leave enough blank space for the fibres and tea stains to remain part of the page design.
- Create the binding holes. Stack only a few layers at a time and pierce them on a suitable work surface. Keep the holes away from fragile edges and reinforce the spine with a narrow paper strip when necessary.
- Sew and cover the book. Use a simple pamphlet stitch or tied binding, then add thin cardstock covers. Open the finished book gently rather than forcing the pages completely flat.
I’d keep the book genuinely small. Enlarging the pages by joining many tea bags can create weak seams and make the delicate material harder to handle.
A single folded tea bag can become a four-page note. Several mini books may be stored together inside a small reused box.
Preserve Pressed Flowers in a Tea-Bag Bookmark
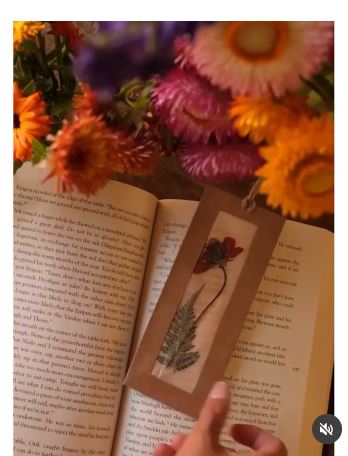
A pressed-flower bookmark makes use of the tea bag’s transparency without requiring a large frame or lantern structure. One opened bag can hold several narrow leaves or flower heads while remaining slim enough for a book.
The featured project brushes the opened tea bag with a glue-and-water mixture, positions pressed flowers on one half, and folds the other half over them.
Choose completely dried botanicals. Fresh flowers contain moisture that may darken, stain, or deteriorate inside the sealed paper.
Materials and Tools
- Dried opened tea bag
- Small pressed flowers or leaves
- Diluted PVA glue or matte medium
- Soft brush
- Non-stick work surface
- Scissors
- Hole punch
- Thin ribbon or thread
- Optional cardstock strip
Assemble the Bookmark
- Test the page size. Open the tea bag and place it beside an average book page. Trim only enough to create a practical bookmark while preserving the strongest original seams.
- Arrange the botanicals. Position the flowers on one half of the bag and leave a clear margin around the edges. Use fewer pieces than you think you need, as overlapping stems can create stiff lumps.
- Seal the layers. Brush on a thin coat of adhesive mixture, fold the second half over the flowers, and smooth the surface gently. Let the bookmark dry flat on a non-stick sheet.
- Finish the shape. Trim uneven edges, reinforce the top with a small piece of card when necessary, and add a fine ribbon. Test the bookmark inside a closed book to make sure no dried stem creates pressure on the pages.
I’d rather preserve one clear flower than fit an entire miniature garden inside the bookmark. The tea stain and open space help the plant remain visible.
The same method can create gift tags, window decorations, narrow journal inserts, or small botanical panels for handmade cards.
Why Tea-Bag Projects Tear, Mould, or Refuse to Compost
Saving the Bags While They Are Still Wet
A pile of damp tea bags has very little airflow. Open, empty, and spread them out promptly rather than storing them in a cup or plastic container.
Using Bags That Contained Milk or Sweetened Tea
Sugar, milk, syrups, and other additions may leave sticky residue and unwanted odours. Save bags from plain, unsweetened tea for paper projects.
Assuming Every Bag Is Paper
Some bags use plastic fibres, synthetic mesh, heat-sealed edges, or non-compostable components. Check the packaging and remove the leaves when the bag material remains uncertain.
Adding Staples to Compost
Remove staples, tags, strings, and other non-compostable fittings before adding suitable paper bags or leaves to a home compost system. EPA guidance specifically identifies paper tea bags without staples as appropriate worm-bin material.
Applying Too Much Glue
Tea-bag paper becomes fragile when saturated. Use a soft brush, support the sheet on a non-stick surface, and add thin layers rather than soaking it.
Pulling the Seams Open Quickly
Many bags unfold successfully, but others have bonded seams that tear under pressure. Work from one corner with tweezers or cut a narrow edge when unfolding is not practical.
Using a Real Candle Inside a Paper Lantern
Dried tea bags, flowers, glue, thread, and wooden sticks can burn. Use a cool battery-operated LED and keep the switch and battery compartment accessible.
Sealing Moist Flowers Inside the Paper
Fresh flowers may release moisture and change colour. Press and dry all botanical material before enclosing it in a bookmark, lantern panel, or collage.
Storing Finished Work in Damp Rooms
Tea-bag art remains a paper-based craft. Display it away from sinks, bathrooms, condensation, and direct contact with plant soil.
Frequently Asked Questions
Do used tea bags need to be rinsed before crafting?
Not always. Rinsing may remove loose tea but can also weaken thin paper and fade the natural stain. Empty the bag carefully and rinse only when residue remains.
How long should tea bags dry before I use them?
Drying time depends on the bag material, room temperature, airflow, and how wet the bag remains. Use it only when both sides and the folded seams feel completely dry.
Can all used tea bags go in home compost?
No. Some contain plastic fibres, synthetic mesh, staples, or heat-sealing materials. Check the packaging or compost only the tea leaves when the bag’s construction is uncertain.
What adhesive works on tea-bag paper?
A thin paper adhesive, diluted PVA glue, or matte acrylic medium may work. Test it on one bag first because the fibres and dyes differ between products.
Can I iron dried tea bags flat?
Direct heat may scorch the fibres or affect synthetic bag materials. Press the bags beneath clean paper and a light book instead, or test very low heat through a protective cloth on an expendable sample.
Can children make tea-bag crafts?
Children can make stain prints or simple collages with cooled, clean bags and adult supervision. Adults should handle staples, sharp tools, strong adhesives, binding needles, and lantern construction.
Can I save tea bags for several weeks before crafting?
Yes, but only after they have been emptied and dried fully. Store them loosely in a clean paper envelope or box rather than an airtight container.
Let the Tea Stain Become Part of the Design
These ways to reuse tea bags work because the material already carries colour, texture, and evidence of its first purpose.
A damp bag can leave the starting mark for a painted creature. Once opened and dried, the same thin paper can hold a photograph, preserve a flower, soften a collage, form a lantern panel, or become a page in a miniature book.
Begin with one plain, unsweetened tea bag and let it dry fully. A small bookmark or stain print is enough to understand how the material behaves before you save an entire stack.
Which used tea-bag project would you try first: a pressed-flower bookmark, miniature frame, translucent collage, painted creature, lantern, or tiny handmade book?