Turn Your Kitchen Cabinets into Chalkboard Magic
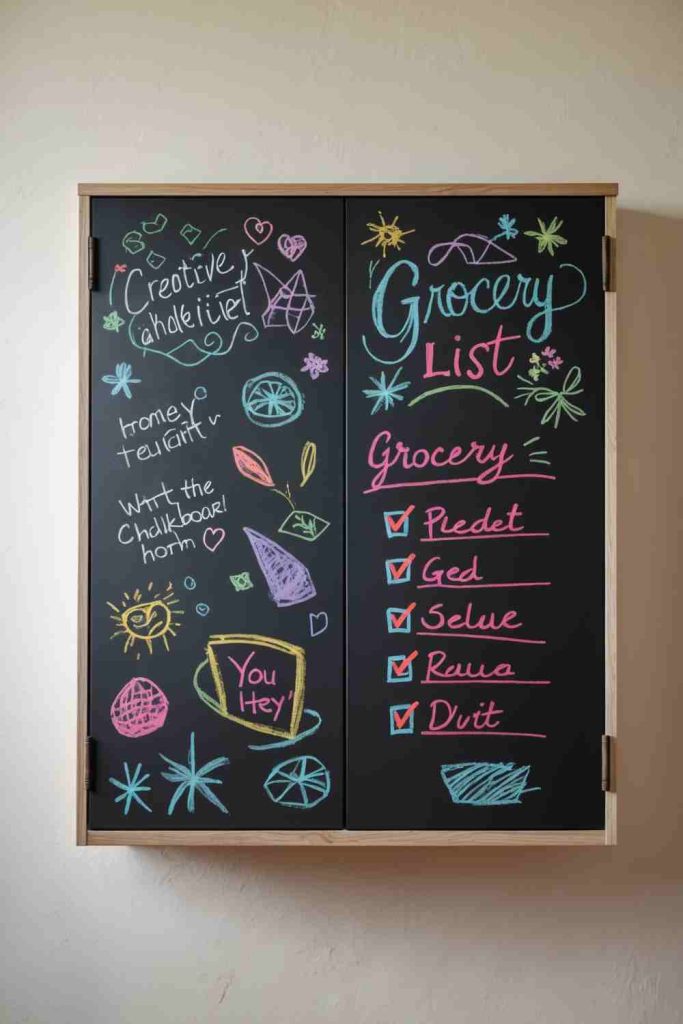
4 Steps to Create This Look
- Prep the Surface
Remove cabinet doors, clean them thoroughly, and sand them down to ensure the paint adheres smoothly. - Apply Chalkboard Paint
Use a foam roller for even coverage. Apply 2-3 coats, letting each layer dry completely before adding the next. - Add Creative Touches
Use chalk markers to design fun borders or labels. Don’t forget to leave space for grocery lists or notes! - Reinstall and Style
Once dry, reattach the cabinets and style your kitchen with colorful chalk and erasers nearby. Enjoy your upcycled masterpiece!
Transform Your Kitchen Cabinets with Vintage Map Decoupage
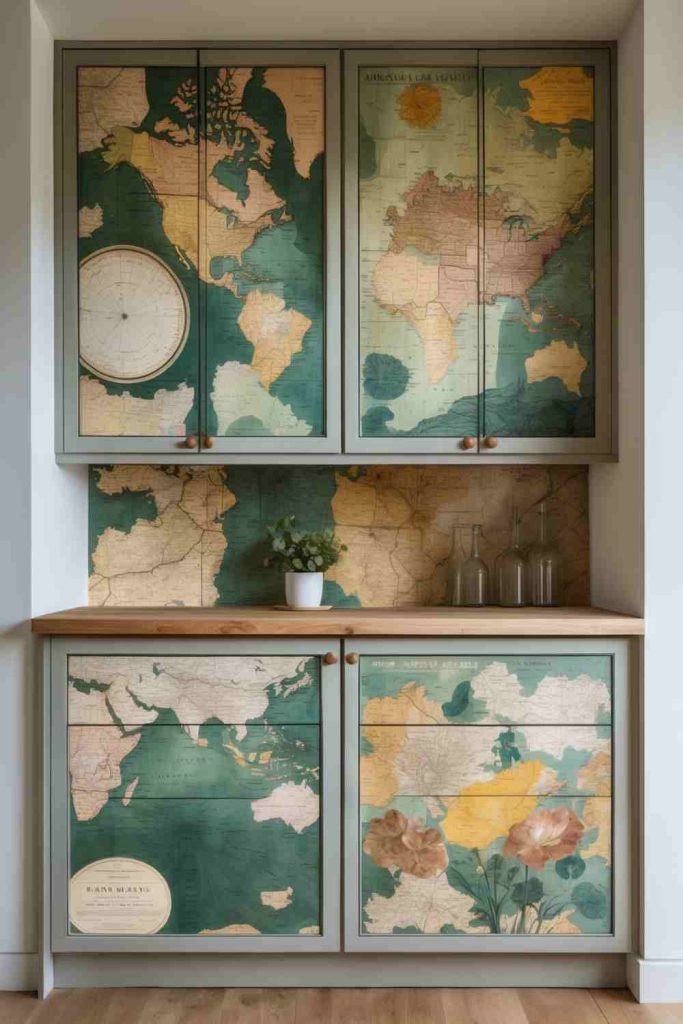
4 Steps to Create This Look Vintage Map Decoupage
- Prep Your Cabinets
Remove the cabinet doors and clean the surfaces thoroughly. Sand them lightly to ensure the decoupage adheres smoothly. - Choose Your Maps
Select vintage-style maps that match your aesthetic. Trim them to fit the cabinet door dimensions. - Apply the Decoupage Glue
Spread a thin, even layer of glue on the cabinet surface. Carefully place the map, smoothing out any wrinkles or bubbles. Once dry, seal with a clear topcoat for durability. - Reattach and Style: Once fully dry, reattach the cabinet doors. Complement your new look by styling your kitchen with coordinating vintage-inspired decor. Enjoy your upcycled masterpiece!
Upcycle Kitchen Cabinets with Bold Fabric Panels
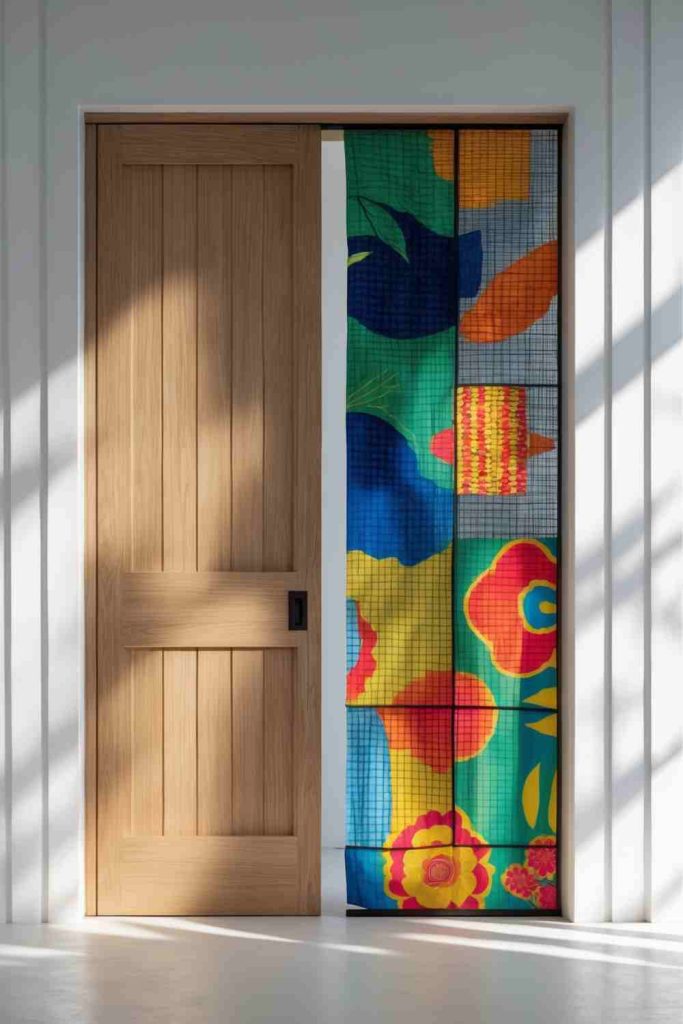
4 Steps to Create This Bold Fabric Panels
- Prep Your Cabinets
Remove cabinet doors and clean them thoroughly. Sand the surfaces lightly to help the adhesive stick better. - Choose Your Fabric
Pick vibrant, durable fabric that matches your style. Measure and cut it to fit the door panel areas. - Attach the Fabric
Use fabric glue or a strong adhesive spray to stick the fabric onto the panels. Smooth out any wrinkles and trim the edges for a neat finish. Seal with a protective spray for durability if needed. - Reinstall and Admire
Once dry, reattach the cabinet doors. Showcase your new, artistic kitchen design with bold colors and patterns that pop!
Upcycle Kitchen Cabinets into a Hidden Spice Rack
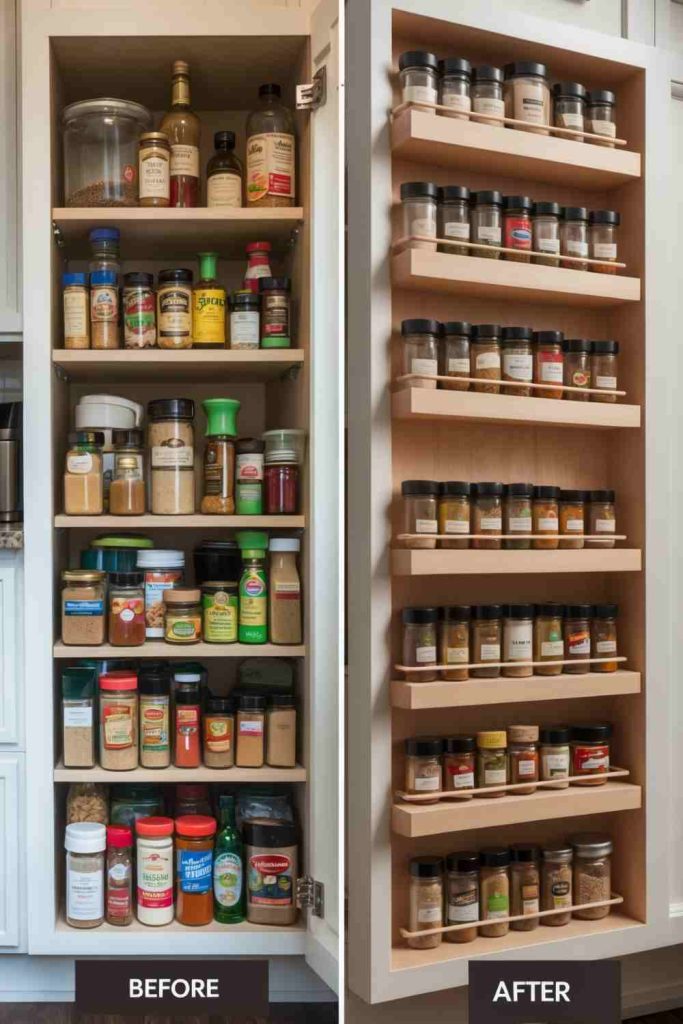
4 Steps to Create This Hidden Spice Rack
- Measure and Prepare
Empty the cabinet and measure the available space. Decide how many shelves or racks you want to add for your spice jars. - Install Custom Shelves
Use pre-made spice racks or install custom shelves to fit snugly inside the cabinet. Make sure the shelves are sturdy and evenly spaced. - Organize Your Spices
Transfer your spices into uniform jars with clear labels for easy identification. Arrange them by size or frequency of use for added convenience. - Style and Secure
Secure the shelves or racks in place. Close the cabinet door, keeping your spices hidden yet easily accessible. Now admire your tidy, upgraded kitchen!
Upcycle Kitchen Cabinets with Stylish Lattice Inserts
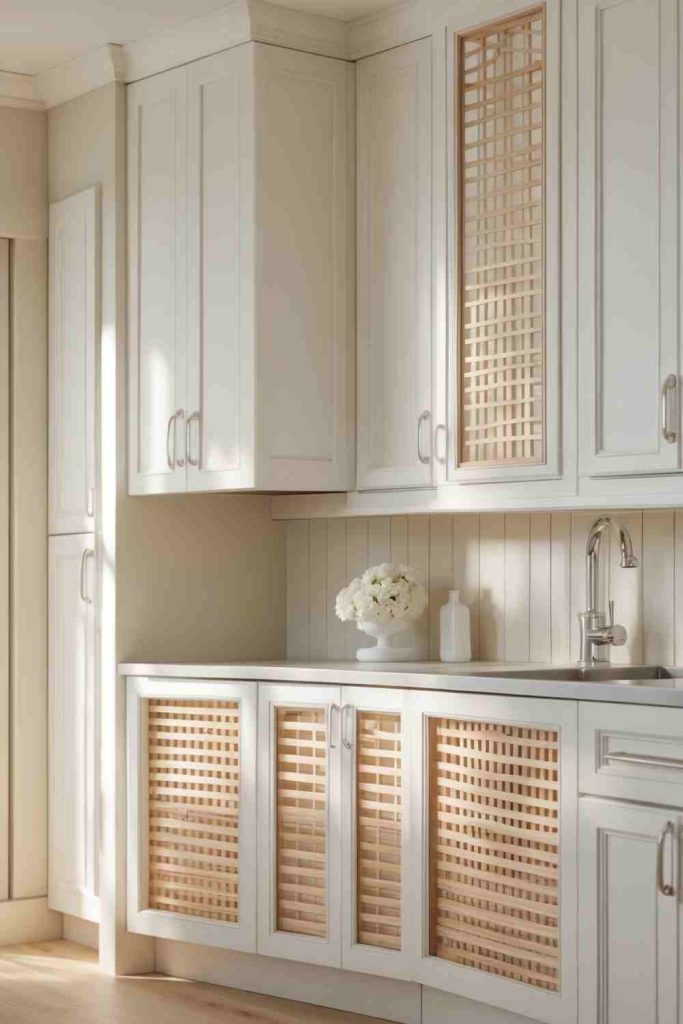
4 Steps to Create This Stylish Lattice Inserts
- Remove Cabinet Panels
Carefully detach the inner panel of your cabinet doors, leaving the frame intact. Sand any rough edges for a clean finish. - Cut and Fit Lattice Inserts
Choose lattice wood in a pattern that fits your style. Measure and cut the lattice to fit the open space in your cabinet doors. - Attach the Inserts
Secure the lattice panels into place using wood glue or small nails. Ensure it is firmly attached and aligned properly. - Paint and Reinstall
Paint or stain the lattice inserts to match your cabinets. Once dry, reattach the doors and admire the fresh, modern look in your kitchen!
Upcycle Kitchen Cabinets into a Lazy Susan Corner
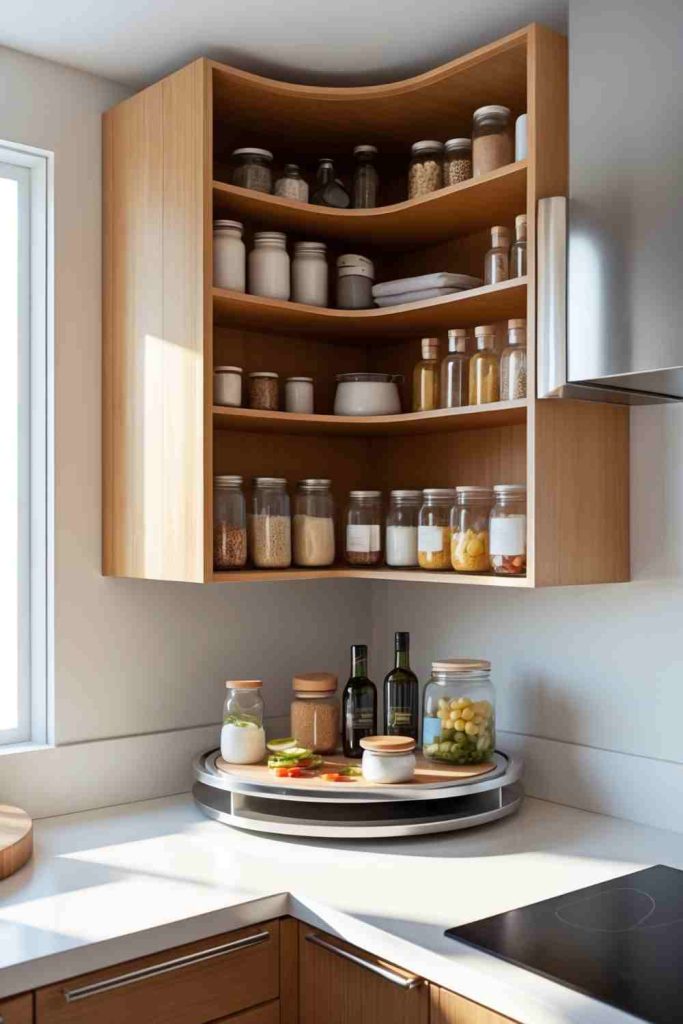
4 Steps to Create This Lazy Susan Corner
- Clear and Measure Your Corner Cabinet
Empty your corner cabinet and measure the dimensions to determine the size of the Lazy Susan you’ll need. - Install the Lazy Susan Mechanism
Purchase a rotating Lazy Susan shelf kit. Follow the instructions to attach the rotating mechanism securely to the cabinet base or shelves. - Organize Your Items
Transfer spices, jars, or kitchen essentials into clear containers or labeled jars. Arrange them neatly on the Lazy Susan for easy access. - Style and Enjoy
Add decorative touches like matching jars or labels to elevate the look. Spin your new Lazy Susan and enjoy a clutter-free and stylish kitchen!
Upcycle Kitchen Cabinets into a Handy Magnetic Board
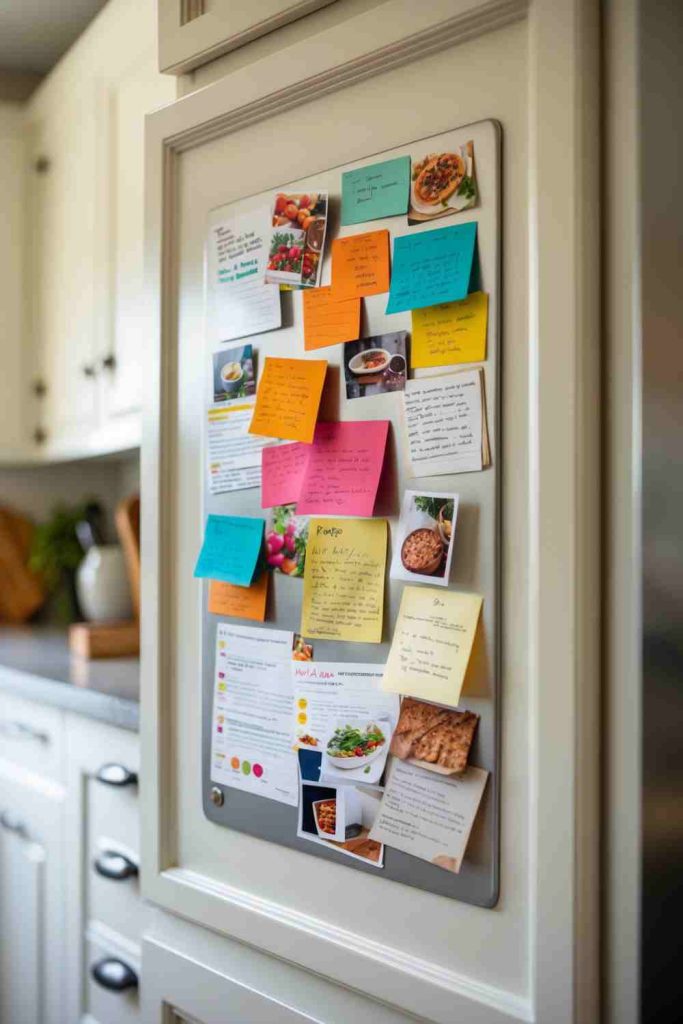
4 Steps to Create This Handy Magnetic Board
- Remove and Prep the Cabinet Door
Take the cabinet door off its hinges and clean it thoroughly. Sand lightly to ensure proper adhesion of materials. - Attach a Magnetic Sheet
Cut a magnetic sheet to fit the cabinet surface. Use strong adhesive or screws to secure it firmly to the door. - Paint or Decorate
Paint over the magnetic surface using chalkboard or whiteboard paint for added functionality. Customize the frame with colors or patterns that match your kitchen decor. - Reinstall and Use
Reattach the cabinet door, and start organizing! Add sticky notes, recipe cards, or magnets to keep everything in view and within reach. Your kitchen just got a whole lot smarter and more stylish!
Upcycle Kitchen Cabinets with Vibrant Hand-Painted Patterns
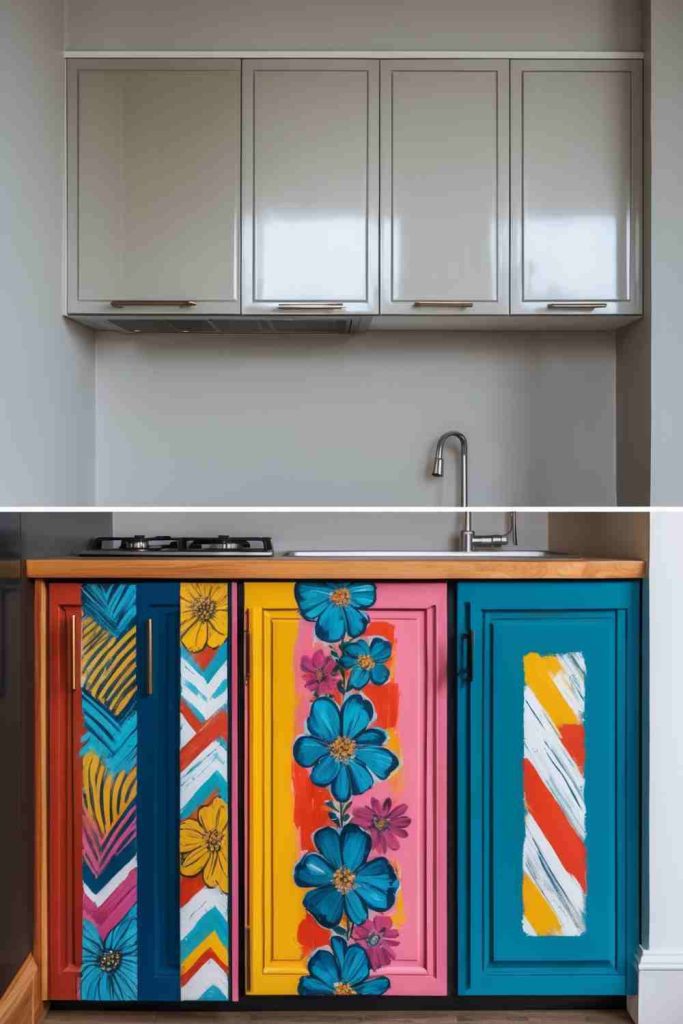
4 Steps to Create This Hand-Painted Patterns
- Clean and Prep the Cabinets
Remove the cabinet doors and clean them thoroughly. Sand the surface lightly to allow the paint to adhere properly. - Design Your Pattern
Sketch your design on paper first, or freehand directly on the cabinet. Use painter’s tape for straight lines or stencils for intricate designs. - Paint Your Design
Select bold, vibrant paints suitable for wood surfaces. Use brushes or sponges to fill in your pattern, and allow the paint to dry completely before layering additional colors or details. - Seal and Reinstall
Apply a protective sealant to preserve your artwork and add durability. Reattach the cabinet doors and enjoy your stunning, one-of-a-kind kitchen makeover!
Upcycle Kitchen Cabinets into a Functional Pull-Out Pantry
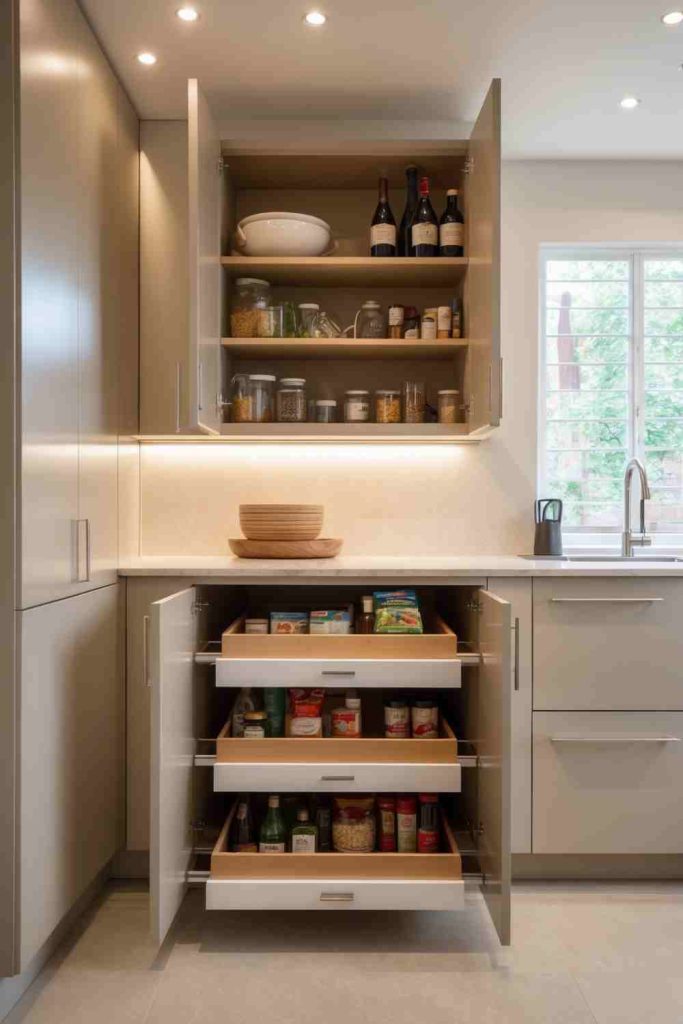
4 Steps to Create This Functional Pull-Out Pantry
- Plan and Measure
Empty your cabinet and measure the interior dimensions, ensuring you have enough space for sliding drawers. - Install Sliding Hardware
Purchase pull-out drawer kits and follow the instructions to attach the sliding hardware securely inside the cabinet. - Add Custom Drawers
Use pre-made or custom-built drawers that fit your cabinet’s dimensions. Secure them onto the sliding tracks and test for smooth operation. - Organize and Style
Place your jars, bottles, and kitchen essentials into the new pull-out drawers. Keep items neatly categorized and enjoy your upgraded, beautifully organized kitchen!
Upcycle Kitchen Cabinets with Stylish Sliding Barn Doors
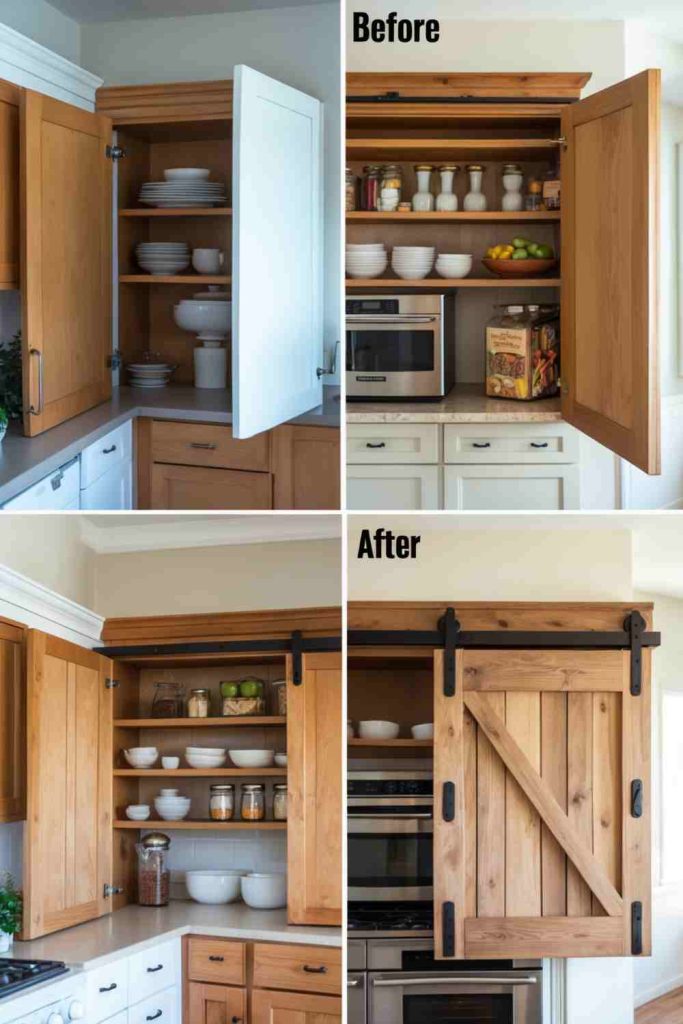
4 Steps to Create This Stylish Sliding Barn Doors
- Remove Existing Doors
Take off the old cabinet doors and clean the cabinet surface to prepare for the barn door installation. - Install Barn Door Hardware
Measure and attach sliding barn door hardware to your cabinet frame. Make sure the tracks are level and secure. - Add Custom Sliding Doors
Create or purchase barn doors to fit your cabinet opening. Attach them to the hardware and test the sliding mechanism. - Organize and Showcase
Arrange your dishes or dry goods inside the cabinet for an organized, clean look. Enjoy the rustic elegance of your newly upcycled sliding barn door cabinet!
Upcycle Kitchen Cabinets with Elegant Stenciled Patterns
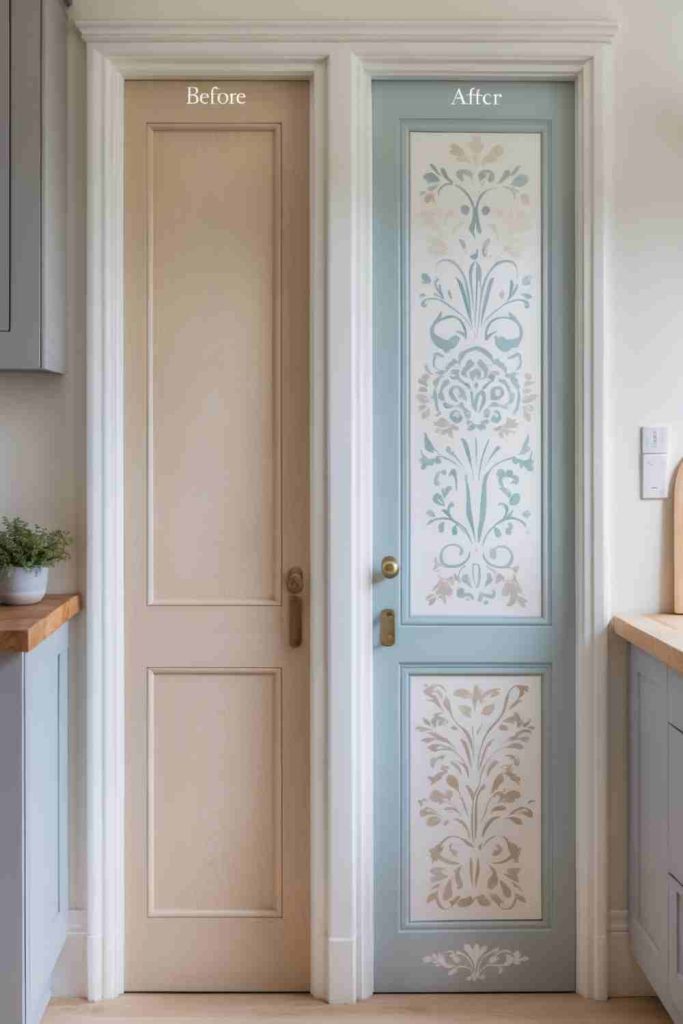
4 Steps to Create This Elegant Stenciled Patterns
- Clean and Prep the Surface
Remove the cabinet doors and clean them thoroughly. Sand lightly to create a smooth surface for painting. - Choose and Apply Base Paint
Pick a base color that complements your kitchen decor. Apply the paint evenly and allow it to dry completely. - Stencil Your Pattern
Position your stencil on the cabinet and secure it with tape. Use a stencil brush or sponge to apply your chosen paint color. Carefully remove the stencil and repeat the process as needed. - Seal and Reinstall
Once the design is dry, apply a sealant to protect the pattern. Reattach the doors and enjoy your beautifully upcycled kitchen cabinets!
Upcycle Kitchen Cabinets with Stylish Under-Cabinet Lighting
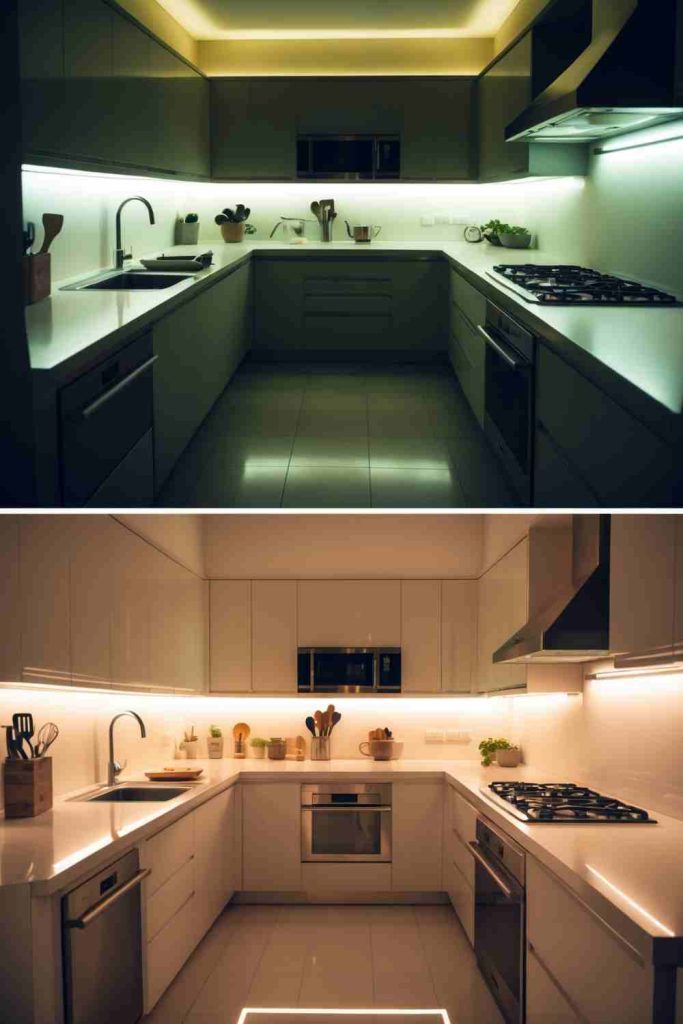
4 Steps to Create This Stylish Under-Cabinet Lighting
- Choose Your Lighting
Select under-cabinet lighting, such as LED strips or puck lights, that complements your kitchen’s design and brightness needs. - Prep Your Cabinets
Clean the undersides of the cabinets and plan out where you’ll install your lights. Mark the placement for even lighting distribution. - Install the Lights
Follow the lighting kit instructions to securely attach the lights. Ensure proper wiring or battery placement for functionality. - Illuminate and Enjoy
Turn on your new under-cabinet lights to see the difference! Enjoy a brighter, more stylish kitchen that’s as functional as it is beautiful.
Upcycle Kitchen Cabinets into a Chic Rustic-Style Cabinet
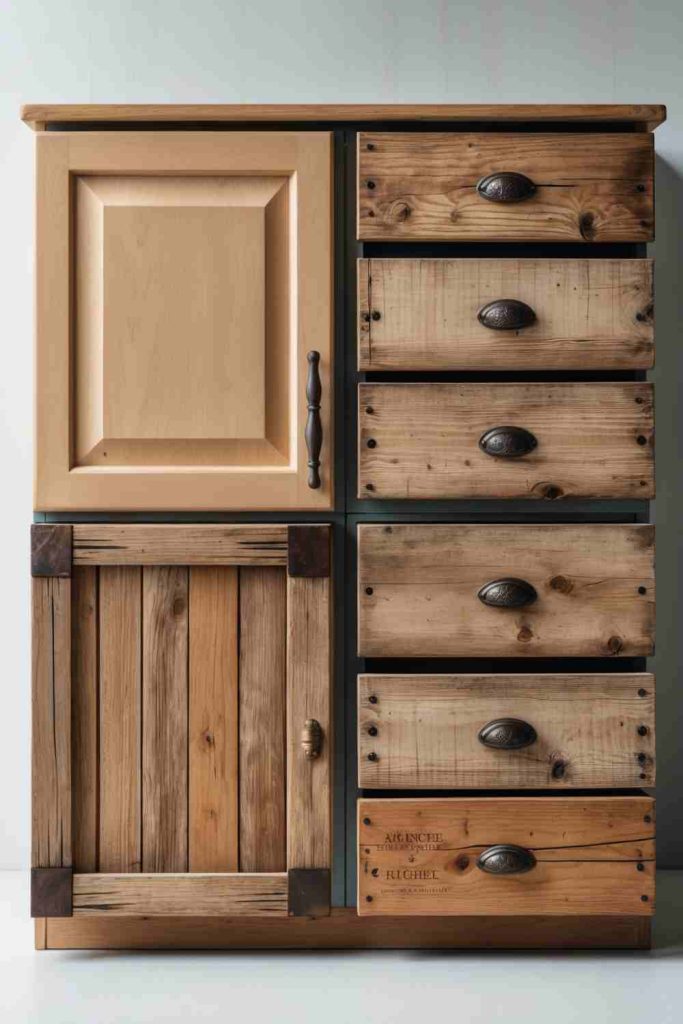
4 Steps to Create This Chic Rustic-Style Cabinet
- Disassemble and Plan
Remove cabinet doors and drawers. Decide on the placement, blending light and dark tones for a rustic vibe. - Sand and Stain
Sand all surfaces to remove any old finishes. Apply wood stain to enhance natural grain, choosing complementary tones for an industrial feel. - Add Metal Accents
Attach metal brackets, handles, or corner pieces to complete the rustic aesthetic. Use durable, dark metal for that perfect industrial charm. - Reassemble and Style
Reinstall doors and drawers into your chosen arrangement. Add your cabinet to any room for a beautiful, functional statement piece!
Upcycle Kitchen Cabinets into a Functional Vertical Herb Garden
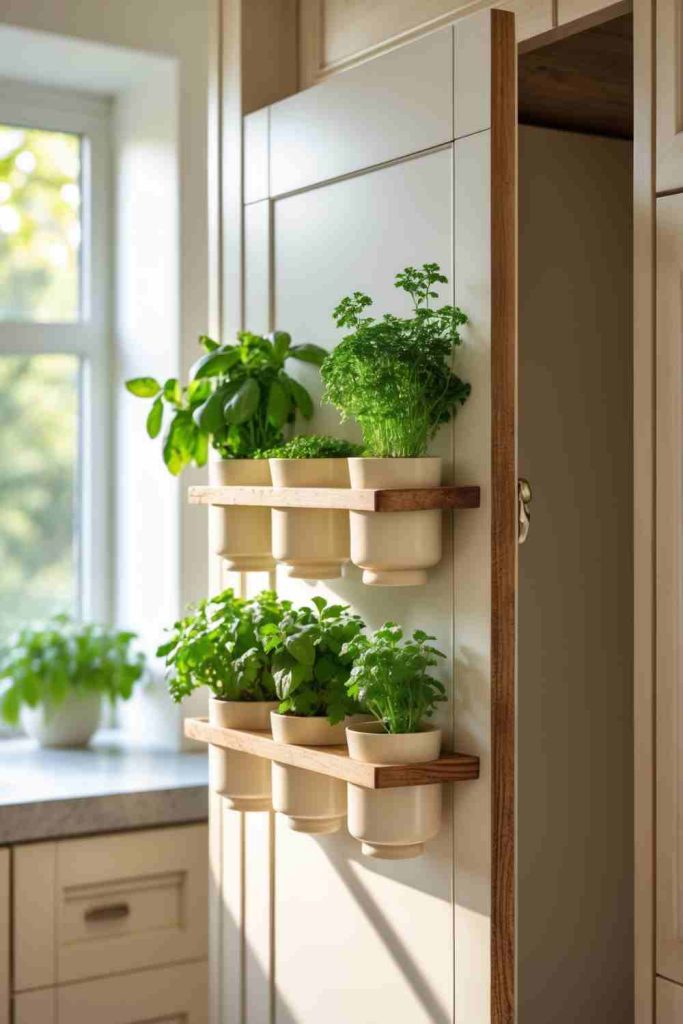
4 Steps to Create This Vertical Herb Garden
- Disassemble and Prep
Remove cabinet doors and hardware. Sand and paint the cabinet frame or shelves to suit your kitchen style. - Build Your Shelves
Install sturdy wooden shelves inside the cabinet or along the panel. Ensure they can hold small pots securely. - Add Pots and Plants
Arrange cream or natural-toned pots filled with your favorite herbs like basil, mint, or parsley. Insert hooks or dowels for added stability if needed. - Position and Maintain
Place your vertical herb garden near a window for sunlight. Water regularly and trim herbs to keep them fresh and thriving. Enjoy your kitchen’s green upgrade!
Upcycle Kitchen Cabinets with Bold Wallpaper Inserts
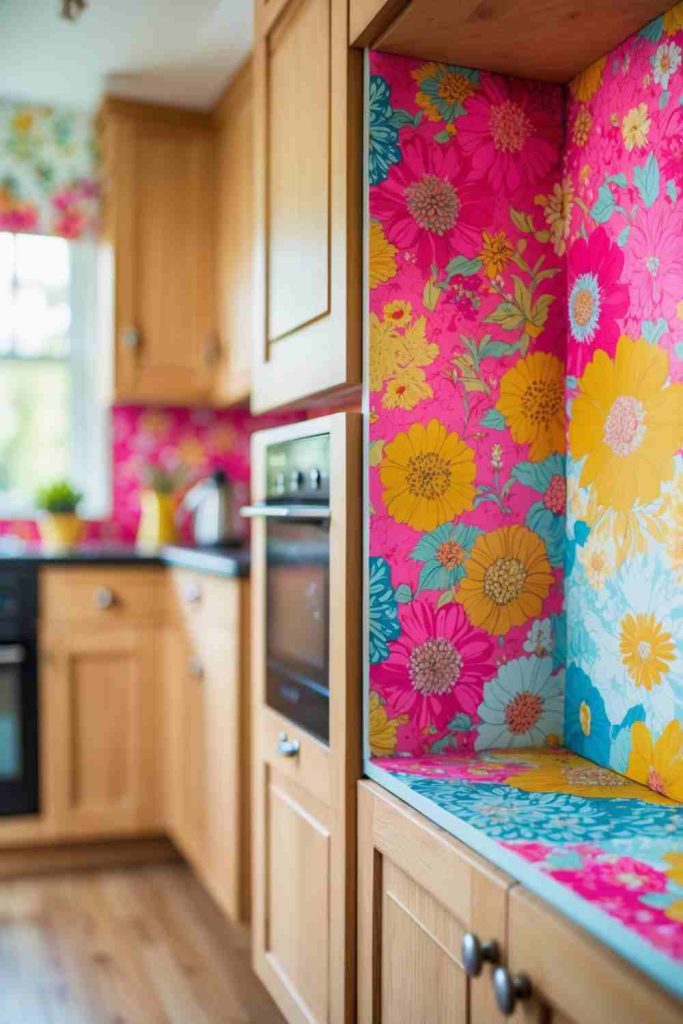
4 Steps to Create This Bold Wallpaper Inserts
- Select Your Wallpaper
Choose bold, vibrant wallpaper designs that match your desired kitchen theme. Floral, geometric, or abstract patterns work best for adding personality. - Prep Your Cabinets
Remove the cabinet doors and sand the panels for a smooth surface. Clean them thoroughly for proper adhesion. - Apply the Wallpaper
Cut wallpaper pieces to fit the cabinet door insets. Use adhesive or wallpaper glue to attach them securely. Smooth out air bubbles as you go. - Reassemble and Style
Once the wallpaper is fully dry, reattach the cabinet doors. Pair with matching decor or accessories to complete your fun, colorful kitchen upgrade!