
Old wood rarely looks identical from one piece to the next, and that is exactly why it works so well for upcycling. A pallet slat may have old nail marks, a crate may be darker at the corners, and a short offcut may carry a knot that would never appear in a factory-made panel. I am Stella Eve Louise, and I tend to see those differences as useful information rather than flaws. They tell you what the material has already been through and help you decide what it could become next.
Wood is also a material that deserves a little respect before the saw or drill comes out. Reclaimed boards can hide metal, weak end grain, old coatings, moisture damage, or structural problems that are easy to miss when you are focused on the finished look. I don’t think every saved board needs to become furniture. Sometimes the smartest reuse is a frame, a key holder, or a small piece of wall art because the wood is visually interesting but not suitable for heavy loads.
These upcycling wood ideas range from small scrap projects to shelves, headboards, planters, and a picnic table. The useful thread running through all of them is simple: keep the character that makes reclaimed wood worth saving, then build the new function around what the material can safely do.
Inspect Reclaimed Wood Before You Cut, Sand, or Drill
Start with the condition and history of the wood, not the project you hope it will become. Remove nails, screws, staples, wire, and other hidden metal before cutting or sanding. Brush away dirt, look for rot, deep splits, insect damage, oily residues, soft fibers, and unstable old coatings. If a board smells strongly of chemicals or its previous use is unknown, I would keep it away from food-contact projects, children’s items, pet projects, and anything that will be handled closely.
Work on a stable bench and clamp small pieces before drilling or sawing. Wear eye protection for cutting and drilling, control dust with appropriate extraction or respiratory protection for the material and process, and stop if you discover embedded metal or an unknown coating that changes the risk of the job.
Match the Joinery and Hardware to the Job the Wood Must Do
A picture frame, coat rack, bookshelf, stool, and picnic table ask completely different things from reclaimed timber. Decide the expected load before choosing screws, brackets, glue, or wall anchors. Decorative glue joints can be fine for light pieces, while shelves, seating, headboards, and outdoor furniture need sound material and mechanical connections that transfer load through solid wood. Then test the structure gradually instead of assuming a rustic-looking joint is strong because it feels solid in your hands.
Good upcycling is not about forcing every scrap into the most ambitious project. If a plank is attractive but too thin or cracked for furniture, move it toward wall art, a frame, a jewelry organizer, or another light-load use. That is still successful reuse, and often a safer one.
Plan the Finish Around Food, Heat, Moisture, Pets, and Children
The finish should follow the use. A wall panel can tolerate choices that would be inappropriate on a cutting board, toy, pet bed, or planter. Keep unknown reclaimed coatings away from direct food contact, use only products explicitly intended for the intended use, and avoid trapping wet soil against timber when separate pots can do the job. For wooden lanterns and candle holders, I would favor low-heat battery lighting rather than asking reclaimed wood to sit beside an open flame.
I know it can be tempting to choose stain or paint first because finish is the fun part, but the intended use should make that decision. Once you know where the piece will live and what it will touch, the safest and most practical finish choices become much clearer.
DIY Driftwood Key Holder
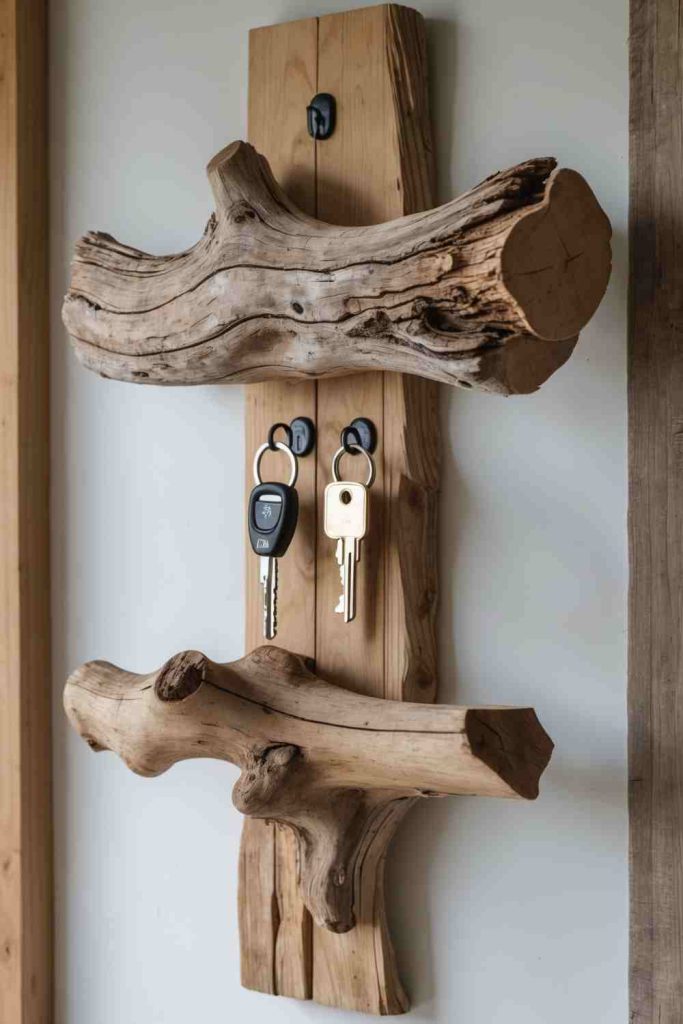
A small reclaimed-wood project can be especially satisfying when the original marks still make sense in the finished piece. This project turns a weathered piece of driftwood and a backing board into a compact wall station for keys, dog leads, lanyards, or lightweight everyday items. The appeal comes from letting the irregular grain and natural shape remain visible while adding only the hardware needed for daily use.
Before you commit to the final layout, decide which marks are worth keeping and which areas need repair or sanding. Reclaimed wood often gives you less freedom than new lumber, but that can improve the design because you are working with real knots, holes, board widths, and worn edges instead of pretending the material is blank. The practical goal is to preserve character without allowing a weak board, rough edge, unsuitable coating, or poor fixing point to become part of the finished function.
Materials and Tools
· Dry driftwood
· Sound reclaimed backing board
· Small hooks or knobs
· Screws suitable for the wood
· Wall-mounting hardware
· Drill and bits
· Sandpaper
· Brush or cloth for cleaning
Steps for This Wood Upcycling Project
1. Inspect and clean the wood. Brush away loose dirt, check both pieces for soft or crumbling areas, and remove any hidden metal before sanding. Let the driftwood keep its uneven outline, but smooth every place that hands will touch.
2. Plan the hook spacing. Lay the driftwood against the backing board and mark where the hooks can sit without crowding one another. Check from the front before drilling because an off-center arrangement can make a small key holder feel busier than it needs to.
3. Drill and assemble securely. Clamp the wood rather than holding it in your hand, drill pilot holes where helpful, and attach the driftwood and hooks with fasteners that bite into solid wood. Then tug each hook gently to confirm it is not relying on a loose surface layer.
4. Mount it for the intended load. Choose wall fixings that suit the wall type and the light items you plan to hang. Keep the finished rack for keys and similarly small objects rather than treating decorative driftwood as structural storage.
I would resist sanding away every weathered mark here. The project is more convincing when the wood still looks found and aged, provided the surface is clean and comfortable to handle.
Variation: Use a short offcut instead of driftwood for a cleaner look, or add one narrow ledge above the hooks for a small tray – as long as the mounting is designed for the extra load.
Upcycled Wood Birdhouse
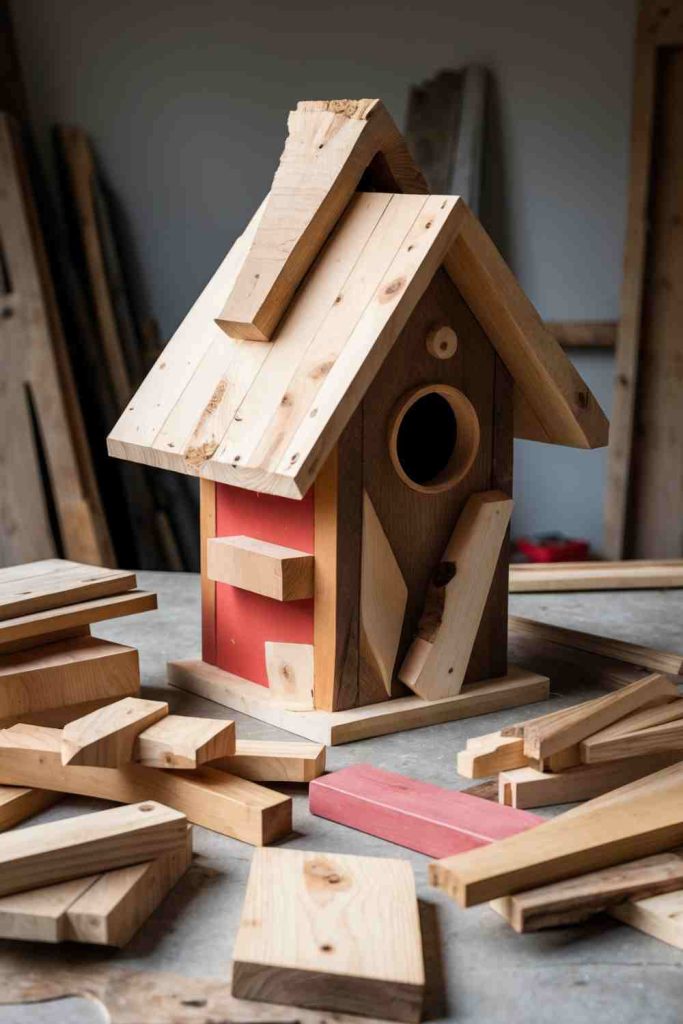
This idea works because the old wood is doing real work rather than acting as a decorative label for sustainability. This project turns leftover exterior-suitable wood into a small birdhouse with a simple roof, enclosed body, and access opening. This is one of those projects where reclaimed material only makes sense if the wood is sound, dry, free of protruding fasteners, and suitable for outdoor use.
Before you commit to the final layout, decide which marks are worth keeping and which areas need repair or sanding. Reclaimed wood often gives you less freedom than new lumber, but that can improve the design because you are working with real knots, holes, board widths, and worn edges instead of pretending the material is blank. The practical goal is to preserve character without allowing a weak board, rough edge, unsuitable coating, or poor fixing point to become part of the finished function.
Materials and Tools
· Sound untreated or known-safe wood scraps
· Saw
· Drill and bits
· Exterior-suitable screws or nails
· Wood glue suitable for the assembly if needed
· Sandpaper
· Measuring tools
· Outdoor mounting hardware
Steps for This Wood Upcycling Project
1. Sort the usable boards. Reject wood that is rotten, heavily split, contaminated, or of unknown treatment if the risk cannot be assessed. Remove nails and staples, then sand splintered edges without polishing the wood so smooth that assembly marks become hard to see.
2. Plan the box and opening. Sketch a simple body, roof, floor, and front panel before cutting. Keep the design modest and use a reliable birdhouse plan appropriate to the species in your area rather than guessing critical opening or ventilation details.
3. Cut and assemble the shell. Clamp each board before sawing or drilling, then join the walls squarely with suitable fasteners. Build the roof and access panel so the structure can be checked and cleaned rather than permanently sealing every joint.
4. Finish and mount thoughtfully. Avoid decorative finishes of uncertain safety on interior surfaces. Smooth exposed splinters, confirm the house drains and ventilates according to your chosen plan, then mount it securely where local bird guidance recommends.
I know the temptation is to make a birdhouse mostly about decoration, but function matters more here. A plain, well-built box from sound reclaimed timber is a better upcycle than a highly decorated one made from questionable wood.
Variation: If you cannot verify that your reclaimed timber is appropriate for a wildlife structure, use it for a decorative indoor birdhouse instead and keep the real outdoor house to known-safe material.
DIY Pallet Dog Bed
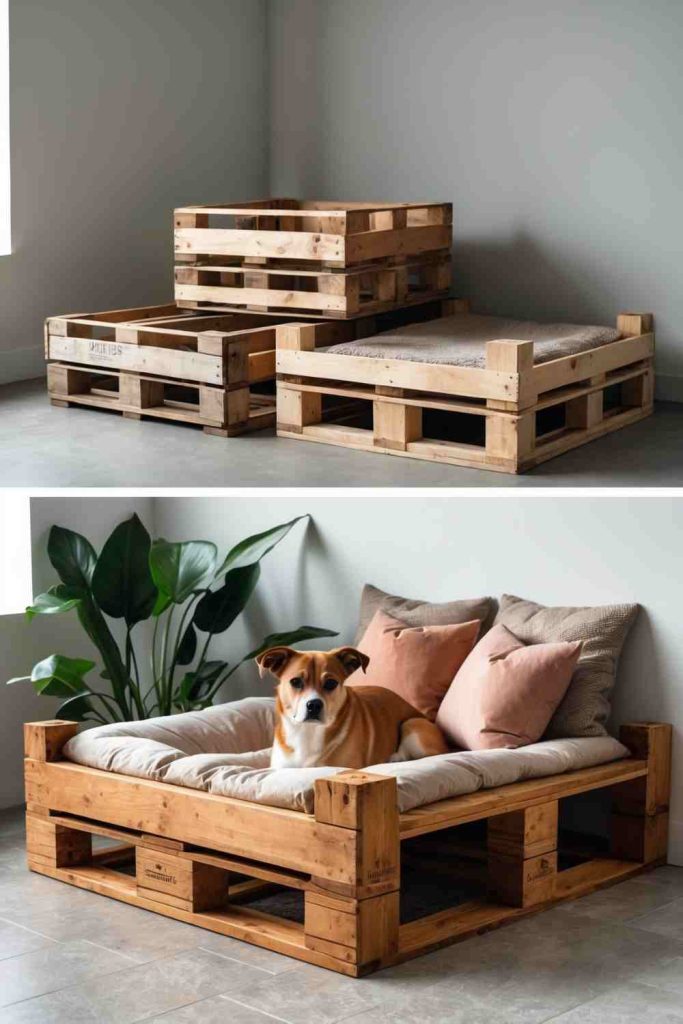
Short, irregular boards become much easier to use when the project is designed around their actual size and strength. This project turns sound pallet or reclaimed boards into a raised pet-bed frame that supports a removable cushion. The frame needs to be more than attractive: it should be stable, smooth, free of exposed hardware, and easy to clean around.
Before you commit to the final layout, decide which marks are worth keeping and which areas need repair or sanding. Reclaimed wood often gives you less freedom than new lumber, but that can improve the design because you are working with real knots, holes, board widths, and worn edges instead of pretending the material is blank. The practical goal is to preserve character without allowing a weak board, rough edge, unsuitable coating, or poor fixing point to become part of the finished function.
Materials and Tools
· Known-source pallet or reclaimed boards
· Pet cushion or washable mattress
· Saw
· Drill
· Screws
· Sandpaper
· Measuring tape
· Optional pet-appropriate finish for non-chew surfaces
Steps for This Wood Upcycling Project
1. Choose safe, sound timber. Use only wood whose condition and previous use you can assess. Pull all nails and staples, reject cracked or oily boards, and sand the surfaces, corners, and gaps that a paw, collar, or fabric cover could catch on.
2. Plan the frame around the cushion. Set the cushion on the floor and arrange the boards around it before cutting. Leave practical access for removing the cushion and avoid decorative rails or gaps that could trap a paw.
3. Build a rigid base. Cut and clamp the pieces, then screw the main frame together through solid wood. Add support beneath the cushion where needed and check that the frame sits flat without rocking before you add any decorative parts.
4. Finish and test the bed. Round or soften sharp edges, recess or cover exposed fastener heads, and wipe away sanding dust. Press and shift your weight across the frame by hand to check movement, then add the washable cushion only after the structure feels solid.
For me, the best pallet dog bed is almost boring underneath the cushion – square, smooth, stable, and easy to inspect. The reclaimed character can show on the outer faces without creating hazards where the dog actually rests.
Variation: Skip the raised sides and make a low platform if your pet benefits from easier access. A simple low base can still make good use of short boards while reducing the amount of joinery.
DIY Wooden Pallet Bookshelf
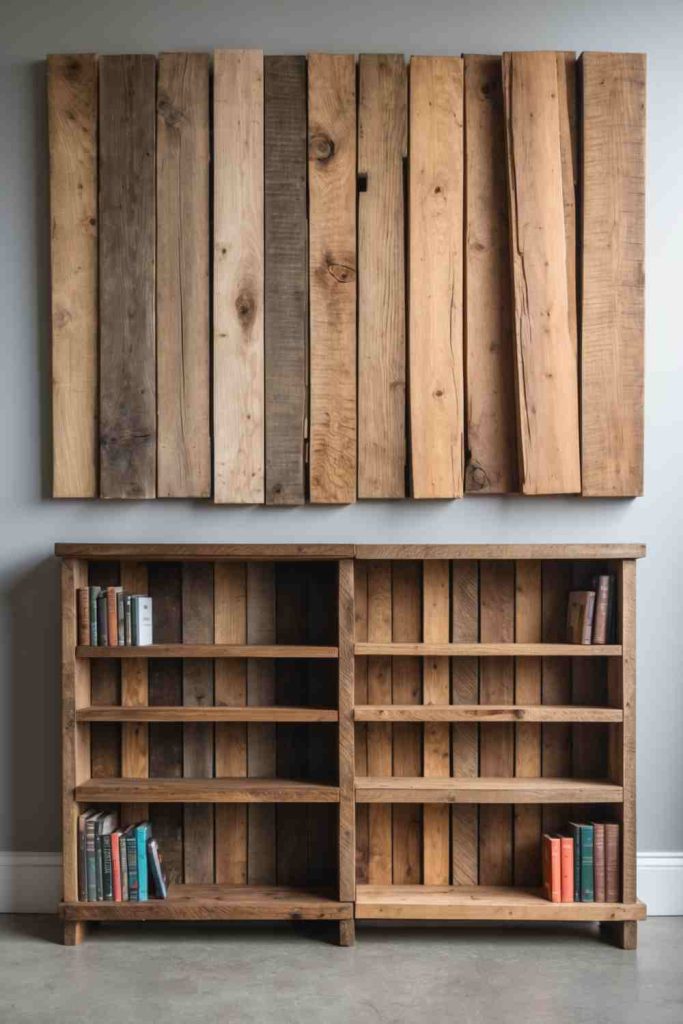
What I like here is the balance between visible age and a very ordinary practical function. This project turns pallet boards into a shallow wall or floor bookshelf that turns narrow reclaimed planks into useful book storage. Books become heavy quickly, so the shelf design and wall fixing matter more than the rustic finish.
Before you commit to the final layout, decide which marks are worth keeping and which areas need repair or sanding. Reclaimed wood often gives you less freedom than new lumber, but that can improve the design because you are working with real knots, holes, board widths, and worn edges instead of pretending the material is blank. The practical goal is to preserve character without allowing a weak board, rough edge, unsuitable coating, or poor fixing point to become part of the finished function.
Materials and Tools
· Sound pallet boards
· Saw
· Drill
· Wood screws
· Sandpaper
· Square and measuring tape
· Clamps
· Appropriate wall anchors or brackets
Steps for This Wood Upcycling Project
1. Break down and sort the pallet. Remove boards carefully, pull out all hidden nails, and discard damaged pieces instead of trying to make every slat useful. Sand the boards enough to remove splinters while keeping the grain visible.
2. Design for the book load. Decide whether the shelf will stand on the floor or mount to the wall, then position supports beneath the shelf boards rather than relying on decorative face pieces. Check shelf depth against the books you actually want to store.
3. Assemble the shelf squarely. Clamp the pieces, drill pilot holes where appropriate, and screw into solid sections of wood. Then stand the unit on a level surface and correct any twist before adding a finish or mounting hardware.
4. Anchor and load gradually. Use wall fixings that suit the wall construction and expected weight if the shelf is wall mounted. Add books gradually and watch for movement, sagging, or loosening instead of filling every shelf at once.
I do not think a pallet bookshelf needs decorative distressing – the old nail marks and color variation already provide enough texture. I would put the effort into straight shelves and trustworthy mounting instead.
Variation: Use one short pallet section as a narrow picture-book ledge or magazine rack. A smaller shelf is often the better beginner project because the load and wall span are easier to manage.
DIY Wooden Crate Coffee Table
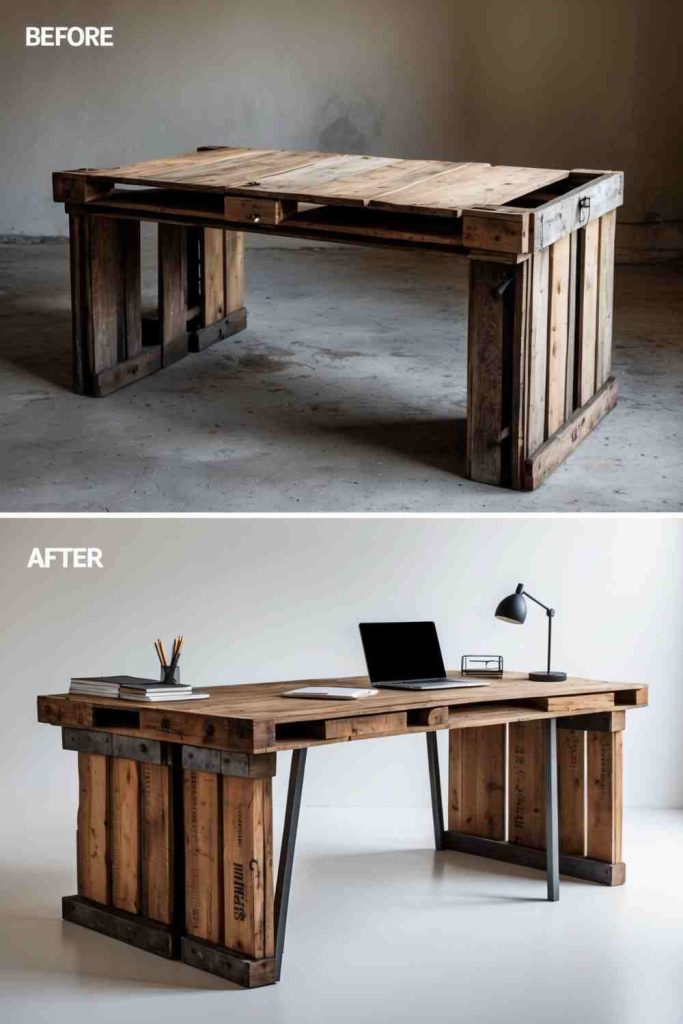
There is no need to erase every dent or nail mark when the new structure is clean, secure, and easy to use. This project turns reused wooden crates into a low coffee table with open cubbies for books, baskets, or living-room storage. The crate arrangement can create useful storage, but the table still needs a level top, firm connections, and a base that does not shift when someone bumps it.
Before you commit to the final layout, decide which marks are worth keeping and which areas need repair or sanding. Reclaimed wood often gives you less freedom than new lumber, but that can improve the design because you are working with real knots, holes, board widths, and worn edges instead of pretending the material is blank. The practical goal is to preserve character without allowing a weak board, rough edge, unsuitable coating, or poor fixing point to become part of the finished function.
Materials and Tools
· Sound wooden crates
· Reclaimed base board if needed
· Wood screws
· Drill
· Sandpaper
· Clamps
· Optional furniture feet or locking casters
· Finish suitable for the intended indoor use
Steps for This Wood Upcycling Project
1. Inspect every crate. Check corners, slats, staples, and joints before planning the layout. Reinforce loose crate corners and sand splinters, because a coffee table gets touched from every side and weak slats are easy to catch with a foot.
2. Dry-fit the arrangement. Turn the crates so the openings create useful cubbies and confirm the overall shape suits the room. Measure diagonals or use a square so the layout is not slowly drifting out of alignment.
3. Join the units and base. Clamp neighboring crates together before screwing through strong frame members, not thin decorative slats. Attach a base or feet if the arrangement needs extra rigidity, and use locking casters only if the table is designed to stay put during use.
4. Finish the touch points. Sand the top edges and corners again, clean the surface, and apply an appropriate finish if desired. Then check for wobble and exposed fasteners before using the cubbies or placing objects on top.
The clever part of this table is the storage, so I would leave at least some crate openings easy to reach. Turning every cubby inward can look tidy in a photo but makes the table less useful day to day.
Variation: Use two sturdy crates and a reclaimed plank top for a narrower table, or make a side table from one crate if you want the same storage idea with less assembly.
DIY Wooden Picture Frame
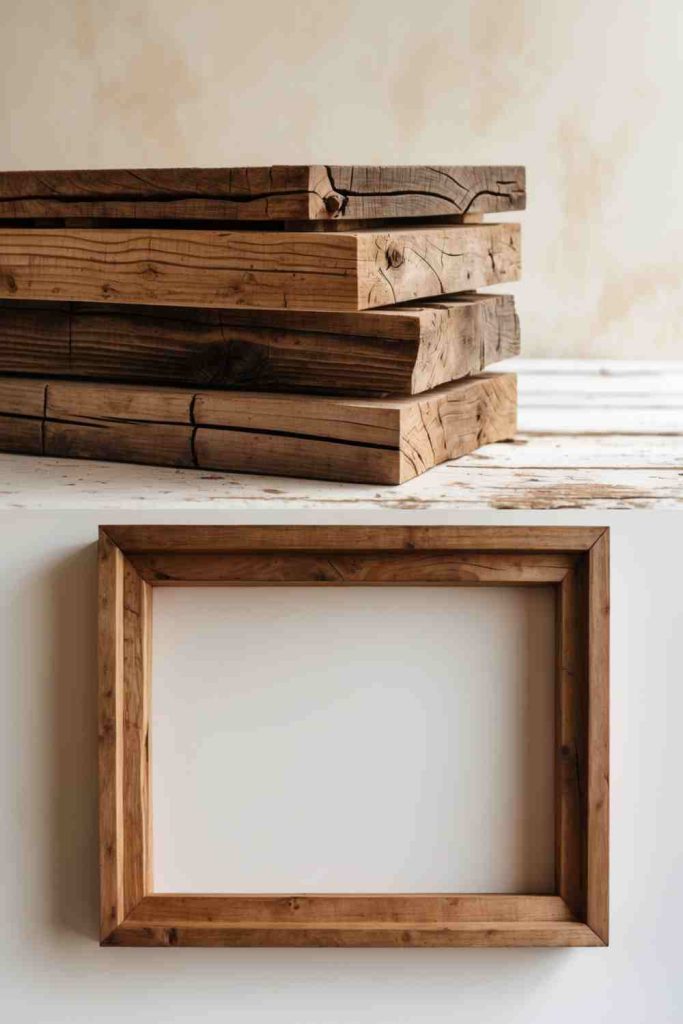
A small reclaimed-wood project can be especially satisfying when the original marks still make sense in the finished piece. This project turns small reclaimed wood scraps into a picture frame that keeps worn grain, saw marks, or old paint as part of the border. A frame is a good place to use short offcuts because the pieces do not need to carry much load, but the corners still need to meet cleanly enough to hold the backing.
Treat the finished object as a structure first and a rustic feature second. Check where the load travels, where screws enter solid wood, and whether the assembly can rack, twist, or pull away from the wall. If the reclaimed boards are visually appealing but not strong enough for the intended load, change the function rather than hiding the weakness under paint or extra hardware.
Materials and Tools
· Four sound wood offcuts
· Saw and mitre guide if available
· Sandpaper
· Wood glue
· Small fasteners or corner reinforcement if needed
· Clamps
· Backing board
· Picture glazing or clear sheet if desired
Steps for This Wood Upcycling Project
1. Select compatible scraps. Choose pieces with similar thickness even if the colors and grain differ. Remove metal, brush away dirt, and sand the back faces flat enough that the finished frame can sit evenly against a wall.
2. Measure around the artwork. Plan the opening from the actual photo or artwork rather than estimating. Mark the cuts carefully and decide whether you want square butt joints or angled corners based on your tools and experience.
3. Cut and join the frame. Clamp each piece for cutting, then dry-fit all four sides before applying glue or fasteners. Check the diagonals so the frame is not racked, and keep adhesive away from the visible opening.
4. Add the backing and hanging method. Fit the artwork, glazing if used, and backing without forcing them into the frame. Add hanging hardware to solid wood and confirm the picture sits flat before putting it on the wall.
A little mismatch works well on a reclaimed frame. I would rather keep four interesting pieces with slightly different grain than cover them under thick paint just to make them look factory-made.
Variation: Turn the same four-piece construction into a small mirror frame, pressed-flower frame, or notice-board border, adjusting the backing and mounting method for the new insert.
DIY Wooden Plant Holder
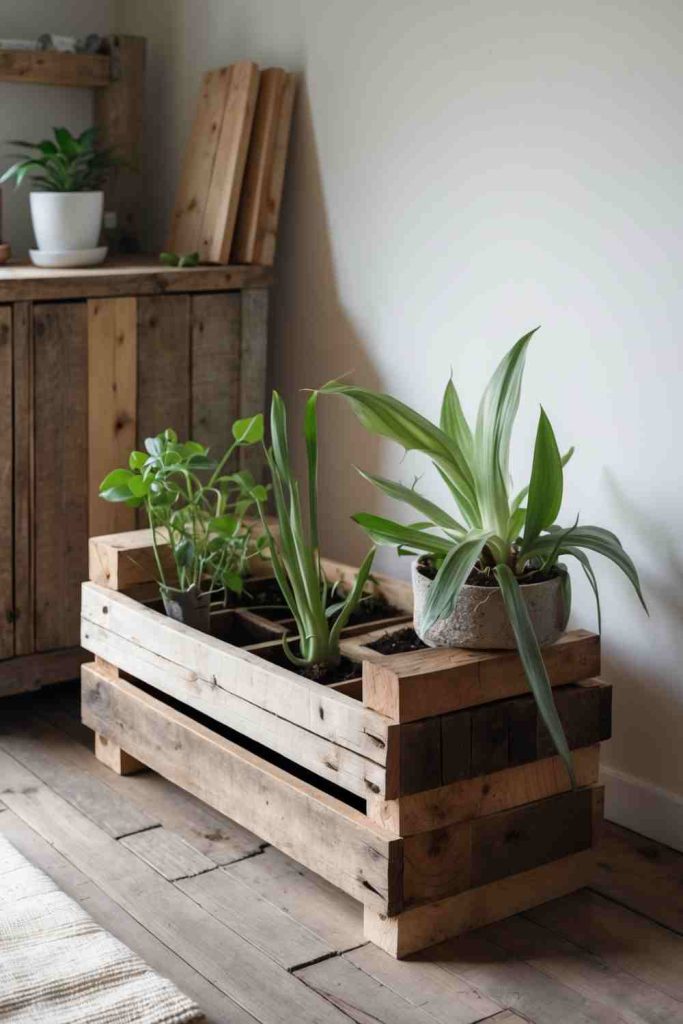
This idea works because the old wood is doing real work rather than acting as a decorative label for sustainability. This project turns reclaimed pallet boards into a box-style plant holder that groups several pots while keeping water and soil separate from the timber. The wood can act as the outer structure, but the actual pots should handle soil and drainage so wet compost is not sitting directly against unknown reclaimed boards.
Before you commit to the final layout, decide which marks are worth keeping and which areas need repair or sanding. Reclaimed wood often gives you less freedom than new lumber, but that can improve the design because you are working with real knots, holes, board widths, and worn edges instead of pretending the material is blank. The practical goal is to preserve character without allowing a weak board, rough edge, unsuitable coating, or poor fixing point to become part of the finished function.
Materials and Tools
· Sound reclaimed boards
· Plant pots with drainage
· Saw
· Drill or hammer
· Screws or nails
· Sandpaper
· Measuring tape
· Optional liner or removable tray
Steps for This Wood Upcycling Project
1. Prepare the reclaimed boards. Remove old fasteners and reject soft, rotten, or contaminated wood. Sand hand-contact edges and decide which faces will remain visible before cutting.
2. Plan around real pots. Arrange the pots on a flat surface and build the holder around their actual footprints. Leave enough room to lift each pot out for watering, cleaning, and checking drainage.
3. Build the outer holder. Cut the sides, ends, and supports, then fasten them through solid wood. Keep the base stable and add gaps or a removable tray rather than trapping water inside a sealed wooden box.
4. Protect and place it sensibly. Use a finish suitable for the intended indoor or outdoor location if you choose to finish the wood. Put the pots back in only after everything is dry and confirm water cannot collect where it will damage the wood or floor.
I especially like plant holders that let the pots stay removable. It is much easier to care for the plants – and the reclaimed wood – when watering does not happen inside a permanently enclosed box.
Variation: Make a single-pot sleeve from four short scraps, or build a stepped holder for small pots as long as each level remains stable and easy to lift for drainage.
DIY Rustic Frame
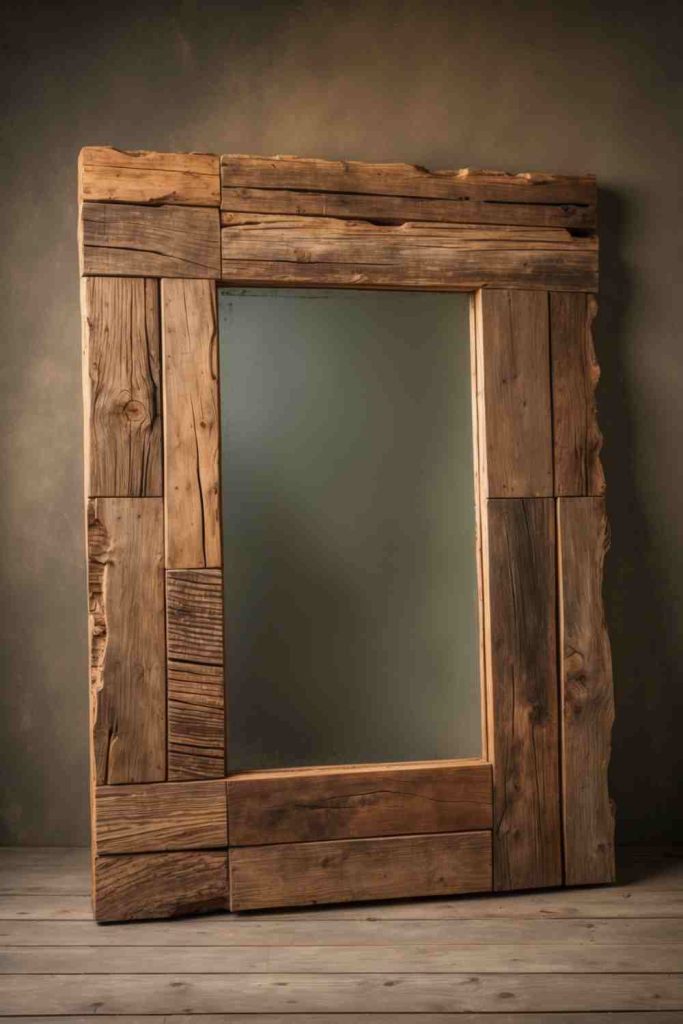
Short, irregular boards become much easier to use when the project is designed around their actual size and strength. This project turns old wooden planks into a deliberately simple rustic frame that emphasizes rough grain, age marks, and a substantial border. Unlike a delicate picture frame, this version can use chunkier pieces, but the back still needs to be flat enough for safe hanging.
Before you commit to the final layout, decide which marks are worth keeping and which areas need repair or sanding. Reclaimed wood often gives you less freedom than new lumber, but that can improve the design because you are working with real knots, holes, board widths, and worn edges instead of pretending the material is blank. The practical goal is to preserve character without allowing a weak board, rough edge, unsuitable coating, or poor fixing point to become part of the finished function.
Materials and Tools
· Reclaimed planks
· Saw
· Sandpaper
· Wood glue
· Clamps
· Optional corner fasteners
· Backing board
· Hanging hardware
Steps for This Wood Upcycling Project
1. Choose the most interesting faces. Lay the planks face up and decide which knots, worn edges, or paint traces you want to keep. Clean them thoroughly and remove any splinters or loose coatings that could flake onto the artwork.
2. Mark the frame opening. Measure the item you want to display and plan a border that does not cover important details. Make all marks on the back where possible so layout lines do not become part of the finished face.
3. Cut and clamp the corners. Use controlled cuts, dry-fit the four pieces, and clamp the frame flat while the joints are secured. Check that the frame is square before the adhesive sets or the fasteners are fully tightened.
4. Fit the backing and hanger. Attach a backing system that supports the displayed item without relying on tape alone. Fix the wall hardware into strong wood, then hang the frame using anchors appropriate to its weight and wall type.
Rustic does not have to mean rough enough to catch clothing or scratch a wall. I would keep the visual wear on the front and make the edges, back, and hanging points much more controlled.
Variation: Use the same approach around a small chalkboard, cork panel, or family notice board instead of a photograph.
DIY Wooden Serving Tray
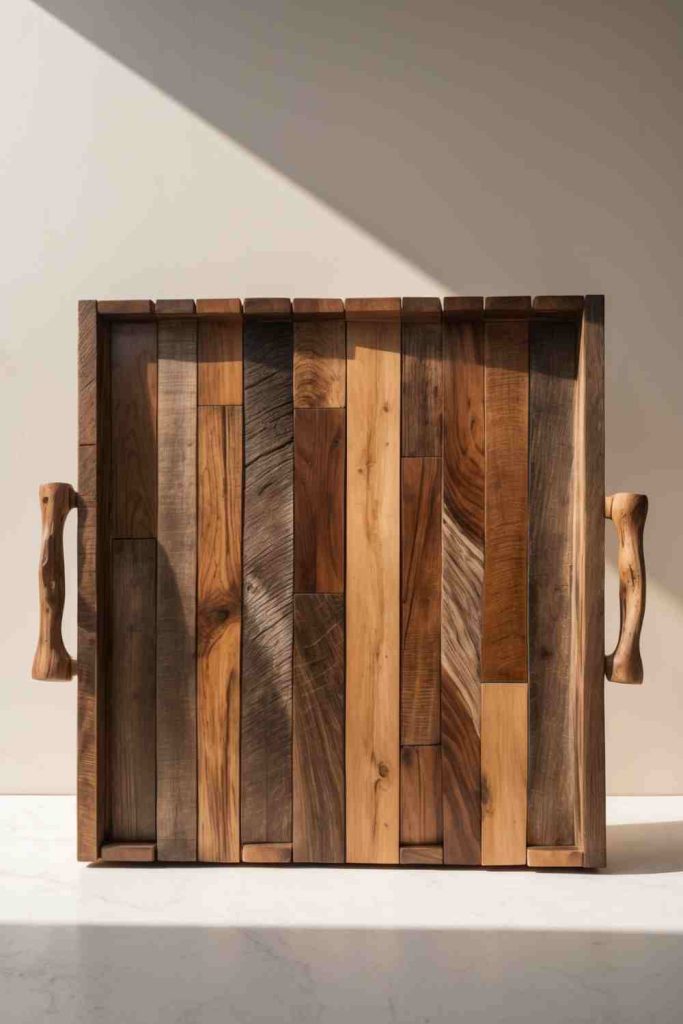
What I like here is the balance between visible age and a very ordinary practical function. This project turns reclaimed boards and reused handles into a carrying tray for dry household items, coffee-table styling, or breakfast accessories. Because a tray is lifted from both ends, the joints and handle attachments matter more than a decorative surface pattern.
Before you commit to the final layout, decide which marks are worth keeping and which areas need repair or sanding. Reclaimed wood often gives you less freedom than new lumber, but that can improve the design because you are working with real knots, holes, board widths, and worn edges instead of pretending the material is blank. The practical goal is to preserve character without allowing a weak board, rough edge, unsuitable coating, or poor fixing point to become part of the finished function.
Materials and Tools
· Clean reclaimed boards
· Two sound handles
· Saw
· Drill
· Wood screws or suitable fasteners
· Wood glue if appropriate
· Sandpaper
· Finish suitable for the intended use
Steps for This Wood Upcycling Project
1. Choose clean, stable wood. Avoid boards with unknown residues if the tray may be used around food or drink. Remove metal, sand the surface, and check for splits near the places where handles will attach.
2. Build a flat tray base. Arrange the boards side by side or use one wider board, then add supporting strips beneath if several narrow pieces need to act as one panel. Clamp and fasten the base so it stays flat.
3. Attach the handles securely. Position both handles where the load will feel balanced, drill pilot holes if needed, and fasten them into substantial wood rather than a thin edge. Then lift the empty tray several times to check for flex or movement.
4. Finish for the intended use. Round sharp corners, clean away dust, and use only finishes appropriate to how the tray will actually be used. Treat decorative finishes as decoration, not as a substitute for a washable food-contact surface.
I would decide early whether this is a decorative tray or a tray that will regularly carry mugs and dishes. That one decision changes how much attention the handles, surface finish, and cleaning routine need.
Variation: Make a small bedside tray from one wide offcut, or turn narrow strips into a striped base if the supports underneath are strong enough to keep the panel rigid.
DIY Rustic Wooden Headboard
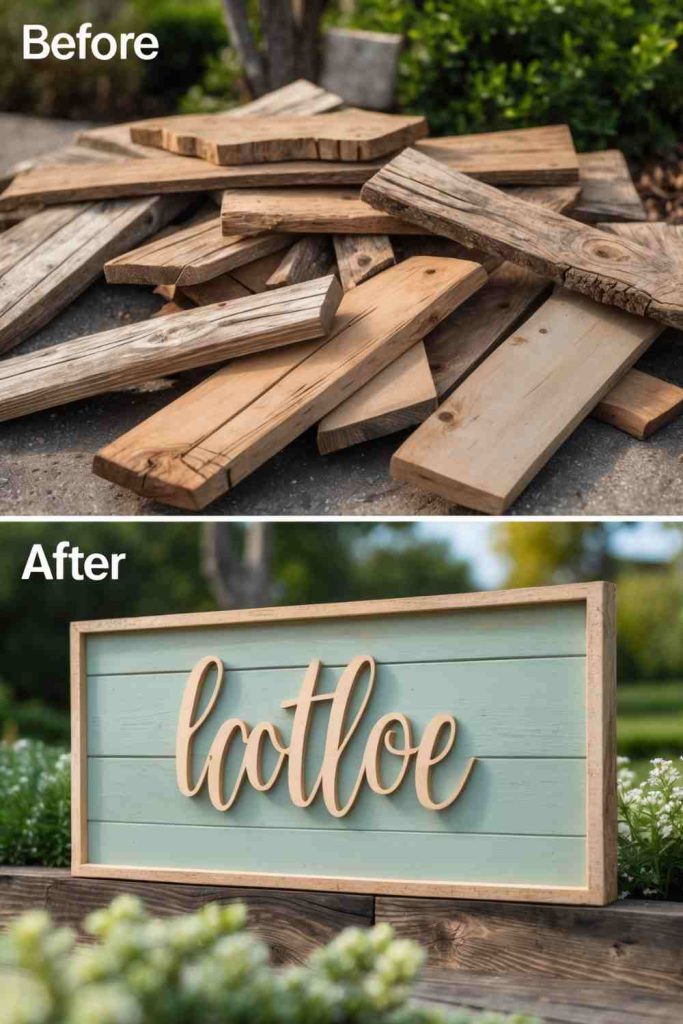
There is no need to erase every dent or nail mark when the new structure is clean, secure, and easy to use. This project turns reclaimed planks into a wide decorative headboard panel that brings old wood texture to the wall behind a bed. A headboard is large and heavy enough that wall or bed-frame attachment should be planned before the decorative layout.
Before you commit to the final layout, decide which marks are worth keeping and which areas need repair or sanding. Reclaimed wood often gives you less freedom than new lumber, but that can improve the design because you are working with real knots, holes, board widths, and worn edges instead of pretending the material is blank. The practical goal is to preserve character without allowing a weak board, rough edge, unsuitable coating, or poor fixing point to become part of the finished function.
Materials and Tools
· Sound reclaimed planks
· Backing battens or structural support boards
· Saw
· Drill
· Screws
· Sandpaper
· Level
· Appropriate wall or bed-frame mounting hardware
Steps for This Wood Upcycling Project
1. Sort and clean the planks. Reject wood that is rotten, heavily warped, insect-damaged, or contaminated. Remove metal and sand the face and edges so bedding cannot catch on splinters while still retaining the old grain.
2. Lay out the full panel. Arrange the boards on the floor and move them until the color and board widths feel balanced. Mark the final positions on the back, then measure the completed width against the bed and wall space.
3. Build a rigid backed panel. Attach the planks to strong rear supports rather than trying to join every board edge-to-edge. Keep screws from breaking through the front face, and check the whole assembly for twist before lifting it.
4. Mount it with suitable hardware. Because the panel can be heavy, use a secure mounting system matched to the wall or bed frame. Check level, fastener engagement, and clearance from outlets or fixtures before putting the bed back in place.
I would make the mounting plan before I get attached to a particular plank arrangement. A headboard can look light and decorative from the front while still being a substantial object that needs dependable support.
Variation: Use fewer planks to create a narrower decorative panel rather than a full-width headboard, or mount the reclaimed boards to a freestanding bed-frame structure if that is the safer option for your room.
DIY Wooden Cutting Boards
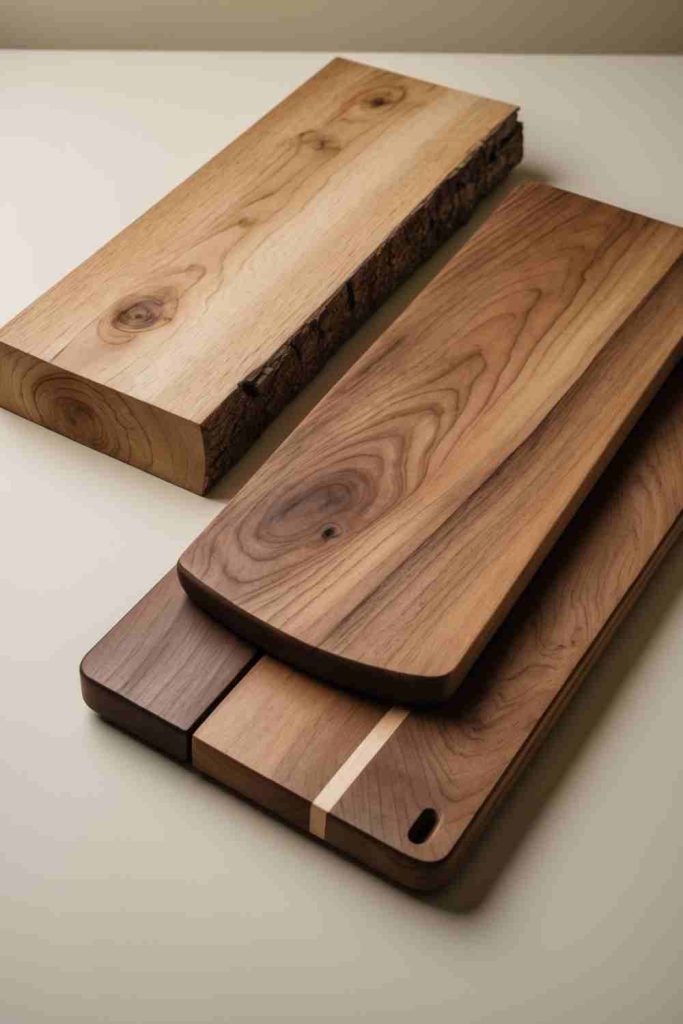
A small reclaimed-wood project can be especially satisfying when the original marks still make sense in the finished piece. This project turns suitable clean hardwood offcuts into simple cutting or serving boards with rounded edges and an easy-to-grip shape. This is not a project for random reclaimed timber. Wood intended for direct food contact must have a known, suitable history and be free of contamination, embedded metal, unsafe coatings, cracks, and questionable treatments.
Before you commit to the final layout, decide which marks are worth keeping and which areas need repair or sanding. Reclaimed wood often gives you less freedom than new lumber, but that can improve the design because you are working with real knots, holes, board widths, and worn edges instead of pretending the material is blank. The practical goal is to preserve character without allowing a weak board, rough edge, unsuitable coating, or poor fixing point to become part of the finished function.
Materials and Tools
· Known food-suitable hardwood offcuts
· Saw or jigsaw
· Sandpaper in suitable grits
· Drill if adding a hanging hole
· Clamps
· Clean cloth
· Finish explicitly labeled for food-contact use if finishing
· Measuring tools
Steps for This Wood Upcycling Project
1. Verify the wood first. Use only timber you can confidently identify as suitable for food-contact use and reject salvaged boards with unknown treatments, paint, stains, odors, deep cracks, or contamination. Remove any metal before cutting.
2. Cut a simple shape. Mark a rectangle, paddle, or gently rounded outline and clamp the board before sawing. Keep the form uncomplicated so there are no thin projections that may split during washing or use.
3. Sand every surface thoroughly. Smooth the faces, edges, corners, and hanging hole if you add one. Then wipe away sanding dust and inspect the board under good light for splinters or cracks that were hidden before shaping.
4. Finish and use appropriately. If you apply a finish, choose one specifically intended for food-contact wooden items and follow its own instructions. Keep the board clean and retire it from food use if deep damage, contamination, or structural cracking develops.
This is the one project where I would be much more selective than sentimental. A pretty old board with an unknown past belongs in wall decor, not automatically in the kitchen.
Variation: If the timber history is uncertain, turn the same shape into a decorative sign, plant-pot stand, or dry display board instead of using it for food preparation.
DIY Rustic Wall Clock
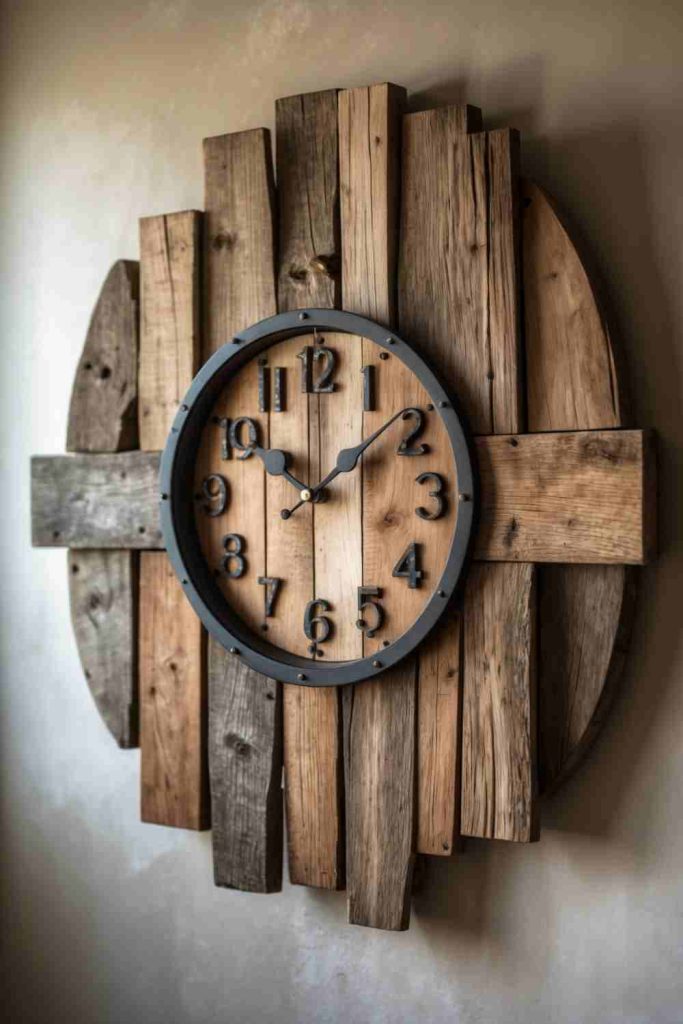
This idea works because the old wood is doing real work rather than acting as a decorative label for sustainability. This project turns pallet or reclaimed planks into a wall-clock face fitted with a separate clock mechanism and hands. The wood creates the visible face, while the clock mechanism needs a flat, correctly centered mounting area and enough clearance for the hands to move freely.
Before you commit to the final layout, decide which marks are worth keeping and which areas need repair or sanding. Reclaimed wood often gives you less freedom than new lumber, but that can improve the design because you are working with real knots, holes, board widths, and worn edges instead of pretending the material is blank. The practical goal is to preserve character without allowing a weak board, rough edge, unsuitable coating, or poor fixing point to become part of the finished function.
Materials and Tools
· Reclaimed wood planks
· Clock mechanism and hands
· Backing board or rear battens
· Saw
· Drill
· Wood screws or glue as appropriate
· Sandpaper
· Wall-hanging hardware
Steps for This Wood Upcycling Project
1. Prepare the clock-face wood. Remove old fasteners, sand splinters, and arrange the planks so the grain and color feel balanced. Join them on a backing structure strong enough to act as one rigid panel.
2. Find and mark the center. Measure the completed face rather than guessing from individual boards. Mark the mechanism position on the back and confirm the hands will clear the wood, frame, and any raised decoration.
3. Install the mechanism. Drill the center opening using the dimensions required by your clock hardware, then fit the mechanism according to its instructions. Attach the hands carefully and turn them through a full cycle by hand to check clearance.
4. Add secure wall hardware. Fix the hanging hardware to the supporting structure, not a loose decorative plank. Hang the clock level and make sure the mechanism remains accessible when the battery needs changing.
I like a clock face that leaves some empty wood visible. The grain already provides plenty of pattern, so the numbers or markers do not need to compete with it.
Variation: Use one round reclaimed board if you have a suitable piece, or make a minimalist clock with only four hour markers instead of a full set of numerals.
DIY Reclaimed Wooden Candle Holder
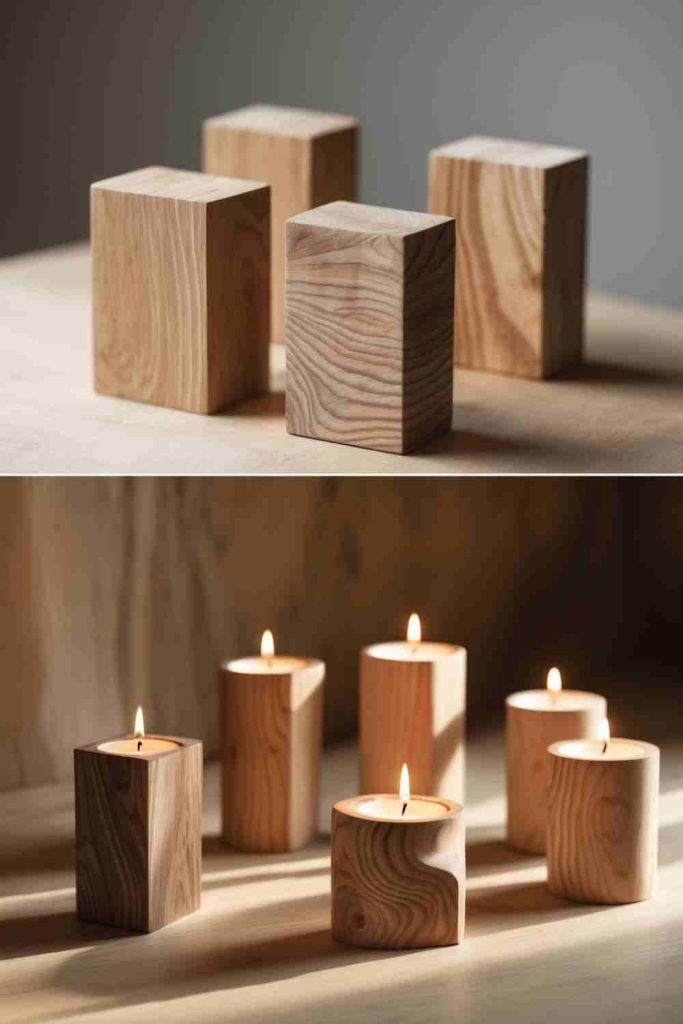
Short, irregular boards become much easier to use when the project is designed around their actual size and strength. This project turns a solid reclaimed wood block into a decorative holder for small lights or protected candle inserts. Wood and open flame need careful separation. The safest upcycled version uses battery LED lights, or a purpose-made noncombustible insert that keeps heat and flame away from the timber.
Before you commit to the final layout, decide which marks are worth keeping and which areas need repair or sanding. Reclaimed wood often gives you less freedom than new lumber, but that can improve the design because you are working with real knots, holes, board widths, and worn edges instead of pretending the material is blank. The practical goal is to preserve character without allowing a weak board, rough edge, unsuitable coating, or poor fixing point to become part of the finished function.
Materials and Tools
· Sound reclaimed wood block
· Drill press or drill with suitable bit
· Clamps
· Sandpaper
· Measuring tools
· Battery LED lights or purpose-made noncombustible inserts
· Optional finish suitable for the intended decorative use
Steps for This Wood Upcycling Project
1. Inspect and flatten the wood. Choose a stable block without deep splits and remove hidden metal before drilling. Sand the base so it sits flat and cannot rock on a table.
2. Mark the light positions. Arrange the lights or inserts on top first and leave enough solid wood between openings. Keep the layout away from weak end grain or existing cracks.
3. Drill while the work is clamped. Secure the wood firmly and use a controlled drilling setup rather than holding the block by hand. Stop and clear chips as needed, then sand the rims of the openings until they are smooth.
4. Choose the light source conservatively. Use battery LEDs for the simplest low-heat option. If the design uses a real candle, keep the flame and heat inside a purpose-made noncombustible insert and follow the candle manufacturer guidance – never let an open flame sit directly against reclaimed wood.
I would choose LEDs for this project without feeling that anything is lost. You still get the warm pool of light, and the old wood remains the visual focus rather than the flame.
Variation: Drill one larger recess for a removable LED puck, or use several shallow recesses for small battery tea lights arranged along a mantel or table.
Transform Simple Wood Pieces into Creative Children’s Toys
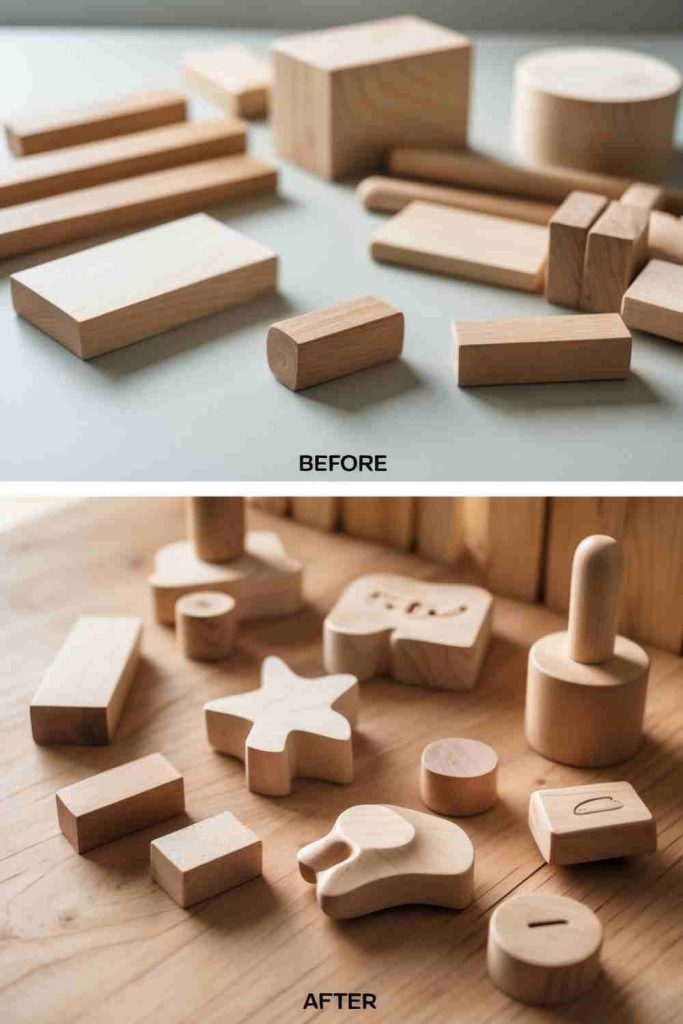
What I like here is the balance between visible age and a very ordinary practical function. This project turns small clean wood offcuts into simple blocks, animals, vehicles, or stacking shapes for supervised play or decoration. Children’s items require stricter material selection, rounded edges, secure parts, and finishes explicitly intended for the age and use involved.
Before you commit to the final layout, decide which marks are worth keeping and which areas need repair or sanding. Reclaimed wood often gives you less freedom than new lumber, but that can improve the design because you are working with real knots, holes, board widths, and worn edges instead of pretending the material is blank. The practical goal is to preserve character without allowing a weak board, rough edge, unsuitable coating, or poor fixing point to become part of the finished function.
Materials and Tools
· Known-safe clean wood offcuts
· Saw or scroll saw if appropriate
· Clamps
· Sandpaper
· Drill if needed
· Age-appropriate hardware only if necessary
· Finish or paint explicitly suitable for children’s items
· Simple paper templates
Steps for This Wood Upcycling Project
1. Start with known-safe material. Do not use mystery reclaimed wood for a child’s toy. Choose clean, sound timber with a known history, remove all metal, and reject pieces that split easily or have loose knots.
2. Keep the design simple and robust. Sketch broad shapes with no fragile points or tiny detachable decorations. Size and design the toy for the child’s age, and avoid small components where they could create a choking or swallowing hazard.
3. Cut, shape, and sand carefully. Clamp every piece before sawing and round all corners and edges. Sand the full surface, then inspect with your hands as well as your eyes because a tiny splinter is easy to miss.
4. Finish and inspect before use. Use only coatings explicitly suitable for children’s products and the intended age group, following their instructions. Check that every part is secure, smooth, and clean before the toy is used, and recheck it as it wears.
I would rather make one chunky wooden animal with smooth edges than five complicated toys with delicate parts. Simple forms suit scrap wood and make the safety check much easier.
Variation: Use the same shapes as nursery shelf decor instead of play objects if the wood history or finish cannot be verified for children’s use.
Transform Wood Scraps into Stylish Floating Shelves
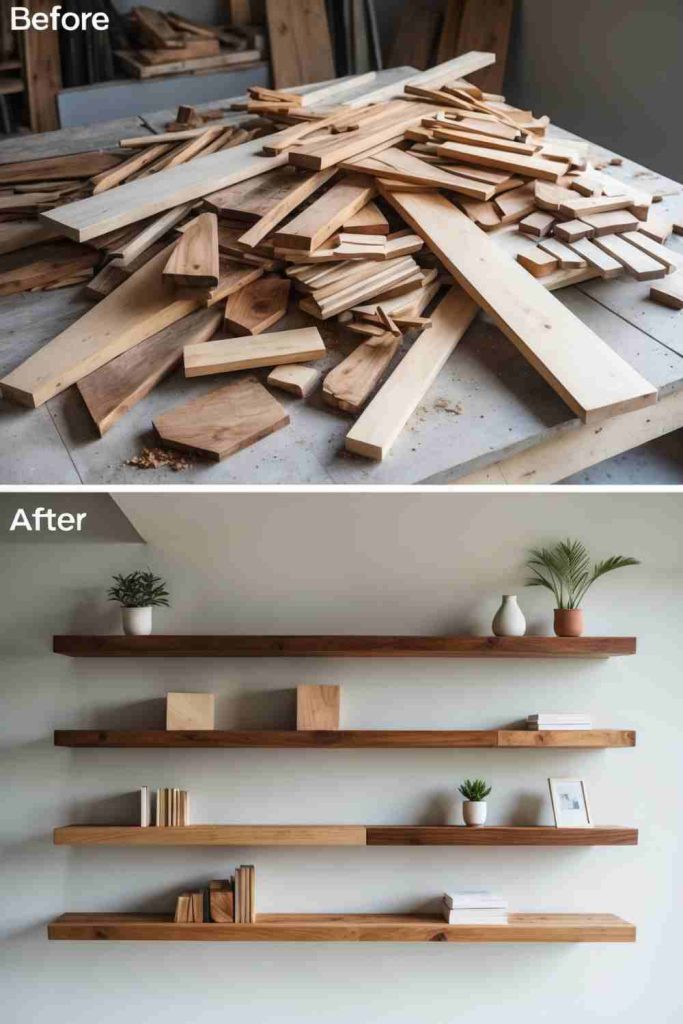
There is no need to erase every dent or nail mark when the new structure is clean, secure, and easy to use. This project turns short reclaimed boards into compact floating-style shelves for lightweight display and storage. The hidden or low-visibility support is the real project here. A shelf can only be as dependable as the wall fixing and the solid wood around its attachment points.
Before you commit to the final layout, decide which marks are worth keeping and which areas need repair or sanding. Reclaimed wood often gives you less freedom than new lumber, but that can improve the design because you are working with real knots, holes, board widths, and worn edges instead of pretending the material is blank. The practical goal is to preserve character without allowing a weak board, rough edge, unsuitable coating, or poor fixing point to become part of the finished function.
Materials and Tools
· Sound reclaimed boards
· Shelf brackets or concealed support system
· Drill
· Screws
· Wall anchors suitable for the wall
· Level
· Sandpaper
· Stud or wall-fixing locator if appropriate
Steps for This Wood Upcycling Project
1. Prepare straight, sound shelf boards. Remove nails and staples, sand splinters, and reject boards that are badly cupped or split around likely fixing points. Check the bottom edge against a flat surface so mounting hardware can sit correctly.
2. Plan the shelf location and load. Decide what the shelf will hold before choosing brackets or anchors. Mark the wall position with a level and locate suitable fixing points according to the wall construction.
3. Install the support system. Follow the hardware instructions and use fixings rated for the wall and expected load. Tighten the supports firmly, then test them before sliding or fastening the reclaimed shelf board into place.
4. Load the shelf gradually. Check that the board sits level and does not twist on the support. Add lightweight objects first and stop if you see movement, cracking, or pulling around the wall fixings.
Floating shelves look simple because the support disappears visually, but that hidden support deserves most of the attention. I would choose a plainer board with better fixing points over a dramatic cracked one every time.
Variation: Use visible metal brackets if concealed hardware does not suit the reclaimed board. The brackets can become part of the look and are often easier to inspect.
Simple Wooden Crates to Beautiful Garden Planters
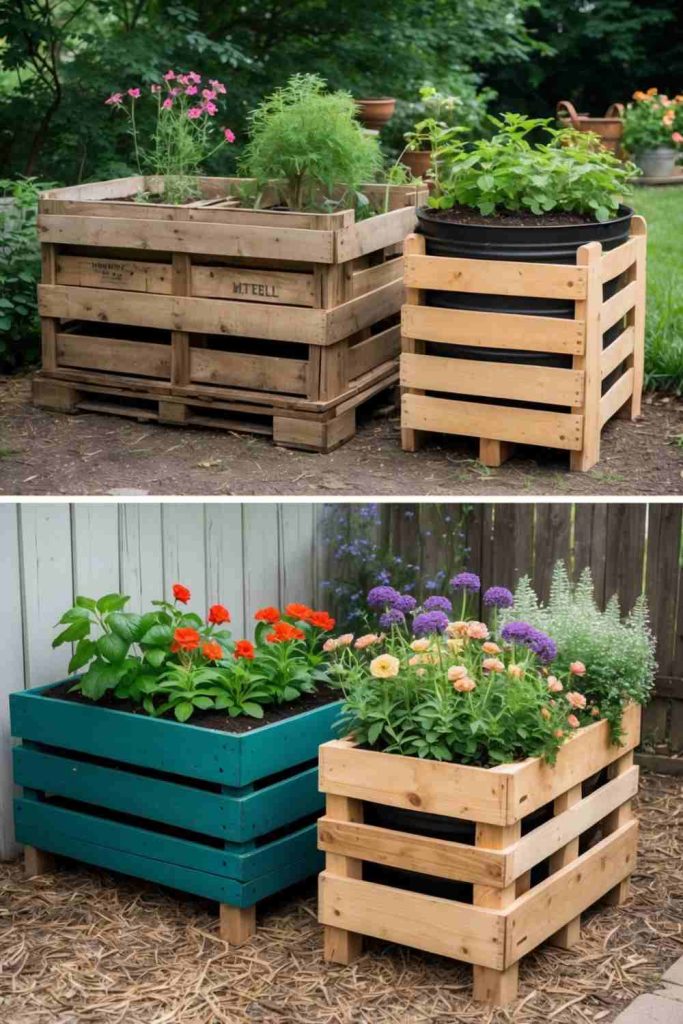
A small reclaimed-wood project can be especially satisfying when the original marks still make sense in the finished piece. This project turns wooden crates into outer garden planters that hold removable pots or a lined planting area. Outdoor moisture is the main challenge, so drainage and separation between wet soil and the reclaimed wood need to be planned from the start.
Before you commit to the final layout, decide which marks are worth keeping and which areas need repair or sanding. Reclaimed wood often gives you less freedom than new lumber, but that can improve the design because you are working with real knots, holes, board widths, and worn edges instead of pretending the material is blank. The practical goal is to preserve character without allowing a weak board, rough edge, unsuitable coating, or poor fixing point to become part of the finished function.
Materials and Tools
· Sound wooden crates
· Plant pots or suitable liner
· Outdoor-appropriate fasteners if reinforcement is needed
· Sandpaper
· Brush
· Drainage tray or feet if appropriate
· Exterior-suitable finish if desired
· Potting mix and plants
Steps for This Wood Upcycling Project
1. Clean and reinforce the crates. Brush away dirt, inspect the slats and corners, and replace or reinforce loose fasteners. Sand hand-contact edges and reject any crate with unknown contamination that makes it unsuitable for garden use.
2. Choose pots or a drainage system. The easiest approach is to place separate plant pots inside the crate. If you use a liner, make sure excess water can escape rather than collecting against the wood.
3. Prepare the exterior. Raise the crate slightly off a constantly wet surface if possible and use an exterior-suitable finish if you want extra protection. Keep drainage openings clear and do not seal water into the base.
4. Plant and maintain access. Add the pots or planting system and arrange plants without overloading weak slats. Check the wood periodically for loosening, rot, or trapped moisture and repair it before the crate begins to fail.
I prefer removable pots inside a crate because they make almost every maintenance job easier. You can water, repot, and clean without turning the reclaimed wood into a permanently damp soil box.
Variation: Stack two reinforced crates as a vertical display only if they are securely connected and stable, or use single crates as separate planters along a wall.
Transform Simple Wooden Doors or Pallets into a Rustic Headboard
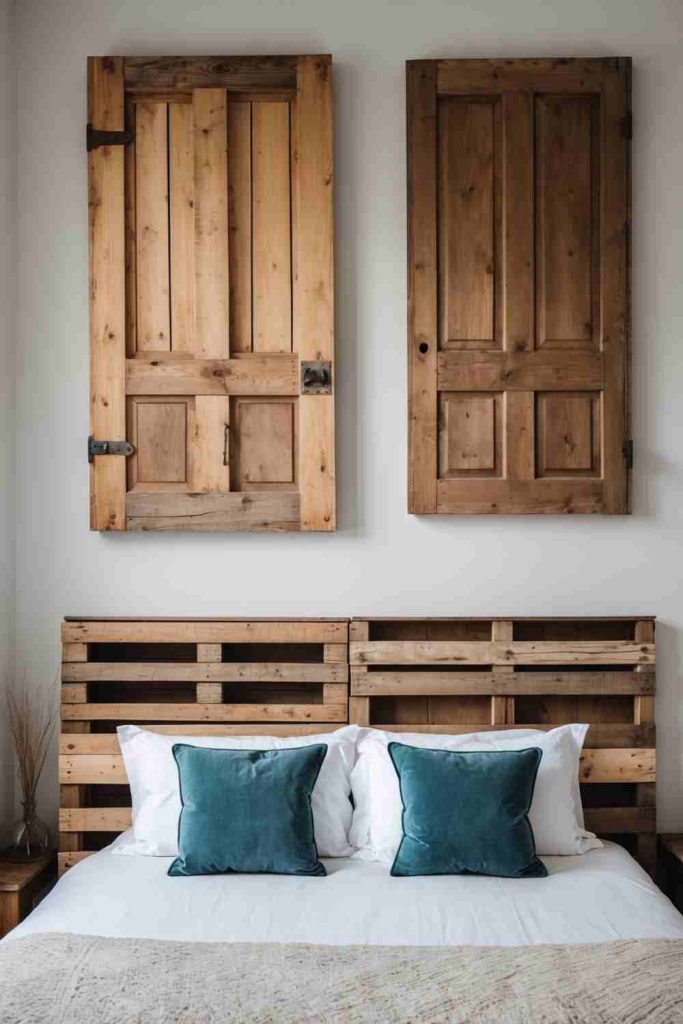
This idea works because the old wood is doing real work rather than acting as a decorative label for sustainability. This project turns an old wooden door or pallet section into a large rustic headboard that uses an existing panel instead of building the whole surface from individual boards. The time saved on assembly does not remove the need to inspect the old panel for hidden hardware, loose boards, old coatings, and safe mounting points.
Before you commit to the final layout, decide which marks are worth keeping and which areas need repair or sanding. Reclaimed wood often gives you less freedom than new lumber, but that can improve the design because you are working with real knots, holes, board widths, and worn edges instead of pretending the material is blank. The practical goal is to preserve character without allowing a weak board, rough edge, unsuitable coating, or poor fixing point to become part of the finished function.
Materials and Tools
· Sound old door or pallet section
· Pry bar and nail puller as needed
· Sandpaper
· Drill
· Structural screws or brackets
· Level
· Backing supports if reinforcement is needed
· Wall or bed-frame mounting hardware
Steps for This Wood Upcycling Project
1. Inspect the existing panel. Check both sides for nails, screws, glass, loose joints, protruding hardware, or damaged boards. Clean it thoroughly and remove anything that could catch bedding or hands.
2. Reinforce before decorating. If the door or pallet flexes, add rear supports through solid material. Sand the edges and decide whether old paint or finish is stable enough to keep; flaking or unknown coatings should be treated cautiously.
3. Plan the final position. Measure the bed and wall, mark the desired height, and identify where the panel can be safely supported. Do this before adding decorative features that might block mounting hardware.
4. Mount and recheck. Use a secure system appropriate to the panel weight and wall or bed frame. Confirm it is level, rigid, and clear of outlets, lights, or moving bed parts before regular use.
An old door already has scale and character, so I would keep the redesign restrained. The most important work is usually on the back where nobody sees the reinforcement and mounting hardware.
Variation: Use half a door, a narrow shutter, or a shorter pallet section as a decorative central panel if a full-width headboard would be too heavy for your room.
Transform Simple Wooden Panels into Charming Wooden Lanterns
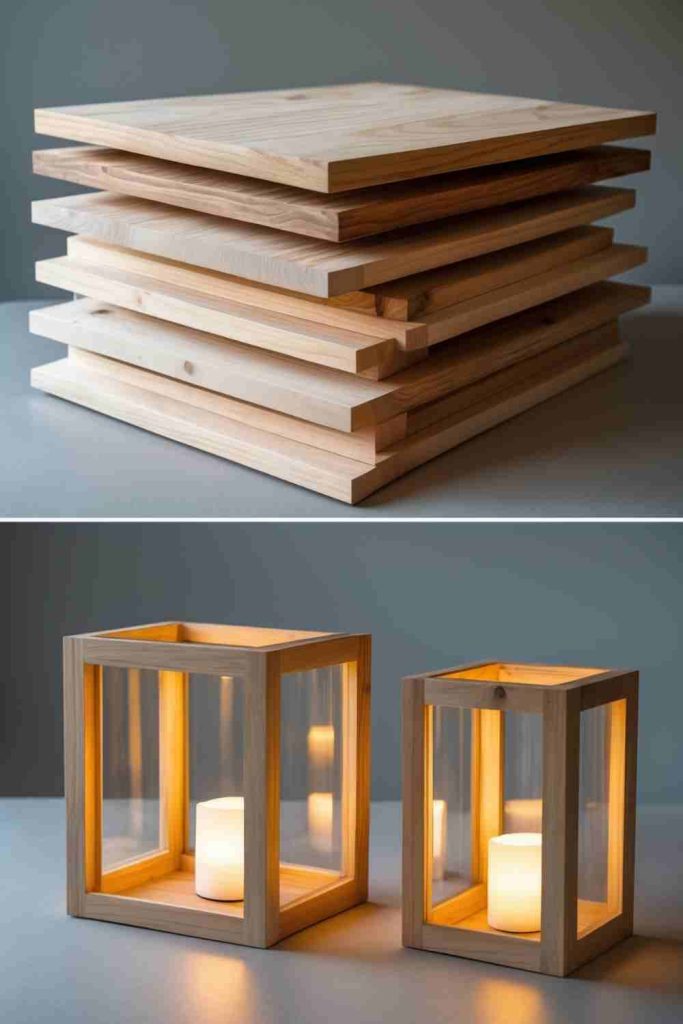
Short, irregular boards become much easier to use when the project is designed around their actual size and strength. This project turns thin reclaimed panels into box-shaped lantern frames with transparent sides and a contained light source. The lantern should be treated as a decorative enclosure, not as a wooden candle cage. Battery lighting is the simplest way to keep heat away from timber and reused coatings.
Before you commit to the final layout, decide which marks are worth keeping and which areas need repair or sanding. Reclaimed wood often gives you less freedom than new lumber, but that can improve the design because you are working with real knots, holes, board widths, and worn edges instead of pretending the material is blank. The practical goal is to preserve character without allowing a weak board, rough edge, unsuitable coating, or poor fixing point to become part of the finished function.
Materials and Tools
· Thin sound wood panels or strips
· Saw
· Wood glue and small fasteners
· Clamps
· Sandpaper
· Clear acrylic or other suitable panel material if desired
· Battery LED light
· Optional decorative finish
Steps for This Wood Upcycling Project
1. Prepare matching frame pieces. Choose strips that are straight enough to form a box and sand away splinters. Cut repeated pieces using a stop block or careful marking so opposite sides align.
2. Assemble the frame. Dry-fit the base, uprights, and top pieces before gluing or fastening. Clamp the lantern square and keep the interior open enough to remove the light source easily.
3. Fit the side panels. Cut clear panels only with tools suitable for that material and smooth their edges. Attach them so they cannot rattle or fall inward, leaving any ventilation required by the light source.
4. Add low-heat lighting. Use a battery LED or similarly low-heat light and keep wiring or battery access unobstructed. Avoid placing a naked flame inside a reclaimed wooden lantern.
I think the timber looks better when the lantern frame stays fairly simple. Too many crosspieces make the box feel heavy and hide the light that is supposed to animate it.
Variation: Skip the transparent panels and make an open slatted lantern for indoor LED lights, or scale the idea down into a small table lantern from narrow offcuts.
DIY Wooden Pieces Stool or Ottoman
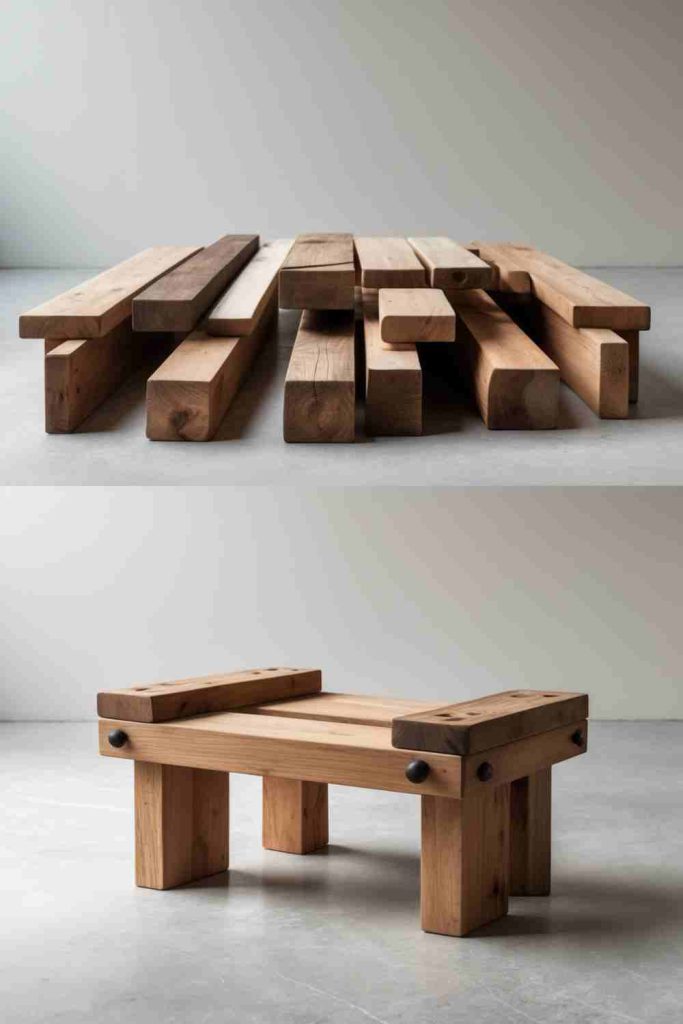
What I like here is the balance between visible age and a very ordinary practical function. This project turns reclaimed wood pieces into a compact stool or ottoman base that can serve as seating or, with a different top, as a small side table. Because this project may carry a person’s weight, decorative scrap-wood assembly is not enough. The frame, joints, timber condition, and load path all need to be appropriate for seating.
Treat the finished object as a structure first and a rustic feature second. Check where the load travels, where screws enter solid wood, and whether the assembly can rack, twist, or pull away from the wall. If the reclaimed boards are visually appealing but not strong enough for the intended load, change the function rather than hiding the weakness under paint or extra hardware.
Materials and Tools
· Sound structural-quality reclaimed wood
· Saw
· Drill
· Appropriate screws or bolts
· Wood glue if used with mechanical joinery
· Clamps
· Square
· Sandpaper
Steps for This Wood Upcycling Project
1. Select wood for structure, not appearance. Reject split, rotten, thin, or mystery boards that are not suitable for a load-bearing frame. Remove embedded metal and identify which pieces will act as legs, rails, and seat supports.
2. Build the base squarely. Cut matched legs and rails, then clamp the frame on a flat surface. Use joinery and mechanical fasteners appropriate to seating rather than relying on surface glue alone.
3. Add a supported seat. Fasten the top to rails or a frame that distributes weight to all legs. Avoid long unsupported spans made from thin boards, and round the exposed corners where legs or hands may contact them.
4. Test conservatively before use. Check every joint, place the stool on a level floor, and apply load gradually while watching for flex, creaking, or movement. If you are uncertain about the structure, use it as a side table or plant stand instead of seating.
This is one project where I would downgrade the function rather than gamble on weak wood. A questionable stool can still become a useful side table; it does not have to carry a person just because the shape suggests seating.
Variation: Add a removable upholstered cushion only after the wooden frame is structurally sound, or build the same base as a small low table if the reclaimed wood is better suited to lighter loads.
Simple Wooden Plank to Rustic Coat Rack
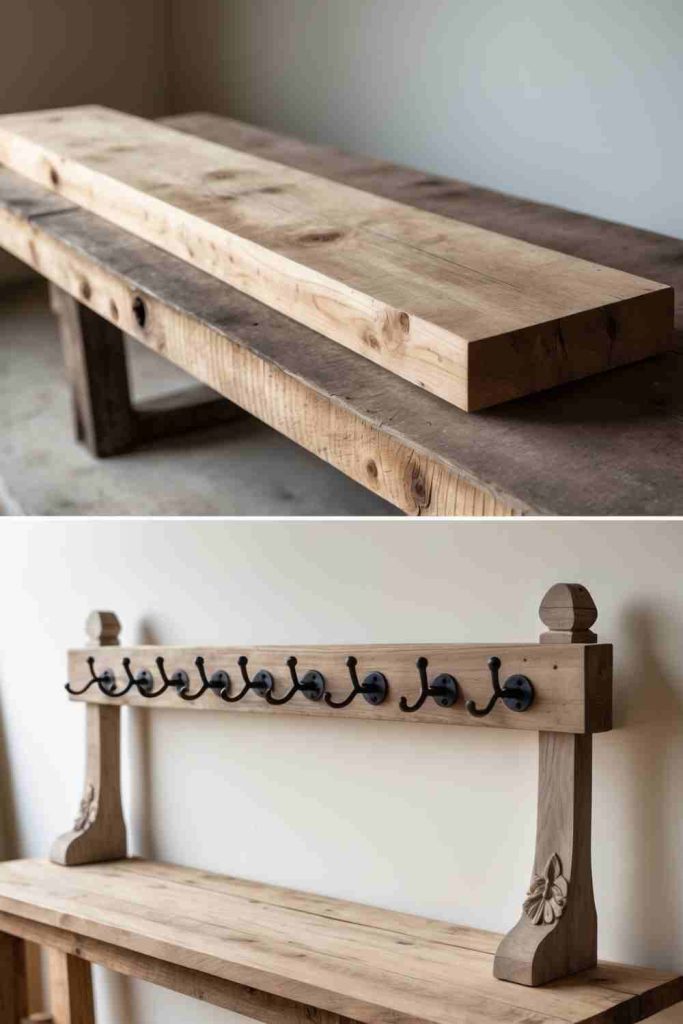
There is no need to erase every dent or nail mark when the new structure is clean, secure, and easy to use. This project turns one reclaimed plank and reused hooks into a wall rack for coats, bags, hats, or towels. The plank is simple, but the rack may carry repeated pulling loads, so both the hook screws and the wall mounting need solid attachment points.
Treat the finished object as a structure first and a rustic feature second. Check where the load travels, where screws enter solid wood, and whether the assembly can rack, twist, or pull away from the wall. If the reclaimed boards are visually appealing but not strong enough for the intended load, change the function rather than hiding the weakness under paint or extra hardware.
Materials and Tools
· Sound reclaimed plank
· Hooks or knobs
· Drill
· Screws
· Wall anchors or mounting cleat
· Level
· Sandpaper
· Measuring tape
Steps for This Wood Upcycling Project
1. Prepare the plank. Remove hidden metal, sand splinters, and check for cracks along the edges where hooks or mounting screws might go. Keep stable age marks and grain if they do not weaken the board.
2. Lay out the hooks. Place the hooks on the board and test the spacing with the coats, bags, or towels you actually plan to hang. Mark the positions only after the arrangement feels usable from both ends.
3. Attach hooks to solid wood. Drill pilot holes where helpful and fasten each hook firmly. Avoid placing screws too close to split ends or thin damaged areas, then pull each hook by hand to check movement.
4. Mount the rack securely. Use a mounting method suitable for the wall and expected load, keeping the board level. Load the hooks gradually and recheck the wall fasteners after the rack has been used.
The empty spaces between hooks matter as much as the hooks themselves. I would rather fit fewer coats comfortably than squeeze in extra hardware and end up with everything overlapping.
Variation: Use smaller hooks for keys and lanyards, or add a narrow shelf above the plank if the mounting system is designed for the extra weight.
Simple Wooden Plank to DIY Jewelry Organizer
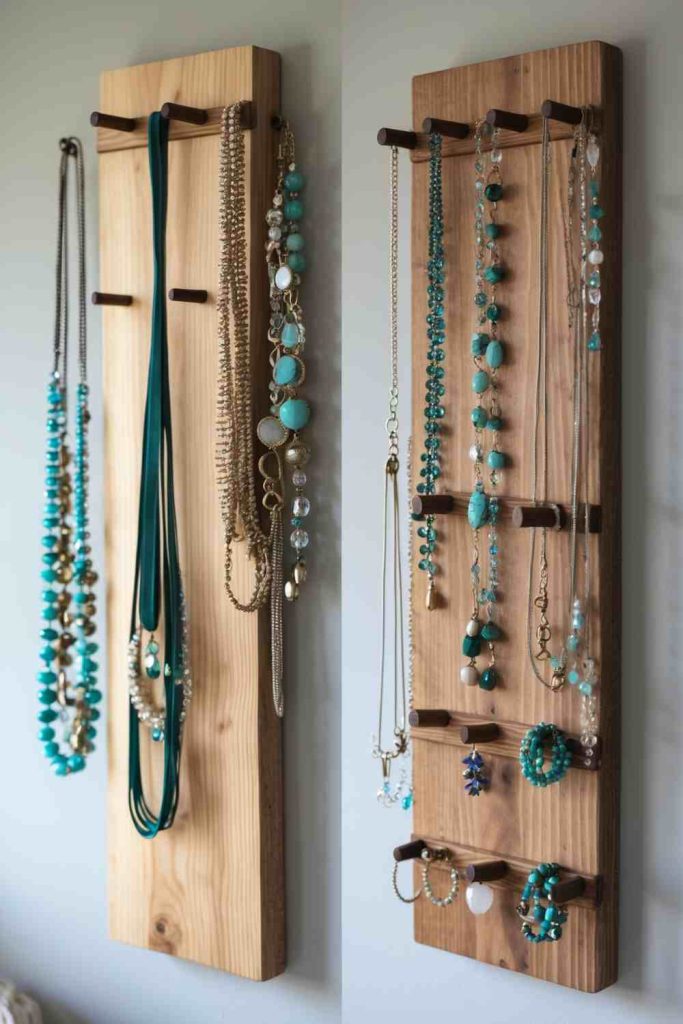
A small reclaimed-wood project can be especially satisfying when the original marks still make sense in the finished piece. This project turns a narrow reclaimed plank into a wall organizer for necklaces, bracelets, earrings, and small accessories. This is a light-load project, which makes it a good place to use thin offcuts or visually interesting boards that would not suit furniture.
Treat the finished object as a structure first and a rustic feature second. Check where the load travels, where screws enter solid wood, and whether the assembly can rack, twist, or pull away from the wall. If the reclaimed boards are visually appealing but not strong enough for the intended load, change the function rather than hiding the weakness under paint or extra hardware.
Materials and Tools
· Clean reclaimed plank
· Small hooks, knobs, or pegs
· Drill
· Small screws
· Sandpaper
· Wall-mounting hardware
· Optional narrow ledge
· Measuring tools
Steps for This Wood Upcycling Project
1. Clean and smooth the plank. Remove any metal, sand splintered edges, and wipe away dust. If the board has old stable paint you want to keep, avoid aggressive sanding that removes all of its character.
2. Arrange the jewelry hardware. Lay out necklaces and bracelets against the board so you can see how much vertical space they need. Mark hooks at different heights where helpful to reduce tangling.
3. Install hooks and optional ledge. Drill small pilot holes if the plank is brittle, then attach the hardware without overtightening it. Add a shallow ledge only if it can be fastened into solid wood rather than glued to a dusty surface.
4. Mount at a practical height. Choose wall anchors appropriate to the wall, hang the organizer level, and test each hook with a few items. Keep delicate jewelry away from rough unfinished edges that could snag chains or fabric.
For jewelry storage, I would keep the board visually quiet. Once necklaces and bracelets are hanging, they provide all the color and movement the organizer needs.
Variation: Use short pegs for rings and bracelets, add a strip of perforated metal for earrings, or make a tabletop version with a weighted base if wall mounting is not convenient.
DIY Decorative Wall Art from Simple Wooden Planks
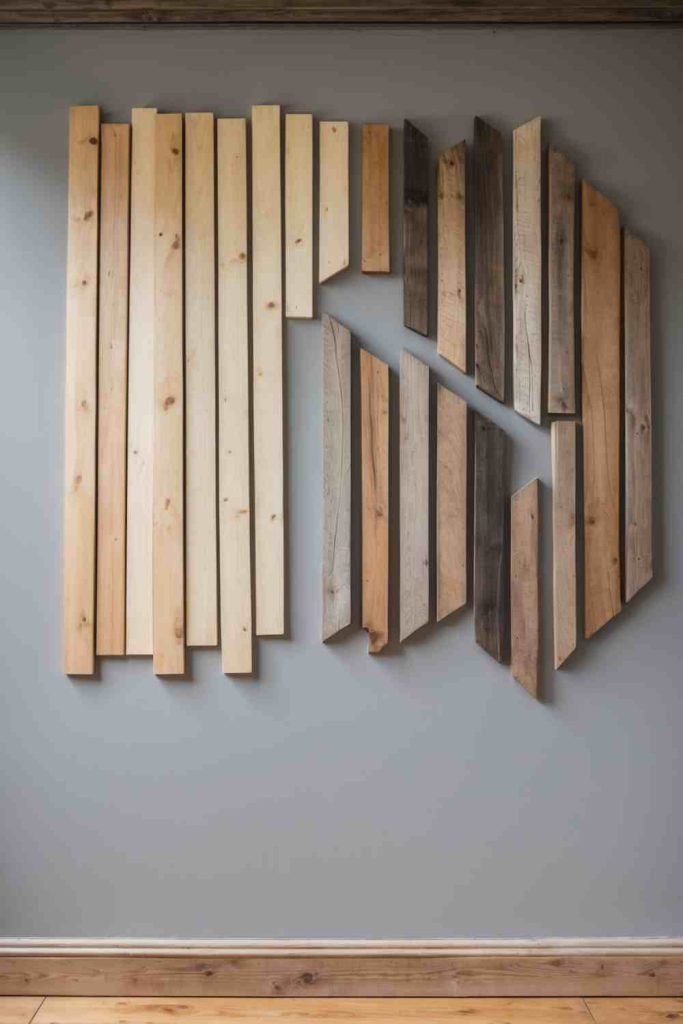
This idea works because the old wood is doing real work rather than acting as a decorative label for sustainability. This project turns reclaimed planks into geometric or abstract wall art that turns grain, paint remnants, and offcut shapes into the visual pattern. Because the piece is decorative, you can use shorter and more irregular scraps, but the backing and wall hardware still need to carry the finished weight safely.
Treat the finished object as a structure first and a rustic feature second. Check where the load travels, where screws enter solid wood, and whether the assembly can rack, twist, or pull away from the wall. If the reclaimed boards are visually appealing but not strong enough for the intended load, change the function rather than hiding the weakness under paint or extra hardware.
Materials and Tools
· Assorted reclaimed planks or offcuts
· Backing board
· Saw
· Wood glue and/or small fasteners
· Clamps
· Sandpaper
· Square or straightedge
· Wall-hanging hardware
Steps for This Wood Upcycling Project
1. Sort by color, grain, and thickness. Clean the scraps and remove hidden metal before cutting. Group pieces with similar thickness so the front surface does not become accidentally uneven unless relief is part of the design.
2. Compose before cutting everything. Arrange the pieces on the backing board and move them several times. I know it can feel tempting to start gluing as soon as the first pattern works, but then you lose the chance to rebalance the whole composition.
3. Cut and secure the pattern. Mark each piece from the final layout, clamp it for cutting, and return it to its position. Fasten the wood to a stable backing using a method suited to the weight and material.
4. Finish the edges and hang safely. Trim or frame the outer edge if needed, sand touch points, and attach hanging hardware to the backing structure. Use wall anchors that suit the total weight rather than hanging the piece from a decorative slat.
This is where I would let mismatched wood stay mismatched. The project becomes more interesting when a pale board, a dark knot, and an old paint trace can each contribute without being forced into one finish.
Variation: Make a small panel from only three or four offcuts, or turn the same layout into a cabinet-door insert or freestanding shelf backdrop.
Transform Wooden Planks into a Picnic Table
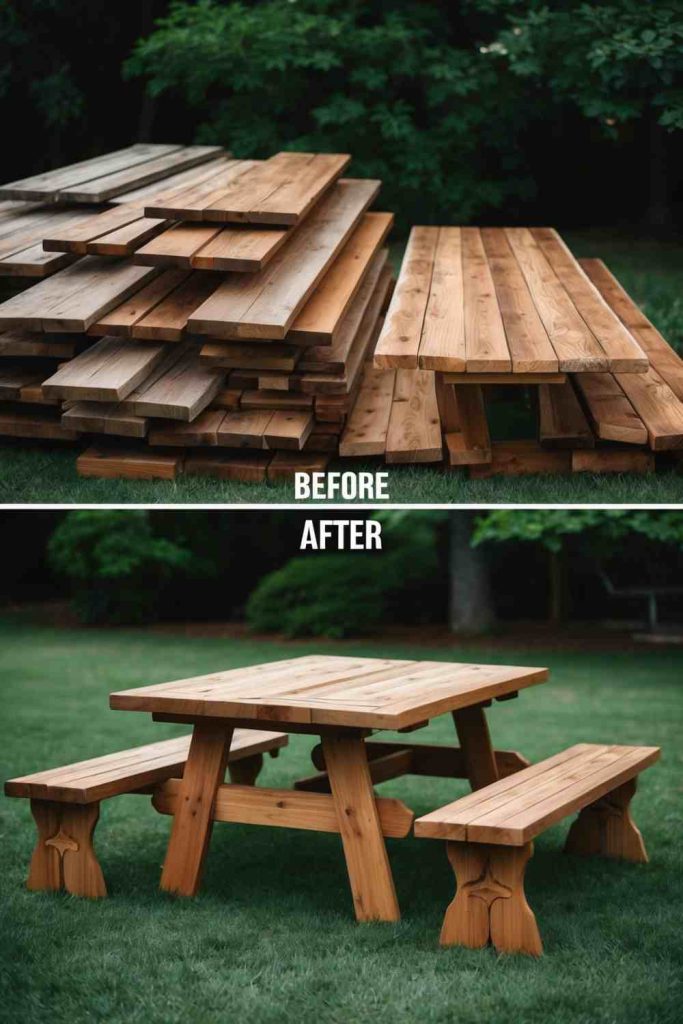
Short, irregular boards become much easier to use when the project is designed around their actual size and strength. This project turns sound reclaimed planks into an outdoor picnic table with an integrated tabletop, legs, and benches. This is the most structural project in the list. A picnic table carries people and lives outdoors, so the design should follow a proven plan and use timber and fasteners appropriate to those loads and conditions.
Treat the finished object as a structure first and a rustic feature second. Check where the load travels, where screws enter solid wood, and whether the assembly can rack, twist, or pull away from the wall. If the reclaimed boards are visually appealing but not strong enough for the intended load, change the function rather than hiding the weakness under paint or extra hardware.
Materials and Tools
· Sound structural-quality reclaimed lumber
· Proven picnic-table plan
· Saw
· Drill or driver
· Exterior-suitable structural fasteners
· Clamps
· Square and measuring tools
· Sandpaper
· Exterior-suitable finish if desired
Steps for This Wood Upcycling Project
1. Grade the reclaimed lumber carefully. Use only boards that are sound enough for structural furniture and reject rotten, deeply cracked, badly twisted, or contaminated pieces. Remove hidden metal before cutting and identify the strongest boards for legs, rails, and bench supports.
2. Work from a proven plan. Do not guess the geometry of the legs or benches. Adapt a reliable picnic-table plan to the actual lumber you have, making changes only where you understand how they affect stability and load paths.
3. Build and brace the frame. Cut, clamp, and fasten the leg assemblies and supports squarely, then attach the tabletop and benches to the supporting structure. Use appropriate exterior structural fasteners rather than decorative screws intended for light indoor work.
4. Inspect before anyone sits on it. Sand exposed edges, finish for outdoor use if desired, and place the table on stable ground. Check every joint and brace under gradually increasing load; if the structure moves or racks, correct it before regular use.
I would not make a picnic table my first reclaimed-wood furniture project. There is nothing wrong with starting with a shelf or planter and saving load-bearing outdoor furniture until the joinery feels familiar.
Variation: Use the same outdoor planks for a low garden table or potting bench if the timber is sound but you do not want to build seating.
Wood Upcycling Choices That Can Cause Splinters, Weak Joints, or Unsafe Finishes
Assuming Every Old Board Is Safe to Reuse
Age alone does not make wood suitable for a new purpose. Unknown chemical treatment, contamination, hidden metal, rot, and unstable coatings can all change what the board should become. Use known, sound material for food-contact items, children’s projects, pet projects, and load-bearing furniture; redirect uncertain boards toward non-contact decorative use.
Cutting Before Removing Hidden Nails and Staples
A tiny buried fastener can damage a blade and send fragments where you do not want them. Inspect both faces and edges, use appropriate detection methods when available, and pull metal before cutting, planing, routing, or aggressive sanding.
Sanding Away the Character You Wanted to Save
Reclaimed wood does not need to become perfectly uniform. Sand splinters, rough touch points, unstable coatings, and areas needed for good joints, but stop before every age mark disappears unless a smooth new finish is genuinely part of the design.
Using Glue as a Substitute for Structural Joinery
Glue can be useful, but a stool, bookshelf, headboard, picnic table, or loaded wall rack may need mechanical fasteners, brackets, battens, or proven joinery as well. Build the load path first; decoration comes later.
Driving Screws Into Split End Grain
Fasteners placed too close to a cracked end can widen the split instead of strengthening the joint. Trim back damaged ends where possible, drill pilot holes when appropriate, and move the fixing point into sound wood.
Hanging Heavy Pieces From Decorative Slats
Wall art, clocks, shelves, and headboards should hang from the structural backing or frame. A visually appealing face board may be thin or weak, so attach wall hardware where the load is actually supported.
Using Mystery Reclaimed Wood for Food or Children’s Items
A cutting board or toy needs stricter material selection than wall decor. If you cannot verify the wood and finish for the intended contact, choose a different use rather than relying on sanding to remove an unknown history.
Trapping Water Against Outdoor Wood
Planters and outdoor furniture fail faster when water has nowhere to drain or the wood sits permanently wet. Use removable pots, drainage gaps, feet, and exterior-appropriate finishes where suitable, then keep checking the piece as weather changes it.
Putting Open Flame Directly Into Wooden Lanterns or Holders
A wooden recess is not automatically a safe candle cup. Use battery LED lighting for the simplest option, or a purpose-made noncombustible insert that separates the flame and heat from the wood while following the candle guidance.
Treating Rustic as an Excuse for Rough or Unstable Work
Visible nail holes, uneven color, and old saw marks can be intentional. Splinters, wobble, sharp corners, loose fasteners, rocking legs, and unreliable wall anchors are not part of the rustic look; they are unfinished problems.
Frequently Asked Questions
How do I know whether reclaimed wood is safe to use?
Start with its source and condition. Reject wood with rot, strong chemical odors, contamination, unstable coatings, or a history you cannot assess for sensitive uses, and remove all embedded metal before working it.
Do I need to sand reclaimed wood completely smooth?
Not necessarily. Sand splinters, sharp edges, joint surfaces, and unstable finish, but you can leave sound age marks and texture where they do not interfere with safety, cleaning, or assembly.
Can I use pallet wood for indoor furniture?
Sometimes, but only after you assess the pallet’s source, markings, contamination, condition, and structural quality. If you cannot establish that the wood is appropriate for the planned use, choose a different reclaimed source or limit it to a non-sensitive decorative project.
What is the safest way to cut small wood scraps?
Clamp the piece to a stable work surface and use a tool appropriate to its size and shape. Do not hold a tiny offcut in your fingers while sawing or drilling, and wear suitable eye protection.
Can reclaimed wood be used for a cutting board?
Only use timber you can confidently identify as appropriate for direct food contact and free from unknown treatments, contamination, coatings, embedded metal, and deep cracks. If the history is uncertain, use the wood for a decorative board instead.
How can I stop a reclaimed wood shelf or rack from pulling away from the wall?
Match the wall fixings to the wall construction and the expected load, and attach the hardware to the structural part of the project. Load the item gradually and stop if you see movement, cracking, or loosening around the anchors.
What can I make from very small wood offcuts?
Small scraps are useful for bookends, key racks, frame details, jewelry organizers, clock markers, toy-shaped decor, coasters for non-food use, or geometric wall art. Group pieces by thickness and condition before choosing the project so you are not forcing fragile scraps into load-bearing roles.
Let Reclaimed Wood Keep Its Character Without Losing Its Purpose
The best upcycling wood ideas do not ask old timber to pretend it is new. They use the grain, nail marks, faded color, and odd dimensions as part of the design while still insisting on smooth touch points, sound joints, appropriate finishes, and reliable mounting. That balance is what turns a saved board into an object you can actually live with rather than a craft that only looks good for a moment.
If you are new to reclaimed wood, begin with a light-load project such as the driftwood key holder, picture frame, jewelry organizer, wall art, or wood scrap bookends. Then move toward shelves and furniture as your confidence with inspection, cutting, drilling, joinery, and mounting grows. I would much rather see one small offcut become a dependable object than watch a questionable plank get pushed into a job it cannot safely do. Which forgotten piece of wood would you like to give a useful second role next?