A denim jacket can stay wearable for years even after its original look starts feeling tired. The fabric may still be strong, the seams may sit properly, and the pockets may work perfectly, yet the jacket ends up pushed to the back of the wardrobe simply because it no longer feels interesting. That gap between ‘still good’ and ‘still worn’ is exactly where denim upcycling becomes useful.
I especially like denim because it gives you a sturdy base for techniques that would overwhelm thinner clothing. Embroidery can sit comfortably on a back panel, scraps can become visible patches, lace can soften a heavy collar, and old knitwear can replace damaged areas instead of being discarded separately. Even so, the best result is not the one with the most decoration. It is the one that still feels like a jacket you actually want to wear.
What matters is matching the technique to the strength and movement of the garment. A rigid bottle cap belongs on a stable panel, not at an elbow. Beadwork needs secure thread and sensible spacing. Knitted fabric needs support so it does not stretch away from the denim. Paint needs flexibility. I don’t think every empty section needs filling; sometimes one carefully planned panel changes the whole jacket.
Check the Jacket’s Structure Before Adding Anything New
Before choosing colours, trims, beads, or fabric scraps, inspect the jacket itself. Denim can hide wear surprisingly well until you start pulling stitches through it or adding extra weight. A back panel may look solid from a distance while the elbows, underarms, pocket corners, or buttonholes have already begun thinning.
· Check shoulder seams, armholes, elbows, cuffs, pocket corners, buttonholes, and the lower hem for thinning or broken stitching.
· Hold suspicious areas toward a light source; unusually thin denim becomes much easier to spot this way.
· Repair open seams before covering them with decorative work, because an appliqué should not be expected to hold a structural seam together.
· Remove loose threads carefully without cutting into intact woven fibres.
· Wash a second-hand or long-stored jacket before planning permanent additions so shrinkage, odour, hidden stains, and weak areas become obvious.
· Make sure buttons, snaps, zippers, pockets, and cuffs still work before investing time in decoration.
If the denim is weak in one area, reinforce it first and then treat the visible embellishment as the design layer. That small distinction makes a big difference: the repair carries stress, while the decoration adds character.
Test Paint, Bleach, Knit Fabric, and Adhesive on Scraps First
Denim is sturdy, but not every jacket behaves the same way. Rigid cotton denim, stretch denim, heavily washed denim, and coated finishes can react differently to paint, heat, stitching, adhesive, and chemical fading. I know testing feels like an extra step when you are ready to start, but a small trial can prevent a much larger problem later.
· Test fabric paint on an inside seam allowance or a similar denim offcut to check coverage, stiffness, and colour.
· Check knitted scraps for excessive stretching or unravelling before cutting them into permanent jacket panels.
· Place lace against the denim first so you can judge whether its scale and weight suit the jacket before trimming it.
· Treat adhesive as a positioning aid rather than the only structural attachment for heavy or frequently flexed pieces unless the product is designed for that exact use.
· If using bleach or another fading treatment, follow the product directions, protect skin and work surfaces, provide ventilation, and never mix it with other cleaners or chemicals.
· Try one sample stitch through a thick seam or layered section before committing to a large area; this tells you whether your needle, thread, and tension are suitable.
Once you know how the materials behave together, the jacket becomes much easier to plan. It also helps you decide which technique belongs on a stable back panel and which one can safely move onto a sleeve, pocket, or cuff.
Plan Weight, Movement, and Washing Before the Final Layout
An embellished jacket still needs to act like clothing. A balanced arrangement on a table can become uncomfortable when beads press against a chair, thick patches restrict an elbow, or a knitted overlay stretches differently every time the garment is worn. I would decide how the jacket needs to move before making permanent attachments.
· Pin or temporarily position large additions, then try the jacket on before sewing them permanently.
· Lift your arms, bend your elbows, sit down, close the buttons, and put your hands in the pockets to check real movement.
· Keep rigid or heavy decoration away from underarms, elbow folds, tight cuffs, and other areas that bend sharply.
· Check the inside surface for hard knots, backing fabric, metal edges, or bulky seam intersections that could rub the body.
· Avoid blocking working pockets, buttonholes, zippers, or snaps unless you deliberately want to remove that function.
· Plan cleaning according to the most delicate new material you add, because the original care label may no longer suit the finished jacket.
Then step back and consider the visual weight as well. Denim already has topstitching, seams, pockets, fading, and hardware. Leaving some of that original structure visible usually makes the upcycled parts feel more intentional.
DIY Upcycled Denim Jacket Ideas with Stunning Embroidery & Appliqué
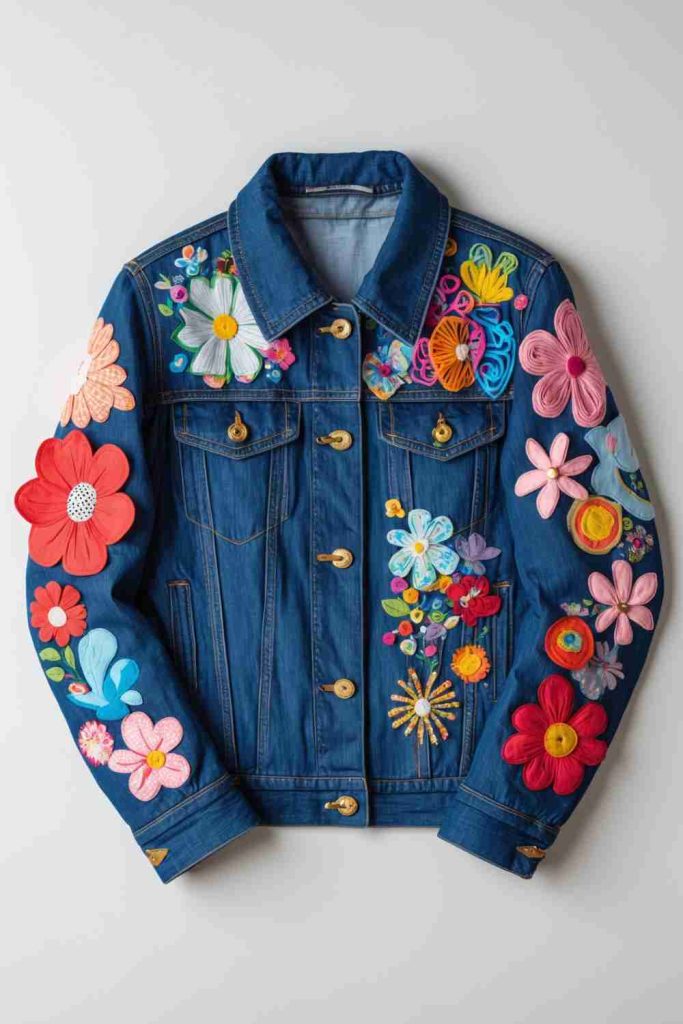
Embroidery and appliqué work naturally with denim because the jacket gives softer decorative fabric a firm background. Floral motifs can spread across a back panel, frame a pocket, climb from the lower hem toward the shoulder, or sit in one concentrated area without changing the basic construction of the garment.
The strongest designs usually combine two levels of detail. Larger appliqué pieces establish the main shapes, while embroidery connects them with smaller leaves, stems, outlines, lettering, or abstract marks. That prevents the jacket from looking like several unrelated patches were simply attached wherever they happened to fit.
Materials and Tools
· Denim jacket in sound condition
· Fabric appliqués or suitable fabric scraps
· Embroidery thread
· Hand-sewing and embroidery needles
· Embroidery hoop where practical
· Fabric scissors
· Pins or removable fabric marker
· Optional fabric adhesive for temporary positioning
· Small backing fabric for weak areas if needed
Steps for This Denim Jacket Upcycle
1. Choose one main decoration zone. Put the jacket on and decide where the design can sit without interfering with movement. The broad back panel is usually easier for a first attempt than elbows or underarms. Lay the jacket flat, arrange the largest appliqués, and mark only the main positions so you still have room to adjust the composition.
2. Prepare and stabilise the appliqué pieces. Trim fraying fabric neatly, turn raw edges under where appropriate, or use a finishing method that suits the material. If the denim underneath feels soft, add a small backing layer on the inside before you sew. Pin the pieces in place and make sure they are not stretching the jacket out of shape.
3. Secure the appliqués before adding embroidery. Sew around the stable outer edges with small, even stitches that catch the decorative fabric securely without pulling the denim into puckers. Work from the larger pieces toward smaller ones. Keep checking the jacket from a distance so the design stays balanced instead of becoming crowded in one corner.
4. Build embroidery around the fixed shapes. Add stitched stems, leaves, outlines, words, or smaller motifs after the main appliqués are stable. Work in short sections and secure thread ends carefully on the inside. Then turn the jacket over, remove uncomfortable loops or bulky knots, and reinforce any edge that lifts when the denim bends.
For me, the empty denim between embroidered areas matters almost as much as the stitching. Leaving some original fabric visible gives each decorative section room to stand out.
Variation: Use scraps from an old floral blouse as appliqué and limit the embroidery to simple outlines if detailed stitching feels too time-consuming.
DIY Upcycled Denim Jacket Ideas with Unique Bottle Cap Decorations
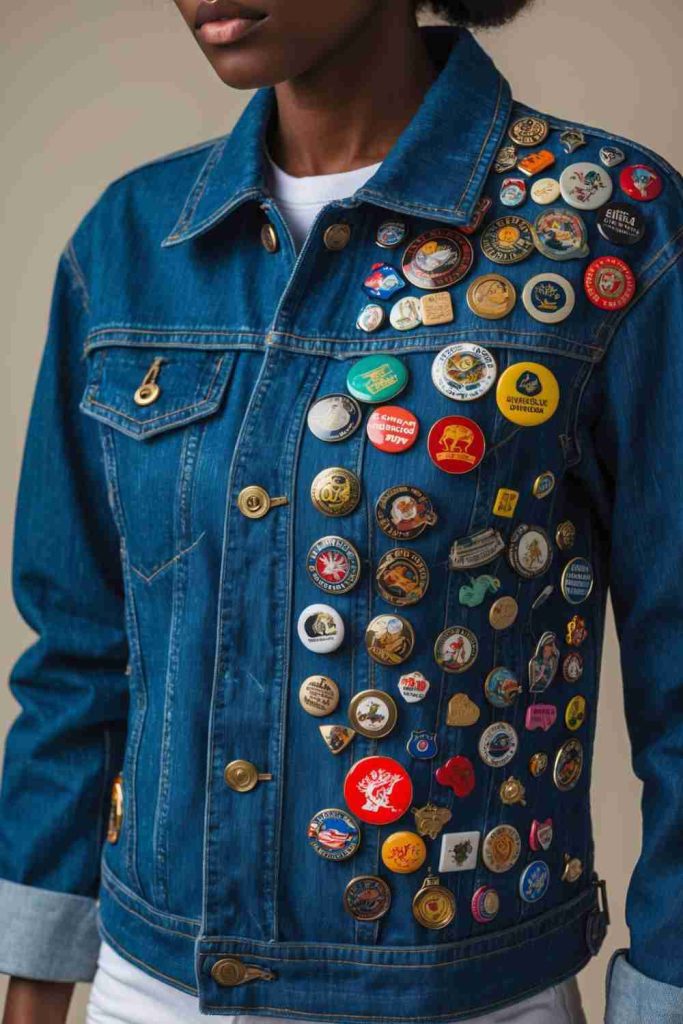
Bottle caps create a much harder and heavier surface than ordinary fabric embellishments, so this idea works best when the decoration is controlled. A small cluster across a stable back yoke, pocket flap, or shoulder panel can give a jacket an industrial, collected look without turning the whole garment into something awkward to sit in.
The preparation matters more than the number of caps. Every piece should be clean, dry, rust-free, and free from sharp edges. I would reject damaged caps rather than trying to hide a rough rim against fabric or skin.
Materials and Tools
· Sturdy denim jacket
· Clean bottle caps in safe condition
· Pliers
· Protective gloves and eye protection for metal preparation
· Strong thread or another secure fabric-compatible attachment method
· Needle suited to denim
· Small reinforcement patches
· Optional removable pin-style attachments if safely constructed
Steps for This Denim Jacket Upcycle
1. Sort and inspect the caps carefully. Remove bent, rusty, cracked, or sharp pieces and clean the usable caps thoroughly. Let them dry completely before planning the design. If any metal modification is required, prepare the caps with the correct tools and protection before they are placed on the garment.
2. Plan a contained layout. Lay the jacket flat and arrange a limited number of caps on a broad, stable area. Keep them away from elbows, underarms, cuffs, side seams, and sections that press directly against a chair. Temporarily place the pieces, then try the jacket on carefully to check whether the weight pulls to one side.
3. Reinforce the denim and attach each piece independently. Add a stable backing patch inside the decorated section if the denim feels soft. Use a secure method that allows each cap to remain independent rather than hanging several pieces from one weak join. Avoid relying on one large patch of rigid glue as the only structural connection on a flexible garment.
4. Wear-test before adding more. Put the jacket on over another layer and move naturally. Sit against a chair, reach forward, and check the inside for hard pressure points or loose attachments. If the first group already feels heavy or noisy, stop there rather than assuming more decoration will improve the result.
Bottle caps are visually strong, so a relatively small group can make the idea clear. I would rather have ten secure pieces than a full panel that turns the jacket into a metal shell.
Variation: Use flattened pull tabs, lightweight washers, or large reclaimed buttons when you want a similar metallic direction with less weight.
DIY Upcycled Denim Jacket Ideas with Distressed & Faded Details
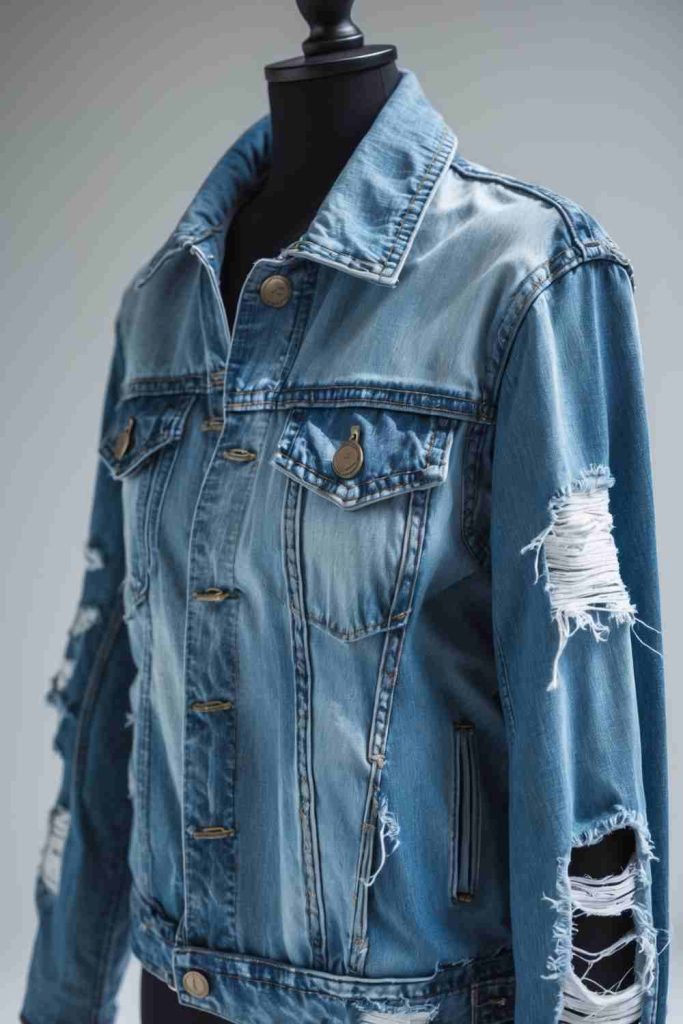
Distressing works best when it looks connected to the way denim naturally wears. Cuffs, pocket edges, seams, elbows, and selected front panels can handle subtle abrasion without making the whole jacket appear damaged. The result should feel broken-in rather than accidentally torn.
The biggest mistake is doing too much too quickly. Sanding and cutting permanently remove fibres, so the process should build gradually. A softly faded edge can always be distressed a little more; an oversized hole cannot easily be returned to strong denim.
Materials and Tools
· Denim jacket
· Fine sandpaper or sanding block
· Seam ripper
· Tweezers
· Fabric scissors for controlled cuts
· Chalk or removable marker
· Protective work surface
· Optional fading treatment suitable for the fabric
Steps for This Denim Jacket Upcycle
1. Mark areas that already make visual sense. Wear the jacket and note where natural folds occur around cuffs, elbows, pocket openings, and seams. Mark small zones rather than large random patches. Keep structural seams intact unless you specifically intend to rebuild them, because distressing should change the surface without weakening the entire garment.
2. Begin with abrasion rather than holes. Rub the denim gently with sandpaper and stop regularly to check the change in texture and colour. Concentrate first on raised seams and edges, where natural wear often appears. Move slowly and vary the pressure so the surface does not develop one obvious rectangular sanded patch.
3. Add controlled fraying only where needed. Make very small cuts or use a seam ripper in selected non-structural zones, then pull a few surface threads with tweezers. Avoid deep cuts at shoulders, pocket corners, and armholes where the fabric carries tension. If a frayed area opens too quickly, stabilise it from the inside before continuing.
4. Wash and reassess before doing more. Clean the jacket after the first distressing stage using a method suitable for the garment. Washing softens raw fibres and often changes the appearance more than expected. Once dry, decide whether anything genuinely needs more abrasion rather than automatically returning with the sandpaper.
I would finish with slightly less distressing than the first plan suggests. Regular wear will keep changing the denim anyway, so the jacket does not need to look fully aged on day one.
Variation: Distress only the collar, cuffs, and pocket edges for a subtle worn-in effect that keeps the main body strong.
DIY Upcycled Denim Jacket Ideas with Bold Fabric Paint Designs

Fabric paint changes the surface of denim without requiring you to cut or rebuild the jacket. That makes it one of the more approachable options when the garment fits well but simply feels visually plain. Broad back panels suit large motifs, while sleeves and pockets work well for smaller repeated marks.
The key is keeping the painted area flexible. Heavy layers may look impressive while the jacket lies flat but become uncomfortable once the fabric bends. A controlled design with some untouched denim usually wears better than a fully painted front or back.
Materials and Tools
· Clean denim jacket
· Fabric paint suitable for the jacket fibre
· Brushes in a few useful sizes
· Palette or shallow container
· Cardboard for inserting inside the jacket
· Chalk or removable marker
· Optional stencil
· Optional masking tape suitable for the task
· Scrap denim for testing
Steps for This Denim Jacket Upcycle
1. Wash and stabilise the jacket. Start with clean fabric so dust, oil, or finishing residue does not interfere with the paint. Slide cardboard inside the section you plan to decorate, then smooth the denim without stretching it. Test the paint on a hidden area or scrap first so you know how opaque and flexible it becomes.
2. Plan the main composition before opening every colour. Sketch the design on paper or mark only a few light guide lines on the denim. If several colours will overlap, decide the order in advance. For geometric work, mask selected areas carefully; for freehand motifs, keep enough open denim around the design so the edges remain clear.
3. Build colour in controlled layers. Apply thinner coats rather than forcing full opacity in one heavy pass. Let each area settle according to the paint instructions before brushing over it repeatedly or adding neighbouring colours. Then add smaller lines, dots, or outlines only after the large shapes are established.
4. Set the paint and flex-test the result. Follow the manufacturer’s directions for drying, curing, and heat-setting where required. Once the paint is ready for wear, remove the cardboard and bend the decorated area gently. Check for cracking, excessive stiffness, or bleed-through before wearing or washing the jacket.
One strong motif often works better than covering the entire jacket. Denim already has seams, pockets, fading, and topstitching, so the original garment contributes plenty of visual texture.
Variation: Paint only the back yoke, one pocket, or a narrow sleeve motif when you want a smaller first project.
DIY Upcycled Denim Jacket Ideas with Colorful Fabric Scrap Patchwork
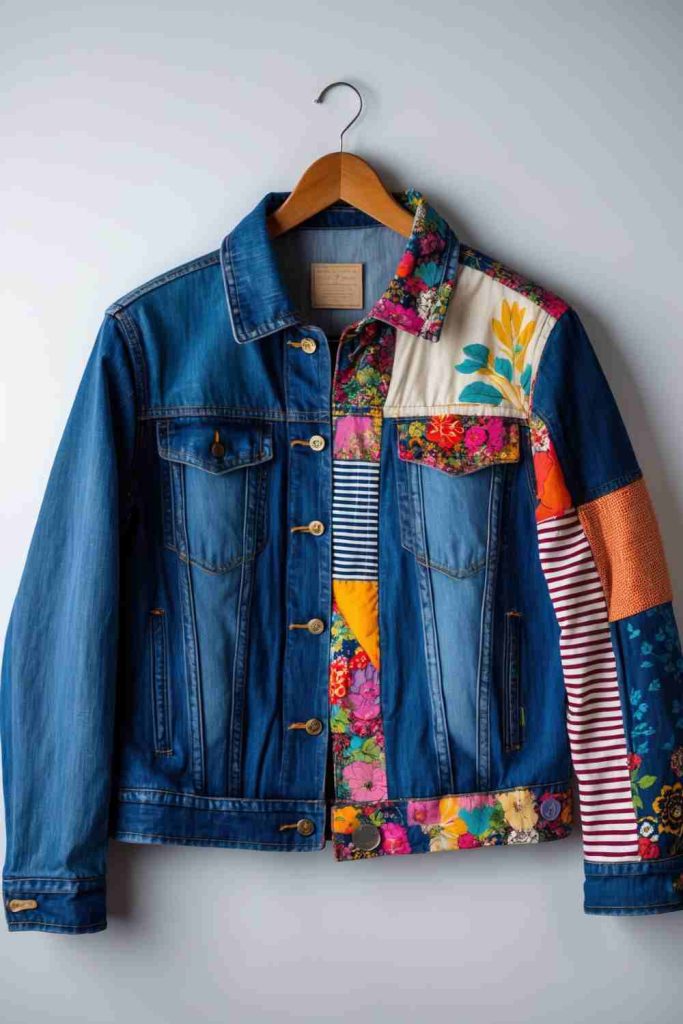
A denim jacket is a useful base for leftover fabric because it can support pieces from shirts, dresses, quilting cotton, or other light-to-medium materials. Patchwork can also cover stains or reinforce worn panels, provided the patch extends beyond weak fabric into healthy denim.
The scraps do not need to match perfectly. What matters more is making the overall arrangement feel intentional and choosing fabrics that can tolerate similar movement and cleaning. A limited group of colours often feels more deliberate than using every scrap simply because it is available.
Materials and Tools
· Denim jacket
· Washed fabric scraps
· Fabric scissors
· Pins or clips
· Hand-sewing needle and thread or sewing machine
· Optional lightweight stabiliser
· Chalk or removable marker
· Iron when suitable for the fabrics
Steps for This Denim Jacket Upcycle
1. Sort scraps by behaviour before colour. Separate very stretchy knits, delicate fabrics, thick upholstery pieces, and stable woven cotton. Choose a group that can sit comfortably on denim without creating extreme differences in weight or stretch. Wash uncertain scraps before cutting so shrinkage does not appear after the patches are attached.
2. Build the layout while the jacket is flat. Cut a few larger shapes first and arrange them around the intended area. Overlap pieces slightly or plan turned edges depending on the finish you want. Pin the main pieces, then try the jacket on so you can check whether the patchwork restricts the shoulder, elbow, or pocket opening.
3. Attach from the largest pieces outward. Secure broad patches first, keeping the denim underneath relaxed rather than stretched. Stitch around each edge and add internal stitching to very large patches if they lift or bubble. At elbows or curved areas, flex the garment as you work so the repair does not become too tight.
4. Finish the edges and inspect the inside. Trim loose threads, secure fraying areas, and press only when all fabrics tolerate the same heat. Turn the jacket inside out and check that bulky patch intersections are not creating uncomfortable ridges. Reinforce any corner that begins lifting before regular wear.
Patchwork looks stronger to me when some denim remains visible. The original jacket should still feel like the base rather than disappearing under a second garment.
Variation: Use only three coordinating fabrics and repeat them across the back and pockets for a calmer patchwork design.
DIY Upcycled Denim Jacket Ideas with Bleach & Fabric Paint Designs
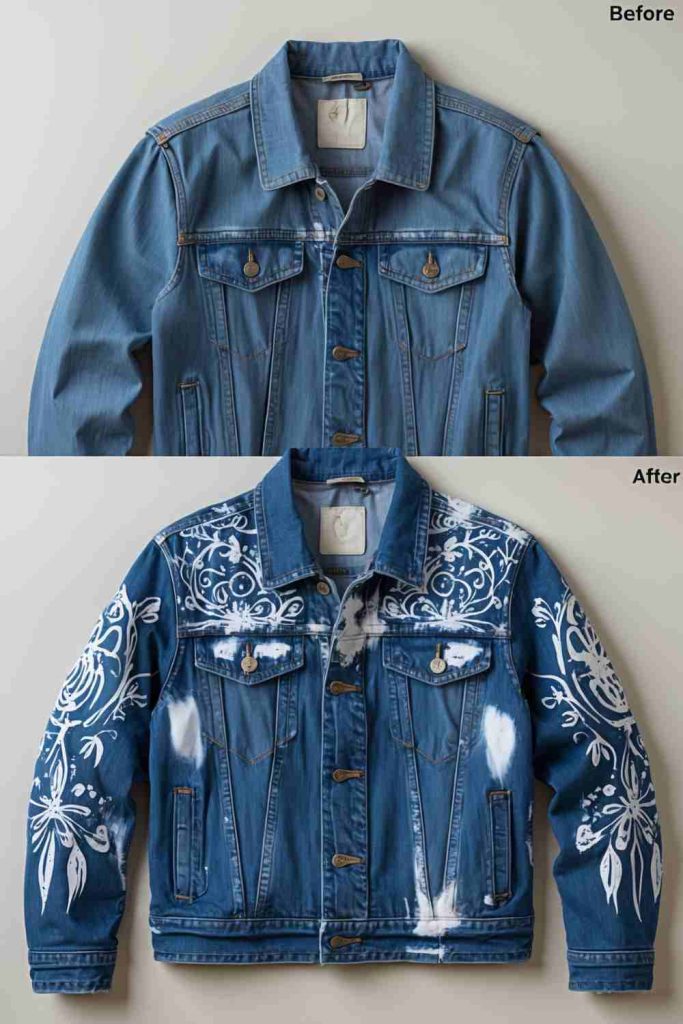
Combining a lightened denim background with fabric paint can create strong contrast, but the two stages should be treated separately. Chemical fading changes the denim itself, while paint sits on or within the surface. Rushing from one process into the next makes it harder to control either one.
This technique also deserves more caution than ordinary fabric paint. Bleach can damage fibres and irritate skin or lungs, so work with ventilation, protective gloves, a protected surface, and the product’s directions. Never mix bleach with other household cleaners or chemicals.
Materials and Tools
· Denim jacket
· Appropriate bleaching product
· Protective gloves
· Protective work-surface covering
· Sponge or applicator suited to the technique
· Fabric paint
· Paintbrushes
· Cardboard barrier
· Clean water for rinsing according to product directions
Steps for This Denim Jacket Upcycle
1. Test the denim before altering a visible area. Different dyes can lighten to very different tones. Test an inconspicuous section or similar denim first, then decide whether the result suits the design you have in mind. If the fibres feel noticeably weaker after the test, skip the chemical treatment and create contrast with paint instead.
2. Create the faded area cautiously. Protect the work surface and place a barrier inside the jacket. Apply the bleaching product only as directed and in a ventilated setting, keeping the treatment away from areas you want to remain dark. Monitor the fabric carefully, then rinse and clean it according to the product instructions before moving on.
3. Let the jacket fully stabilise before painting. Do not paint over damp fabric or fabric that has not been thoroughly cleaned after the fading stage. Once the jacket is dry, mark the main painted motifs across selected lightened areas. Use the new contrast to support the design rather than covering every pale section with paint.
4. Paint, cure, and inspect the finished denim. Apply fabric paint in manageable layers and follow its specific curing instructions. After everything is complete, flex the treated areas and check for unusual weakness, residue, or stiffness. If the denim feels fragile, reinforce or reduce stress on that section before wearing the jacket regularly.
This is one technique where I would keep the first attempt modest. A small faded panel with painted detail can feel far more controlled than a jacket covered in several aggressive treatments at once.
Variation: Skip chemical fading entirely and imitate the light-dark contrast with opaque fabric paint for a simpler process.
Transform Old Jackets into Stylish Sleeveless Vests
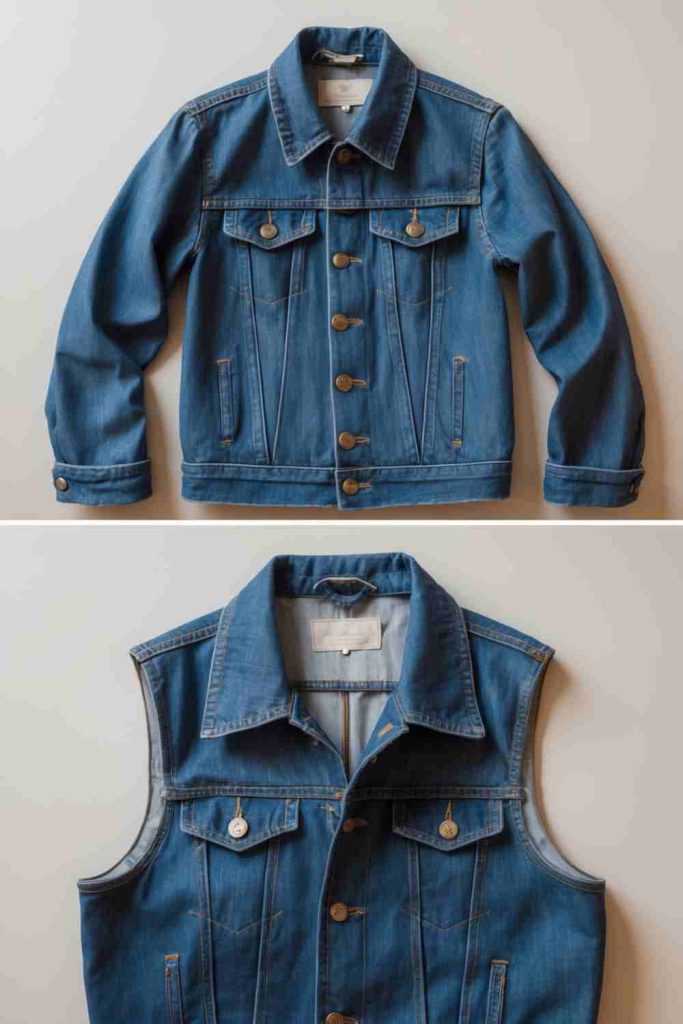
Removing damaged or unwanted sleeves can make sense when the jacket body still fits well. It also turns a heavy garment into something easier to layer over T-shirts, shirts, dresses, and lightweight knitwear. If the sleeves are stained or worn through while the body remains sound, this is a particularly practical second use.
The armhole finish determines whether the result looks deliberate. Simply cutting the sleeves away can suit a raw, frayed style, but a cleaner vest needs the new edge stabilised so fraying does not keep travelling into the body.
Materials and Tools
· Denim jacket
· Fabric scissors
· Seam ripper
· Chalk or removable fabric marker
· Pins or clips
· Needle and strong thread or sewing machine
· Optional bias binding or facing fabric
· Iron if suitable for the denim
Steps for This Denim Jacket Upcycle
1. Decide whether to preserve the original armhole seam. Turn the jacket inside out and inspect how each sleeve joins the body. If the seam itself is strong, removing the sleeve carefully outside that join may leave a useful structural edge. Mark both sides while the jacket is flat so the armholes remain visually balanced.
2. Remove the sleeves gradually. Use a seam ripper if you want to separate the sleeve cleanly at the seam, or cut along the marked line for a raw-edge approach. Work a short section at a time and compare both sides before making final cuts. Keep the removed sleeves because they can become patch material later.
3. Stabilise the new armholes. For a clean finish, turn the raw edge inward where the construction allows and stitch it securely, or cover it with suitable binding or facing. For a deliberately frayed finish, control the depth of the fraying and add a line of stitching inside the edge so it cannot travel indefinitely.
4. Try the vest on and correct the shape. Move your arms forward and back, then check for tight points, uneven armholes, or bulky seams. Trim only after the fit feels comfortable. Press the finished edges if appropriate and add any patches or decoration only after the basic vest shape works well.
I would get the armholes right before adding any decoration. Once the vest fits comfortably, even a plain raw edge can look intentional.
Variation: Use the removed sleeves to make matching pocket patches, a small bag, or repair pieces for another denim garment.
DIY Upcycled Denim Jacket Ideas with Stunning Beadwork Designs
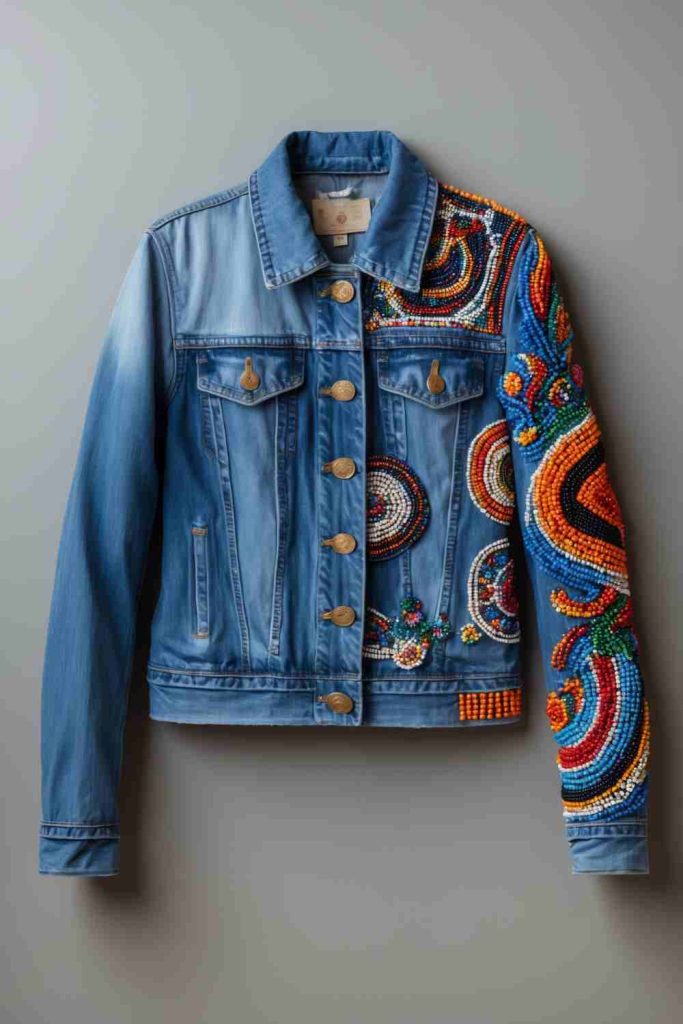
Beadwork can turn a plain denim panel into a textured surface without covering the fabric completely. Small beads can outline seams, form floral or geometric motifs, frame pockets, or create a narrow decorative band across a yoke. Denim is strong enough to carry some added weight, but that does not mean every part of the jacket should be densely beaded.
The most wearable version balances decoration with movement. Heavy clusters belong on broad, stable panels, while sleeves and cuffs usually work better with smaller, flatter details. Thread security matters too; one broken line should not release a whole row of beads.
Materials and Tools
· Denim jacket
· Beads suitable for garment embellishment
· Strong thread or beading thread
· Needle that passes through the beads and denim
· Fabric chalk or removable marker
· Scissors
· Optional embroidery hoop
· Small backing fabric for heavily beaded areas
Steps for This Denim Jacket Upcycle
1. Map the beadwork before sewing. Mark only the main lines or motif boundaries on the jacket. Lay a few beads over the area to check scale and spacing, then try the jacket on with the plan still temporary. Keep dense sections away from elbow folds, underarms, and places where a bag strap constantly rubs.
2. Reinforce soft denim and secure the starting thread. Add a small backing layer if the base fabric feels thin. Begin with a well-secured thread end on the inside and avoid very long runs between attachment points. The aim is to keep each small section independent enough that one failure does not release a large part of the design.
3. Build the pattern in short sections. Sew a manageable group of beads, secure the thread, and then begin the next section. Mix sizes only when the design still lies comfortably against the garment. Check the weight as you go; it is much easier to stop early than to remove dozens of beads after the jacket starts pulling downward.
4. Inspect every attachment from both sides. Gently move the jacket, feel the inside for rough knots, and check that beads do not pivot loosely or catch neighbouring fabric. Reinforce weak points and remove pieces that sit directly under pressure. Then trim thread tails only after the whole section is stable.
Beads already bring plenty of texture and light. I know it can feel tempting to keep filling empty spaces, but stopping sooner often makes the pattern easier to read and the jacket easier to wear.
Variation: Outline only a pocket flap, collar tip, or back-yoke seam for a lighter beginner-friendly version.
DIY Upcycled Denim Jacket Ideas with Cozy Knitted Fabric Panels
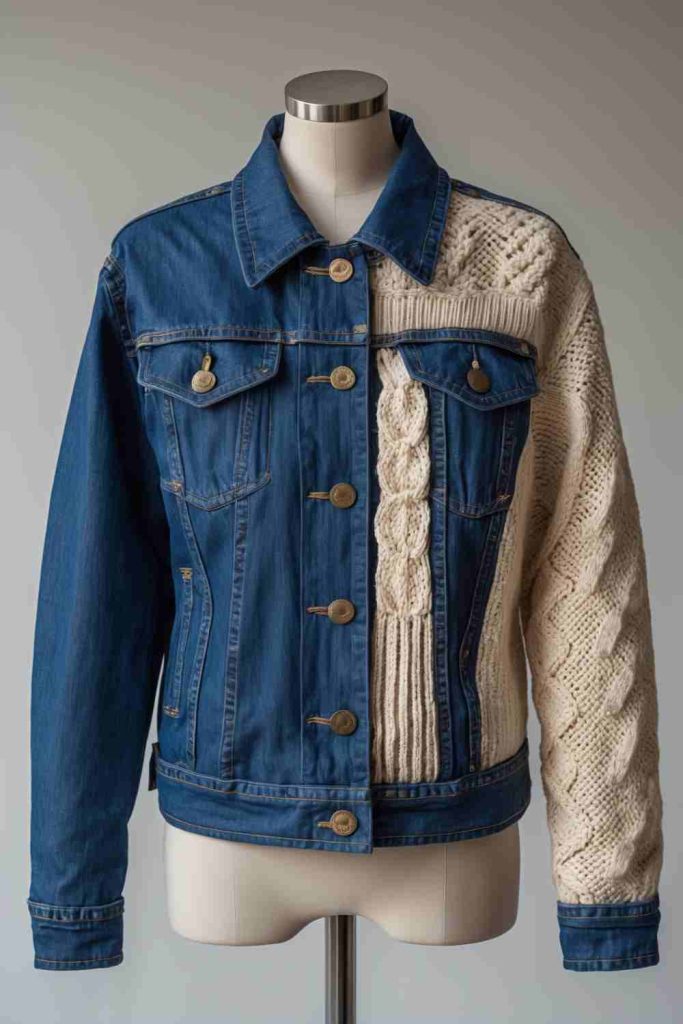
Old knitwear can become useful again when a sweater has good fabric but no longer works as a garment. Replacing a damaged denim sleeve, shoulder panel, or side section with knit fabric creates a softer contrast and lets two worn pieces contribute to one new jacket.
The challenge is stretch. Knitted fabric can grow, curl, or unravel once cut, while denim remains comparatively stable. The join therefore needs more preparation than an ordinary patch. If the knit hangs away from the denim or becomes distorted, the finished jacket can lose its shape quickly.
Materials and Tools
· Denim jacket
· Old knitted sweater or stable knit fabric
· Fabric scissors
· Seam ripper
· Pins or clips
· Needle and durable thread or sewing machine
· Chalk or removable marker
· Optional lightweight backing or stabilising tape
· Measuring tape
Steps for This Denim Jacket Upcycle
1. Choose a knit section that is still structurally sound. Avoid sweater areas that are pilled through, stretched out, or already unravelling. Wash and dry the knit as appropriate before cutting so its behaviour is known. Measure the jacket section carefully and mark a generous seam allowance rather than cutting to the exact visible size.
2. Stabilise the knit before removing denim. Secure the knit edges with suitable stitching or temporary stabilisation so the fabric cannot unravel during handling. Then inspect the jacket and decide whether you are replacing a whole sleeve or panel, or simply covering an existing section. Remove denim only after the replacement piece has been prepared.
3. Pin the knit to the jacket without stretching it. Match key points such as the top of the sleeve, underarm, cuff, or panel corners first. The knit should lie naturally rather than being pulled to fit. Baste or pin closely, then try the jacket on carefully before committing to the final seam.
4. Sew, support, and finish the join. Use a seam that holds the knit securely while allowing enough movement for the garment. Finish raw knit edges so they cannot ladder or unravel. Turn the jacket inside out, inspect the seam allowance for bulk, and reinforce high-stress points before regular wear.
The knit should look relaxed, not stretched tight across the denim. If it has to be pulled hard to fit the opening, I would recut the piece rather than force the seam.
Variation: Replace only the cuffs or lower sleeve sections with knitwear for a smaller project that still gives the jacket a softer texture.
DIY Upcycled Denim Jacket Ideas with Knitted Fabric Patchwork
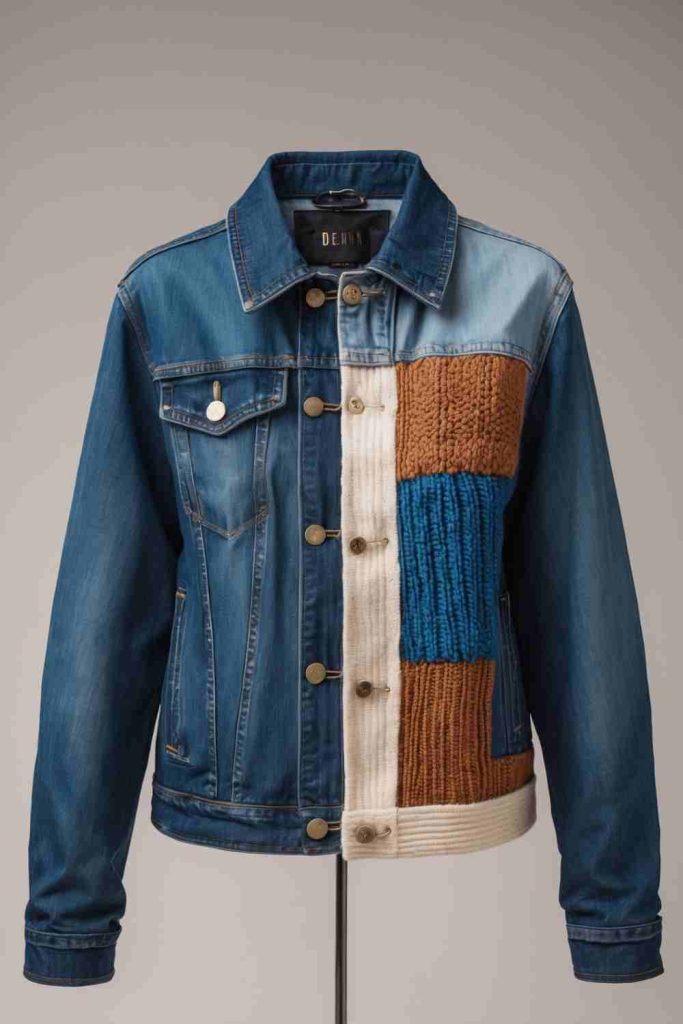
Knitted patchwork uses smaller sweater scraps rather than one large replacement panel. It is useful when you have several pieces of old knitwear with only limited areas worth saving. The patches can cover worn denim, add colour blocks to the back, or create a soft layered surface around pockets and shoulders.
Because every knit can stretch differently, the safest approach is to keep the pieces relatively small and stabilise their edges. Large unstabilised squares can sag, curl, or distort the denim beneath them.
Materials and Tools
· Denim jacket
· Knitted fabric scraps
· Fabric scissors
· Pins or clips
· Needle and durable thread or sewing machine
· Chalk or removable marker
· Optional stabilising backing
· Optional fabric adhesive for temporary positioning
Steps for This Denim Jacket Upcycle
1. Sort the knit scraps by stretch and thickness. Group pieces that behave similarly and set aside very loose, delicate, or damaged sections. Decide whether the patchwork will be decorative or whether it also needs to reinforce worn denim. Repair true structural damage first so the knit does not carry stress it cannot handle.
2. Prepare patches with controlled edges. Cut simple squares, rectangles, or broad curves that are large enough to sew accurately. Stabilise or secure the cut edges before they unravel. Arrange the pieces on the jacket and leave some denim between them so the patchwork does not become one heavy, stretchy blanket across the back.
3. Attach the patches without pulling the base fabric. Pin or baste the knit while both fabrics are relaxed. Sew the perimeter of each patch and add internal stitching to larger pieces if needed. At curved areas, move the jacket occasionally to confirm that the patch is not restricting the garment or stretching away from the seam.
4. Finish and test the patchwork as clothing. Trim only after the patches are secure. Turn the jacket inside out, remove rough thread ends, and try it on over the kind of layer you would normally wear underneath. Reinforce corners that lift and simplify any area that feels bulky or overly warm.
A limited patchwork area usually feels more intentional than covering every panel. For me, the contrast between structured denim and soft knit is the part worth keeping visible.
Variation: Use only one old sweater and rotate its ribbing, body knit, and patterned sections to create variation without mixing many fibre types.
DIY Upcycled Denim Jacket Ideas with Chic Crochet Lace Accents
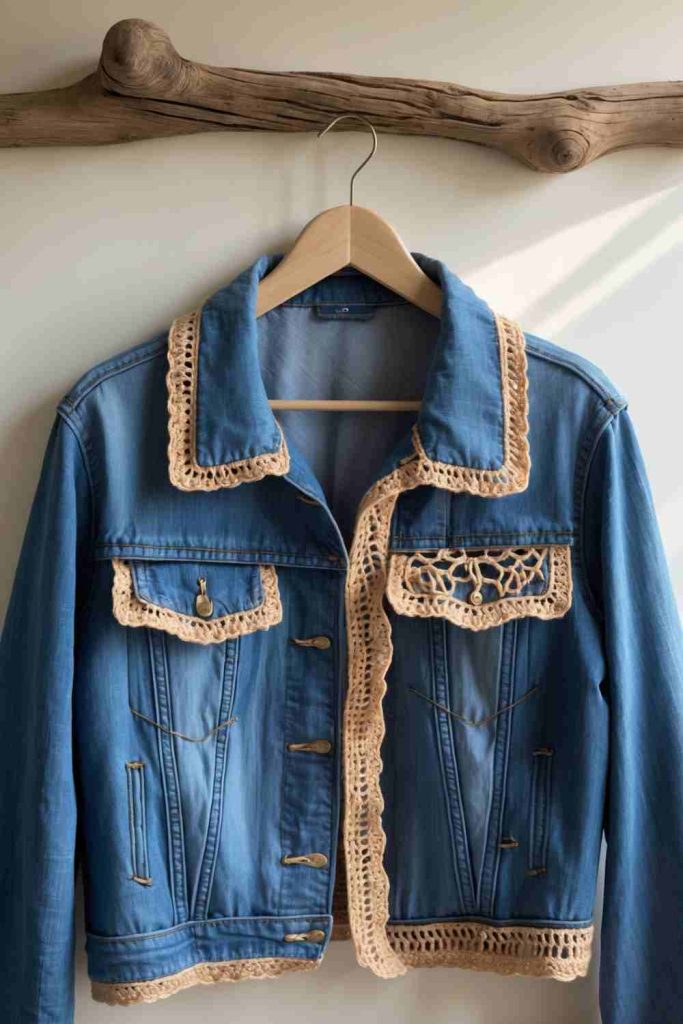
Crochet lace can soften the heavy lines of denim without requiring major garment reconstruction. A narrow trim along a collar, pocket flap, cuff, button line, or lower hem creates contrast while allowing the jacket to keep its original shape.
Vintage lace and crochet pieces can be delicate, so strength matters more than age or appearance. A beautiful trim with weakened loops may tear as soon as it is stretched around a cuff or pulled through a washing cycle.
Materials and Tools
· Denim jacket
· Crochet lace trim or sturdy crochet pieces
· Needle and thread
· Fabric scissors
· Pins or clips
· Measuring tape
· Optional fabric adhesive for temporary positioning
· Small backing fabric where needed
Steps for This Denim Jacket Upcycle
1. Inspect and measure the lace before cutting. Check the crochet for broken loops, weak edges, or sections that stretch unevenly. Measure the jacket area while it lies relaxed, then add a little allowance where the trim will turn around corners or fold under. Do not cut vintage lace until you are sure of the placement.
2. Position the trim while the jacket can still move. Pin the lace along the collar, pocket, cuff, hem, or another stable edge. Try the jacket on and move the relevant area before sewing. Make sure the lace does not bridge across a buttonhole, zipper, or fold that needs to open fully.
3. Sew through the strongest crochet points. Use small hand stitches through stable loops rather than pulling thread through fragile open areas. Secure the beginning and end carefully and keep the lace relaxed so it does not gather the denim. At corners, add extra attachment points instead of stretching the trim around the turn.
4. Finish with restraint and check cleaning needs. Trim loose threads, remove temporary pins, and inspect the inside for hard knots. Decide how the new lace changes the jacket’s care routine, especially if the crochet fibre is unknown or delicate. If the trim already creates enough contrast, stop rather than adding beads or more decoration automatically.
Crochet lace looks strongest when it follows an existing jacket line. A collar edge or pocket flap gives the soft pattern a clear boundary, which keeps the finish from feeling accidental.
Variation: Use small crochet motifs only on the pocket corners or upper back if you do not have enough trim for a full edge.
DIY Upcycled Denim Jacket Ideas with Bold Knitted Fabric Overlay
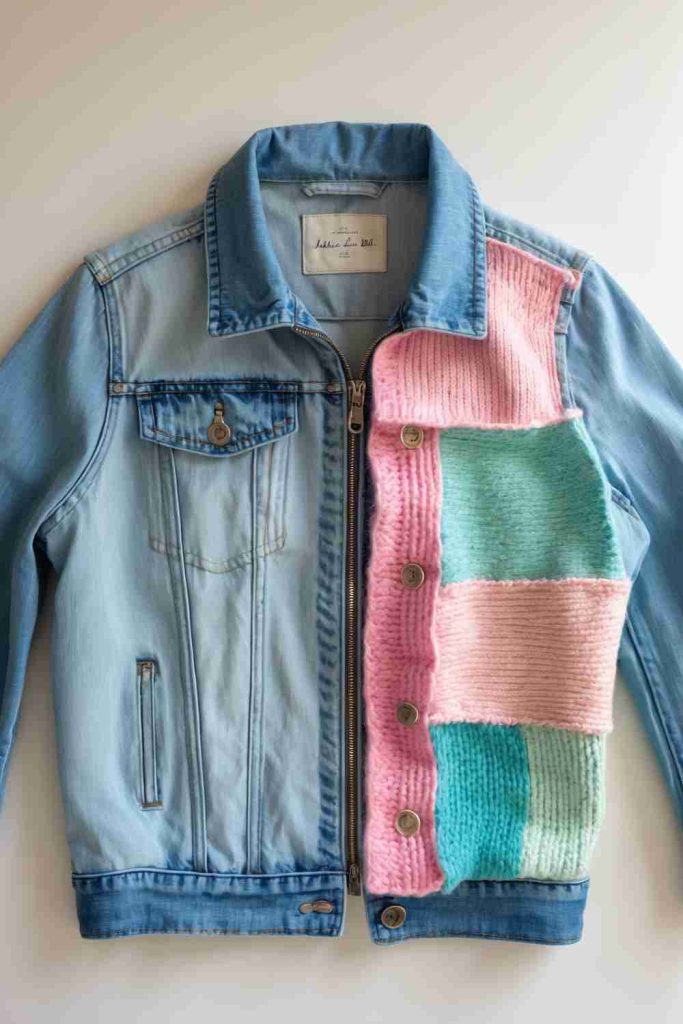
A knitted overlay differs from patchwork because one larger knit section becomes the main surface feature. It might cover part of the back, one front side, or a broad shoulder area while the original denim remains visible around it. This can work especially well with a patterned sweater panel that is too interesting to cut into tiny scraps.
Large knit pieces create more pull than small patches, so the overlay needs a stable attachment line and enough support to stop it sagging. The knit should lie over the denim rather than replacing the jacket’s structural job.
Materials and Tools
· Denim jacket
· Large section of knitted fabric
· Fabric scissors
· Pins or clips
· Needle and durable thread or sewing machine
· Measuring tape
· Chalk or removable marker
· Optional lightweight backing or stabiliser
· Optional decorative buttons if they remain practical
Steps for This Denim Jacket Upcycle
1. Choose a stable overlay zone and measure it carefully. The back panel or one front section is usually easier than a sleeve for a first large overlay. Measure the usable space between seams and decide whether the knit will stop inside those boundaries or intentionally cross them. Keep the jacket’s button line, pockets, and major folds clear.
2. Prepare the knit as one controlled panel. Cut the fabric with enough allowance for secure edges and stabilise the cut perimeter so it cannot unravel. If the knit is very soft, add a lightweight backing or support method before placing it on the jacket. Let the prepared panel rest flat so you can see whether it curls or stretches.
3. Pin and baste from the centre outward. Position the overlay on relaxed denim and anchor the centre or main reference points first. Smooth outward without stretching either fabric, then baste around the perimeter. Try the jacket on before final sewing to confirm that the overlay does not pull the shoulders or distort the front opening.
4. Secure the perimeter and support broad areas. Sew the overlay around stable edges and add a few internal attachment lines if the centre lifts or shifts. Keep decorative buttons or extra embellishment light. Finally, inspect the inside and outside for puckering, sagging, or bulky joins before trimming thread tails.
The knitted panel should look like a deliberate layer, not a blanket pinned to the jacket. I would keep its outline simple and let the knit pattern provide most of the decoration.
Variation: Use a single sweater front as a rectangular back overlay and leave the original denim yoke and lower hem visible as a frame.
Upcycled Denim Jacket Ideas with Shimmering Sequin Sleeves
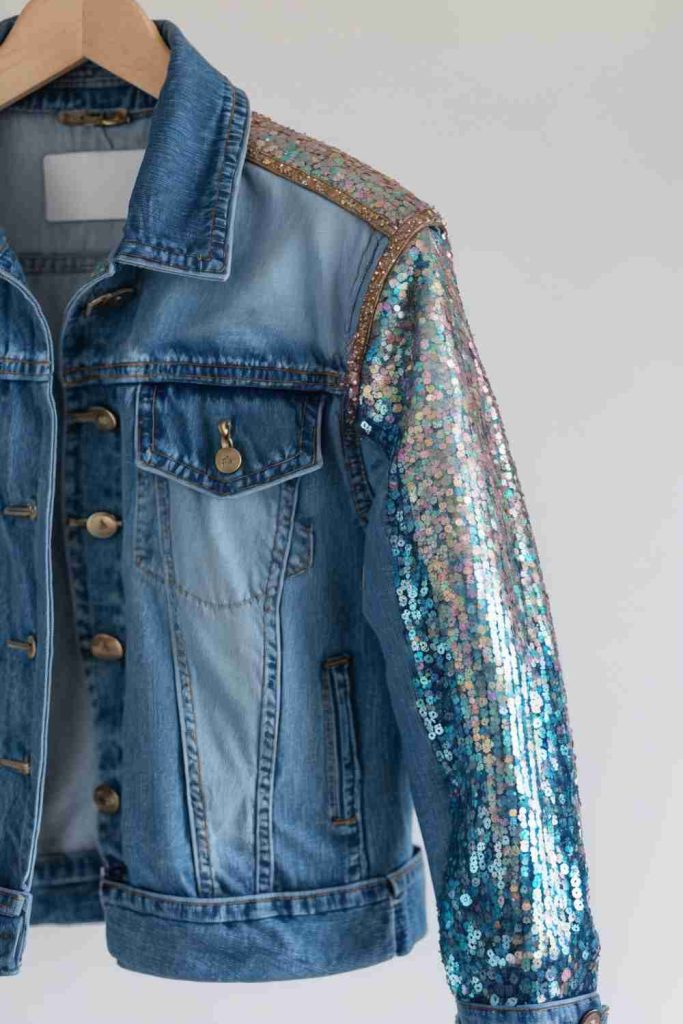
Sequins change how a sleeve catches light, but they also add weight, texture, and potential snag points. A full sequin sleeve can work when the material is flexible and securely attached, while a narrower shoulder or cuff panel gives a similar effect with less bulk.
The sleeve needs to bend at the elbow and move beside the body, so placement matters. Dense, rigid sequin fabric across the elbow crease can feel uncomfortable quickly. I would keep the highest concentration on the upper sleeve or another area with less repeated folding.
Materials and Tools
· Denim jacket
· Sequin fabric or sequins suitable for garment use
· Needle and strong thread or sewing machine where appropriate
· Fabric scissors
· Pins or clips
· Measuring tape
· Chalk or removable marker
· Optional lightweight backing
Steps for This Denim Jacket Upcycle
1. Map the sequin area while wearing the jacket. Put the jacket on and mark where the sleeve bends sharply. Plan the decorative area around those movement zones rather than through them. If using sequin fabric, measure the panel with the sleeve relaxed and leave enough allowance for secure edges without forcing the material to stretch.
2. Prepare the sequin material before attaching it. Trim the panel carefully and remove or secure sequins that sit directly in the seam allowance if necessary. Handle cut sequin edges so sharp or loose pieces cannot scratch the skin or snag the denim. Pin the material in place and compare both sleeves before finalising an asymmetrical design.
3. Attach from stable edges and check movement often. Sew or otherwise secure the sequin section using a method appropriate for the material. Work in manageable sections and keep the denim underneath relaxed. Pause before crossing the elbow area, try the jacket on, and remove any section that restricts bending or presses uncomfortably against the arm.
4. Inspect for loose pieces and snag points. Run your hand gently over the finished surface and check the inside for rough thread ends or backing. Reinforce loose sequins, smooth lifting edges, and test the sleeve against a bag strap or neighbouring garment. Then choose a cleaning method that protects both the denim and the decorative surface.
Sequins are already visually loud, so I would not automatically add beads, glitter stitching, and extra patches as well. One controlled sleeve can be enough to change the whole jacket.
Variation: Decorate only the shoulder cap or cuff with sequins for a lighter version that is easier to wear and clean.
Denim Upcycling Choices That Can Weaken the Jacket or Make It Hard to Wear
Decorating Before Checking Fabric Strength
A worn jacket can look solid until extra weight is added. Beads, bottle caps, sequins, heavy patchwork, and thick knit panels may pull through thinning denim. Inspect and reinforce the base first so decoration is not asked to hold damaged fabric together.
Placing Rigid or Heavy Details on Moving Joints
Elbows, underarms, cuffs, and side seams bend constantly. Rigid pieces in these zones can press into the body, restrict movement, or break loose. Move heavier decoration toward stable back, yoke, pocket, or shoulder panels and leave joint areas more flexible.
Using Glue as the Only Structural Attachment
Adhesive can be useful for temporary positioning and for some lightweight materials, but a flexible jacket bends, warms, and may be washed. Heavy embellishments and high-stress edges usually need stitching or another durable attachment method appropriate for the materials.
Mixing Fabrics That Stretch Very Differently
A stable denim base and a very loose knit can pull against each other, especially around sleeves and side panels. Stabilise stretchy materials, keep them relaxed while pinning, and avoid forcing a small knit piece to stretch across a larger opening.
Covering Buttonholes, Pockets, and Working Seams
A design may look balanced on a flat jacket while accidentally blocking the very features that make it useful. Test pocket access, buttoning, zippers, cuff openings, and movement before final sewing or painting.
Adding More Because the First Section Looks Good
A successful pocket, back panel, or sleeve can make it tempting to continue decorating every surface. More material adds weight and visual noise. Stop periodically, wear the jacket, and decide whether the remaining denim is helping the design by giving it contrast.
Ignoring the Inside of the Jacket
Knots, backing fabric, cut sequin edges, thick seam allowances, and metal attachments can all rub the wearer even when the outside looks neat. Turn the garment inside out and feel every altered area before calling the project finished.
Assuming the Original Care Label Still Applies
Once you add paint, lace, knitwear, beads, sequins, adhesive, or metal pieces, the cleaning requirements change. Care for the finished jacket according to the most delicate or least washable new material rather than relying only on the denim label.
Trimming Too Early
Cutting backing, seam allowances, thread tails, or knit edges before a wear test removes your adjustment options. Try the jacket on first, correct tension and placement, then make the final trims after you know the altered section behaves properly.
Frequently Asked Questions
Can beginners upcycle a denim jacket without a sewing machine?
Yes. Fabric paint, controlled distressing, simple hand-sewn appliqué, lace accents, and small patchwork sections can all be completed without a machine. I would begin with a project that does not require changing the jacket’s fit, then move into sleeve replacement or large knit panels once your hand stitching feels reliable.
Should I wash a denim jacket before decorating it?
Usually, yes, especially if the jacket is second-hand, stored, or newly purchased. Washing reveals shrinkage, stains, weak seams, and the way the denim behaves before you add paint, fabric, or embellishments. Let it dry fully before marking a layout or attaching anything permanent.
What is the easiest upcycled denim jacket idea to start with?
A small painted motif, a few appliqués, or lace added to a pocket or collar is easier than replacing sleeves or creating a full knit overlay. Choose one stable area and one technique. Finishing a restrained first project successfully is more useful than beginning with a complicated full-jacket redesign.
Can fabric glue replace sewing on a denim jacket?
It can help with lightweight decoration or temporary positioning when the product is designed for fabric, but I would not rely on glue alone for heavy beads, bottle caps, structural patches, moving seams, or large knit panels. Denim flexes during wear, so attachment methods need to match the stress placed on them.
How can I keep beadwork or sequins from making the jacket too heavy?
Limit dense decoration to one or two stable panels, use lighter or smaller pieces, and leave open denim between embellished areas. Reinforcement can distribute some load, but it cannot make unlimited weight comfortable. If the jacket begins pulling at the shoulders, removing decoration is usually better than adding more backing.
Can I combine several upcycling techniques on one jacket?
Yes, but the materials should support one another rather than compete. For example, appliqué with embroidery is a natural combination, while heavy bottle caps, dense beadwork, thick knit overlays, and sequins all on the same area may become impractical. Choose one main technique and let smaller details support it.
How should I wash a jacket after it has been upcycled?
Follow the needs of the new materials you added. Paint, lace, knitwear, beads, sequins, adhesive, and metal details may require gentler handling than the original denim. Inspect attachments before and after cleaning, and use the most cautious method that is compatible with all parts of the finished garment.
Let the Jacket Keep Its Strength While You Change Its Story
The best upcycled denim jacket ideas start with the garment that is already in front of you. A strong back panel might invite embroidery or beadwork, damaged sleeves may suggest a vest or knit replacement, and a plain surface can become a better home for paint than for another layer of fabric. There is no need to force the same treatment onto every jacket.
What I would keep consistent is the order: check the structure, test the new material, plan for movement, attach carefully, and wear-test before the final trim. Those practical decisions are what separate a jacket that only looks interesting in a photograph from one you can actually keep wearing.
Choose one manageable section first and let the denim tell you how much more it needs. Which part of an old jacket in your wardrobe would you change first: the back, the sleeves, the pockets, or simply the surface?