A garage shelf has to do more than make boxes look tidy. It sits beside moving doors, parked vehicles, damp concrete, sharp tools, and containers that can become much heavier than they appear. Good garage shelving ideas begin with the way the room is actually used, then give each item a stable place without narrowing the route through the space or hiding everything behind one crowded stack.
I am Stella Eve Louise, and I prefer storage that makes existing materials and forgotten containers useful again. Reclaimed boards, old cabinets, baskets, pallets, metal frames, and even a sound work trolley can all become part of a practical system when they are cleaned, strengthened, and matched to a sensible load. I do not think a garage needs to look like a showroom, but it should be easy to enter, easy to clean, and easy to understand when you need one tool in a hurry.
Plan the Garage Around Doors, Vehicles, and Daily Movement
Open the main garage door, side doors, cupboards, and vehicle doors before drawing a shelf layout. Mark the travel of tracks, springs, opener arms, and handles, then check the route used for bins, bicycles, garden equipment, or shopping. A shelf that fits the empty room may become awkward once a car is parked or a large item has to turn through the doorway.
Use painter’s tape to mark shelf depth and height on the wall. Walk past the outline carrying a box and sit in the vehicle if one is normally parked there. Keep access to electrical panels, meters, outlets, windows, and service points, and leave enough floor space for sweeping and checking for leaks.
Check Walls, Floors, Moisture, and Safe Load Paths
Garage walls may be timber framed, masonry, block, plasterboard, or a mixture around doors and services. Identify the actual structure before choosing fixings, especially for long wall shelves, slatwall, cabinets, and overhead platforms. Tall freestanding units should be restrained against tipping, while rolling carts need locking casters and a floor smooth enough for safe movement.
Inspect the floor and lower walls for dampness, salt marks, rust, or previous water entry. Keep timber and cardboard away from recurring moisture, use sealed containers where needed, and avoid storing valuable items directly on concrete. Follow the load information for commercial shelving and use professional help whenever the wall, ceiling, or intended weight is uncertain.
Sort Items by Weight, Frequency, and Risk
Before building shelves, bring similar items together and remove empty containers, broken tools, and supplies that no longer belong in the garage. Divide what remains by how often it is used, how heavy it is, and whether it needs special storage. Daily hand tools deserve easy reach; light seasonal items can go higher; dense tubs, liquids, and machines should stay low.
Keep products in their original labelled containers and follow their storage instructions. Do not place incompatible chemicals together simply because their bottles are the same size, and keep flammable materials away from heat or ignition sources. Clear labels and a little spare shelf space will usually create a safer system than squeezing every object into the smallest possible footprint.
Hanging Storage for Garage
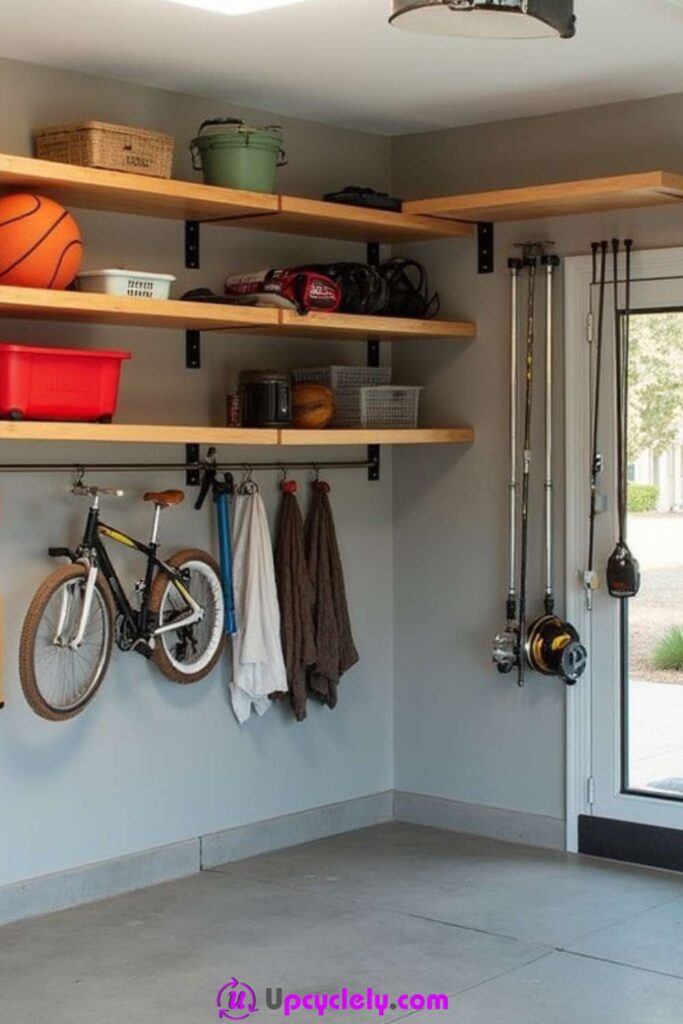
Long timber shelves can share a wall with hanging rails, bicycle hooks, and vertical holders for fishing rods or garden tools. The useful part of this arrangement is not one special shelf; it is the way several shallow storage zones work together while the centre of the garage remains open. Baskets and tubs sit above, frequently used gear hangs below, and awkwardly tall items use the narrow wall beside the door.
This setup suits a garage where sports equipment, coats, and outdoor tools tend to collect near the entrance. I would keep the lowest hanging line high enough that handlebars, hooks, and fabric cannot brush against a parked car or someone walking past. The shelves also need separate support from the hanging rail because a row of heavy containers should never depend on hardware intended only for coats.
Materials and Tools
· Sound timber boards or reclaimed shelves with smooth edges
· Heavy-duty shelf brackets and fixings suited to the wall
· Separate wall rail, bicycle hooks, and tool hooks rated for their use
· Tape measure, level, pencil, drill, and stud finder where appropriate
· Storage tubs or baskets for loose equipment
· Protective eye equipment and a stable step ladder
Steps for This Garage Shelf
1. Mark the movement zone first. Open the garage door, position the vehicle as it is normally parked, and walk the route from the house to the outside. Mark a clear area around doors, windows, switches, and the car before deciding where any shelf or hook can project.
2. Install the shelves as independent structures. Locate solid fixing points and mount each bracket level before placing the boards. Use enough supports for the shelf material and expected load, then smooth the front edges so bags and clothing cannot catch.
3. Add hanging storage below and beside the shelves. Fix the bicycle and tool hooks into suitable structure rather than the shelf boards alone. Space them so one item can be removed without lifting or shifting everything around it, and keep long rods away from the door mechanism.
4. Load the wall from light to heavy. Place light baskets and seasonal gear on the upper shelf, with heavier boxes lower and closer to support brackets. Hang daily items at shoulder or waist height, then check that nothing swings into a walkway or vehicle.
For me, the strongest detail is the empty floor underneath. It can feel tempting to keep adding hooks until every gap is filled, but a little open wall makes the system easier to use and safer to walk past.
A simpler version could use one reclaimed shelf above a short rail for jackets and hand tools. Renters may prefer a freestanding rack with an attached hook panel, provided the unit is stable and secured against tipping.
Adjustable Garage Shelving Unit
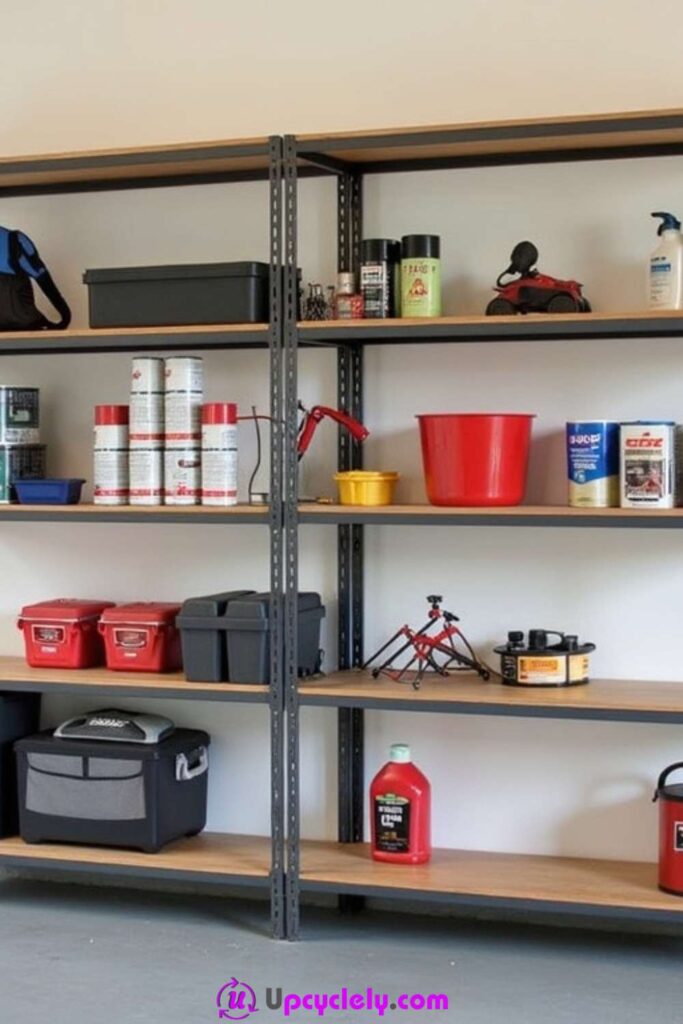
A slotted metal frame with timber shelves creates a practical system because the gaps can change as the contents change. Small tins and hand tools do not need the same vertical space as coolers or deep storage boxes, so fixed shelves often leave awkward unused areas. Here, the dark uprights form a simple grid while the pale shelves keep the structure from feeling too heavy.
Adjustability is most useful before the unit is fully loaded. Sort the largest items first, position the shelf above them with enough lifting room, and then divide the remaining height. I know it can be tempting to squeeze in one more shelf, but a storage box that has to be tilted or dragged out will quickly become the box nobody wants to use.
Materials and Tools
· Adjustable metal uprights, beams, and compatible shelf supports
· Sound timber or manufacturer-approved shelf panels
· Rubber mallet, spanner, or other tools required by the system
· Tape measure, level, and square
· Wall restraint or anti-tip kit where recommended
· Labelled tubs, trays, and containers in several sizes
Steps for This Garage Shelf
1. Sort items by height and weight. Place the objects you expect to store beside the empty frame and group them into large, medium, and small categories. Keep heavy tools and liquids in the lower group so the finished unit has a lower centre of gravity.
2. Assemble and level the frame. Build the uprights and cross-members according to the shelving system, making sure every connector is fully seated. Set the unit in its final position, check the floor for slope, and use approved levelling methods rather than scraps of loose wood.
3. Set shelf heights around real containers. Position the lowest shelf first, then place an empty tub on it and adjust the shelf above until there is comfortable lifting clearance. Repeat upward, leaving the top level for lighter items that are not needed every day.
4. Secure and load the unit evenly. Fit any wall restraint or anti-tip hardware before filling the shelves. Spread weight across each level, keep dense items close to the uprights, and avoid placing one heavy container on the unsupported centre of a thin board.
The part I like here is that the shelf spacing can improve later. If one level remains half empty for several months, move it rather than accepting wasted space as permanent.
A lower-cost adaptation is to reuse sound boards inside a second-hand adjustable frame. Check that the panels fit fully on their supports and replace any board that bows, flakes, or has been weakened by moisture.
Cabinet-Style Garage Storage
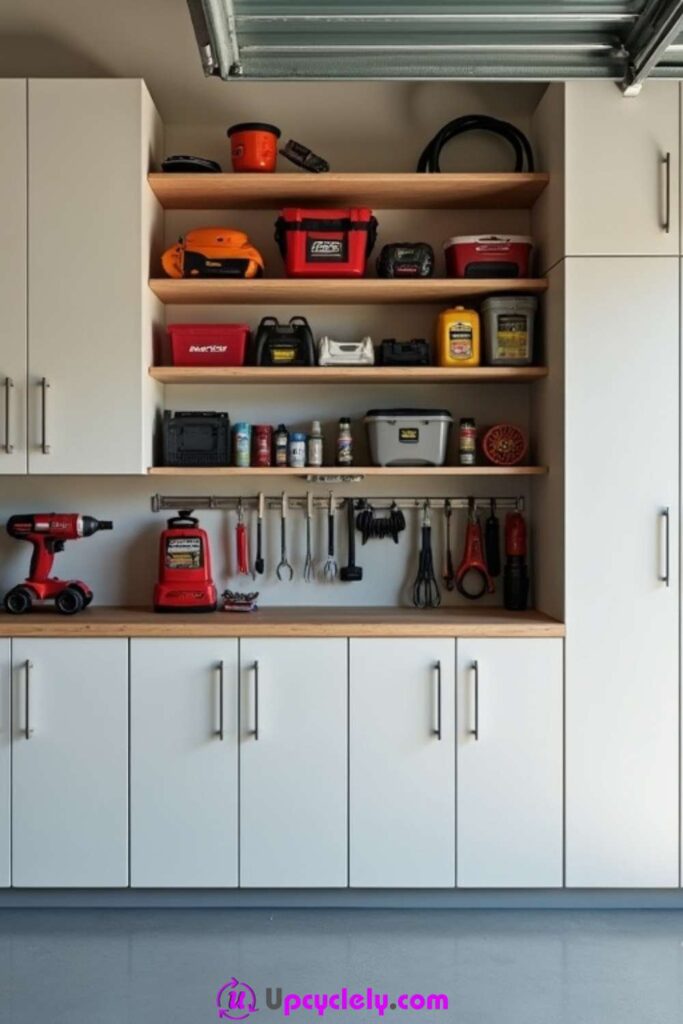
Closed white cabinets around a central run of open timber shelves give the garage a calmer, built-in appearance. Everyday tools remain visible in the middle, while less attractive supplies, spare parts, and cleaning products can sit behind doors. The worktop and hanging rail create a useful preparation zone without leaving every object exposed to dust.
This design works best when the closed sections are assigned a purpose rather than becoming deep hiding places. Tall side cabinets can hold long tools or bulky equipment, lower doors can conceal bins, and the open centre can stay reserved for items used regularly. Cabinet doors also add weight and movement, so the carcasses need firm fixing and enough clearance from garage-door tracks.
Materials and Tools
· Existing cabinets, reused kitchen units, or sound storage carcasses
· Timber shelves and a durable worktop or reused countertop
· Wall screws, cabinet connectors, and fixings suited to the wall
· Level, drill, clamps, tape measure, and square
· Tool rail, hooks, and shallow organisers
· Cabinet paint or protective finish if the reused units need refreshing
Steps for This Garage Shelf
1. Plan the cabinet sequence around access. Measure the wall and mark any outlets, pipework, meters, and garage-door hardware. Place tall cabinets where their doors can open fully, then centre the open work area at a comfortable working position.
2. Inspect and repair reused cabinets. Tighten loose hinges, replace damaged backs, and check that shelves sit securely on their supports. Clean grease or residue thoroughly before painting, and make sure swollen particleboard is replaced rather than hidden.
3. Join and anchor the units. Level the base cabinets first, connect neighbouring carcasses, and fix them through strong points into appropriate wall structure. Add the worktop and upper cabinets only after the lower run is stable and square.
4. Organise the open and closed zones differently. Keep frequently used tools on the rail and open shelves, while labelled bins and infrequent supplies go behind doors. Store hazardous products according to their labels and away from children, pets, heat, or ignition sources.
I do not think every cabinet needs to match perfectly. Consistent handles or one paint colour can connect second-hand units while still allowing their original shapes to show.
For a smaller garage, use one tall reclaimed cupboard beside a short wall shelf and worktop. Sliding or tambour doors can help where a swinging cabinet door would block the parking area.
Cinder Block Shelving Idea
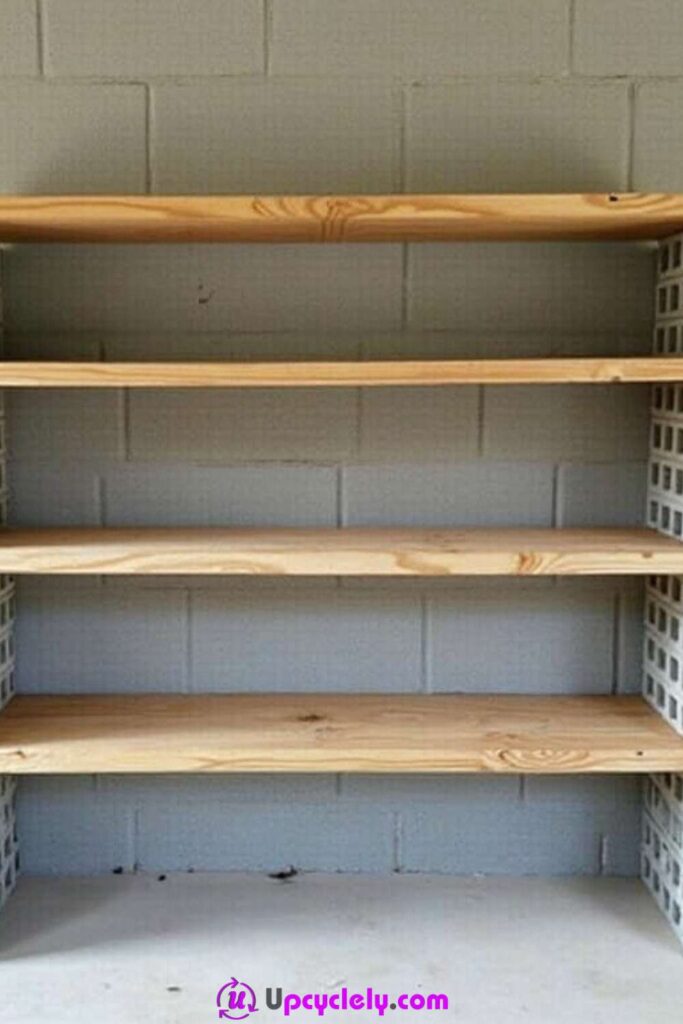
Cinder blocks and plain timber boards form a shelving unit with very little joinery. The blocks act as repeated vertical supports, while the boards bridge between them to create broad open levels. The result has an honest workshop appearance and can be dismantled when the garage layout changes.
Simplicity does not remove the need for stability. Blocks should sit on a flat, sound floor, and each course needs to align so the boards are supported at both ends and at sensible intervals. I would use this idea for moderate, evenly distributed storage rather than tall stacks, valuable equipment, or anything that could create a serious hazard if the structure were bumped.
Materials and Tools
· Clean, undamaged concrete blocks of matching size
· Straight timber boards thick enough for the planned span
· Rubber pads, thin levelling shims, or a protective floor layer
· Tape measure, level, square, and pencil
· Sanding block and clear finish for the timber
· Work gloves and help for moving heavy blocks
Steps for This Garage Shelf
1. Choose a low and level location. Sweep the floor and check for slope, cracks, or water entry. Mark the full footprint and leave enough space around the unit so a vehicle, door, or wheelbarrow cannot strike the projecting board ends.
2. Prepare the boards and blocks. Inspect each block for crumbling corners and remove loose grit. Cut the boards to matching lengths, round the front edges, and seal the wood if the garage is prone to damp air.
3. Build one level at a time. Place the first row of blocks with their broad faces stable, then set the board and check it in both directions with a level. Add the next supports directly above the lower ones so weight transfers vertically rather than through an offset stack.
4. Load conservatively and recheck alignment. Place broad tubs and lightweight boxes across the supported areas instead of concentrating weight in the centre. After loading, check that no block has shifted and that each board still sits fully on its supports.
The edges are what I would watch most closely. A board that overhangs too far can become a lever when someone leans on it, so keep projections short and intentional.
A more permanent variation can use timber side frames shaped to resemble the block spacing. It keeps the open appearance but allows shelves to be screwed into one connected structure.
Corner Garage Storage Idea
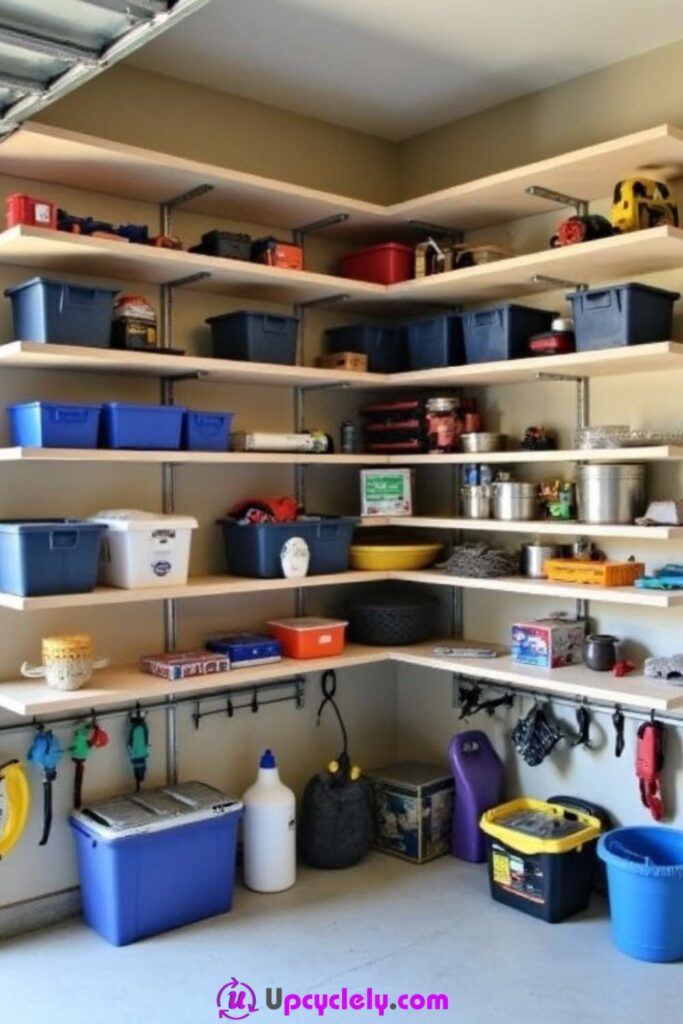
Wraparound shelves can turn an awkward garage corner into one continuous storage zone. The pale boards meet at the corner and continue along both walls, creating room for bins, tins, tool cases, and smaller containers without placing a freestanding unit in the middle of the floor. Repeated vertical tracks make the shelf positions easier to adjust.
The inside corner needs support rather than relying on two board ends simply touching. A corner bracket, cleat, or continuous shelf panel should carry the joint, especially when containers sit near the meeting point. The upper shelves can be broad, but the lower levels should remain clear enough that knees, shoulders, and carried objects do not collide with the projecting corner.
Materials and Tools
· Straight shelf boards or cut-to-fit corner panels
· Adjustable wall tracks, brackets, or timber cleats
· Corner supports and strong fixings for both walls
· Tape measure, level, square, and angle finder if needed
· Drill, saw, sander, and eye protection
· Bins grouped by size and frequency of use
Steps for This Garage Shelf
1. Map the corner from both walls. Measure each wall independently and note where they are not perfectly square. Mark the shelf depths with painter’s tape, then walk past the proposed corner to confirm it does not narrow the useful route.
2. Install the vertical supports level and aligned. Locate suitable fixing points on both walls and mount the tracks or cleats so corresponding shelves meet at the same height. Check each support before drilling the full set of holes because small errors become obvious at the corner.
3. Cut and support the meeting point. Shape the boards so the joint closes neatly without forcing them against one another. Add a support beneath the inside corner and sand the outer corner smooth to reduce bumps and splinters.
4. Organise the corner by reach. Keep daily items on the straight outer sections and use the deeper corner area for broad tubs that can be pulled out easily. Avoid placing small loose objects at the back where they will disappear behind larger containers.
For me, a corner shelf works only when the contents remain visible. Deep corners can swallow small items surprisingly quickly, so one large labelled tub is often better than six little boxes.
A beginner-friendly version uses two short freestanding shelves placed at right angles with a small gap between them. Secure both against tipping and use the gap for long upright tools rather than trying to create a difficult corner joint.
Easy Garage Shelving Idea
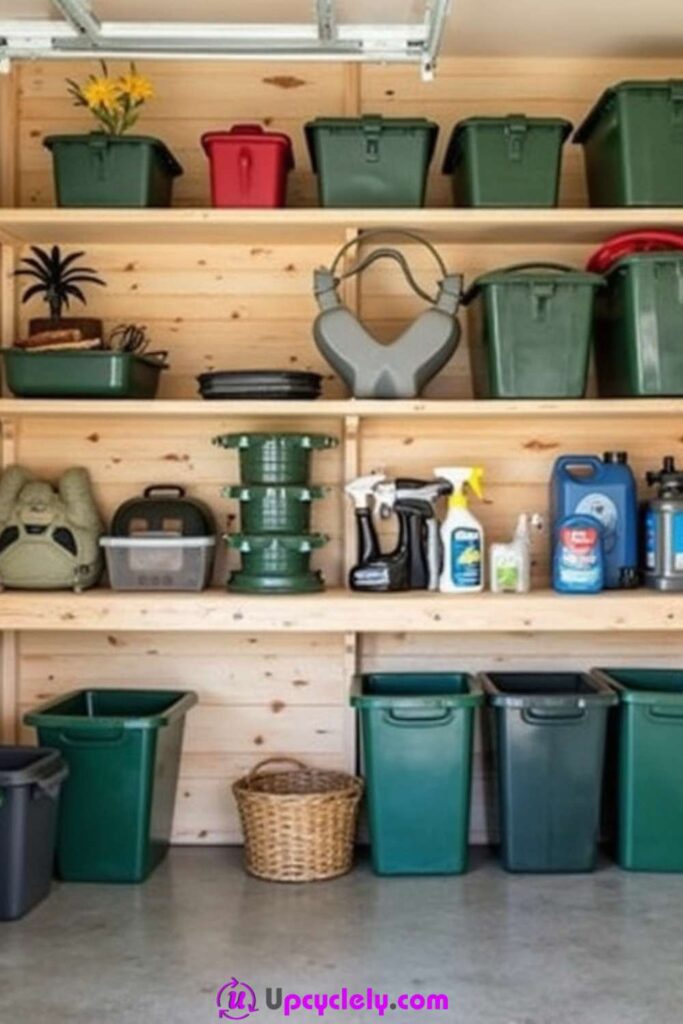
Simple wooden shelves against a timber-lined wall can organise a garage without complicated cabinetry. The wide open levels hold matching tubs, cleaning bottles, cases, and occasional equipment, while the lowest bulky containers remain on the floor. Because the background and shelves use similar wood tones, the storage feels calm even when the contents vary.
An easy shelf should still be planned around the items it will carry. Long boards need regular support, containers need room to lift out, and liquids should sit where leaks can be noticed quickly. The advantage of this straightforward design is that damaged boards or brackets can be replaced without dismantling a complete cabinet system.
Materials and Tools
· Straight timber boards or reused shelves in sound condition
· Wall cleats or heavy-duty brackets
· Suitable wall fixings and screws
· Tape measure, pencil, level, drill, and saw
· Sandpaper and a protective wood finish
· Storage tubs with lids and readable labels
Steps for This Garage Shelf
1. Choose the simplest useful layout. Set the largest containers against the wall and mark the lowest shelf above them. Add two or three upper levels rather than covering the wall automatically, leaving space for tall items and future changes.
2. Prepare the boards before installation. Cut every shelf to length, soften the front edges, and inspect for knots, splits, or old fasteners. Apply a protective finish if needed and let it cure before the shelves are loaded.
3. Fix supports at regular points. Mount the cleats or brackets into suitable structure and check that the full row is level. Rest the boards in place, secure them where required, and test for movement before adding storage.
4. Use containers to keep the shelves readable. Group small items into lidded tubs and label the front, then place heavy boxes low and light seasonal items high. Leave a little empty space on each level so a container can be lifted without disturbing its neighbours.
The good thing about a plain shelf is that it does not dictate how the garage must be used forever. You can move a bin, replace a board, or add one bracket without redesigning the whole wall.
If wall fixing is not possible, build a low freestanding timber frame with the same open levels. Keep it shallow, brace the back, and secure it against tipping if children or pets enter the garage.
Freestanding Garage Shelving
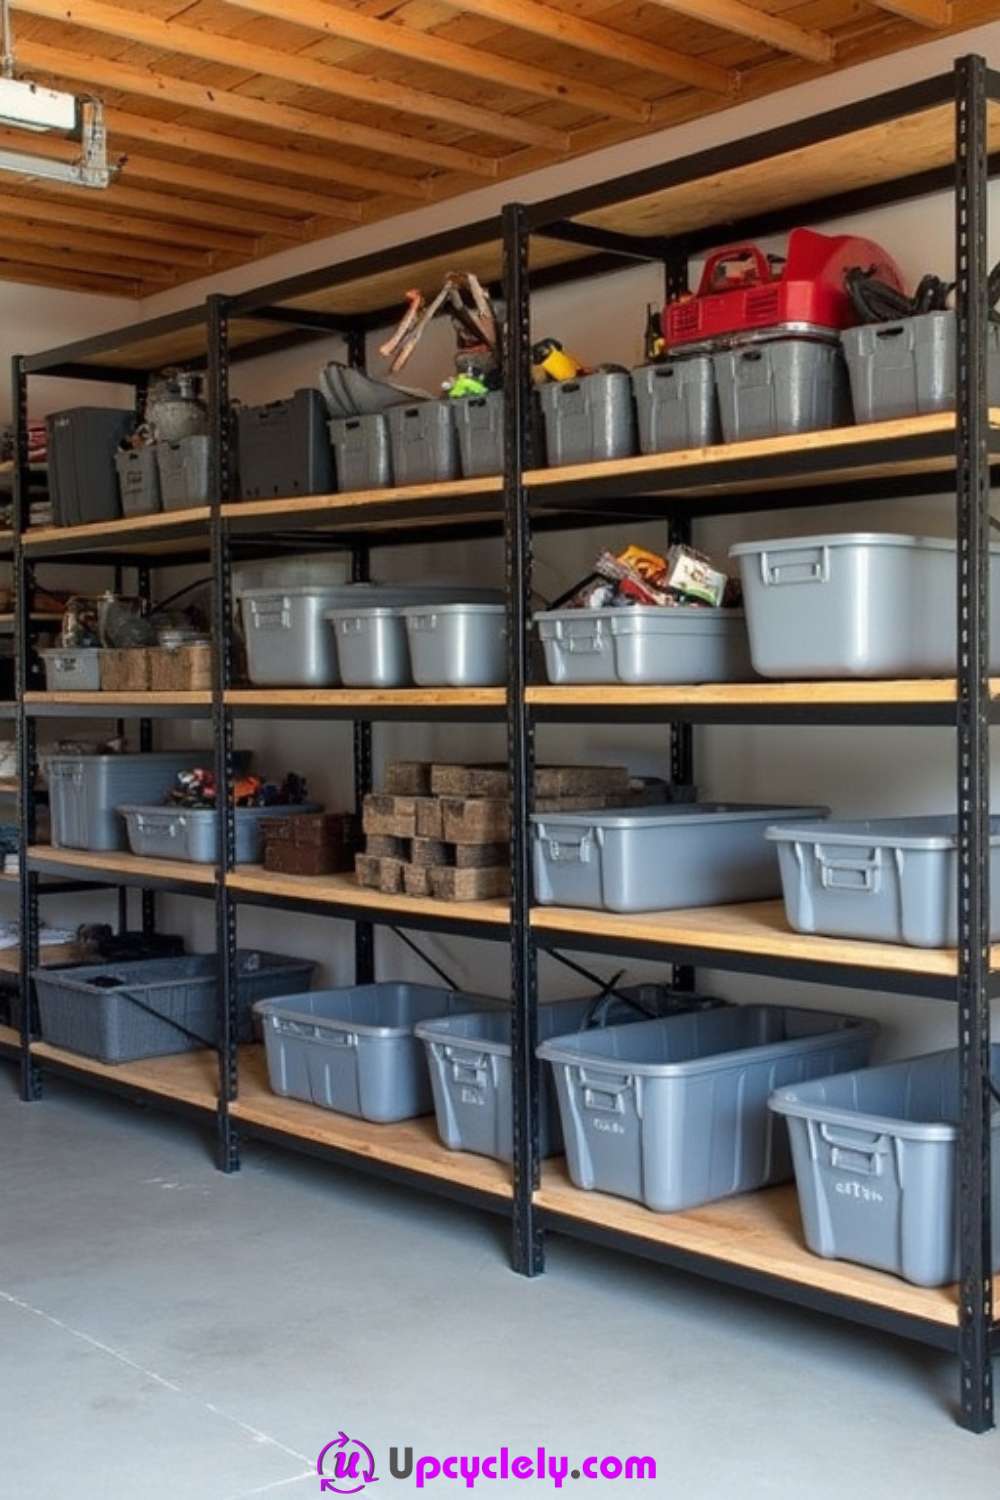
Tall freestanding metal shelves create a long storage wall without drilling through every level. The black frames and pale panels hold rows of grey tubs, tool boxes, blocks, and baskets, while the open sides make it easy to see where each category begins. Several matching units can sit together and behave almost like one continuous installation.
Freestanding does not mean free to wobble. A tall unit can become unstable when heavy containers sit high, when the floor slopes, or when someone pulls a tub forward. Connect neighbouring frames where the system allows, use anti-tip restraints, and keep the bottom shelves loaded with the densest items.
Materials and Tools
· Freestanding shelving units suitable for garage use
· Shelf panels compatible with the frames
· Anti-tip straps or wall restraint hardware
· Level, tape measure, rubber mallet, and spanner
· Floor protectors or approved levelling feet
· Matching tubs, labels, and shallow trays
Steps for This Garage Shelf
1. Clear and measure the full footprint. Check the ceiling height, garage-door movement, and width needed for walking beside the units. Sweep the floor and identify any slope or drain that could leave one frame lower than the next.
2. Assemble every frame square. Build the units on a clear area and make sure beams are fully seated. Fit shelf panels only after the diagonals are equal, because a twisted frame will remain difficult to level once it is loaded.
3. Join, level, and restrain the row. Set the units in position, adjust approved feet or shims, and connect adjacent frames if the manufacturer permits it. Add anti-tip restraints before placing containers on the upper shelves.
4. Create a consistent loading pattern. Store dense boxes and hardware low, medium-weight tubs in the middle, and light seasonal items at the top. Keep labels facing forward and avoid allowing containers to project into the walkway.
I would rather leave one partly empty shelf than build a tower of badly stacked tubs. Empty space makes the system easier to adjust and gives both hands room to lift a container safely.
A mixed version can combine one commercial frame with a sturdy reused workbench. Align the shelf heights visually, but do not attach systems together unless both structures are designed to accept that connection.
Garage Shelving with Baskets
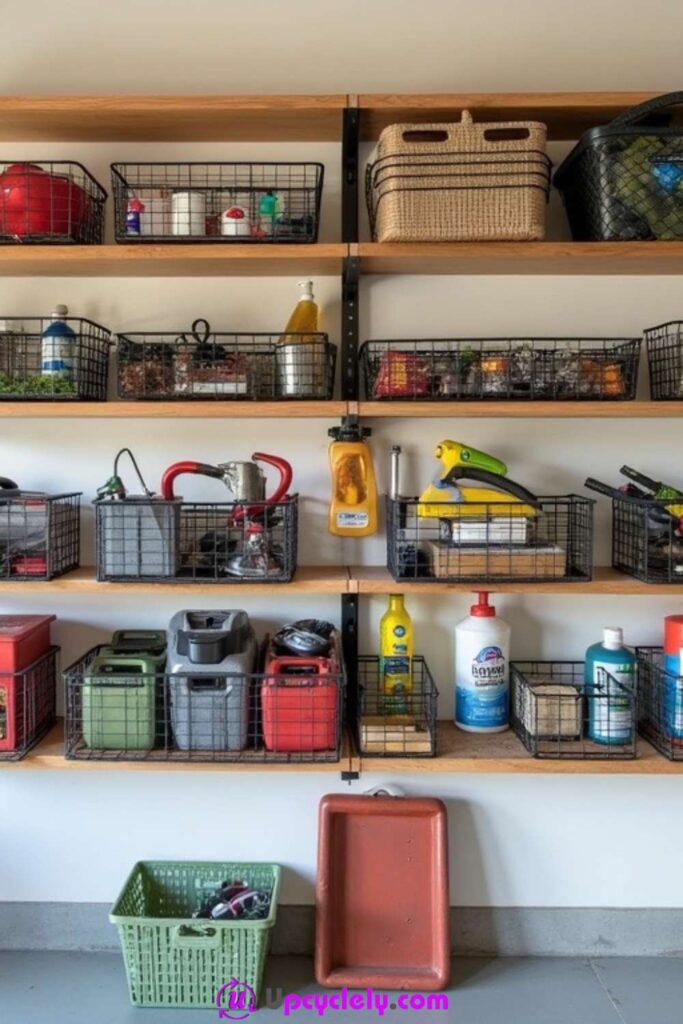
Open timber shelves paired with wire and woven baskets make loose garage supplies easier to handle. Small bottles, cords, fasteners, gardening items, and cleaning products stay grouped, while the baskets can be lifted down and carried to the work area. The black wire outlines create a consistent rhythm even though the objects inside have different colours and shapes.
Baskets work best when the category is narrow enough to understand at a glance. One basket for sanding supplies is useful; one basket labelled miscellaneous usually becomes a small portable junk drawer. Choose containers that sit fully on the shelf, have comfortable handles, and do not allow sharp or leaking items to protrude.
Materials and Tools
· Wall-mounted or freestanding timber shelves
· Wire, plastic, or washable woven baskets
· Shelf brackets and appropriate fixings
· Labels, tags, or reusable label holders
· Small inner containers for fasteners or leaking bottles
· Tape measure, level, drill, and cleaning cloths
Steps for This Garage Shelf
1. Group the loose items before buying baskets. Spread similar supplies together and remove duplicates, empty packaging, and damaged items. Measure the largest group so the basket fits the contents without becoming too heavy to lift.
2. Match basket size to shelf depth. Choose containers that leave a finger gap at the front and do not hang over the board. Use washable plastic trays inside wire baskets when small pieces or liquids could fall through.
3. Arrange the shelves by task. Keep related baskets near one another, such as car-care supplies, gardening items, or painting tools. Place everyday baskets between waist and shoulder height, with infrequent lightweight categories above.
4. Label and review the system. Write specific labels and return items to the same basket after use. After a few weeks, divide any overloaded category and remove baskets that are storing only one or two forgotten objects.
For me, the basket should make a job easier, not merely hide the contents. If you cannot lift it safely or remember what is inside, the category is too broad.
A lower-cost variation uses clean produce crates or sturdy reused containers. Add smooth handles and a front label, and avoid cardboard where damp floors or humid air may weaken it.
Garage Storage Solution
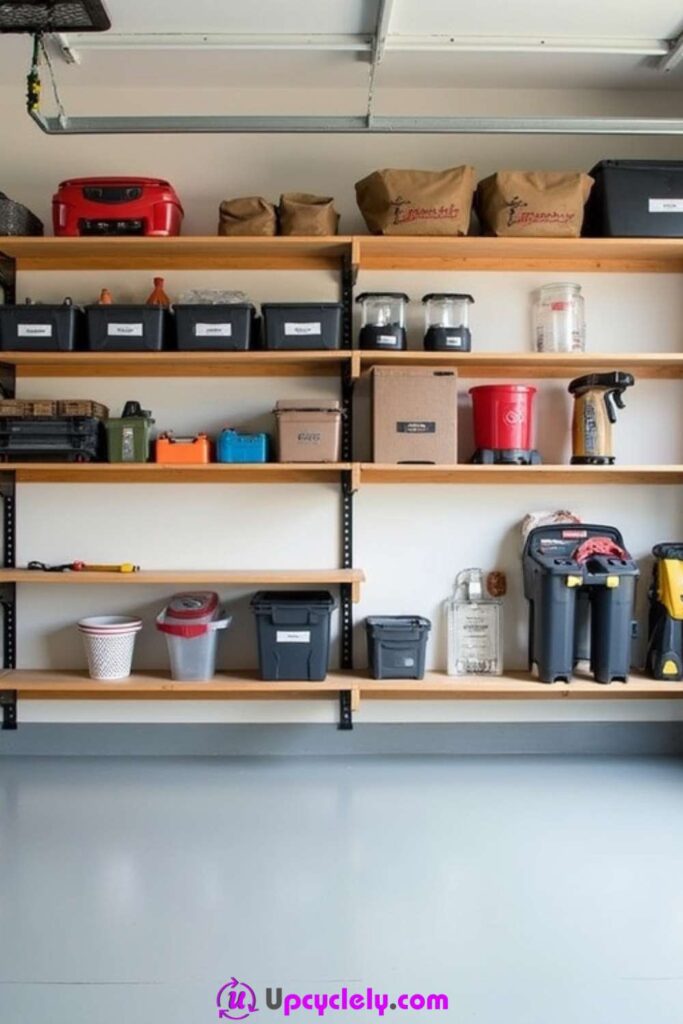
A full wall of open shelves can become a practical garage storage solution when every level has a clear purpose. Labelled black tubs, paper sacks, small boxes, jars, and power-tool cases are spread across long timber boards, leaving the floor almost completely open. The different container types work because their positions are orderly rather than random.
The main challenge is preventing a large wall system from becoming visual storage without real organisation. Categories should follow the work done in the garage, not simply the shape of the available box. Reserve one shelf for active projects, keep spare stock together, and create a regular place for items that are waiting to leave the house.
Materials and Tools
· Long wall shelves or a connected shelving system
· Strong brackets, vertical tracks, and suitable wall fixings
· A mixture of lidded tubs, bins, jars, and trays
· Labels that can be updated as categories change
· Tape measure, level, drill, and step ladder
· Optional shelf lips or bookends for loose containers
Steps for This Garage Shelf
1. Divide the wall into practical zones. Mark a tool zone, household-supply zone, seasonal zone, and one small area for current projects. Keep hazardous materials separated according to their labels rather than grouping everything under a broad cleaning category.
2. Set shelf spacing from the largest containers. Place the biggest empty tubs against the wall and mark the levels above them. Work upward with progressively lighter categories, leaving enough room to grip handles and read labels.
3. Install the support system carefully. Fix tracks or brackets into appropriate structure and check each board for level and front-to-back stability. Add extra support where long boards or dense items could cause sagging.
4. Load, label, and create a return routine. Put one category in each container and face labels toward the aisle. Leave one small open tray for items that need to be returned, then empty it regularly so it does not become permanent clutter.
The part I would protect is the empty section. A shelf with no spare room looks organised on the first day but gives new purchases nowhere sensible to go.
For a smaller wall, use the same zoning idea across three shelves. A few clearly named containers will usually work better than covering every centimetre with boxes.
Garage Wall-Mounted Shelves
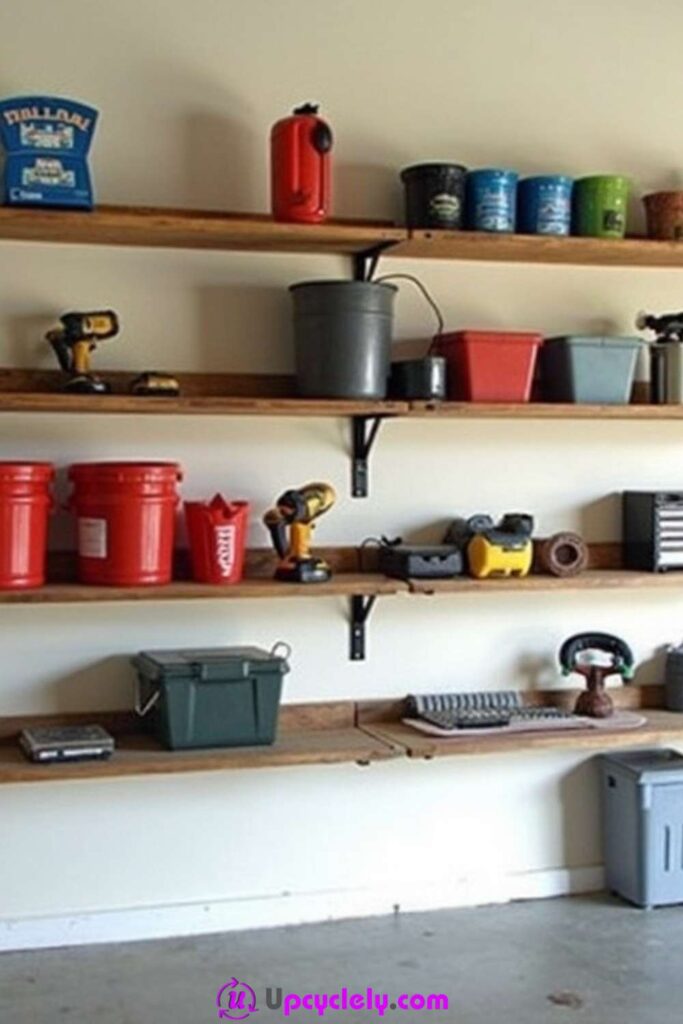
Long reclaimed-looking boards on black wall brackets keep tools, buckets, containers, and equipment off the floor without surrounding them with a full frame. The open space below makes sweeping easier and leaves room for bins or portable machines. Dark brackets repeat at regular intervals, giving the varied objects a clear structure.
Wall-mounted shelves depend completely on the wall and fixings, so the visual simplicity hides most of the important work. Determine whether the wall is timber framed, masonry, or another construction, and choose fixings accordingly. Deep boards also create leverage; reducing shelf depth is often safer and more useful than trying to store every large object overhead.
Materials and Tools
· Straight shelf boards with sound front and rear edges
· Heavy-duty brackets sized for the chosen depth
· Wall fixings appropriate for the actual wall construction
· Stud finder or suitable method for locating solid structure
· Level, drill, tape measure, pencil, and square
· Optional front lip for containers that may shift
Steps for This Garage Shelf
1. Mark shelf depth as well as height. Use tape on the wall and floor to show how far the boards will project. Walk past the outline carrying a box to confirm that the shelves will not interfere with doors, mirrors, vehicles, or shoulder space.
2. Locate and mark every support point. Identify studs or suitable masonry positions before deciding the final bracket spacing. Draw one level line and transfer every fixing point from the actual bracket rather than assuming all holes are identical.
3. Mount the brackets and boards. Fix one end bracket, level the row, and install the remaining supports. Set the board in place, secure it according to the hardware, and check that the front edge cannot lift or twist.
4. Load near the supports. Place heavier items over or close to brackets and lighter objects between them. Keep tall containers away from the front edge and remove anything that causes the board to bow or the fixings to move.
I know a very long shelf looks efficient, but several shorter boards can be easier to level, support, and replace. The gaps can also leave room for tall tools or wall hooks.
A reversible version uses a commercial wall-track system with removable brackets. The tracks still require secure fixing, but the shelf heights can change without drilling a new row of holes.
Slatwall Garage Shelving
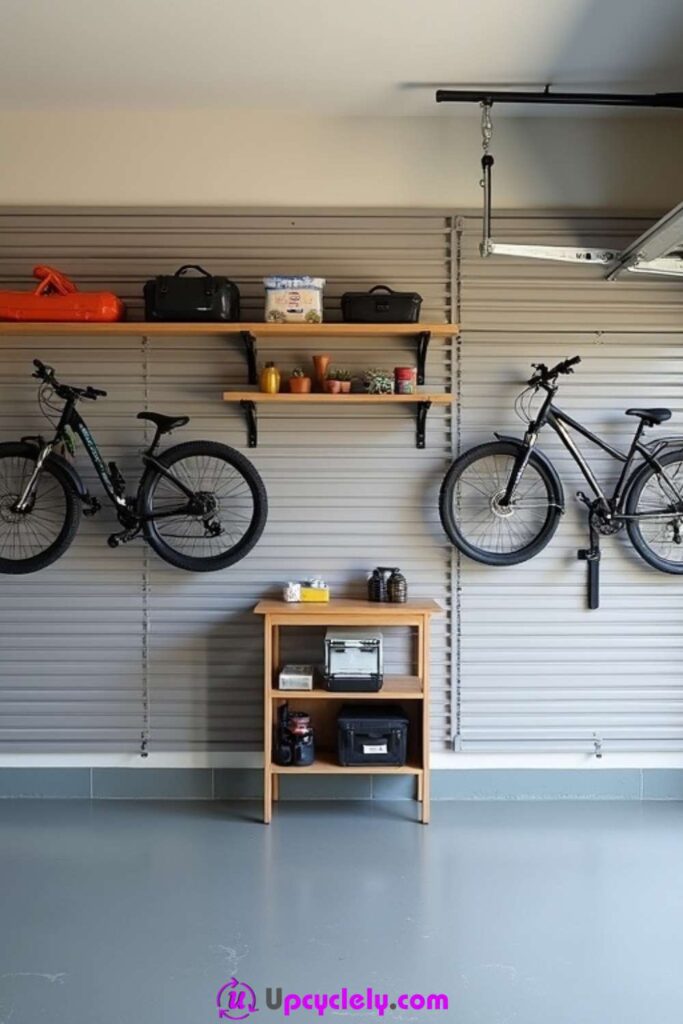
Slatwall panels turn a broad garage wall into adjustable storage for shelves, hooks, bicycles, and smaller accessories. In the arrangement shown, two bikes hang on the wall while timber shelves and a compact open cabinet occupy the centre. The horizontal grooves keep the different attachments visually connected and allow the layout to change as equipment changes.
The panel itself is only one part of the system. It must be installed on a suitable backing and used with compatible hooks and shelf brackets. Large or dynamic loads, such as bicycles, need the correct rated hardware and enough clearance so they can be lifted down without striking the ceiling, door, or neighbouring bike.
Materials and Tools
· Garage slatwall panels and compatible trim
· Manufacturer-compatible shelves, hooks, and bicycle supports
· Backing battens or installation hardware required for the wall
· Level, drill, tape measure, and appropriate fixings
· Small cabinet or reused shelf unit for lower storage
· Labels or containers for accessories
Steps for This Garage Shelf
1. Plan the panel around the largest hanging items. Hold bicycles, ladders, or long tools in their proposed positions and mark the lifting path. Leave space above the handlebars and around the garage-door track, then position shelves in the remaining zones.
2. Install a sound backing and level panels. Follow the panel system for batten spacing and wall fixing, making sure joints land on support. Keep the first panel level because every groove above it will follow the same line.
3. Fit only compatible attachments. Insert the hooks and shelf brackets fully into the grooves and lock them where the system provides a retaining feature. Test each empty attachment with gentle downward and outward pressure before loading it.
4. Organise by frequency and lifting effort. Hang daily hand tools at easy reach, bicycles at a height that can be managed safely, and light seasonal items higher. Keep the floor cabinet for dense tool cases so the wall does not carry every heavy object.
For me, adjustability is valuable only when the layout is actually reviewed. Move an awkward hook instead of learning to work around it every day.
A partial slatwall strip above a workbench can provide many of the same benefits at lower cost. Keep the rest of the wall for ordinary shelves or a pegboard that suits smaller tools.
Industrial Garage Shelves
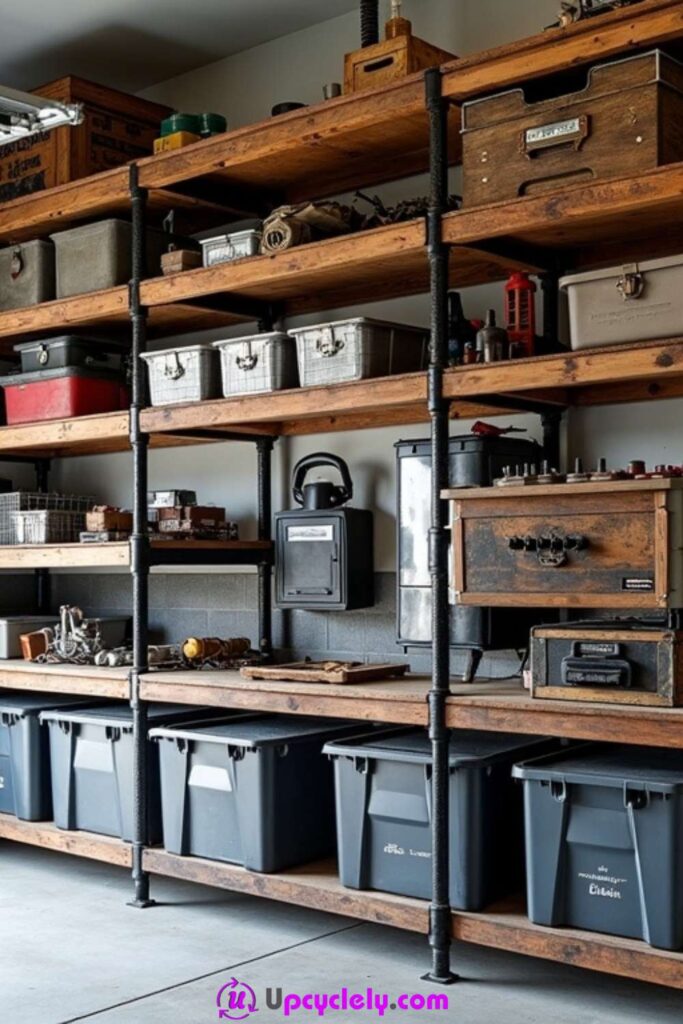
Reclaimed timber shelves supported by dark pipe-style uprights create a strong industrial appearance. Old drawers, metal boxes, storage tubs, and tool cases sit within broad open bays, while the black vertical lines give the rough wood a deliberate framework. The result feels more like workshop furniture than a row of ordinary utility shelves.
Pipe and reclaimed wood both need careful preparation. Decorative plumbing components are not automatically suitable as structural shelving, and old boards may conceal nails, oil, or weak areas. Use a properly designed frame, distribute support under the shelves, and make every threaded connection or mechanical fixing secure before loading the unit.
Materials and Tools
· Sound reclaimed timber boards of similar thickness
· Structural pipe-style shelving frame or suitable metal uprights
· Flanges, connectors, screws, and wall restraints as required
· Spanners, drill, level, square, and protective equipment
· Metal cleaner and wood sanding materials
· Low-sheen finishes compatible with both materials
Steps for This Garage Shelf
1. Inspect the old materials separately. Check timber for hidden metal, rot, strong odours, and deep contamination. Clean the metal components, reject damaged threads or bent pieces, and confirm that the chosen frame design suits shelving rather than decoration alone.
2. Build a square and braced frame. Assemble the uprights and cross-members on a level surface, tightening connections evenly. Add rear or diagonal bracing where required so the tall structure cannot rack from side to side.
3. Prepare and fix the timber shelves. Cut boards to fit fully within their supports, sand splintered edges, and seal porous surfaces. Secure each board so it cannot slide when a heavy drawer or tub is pulled forward.
4. Anchor and load the finished unit. Restrain the structure against tipping and confirm that all feet carry weight evenly. Place large grey tubs on the lowest level, metal drawers in the middle, and light display or seasonal pieces higher.
The old drawers are the detail I would preserve. Their labels, handles, and worn surfaces provide more character than extra signs or decorative lettering could add.
A simpler adaptation uses black metal shelving brackets with one or two reclaimed boards. It keeps the timber-and-metal contrast without requiring a full pipe frame.
Metal Garage Shelves
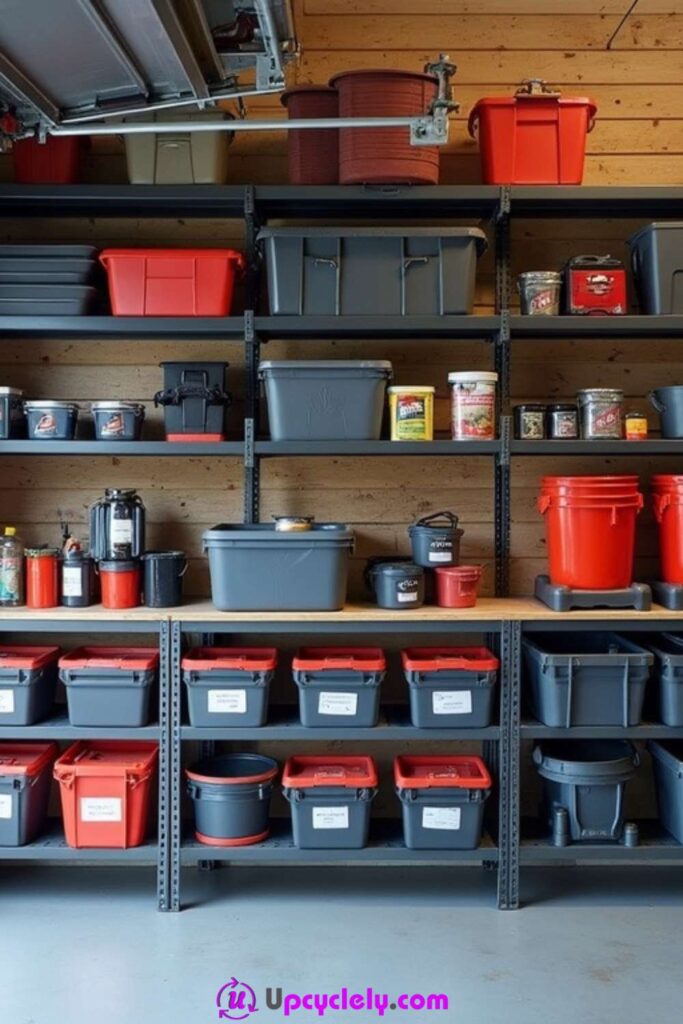
Open metal shelving with dark frames and rows of red and grey tubs creates a hard-working storage wall. The narrow uprights use little visual space, and the repeated shelf levels make containers easy to compare and label. Metal shelves are especially practical where tools, automotive supplies, and dense containers need a surface that does not rely on decorative joinery.
Metal strength varies widely, so appearance alone does not reveal the safe load. Use the rating and assembly method for the actual unit, keep clips and beams fully engaged, and replace bent parts rather than trying to straighten a structural member casually. Rust, sharp edges, and missing feet also need attention before the shelves enter daily use.
Materials and Tools
· Metal shelving units with all original beams, clips, and braces
· Compatible shelf decks or panels
· Wall restraint or anti-tip hardware
· Rubber mallet, spanner, level, and tape measure
· Rust brush and compatible touch-up coating if needed
· Lidded tubs, labels, and spill trays
Steps for This Garage Shelf
1. Check every component before assembly. Lay out uprights, beams, braces, and clips and compare them with the unit instructions. Reject pieces with serious rust, cracks, or distorted connection points, and make sure replacement panels fit the frame correctly.
2. Assemble the lower frame first. Build on a clean level floor, seat each beam fully, and check the first shelf for square. Continue upward only after the base stands evenly without twisting.
3. Restrain the shelves and protect the decks. Install anti-tip hardware and any required cross-bracing. Use trays beneath oils, chemicals, or messy car-care products so leaks do not spread across the metal or drip to lower levels.
4. Balance the load by density. Place heavy tubs and buckets low, medium boxes in the centre, and light bulky containers above. Keep labels visible and avoid stacking tubs higher than their lids and shapes allow safely.
I would not hide bent metal behind a storage tub. A damaged beam is easier to replace while the shelf is empty than after the whole unit has become part of the garage routine.
A mixed-material variation can use timber panels over a sound metal frame. Seal both faces and edges of the wood, and ensure the board is fully supported rather than bridging across an unsuitable gap.
Modular Garage Shelves
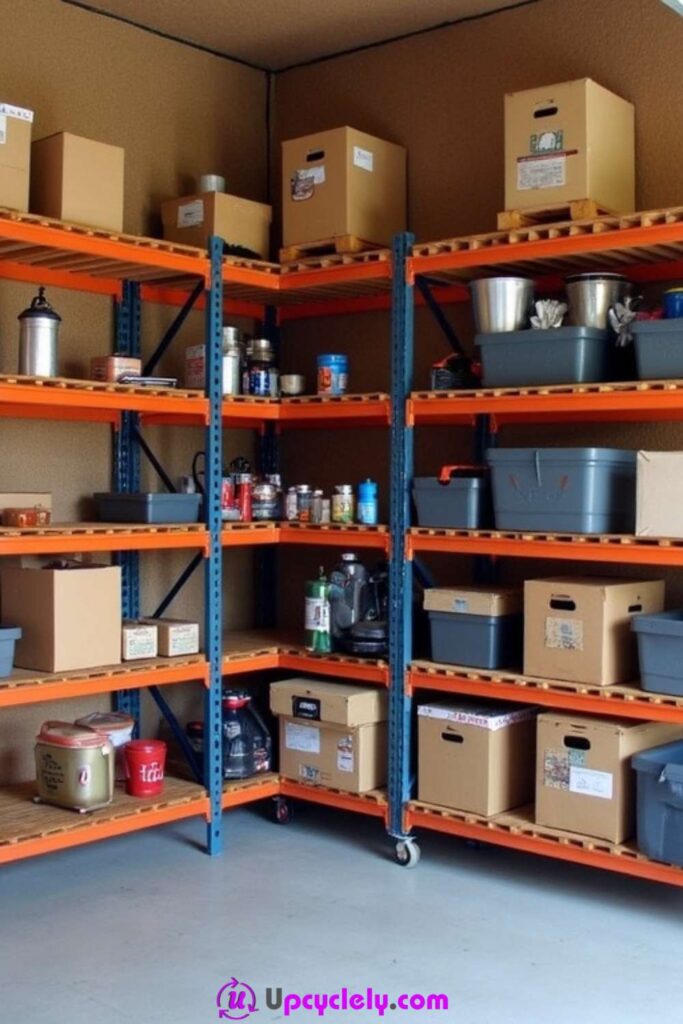
Modular orange-and-blue shelving wraps around the corner and includes a movable lower section on casters. Cardboard boxes, grey tubs, tins, and buckets occupy separate bays, showing how a system can expand without every unit being identical. The strong colour contrast makes the frame easy to see in a busy garage, which can help prevent accidental bumps.
Modularity is useful when the garage must serve several jobs. One bay can remain fixed for archive storage, another can hold household stock, and a wheeled section can move closer to a work area. The modules still need compatible dimensions and safe connections; adding a homemade extension to a commercial rack can create weak points that are difficult to judge.
Materials and Tools
· Compatible modular uprights, beams, braces, and shelf decks
· Locking casters designed for the movable module
· Connection plates or joining hardware supplied for the system
· Level, rubber mallet, spanner, and tape measure
· Anti-tip restraints for fixed tall sections
· Uniform boxes, tubs, and labels
Steps for This Garage Shelf
1. Assign a job to each module. Decide which section will stay fixed, which needs corner access, and whether one unit truly needs wheels. Keep the movable module smaller and lower than the fixed racks so it remains manageable when loaded.
2. Assemble modules to the same reference line. Build each frame square and set the shelf levels using the same measured marks. Check that corner units do not overlap or block one another before tightening every connection.
3. Secure fixed units and test the mobile one. Anchor tall frames and connect compatible modules where permitted. Fit locking casters to the moving section, then roll and brake it while empty to confirm that it tracks straight and remains stable.
4. Load according to movement. Keep fragile or liquid items off the wheeled unit and place its heaviest containers on the lowest shelf. Use fixed upper bays for light boxes and leave enough aisle width for the mobile rack to turn without hitting other storage.
The movable section should solve a real access problem. If it never moves, fixed feet may provide a steadier and simpler arrangement.
A budget version can use separate freestanding racks in the same colour or with matching labels. Visual consistency can make mixed systems feel planned without altering their structural design.
Overhead Garage Storage Shelves
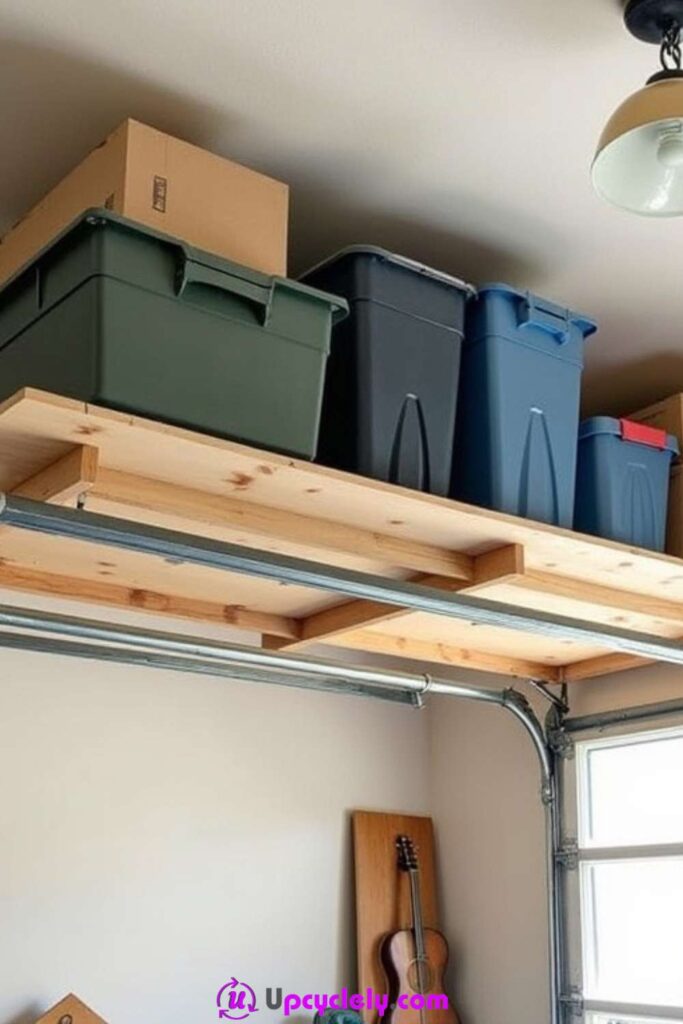
A timber platform mounted close to the ceiling uses the space above the garage-door tracks for large lidded tubs and a cardboard box. This keeps seasonal items away from the floor and leaves the wall below available for instruments, tools, or a work area. The broad underside and visible framing show that overhead storage needs a real structure, not just a deep board fixed to a few brackets.
Overhead shelving carries greater consequences if something shifts or falls. Confirm the route of the garage door and opener, use structural fixings, add a retaining edge where appropriate, and store only light, secure containers. Heavy tools, liquids, glass, and items needed frequently belong lower where they can be handled without a ladder.
Materials and Tools
· Timber framing and deck panels suitable for the planned platform
· Structural hangers, screws, bolts, and ceiling or wall fixings
· Front retaining lip or compatible barrier
· Tape measure, level, drill, saw, and protective equipment
· Stable ladder or platform and a second person to assist
· Light lidded tubs with secure handles and clear labels
Steps for This Garage Shelf
1. Measure the full door movement. Operate the garage door and observe the highest point of panels, tracks, springs, and opener arms. Mark a safety clearance around all moving parts and keep the shelf away from lights, cables, and service access.
2. Design the frame around structural support. Locate joists, studs, or masonry capable of accepting the system and select a proven framing method. If the structure or load path is uncertain, use a professional installer rather than guessing above a parking area.
3. Build and test the empty platform. Install the supports level, fix the deck fully, and add a front edge that helps prevent tubs from sliding. Inspect every connection from below before placing any storage overhead.
4. Load only suitable containers. Use light seasonal textiles, empty luggage, or similar low-risk contents in closed tubs. Lift one container at a time with help, keep labels visible from below, and never stack above the retaining edge.
One detail I would not compromise is access. If a tub cannot be lifted down while maintaining three points of contact on a ladder, it should not be stored there.
A safer beginner alternative is a high wall shelf above shoulder level but below the garage-door mechanism. It still frees floor space while making the contents easier to reach and inspect.
Pallet Shelving for Garage
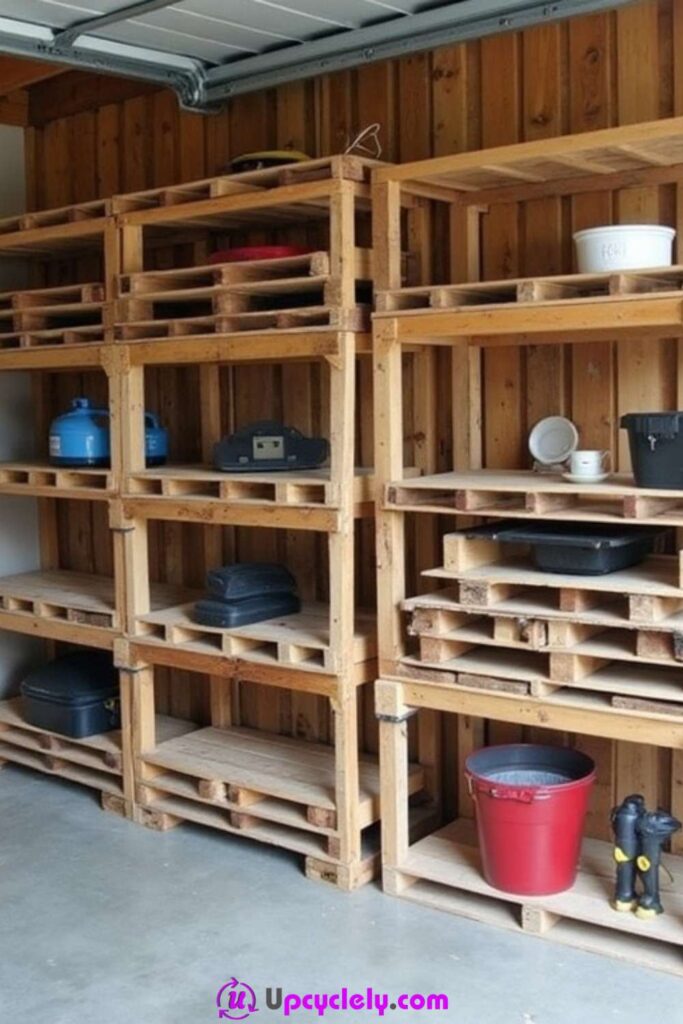
Stacked timber pallets can be turned into broad open shelving with repeated cubby-like spaces. The existing pallet frames create thick shelf edges and useful voids, while extra uprights connect the sections into taller units. Buckets, cases, small machines, and spare boards sit within the natural grid of the reclaimed timber.
Pallets vary greatly in condition and previous use. Choose clean, dry pieces with readable markings when available, avoid wood with chemical spills or strong odours, and remove every protruding nail. A pallet structure also needs positive connections; stacking loose pallets is not enough for a tall garage shelf that may be bumped or climbed against.
Materials and Tools
· Clean, sound pallets suitable for reuse
· Additional timber uprights, cleats, and cross-bracing
· Structural screws, bolts, and wall restraints
· Pry bar, hammer, drill, saw, and eye protection
· Detector for hidden nails plus sanding equipment
· Clear protective finish or garage-suitable paint
Steps for This Garage Shelf
1. Select and dismantle only what is needed. Inspect each pallet for broken blocks, contamination, insect damage, and hidden fasteners. Keep the strongest frames intact for shelf platforms and salvage sound boards from damaged pallets for braces or infill.
2. Clean, sand, and repair the timber. Remove loose nails and staples, scrub away dirt, and smooth every exposed edge. Replace split boards and reinforce weak corner blocks before assembling the units.
3. Join the pallets into framed modules. Set the lowest pallet level on a flat base, add uprights at the corners, and screw each shelf platform into the structure. Fit rear bracing and connect adjacent modules so they cannot rack independently.
4. Anchor and load the shelving cautiously. Secure the tall units against tipping, then store broad lightweight items in the upper bays and dense containers low. Avoid using the narrow pallet voids for objects that could roll out or become impossible to retrieve.
The pallet openings already provide enough texture. I would keep the finish simple and spend the time on removing splinters, hidden nails, and unstable joints instead.
For a cleaner variation, salvage only the boards and build conventional shelf frames from new structural timber. You keep the reused surface while gaining more predictable dimensions and support.
Pegboard Shelving System
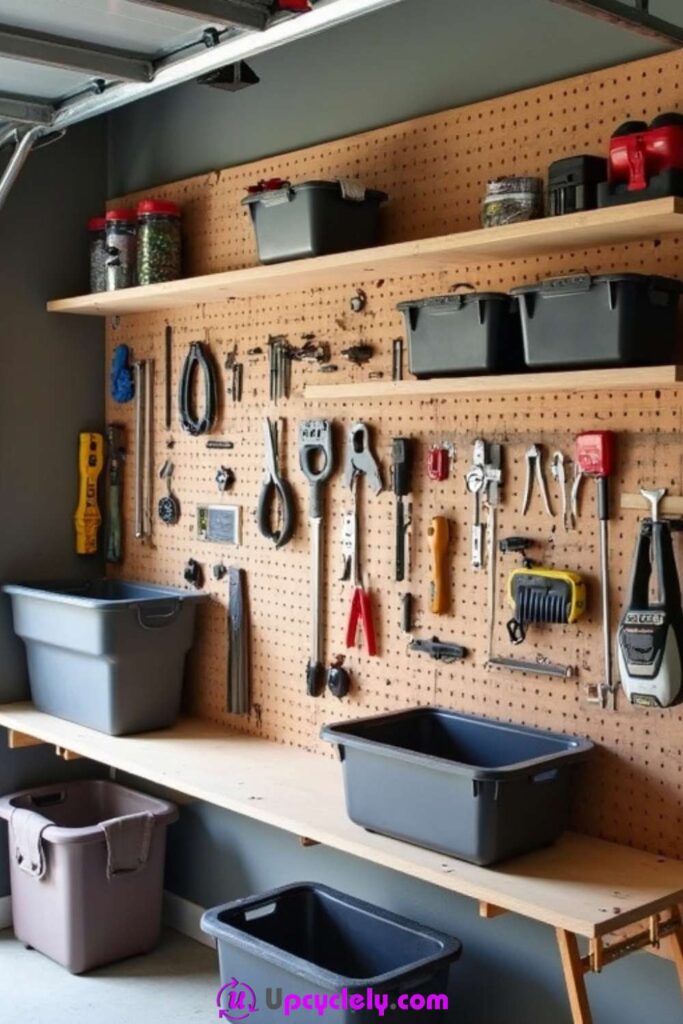
A full pegboard wall combines hanging tool storage with two long timber shelves. Pliers, hammers, levels, cables, small containers, and power tools remain visible, while broad tubs sit on the shelf and floor. The small regular holes make the wall feel organised even when the tools have different shapes.
Pegboard is most successful for light and medium items that are used often. It should be spaced away from the wall so hooks can engage properly, and the shelves need their own support rather than hanging from ordinary peg hooks. Outline labels are optional; a logical tool grouping and a clear return habit usually matter more than making every shape look decorative.
Materials and Tools
· Pegboard panels in sound condition
· Timber battens to create the required wall gap
· Compatible hooks, clips, and small tool holders
· Independent shelf brackets and timber boards
· Drill, level, saw, tape measure, and suitable fixings
· Small bins or jars for loose hardware
Steps for This Garage Shelf
1. Arrange tools before fixing the panel. Lay the everyday hand tools on the floor or workbench and group them by task. Keep heavy cases and large tubs out of the pegboard plan so the panel is not asked to carry inappropriate loads.
2. Install battens and panels securely. Fix the battens into suitable wall structure, leaving the correct space for hooks behind the board. Join panel edges over support and check that the full surface remains flat and level.
3. Mount shelves on separate brackets. Mark the shelf positions through the pegboard but fix the brackets into solid backing or wall structure. Secure the boards and leave enough clearance above them for bins to lift without catching the tool hooks.
4. Place tools by reach and shape. Hang frequently used tools near the centre, long items vertically at the sides, and small accessories in bins. Test each hook by removing and returning the tool several times, then adjust any arrangement that requires awkward twisting.
For me, the best pegboard is not the one with the most hooks. A little blank space makes it easier to notice when a tool is missing and gives the layout room to change.
A smaller version can fit above a reused workbench with one narrow shelf. Paint is optional; sealing the cut edges and keeping the holes clear is more important than matching the wall colour.
PVC Pipe Garage Shelving
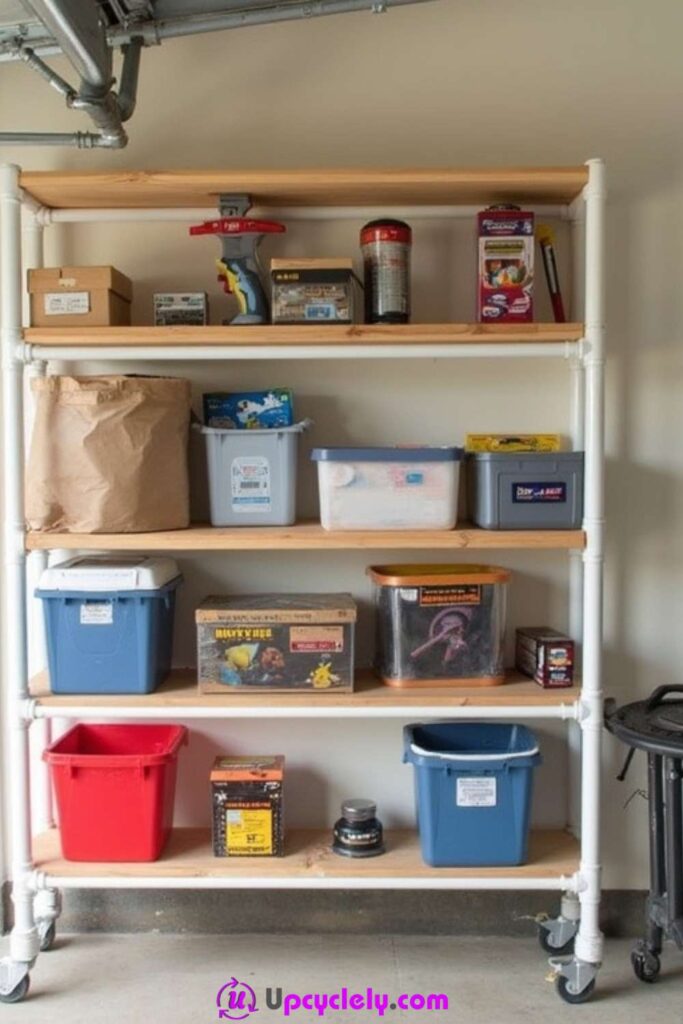
White PVC uprights and fittings can form a lightweight rolling frame for timber shelves. The pale pipe keeps the unit visually open, while the boards provide flat surfaces for boxes, tubs, and hobby supplies. Casters make the rack easy to reposition when the garage needs to change between storage and work.
PVC is not a substitute for structural metal or timber when very heavy loads are involved. Use this idea for lightweight supplies, choose pipe and fittings appropriate to the design, and prevent the joints from twisting. Wheels also change the forces on the frame, so a rolling shelf should stay relatively low, have locking casters, and move only on a clear floor.
Materials and Tools
· PVC pipe and compatible fittings suited to the frame design
· Timber shelf boards cut to fit the supports
· Locking casters and secure mounting plates
· Pipe cutter or suitable saw, tape measure, and marker
· Approved joining method for the selected PVC system
· Lightweight tubs and boxes
Steps for This Garage Shelf
1. Keep the design low and rectangular. Measure the intended containers and draw a frame with broad feet and modest height. Avoid narrow towers or long unsupported spans, especially if the unit will be rolled across joints in the concrete floor.
2. Cut matching pipe sections. Mark repeated lengths from one reference piece and cut the ends square. Dry-fit the entire frame first, then check that shelf supports align before making any joint permanent.
3. Fit shelves and bracing. Secure the timber boards so they cannot slide and add cross-bracing or rigid panels where the design needs resistance to side movement. Round the board corners and keep screw points away from the hollow pipe unless the fixing method is designed for it.
4. Install casters and test with a light load. Use locking wheels attached to a sound base, then roll the empty unit and apply the brakes. Add light containers gradually, checking for flex, loosened joints, or a tendency to tip before regular use.
I would use this rack for craft materials, empty pots, sports accessories, or other light items rather than dense tools. The material should match the job, not just the desired appearance.
A stationary version without casters is simpler and usually steadier. You could also use the PVC only as removable dividers inside a conventional timber shelving frame.
Recycled Wood Garage Shelves
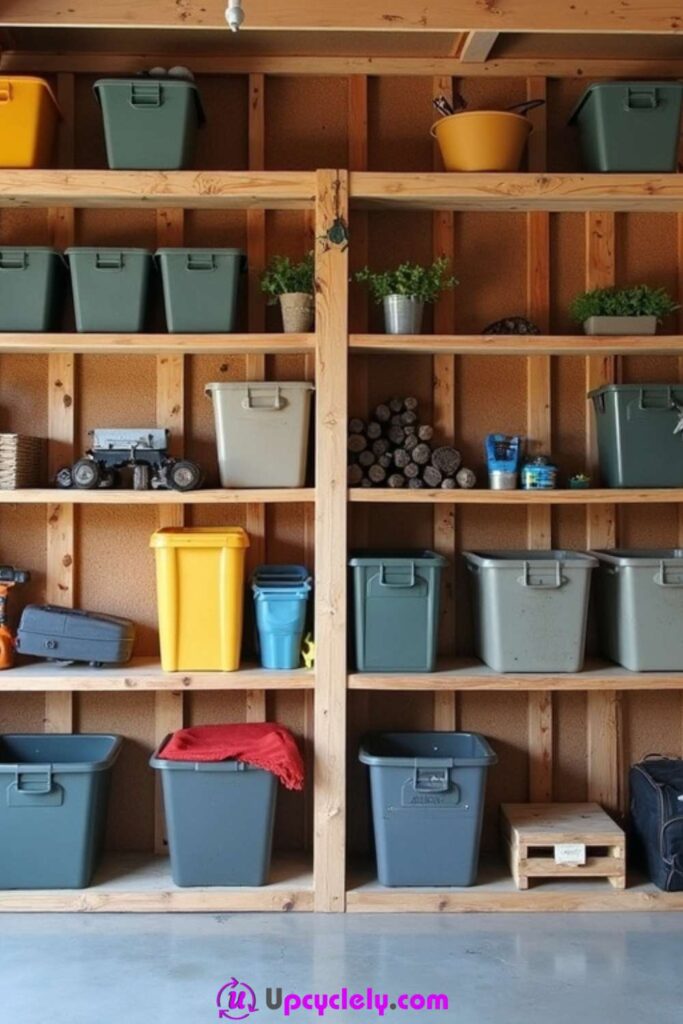
Rough recycled timber can create a broad shelving wall with visible studs, simple uprights, and open compartments. Grey, green, and yellow bins sit alongside logs, tools, planters, and small cases, showing how reclaimed wood can support a very practical arrangement without being dressed up as indoor furniture.
The value of recycled wood is not that every mark must be preserved. Dirt, protruding nails, loose fibres, rot, and contaminated surfaces need to go, while sound saw marks and colour variation can remain. Build the structural frame from pieces that are straight and strong, then use more characterful boards only where their condition allows.
Materials and Tools
· Recycled timber sorted by strength and condition
· Sound structural posts, rails, and shelf supports
· Screws, bolts, brackets, and wall restraints
· Nail detector, pry bar, drill, saw, and eye protection
· Stiff brush, sander, and suitable cleaning supplies
· Breathable protective finish where useful
Steps for This Garage Shelf
1. Sort timber into structural and non-structural groups. Reserve the straightest, strongest pieces for uprights and load-bearing rails. Use shorter or more weathered boards only for lightly loaded shelves after confirming that they are dry and sound.
2. Remove hazards before cutting. Pull nails, screws, staples, and wire, then scan for hidden metal. Clean the timber and cut away soft or contaminated sections rather than sanding questionable material into the air.
3. Build a braced frame. Set the uprights plumb, connect horizontal rails, and add rear bracing so the unit cannot lean. Support each shelf at sensible intervals and keep the lower frame clear of standing water.
4. Fit boards and organise by weight. Screw the shelves down, sand the contact edges, and apply a finish if needed for dust control. Place heavy bins on the lowest levels and leave the upper compartments for light bulky items.
The uneven colour is the part I would keep. It tells the story of the boards without needing artificial distressing or decorative signs.
A neater adaptation uses recycled wood only for the shelf faces over a new, dimensionally consistent frame. This can make levelling easier while still using the old material where it remains visible.
Rolling Garage Shelving Cart
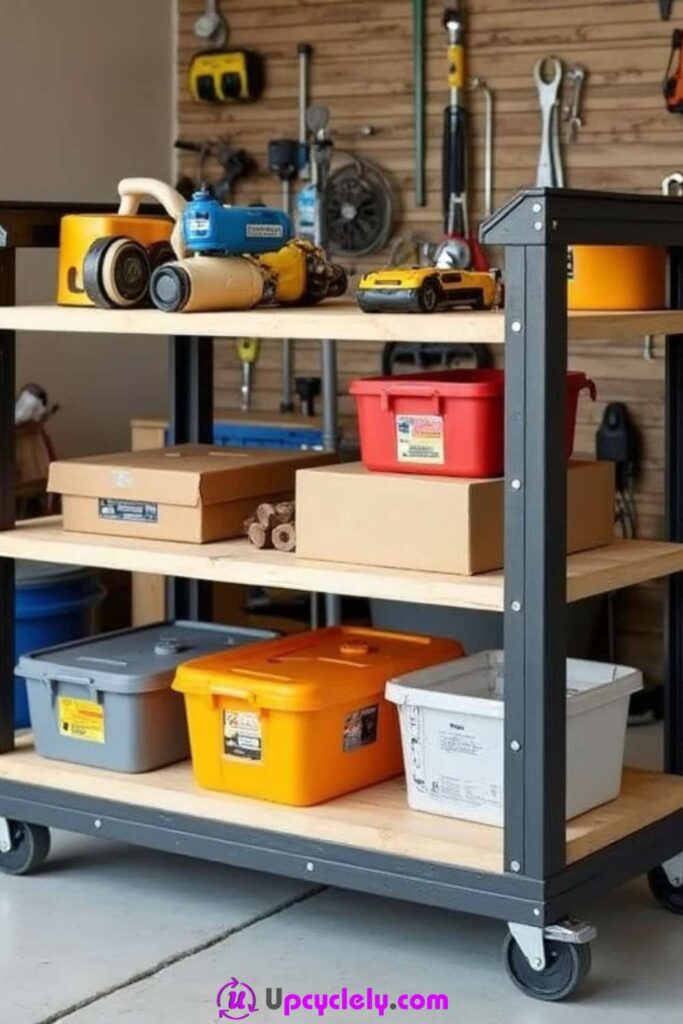
A metal-framed cart with three timber shelves and large casters can carry tools and storage boxes to the place they are needed. The top works as a temporary surface, the middle shelf holds active project boxes, and broad tubs stay low near the wheels. Mobility is especially useful in a garage where the car, workbench, and open floor all compete for the same space.
A rolling cart should be designed around movement rather than simply adding wheels to a tall shelf. Keep the structure low and wide, use locking casters, secure the shelf panels, and avoid loose containers that could slide during a turn. The loaded cart also needs a dedicated parking place so it does not become a permanent obstacle.
Materials and Tools
· Low metal or timber cart frame
· Three sound shelf panels with secure fixings
· Four load-appropriate locking casters
· Bolts, washers, spanner, drill, and square
· Raised edge, non-slip mat, or shallow tray for the top
· Lidded tubs sized to stay within the frame
Steps for This Garage Shelf
1. Choose a safe cart footprint. Measure the narrowest route the cart must travel and allow space for hands around the frame. Keep the overall height below chest level if possible so the user can see over and around the load.
2. Build and brace the frame. Assemble the base square, add uprights and cross-members, and confirm that the structure resists side movement. Secure every shelf so it cannot bounce or shift when the wheels cross a floor joint.
3. Install and test locking casters. Attach the wheels through reinforced areas using suitable bolts and washers. Roll the empty cart in several directions, lock all casters, and push gently from different sides to check stability.
4. Create a balanced mobile load. Keep heavy tubs on the bottom, active tools in the middle, and only a small working selection on top. Remove cords, long handles, or objects that project beyond the frame before moving the cart.
One practical detail I would not skip is a parking line or marked bay. A movable shelf is far more useful when everyone knows where it should return after the job.
A reused service trolley can provide the same function for lighter supplies. Add lidded bins and a non-slip top rather than rebuilding the frame if the existing cart remains sound.
Space-Saving Garage Shelves
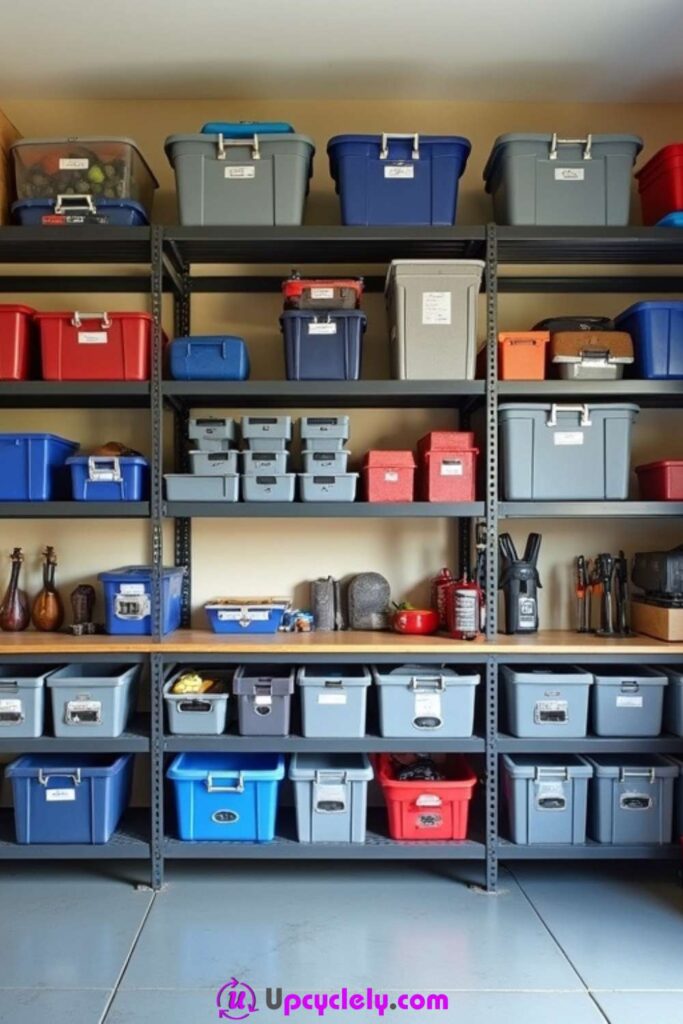
Floor-to-ceiling metal shelving filled with labelled tubs uses one wall very efficiently. Large containers occupy the upper and lower levels, while smaller matching bins form dense rows through the middle. The regular black frames divide the wall into bays, making a large collection feel more controlled than scattered boxes on the floor.
Space-saving should not mean unreachable or overloaded. The deepest and highest positions need light, infrequent items, while daily supplies should sit between waist and shoulder height. Narrow aisles also require container handles and doors to remain within the shelf footprint so nothing projects into the path beside a vehicle.
Materials and Tools
· Tall shelving units sized for the wall and ceiling
· Anti-tip restraints and compatible joining hardware
· Tubs in repeatable sizes with secure lids
· Large, readable labels on the front and top
· Level, tape measure, assembly tools, and stable ladder
· Optional shelf stops or retainers
Steps for This Garage Shelf
1. Measure the full vertical zone. Check ceiling lights, beams, door tracks, and wall services before choosing the shelf height. Mark the aisle width on the floor and confirm that the tallest containers can be lifted without touching the ceiling.
2. Build a stable connected row. Assemble each frame square, level the bases, and join adjacent units where the system permits. Fit anti-tip restraints before loading the upper shelves.
3. Standardise containers where it helps. Use repeatable tub sizes so shelf spacing can remain consistent, but avoid forcing awkward objects into boxes that make them harder to access. Label both the front and lid of containers stored above eye level.
4. Apply a vertical access rule. Place heavy and frequent items low to middle, light seasonal supplies high, and rarely used dense items on the floor level. Keep a safe ladder nearby and never climb the shelving to reach a top tub.
The strongest part of this layout is not the number of tubs; it is the clear pattern. A consistent label position can make mixed container colours feel organised.
For a single-car garage, use one tall bay and one low bench-height bay rather than filling the entire wall. The lower section can double as a sorting surface while keeping the upper area visually lighter.
Sliding Door Garage Storage Shelves
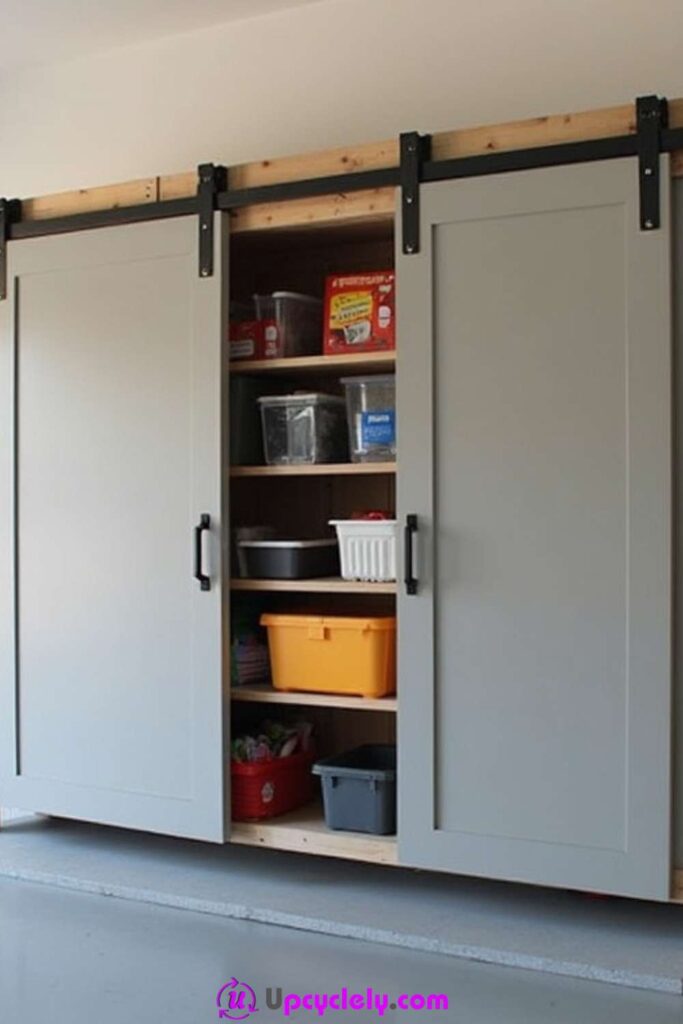
Broad grey sliding doors can conceal a full wall of timber shelves while requiring very little space in front of the unit. The barn-style tracks and black handles create a clear outer frame, and the centre opening reveals deep shelves with tubs, trays, and garden supplies. Closed storage can make a garage feel calmer without sacrificing capacity.
The doors need enough wall or cabinet width to overlap the openings, and the track must be fixed to a structural header. A sliding panel can be heavy, so floor guides, end stops, anti-jump devices, and smooth handles matter as much as the appearance. Contents also need to stay behind the shelf front so they cannot obstruct the moving doors.
Materials and Tools
· Existing shelving wall or built-in timber cabinet
· Sound door panels sized for the openings
· Sliding-door track, hangers, stops, and anti-jump hardware
· Structural header board and suitable wall fixings
· Floor guides, handles, level, drill, and spanners
· Labels and low containers that remain within the shelves
Steps for This Garage Shelf
1. Confirm the doors have room to travel. Measure the total opening and the wall or cabinet space needed for each panel to slide aside. Check that lights, switches, side walls, and the garage door do not interrupt the full path.
2. Strengthen the shelving and header. Anchor the shelving independently and add a structural header where the track will sit. Do not expect thin cabinet trim or decorative boards to carry the moving door weight.
3. Install the track and guides accurately. Level the track, fit hangers and stops, then hang one door at a time with assistance. Add anti-jump devices and floor guides so the panels cannot swing outward or leave the rail.
4. Organise for clear door movement. Place shallow containers near the front and push all contents fully behind the door line. Open and close every panel after loading, listening for contact and adjusting any shelf item that projects.
For me, the closed front works best when the inside remains organised too. Doors should hide visual noise, not make it acceptable to pile items where they can jam the track.
A lighter adaptation uses sliding fabric panels or simple curtains in front of low-risk storage. They need less structural hardware, although they will not provide the same protection from dust or impact.
Garage Shelf Choices That Can Turn Order into Trouble
Installing shelves before checking the garage door. Door panels, tracks, springs, and opener arms move through more space than they appear to occupy when closed. Operate the door fully, mark the movement zone, and keep shelves, hooks, and tall containers outside it.
Using wall fixings without identifying the wall. A screw that feels tight in plasterboard may not support a loaded shelf. Locate studs, masonry, or suitable backing and use hardware selected for the actual structure and expected load.
Placing the heaviest containers overhead. Dense tubs are difficult to control on a ladder and create greater risk if they shift. Keep heavy tools, liquids, and hardware low, reserving upper shelves for light seasonal items in secure lidded containers.
Building shelves too deep for the aisle. Deep boards can block car doors, catch shoulders, and hide small objects behind large bins. Mark the projection with tape and choose the shallowest depth that holds the intended containers safely.
Treating reclaimed wood as ready to use. Old boards and pallets may contain nails, splinters, rot, oil, or unknown residue. Inspect, clean, remove hidden metal, reject contaminated pieces, and use only sound timber in structural parts.
Leaving freestanding units unrestrained. Tall racks can tip when a heavy tub is pulled forward or when children climb or lean against them. Level the base, keep weight low, connect compatible units, and install appropriate anti-tip restraints.
Creating labels that are too broad. A tub marked miscellaneous will slowly collect unrelated items and become difficult to lift or search. Use specific categories, divide overloaded bins, and review the contents before adding another shelf.
Blocking access to services and safety equipment. Shelves should not cover electrical panels, meters, shutoffs, windows, fire equipment, or areas that need inspection. Leave working clearance and choose removable storage where future access may be necessary.
Frequently Asked Questions
What material is best for garage shelves?
The best material depends on the load, moisture, and whether the unit will be fixed or movable. Sound timber works well for custom shelves, while metal systems offer adjustable open storage; reclaimed materials should be used only after careful inspection and repair.
How deep should garage shelves be?
Choose a depth that supports the actual containers without narrowing the aisle or hiding smaller items. Mark the proposed depth with tape and test the route beside a parked vehicle before cutting or purchasing shelves.
Do freestanding garage shelves need to be anchored?
Tall or narrow units usually benefit from appropriate anti-tip restraint, especially when heavy tubs can be pulled forward. Follow the shelving system guidance and secure the unit to suitable structure rather than relying on stored weight to hold it in place.
Can I use reclaimed wood for garage shelving?
Yes, when the wood is dry, sound, clean, and free from hidden nails, rot, insect damage, or chemical contamination. Use the strongest pieces for the frame and supports, and keep heavily weathered boards for lighter decorative or non-structural roles.
What should not be stored on overhead shelves?
Avoid heavy machines, liquids, glass, loose items, and anything needed frequently. Overhead shelves are better for light seasonal contents in closed tubs that can be handled safely from a suitable ladder.
How can I protect garage shelves from dampness?
Keep lower timber and cardboard away from wet concrete, repair water-entry problems, and use lidded plastic containers for vulnerable contents. Seal suitable wood surfaces and leave airflow rather than pressing every box tightly against a damp wall.
Can renters add garage shelves without permanent changes?
A stable freestanding rack, low rolling cart, or workbench with storage may avoid extensive wall drilling. The unit still needs safe assembly and anti-tip measures, so discuss any required restraints or fixings with the property owner before installation.
Make the Garage Easier to Use, Not Merely Fuller
The most useful garage shelving ideas begin with clear movement, realistic loads, and containers that can be reached without shifting half the room. A few secure wall shelves may be enough for one garage, while another needs cabinets, baskets, a rolling cart, or a full modular wall. The right answer is the system that keeps heavy items low, daily tools visible, and doors and vehicles free to move.
Start with one troublesome category and build only the storage it genuinely needs. Reuse a sound board, cabinet, basket, pallet, or metal frame when it can be made safe, then leave room for the arrangement to change. Which part of your garage would become easier to use if every item on the floor had one clear place today?