Scandinavian gnomes have a wonderfully simple face: a low hat, a rounded nose, and either a long beard or thick yarn hair. Those few features leave plenty of room to reuse fabric scraps, odd socks, leftover yarn, faux-fur offcuts, buttons, ribbons, and small natural materials that might otherwise sit forgotten in a drawer.
I especially like gnome projects because they don’t depend on exact measurements or perfectly matched supplies. A slightly crooked hat can add character, and two different greys can often look more interesting than one newly purchased fabric. What matters is giving the body enough weight to stand, keeping the nose securely attached, and arranging the hat so it rests naturally over the face.
The six designs below use different methods, from soft sewn figures and knitted miniatures to a painted clay ornament. You can follow one idea closely or borrow individual details, such as a braided hairstyle, a floral hat, a tiny lantern, or decorations made from dried acorns.
Before You Start
Decide whether your gnome will be a soft indoor decoration, a small hanging ornament, or a firmer painted figure. That choice affects the materials you’ll need and how strongly each part should be attached.
For a standing fabric gnome, add a little dried rice, clean gravel, or weighted craft filling to the bottom before adding soft stuffing. Keep the weighted material inside a tied fabric pouch so it cannot leak through seams.
Check faux fur from the back before cutting it. Slide the scissors through the backing rather than cutting straight through the hair, as this keeps the beard full instead of leaving a blunt edge.
Check Your Materials Before Making the Gnome
Place all the fabric, socks, yarn, faux fur, decorations, and filling on a clean table before starting. Decide whether you are making a standing fabric gnome, a hanging ornament, a knitted figure, or a clay decoration. This will help you choose materials that are suitable for the size and weight of the finished piece.
Clean reused materials before cutting them, and allow everything to dry fully. Keep pieces for the body, hat, beard, nose, and decorations in separate groups so you can see whether the colours and textures work well together.
Set Aside Materials That Are Not Safe to Use
Do not use materials that could weaken the gnome or create a safety problem. Set aside:
- Fabric with mold, damp patches, or a strong musty smell
- Socks or clothing with grease, chemical stains, or unknown residue
- Brittle fabric that tears when gently stretched
- Faux fur that sheds heavily or has a damaged backing
- Yarn with signs of insects or moisture damage
- Rusty bells, wires, pins, or metal decorations
- Broken beads with sharp edges
- Cracked buttons or loose plastic pieces
- Fresh leaves, berries, acorns, or seed pods
- Natural materials with holes, dust, moisture, or signs of insects
- Wet or clumped stuffing
- Loose sand, rice, gravel, or pellets that cannot be sealed securely
- Damaged electrical lights or exposed battery wires
- Air-dry clay that has hardened inside the package
- Glue that has separated, thickened, or passed its recommended storage period
- Paint with an unusual smell, heavy lumps, or signs of contamination
Avoid materials that have been treated with strong household chemicals, especially when you do not know what was used on them. Washing may not remove every residue.
These gnomes should be treated as decorations rather than children’s toys when they contain beads, bells, buttons, long fibres, natural pieces, weighted filling, glue, or battery-powered lights.
For Ordinary, Clean Materials, Inspect:
- Whether the fabric is strong enough to hold stuffing
- Small holes, thin areas, and weak seams
- The amount of stretch in socks and knitted fabric
- Whether the hat fabric can hold its shape
- The direction and length of faux-fur fibres
- Whether the faux-fur backing is strong enough for stitching or glue
- Yarn that tangles, sheds, or separates easily
- Colour transfer from dark or brightly dyed fabric
- Decorations that feel too heavy for the hat
- Buttons, bells, and beads with secure fixing points
- Sharp edges on acorn caps, twigs, and seed pods
- Natural pieces that are completely clean and dry
- Stuffing that is soft, dry, and free from lumps
- The strength of fabric intended for the weighted pouch
- Whether the filling can escape through the body fabric
- The size and firmness of the material used for the nose
- Glue compatibility with fabric, fur, felt, clay, or wood
- Whether painted and clay pieces can stand on a flat surface
- Battery access if a small craft light is being added
- The finished gnome’s balance before decorations are attached
Test stretchy fabrics by placing a small amount of stuffing inside them. Thin socks can become almost transparent when filled and may need a second fabric layer.
Check the balance of a standing gnome throughout the project. A long hat, thick beard, bell, flower arrangement, or group of acorns can pull the figure forward. Place the weighted pouch at the lowest point of the body and test the gnome on a level surface before securing the final details.
When using faux fur, turn it over and mark the beard shape on the backing. Cut only through the backing with the tips of the scissors so the longer fibres remain intact.
Useful Materials and Tools
- Clean fabric scraps, sleeves, fleece, felt, or old socks
- Faux-fur offcuts
- Leftover yarn or wool
- Soft toy filling
- Strong fabric for making a weighted pouch
- Weighted craft pellets, clean gravel, or dried rice
- Fabric scissors
- Small embroidery scissors
- Needle and strong thread
- Yarn needle
- Pins or fabric clips
- Seam ripper
- Tape measure or ruler
- Pencil, tailor’s chalk, or removable fabric marker
- Paper for making simple patterns
- Fabric glue
- Low-temperature glue gun and glue sticks
- Felt for reinforcing decorations
- Beige fabric, felt, or wooden beads for noses
- Buttons, ribbons, bells, or lightweight beads
- Clean and thoroughly dried natural decorations
- Tweezers for placing small pieces
- Stuffing tool, blunt pencil, or wooden stick
- Knitting needles or crochet hook, where needed
- Air-dry clay and blunt modelling tools
- Aluminium foil for a lightweight clay core
- Acrylic paint and small paintbrushes
- Protective work mat
- Compatible clear finish for painted clay
- Small cool-running battery craft light, if required
- Small containers for loose decorations
- Dust mask when cutting shedding fibres or handling dry natural materials
Choose glue according to the materials being joined. Fabric glue is usually easier to control on felt, fleece, and cloth, while heavier decorations may also need hand stitching or a reinforced felt patch.
Before final assembly, arrange the hat, beard, nose, arms, and decorations without fixing them permanently. Move the pieces until the gnome looks balanced from the front and sides. Attach the beard first, position the nose next, and fit the hat last.
Keep small bells, buttons, beads, loose acorns, and weighted fillings away from young children and pets. These gnomes are decorative objects rather than toys unless every part has been designed and secured for safe play.
Sew a Coordinated Pair of Soft Grey Gnomes
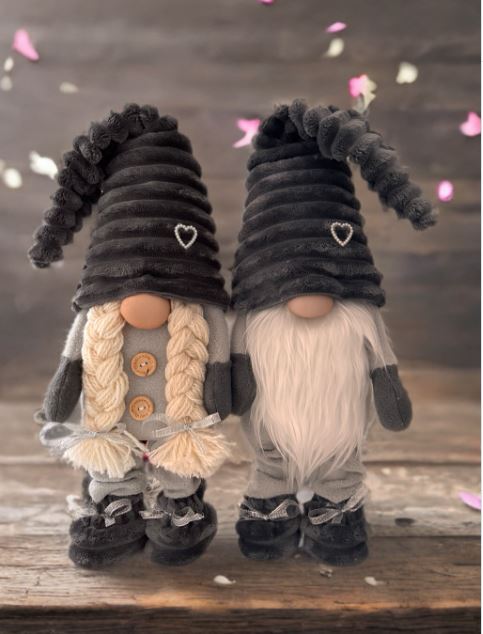
A coordinated pair does not need to be identical. These two gnomes use the same dark ribbed hats, soft grey clothes, rounded noses, dark mittens, and black shoes, but their hair and clothing details make them feel like individual figures.
One gnome has two thick cream yarn braids, a buttoned top, a light skirt, and small ribbon details. The other has a long white faux-fur beard that covers most of the body. Both hats bend to one side and finish with curled fabric details, while a small heart on each hat quietly connects the design.
The strongest part of this pair is the balance between repetition and variation. I don’t think matching decorations need to repeat every feature. Using the same fabric family, shoes, and hat shape is enough to make two different characters belong together.
Materials and Tools
· Dark grey ribbed, plush, or textured fabric for the hats
· Light and medium grey fleece or felt for the bodies and clothes
· White faux fur
· Thick cream yarn
· Beige stretch fabric for the noses
· Soft filling and a weighted base pouch
· Small wooden buttons
· Narrow grey or silver ribbon
· Black felt, fleece, or fabric for the shoes
· Strong thread, needle, pins, and fabric scissors
· Fabric glue for small decorative details
Build the Matching Pair
1. Make two stable bodies. Sew or glue two simple fabric tubes or rounded body shapes, leaving an opening for filling. Add a small weighted pouch at the bottom of each one, then fill the remaining space until the bodies are firm enough to stand without becoming hard.
2. Create the different hairstyles. Cut a piece of white faux fur for the bearded gnome, keeping the hair longer at the centre and slightly shorter near the sides. For the second figure, divide thick cream yarn into two equal groups, braid each one, and tie the ends before trimming them evenly.
3. Add clothes, arms, and shoes. Cover the bodies with soft grey fabric, then attach narrow stuffed arms and darker mittens at the sides. Shape the shoes from padded black fabric, making them wide enough to help the figures stand, and add buttons, ribbons, or a small skirt only after the basic shape feels balanced.
4. Make the noses and tall hats. Form each nose from a small circle of beige stretch fabric gathered around stuffing. Cut the hats as long tapered shapes, stitch or glue the seams, then pull them low enough to hide the upper edge of the beard or braids.
5. Finish the pair with repeated details. Bend each hat gently to one side and secure the curve with a few hidden stitches if necessary. Add the curled trim, small hearts, and matching ribbons last, then place both gnomes together and check whether one looks noticeably taller or heavier than the other.
For a simpler pair, leave out the skirt and braided hair and make two bearded gnomes with different beard colours. You could also reuse the sleeves of an old fleece jumper for the bodies and a worn ribbed scarf for both hats.
Shape a Red Christmas Gnome with Air-Dry Clay
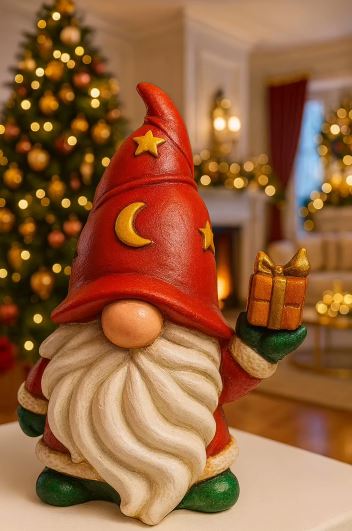
This red Christmas gnome has the appearance of a solid sculpted decoration rather than a sewn fabric figure. Its tall hat curves forward over a round nose, while the deeply shaped beard creates movement across the front of the body. Green mittens and a small Christmas tree break up the red and cream colour scheme.
A similar piece could be made from air-dry clay placed over a lightweight foil core. That method uses less clay, keeps the figure manageable, and makes it easier to create a broad base. Papier-mâché clay or another paintable modelling material may also work, provided it is suitable for the thickness of the project.
I’d keep the overall shape fairly simple. The flowing beard already carries plenty of detail, so the body, shoes, and hat do not need extra patterns.
Materials and Tools
· Air-dry clay or another suitable modelling material
· Aluminium foil for a lightweight core
· Water and a small smoothing brush
· Blunt modelling tools
· Acrylic paint in red, cream, green, brown, and warm skin tones
· Small paintbrushes
· Protective work mat
· Compatible clear finish, if recommended for the chosen clay
· Optional lightweight tree form or extra clay for the tree
Model and Paint the Gnome
1. Build the basic core. Compress foil into a rounded body with a flat bottom, then add smaller foil shapes for the shoes and the general direction of the hat. Keep the form compact so the finished ornament is less likely to tip forward.
2. Cover and shape the main figure. Apply an even layer of clay over the foil and smooth the body before adding smaller parts. Form the nose, shoes, arms, and mittens separately, then blend their edges into the main body while the material remains workable.
3. Create the hat and beard. Wrap a tapered clay section around the top of the figure and curve the point forward. Add the beard in overlapping sections, then use a blunt tool to draw flowing grooves rather than cutting deep lines that may weaken the clay.
4. Add the small tree. Shape a simple cone and press layered branch forms around it, or cover a lightweight base with clay. Attach it securely to the mitten and body so it does not rely on one narrow connection.
5. Dry and paint carefully. Let the complete figure dry according to the material instructions, turning it when needed so hidden areas can dry as well. Paint the broad red areas first, then the beard, nose, mittens, tree, and small shaded details before applying any compatible protective finish.
Avoid drying thick air-dry clay beside strong heat, as the outer surface may dry much faster than the centre. A smaller version is easier for a first attempt and still gives you enough room to practise the beard texture.
Make a Lavender Floral Gnome from Fleece
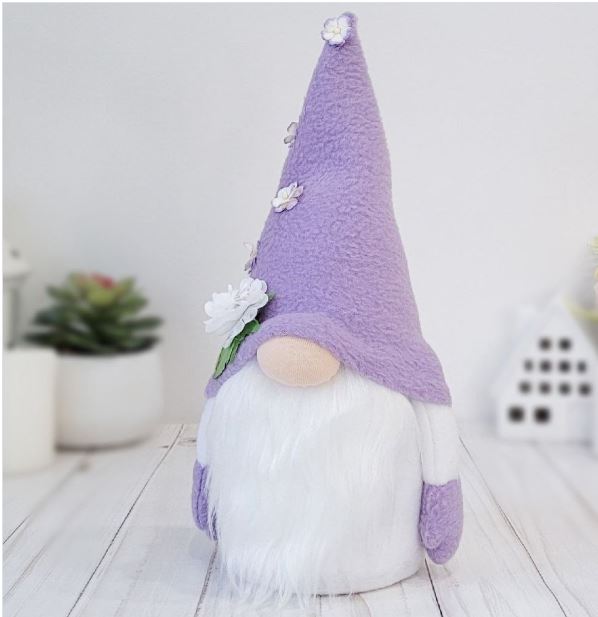
This lavender gnome uses a broad rounded body, a straight white beard, small side arms, and a very tall pointed hat. The soft fleece-like surface gives the hat a warm texture, while white flowers and green leaves create a light decorative line along one side.
The design is calm because the colours remain limited. Lavender appears on the hat and mittens, white covers the beard and sleeves, and the nose uses a warm neutral tone. The flowers are small enough to add interest without hiding the shape of the hat.
The body appears almost cylindrical, which makes this a sensible beginner project. There are no visible feet to align, and the wide base provides more stability than narrow legs.
Materials and Tools
· Lavender fleece, sherpa, or another soft fabric
· White faux fur with a straight pile
· White fleece for the body and arms
· Beige stretch fabric for the nose
· Stuffing and a weighted base pouch
· Small artificial or handmade fabric flowers
· Green felt for leaves
· Needle, strong thread, pins, and scissors
· Fabric glue for lightweight floral details
Assemble the Lavender Gnome
1. Sew the rounded body. Cut a rectangle for the side and a circle or oval for the base, then join them to create a soft cylinder. Add the weighted pouch first, fill the body evenly, and close the top securely.
2. Prepare the beard and arms. Cut the faux fur from its backing into a wide beard shape that reaches close to the base. Make two narrow white arms with lavender mitten ends, lightly stuff them, and attach them at equal heights on the sides.
3. Form the nose and hat. Gather a small beige fabric circle around filling to make the nose, then stitch it near the upper edge of the beard. Sew the lavender hat as a long cone and place it over the top so the lower edge rests just above the centre of the nose.
4. Arrange the flowers before fixing them. Place the largest flower near the lower side of the hat, add leaves behind it, and continue with smaller flowers toward the tip. Move the pieces several times before attaching them; the first arrangement rarely needs to be the final one.
5. Check the shape from every side. Make sure the hat does not lean so far that the gnome becomes unstable. Secure any loose flower edges, fluff the beard, and adjust the mittens so both remain visible from the front.
A no-flower version could use small felt circles, embroidered stars, or a line of reused buttons. For a seasonal variation, replace the white flowers with tiny fabric leaves in muted autumn colours.
Knit a Woodland Gnome with a Tiny Acorn Lantern
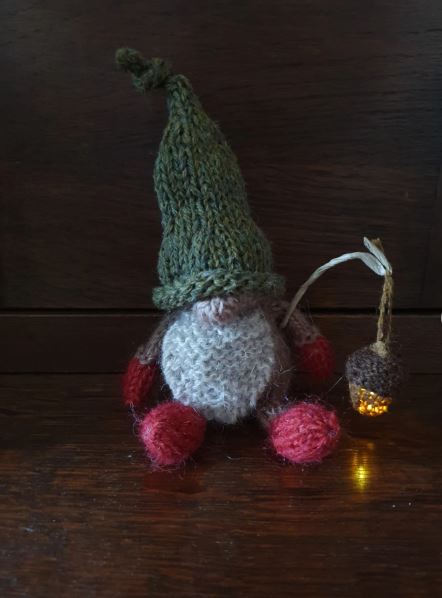
This tiny woodland gnome has a hand-knitted appearance, with a moss-green pointed hat, a rounded grey and white body, red arms, and large red feet. Its most memorable detail is the small hanging lantern, which appears to use an acorn-shaped top and a warm light below.
A miniature gnome like this is useful for leftover yarn because each colour needs only a small amount. It could sit on a shelf, hang from a branch display, or become part of an autumn arrangement. The soft uneven fibres add to its woodland character, so there is no need to make every stitch look completely uniform.
I know the lantern may look like a tiny detail, but it needs careful planning. Any light should be a cool, low-voltage battery light designed for crafts, and the battery section must remain accessible.
Materials and Tools
· Small quantities of green, grey, white, and red yarn
· Knitting needles or a crochet hook suited to the yarn
· Soft filling
· Beige fabric, felt, or a small wooden bead for the nose
· Strong sewing thread
· An acorn cap or lightweight imitation acorn
· Small translucent bead or craft lantern piece
· Optional cool-running battery micro-light
· Yarn needle and small scissors
Create the Small Knitted Figure
1. Make the body and feet. Knit or crochet a compact rounded body, adding a little filling as you close it. Form two red feet separately and attach them near the base, keeping them broad enough to support the figure.
2. Add the beard, arms, and nose. Use fluffy grey or white yarn for the beard, stitching short lengths into the front and brushing them gently if the fibre allows. Add red arms at the sides and place the nose just above the beard.
3. Work the pointed green hat. Knit or crochet a tapered tube that narrows gradually toward the top. Fold or roll the lower edge slightly, place the hat low over the nose, and knot or bend the tip for the relaxed woodland shape.
4. Make the acorn lantern. Join a clean, dry acorn cap to a small translucent bead or lightweight lantern shape. Add a thread or thin cord handle, then attach the lantern to one hand without pulling the arm away from the body.
5. Add light only when it can be used safely. A tiny craft light can sit inside or behind the translucent section, but it should not produce noticeable heat. Keep the battery pack outside the gnome’s stuffing and turn the light off when the ornament is unattended.
You can leave the lantern unlit and use a gold bead instead. Another simple option is to give the gnome a small felt mushroom, pine cone, or bundle of twigs.
Turn Soft Pastel Socks into Two Small Gnomes
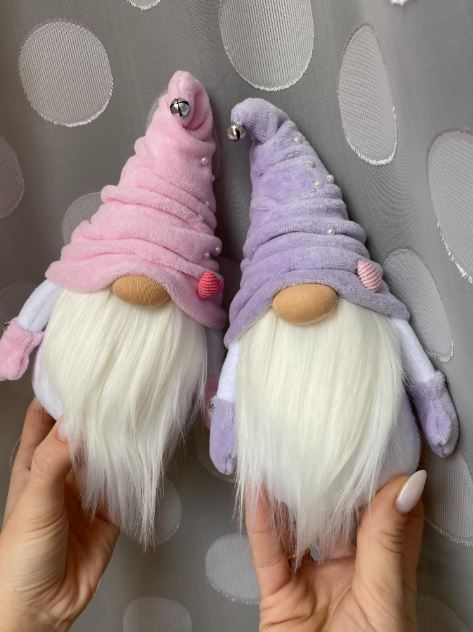
These hand-sized gnomes use soft pink and lilac materials, long white beards, small rounded noses, and narrow hanging arms. The hats have several relaxed folds rather than one smooth cone, which makes old socks or stretch fleece especially suitable.
Small bells sit near the hat tips, and tiny bead-like details decorate the folds. The gnomes also have small striped pieces near their sides, which could be decorative hands, cuffs, or wrapped fabric accents.
Because the beard covers most of each body, you don’t need complicated clothing underneath. That makes this one of the easier ways to make Scandinavian gnomes from reused textiles.
Materials and Tools
· One pink and one lilac soft sock, sleeve, or stretch fabric piece
· White faux fur
· White or matching fabric for the bodies and arms
· Beige stretch fabric or wooden forms for the noses
· Filling and small weighted pouches
· Two lightweight bells
· Small beads or imitation pearls
· Striped fabric scraps or cord for hand details
· Needle, thread, scissors, and fabric glue
Make the Pastel Pair
1. Build two compact bodies. Fill the lower part of each fabric body with a sealed weighted pouch, then add soft stuffing. Keep both bodies similar in size, but don’t worry about making them exact copies.
2. Cut and position the beards. Shape two long faux-fur beards that taper slightly toward the bottom. Attach them high on the front so the body fabric almost disappears beneath the fur.
3. Add the noses and arms. Make two firm rounded noses and place each one over the upper beard edge. Sew narrow stuffed arms to the sides, then add small striped or matching hand details near the ends.
4. Shape the folded hats. Slide a sock or sewn stretch-fabric tube over each body and gather the upper section into soft folds. Secure a few folds with hidden stitches so they do not drop over the nose or unravel when the gnome is moved.
5. Attach the final decorations. Add a bell near each tip and place a few lightweight beads along the hat folds. Use fewer beads than you think you need, then stop and check the overall balance before adding more.
The part I would keep simple is the colour palette. Pastel fabric, a white beard, and one small bell already create enough contrast. Extra bows, flowers, and several types of beads could make a small figure feel crowded.
Create a Woodland Gnome with a Naturally Decorated Hat
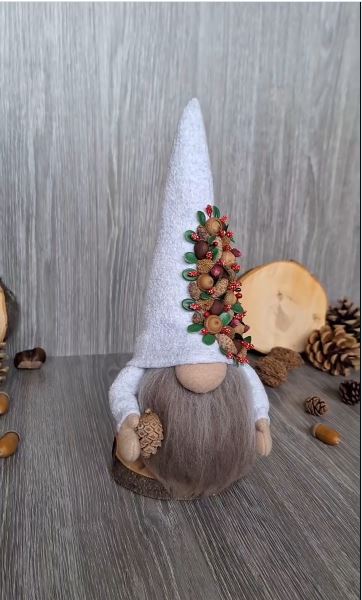
This woodland gnome combines a tall white hat with a rounded grey body, a soft grey beard, and simple pale arms. A vertical arrangement of acorns, seeds, green leaves, and small red details runs up one side of the hat.
The decoration works because it follows the hat’s tall shape rather than covering the whole surface. Larger natural pieces sit near the centre, while smaller elements fill the gaps and soften the outer edges. The gnome also holds a small acorn-like object, which connects the body to the hat decoration.
Natural materials need a little preparation before they come indoors. Use only clean, completely dry pieces, and inspect acorns or seed pods for damage. Artificial berries or painted wooden beads are often more reliable than fresh plant material.
Materials and Tools
· White felt or firm fleece for the hat
· Grey faux fur, wool fabric, or fluffy yarn for the beard and body
· Beige fabric for the nose
· White fabric for the arms
· Filling and a weighted base
· Clean, thoroughly dried acorns and seed pods
· Small artificial leaves and berries
· Wooden beads, buttons, or painted seeds
· Strong fabric glue or hand-sewing thread
· Tweezers for arranging small pieces
Decorate the Woodland Gnome
1. Make the rounded body and beard. Sew a firm rounded base that can stand on its own, then attach the grey beard across the front. Add the nose above the beard and place two simple pale arms at the sides.
2. Construct the tall white hat. Cut a long narrow triangle or cone shape from white felt and join the side seam. Test it on the body before closing the top, making sure the lower edge covers the forehead without hiding the entire nose.
3. Sort the natural decorations. Arrange the acorns, seeds, leaves, and berry-coloured pieces on the table from largest to smallest. Discard anything cracked, damp, loose, or likely to crumble.
4. Build the design from the centre outward. Place the largest pieces in a loose vertical line, then use smaller seeds, leaves, and beads to connect them. I’d rather leave a little white felt showing than force decorations into every empty space.
5. Attach and finish the details. Secure each piece carefully, supporting heavier acorns with thread when glue alone feels unreliable. Add a small acorn to one hand, check that the hat still sits straight, and remove any loose fibres or glue strings.
For a fully reusable version, replace natural pieces with wooden beads, felt leaves, and fabric berries. You could also sew the decorations onto a separate strip of felt and pin that strip to the hat, making it easier to change the design later.
Common Mistakes to Avoid
Making the Body Too Light
A tall hat, long beard, or cluster of acorns can pull a gnome forward. Place a sealed weighted pouch in the lowest part of the body before adding soft filling, then test the balance before attaching the hat decorations.
Cutting Faux Fur Like Ordinary Fabric
Cutting straight through both the backing and hair leaves a blunt beard. Turn the fur over and cut only the backing with the tips of the scissors, then gently separate the fibres.
Fixing the Hat Before Adding the Nose
The hat, nose, and beard overlap each other. Attach the beard first, position the nose second, and then test the hat before making the final stitches.
Adding Too Many Decorations
Flowers, buttons, bells, beads, and natural materials can quickly compete with one another. Choose one main decorative feature and allow the simple gnome shape to remain visible.
Using Fresh Natural Materials
Fresh leaves, berries, acorns, or seed pods may shrink, stain fabric, attract pests, or develop mould. Use only clean and completely dry materials, or replace them with artificial alternatives.
Making the Nose Too Soft
A loosely filled nose can flatten under the hat. Pack it firmly enough to hold its round shape and secure it through the body fabric rather than relying only on the beard fibres.
Attaching Heavy Details to Stretch Fabric
A bell or acorn can pull a soft hat out of shape. Reinforce the inside with a small felt patch, use lightweight decorations, and add a few stitches even when glue is also used.
Treating Decorative Gnomes as Toys
Long fibres, bells, beads, weighted filling, and small buttons may create hazards for children and pets. Display the finished pieces where they cannot be pulled apart or chewed.
Frequently Asked Questions
What can I use to fill a Scandinavian gnome?
Soft toy filling works well for the upper body. Add a small tied pouch of dried rice, clean gravel, or weighted craft filling at the bottom when the gnome needs to stand, but keep the filling completely enclosed.
Can I make a gnome without sewing?
Yes. A sock body can be tied securely, while fabric glue can attach the beard, nose, and hat. Hand stitching usually gives stronger results, especially around heavy decorations, but a simple no-sew gnome is possible.
What is the best material for a gnome beard?
Faux fur is the most familiar choice, although thick yarn, brushed yarn, wool roving, or a reused fluffy fabric can also work. Choose a material that hangs naturally and does not shed heavily.
How do I make the gnome’s hat stand up?
Use felt, fleece backed with interfacing, or a fabric cone fitted over a lightweight card or felt support. For a soft bent hat, add a little filling and secure the curve with hidden stitches.
Can I use a wooden bead for the nose?
A wooden bead can work, particularly on small knitted or sock gnomes. Attach it with strong thread through its hole when possible rather than depending entirely on glue.
How can I clean a fabric gnome?
Remove loose dust with a soft brush or low-suction vacuum attachment. Spot-clean only when the fabrics and decorations allow it, and avoid soaking a gnome that contains weighted filling, cardboard, bells, natural materials, or glued pieces.
Are these gnomes only suitable for Christmas?
No. Red hats and miniature trees suit Christmas, but lavender flowers, grey fabrics, woodland colours, and natural materials can be displayed in other seasons. Changing the hat decoration is usually enough to alter the mood.
Let Small Leftovers Shape the Gnome
Learning how to make easy Scandinavian gnomes is less about following one exact pattern and more about recognising which materials already work together. A ribbed sleeve may become a curled hat, cream yarn can form two braids, and a handful of dried acorns can decorate a plain felt cone.
Begin with one body shape and one main feature. That might be a long beard, a floral lavender hat, a tiny woodland lantern, or a pair of matching grey figures. Then give yourself time to move the details around before attaching them. I know it can feel tempting to glue everything immediately, but a few minutes of arranging usually prevents a crowded hat or an unbalanced body.
Which would you make first: the soft grey pair, the red clay Christmas gnome, or the woodland figure with the acorn-covered hat?