A real Christmas tree still has useful material left after the decorations come down. The branches may look tired beside the stand, but many of them remain green, flexible, and suitable for simple home projects. Even the shorter clippings can become part of a wreath, table arrangement, mantel garland, outdoor planter, or a small display in an old glass jar.
I prefer to separate a tree into useful parts before deciding what should be discarded. You do not need a perfectly fresh tree or a cupboard full of specialist supplies. What matters is choosing branches that still feel firm, trimming away dry or damaged sections, and matching each piece to a project that suits its shape.
I know it can feel easier to carry the whole tree outside and forget about it, especially after a busy holiday season. Still, a little sorting can give the best branches another useful stage. Then the remaining trunk and unusable greenery can be handled according to the tree-recycling options available in your area.
Prepare the Tree Before Reusing It
Move the tree to a protected work area before cutting anything. A garage, covered porch, utility space, or a floor protected with an old sheet will catch most of the loose needles. Wear gloves because dried needles and small branch ends can scratch your hands, and use pruning shears that feel comfortable and secure.
Remove every hook, wire, ornament, light, ribbon, and piece of tinsel before trimming the branches. Check the tree carefully from several angles; small metal hooks are easy to miss when they sit close to the trunk. Do not reuse branches that smell mouldy, feel slimy, show heavy discoloration, or crumble as soon as they are touched.
Sort the usable greenery by length. Keep long flexible branches for wreaths and garlands, medium branches for planters and table arrangements, and short neat tips for jars or small gaps. This simple sorting step saves time later because you can see what the tree can realistically provide before choosing the final layout.
Basic Tools and Materials
· Gloves and sturdy pruning shears
· Old sheet, drop cloth, or large cardboard sheet
· Natural twine, floral wire, or reusable garden ties
· Wire cutters when floral wire is used
· Pinecones, ribbon, jars, trays, or planters already available at home
· Battery-operated lights for greenery placed near fabric or dry surfaces
· A brush and dustpan for loose needles
Turn Christmas Tree Branches Into a Simple Door Wreath

A wreath makes good use of the longer branches because their natural curve helps build a circular shape. The slightly uneven needles are part of the appeal here; the finished wreath does not need the dense, identical look of a shop-bought version. A few pinecones and one simple bow are enough to give the greenery a clear finish without hiding the reused material.
This project works best with branches that still bend without snapping. If the tree has dried considerably, use shorter pieces attached to a firm ring rather than trying to bend one long branch into a circle. I don’t think every gap needs to disappear. A little variation makes the wreath look natural and keeps the project manageable for a beginner.
Materials and Tools
· Long and medium Christmas tree branches
· A reused wire wreath ring, grapevine ring, or a circle made from strong flexible twigs
· Floral wire, natural twine, or reusable garden ties
· Pruning shears and wire cutters
· Several dry pinecones
· A strip of leftover ribbon, linen, or fabric for the bow
· A strong hanging loop
How to Build the Evergreen Wreath
1. Prepare the branches and base. Trim away dry brown tips, damaged twigs, and very thick ends that will not sit against the wreath form. Group the branches into small bundles with the cut ends pointing in the same direction. Place the wreath base flat on a protected table so you can rotate it as you work.
2. Attach the first layer. Position one bundle along the curve of the base and secure the lower stems firmly with wire or twine. Add the next bundle so its needles cover the previous fastening point. Continue in the same direction, keeping the outer edge full while leaving the centre opening visible.
3. Balance the shape before adding decoration. Lift the wreath and look at it from the front rather than judging it only while it lies flat. Tuck shorter branch tips into thin areas and remove any stem that sticks awkwardly across the centre. Then reinforce loose sections with extra ties hidden beneath the needles.
4. Add pinecones and a bow. Fasten each pinecone with wire around its base, then twist the wire onto the wreath ring instead of gluing it directly to loose needles. Place the bow near the top or slightly to one side. I’d keep the decoration limited so the texture of the evergreen remains the main feature.
5. Create a secure hanging point. Tie a strong loop around the ring, test the wreath close to the floor, and check that the weight does not pull the greenery out of shape. Hang it away from open flames, heaters, and strong indoor heat. Remove brittle pieces as the wreath dries rather than letting them collect around the door.
Variation: A simpler version uses a small twig ring with only three or four branch bundles attached across the lower half. This half-wreath style needs less greenery, weighs less, and works well on an interior door or a small wall hook.
Make a Rustic Evergreen Table Centrepiece
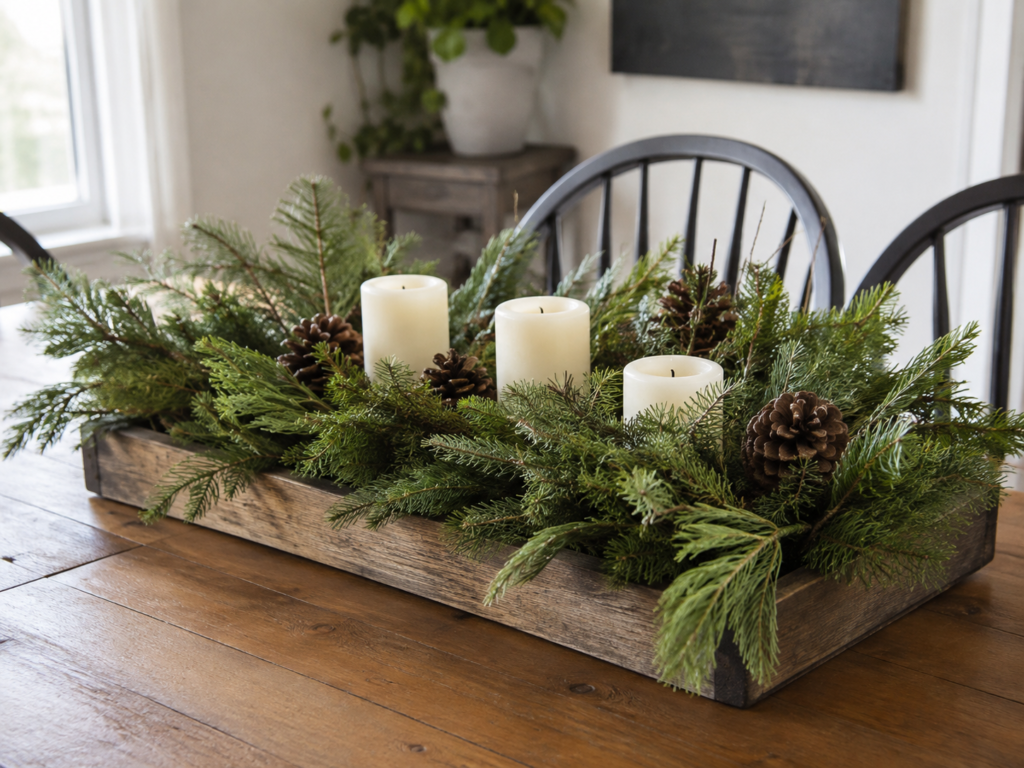
A shallow tray gives loose branches a boundary, which makes this arrangement easier than building a formal centrepiece. Medium clippings can overlap naturally along the length of the tray, while pinecones break up the green surface. The low shape also keeps the arrangement practical on a dining table because it does not block the view as much as tall branches would.
The candles in this style should be treated carefully. Dried evergreen is flammable, so battery-operated candles are the safest option when the greenery sits close to them. If real candles are used elsewhere, keep them completely separate from the branches and never leave them unattended. For me, the safest version is also the easiest because there is no wax or heat to manage.
Materials and Tools
· Medium and short evergreen branches
· A shallow wooden tray, old drawer, baking tin, or sturdy box lid
· Small jars, candle sleeves, or blocks to support decorative candles
· Battery-operated pillar candles
· Pinecones or short bare twigs
· Pruning shears
· Optional reusable floral wire or twine
How to Arrange the Table Centrepiece
1. Choose a stable container. Place the empty tray in the centre of the table and check that it sits flat without rocking. If the surface could scratch, add felt pads underneath. Arrange any candle supports first because they should remain stable and visible before the greenery fills the tray.
2. Create the lowest greenery layer. Lay the longest branches along both ends of the tray so the tips extend outward without falling into plates or walkways. Add medium pieces across the centre, keeping their cut ends hidden beneath neighbouring branches. The tray should look full but still be easy to lift.
3. Build around the candle positions. Place shorter branch tips around the candle bases without pressing needles against the sides. Keep clear space around every light source, even when using battery candles, so the arrangement does not look crowded. Then turn the tray and check both long sides because a dining centrepiece is viewed from more than one direction.
4. Add pinecones and correct the balance. Nestle the largest pinecones near the centre and use smaller ones toward the ends. Avoid placing every decoration in a straight row; a slight stagger looks more relaxed. I know it can feel tempting to fill every small opening, but the darker gaps help individual branches remain visible.
5. Finish and maintain the display. Remove loose needles, test that nothing rolls when the tray moves, and keep the arrangement away from radiators or fireplaces. Replace any branch that becomes brittle or drops heavily. When the display is finished, separate the reusable tray, candles, wire, and pinecones from the dried greenery.
Variation: For a smaller table, use one old loaf tin or a narrow box lid with a single battery candle and a handful of short branches. The reduced version keeps the same idea without taking over the eating space.
Create a Mantel Garland From Flexible Branches

A mantel garland suits branches that are long enough to overlap but not flexible enough for a tight wreath. Instead of forcing the stems into one continuous rope, you can build the garland in sections and let the needles hide the joining points. The finished shape can remain loose and slightly asymmetrical, especially when a few tips hang naturally over the front edge.
Before placing greenery on a mantel, check what sits below and around it. Keep dry branches away from an operating fireplace, stove, candle flame, hot light, or heater. A decorative shelf away from heat is a better location when the greenery has already started drying. Use only cool battery-operated lights and inspect their cable before weaving it through the branches.
Materials and Tools
· Long and medium Christmas tree branches
· Natural twine, reusable ties, or floral wire
· Pruning shears and wire cutters
· Pinecones
· Cool battery-operated string lights
· Removable hooks or existing mantel fixing points
· A protective cloth for the shelf surface
How to Assemble the Garland
1. Measure and plan the direction. Measure the mantel or shelf, then lay the branches on the floor in roughly the same length. Decide whether the garland will run straight across or fall slightly at each end. Put the fullest branches near the centre and save thinner tips for covering joins.
2. Make several manageable sections. Overlap two or three branches with their cut ends together and tie them securely. Build short sections rather than one very long garland, especially if you are working alone. The sections are easier to lift, adjust, and remove without scattering needles across the room.
3. Place and join the greenery. Set the first section on the shelf and secure it to an existing fixing point or a suitable removable hook. Add the next section with its leafy end covering the previous stems, then tie the sections together. Avoid relying on loose branches alone, because one small pull can bring the entire arrangement forward.
4. Weave in lights and pinecones. Test the lights before adding them, then run the cable loosely through the upper greenery where it remains visible enough to inspect. Attach pinecones with short wire loops instead of pushing them into unstable gaps. Then step back and remove any hanging branch that sits too close to the floor, fabric, or fireplace opening.
5. Check the garland regularly. Feel near the lights and shelf to confirm that nothing becomes warm, and switch the lights off when the room is unattended. Remove sections that become extremely dry or brittle. The greenery will change as it dries, so a quick adjustment every few days keeps the garland neat and safer.
Variation: A rental-friendly version can sit inside a long wooden tray on a console table instead of being attached to a wall or mantel. The tray holds the branches in place and lets you move the whole display without using hooks.
Fill an Outdoor Planter With Tree Clippings

An outdoor planter can use the thicker, less flexible branches that would be awkward in a wreath. The pot supports the stems, while a mixture of upright and outward-facing clippings creates a full shape. Pinecones and a small amount of red detail give the arrangement contrast, but the greenery itself should provide most of the volume.
Use a heavy, stable container that can cope with local weather. A tall lightweight pot may tip when broad branches catch the wind, so add weight at the base or place a smaller weighted container inside it. I’d rather build a slightly lower arrangement than create one that looks impressive for a day and then falls across the porch.
Materials and Tools
· Thick, medium, and fine evergreen branches
· A sturdy outdoor planter or reused bucket placed inside a decorative pot
· Soil, gravel, sand, or another stable filler
· Pruning shears and gloves
· Pinecones
· Optional berry stems suitable for outdoor display
· Twine or reusable garden ties
How to Build the Porch Planter
1. Stabilise the pot. Check for cracks and make sure the container cannot easily tip. Add gravel, soil, or another suitable filler, leaving enough depth to hold the stems firmly. If drainage matters for the container, keep the drainage holes open rather than sealing the base completely.
2. Insert the tallest branches first. Trim thick stems at an angle and push them into the centre or rear of the pot. Use three to five strong branches to establish the height, turning the pot as you work. Keep the tallest pieces below any door handle, porch light, or walkway where they could catch clothing.
3. Add the broad middle layer. Place medium branches around the central stems with their tips pointing outward. Alternate the direction and type of greenery so the arrangement does not form a rigid circle. Then use softer, shorter tips near the front edge to hide the filler and the cut ends.
4. Add restrained decoration. Tuck pinecones between strong branches or attach them with wire so wind cannot lift them out. Add a few berry stems in separated groups rather than distributing them evenly everywhere. The red details should lead the eye through the planter, not cover the shape of the evergreen.
5. Test the finished arrangement outdoors. Shake the pot gently and remove any loose branch that moves too easily. Position it where it will not narrow the entrance or create a trip hazard. After strong wind or heavy weather, check the pot again and collect any fallen wire, berries, or cones before pets or children find them.
Variation: A smaller version works in an old metal bucket or weatherproof basket. Use fewer upright stems and keep the branches short, then place the container on a sheltered step where wind is less likely to disturb it.
Display Short Evergreen Tips in Reused Glass Jars
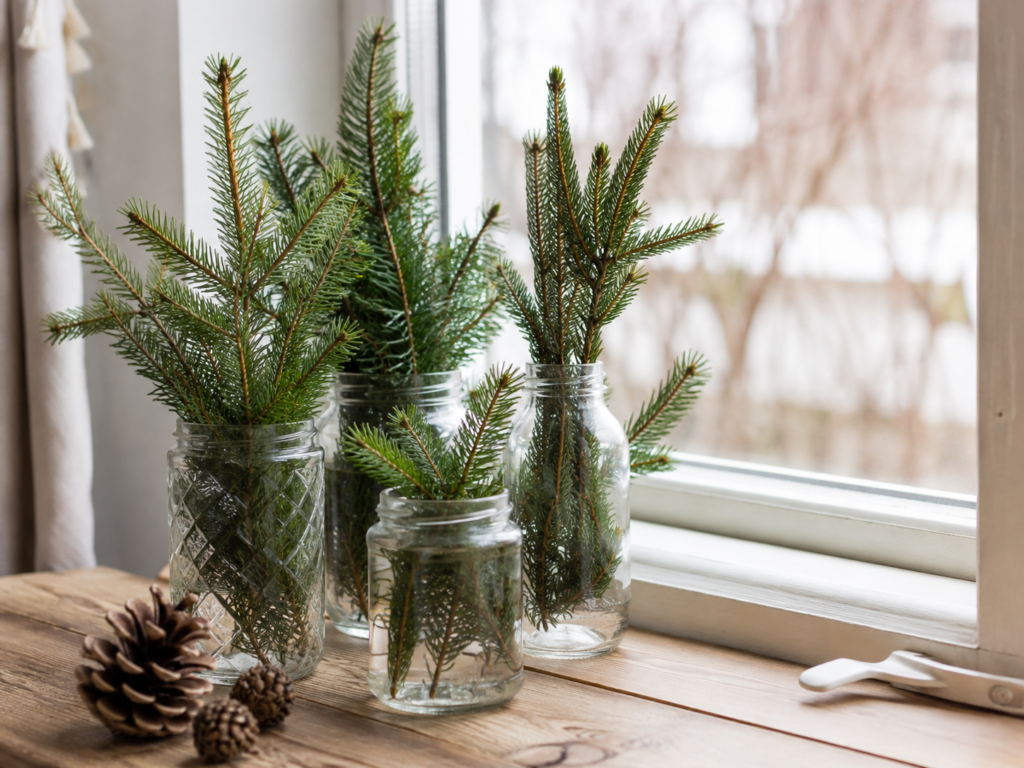
The smallest branch tips often look too neat to throw away, and jars give them an immediate use without complicated construction. Different jar heights help the cuttings form a loose group, while the clear glass keeps the display light. This is also a practical choice when the tree does not provide enough flexible greenery for a large project.
Choose sturdy containers with no cracks or chipped rims. Remove old labels and wash the jars thoroughly before use. If water is added, protect the surface below and change it when it becomes cloudy. Keep the arrangement away from direct heat and place it where falling needles can be cleaned easily.
Materials and Tools
· Short healthy evergreen tips
· Reused glass jars or bottles in several heights
· Warm water and dish soap for cleaning
· Pruning shears
· A tray or waterproof mat
· Optional pinecones, twine, or plain paper labels
How to Arrange the Jar Display
1. Clean and inspect the containers. Soak off labels, remove adhesive residue, and check every rim with your fingers protected by a cloth. Do not use a chipped jar for this project. Group the safe containers on a tray before adding branches so you can test their combined width.
2. Prepare the cuttings. Remove needles from the lower part of each stem so they do not sit below the rim or in water. Trim the stems to different heights, keeping a few tall upright pieces and several shorter side branches. This creates variation without needing extra decoration.
3. Fill the jars gradually. Add only a small number of branches to each container and turn the stems until the needles spread naturally. Use the tallest jar toward the back and lower jars near the front. Then move the containers closer together so they read as one display rather than unrelated single jars.
4. Add simple finishing details. Place one or two pinecones beside the jars, or tie a narrow piece of twine around a plain container. Avoid heavy decorations that could make a jar unstable. I don’t think each jar needs matching ribbon; the repeated green branches already connect the group.
5. Choose a safe display location. Put the jars on a stable tray away from the edge of the sill, children, pets, candles, and electrical equipment. Wipe any water immediately and remove branches when they become brittle. The jars can then return to storage or another household use.
Variation: For a single small arrangement, place three branch tips in one wide jar and add a plain paper tag. This version is quick, uses very little greenery, and suits a desk, bedside table, or kitchen shelf away from heat.
Common Mistakes to Avoid
Leaving hooks or wire inside the tree. Hidden ornament hooks can injure hands, damage pruning shears, or end up inside a finished arrangement. Inspect the tree carefully and remove every decoration before cutting branches.
Using mouldy or badly deteriorated greenery. Unpleasant smells, slimy patches, or crumbling stems are signs that a branch is not suitable for indoor reuse. Choose only firm, clean sections and discard questionable material instead of trying to hide it inside a project.
Building before sorting the branches. Long flexible pieces and short stiff tips behave differently. Sorting by size first prevents you from cutting useful wreath branches into pieces that are too short and helps each project feel intentional.
Placing dry greenery near flames or heat. Evergreen branches become increasingly dry after the tree is cut. Keep them away from fireplaces, candles, heaters, hot bulbs, and cooking areas, and favour cool battery-operated lights.
Making the decoration too heavy. Too many pinecones, thick branches, or ornaments can pull a wreath out of shape and make a garland or planter unstable. Add decoration gradually and test the project before hanging or moving it.
Ignoring falling needles. Needle drop is normal as branches dry, but it can make floors slippery and displays messy. Place projects where they are easy to inspect, sweep regularly, and remove brittle greenery before it becomes a nuisance.
Forgetting the final disposal stage. Wire, ribbon, jars, pots, lights, and trays should be separated from natural greenery when the project is finished. Keeping reusable and non-natural materials apart makes the final clean-up much easier.
Frequently Asked Questions
Can I repurpose a Christmas tree that has become dry?
You may still be able to use some firm branches, especially for an outdoor planter, but avoid pieces that crumble, smell unpleasant, or break with very little pressure. Dry greenery needs greater distance from heat, flames, and electrical equipment.
Do I need to wash Christmas tree branches before using them indoors?
Usually a careful shake and visual inspection are more practical than soaking the branches. Remove dust, loose needles, insects, old hooks, and damaged sections. Allow damp outdoor branches to dry before placing them on furniture.
How can I reduce needle mess while working?
Move the tree onto an old sheet or large piece of cardboard before cutting. Trim and sort the branches in one area, then fold the sheet inward and carry the loose needles outside or dispose of them according to local guidance.
Can I use real candles with evergreen centrepieces?
The safer choice is a battery-operated candle because cut greenery dries and can burn. Keep real flames completely separate from branches, pinecones, ribbon, and other flammable decorations, and never leave a candle unattended.
How long will repurposed evergreen decorations stay fresh?
The appearance varies with the tree, room temperature, branch condition, and location, so there is no single reliable time. Inspect the greenery regularly and remove it when the needles become very brittle, discoloured, or heavily shed.
Can children help with these projects?
Children can help sort safe branches, choose pinecones, and arrange jars under supervision. Adults should handle pruning shears, wire cutters, sharp branch ends, glass inspection, and any hanging or electrical elements.
What can I do with the trunk after removing the branches?
The options depend on local collection and recycling services. Keep all hooks, wire, lights, and decorations off the trunk, then follow the disposal or tree-recycling method available where you live rather than assuming the same method applies everywhere.
Use the Tree One More Time Before Letting It Go
Learning how to repurpose Christmas tree material starts with seeing the tree as separate useful parts rather than one large object ready for disposal. Long branches can curve around a wreath or run across a shelf, strong stems can support an outdoor planter, and the smallest green tips can sit quietly in reused jars.
Begin with the project that matches the condition of your tree and the materials already at home. A jar display takes only a few healthy clippings, while a wreath or garland needs more flexible branches and stronger fastening. Then keep safety and clean-up in mind as the greenery dries.
The part I like most is that none of these ideas requires every branch to look identical. A slightly uneven wreath, a loose table arrangement, or a mixed group of jars can still feel considered and useful. Which part of your Christmas tree would you be most likely to reuse first?