Empty milk tins often remain useful long after the powder inside has gone. Their metal sides are firm, the plastic lids usually fit securely, and the generous size makes them more practical than many ordinary food cans.
The printed packaging may look too busy for a shelf or worktop, but that is only the outer layer. Paint, paper, fabric, wood, or simple labels can give the container a completely different purpose without hiding its useful shape.
I don’t think every milk tin needs an elaborate makeover. Sometimes a clean wrap and a handwritten label are enough. A stronger tin can support a planter, storage box, lamp, garden light, or small decorative display.
Before choosing a project, check the metal carefully. A clean tin with a firm base and smooth rim gives you many options. Rust, loose seams, and sharp edges need more caution.
Once you know the container is safe to handle, it becomes much easier to decide whether it belongs on a desk, in the garden, or beside your favourite chair.
Prepare the Milk Tin Before Reusing It
Remove any remaining powder and wash the tin according to its construction. Some milk tins have metal bodies but moisture-sensitive seams or inner layers, so avoid leaving them submerged in water. Wipe them clean, rinse carefully, and dry every part before replacing the lid.
Peel away the original label when possible. Warm water may loosen paper, while a small amount of cooking oil can soften stubborn adhesive. Wash away oily residue afterwards because paint, glue, and self-adhesive paper may not stick to a greasy surface.
Check these areas closely:
· The upper rim
· The inside coating
· The base seam
· Dented sections
· Rust spots
· Loose pieces of metal
· The plastic lid
· Any holes or punctures
· Remaining food residue
· Sharp edges left by opening
Do not continue with a tin that has severe rust, a splitting seam, or an unstable base. Wear eye protection and sturdy gloves when drilling, cutting, or filing metal. Secure the tin before working so it cannot roll across the table.
For kitchen storage, I would keep dry food inside its original packet rather than placing it directly against paint, glue, fabric, or an unknown inner coating. Craft supplies, wrapped snacks, tea sachets, tools, and household items are easier choices.
Turn a Milk Tin Into a Raised Flower Planter
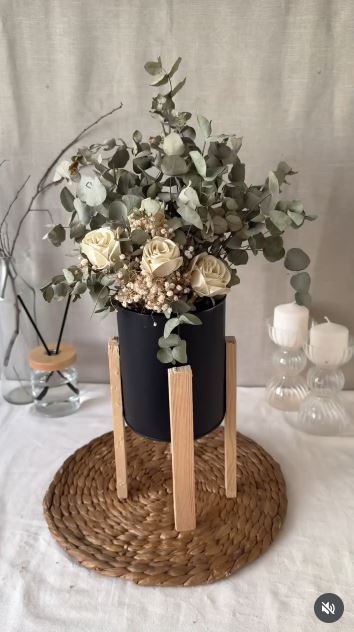
A tall milk tin already has the right proportions for a compact planter. Adding slim wooden supports changes the outline and prevents the finished piece from looking like an ordinary container placed on a shelf.
The inspiration uses an empty formula tin, a painted exterior, wooden leg pieces, and flowers. The visible construction relies on the strength of the tin body and securely attached wooden supports.
This project works particularly well with artificial flowers or a plant kept inside a separate nursery pot. Direct planting requires drainage, moisture protection, and a stable base, so using an inner pot is usually the simpler option.
Materials and Tools
· Clean milk tin
· Metal-suitable primer
· Acrylic paint or spray paint
· Three or four equal wooden strips
· Sandpaper
· Strong construction adhesive
· Measuring tape
· Pencil
· Masking tape
· Inner plant pot or artificial flowers
· Clear protective finish, if suitable
· Gloves and eye protection
Make the Raised Planter
1. Prepare the tin and wooden supports. Remove the label, clean away adhesive, and dry the surface completely. Sand the wooden pieces until the edges feel smooth, then place them beside one another to confirm that their lengths and thicknesses look consistent.
2. Plan the leg positions. Stand the tin upright and mark equally spaced attachment points around its lower half. Use masking tape as a temporary guide so the supports remain at the same height rather than drifting upward or downward as you work.
3. Paint the separate parts. Apply primer when the paint requires it, then cover the tin and wooden pieces with thin coats. Let each layer settle properly before handling. I know it can feel tempting to attach everything immediately, but wet paint and strong adhesive are not especially good friends.
4. Attach the supports securely. Apply adhesive to the flat side of each wooden piece and press it against the marked position. Keep the tin upright while the bond sets, then check that every support reaches the work surface evenly and does not make the container wobble.
5. Add the plant or flowers. Place a lightweight inner pot inside the tin, then arrange the plant so its weight remains centred. If you are using artificial stems, add a removable inner block or small jar rather than gluing the arrangement permanently into the container.
The part I would check most carefully is the balance. Decorative legs may look even from the front while one sits slightly higher at the back. Test the empty planter on a level surface before adding anything heavy.
A beginner can leave the tin flat on its base and glue narrow wooden strips around the outside as decoration. Rope, craft sticks, or reclaimed timber offcuts can create a similar natural finish without raising the planter.
Turn One Large Tin Into Two Small Storage Boxes
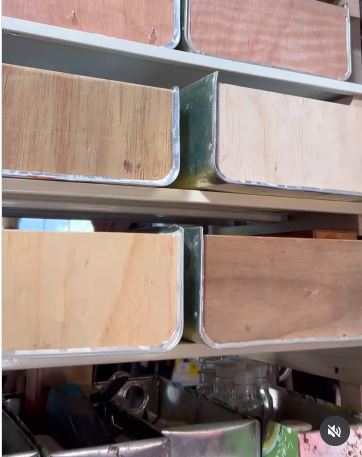
A large milk tin can provide more than one container when its metal remains firm enough to cut and reshape. The project inspiration divides a sizeable metal tin, smooths the cut sections, and adds fitted wooden pieces to create separate storage boxes.
This is one of the more advanced ideas because the cut metal must be made completely safe. It can work for sewing supplies, small tools, stationery, seed packets, or wrapped household items. It is not a project I would use for children’s storage unless every edge has been professionally folded, covered, and checked.
Materials and Tools
· Large, sturdy milk tin
· Permanent marker
· Measuring tape
· Metal-cutting tool suited to the container
· Metal file
· Pliers
· Heavy work gloves
· Eye protection
· Cardboard for templates
· Reclaimed wood or thick plywood
· Jigsaw or suitable wood-cutting tool
· Sandpaper
· Strong adhesive or small fasteners
· Optional felt lining
· Paint, paper, or labels
Build the Storage Boxes
1. Mark the dividing line. Measure the tin and decide where each storage section should end. Draw a clear line around the body, then check it from several angles. An uneven cut will make the wooden insert harder to fit and may leave one section too shallow to use.
2. Cut and smooth the metal. Secure the empty tin before cutting and wear proper hand and eye protection. Work slowly with a suitable tool, then file every cut edge. Fold or cover the rim where possible rather than relying on light sanding alone.
3. Make the end templates. Place each open end against cardboard and trace its exact shape. Cut the templates, test the fit, and adjust them before transferring the shape to wood. Then cut and sand the wooden pieces until they sit firmly without forcing the metal outward.
4. Attach the wooden ends. Fix each insert with a method suited to the tin and the intended contents. Apply adhesive evenly or use suitable fasteners, then check the inside for protruding points, rough joins, or gaps where small objects could become trapped.
5. Finish the containers. Add felt or fabric lining when the boxes will hold delicate items. Paint the outside, cover it with paper, or keep part of the original metal visible. Attach simple labels only after deciding where each container will sit.
I’d rather make one safe, well-finished container than rush to create two. If the metal feels difficult to control, keep the milk tin whole and make a single wooden lid instead. You still gain useful storage without producing a long cut edge.
A no-cut variation is much easier. Cover the full tin, add a fitted lid, and divide the inside with removable cardboard sections for pens, brushes, sewing tools, or charging cables.
Make a Rechargeable Table Lamp With Hidden Storage
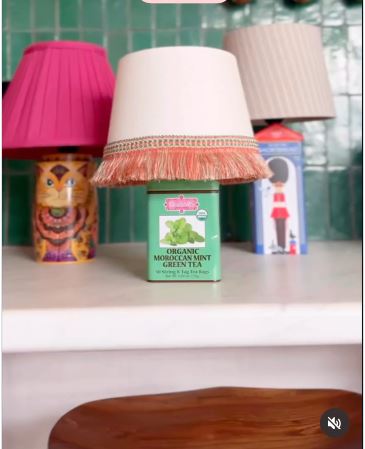
A decorative tin makes a useful lamp base because it is hollow, lightweight, and easy to move. The inspiration combines a metal tea tin with a lamp fitting and a rechargeable bulb, allowing the container beneath the light to remain useful for storage.
A milk tin can be adapted in the same way, especially when its plastic lid still fits well. The safest beginner version uses a rechargeable bulb and a ready-made lamp socket rather than mains wiring. The tin can then hold remote controls, charging cables, reading glasses, or other lightweight items.
Materials and Tools
· Clean milk tin with lid
· Rechargeable bulb
· Compatible ready-made bulb holder
· Lightweight lampshade
· Marker
· Measuring tape
· Drill with a suitable bit
· Small metal file
· Rubber grommet or protective ring
· Strong adhesive, if required
· Decorative paper or paint
· Eye protection
· Work gloves
Assemble the Tin Lamp
1. Plan the fitting position. Find the centre of the lid and mark the opening required by the ready-made bulb holder. Check the fitting instructions before cutting because the hole should support the holder without allowing it to move from side to side.
2. Create and protect the opening. Secure the lid on a stable surface, wear eye protection, and drill carefully. Smooth the opening completely, then add a rubber grommet or another suitable protective edge so the fitting does not rest against sharp metal or rough plastic.
3. Decorate the tin. Paint or cover the body while keeping the rim and lid connection clear. Avoid building up thick layers where the lid needs to close. Then allow the surface to dry fully before adding the electrical components.
4. Install the rechargeable light. Attach the ready-made holder according to its instructions and fit the rechargeable bulb. Add a lightweight shade that does not make the narrow tin unstable. Test the light before placing anything inside the storage section.
5. Choose safe contents. Store only lightweight, dry items that will not interfere with the fitting. Keep the rechargeable components accessible for removal and charging, and check that the lamp remains steady when the lid is opened or closed.
One detail I wouldn’t skip is the weight of the shade. A large shade may look attractive but can pull a lightweight milk tin over with one accidental touch. A smaller shade usually creates better proportions and a safer base.
For a no-drill version, place a small rechargeable puck light beneath a lightweight decorative shade supported by a separate frame. You could also use the covered milk tin only as a raised stand for an independent battery lamp.
Build a Milk-Tin Garden Lantern on a Wooden Stake
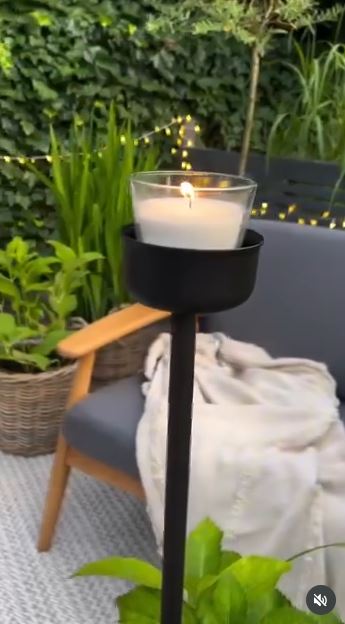
The original idea places a shallow metal can on a wooden rod to form a small garden light. A milk tin can follow the same principle, although its greater height and weight require a stronger connection and a wider light opening.
For a tall milk tin, small punched holes can release light through the sides while the top remains open. An outdoor-rated LED candle is safer and easier to control than a real flame, particularly around dry leaves, fences, children, and pets.
Materials and Tools
· Empty milk tin
· Strong wooden stake
· Outdoor-rated LED candle
· Drill and suitable bits
· Marker
· Hammer and nail, if suitable for making guide holes
· Metal file
· Screw and washer
· Exterior paint
· Clear exterior finish
· Work gloves
· Eye protection
Create the Garden Lantern
1. Plan the light pattern. Mark dots, lines, leaves, stars, or another simple pattern around the tin. Keep enough space between the holes so the metal remains strong. A few clear openings usually produce a cleaner result than dozens of crowded punctures.
2. Make the openings safely. Fill the tin tightly with scrap wood or secure it with clamps so it cannot collapse or roll. Drill the marked holes using suitable protection, then file away every sharp burr inside and outside the container.
3. Prepare the wooden stake. Sand the stake and seal it with an outdoor finish. Decide how high the lantern should sit, remembering that a tall, heavy tin needs more support than a shallow can. The stake should enter the soil deeply enough to remain upright.
4. Join the tin and stake. Use a screw, washer, and secure attachment point rather than depending only on hot glue outdoors. Test the connection by moving the empty lantern gently. Then paint or seal the exposed hardware to help protect it from weather.
5. Add the light. Place an outdoor-rated LED candle or small rechargeable light inside the tin. Position the lantern away from paths where someone could knock it over, and bring it under cover when the materials are not intended for continuous outdoor exposure.
For me, the light source is the part to keep simple. A battery or solar LED gives you the glow without requiring an open flame inside a painted metal container.
A smaller version can sit directly on a table without a stake. Add a wire handle and use it as a portable lantern, but make sure the handle attachment is smooth and strong before carrying it.
Create a Seasonal Miniature Scene Inside a Milk Tin
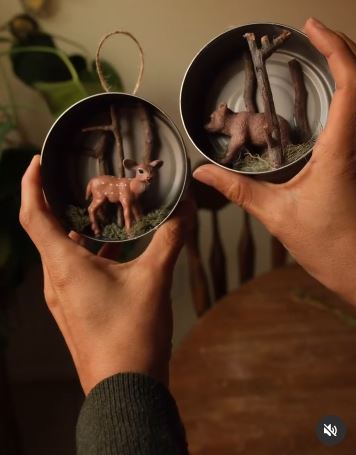
A tin can work like a deep frame when it is placed on its side and filled with layered scenery. The inspiration uses shallow cans to create hanging miniature scenes with paper backgrounds, greenery, small figures, and natural decorative pieces.
A milk tin is deeper, so it can become a larger woodland scene, festive display, memory box, or miniature room. You may keep the full tin and work through its open top while it rests horizontally. Cutting a side window is possible, but it introduces sharp edges and should only be attempted with suitable tools and experience.
Materials and Tools
· Clean milk tin
· Cardboard or thick paper
· Decorative paper
· Small artificial greenery
· Twigs, pinecones, or dried seed heads
· Miniature figures
· Felt or fabric scraps
· Strong craft adhesive
· Scissors
· Ruler
· Pencil
· Paint, if desired
· Ribbon or strong cord
· Optional clear plastic front
Arrange the Miniature Display
1. Choose the viewing direction. Lay the tin on its side and decide which area will become the bottom. Test whether it rolls, then create a small hidden stand from wood, cardboard, or another stable material before adding delicate decorations.
2. Make the background. Trace the inside shape onto paper or thin cardboard and cut a fitted backdrop. Paint it or cover it with a simple pattern, then place it inside the tin without glue to check that the edges do not bend or leave distracting gaps.
3. Build the scene in layers. Attach the background first, then add larger pieces such as trees, furniture shapes, or raised ground. Place small figures near the front only after the main forms feel balanced. This is where patience matters more than buying another packet of decorations.
4. Secure the details. Glue lightweight items gradually and allow each layer to hold before adding the next. Avoid pressing fragile natural materials against the sharp inner rim. Then shake the tin very gently to identify anything that remains loose.
5. Finish the display. Add a ribbon only when the attachment can support the complete weight, or keep the scene on a shelf using a stable stand. A removable clear cover can protect the interior from dust without permanently sealing the project.
I don’t think the entire space needs to be filled. Leaving some visible background around the main figure helps the scene feel deeper and makes the small details easier to notice.
For a simpler version, line the tin with fabric and display one keepsake, photograph, or handwritten message. Children can help arrange paper decorations, but an adult should prepare and inspect the metal container first.
Common Mistakes to Avoid
Decorating Before Removing Grease
Paint and adhesive may lift when powder residue, label glue, or cooking oil remains on the surface. Wash the tin again after removing the label and let it dry completely before applying anything decorative.
Ignoring Sharp Metal Edges
A cut rim can remain dangerous even when it looks smooth. File, fold, cover, or professionally finish every exposed edge. Do not rely on a thin strip of decorative tape as the only protection.
Using Hot Glue for Heavy Outdoor Parts
Hot glue can be useful for light decoration, but it may not provide dependable structural support for legs, stakes, lamp fittings, or outdoor hardware. Choose an attachment method suited to the weight, weather, and movement the project will experience.
Planting Directly Into an Unprotected Tin
Soil and trapped water may affect the container over time. Use a removable inner pot whenever possible. If you add drainage holes, protect the work surface and place a tray beneath the planter.
Making a Lamp Top-Heavy
A wide or heavy lampshade can make a narrow milk tin unstable. Test the proportions before completing the fitting and add discreet weight inside the base only when it cannot interfere with storage or electrical components.
Storing Loose Food Against Decorative Materials
Paint, glue, paper, and fabric may not be suitable for direct food contact. Keep food sealed in packets or use a removable food-safe container inside the decorated tin.
Adding Too Much to a Miniature Scene
Deep tins can hold many decorations, but that does not mean they need all of them. Arrange the main pieces first, then remove anything that hides the focal point or makes the scene difficult to clean.
Forgetting the Lid
A fitted milk-tin lid can become part of the project. It may close a storage box, support a lamp fitting, protect craft supplies, or act as a base behind a decorative scene. Keep it until the project is complete.
Frequently Asked Questions
What is the easiest way to reuse a milk tin?
The simplest option is to clean the tin, cover it with decorative paper, and use it for dry household storage. Pens, craft brushes, wrapped packets, charging cables, and sewing supplies require no structural alteration.
Can I paint directly onto a milk tin?
Paint may adhere better after the surface has been cleaned and lightly prepared. Use a primer when recommended for the paint and metal type. Test a small hidden area before covering the complete container.
Can a milk tin be used as a plant pot?
Yes, but using a removable nursery pot inside the tin is usually easier than planting directly into it. The inner pot allows drainage and prevents wet soil from remaining against the metal.
How can I make a milk-tin project safe for children?
Choose a project that does not require children to handle cut metal, drills, strong adhesive, or electrical fittings. An adult should inspect the rim, prepare the container, and secure any small decorations that could become choking hazards.
Can I use a milk tin for kitchen storage?
It can hold sealed tea bags, wrapped snacks, sachets, or other packaged goods. Avoid placing loose food directly against paint, glue, fabric, rust, or an unknown inner coating.
How do I stop a decorated tin from rusting?
Keep the tin dry, protect drilled or cut areas, and use finishes suitable for the intended setting. Outdoor pieces should be checked regularly and brought under cover when they are not designed for constant exposure.
Can I cut a milk tin with ordinary scissors?
Ordinary household scissors are not suitable for cutting sturdy metal and may slip or become damaged. Use a proper metal-cutting tool, secure the container, and wear protective equipment. For beginners, choosing a no-cut project is often the better decision.
Let a Strong Milk Tin Keep Working
Learning how to reuse milk tins begins with noticing what the container already offers. The metal body provides structure, the lid protects the contents, and the height makes the tin suitable for storage, plants, lighting, or a miniature display.
You do not need to begin with cutting or drilling. A painted planter or labelled storage tin may be the right first project. More involved ideas can wait until you have the tools and a clear method for handling metal safely.
Keep the decoration connected to the finished purpose. Reinforce anything that carries weight, protect every cut edge, and use removable inner containers when moisture or food is involved.
Which empty milk tin would you reuse first: the large one waiting to become storage, the narrow one suited to a lamp, or the sturdy container that could hold your next plant?