A lot of household waste begins as something that still has a little usefulness left in it: a sturdy jar, a clean cardboard tube, a tin can with no dents, an old T-shirt that is too worn to wear, or a bottle cap that seems far too small to matter. Those everyday objects are useful teaching tools because they make the ideas of reducing, reusing, and recycling feel real instead of abstract. A child can see the object before, handle it during the activity, and understand what changed afterward.
I’m Stella Eve Louise, and I’m always drawn to projects that make reuse feel practical rather than preachy. The best activities are usually the ones that fit naturally into ordinary life. Sorting recyclables, packing a reusable bottle, growing herbs in an old jar, or turning cardboard into a useful organizer can all become habits rather than one-off craft sessions.
These ideas are intentionally simple. Most use materials that are already around the house, and several can be adjusted for different ages. The point isn’t to create flawless finished pieces. It’s to help children and adults notice what they already have, use it more thoughtfully, and think twice before treating every empty container or scrap as automatic rubbish.
What Makes a Reduce, Reuse, and Recycle Activity Worth Repeating
A useful sustainability activity should make sense after the craft table has been cleared. If a child sorts clean paper, bottles, and cans once for a photograph but never sees where those materials go afterward, the lesson can disappear quickly. If the same child has an easy place to sort items every day, refills a water bottle before leaving home, or keeps a small box for clean craft scraps, the idea becomes part of a routine.
That’s why I like activities that have an obvious purpose. A cardboard desk organizer can stay on a homework table. A T-shirt tote can carry books or lightweight groceries. A jar herb planter can sit on a sunny windowsill. Even a bottle-cap sorting game can double as a way to save caps for later craft projects. The activity works harder because the finished result continues to be used.
It also helps to keep the language simple. “Reduce” means using less or choosing reusable options when possible. “Reuse” means finding another use for something before discarding it. “Recycle” means sorting suitable materials so they can enter a recycling system where local services accept them. Children do not need a complicated lecture to understand those three ideas. They need repeated, visible examples.
Choose Clean, Safe Materials Before You Start
Not every discarded item belongs on a craft table. I would always begin by checking that containers are clean, dry, and free from sharp edges. Wash food jars, bottles, and cans thoroughly, remove loose labels when useful, and let everything dry before storing it for projects. Tin cans need special care because a cut rim can be sharp; if the edge does not feel completely safe, skip that can or cover the rim securely with an appropriate protective edge.
Cardboard should be dry and reasonably strong. Avoid pieces that have absorbed grease, moisture, or food residue. Old clothing should be washed before cutting, especially when it will become a tote or another item that gets handled often. For projects involving scissors, piercing holes, or stronger adhesive, an adult should handle the difficult parts for younger children.
I know it can feel tempting to save every jar, tube, and box “just in case,” but that can turn a reuse shelf into a small avalanche. Keep only clean materials you realistically expect to use. A shallow box or one cupboard shelf is enough for most homes, and it makes choosing materials much easier.
Keep the Focus on Useful Habits, Not Perfect Crafts
Children often understand sustainability better when they are allowed to make decisions. Let them choose which paper scraps belong in a collage, which jar will hold basil, or which colors of bottle caps should go together. The finished project does not need to look like a shop-bought item. Slightly uneven cardboard, visible knots, mismatched paper, and hand-cut edges can actually make it clearer that something old has been reused.
The part I would keep consistent is function. A toy car should roll well enough to be played with. A seed pot should hold soil without collapsing immediately. A desk organizer should be stable. A bird feeder should hang securely and be placed where it can be monitored and cleaned. When function comes first, decoration can stay simple.
It is also worth talking about the decision behind each activity. Ask, “Could we use this again?” before throwing something away. Ask, “Do we already have a container for that?” before buying another one. Ask, “Does our local recycling service accept this?” before placing an item in the recycling bin. Those questions turn a craft project into a way of thinking.
1. Sort Clean Household Recyclables Into Simple Bins
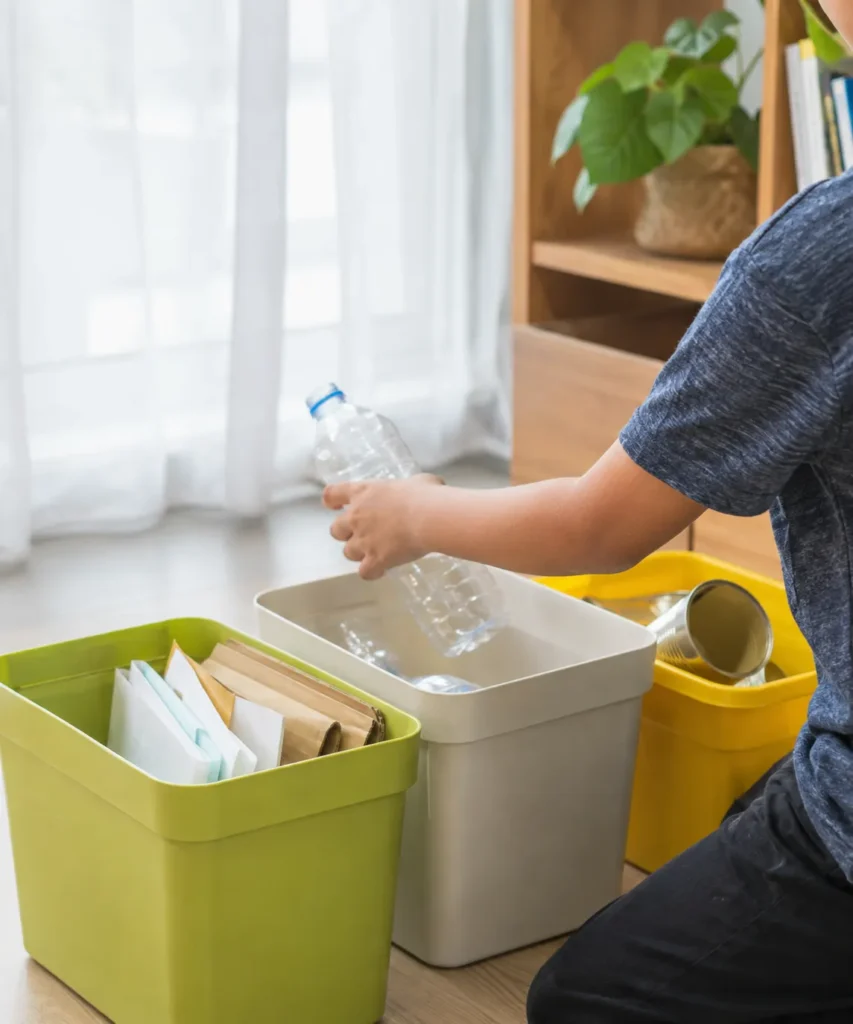
A sorting activity may look basic, but it teaches one of the most useful recycling habits: checking an item before deciding where it goes. Paper, plastic, and metal are easy categories for children to recognize, yet local recycling rules can differ, so the activity should reflect the system you actually use at home. The goal is not to memorize every recycling symbol. It is to build the habit of pausing, checking, and sorting carefully.
Keep the first version small. Use a few clean household items such as plain paper, an empty drink bottle, a rinsed metal can, or a cardboard sleeve. Avoid messy packaging, sharp metal, broken glass, or anything that previously held hazardous products. If your local service combines recyclables into one bin, you can still sort by material during the activity and then place accepted items together afterward.
Materials and Tools
· Two or three open bins, baskets, or sturdy boxes
· A small collection of clean, dry recyclable items
· Paper, cardboard, plastic, and metal examples that are locally accepted
· Optional reusable picture cards showing the material categories
· A cloth for wiping containers before the activity
A Practical Way to Do It
1. Choose a small group of safe items. Put six to ten clean objects on the floor or a low table. Include obvious differences in texture and weight so children can compare paper, plastic, and metal without being overwhelmed by too many examples.
2. Talk about each object before sorting it. Let the child hold one item, name what it is made from, and decide which container should receive it. If the answer is uncertain, check the local recycling guidance together rather than guessing.
3. Sort and then review the bins. Once everything has been placed, look through each bin and ask whether the items seem to belong together. Then move accepted materials to your real household recycling system.
4. Repeat with ordinary daily waste. The useful part begins after the activity. Keep the bins or a simplified sorting station accessible so the same thinking can continue during the week.
For me, the strongest version of this activity is the least decorative one. Clear containers and familiar objects make the lesson obvious. I don’t think children need color-coded labels everywhere if the household system is already simple; too much decoration can distract from the actual sorting decision.
Variation: For older children, add a small “check first” basket for items they are unsure about. Research those items together later. This is a good way to teach that responsible recycling sometimes means admitting you do not know and checking the rules.
2. Pack a Reusable Water Bottle and Lunch Box
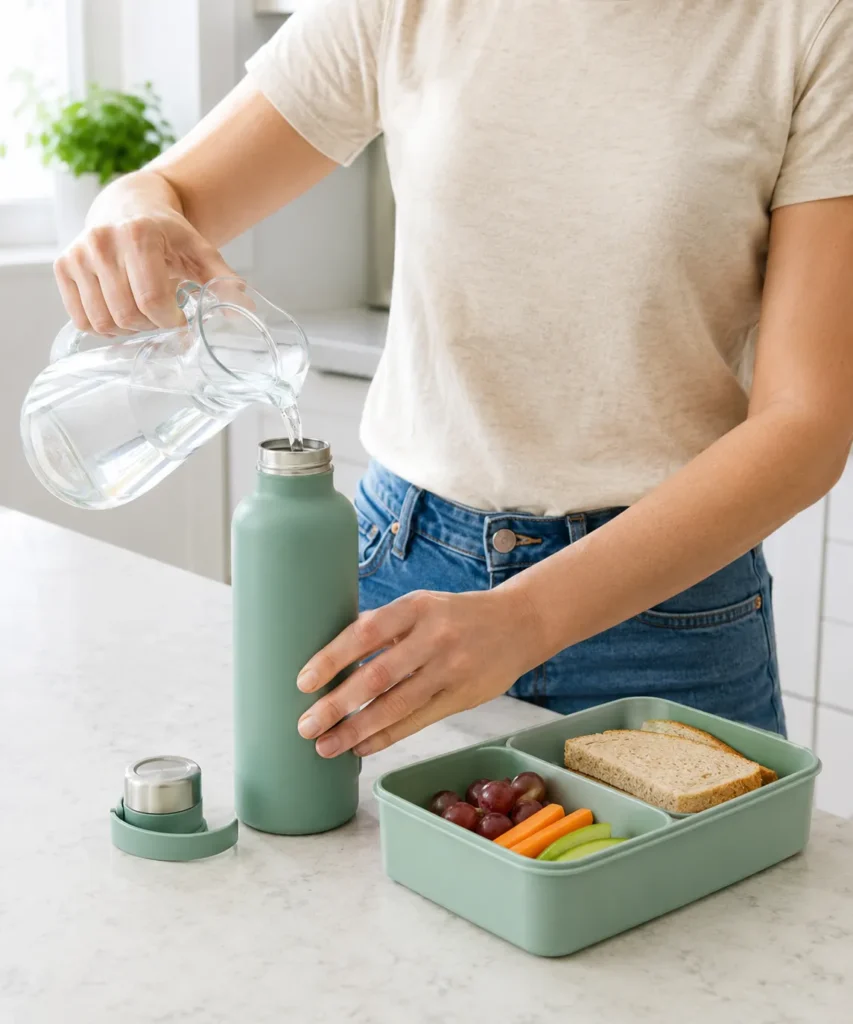
Reduce is sometimes the hardest of the three ideas to turn into a craft because it is really about preventing waste before it appears. That is exactly why a reusable bottle and lunch box activity belongs here. It gives children a visible example of choosing something that can be used again instead of reaching automatically for a disposable option.
This does not need to become a shopping exercise. Use the reusable bottle and food container you already own. The lesson is about repetition: fill the bottle, pack food in washable containers, bring everything home, clean it, and use it again. Even a simple cloth napkin can become part of the routine if that suits your household.
Materials and Tools
· A clean reusable water bottle
· A washable lunch box or food container
· Reusable snack containers if already available
· A cloth napkin or small reusable wrap, optional
· Everyday lunch or snack food
Build the Habit
1. Gather what you already use. Put the bottle, lunch box, and any small containers together in one place. Children can help check lids and match the correct pieces before packing.
2. Fill and pack with normal food. Keep the activity realistic. Add the same kind of lunch or snack you would normally prepare, rather than creating a special display that will never be repeated.
3. Count what is not needed. Ask which disposable items you did not use: perhaps a single-use drink bottle, disposable bag, or throwaway cutlery. Keep the conversation practical rather than turning it into a guilt exercise.
4. Create a return-home routine. After lunch, bring the containers back, empty them, wash them, and place them where they will be easy to find the next day. Then the “reduce” activity becomes a household system instead of a one-time lesson.
The part I like is that nothing needs to look crafty. A plain bottle can teach more about reducing waste than a complicated project if it is genuinely used again and again. Children also get to see that sustainable choices are often ordinary choices, not dramatic ones.
Variation: If packed lunches are not part of your routine, use the same idea for a picnic, sports practice, a car journey, or an afternoon at the park. The important part is choosing washable, reusable items that fit your real life.
3. Grow Herbs in Reused Glass Jars
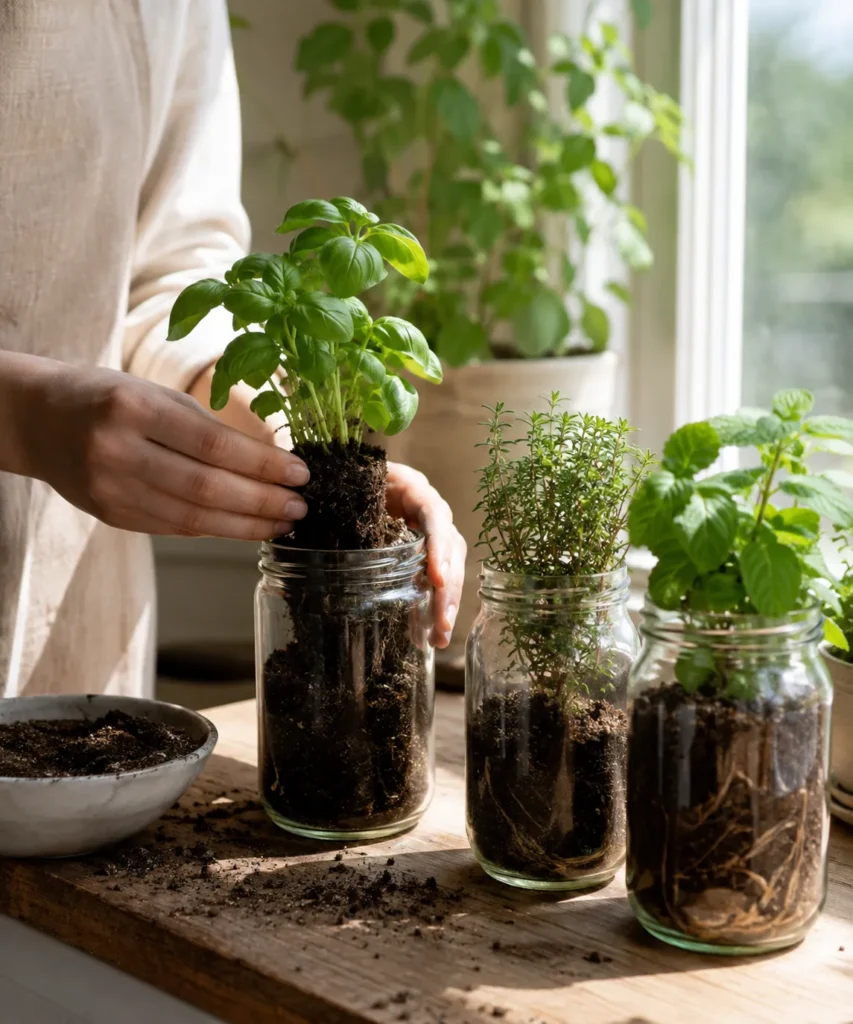
Glass jars are easy to save because they already have useful proportions: they are sturdy, easy to clean, and transparent enough to make roots and soil visible. Used as herb containers, they create a simple reuse activity that can continue for weeks. Basil, mint, and other small herbs can make the finished project feel useful rather than decorative only.
There is one practical limitation to mention. Many glass jars do not have drainage holes, so they should not be treated exactly like ordinary plant pots. Use a small layer of gravel if helpful, water lightly, and watch the soil rather than keeping it constantly wet. Another option is to use the jar as an outer holder for a small nursery pot that fits inside it.
Materials and Tools
· Clean glass food jars with smooth, unchipped rims
· Small herb plants or suitable seedlings
· Potting mix
· A spoon or small scoop
· Optional small stones or an inner nursery pot
· A tray or cloth to protect the work surface
Plant the Jars Carefully
1. Clean and inspect the jars. Remove food residue and check the rim for chips or cracks. If a jar is damaged, recycle it appropriately rather than using it for a hands-on activity.
2. Plan for drainage. If planting directly into the jar, add only a modest amount of soil and water carefully. A safer beginner option is placing a small plastic nursery pot inside the jar so excess water can be managed more easily.
3. Set the herb at the right depth. Loosen the root ball gently, hold the plant upright, and fill around it with potting mix. Press the soil lightly rather than compacting it hard.
4. Choose a suitable windowsill. Place the herbs where they can receive the light they need, and rotate the jars if the plants begin leaning strongly in one direction.
I especially like leaving the jars clear. The glass makes the reuse obvious, and children can observe changes below the surface that would usually stay hidden. There is no need to cover every jar with paint or ribbon unless decoration is part of the activity you actually want.
Variation: Use one larger jar as a holder for cut herbs in water, or turn a small jar into a propagation container for suitable plant cuttings. If children are very young, choose sturdy plastic containers instead of glass.
4. Start Seeds in Cardboard Tube Pots
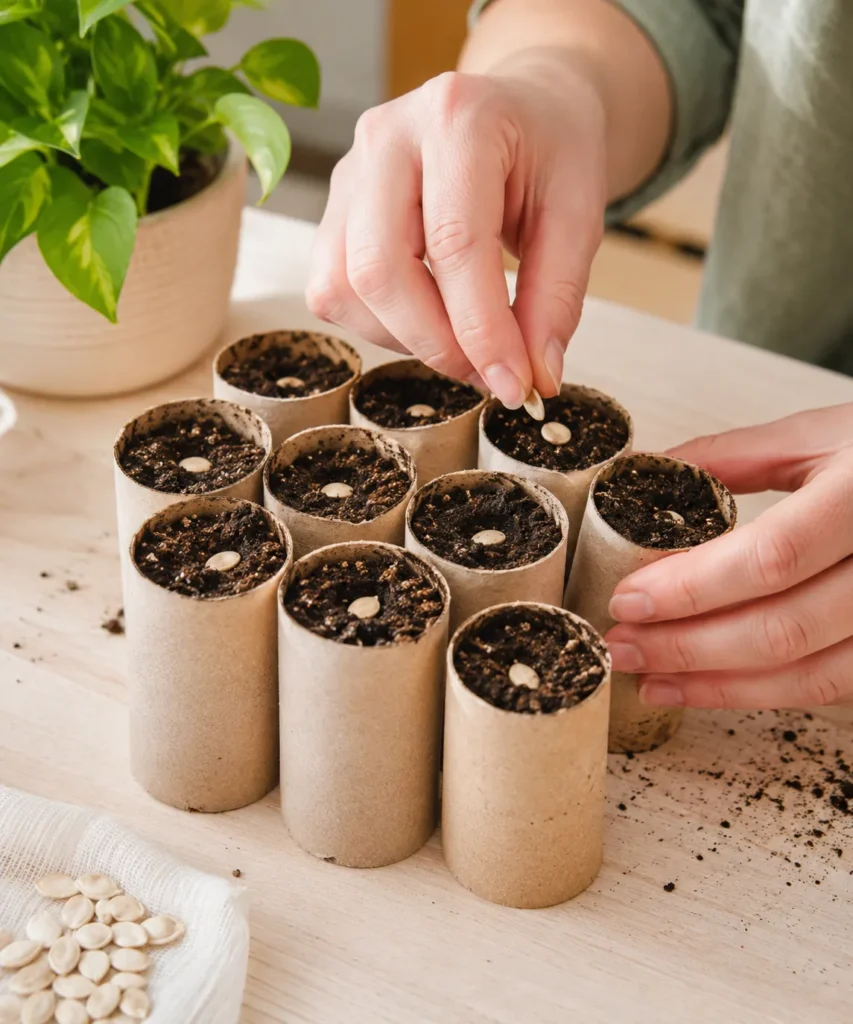
Cardboard tubes are one of those materials that seem too ordinary to save until a useful project appears. Cut into shorter sections and packed closely together, they can become temporary seed-starting pots. The cardboard is easy to handle, holds a small amount of soil, and can be composted later if it remains clean and suitable.
The key is moisture control. Cardboard softens when it stays wet, so these are not long-term planters. They work best for seeds that will be moved on after germination rather than plants that need to remain in the tube for many weeks.
Materials and Tools
· Clean cardboard tubes
· Scissors for adult use when shortening tubes
· Seed-starting mix or fine potting mix
· Suitable seeds
· A shallow waterproof tray
· A spoon and small watering container
Turn Tubes Into Temporary Seed Pots
1. Prepare short, even sections. Cut the tubes so they can stand steadily in a shallow tray. For younger children, an adult should handle the cutting and check that the edges are not crushed.
2. Pack the tubes together before filling. A close arrangement helps keep them upright. Add damp seed-starting mix with a spoon, leaving a little space at the top instead of overfilling.
3. Add the seeds at an appropriate depth. Follow the seed packet rather than assuming every seed needs the same treatment. Children can place larger seeds individually and gently cover them.
4. Water lightly and observe. Keep the tray in a suitable location and add small amounts of water as needed. Then watch the cardboard as carefully as the seedlings; if it begins breaking down too early, move the plants to stronger containers.
I know it can feel satisfying to make a whole tray at once, but a smaller batch is easier to manage. Four or six tubes give children enough to compare without creating more seedlings than you have space to care for.
Variation: Egg carton cups can work in a similar way for small seeds. You can also write plant names on small scrap-card markers instead of buying new labels.
5. Make a Collage From Scrap Paper and Cardboard
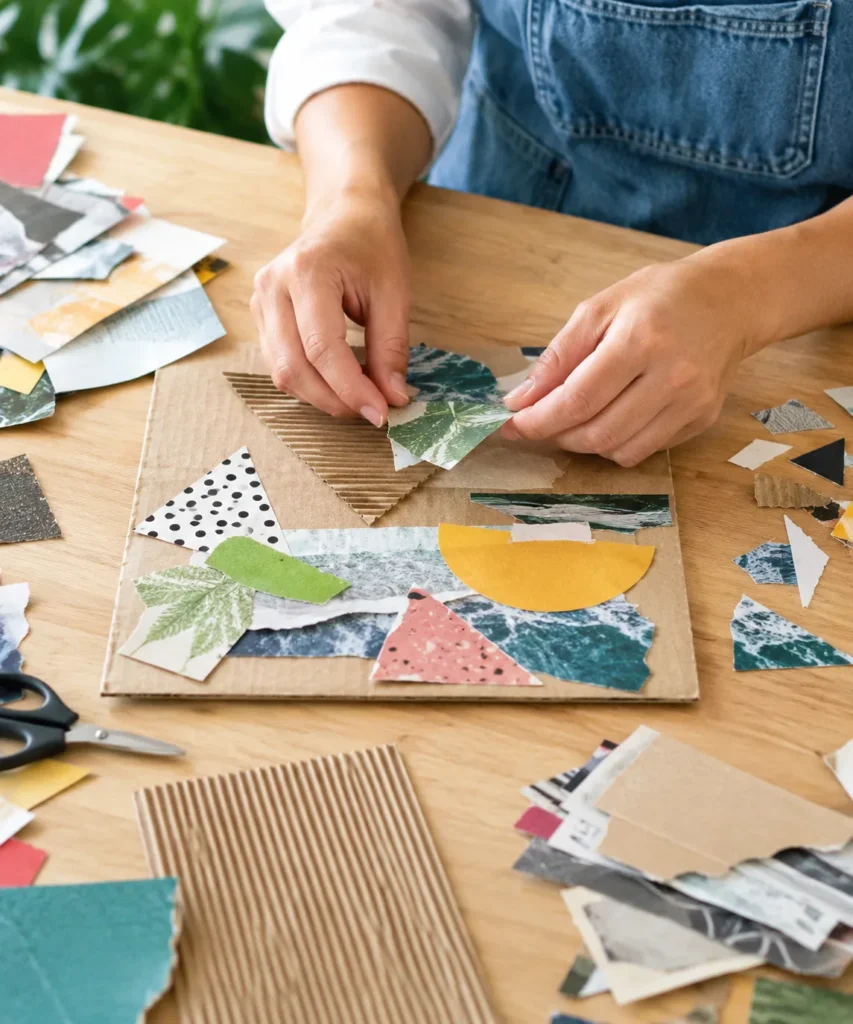
A scrap-paper collage is one of the easiest ways to demonstrate reuse because nearly every material begins as a leftover. Magazine offcuts, wrapping-paper pieces, clean packaging, old envelopes, paper bags, and corrugated cardboard can all contribute different colors and textures. Instead of buying a matching craft pack, the activity asks children to look at what is already available.
The result works best when the base is strong. A flat piece of packaging cardboard gives thin paper enough support and allows children to move pieces around before gluing. I’d encourage arranging first, because once glue is everywhere, changing your mind becomes considerably less graceful.
Materials and Tools
· A flat piece of clean packaging cardboard
· Scrap paper from magazines, envelopes, packaging, or old craft projects
· Child-safe scissors where appropriate
· Glue stick or suitable paper glue
· A small tray for sorting scraps by color or texture
· Optional pencil for light planning marks
Build the Collage in Layers
1. Sort the scraps before gluing. Group pieces loosely by color, size, or texture. This helps children see that even small leftovers can be useful and prevents the table from becoming an unmanageable paper heap.
2. Choose a simple main shape. A landscape, flower, house, abstract pattern, or large geometric form works well. Place the biggest pieces first and let them establish the general composition.
3. Layer smaller pieces over gaps. Tear or trim paper as needed and overlap edges. Then lift one piece at a time, apply a modest amount of glue, and return it to the planned position.
4. Use tiny scraps for details. Save small shapes for the end rather than discarding them halfway through. A narrow strip can become a stem, border, roof line, or simple texture.
For me, mismatched paper is the entire point. I don’t think a reuse collage should be made to look like every piece came from the same coordinated set. Different print, faded color, corrugated texture, and imperfect torn edges make the material history visible.
Variation: Create a color challenge using only scraps in one color family, or make a “packaging portrait” using cereal boxes, paper labels, and envelopes. For a no-glue version, arrange pieces on a tray and photograph the final composition before returning the scraps to the craft box.
6. Turn Tin Cans Into a Desk Organizer
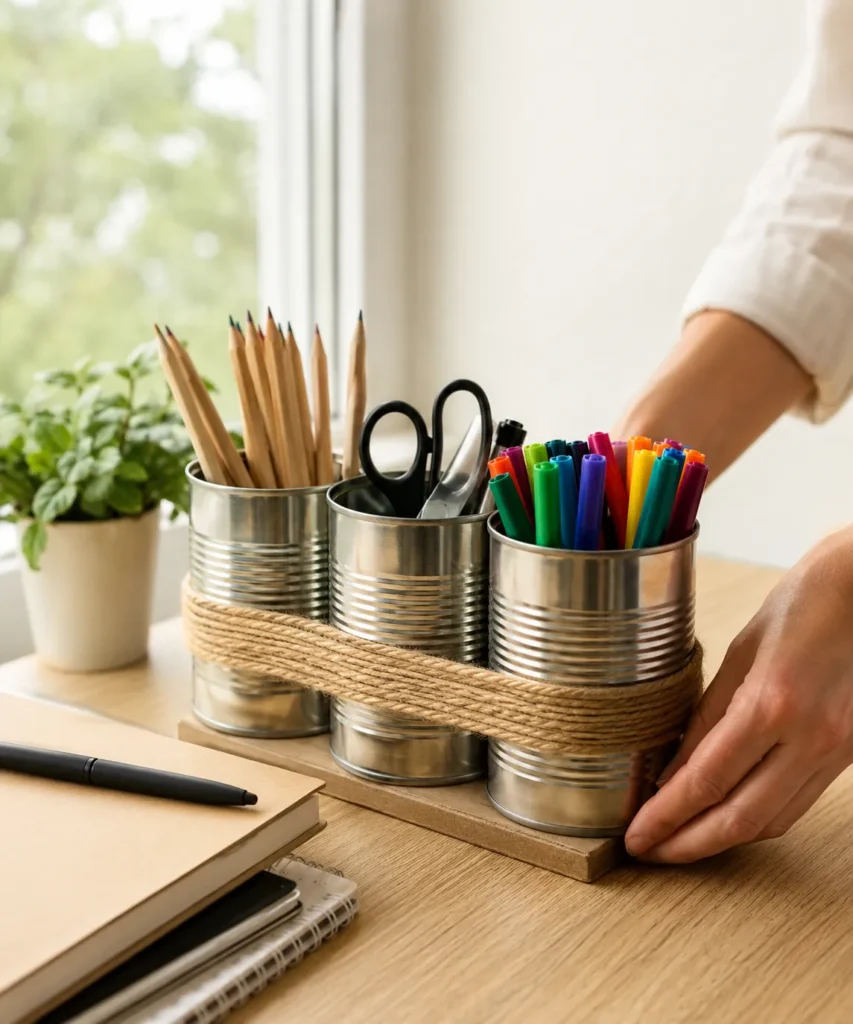
Tin cans have enough weight and structure to make useful pencil cups, which is why they are worth considering before they go into recycling. Grouping several together creates separate spaces for pencils, scissors, markers, brushes, or rulers. A simple wrap of twine or a reused cardboard base can hold the arrangement visually together.
Safety matters more than decoration here. Only use cans with rims that are completely smooth and safe to touch. If the opening has any sharp metal, do not hand it to a child. An adult can choose a different can, use a proper edge-smoothing method, or skip the project altogether.
Materials and Tools
· Three or more clean tin cans with safe, smooth rims
· A piece of sturdy reclaimed cardboard or thin wood for a base, optional
· Twine, leftover ribbon, or paper for decoration
· Strong craft adhesive suitable for the materials, adult-managed where needed
· Pens, pencils, scissors, or brushes to organize
Assemble a Stable Organizer
1. Check every can before using it. Wash away food residue, dry the cans completely, and run an adult hand carefully around the rim. Reject any can that feels sharp or damaged.
2. Plan the arrangement. Place the cans together on the desk and decide whether a row, triangle, or compact cluster works best. Test the tools inside them so taller items do not make the organizer tip.
3. Secure the cans if needed. For a permanent organizer, an adult can attach the cans to a sturdy reclaimed base and wrap the group with twine. If you prefer flexibility, leave them separate and simply arrange them together.
4. Sort tools by function. Put pencils in one cup, markers in another, and scissors or rulers in a third. The sorting step makes the finished item genuinely useful rather than just decorative.
One detail I wouldn’t skip is stability. A narrow can packed with heavy scissors can topple easily, so keep heavier tools in the center or choose broader containers. Practicality is more important than making every can identical.
Variation: Wrap the cans with leftover wallpaper, fabric strips, or brown paper. If metal containers are not suitable, use sturdy cardboard food tubes or small boxes to create the same compartment-style organizer.
7. Build a Toy Car From Scrap Cardboard and Bottle Caps
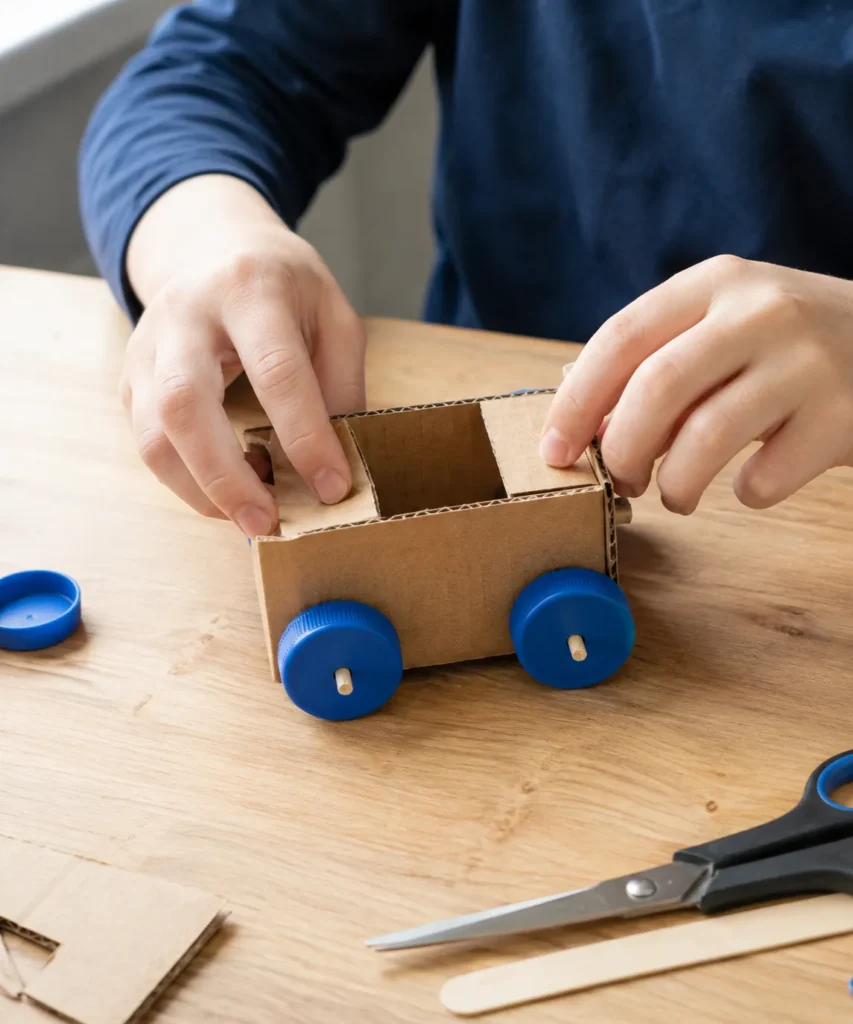
This is the sort of reuse project that makes children look differently at packaging. A small cardboard box already has the basic shape of a vehicle body, while bottle caps can become wheels. The challenge is not making the car look realistic. It is getting the wheels to turn without rubbing against the cardboard.
Because the activity may involve making holes and trimming thick card, adults should handle any sharp or forceful tool work. Children can help with planning, decorating, placing parts, and testing the finished car.
Materials and Tools
· A small cardboard box or folded corrugated cardboard
· Four matching or similar plastic bottle caps
· Two straight wooden skewers or thin dowels for axles
· Short pieces of paper straw or similar tubes to guide the axles, optional
· Scissors and a hole-making tool for adult use
· Tape or suitable glue
· Scrap paper for simple decoration
Make the Car Roll
1. Build a light, square body. Use a small box or fold a simple rectangular shape from sturdy cardboard. Avoid making the body so tall or heavy that it becomes difficult for the wheels to support.
2. Create straight axle guides. An adult can attach two short straw sections under the body or make aligned holes for the axles. The front and back guides need to be parallel; otherwise the car may pull sideways.
3. Attach the bottle-cap wheels. Make centered holes in the caps with appropriate adult supervision, slide them onto the axles, and secure them so they do not fall off while still allowing rotation.
4. Test before decorating heavily. Roll the car across a flat surface. Then adjust any wheel that rubs, strengthen weak cardboard, and add lightweight paper details once the movement works.
The first test roll is more useful than another layer of decoration. If the wheels stick, fix that before adding windows, flags, or a roof. A toy that moves will be played with; a heavily decorated one that does not roll may be admired for about thirty seconds.
Variation: Make a tiny delivery truck, bus, or animal-shaped vehicle using the same axle idea. For younger children, create a stationary cardboard vehicle without moving parts and focus on cutting and attaching safe paper shapes.
8. Make a Hanging Bird Feeder From a Cardboard Tube
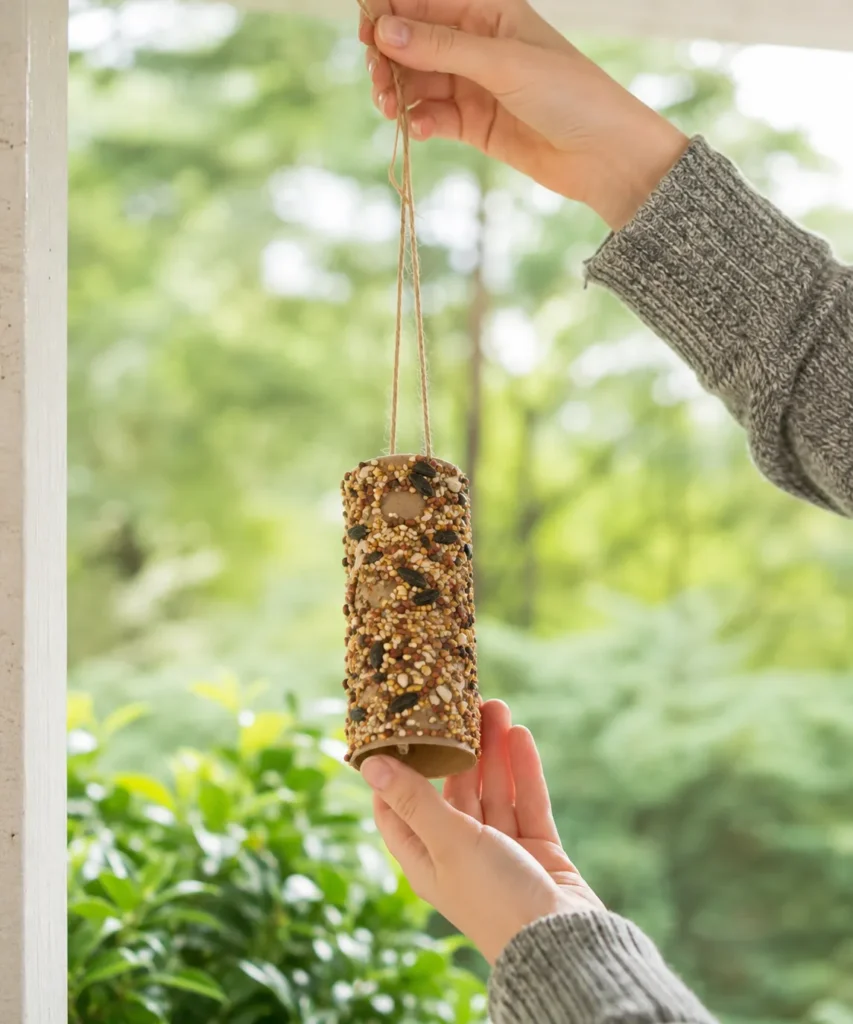
A cardboard-tube bird feeder is a short-lived reuse project rather than a permanent garden object, and that is part of its value. The tube gets one more practical use before it breaks down, while children can observe visiting birds from a suitable distance. The project should use bird-appropriate ingredients and be placed where the feeder can be removed if it becomes wet, dirty, or damaged.
Different regions have different birds and feeding guidance, so choose seed and a safe coating appropriate for local wildlife. If you are unsure, check advice from a reputable local bird or wildlife organization before putting food outside.
Materials and Tools
· A clean cardboard tube
· Plain twine
· Birdseed suitable for local birds
· A bird-safe sticky food coating recommended for your area
· A shallow plate or tray for rolling the tube
· Scissors for adult use when cutting twine
Prepare and Hang the Feeder
1. Set up a clean work area. Pour a shallow layer of seed onto a plate or tray. Cut a length of twine long enough to hang the feeder securely without leaving dangerous loose loops.
2. Coat the outside of the tube. Spread a thin, even layer of the chosen bird-safe coating over the cardboard. Keep the inside relatively clean so the tube remains easy to handle.
3. Roll the tube in seed. Press gently so the seeds stick around the surface. Then thread or tie the twine securely according to the tube shape.
4. Hang it in a suitable place and monitor it. Choose a location away from hazards and remove the feeder if the cardboard becomes soaked, moldy, or unstable. Clean up fallen material as appropriate for your space.
For me, this project works best when it stays simple. The birds do not need glitter, paint, beads, or extra craft decorations. In fact, I’d leave those things out completely and focus on safe food, secure hanging, and easy removal.
Variation: Use a small pine cone or another natural feeder base if cardboard is likely to become wet immediately in your weather. The activity can also become an observation exercise: count visits from a window without disturbing the birds.
9. Turn an Old T-Shirt Into a No-Sew Tote Bag
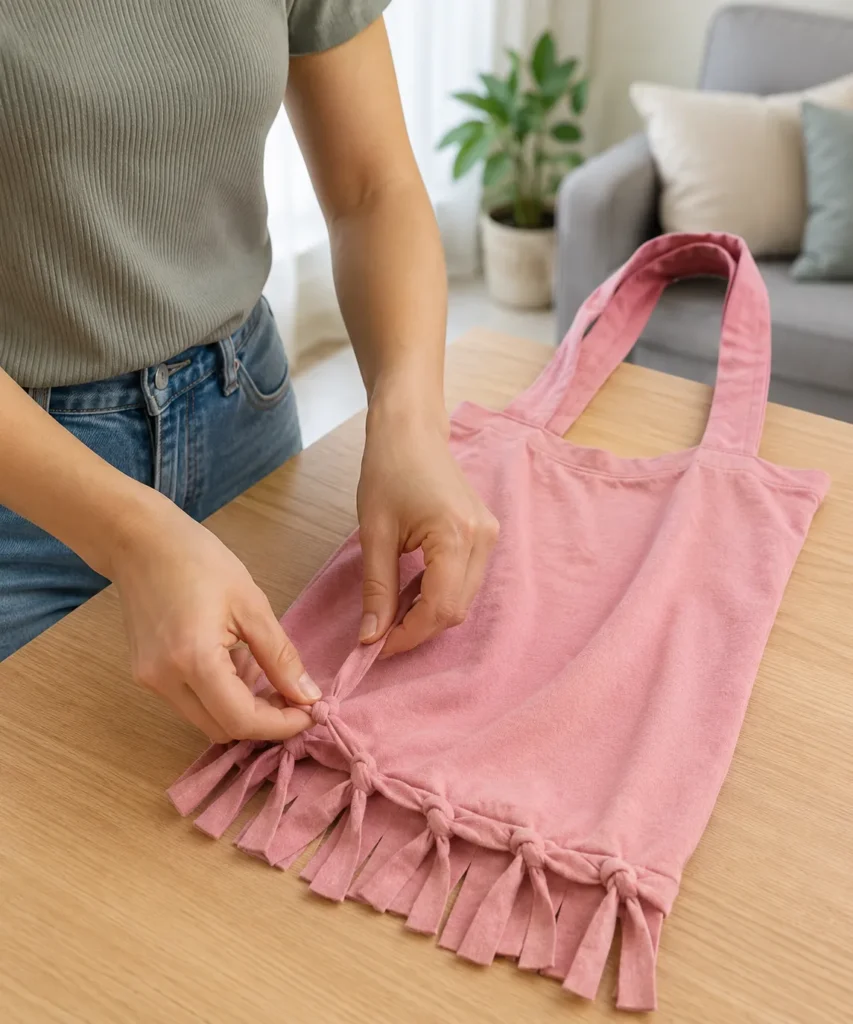
An old T-shirt is already soft, washable, and shaped roughly like a bag body, so it is a natural material for a no-sew tote. The sleeves can be removed to form handles, the neckline can be widened, and the bottom can be turned into fringe that ties together. This is a good example of reuse because the original fabric remains recognizable.
Choose a shirt that is clean and still reasonably strong. Fabric that has become extremely thin, torn, or brittle may not hold weight safely. This type of tote is best for lightweight belongings rather than heavy shopping.
Materials and Tools
· A clean old T-shirt
· Fabric scissors
· Washable marker or chalk, optional
· A ruler or simple cardboard guide for even fringe, optional
· A flat work surface
Tie a Simple No-Sew Tote
1. Lay the shirt flat and check the fabric. Smooth it on the table and identify any holes or weak areas. If the fabric is stretched badly near the hem, choose another shirt or make a smaller bag from the strongest section.
2. Create the handle openings. An adult or older child can cut away the sleeves and widen the neckline to form a comfortable opening. Keep enough fabric around the shoulders so the handles remain strong.
3. Cut fringe along the bottom edge. Make short vertical strips through both layers of fabric. Keep the strips fairly even so they can be paired easily, but there is no need for ruler-perfect cutting.
4. Tie the fringe securely. Knot corresponding front and back strips together across the entire bottom. Then check for gaps and add a second knot where the fabric feels slippery or loose.
5. Test with lightweight items. Put in a towel, book, or a few soft objects and lift the bag gently. If any knot stretches or opens, reinforce it before regular use.
I like that the old shirt still looks like itself. There is no reason to hide the original color, faded print, or small signs of wear unless you want to. Those details make the reuse visible and can make the tote feel more personal.
Variation: Use the same method to make a small library bag from a child’s outgrown shirt, or turn the lower half of a larger shirt into a drawstring storage sack if the shoulder fabric is damaged.
10. Compost Kitchen Scraps at Home
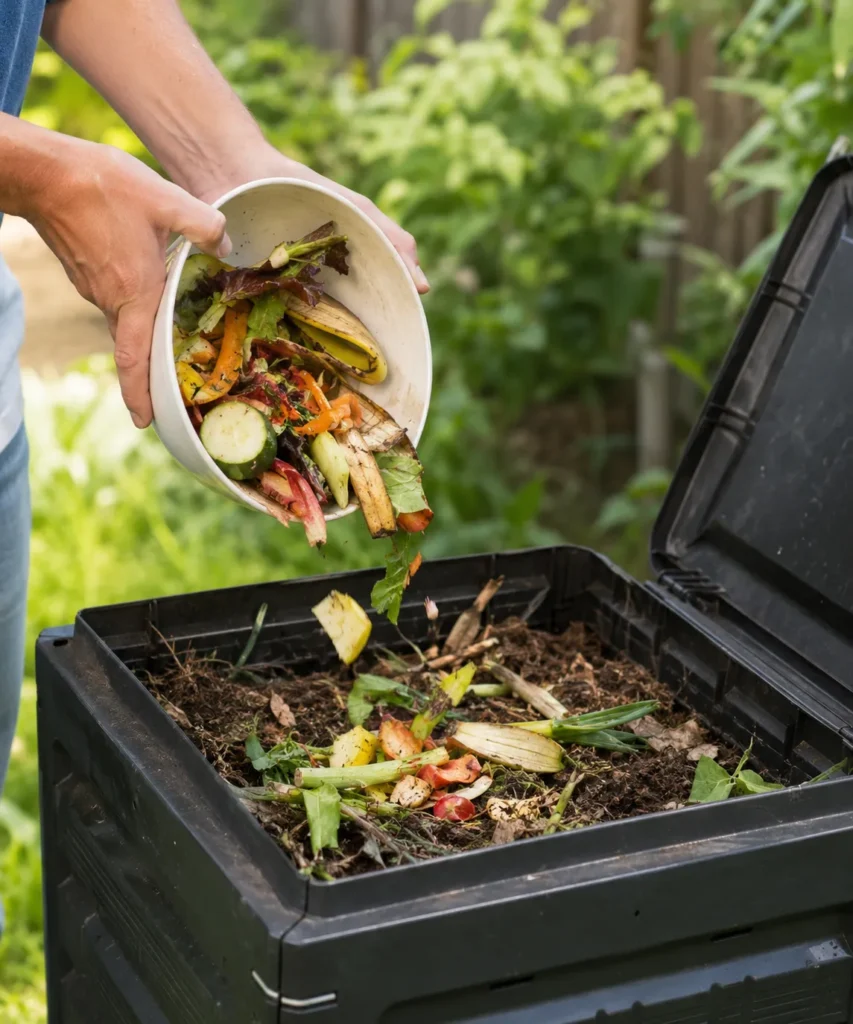
Composting changes the conversation from “What can we make from this?” to “What can this material become naturally?” Fruit and vegetable scraps, coffee grounds, and other suitable compostable materials can be collected and added to a home compost system where appropriate. For children, the transformation is especially interesting because the material changes gradually rather than becoming a finished object in one afternoon.
A compost system should follow the method that suits your home, garden, climate, and local guidance. Not every food belongs in every compost setup, and a poorly managed bin can attract pests or develop unpleasant odors. Keep the first lesson focused on a few clearly suitable plant-based scraps and explain that the compost also needs dry, carbon-rich material such as suitable dry leaves or plain cardboard.
Materials and Tools
· A suitable compost bin or established compost area
· A small kitchen scrap container
· Fruit and vegetable peelings suitable for your system
· Dry leaves, plain cardboard pieces, or other suitable “brown” material
· A garden fork or compost tool for adult use as needed
· Gloves, optional
Make Composting Part of the Routine
1. Collect only suitable scraps. Begin with familiar fruit and vegetable trimmings. Keep out anything your compost system should not receive and explain why the kitchen container is not simply another rubbish bin.
2. Empty the scraps regularly. Carry the small container to the compost area before it becomes unpleasant indoors. Children can help tip in the scraps while an adult manages the main bin.
3. Add dry material as needed. Cover fresh scraps with suitable dry leaves or plain torn cardboard so the compost includes a mix of wetter and drier material. Avoid using coated or heavily printed card unless you know it is appropriate for your system.
4. Observe change over time. Look at the compost occasionally and notice how recognizable scraps gradually break down. The slow process is the lesson; there is no need to rush it or promise an exact finish date.
The good thing is that composting gives children a reason to look closely at food waste without turning every peel into a craft supply. Sometimes the better use is not another object. It is returning suitable organic material to a composting cycle.
Variation: If you cannot compost at home, check whether your area offers a food-scrap collection service or community compost option. You can still use a small kitchen container to practice separating suitable food scraps from general waste.
11. Make a Desk Organizer From Used Cardboard Packaging
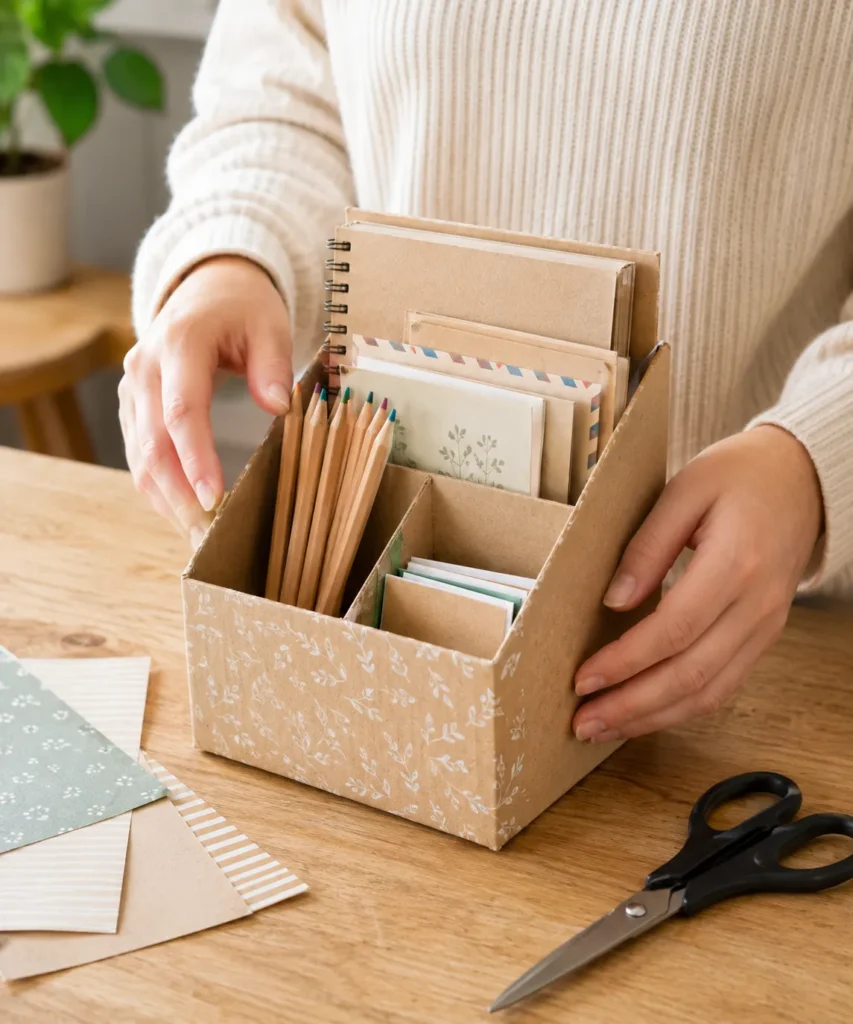
Some cardboard is too useful to flatten immediately. Thick delivery boxes and product packaging can be strong enough to become storage, especially when several layers are doubled together. A desk organizer is a practical choice because the compartments can be designed around items you actually need to store rather than around a fixed shop-bought layout.
This project works best when adults handle the structural cutting. Thick cardboard can require a craft knife or heavy scissors, and straight edges matter more than decorative detail. Children can help measure notebooks, choose compartment sizes, wrap visible surfaces with leftover paper, and decide where each item should go.
Materials and Tools
· Strong clean cardboard from packaging
· Pencil and ruler
· Scissors or craft knife for adult use
· Cutting mat if using a knife
· Paper tape, strong craft glue, or another suitable joining method
· Leftover wrapping paper, wallpaper, or plain paper for finishing, optional
· The stationery items you want the organizer to hold
Build Compartments Around Real Items
1. Measure what needs storing. Place notebooks, pencils, cards, and small papers on the cardboard before drawing the organizer. This keeps the compartments useful and prevents making sections that are too narrow or unnecessarily large.
2. Cut the main box and dividers. An adult can cut a rectangular base, sides, back, and internal dividers. Double-layer thin cardboard where extra stiffness is needed, especially on the base and tall back panel.
3. Dry-fit before gluing. Stand the pieces together with temporary tape and test the stationery inside. Then adjust divider height or spacing while changes are still easy.
4. Secure and finish the structure. Glue or tape the parts firmly and let the joints set before loading the organizer. Cover the outside with leftover paper if you want a cleaner finish, but keep bulky decoration away from the inside edges.
5. Use the compartments deliberately. Give each section a job: pencils in one, notebooks at the back, small cards or notes in the front. A clear purpose helps the organizer stay useful instead of becoming another container full of miscellaneous clutter.
For me, measuring the actual objects is the clever part. It turns scrap cardboard into storage that fits your routine. I’d rather have slightly uneven hand-cut edges and useful compartments than a polished box that cannot hold the notebook it was meant for.
Variation: Make a shorter version for art supplies, a mail sorter for envelopes, or a bedside organizer for books and charging cables. If you want it to remain fully recyclable later, choose paper-based tape and avoid adding plastic decorations where practical.
12. Turn Saved Bottle Caps and an Egg Carton Into a Sorting Game
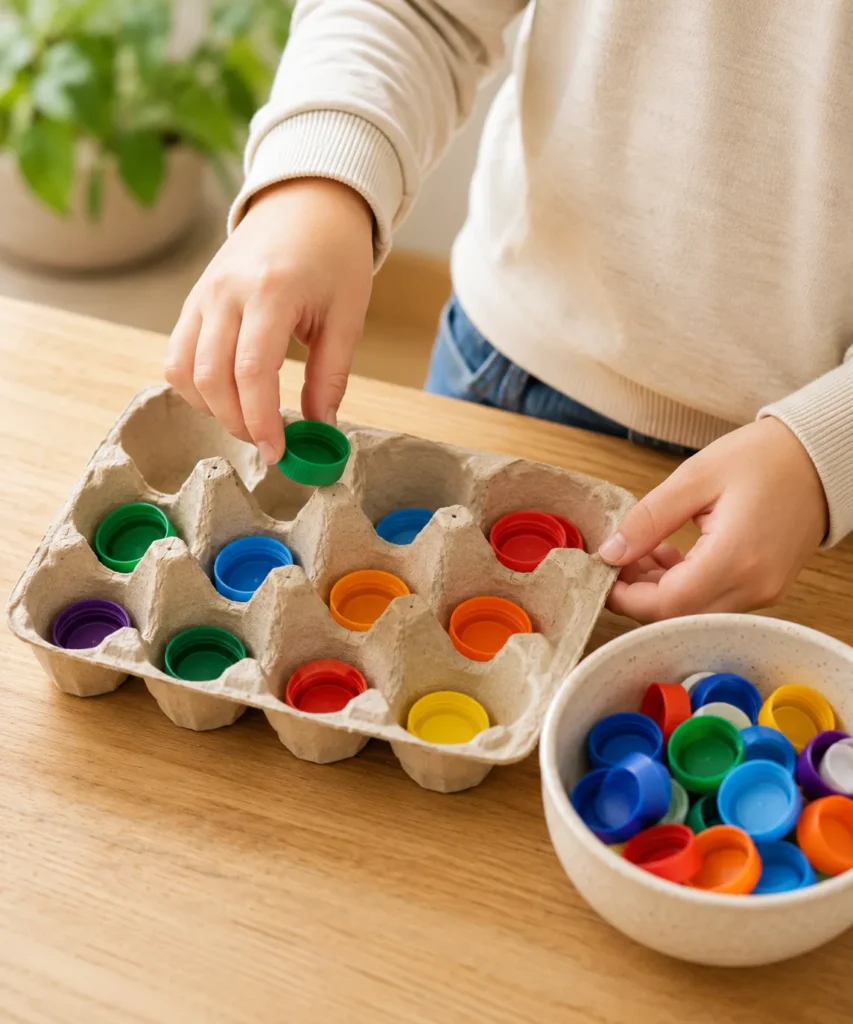
Bottle caps are small, bright, and easy to collect, which makes them useful for sorting and counting with older children who can handle small objects safely. An empty cardboard egg carton already provides separate compartments, so the two discarded materials work together without needing much preparation. The activity is temporary by design: sort, count, make patterns, then store or dispose of the materials responsibly according to local rules.
Small parts can be a choking hazard. This activity is not suitable for babies or young children who may put objects in their mouths. Use it only with children old enough to handle small pieces safely and with appropriate supervision.
Materials and Tools
· A clean, dry cardboard egg carton
· A collection of clean plastic bottle caps in several colors
· A shallow bowl or tray
· Optional scrap paper for simple number or color cards
· A storage container if the caps will be reused again
Turn Sorting Into a Reuse Activity
1. Wash and inspect the caps. Make sure they are clean, dry, and free from cracked sharp edges. Keep the number manageable so the activity stays focused rather than becoming a pile of tiny plastic pieces.
2. Choose one sorting rule. Begin with color, then try size if the caps vary clearly. Place one example in a compartment and let the child continue the pattern.
3. Add counting or sequences. Once sorting feels easy, ask for two blue caps, three green caps, or a repeating color pattern. Then mix them up and create a new rule.
4. Decide what happens afterward. Save the caps for another supervised craft, use them again for counting, or check how your local waste system handles them. The final decision is part of the sustainability lesson.
I like this because it does not pretend that every small plastic piece needs to become permanent décor. Reuse can be temporary. If the caps provide several rounds of play and learning before their next destination, they have already done more than a single-use object normally would.
Variation: Use the same egg carton with large natural objects such as smooth stones, seed pods, or wooden counters if bottle caps are not appropriate. Older children can create simple addition or pattern challenges using the compartments.
Habits That Can Make These Activities Less Effective
A reuse activity can look successful on the table while missing the bigger lesson. One common problem is saving far more material than you can realistically use. A cupboard full of damp boxes, dozens of jars, and bags of caps is not automatically more sustainable. Keep a limited, clean supply and recycle or dispose of excess material through the correct local system.
Another mistake is forcing an item into a project when it is no longer safe or useful. A rusty can, chipped jar, weak T-shirt, greasy cardboard box, or cracked cap should not be kept simply because the activity is called “reuse.” The new purpose still has to make sense. Safety and function come first.
Overdecorating can also work against the original goal. Covering a recyclable cardboard organizer with layers of plastic embellishment or coating a jar with materials that make future separation difficult may create a more complicated end-of-life problem. Decoration is not forbidden, but I’d ask whether it improves the object enough to justify the extra material.
It is also easy to confuse “recyclable in theory” with “accepted in my local bin.” Recycling systems differ. Teach children to check local guidance instead of treating every plastic, metal, or paper object the same. That small habit is more useful than memorizing a generic list.
Finally, do not make children feel personally responsible for solving an enormous environmental problem through one craft. These activities are about building thoughtful habits: use less when possible, reuse what still has value, sort materials carefully, and notice waste. A positive routine is more likely to last than a lesson built around guilt.
Frequently Asked Questions
What is the easiest activity to start with?
Sorting a few clean household recyclables is probably the simplest because it uses objects already moving through your home. Keep the categories small and match them to your local system. Once children understand the routine, you can add a reuse project such as a cardboard organizer or jar planter.
Which activities are best for younger children?
Paper collage, supervised recycling sorting, reusable lunch packing, and planting larger seeds are usually easier to simplify for younger children. Avoid small bottle caps, sharp metal, glass, or difficult cutting unless an adult controls those parts. The exact choice should match the child’s age and abilities.
Do I need to buy craft supplies for these projects?
No. The strongest versions rely mainly on items you already have: packaging cardboard, jars, tubes, old fabric, paper scraps, and everyday containers. You may still need basics such as glue, scissors, potting mix, or seeds, but there is no reason to buy a large set of new decorations just to make a reuse activity look finished.
Can I use any plastic container or bottle for a project?
Check the container first. It should be clean, intact, and appropriate for the new purpose. Avoid unknown chemical containers, damaged plastic, and anything that would create a safety or hygiene concern. For recycling, follow your local acceptance rules rather than assuming every plastic belongs in the same bin.
How can I stop a reuse collection from becoming clutter?
Give the materials a fixed storage limit. One box for clean cardboard pieces, one container for small craft items, and a short row of jars is usually enough. When the space is full, use what you have before saving more.
Is composting the same as recycling?
Not exactly. Composting is a way of managing suitable organic material so it can break down within a composting system, while recycling generally refers to processing accepted materials such as paper, glass, metal, or certain plastics. For children, both are useful examples of keeping material out of general rubbish when another suitable pathway exists.
What should I do with a finished upcycled project when I no longer need it?
First ask whether it can be reused again, repaired, donated, or taken apart. If it needs to be discarded, separate materials where practical and follow local recycling or waste guidance. That final step is worth discussing because upcycling does not make an object permanent.
Make One Small Reuse Habit Easy to Repeat
The most useful reduce, reuse, and recycle activities are the ones that change what happens after the project ends. A child who refills the same bottle tomorrow, sorts a can correctly next week, saves a strong box for useful storage, or remembers that vegetable peelings belong in the compost has carried the lesson beyond the craft table.
You do not need to complete all twelve activities at once. Choose the one that fits something already happening in your home. If lunch is packed every morning, begin with reusable containers. If cardboard boxes arrive regularly, turn one into an organizer. If you garden, try seed tubes or a jar herb planter. If recycling is confusing, make sorting the first activity and learn the local rules together.
For me, that is where these reduce, reuse, and recycle activities become genuinely helpful. They make ordinary materials easier to notice and everyday choices easier to repeat. Pick one object you would normally throw away or recycle immediately, check that it is safe to keep, and ask one simple question: could this still be useful once more?