Used coffee grounds change quickly after brewing. One moment they smell warm and fresh, and the next they are sitting in a damp clump at the bottom of a filter, cafetière, or espresso machine.
That moisture is the first thing to deal with. Wet grounds may suit a compost pile immediately, but soap, incense, storage, and decorative projects need grounds that have been dried properly. Once the grounds are spread out and prepared, their dark colour and grainy texture become surprisingly useful.
I don’t think every batch needs to become something complicated. Some grounds can go straight into a balanced compost bin. Others may become part of a small zen garden, a handmade soap bar, or an outdoor scent project.
The important part is matching the grounds to the job. Grounds intended for skin need a different level of care from those going into compost, while anything that will be burned needs proper ventilation and fire safety. Begin with one small batch rather than saving damp coffee for weeks without a clear purpose.
Prepare Used Coffee Grounds Before Reusing Them
Remove the grounds from the coffee maker soon after brewing. Check for pieces of plastic, foil, staples, torn filter material, or anything else that should not be included in the project.
Used grounds can be divided into two groups:
· Grounds for immediate composting
· Grounds that need to be dried for crafts or household projects
Coffee grounds are accepted as a nitrogen-rich “green” material in home composting, but they should be mixed with carbon-rich materials such as dry leaves, shredded plain cardboard, or plant stalks.
For dry projects, spread the grounds in a thin layer over a lined tray or wide plate. Break apart compact espresso pucks so moisture does not remain trapped in the centre. Turn the grounds occasionally and keep them somewhere protected from dust, insects, and splashing water.
The grounds should feel loose rather than damp or sticky before they enter soap, incense, decorative sand, or a storage jar. Discard any batch that develops an unpleasant sour smell or visible contamination.
Keep separate tools for craft and food preparation whenever possible. A spoon used for soap or incense ingredients should not return to the kitchen drawer afterwards.
Create a Small Zen Garden With Dried Espresso Grounds
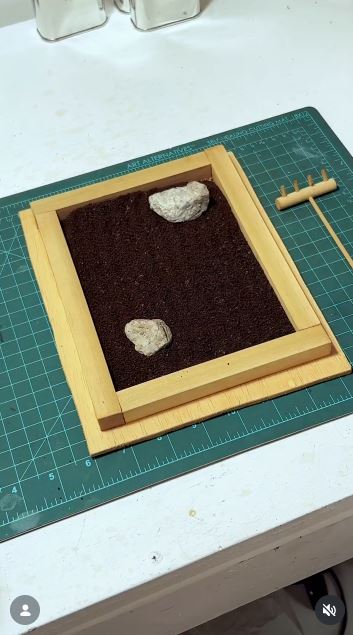
A miniature zen garden usually relies on fine sand that can hold lines made by a small rake. Dried espresso grounds offer a darker alternative with a familiar colour and texture.
The Reel project uses spent espresso as the loose material inside a shallow tabletop garden. The grounds are spread across the base and arranged with small objects to create a simple decorative scene.
This idea works best when the grounds are completely dry and finely broken apart. Large damp clumps will drag beneath the rake instead of forming clear patterns. The tray should also stay somewhere dry, as this is a decorative craft rather than a planter or living garden.
Materials and Tools
· Fully dried used coffee grounds
· Shallow tray, dish, or box lid
· Fine sieve
· Spoon
· Small stones
· Miniature rake or fork
· Small brush
· Optional air plant kept in a separate holder
· Optional wooden shapes
· Paper or felt for lining the base
Make the Coffee-Ground Zen Garden
1. Dry and refine the grounds. Break apart the used coffee and spread it thinly until no damp clumps remain. Pass the dry grounds through a fine sieve if they contain large pieces that would interfere with the rake.
2. Prepare the tray. Clean and dry the container, then check whether any gaps could allow the grounds to escape. Add a fitted paper or felt lining when the tray has cracks, rough joins, or a base that could be stained.
3. Add a shallow layer. Spoon the grounds into the tray and level them gently. There is no need to make the layer extremely deep. It only needs enough loose material to accept lines without exposing the tray every time the rake moves.
4. Arrange the main objects. Position two or three stones, a small wooden piece, or another simple focal point. Then draw lines around them with the miniature rake. Leave some open space so the pattern can change without removing every object.
5. Maintain the display. Keep the tray away from water, steam, pets, and open windows where the grounds could scatter. Use a dry brush to clean the edges, and replace the coffee if it becomes damp or dusty.
For me, the dark surface is already the strongest detail. I would avoid adding too many brightly coloured miniatures because the project can quickly start looking like a crowded model village rather than a calm desk piece.
A beginner can use one smooth stone and an ordinary fork instead of buying miniature accessories. A reclaimed picture frame with a deep edge may also work as a tray after the glass and sharp fittings have been removed safely.
Add Dried Coffee Grounds to a Handmade Soap Bar
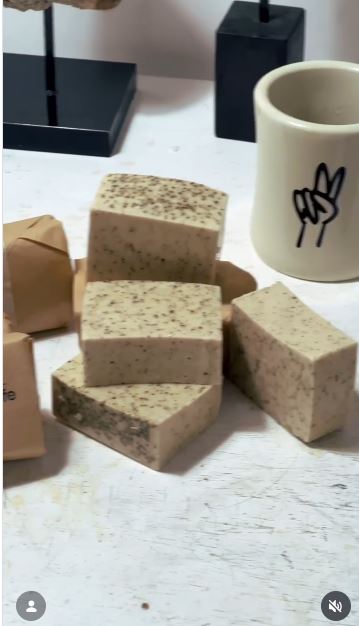
Coffee-ground soap uses the grainy material as a visible and physical addition to the bar. A practical beginner method is to combine a small amount of completely dried coffee with a ready-made melt-and-pour soap base.
The Reel inspiration presents coffee grounds as part of a handmade bar-soap project.
I would not begin with lye-based soap unless you already understand cold-process soapmaking and have the necessary protective equipment. Melt-and-pour soap removes that chemical-mixing stage, although heated soap base still requires careful handling.
Coffee grounds can feel rough on sensitive skin. Keep the amount modest, use finely textured grounds, and avoid using the bar on the face, broken skin, irritated areas, or active rashes. Use physical exfoliants gently because aggressive scrubbing can cause redness and irritation.
Materials and Tools
· Fully dried used coffee grounds
· Melt-and-pour soap base
· Heat-safe jug
· Suitable soap mould
· Spoon or silicone spatula
· Microwave or double-boiler setup
· Small sieve
· Protective oven gloves
· Rubbing alcohol spray, if appropriate
· Optional skin-safe soap fragrance
· Paper for wrapping finished bars
Make a Coffee-Textured Soap Bar
1. Prepare the grounds. Dry the coffee thoroughly and sieve it to remove hard clumps. Begin with a very small quantity. You can always add slightly more to another batch, but an overloaded bar may feel uncomfortably rough.
2. Prepare the mould and soap base. Place the mould on a flat, heat-resistant surface before melting anything. Cut the soap base into smaller pieces so it melts more evenly, then warm it according to the instructions supplied with that particular base.
3. Add the coffee carefully. Allow the melted soap to cool slightly without setting, then stir in the dried grounds. Mix slowly so the particles spread through the soap rather than gathering in one heavy layer at the bottom.
4. Pour and settle the bars. Transfer the mixture into the mould without splashing. Remove surface bubbles using a method suitable for the soap base, then leave the mould untouched until the bars have become firm enough to release.
5. Test and store the soap. Try the bar gently on a small area of intact body skin and stop using it if irritation develops. Keep unused bars dry and wrap them only after the surface is firm and free from moisture.
I know it can feel tempting to add more grounds because the speckles look interesting, but extra coffee does not automatically create a better soap. A few evenly distributed particles are usually more comfortable than a bar that behaves like coarse sandpaper.
A simpler variation is to place a light sprinkle of grounds on only one side of the bar. That creates a textured surface while leaving the opposite side smooth. You could also use a plain unscented soap base and let the natural coffee colour provide the only decoration.
Form Dried Coffee Grounds Into Aromatic Incense
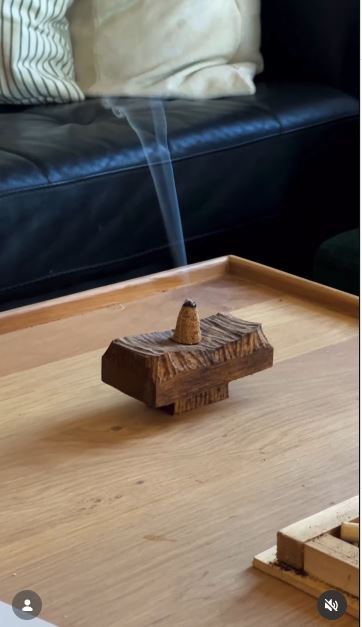
The deep roasted smell of coffee makes the grounds an interesting material for a small incense-style project. The Reel inspiration uses spent coffee grounds to create aromatic incense rather than treating them as ordinary waste.
Any project that smoulders or burns needs more care than an ordinary craft. Use a fireproof dish, work in a well-ventilated outdoor area, and keep the material away from curtains, dry plants, paper, children, and pets.
Do not assume that smoke from homemade ingredients is harmless. Avoid breathing it directly, and skip the project if anyone nearby has asthma, breathing sensitivity, or another condition affected by smoke.
Materials and Tools
· Completely dried used coffee grounds
· Natural incense-binding material suited to cone making
· Small mixing bowl
· Spoon
· Water added gradually
· Baking paper
· Small cone mould or fingertips for shaping
· Fireproof ceramic or metal dish
· Sand for lining the dish
· Long lighter
· Metal tongs
· Covered outdoor working area
Shape and Use the Coffee Incense
1. Prepare a dry, fine base. Sieve the coffee grounds and remove anything that feels damp or unusually coarse. The material should be consistent before you add a binder, as hidden wet clumps may prevent the shapes from drying evenly.
2. Make a workable mixture. Combine the grounds with a binder intended for handmade incense. Add water gradually until the mixture holds together without becoming wet and sticky. Follow the binder instructions rather than guessing the proportions.
3. Form small shapes. Press the mixture into small cones or compact pieces. Keep each one modest so it can dry through the centre. Place the shapes on baking paper with enough space for air to reach their sides.
4. Dry them completely. Leave the pieces in a protected, ventilated place until they are hard throughout. Turn them when appropriate. Do not light a piece that still feels cool, soft, or damp in the centre.
5. Test one outdoors. Place a single piece in a sand-lined fireproof dish on a stable, non-flammable surface. Light it carefully, observe it from nearby, and extinguish it fully before leaving the area.
One detail I wouldn’t skip is the drying stage. A cone can feel solid outside while remaining wet in the middle, which usually leads to a disappointing test and a rather determined little lump that refuses to stay lit.
For a no-burn alternative, fill a breathable fabric sachet with fully dried grounds and place it near a coffee station or craft area. It will not work like incense, but it keeps the project simple and avoids smoke altogether.
Add Coffee Grounds to Compost or Garden Soil in Moderation
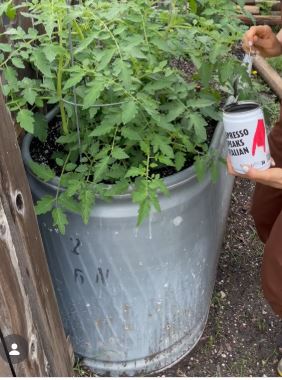
The garden may be the most obvious destination for used coffee grounds, but it is also where enthusiasm can cause trouble. The Reel project places coffee grounds around established tomato plants as a garden amendment.
Spent grounds can feed soil organisms and make a useful compost ingredient. They are not a complete fertiliser, and brewed grounds do not reliably make soil much more acidic. Use them in modest amounts rather than repeatedly emptying every coffee batch onto one plant.
A thick layer may compact and interfere with water movement. Mixing the grounds with compost or other organic material is usually more dependable than leaving them as a dense circle on the soil surface.
Materials and Tools
· Used coffee grounds
· Compost bin or garden container
· Dry leaves
· Shredded plain cardboard
· Untreated plant material
· Garden fork or hand trowel
· Gloves
· Watering can
· Covered collection container
· Existing compost, if available
Use the Grounds in the Garden
1. Choose composting or direct use. Add regular batches to compost when possible. Coffee grounds count as a green material, so combine them with dry brown ingredients rather than building a pile made mostly from coffee.
2. Break up compact grounds. Crumble espresso pucks and mix them through the compost. Do not leave dense pieces sitting together because air and moisture need to move through the surrounding material.
3. Apply direct grounds lightly. For established plants, scatter only a modest amount and work it gently into the upper soil or existing compost without disturbing the roots. Avoid forming a thick, continuous crust.
4. Cover exposed grounds. Add leaves, bark, straw, or another coarse organic material over a thin coffee layer. This helps prevent the surface from drying into a compact sheet that may repel water.
5. Watch the plant and soil. Stop adding grounds if water begins sitting on the surface, seedlings struggle, or the soil develops a dense texture. Coffee should remain one ingredient among several, not the entire feeding plan.
I’d rather add a small amount to a healthy compost mixture than treat coffee as a miracle fertiliser. The compost bin is much better at balancing kitchen enthusiasm than a single tomato plant.
Coffee filters made from plain compostable paper may also enter the compost after any plastic fittings or staples have been removed. Tear larger filters into pieces so they mix more easily with the other materials.
Common Mistakes to Avoid
Saving the Grounds While They Are Still Wet
Damp grounds stored in a deep container may become unpleasant before you have enough for a project. Dry them promptly for crafts or add them to compost without building a forgotten collection beside the coffee machine.
Using Craft Grounds in Food
Once grounds have been spread on a craft tray, mixed with soap ingredients, or handled with non-food tools, keep them away from cooking and drinks. Label containers clearly.
Adding Too Much Coffee to Soap
A heavily textured bar may scratch or irritate the skin. Begin with a small amount, use gentle pressure, and stop if the bar causes redness or discomfort.
Applying a Coffee Scrub to the Face
Coffee particles may be too rough for delicate facial skin, especially when rubbed aggressively. Avoid broken, inflamed, sunburned, or acne-affected areas, and speak with a dermatologist when you are unsure about exfoliation.
Treating Coffee as a Complete Fertiliser
Coffee grounds contribute organic material, but they do not supply everything plants need. Use them as one compost ingredient and pay attention to the wider condition of the soil.
Creating a Thick Garden Crust
Repeatedly pouring wet grounds onto the same spot may form a compact layer. Mix them into compost or combine a thin amount with coarser materials.
Burning Grounds Indoors
Incense and smoulder projects create smoke and heat. Use them only in a suitable ventilated setting, follow local rules, and never leave them unattended.
Using Damp Grounds in Incense
Moisture trapped in a cone may prevent even drying and burning. Make small pieces and let them dry fully before testing one.
Leaving Coffee Projects Near Pets
Dogs and other animals should not be allowed to eat coffee grounds or lick soap and craft mixtures containing them. Store every batch and finished project out of reach.
Keeping More Grounds Than You Can Use
Saving waste is only helpful when it has a clear destination. Compost the extra rather than allowing several damp containers to take over the kitchen.
Frequently Asked Questions
What is the easiest way to reuse used coffee grounds?
Adding a moderate amount to a balanced compost bin is usually the simplest option. Mix the grounds with dry leaves, shredded cardboard, or other brown materials instead of keeping them in one dense layer.
Do used coffee grounds need to dry before composting?
No. They can enter a managed compost pile while still damp. Drying becomes important when the grounds will be stored or used in soap, incense, sachets, or decorative crafts.
Can I put coffee grounds directly around plants?
You can use a modest amount around established plants, but avoid creating a thick surface layer. Mixing grounds with compost or lightly working them into the upper soil is generally more practical.
Do coffee grounds make soil acidic?
Brewed coffee grounds are close to neutral and do not reliably lower garden-soil pH enough for acid-loving plants. Use an appropriate soil test and established amendment when changing pH is the real goal.
Can I use used coffee grounds in soap?
Yes, provided the grounds are fully dried and used sparingly. Choose a beginner-friendly soap base, avoid sensitive or damaged skin, and test the finished bar gently before regular use.
Is it safe to burn used coffee grounds?
Burning or smouldering material always introduces fire and smoke risks. Use a fireproof container outdoors, remain present, and avoid the project during windy or very dry conditions.
Can I reuse mouldy coffee grounds?
Mouldy grounds may still break down inside a managed outdoor compost pile, but they are not suitable for skin products, decorative crafts, incense, or indoor storage. When you are uncertain about contamination, discard them responsibly.
Let the Next Use Match the Grounds
Learning how to reuse used coffee grounds begins before they collect at the bottom of another container.
Send everyday batches to a balanced compost pile. Dry a smaller amount when you already have a soap, zen garden, or aromatic craft in mind. Keep skin projects gentle, garden applications modest, and every burning project controlled.
The grounds do not need to become five different things at once. One small tray of dry coffee can become a calm desk garden, while tomorrow’s batch can join the leaves and cardboard in the compost.
Which project would you try first: the dark espresso zen garden, the textured soap bar, or the simple compost mixture waiting outside?