Everyday packaging becomes far more interesting once a toddler is allowed to touch it, sort it, paint it, stack it, or turn it into something that can be used again. A cereal box is no longer just a box when it becomes a chunky puzzle, and a milk jug feels completely different when it helps water a pot of flowers. I’m Stella Eve Louise, and this is the part of recycling with young children that I find most useful: the lesson does not have to sound like a lesson.
For toddlers, simple usually works best. The material needs to be clean, large enough to handle safely, and easy to understand. Adults should take care of cutting, piercing, taping sharp edges, and anything else that requires precision. Then the child can do the enjoyable part choosing colours, placing pieces, sorting, stamping, pretending, and helping with a finished object that has a clear second purpose.
I don’t think a recycling activity needs expensive craft supplies or a perfect final result. A slightly crooked cardboard window or uneven paint mark often makes the project feel more like a real child’s creation, which is exactly what it should be.
Choose Clean, Large Recyclables That Toddlers Can Handle
The best starting materials are usually the simplest ones: sturdy cardboard, large plastic bottles, clean paper, egg cartons, empty paper rolls, and containers that can be thoroughly washed. I know it can be tempting to save every interesting lid, cap, button, and tiny offcut, but toddler crafts are easier to manage when the materials are large and obvious.
- Wash food and drink containers thoroughly and let them dry before craft time.
- Remove staples, loose foil, broken plastic, sharp tabs, and damaged cardboard.
- Choose large pieces that are easy for small hands to hold, press, stack, or paint.
- Keep very small loose components out of toddler activities. For children under three, loose small parts can present a choking hazard.
- Check finished crafts again after use because tape, paper pieces, or decorations can loosen.
Let Adults Prepare Every Cut Edge, Hole, and Small Part
Recycled crafts often begin with materials that were not designed as toys. That means the adult preparation matters more than the decoration. Cut openings in cardboard boxes, trim bottles, punch drainage holes, and prepare puzzle pieces before the toddler joins the activity.
Sharp metal or rough cut edges should never be left exposed. If a material cannot be made smooth and secure, I would choose a different container rather than trying to rescue it for the sake of the project. CPSC toy-safety guidance also addresses hazardous sharp edges and points in children’s products.
- Adults should handle knives, hole punches, awls, nails, scissors used on thick cardboard, and any metal cutting.
- Cover rough cardboard edges with tape where hands will rub repeatedly.
- Keep cut plastic edges rounded and smooth, or cover them with a secure protective edge.
- Avoid detachable decorations that can easily come loose during play.
- Prepare paint, glue, and water in small amounts so the activity stays manageable.
Keep the Activity Short, Supervised, and Easy to Reset
Toddlers rarely need a long set of instructions. One clear action is often enough: stick the paper, press the stamp, sort the colours, water the plant, or decorate the box. I’d rather finish a short activity while the child is still interested than stretch it until everyone is tired of the project.
Set out only the materials needed for the current stage and keep the rest nearby but out of reach. This makes the table calmer and gives the child a clearer task. Once that stage is done, then you can swap in the next material instead of surrounding a toddler with every tool at once.
- Use washable, age-appropriate craft materials.
- Stay within arm’s reach during activities involving loose craft pieces.
- Let paint and glue dry completely before turning a craft into a play item.
- Stop using a project if pieces begin breaking, peeling, or becoming sharp.
- Keep expectations simple; toddler-made does not need to look adult-finished.
1. Upcycled Paper Collage Art
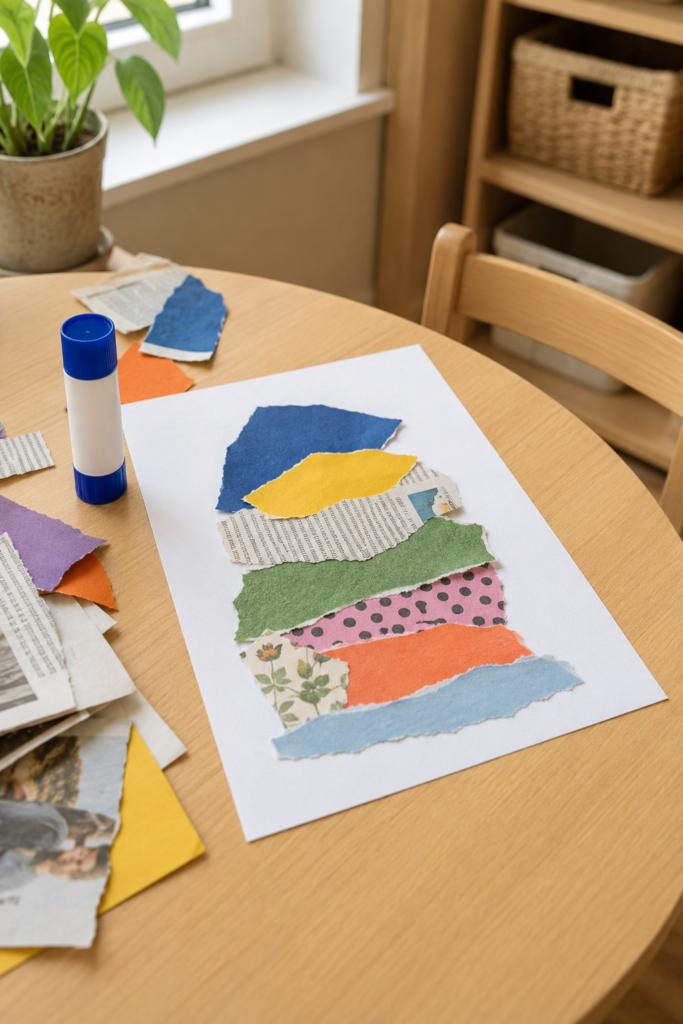
Paper collage is a useful first recycling activity because the original material remains familiar. Old wrapping paper, plain packaging paper, magazine pages, envelopes, and clean offcuts can all become part of one larger picture. The torn edges are actually helpful here; they make the activity look relaxed rather than like the child is expected to place perfect shapes.
The most practical version uses a glue stick and pre-torn pieces that are large enough to pick up easily. You can loosely group colours, but there is no need to turn it into a matching exercise unless the child enjoys that. The finished collage can be abstract, or you can suggest a simple idea such as a house, tree, rainbow, or layered landscape.
Materials and Tools
- Large sheet of paper or thin cardboard
- Clean scrap paper, old magazines, envelopes, or wrapping-paper offcuts
- Glue stick or child-appropriate craft glue
- Optional washable crayons
- Tray or shallow box for holding paper pieces
Steps for This Recycling Activity
- Prepare a small paper selection. Tear or pre-cut several large paper pieces and remove staples, glossy plastic film, or anything with a rough edge. Keep the selection limited so the table still feels easy to understand.
- Arrange before gluing. Let the toddler place pieces on the backing sheet and move them around. If the child wants to stack several layers, that is fine; the first arrangement does not need to become the final one.
- Add glue in a simple rhythm. Offer one piece at a time, add a small amount of glue, then press it onto the page. Continue until the child loses interest or the main area is filled.
- Finish without overworking it. Leave the collage flat to dry and trim only loose backing-paper edges if necessary. Avoid adding extra decorations simply because blank space remains.
For me, this works best when the adult does not keep correcting the layout. A toddler who places yellow beside purple has already made a design decision, even if it is not the one we would have made.
Variation: Use only paper from one source, such as an old gift bag or a few magazine pages, for a more limited colour palette and an even simpler setup.
2. Cardboard Box Playhouse
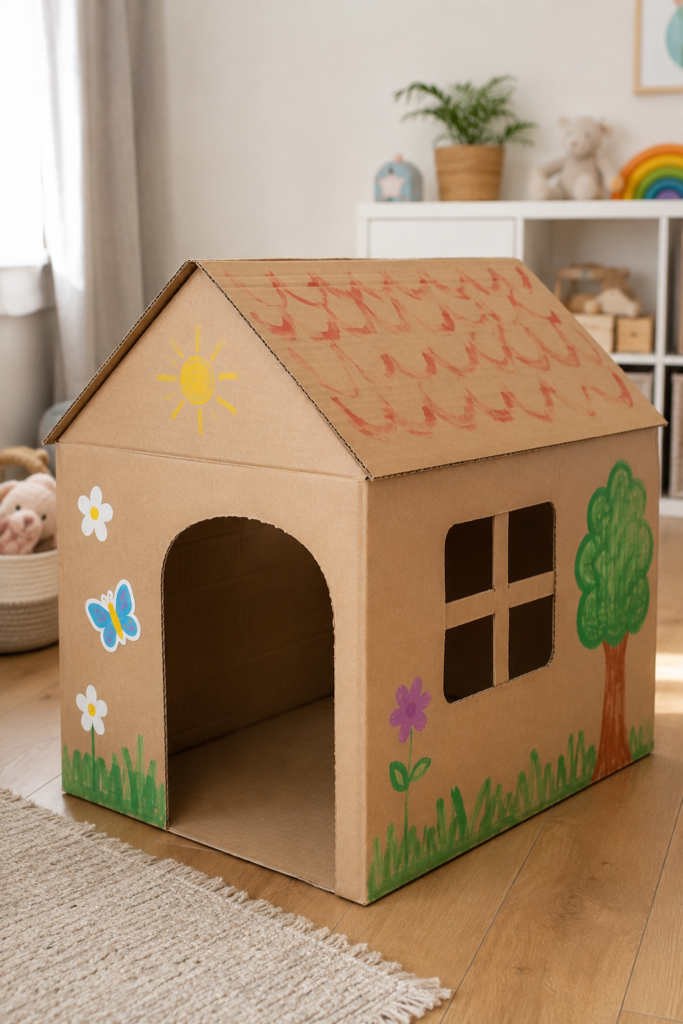
Large cardboard boxes already have the most important part of a playhouse: structure. Once an adult adds a doorway and one or two windows, the rest can stay wonderfully simple. Toddlers do not need a miniature building with perfect shutters and furniture; they mainly need a space they can enter, peek through, and pretend belongs to them.
Before decorating, test the box on the floor and make sure it does not collapse when lightly pushed. Remove staples, packaging straps, and loose tape. I would also keep the doorway broad rather than narrow so the child can get in and out without catching clothing on the cardboard.
Materials and Tools
- Large sturdy cardboard box
- Strong tape for adult reinforcement
- Washable paint, chunky crayons, or markers
- Large stickers or paper shapes if suitable for the child
- Craft knife or heavy scissors for adult use only
Steps for This Recycling Activity
- Strengthen the box first. Close weak bottom flaps with tape and press along the walls to find soft areas. Reinforce only where needed so the box still stays lightweight.
- Cut a generous doorway and window. An adult should make all openings and round the corners instead of leaving sharp points. Cover any rough edge with tape, then run your hand around each opening to check it.
- Invite simple decoration. Let the toddler add large painted flowers, grass marks, dots, stickers, or broad crayon lines. There is no need to fill every wall.
- Set it up for pretend play. Once everything is dry, place the house on a clear floor area away from heaters, stairs, and heavy furniture. Add a small cushion or soft toy rather than filling the interior with loose craft materials.
I especially like cardboard houses that still look like cardboard. Keeping some of the original brown surface visible makes the transformation easy for a child to understand.
Variation: Use a smaller box as a doll or stuffed-animal house when you do not have floor space for a child-sized version.
3. Plastic Bottle Planters
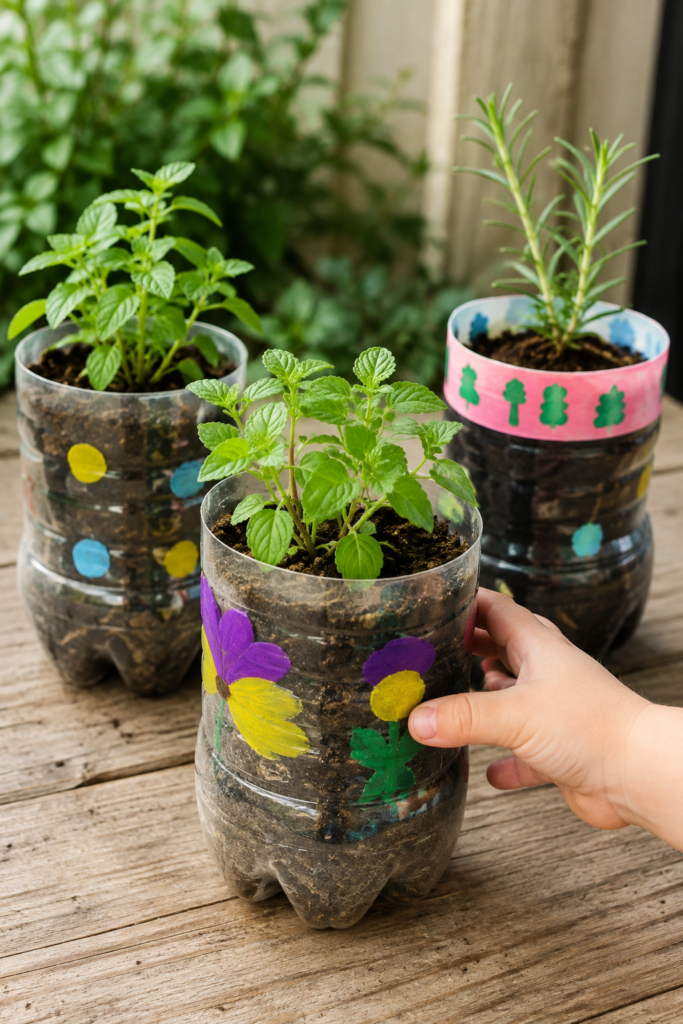
A clear plastic bottle makes a good planter because toddlers can see the soil level and understand that an ordinary container has gained a completely different job. Herbs are especially nice for this scale because a small planter can still look full without requiring a deep pot.
The cutting stage belongs entirely to the adult. The top edge should be smooth, and drainage holes should be prepared before the child handles the container. If the plastic feels thin, cracked, or sharp after cutting, use another bottle rather than trying to tape an unstable edge into submission.
Materials and Tools
- Clean plastic bottles
- Potting soil
- Small herb or flower plants
- Washable paint suitable for decorating the outside
- Adult cutting tool
- Tool for making drainage holes, used only by an adult
Steps for This Recycling Activity
- Prepare the bottle safely. An adult cuts the bottle to planter height, smooths the rim, and adds a few drainage holes. Wash away any plastic dust or fragments before the child joins in.
- Decorate the outside. Let the toddler paint broad flowers, dots, colour bands, or simple shapes. Keep paint on the exterior and leave enough clear plastic visible if you want the soil level to remain easy to see.
- Add soil and plant together. Spoon in soil, set the plant in place, then let the toddler press loose soil gently around the roots. A small scoop keeps the process easier than pouring from a large bag.
- Water lightly and place carefully. Add a modest amount of water and stand the planter on a saucer or outdoor surface where drainage will not make a mess. Then make watering a small repeated job rather than flooding the planter all at once.
The part I like is the visible change over time. The craft is not finished the day the paint dries; the plant continues changing, which gives the reused bottle an ongoing purpose.
Variation: Skip paint and wrap a wide strip of paper around the outside for decoration, removing it before watering if it is not water-resistant.
4. Cereal Box Puzzle
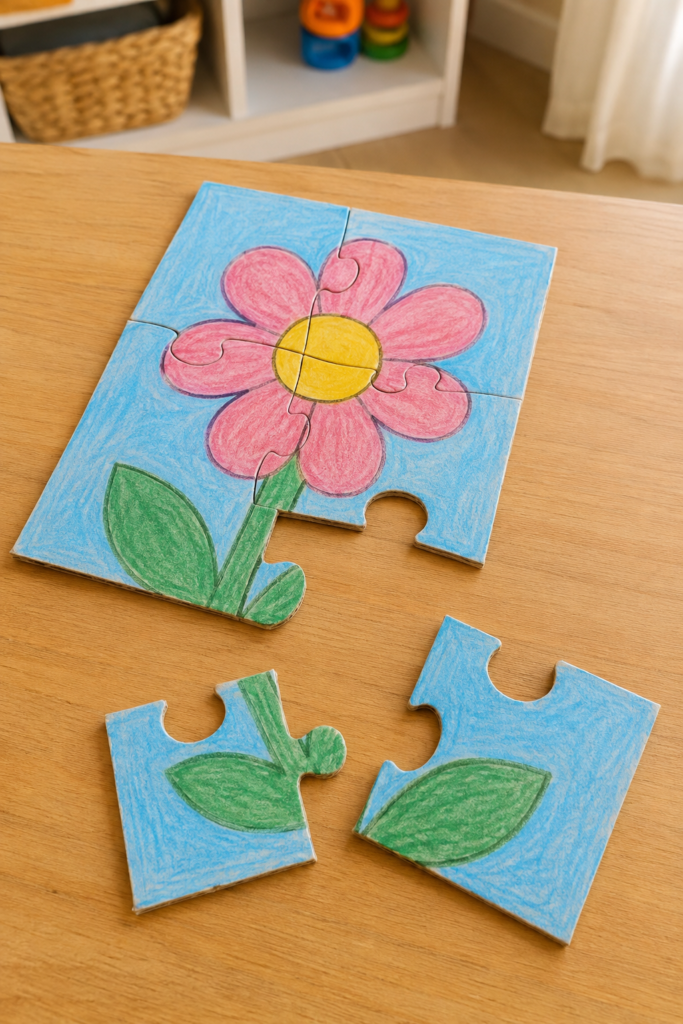
Cereal-box cardboard is thin enough for an adult to cut easily but firm enough to become a short-lived homemade puzzle. For toddlers, the picture matters less than the size of the pieces. Large sections with obvious shapes are easier to turn, compare, and place than many little jigsaw pieces.
A single bold drawing works well because the child can use colour and line direction as clues. I would avoid tiny interlocking tabs and instead use four to six broad pieces with rounded internal curves. The finished puzzle does not need to behave like a shop-bought jigsaw to be useful.
Materials and Tools
- Clean cereal box or similar cardboard packaging
- Crayons or washable markers
- Pencil for adult planning
- Scissors or craft knife for adult use
- Optional clear tape for reinforcing the back before cutting
Steps for This Recycling Activity
- Flatten and reinforce the cardboard. Cut one broad panel from the box and remove folded flaps. If the cardboard feels very thin, tape a second layer behind it before drawing.
- Create one simple picture. Draw a flower, face, house, fish, or another familiar object using broad colour areas. Keep the design large enough to cross several puzzle pieces so the picture helps with matching.
- Cut a few oversized pieces. An adult draws simple dividing lines and cuts the board into large sections with smooth edges. Avoid small tabs or pieces that could be mouthed.
- Let the child solve it loosely. Place two or three pieces close to their correct positions first, then add the rest. If frustration starts quickly, simplify the puzzle rather than insisting the original layout must be completed.
I know it can be tempting to make a clever puzzle, but this is one project where easy is usually better. The satisfaction comes from recognising and rebuilding the picture, not struggling with difficult joins.
Variation: Make two matching-picture halves instead of a full puzzle for a younger toddler who is just beginning to pair shapes.
5. Egg Carton Animals
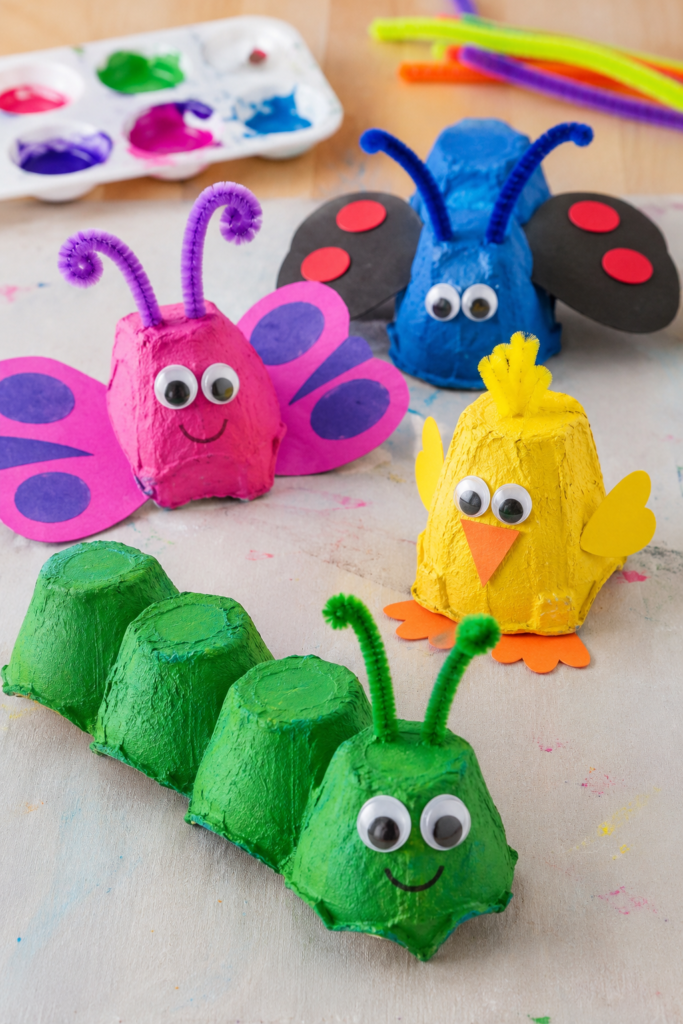
Egg cartons already contain curves, cups, and connected sections, so they do much of the shaping work for you. One row can become a caterpillar, a single cup can become a chick, and two joined shapes can suggest a bug or butterfly body.
For toddlers, I would simplify the details shown in decorative craft examples. Loose googly eyes, tiny beads, and short pipe-cleaner pieces can detach, so a safer toddler version uses drawn eyes and large paper wings attached firmly by an adult. The animal still reads clearly without lots of tiny accessories.
Materials and Tools
- Clean cardboard egg carton
- Washable paint
- Large paper scraps for wings, beaks, or feet
- Child-appropriate glue
- Thick marker for facial features
- Adult scissors
Steps for This Recycling Activity
- Cut the carton into easy shapes. An adult separates the cups or trims a connected row for a caterpillar. Round rough cardboard points and remove any loose torn fibres.
- Paint the main body first. Let the toddler choose one or two colours and cover the outside. Place the pieces on scrap paper and allow them to dry before adding details.
- Add large features. Attach broad paper wings, a beak, or large feet where needed, then draw eyes and a mouth directly onto the carton instead of relying on tiny detachable decorations.
- Use the animals for simple play. Once dry and secure, let the child line them up, name colours, make animal sounds, or use them in a short pretend story.
The slightly lumpy carton texture actually helps these animals. It stops them from looking too polished, and toddlers can still recognise the basic creature from just a few bold features.
Variation: Keep one long strip of carton connected and turn it into a painted caterpillar with a face drawn directly on the first cup.
6. Tin Can Drums
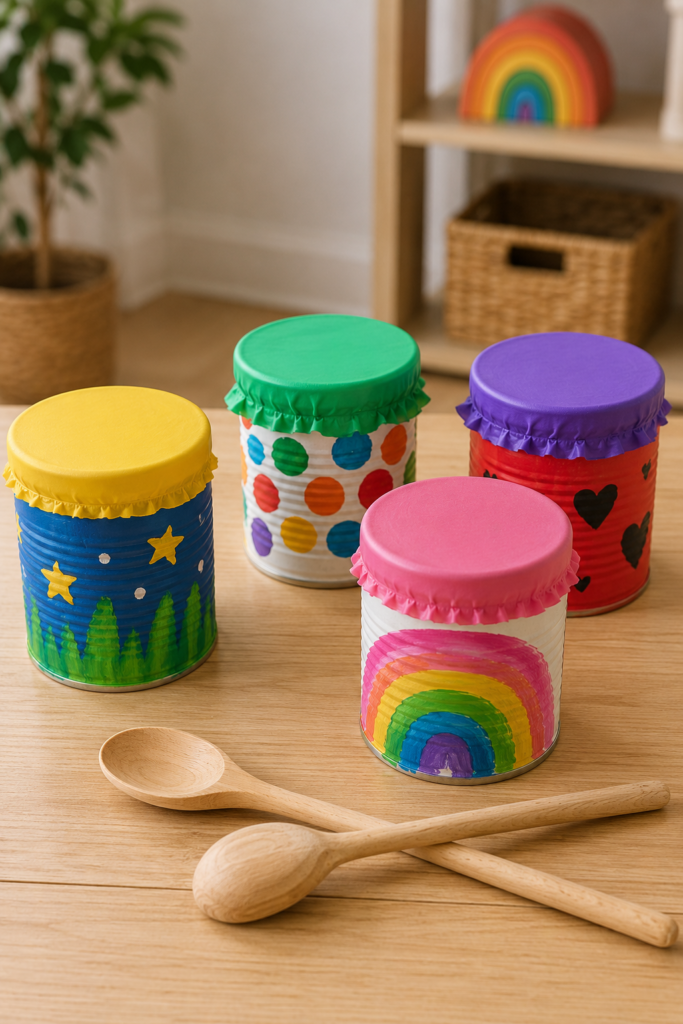
A row of recycled containers makes a simple sound activity because each one can produce a slightly different tone. The important word here is containers. If a metal can has any exposed cut rim, sharp edge, rust, or damage, I would not hand it to a toddler. Use only a version that an adult can make completely smooth and inaccessible, or substitute sturdy cardboard tubs.
The easiest setup turns the container upside down so the child taps the smooth factory-sealed base. The open end stays against the table and should still be fully covered or secured by an adult. That keeps the activity focused on rhythm rather than on a complicated drumhead.
Materials and Tools
- Clean sturdy cans with edges made fully safe by an adult, or cardboard food tubs
- Washable paint
- Wide strong tape for adult edge covering
- Wooden spoons or other lightweight tapping tools
- Protective table covering
Steps for This Recycling Activity
- Inspect and secure each container. An adult checks the entire can, covers the open edge completely, and rejects any container with dents, rust, sharpness, or loose metal. If there is doubt, use cardboard instead.
- Decorate the outside. Let the toddler paint stripes, dots, hearts, stars, or broad colour areas. Keep decoration away from any taped safety edge so you can still inspect it clearly.
- Turn the drums upside down. Place the smooth sealed bases facing upward on a stable table or floor. Space them slightly apart so the child can tap one at a time.
- Explore simple rhythms. Begin with slow patterns—tap, tap, stop—rather than loud free-for-all banging. Put the spoons away when the activity ends so the cans do not become unsupervised play objects.
This is one of those projects where the decoration is optional but the safety preparation is not. A plain safe container is much more useful than a brightly painted one with a questionable edge.
Variation: Use oatmeal tubs, large cardboard cylinders, or sturdy plastic food containers for a completely metal-free version.
7. Milk Jug Watering Can
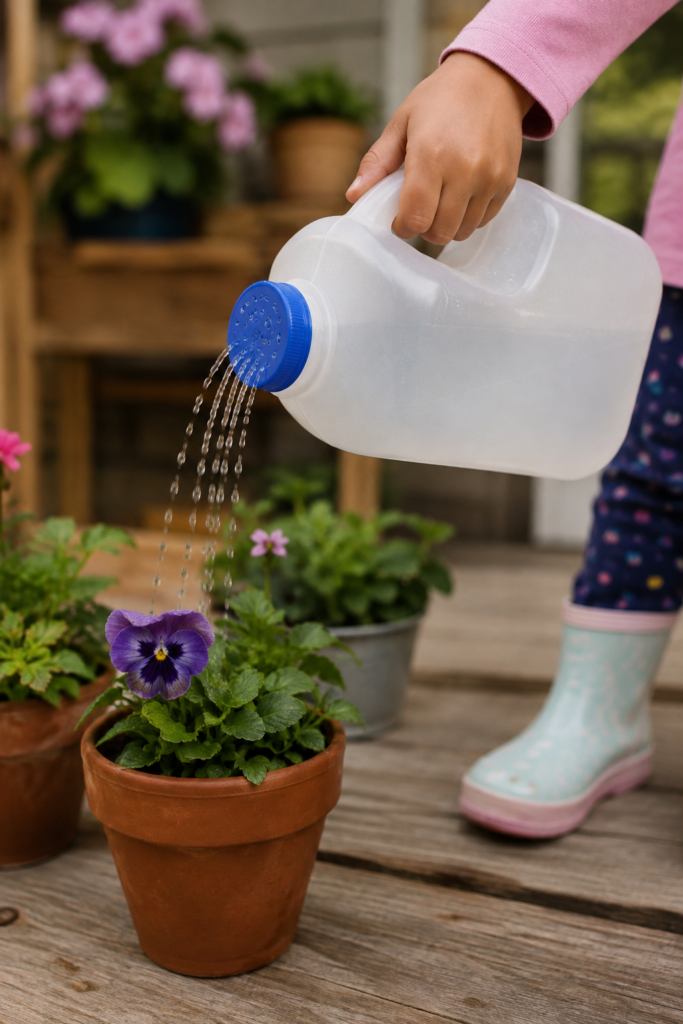
A handled milk jug already has the shape of a watering tool, so very little needs to be added. That is exactly why I like this kind of reuse. The toddler can understand the new purpose immediately, and the finished object is useful rather than decorative only.
The jug should stay lightweight. Fill it with only enough water for the child to lift and tip comfortably. An adult should make the cap holes and check that the cap screws on securely before each use.
Materials and Tools
- Clean plastic milk jug with handle and cap
- Water
- Adult tool for making small holes in the cap
- Potted plants or outdoor flower bed
- Towel for indoor spills if needed
Steps for This Recycling Activity
- Clean and prepare the jug. Wash it thoroughly and remove any loose label edges if they are peeling. An adult makes several small holes in the cap and checks that no plastic fragments remain.
- Add only a little water. Fill the jug partway so it is easy to carry. Screw the cap on firmly and test the flow over a sink before handing it to the child.
- Show one plant at a time. Let the toddler hold the handle with both hands if needed and tip the jug slowly. Then stop, move to the next pot, and repeat rather than letting all the water rush into one container.
- Empty and dry after use. Pour out leftover water and let the jug dry open. Check the cap and handle before the next gardening session.
The good thing is that this activity can become a routine. The jug does not need to be remade each time, so the child sees that reusing an object can be practical and repeated.
Variation: Use a smaller handled juice container if a full-size milk jug is awkward for the child to lift.
8. Newspaper Rockets
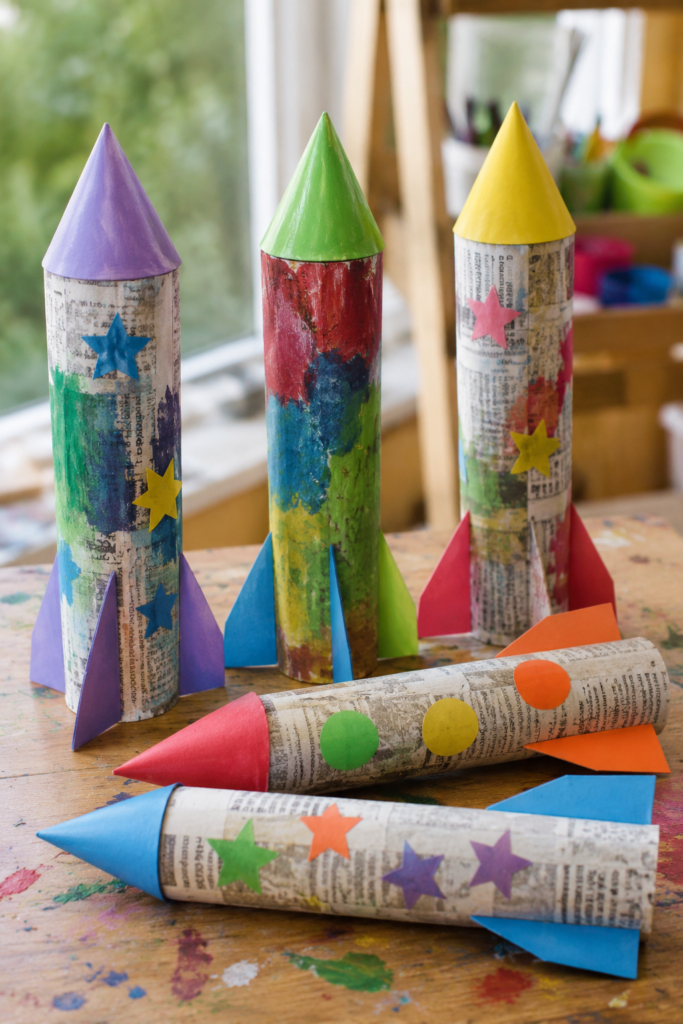
Newspaper rockets work best as pretend-play props rather than as projectiles. Rolling the paper gives it enough structure to stand upright, while a paper cone and broad fins make the shape obvious even when the construction is very simple.
Adults should handle the main cutting and shaping, especially for younger toddlers. The child can choose colours, press on large paper shapes, or paint broad areas. Keep the finished rockets soft and lightweight, and use them for floor play instead of launching them toward people or furniture.
Materials and Tools
- Newspaper or large scrap-paper sheets
- Cardboard roll or rolled-paper core if extra structure is needed
- Large coloured paper scraps
- Child-appropriate glue
- Washable paint or crayons
- Adult scissors
Steps for This Recycling Activity
- Build the basic rocket body. Roll several newspaper sheets around a cardboard tube or into a firm cylinder and secure them. An adult trims the ends so they are even.
- Add a broad paper cone and fins. Make one simple cone for the top and attach two or three large fins near the base. Avoid thin pointed fins that tear easily.
- Let the toddler decorate. Add painted bands, large stars, circles, or coloured paper patches. A few bold details are enough to make the rocket recognisable.
- Use it for gentle pretend play. Stand the rockets on the floor, count down, make sound effects, and move them by hand. Put away damaged rockets before torn paper turns into loose scraps.
I don’t think these need to be perfectly cylindrical. A slightly wrinkled newspaper rocket still feels like a rocket once it has a cone, fins, and a confident countdown.
Variation: Make one large rocket from a mailing tube and let several children decorate different sections of the same object.
9. Button Sorting and Recycling Game
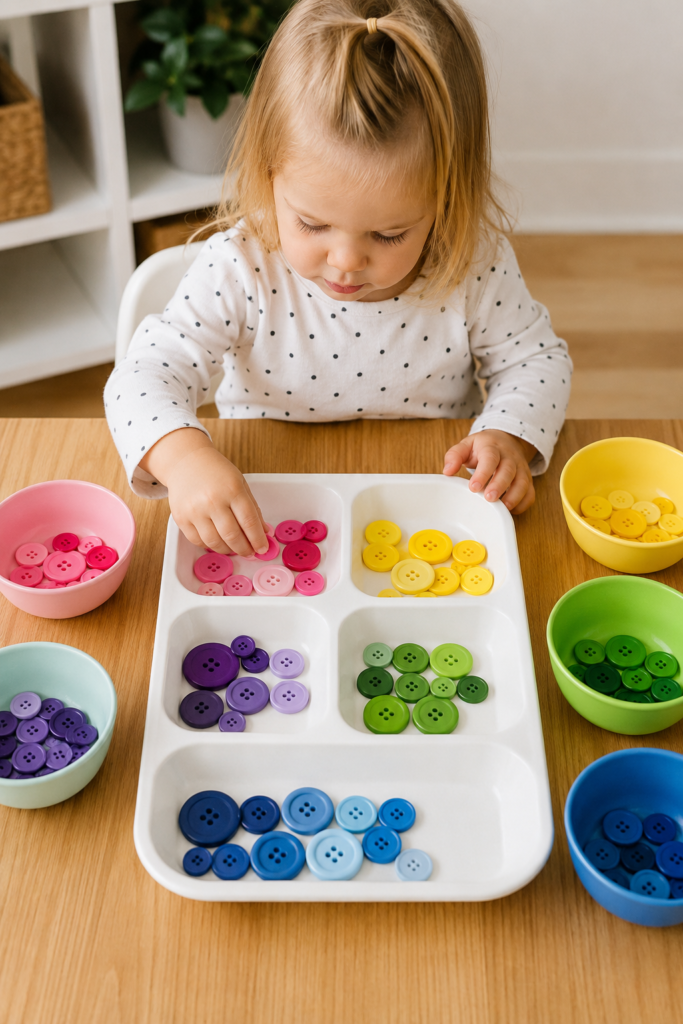
The idea behind this activity is excellent: take unused objects, group them by colour or size, and give them another learning purpose. The usual version uses buttons, but I would change the material for toddlers under three. Loose small buttons can be a choking hazard, so use oversized recycled lids or another large, smooth object instead.
The sorting tray should also stay simple. Four colour groups are plenty at first, and the child does not need to complete every category. If the child begins inventing a different system—large pieces here, favourite colours there—that is still useful sorting practice.
Materials and Tools
- Large recycled plastic lids or other oversized smooth sorting pieces
- Divided tray, muffin pan, or shallow bowls
- Four or five colour categories
- Optional matching coloured paper circles for visual cues
- Storage container kept out of reach when the activity is finished
Steps for This Recycling Activity
- Choose large sorting pieces. Remove anything cracked, sharp, or small enough to be mouthed. Wash and dry the pieces before use.
- Set up only a few categories. Put one example piece in each section of the tray so the child can see the idea without a long explanation. Use colour first because it is easy to notice.
- Sort together, then step back. Place one or two pieces as examples, then let the toddler continue. If the child changes the rules, follow the new pattern for a while rather than constantly correcting it.
- Count and pack away. When finished, collect every loose piece and store the set where the child cannot access it unsupervised.
For me, the best part is that the container matters as much as the objects. An old divided food tray can become the organising tool instead of buying a special sorting board.
Variation: Sort clean large lids by colour, texture, or size instead of using buttons at all.
10. Toilet Paper Roll Binoculars
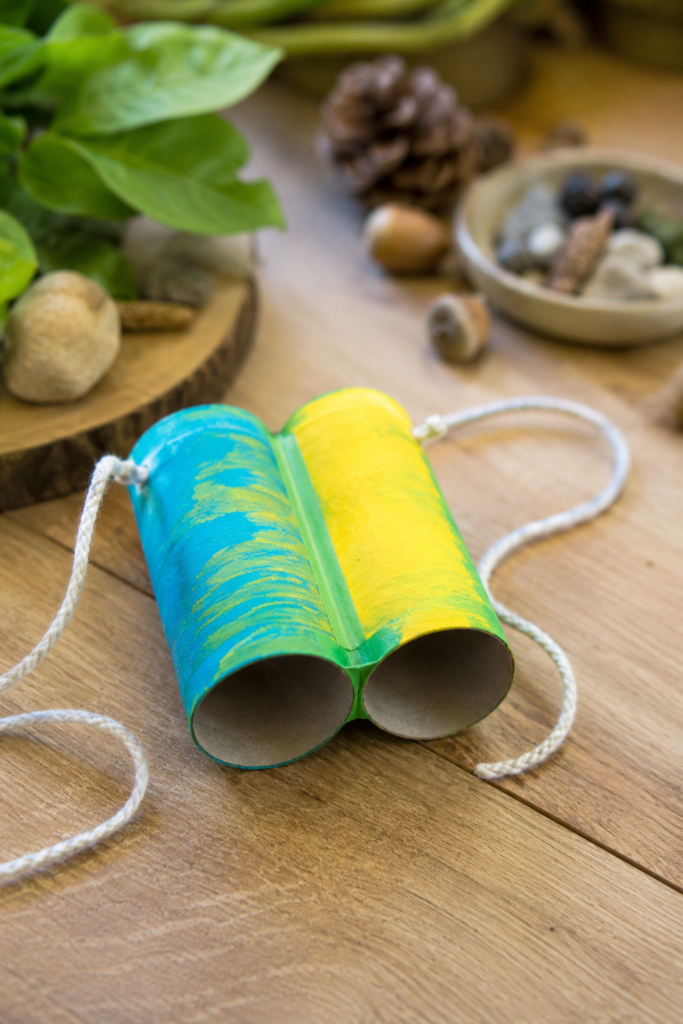
Paper-roll binoculars are one of the easiest pretend-play crafts because the rolls already resemble the finished object. The child can look through them, search for birds from a window, or carry them on a short garden walk without needing lenses or complicated construction.
I would keep neck cords out of toddler versions. A long string adds no real value to the activity and creates something extra to manage around the neck. The binoculars work perfectly well held in two hands, or you can add a short hand loop only when appropriate and closely supervised.
Materials and Tools
- Two clean cardboard toilet-paper rolls
- Washable paint or crayons
- Wide tape or child-appropriate glue
- Optional strip of cardboard between the rolls for spacing
- Adult scissors
Steps for This Recycling Activity
- Check and shape the rolls. Remove loose paper and flatten any sharp torn edges. If the rolls are very soft, use a small strip of cardboard between them to help the pair stay aligned.
- Decorate before joining. Let the toddler paint or colour the outside of each roll. Leave the inside plain so wet paint does not transfer around the face.
- Join the two rolls securely. An adult tapes or glues them side by side and presses the connection until firm. Check that no tape corner is peeling where it could stick to hair or skin.
- Use them as a looking tool. Ask the child to find something green, something round, or a bird outside. Keep the activity calm and visual rather than adding lots of extra accessories.
The design really does not need more than two tubes. Once the child can hold them and look through them, the craft has already done its job.
Variation: Cover the outside with one strip of leftover wrapping paper instead of paint for a faster, less messy version.
11. Recycled Art Stamps
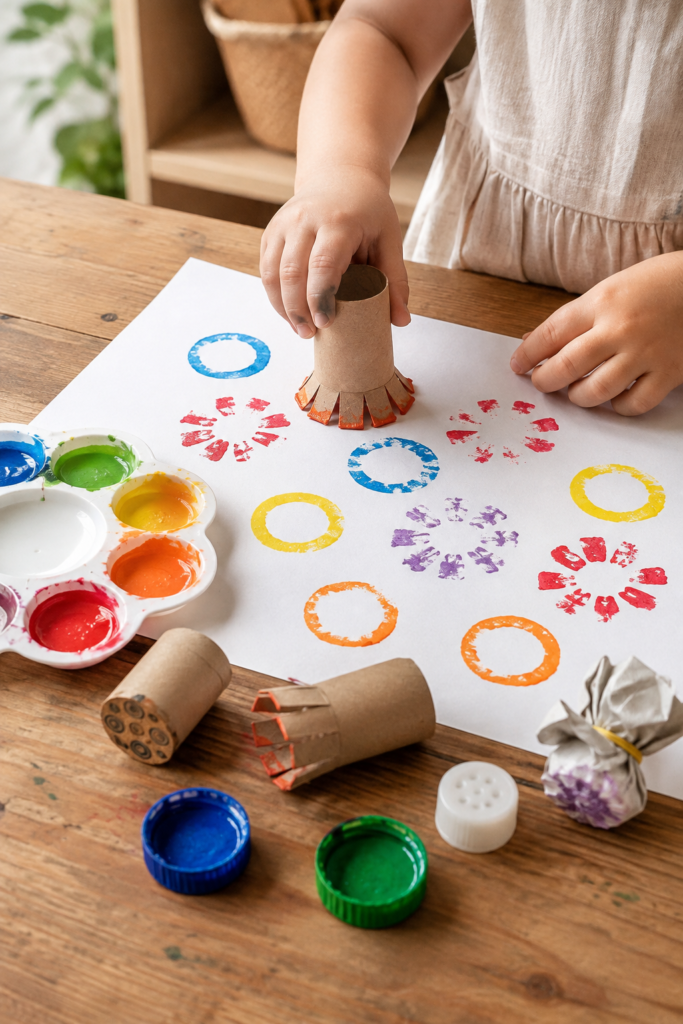
Stamping is especially good for recycling because the tool can be almost as simple as the print. A cardboard roll makes a circle, a folded edge makes an oval, and an adult can snip the end of a roll into broad fringe to create a flower-like mark. This keeps the tool large enough for small hands and avoids relying on tiny bottle caps.
The main trick is controlling the paint. A shallow amount gives a clearer print and keeps the cardboard from becoming soggy too quickly. I would prepare two or three stamp shapes rather than a whole collection, then let the child repeat them across the paper.
Materials and Tools
- Cardboard paper rolls
- Large plastic lids if appropriate and easy to grip
- Washable non-toxic craft paint
- Shallow paint tray or palette
- Large sheet of paper
- Adult scissors for shaping cardboard-roll ends
Steps for This Recycling Activity
- Prepare large stamp shapes. Keep one roll round, flatten another slightly for an oval, and let an adult cut broad fringe into a third if desired. Avoid very thin cuts that bend or tear immediately.
- Use shallow paint. Pour a small amount into a tray and show the child how to touch only the stamp edge into the colour. Too much paint hides the shape and makes the tool slippery.
- Press, lift, and repeat. Stamp straight down and lift rather than rubbing the tool across the page. Then try another colour or overlap a few prints to make flowers, wheels, or simple patterns.
- Stop before the cardboard collapses. Replace a soggy stamp instead of continuing to press with it. Leave the artwork flat to dry and wash reusable plastic pieces immediately.
This is where repetition becomes part of the design. Toddlers often want to stamp the same shape again and again, and there is no reason to interrupt that just to make the page look more varied.
Variation: Use the cut base of a clean cardboard food carton to create a larger geometric stamp that is easier to grip than small caps.
Toddler Recycling Craft Choices That Can Create Frustration or Safety Problems
Using Small Loose Pieces Because They Look Colourful
Tiny buttons, beads, googly eyes, short craft-wire pieces, and small caps may make a project look detailed, but they are a poor fit for very young children. For toddlers under three, keep loose small parts out of reach and replace them with drawn details, large paper shapes, or oversized recycled pieces.
Letting the Child Join Before the Adult Preparation Is Finished
Cutting the bottle, opening the cardboard window, making holes in a cap, or securing a metal edge should happen before the activity begins. A toddler should arrive at a prepared craft station, not wait beside adult tools while the project is being made safe.
Saving Damaged Materials Just Because They Are Recyclable
Cracked plastic, rusty cans, wet cardboard, containers with strong odours, and materials with sharp damage are not worth using. Recycling works best when the material is still suitable for a second purpose.
Making Every Project Too Decorative
A watering jug needs to pour, binoculars need to be comfortable to hold, and a playhouse needs a safe doorway. Decoration should not interfere with the main job of the finished object. If paint, ribbon, glued pieces, or extra attachments make the craft harder to use, remove them.
Giving Too Many Instructions at Once
Toddlers usually respond better to one action at a time. “Press this stamp” is easier than a long explanation about repeating patterns, colour sequences, and where each shape should go. Keep the goal small and let the child’s attention decide when the activity is finished.
Using Long Cords or Wearable Attachments Unnecessarily
Pretend binoculars and similar crafts do not need long strings around a toddler’s neck. Keep them handheld and simple unless an accessory is genuinely necessary and age-appropriate.
Forgetting to Recheck the Finished Craft
Cardboard softens, tape peels, paint flakes, and glued pieces can loosen after play. Check reusable projects before each session and retire them when they no longer feel secure.
Frequently Asked Questions
What are the easiest recycling activities for a young toddler?
Paper collage, cardboard-roll stamping, a milk-jug watering can, and a simple cardboard box playhouse are good starting points because the child can understand the action quickly. Choose projects with large materials and very little assembly during the toddler’s part of the activity.
Can toddlers use recycled bottle caps and buttons for crafts?
For children under three, loose small parts can pose a choking hazard, so I would avoid small buttons and small caps during direct play. Use larger recycled lids, draw decorative details instead, or save small-piece crafts for older children.
How do I clean recycled materials before craft time?
Wash food and drink containers thoroughly with soap and water, rinse them, and let them dry completely. If a container keeps an odour, greasy residue, rust, mould, or damage after cleaning, choose another material.
Which parts of these projects should adults do?
Adults should handle cutting thick cardboard, trimming plastic bottles, piercing drainage holes, making holes in jug caps, securing metal edges, and any step involving sharp tools. The toddler can usually handle painting, pressing, sorting large pieces, placing paper, and simple pretend play.
Do recycling activities need to look neat to be useful?
No. A toddler-made project can have uneven paint, crooked paper, and mismatched colours and still work very well. I would focus on whether the child can use the object and understand its new purpose rather than whether the result looks polished.
How can I stop recycled crafts from creating even more clutter?
Choose projects with a clear second use and keep only the ones the child actually returns to. A watering can, planter, playhouse, puzzle, or pair of binoculars earns its space more easily than a large pile of crafts that are never handled again.
How long should a recycling activity last for toddlers?
There is no single ideal time. Stop while the child is still comfortable and interested, even if the project is not fully decorated. You can always return to a cardboard house or planter later, but forcing a long session usually makes the craft less enjoyable.
Let Simple Recycled Materials Become Part of Everyday Play
The most useful recycling activities for toddlers do not ask children to understand waste systems or environmental terminology. They show the idea physically. A box that would have been discarded becomes a place to play, a bottle holds a plant, a jug waters flowers, and yesterday’s newspaper becomes today’s pretend rocket.
That clear before-and-after change is what I would keep at the centre of these 11 creative recycling activities for toddlers. Choose clean materials, let adults handle the risky preparation, and give the child one simple job they can genuinely do. The project does not need to be elaborate to make reuse feel normal.
Start with whatever suitable item is already waiting in your recycling pile. Which one could become something useful before it leaves the house?