An Adirondack chair can look tired long before the timber has reached the end of its useful life. Sunlight fades the colour, rain works into small cracks, and the broad arms collect every mark from cups, plant pots, and muddy hands. A careful paint job can make that same chair feel settled in the garden again, but the lasting part happens before the first bright coat goes on.
I don’t think outdoor furniture needs to be replaced simply because the old finish has peeled or the colour no longer suits the space. Wooden Adirondack chairs are worth checking properly because their wide slats, angled joints, and low seat can hide loose screws and damp patches. Clean wood, sound joints, feathered paint edges, and a suitable exterior coating matter far more than rushing towards the colour.
The chairs here range from heavily weathered white timber to quiet neutral pairs, muted green seating, and a bold two-colour team design. Each finish solves a slightly different problem, so the best method depends on the chair you already have rather than on one fixed formula.
Before You Start
Move the chair onto a firm work surface and check it in daylight. Tighten loose screws, look for split slats, and press gently around the feet, arms, and seat supports. Paint will not make weak wood safe, so repair or replace damaged parts before treating the surface as a decorating project.
Wash away dirt, algae, grease, and loose chalky paint with a cleaner suitable for the existing finish. Let the chair dry fully before sanding or priming. Trapped moisture can push a new coating away from the timber, especially around end grain and joints where water tends to sit.
Choose an exterior paint system that suits the chair material and the condition of the old coating. Bare or exposed wood may need an exterior primer, while sound existing paint may only need cleaning and thorough scuff sanding. Follow the paint manufacturer’s preparation, temperature, recoat, and curing instructions rather than relying on a quick touch test.
Set Aside Chairs with Serious Damage
A fresh coat of paint can improve a worn finish, but it cannot make a damaged chair safe. Set the chair aside if you find:
- Rotten or soft wood around the legs, seat, or joints
- Deep cracks through a supporting board
- Broken seat or back slats
- Loose joints that continue moving after the screws are tightened
- Large areas of swollen or separating wood
- Active mold or a strong damp smell
- Fresh wood dust or signs of insect damage
- Rusted bolts that have weakened the surrounding material
- Missing structural screws, braces, or supports
- Sharp edges that cannot be sanded safely
- Plastic that has become brittle, chalky, or cracked
- A metal frame with deep rust or holes
- Previous repairs that are separating
- A chair that leans or collapses under light pressure
- Old peeling paint of unknown age
Do not sand an old painted chair until you know whether the existing coating can be handled safely. Older furniture may have layers of paint that require special testing and removal precautions.
Severely cracked plastic chairs are usually unsuitable for repainting. Paint may cover the damage for a short time, but it will not restore the strength of sun-damaged plastic.
For Ordinary, Sound Chairs, Inspect:
- The chair material, such as wood, plastic, composite material, or metal
- Loose screws, bolts, nails, and brackets
- Movement around the arms, legs, seat, and backrest
- Small cracks that can be repaired
- Splinters and rough edges
- Peeling, bubbling, or flaking paint
- Bare wood exposed by weathering
- Grey or faded wood fibres
- Rust around metal fittings
- Dirt trapped between narrow slats
- Green growth, mildew, or bird droppings
- Grease, sunscreen, food, and drink stains
- Water marks and dark patches
- Sap or sticky residue
- Uneven legs or damaged feet
- Previous filler and repair work
- Water collecting in screw holes or joints
- Plastic surfaces that feel chalky
- Areas that rub when the chair is folded or moved
- The condition of the underside and back edges
Tighten loose fittings and replace badly rusted screws before painting. Use outdoor-rated replacement hardware where possible.
Check whether the existing paint is firmly attached. Scrape a small loose area with a filling knife. If the coating lifts easily in wide sections, more preparation will be needed before primer can be applied.
Allow wooden chairs to dry completely after washing. Moisture trapped inside the wood can cause new paint to blister or peel.
Useful Materials and Tools
- Protective gloves
- Safety glasses
- Dust mask or suitable respirator
- Drop cloth or plastic sheeting
- Bucket of warm water
- Mild soap or outdoor furniture cleaner
- Stiff nylon brush
- Small cleaning brush for narrow gaps
- Sponge and clean cloths
- Garden hose
- Paint scraper
- Filling knife
- Medium- and fine-grit sandpaper
- Sanding block or sanding sponge
- Detail sanding tool for spaces between slats
- Vacuum with a brush attachment
- Tack cloth or slightly damp dusting cloth
- Screwdrivers
- Adjustable wrench or socket set
- Replacement outdoor-rated screws and bolts
- Exterior wood glue
- Exterior wood filler
- Clamps for minor repairs
- Rust-removing brush for metal fittings
- Painter’s tape
- Primer suitable for wood, plastic, composite material, or metal
- Exterior furniture paint
- Angled paintbrush
- Small brush for narrow gaps
- Small smooth-finish roller
- Paint tray
- Stirring stick
- Paint sprayer or plastic-rated spray paint, where suitable
- Compatible exterior clear coat, if required
- Wooden blocks or painter’s pyramids for lifting the chair
- Small container for removed screws and fittings
Choose the primer and paint according to the chair material rather than its appearance. Wood, plastic, composite boards, and metal do not accept the same products.
Test the cleaner, primer, and paint on a hidden area before treating the complete chair. Check that the new coating bonds properly and does not soften, wrinkle, or lift the old finish.
Work outdoors or in a well-ventilated area, but avoid painting in strong wind, direct midday sun, rain, or very humid conditions. Place the chair on blocks so you can reach the lower edges without setting freshly painted surfaces directly on the ground.
Safety note: Wear eye protection and a suitable dust mask while scraping or sanding. If an old coating may contain lead or another hazardous material, test it or seek professional advice before disturbing it.
Rescue a Weathered White Chair with Bright Turquoise Paint
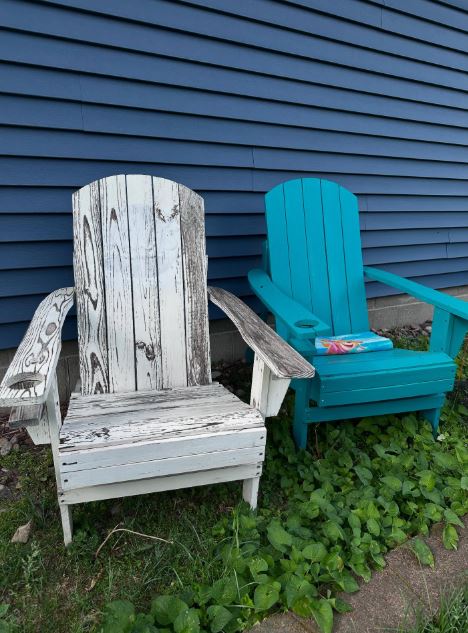
A peeling white Adirondack chair shows exactly why preparation cannot be treated as a quick formality. The remaining white paint is broken by exposed dark timber, worn arm surfaces, and marks that would remain visible beneath a thin new coat. Beside it, the turquoise chair has a clean, solid colour that makes the simple slatted construction feel much more deliberate.
Bright colour works well on a chair with a rough visual history because it creates one strong finish across repaired and previously painted areas. Even so, the new paint should not be asked to bridge flakes, deep ridges, or soft timber. The most useful goal is not to remove every trace of the former coating; it is to remove anything unstable and smooth the boundaries that remain.
I especially like turquoise near dark blue siding because the colours are related without disappearing into one another. In a greener garden, the same chair could become a small point of colour rather than another object blending into the planting.
Materials and Tools
· Sound wooden Adirondack chair with repairable joints
· Exterior furniture cleaner, scrubbing brush, and clean cloths
· Paint scraper and medium- and fine-grade sandpaper
· Wood filler or exterior repair product when appropriate
· Exterior primer suited to bare wood and the remaining coating
· Exterior-grade turquoise paint suitable for wooden furniture
· Quality synthetic brush and a smaller brush for joints
· Drop cloth, gloves, eye protection, and dust mask
Build a Clean, Even Turquoise Finish
1. Stabilise the chair before decorating it. Check every slat, arm support, and foot, then tighten or replace loose fasteners. Fill only small, stable defects with a suitable exterior repair product; badly split or soft pieces need a proper timber repair rather than a layer of filler and hope.
2. Remove loose paint and soften the old edges. Scrape away coating that lifts easily, then sand the remaining paint until the transition into exposed wood feels gradual. Work carefully around screw heads and narrow slats, where thick flakes often remain after the larger flat areas look clean.
3. Clean again and prime the exposed areas. Vacuum or brush away sanding dust, wipe the chair clean, and let it dry. Prime bare timber and repaired patches as directed; when the old coating is very uneven, a full compatible primer coat may give the turquoise colour a calmer base.
4. Apply the colour in thin, controlled coats. Brush along the length of each slat and keep checking the lower edges for drips. Paint the underside, joints, and end grain without flooding them, then let each coat dry as instructed before adding the next one.
5. Give the finish time to settle. Inspect the chair in daylight and touch up missed edges only after the main coat has dried properly. Keep it out of heavy use until the complete paint system has cured, because wide arms and front seat boards are often marked first when a chair is returned too quickly.
The part I would check most carefully is the arm surface. It sits almost horizontal, so thick paint can pool there and later show fingerprints, dents, or ridges.
For a quieter version, use deep teal, dusty blue, or charcoal rather than bright turquoise. A small side table in the same colour can connect the chair to the rest of the patio without turning every piece into a matching set.
Paint a Matching Pair in a Quiet Greige
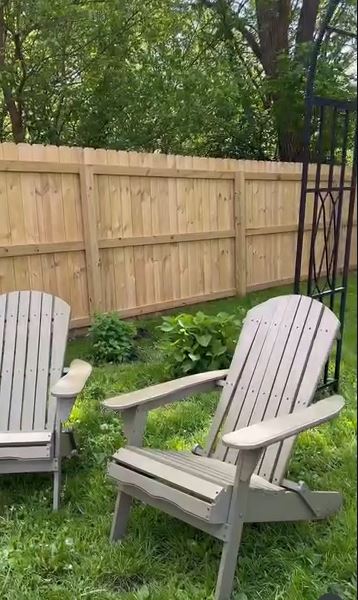
A warm greige finish gives these two chairs a softer presence than plain white and a lighter feel than dark brown. The colour sits comfortably beside the fresh timber fence, grass, and leafy planting, which makes the seating look part of the garden rather than a separate decorative statement.
Painting a pair brings one extra challenge: small differences become easy to notice. One chair can look darker simply because its old coating absorbed primer differently, or because the second chair received a heavier final coat. Preparing both chairs together and using the same tin of well-mixed paint helps the pair stay consistent.
Neutral paint also shows shadows clearly along the back slats, seat boards, and arm supports. That is useful because the structure remains visible, but it means runs and thick brush marks will catch the light. Several light coats are calmer than one heavy attempt to finish both chairs in an afternoon.
Materials and Tools
· Two structurally sound wooden Adirondack chairs
· Cleaner suitable for exterior painted wood
· Scraper, sanding sponges, and detail sandpaper
· Exterior primer where the old finish or bare timber requires it
· One batch of greige or warm neutral exterior furniture paint
· Synthetic brushes in medium and small sizes
· Stirring stick, paint kettle, and labelled hardware containers
· Protective sheet and safety equipment
Keep the Colour Consistent Across Both Chairs
1. Inspect the pair as one project. Place the chairs side by side and compare their condition before beginning. Mark loose joints, worn feet, exposed timber, and areas of peeling paint so one chair does not receive less preparation simply because it looks slightly better at first glance.
2. Clean and sand in the same order. Wash both chairs, let them dry, then scrape and scuff the same sections on each one. Pay attention to the seat edges and the underside of the arms, where hands and weather often wear the coating differently.
3. Prime the surfaces evenly. Spot-prime exposed timber and repairs, or apply a complete compatible primer when the existing finishes differ noticeably. Keep the primer thin around the gaps between slats so the boards remain visually separate and water is less likely to sit in a thick paint bridge.
4. Work from the same mixed paint batch. Stir the paint thoroughly and decant a manageable amount. Paint the back slats of both chairs, then the arms, seats, sides, and lower supports in the same sequence; this makes it easier to maintain similar coverage and notice missed areas.
5. Compare the finished pair in natural light. After the coats have dried as directed, move the chairs into the same light and look across the broad arms and seat boards. Correct thin patches with a light final coat rather than adding a heavy patch that leaves one chair shinier or more textured than the other.
I know it can feel quicker to finish one chair completely before touching the second, but working through the same stage on both usually produces a closer match.
Greige is easy to adapt. A slightly warmer tone works near cedar fencing, while a cooler stone shade suits grey paving and darker cladding. Reused outdoor cushions can provide the colour if the chairs themselves stay quiet.
Use Muted Sage Green for a Calm Deck Finish
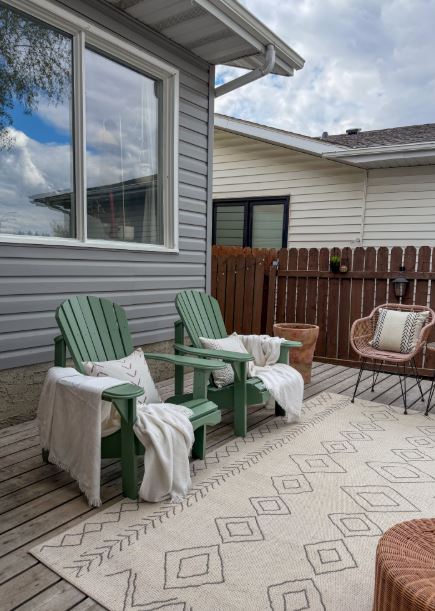
Muted sage green sits between a neutral and a stronger garden colour. These chairs are clearly painted, yet the finish still relates to timber decking, planted pots, and the outdoor setting. The broad arms and evenly spaced back slats make the green look steady rather than busy.
A softer colour depends on an even base because dark patches, filler, and exposed wood can show through more readily than they do beneath a deep navy or saturated teal. Primer is especially helpful when the chair has several previous finishes or when pale repairs interrupt a darker old coating.
The smooth result also suits a deck where the chairs sit beside a patterned rug. I don’t think the furniture needs extra decorative motifs here; the shape of the chair and the restrained green are enough.
Materials and Tools
· Wooden Adirondack chair or matching pair
· Mild exterior cleaner and soft scrubbing brush
· Fine sanding sponge for curved edges and slats
· Exterior bonding or wood primer as required
· Muted sage exterior paint intended for furniture or trim
· Quality synthetic brush and optional small foam roller for broad flat boards
· Clean paint tray, stirrer, and lint-free cloths
· Drop cloth and personal protective equipment
Create a Soft Sage Finish Without Heavy Brush Marks
1. Test the colour on the actual chair. Paint a small prepared area underneath an arm or on a sample board coated with the same primer. Check it outdoors at different times of day, because sage can appear cooler beside grey siding and warmer against natural timber.
2. Prepare every edge that catches the hand. Clean the chair, then sand the arms, front seat board, and upper back carefully. These are the surfaces people touch most, so old gloss, rough fibres, and chipped paint need more attention than hidden areas.
3. Prime for colour consistency. Cover bare wood, filler, and strongly contrasting patches with a suitable primer. If the chair has a dark or blotchy base, a complete primer coat can reduce the number of sage coats needed and help the final sheen look even.
4. Paint the narrow parts before the broad faces. Use a small brush around joints, inside corners, and between slats, then smooth the visible faces in the direction of the grain. Work in manageable sections so the paint does not begin to tack before the last light finishing strokes.
5. Protect the new finish from early wear. Let each layer dry and the complete system cure according to its instructions. Avoid dragging the chair across the deck or placing a cushion on it too soon, as pressure and trapped moisture can mark a finish that feels dry but has not fully hardened.
For me, the most important detail is keeping the green off the deck boards. A proper drop cloth is less exciting than choosing paint, but cleaning dried exterior coating from weathered timber is not a pleasant final step.
A single sage chair can pair with natural wood furniture, while two matching chairs create a more settled conversation area. For a slightly bolder version, paint a small table in the same green and leave the remaining outdoor pieces neutral.
Add a Two-Colour Team Design with a Simple Stencil
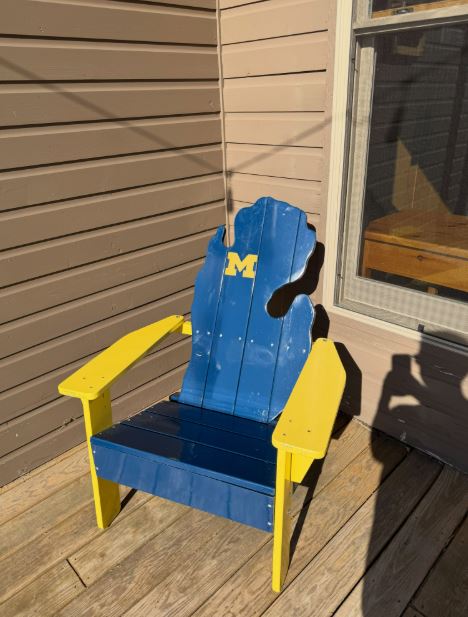
Deep blue across the seat and back gives this chair a strong base, while yellow arms, front legs, and the centred letter create clear contrast. The design feels bold because the colours are kept in large, simple sections rather than scattered across every slat.
A two-colour chair needs more planning than a single-colour finish. The paint boundaries must follow sensible structural lines, and the stencil has to sit square on a back made from separate boards. Masking across narrow gaps can allow paint to creep underneath, so light coats and careful pressing matter.
The shaped backrest gives the chair even more personality, but the same painting approach works on a standard rounded Adirondack back. An initial, house number, small star, or simple geometric symbol can replace the team letter without changing the method.
Materials and Tools
· Prepared wooden Adirondack chair
· Exterior primer compatible with the existing coating
· Deep blue and bright yellow exterior-grade paints
· Low-tack exterior painter’s tape
· Paper or reusable stencil for the chosen letter or symbol
· Small stencil brush or dense foam applicator
· Synthetic brushes for the chair surfaces
· Measuring tape, removable pencil, and straight edge
· Drop cloth and safety equipment
Keep the Colour Boundaries Sharp
1. Plan the colour map before opening the paint. Decide which structural pieces will be blue and which will be yellow, then photograph or sketch the chair. Let the boundaries follow complete arms, legs, or support boards rather than stopping halfway across a piece where a straight line will be difficult to maintain.
2. Prepare and prime the whole chair. Clean, repair, scrape, and sand the surface just as you would for a one-colour finish. Apply the required primer evenly, paying attention to the edges that will later carry tape; rough primer ridges make sharp paint lines harder to achieve.
3. Apply the main blue colour first. Paint the back, seat, and selected supports in thin coats, keeping the yellow areas clean where practical. Let the blue dry properly before masking it, because tape can lift a coating that has only formed a dry skin.
4. Mask and add the yellow sections. Press low-tack tape firmly along the chosen boundaries and paint away from the tape edge rather than pushing paint beneath it. Build the yellow with light coats, then remove the tape while the final layer is still manageable according to the paint guidance.
5. Centre and stencil the letter. Measure the usable back area and mark a light vertical and horizontal centre. Secure the stencil across the slats, offload most of the paint from the applicator, and dab in several light passes; remove the stencil carefully before thick paint can bridge the board gaps.
The logo is the first detail the eye finds, so I’d spend more time centring it than adding extra decoration. A clean single letter usually reads better than several small symbols competing across the back.
For a quieter personalised chair, use two close shades and stencil a house number in a slightly darker tone. You can also keep the chair one colour and reserve the contrast for the stencil alone.
Match the Paint System to the Chair You Have
Bare or Mostly Bare Wood
Bare timber usually needs cleaning, sanding, and an exterior primer suited to the wood and chosen topcoat. Pay particular attention to end grain at the feet and slat ends because those areas absorb moisture readily and often show the first signs of coating failure.
Sound Existing Paint
A firmly attached coating does not always need to be stripped away. Clean it well, dull the gloss with thorough scuff sanding, feather small chips, and confirm that the new primer or paint is compatible with the existing finish.
Peeling or Unknown Coatings
Remove loose material rather than sealing it beneath new paint. When the old coating is very thick, brittle, or of unknown age, test before sanding and use a safer removal method appropriate to the material.
Recently Built or Damp Timber
New or recently wet wood may not be ready for paint simply because the surface looks dry. Let the timber reach the condition required by the coating manufacturer, and avoid painting immediately after rain or heavy washing.
Painting Problems That Can Ruin an Adirondack Chair Finish
Painting Damp Wood
Moisture trapped beneath paint can lead to blistering, peeling, and dark marks around joints. Let the chair dry thoroughly after washing and choose a suitable stretch of weather for the work.
Leaving Weak Joints Untouched
A fresh coating can hide cracks without repairing them. Tighten hardware and replace damaged slats before painting, particularly when the chair will carry an adult’s weight.
Sanding Only the Flat Centres
Paint often fails first along edges, around fasteners, and where arms meet supports. Sand those transition points carefully and remove dust from every gap before priming.
Loading the Brush Around the Slats
Too much paint bridges narrow gaps, creates drips underneath, and can hold water against the timber. Use a smaller amount of paint and check the back of each section before moving on.
Ignoring the Feet and End Grain
The lowest parts of the chair sit close to wet ground or decking. Coat exposed end grain as directed and keep the finished feet out of standing water whenever possible.
Using Interior Paint Outdoors
Indoor wall paint is not designed for the same weather and handling as an exterior chair coating. Choose a product labelled for exterior wood and the expected use.
Using the Chair Before the Coating Cures
A surface may feel dry while remaining soft underneath. Early use can leave cup rings, fabric impressions, and dents on the arms and seat, so follow the full curing guidance.
Frequently Asked Questions
Do I need to sand an Adirondack chair before painting it?
Usually, yes. Sanding removes loose fibres, dulls glossy paint, and softens chipped edges so the new coating has a more even base. The amount of sanding depends on whether the chair is bare, soundly painted, or heavily peeling.
Can I paint directly over the old colour?
You can paint over a firmly attached and compatible old coating after proper cleaning and scuff sanding. Scrape peeling areas, prime exposed wood, and use a full primer coat when the old colour or surface condition may interfere with the new finish.
Is a brush, roller, or sprayer best?
A quality brush gives good control around slats, joints, and shaped arms. A small roller may help on broad flat boards, while spraying can produce an even coat but requires careful masking, ventilation, weather control, and suitable equipment.
Does every wooden Adirondack chair need primer?
Not always, but bare wood, repairs, stains, and strongly contrasting old finishes often benefit from it. Use the primer recommended for the timber, existing coating, and exterior paint you have chosen.
How many coats of paint should I apply?
Use enough thin coats to achieve an even colour and the coverage required by the product. Do not replace several controlled coats with one heavy layer, and follow the stated recoat times.
Should I add a clear sealer over painted chairs?
Only add a clear finish when it is compatible with the paint system and useful for the expected wear. Some exterior paints are designed to stand alone, while an unsuitable topcoat can alter the colour, sheen, or flexibility.
Can the same method be used on plastic Adirondack chairs?
The preparation and coating choice are different. Plastic or resin chairs may need a cleaner, light abrasion where permitted, and a coating specifically designed to bond to that material; do not assume a wood primer will work.
Let the Chair and Setting Choose the Colour
Learning how to paint Adirondack chairs begins with the condition of the wood, not with the colour card. A heavily peeling white chair needs patient scraping and feathered edges, while a sound matching pair may only need cleaning, scuff sanding, and a consistent paint routine. The bright turquoise, quiet greige, muted sage, and blue-and-yellow finishes all work because the preparation supports the design rather than being hidden by it.
Start with one stable chair and one clear plan. Repair the structure, keep the coats thin, and give the finish enough time to cure before the chair returns to ordinary outdoor life. That waiting stage is not the most satisfying part of the makeover, but it often decides whether the broad arms stay smooth or collect marks after the first afternoon.
Which finish would suit the chair you already have: a strong garden colour, a soft neutral pair, a muted green, or a carefully masked two-colour design?