A headboard sits in one of the most noticeable places in a bedroom, yet it does not have to begin as a new piece of furniture. An old door, leftover timber, empty frames, fabric, crates, or even a wall hanging can define the bed when the material is prepared carefully and fitted securely. The useful question is not only what looks attractive, but what can sit safely behind pillows, remain easy to clean, and suit the way the room is actually used.
I prefer headboard ideas that keep some clue to the material’s earlier life. A worn panel door should still look like a door; reclaimed boards can keep their knots; and a vintage frame collection does not need to pretend it is new. I know it can feel tempting to begin with paint or styling, but measuring the bed, checking the wall, and testing the structure usually make the finished result far more convincing.
Measure the Bed and Wall Before Choosing a Headboard
Make the bed with the pillows arranged normally, then measure the visible mattress width, wall space, and height available above the bed. A headboard can extend beyond the mattress, but it should not crowd windows, switches, bedside lights, or wardrobe doors. Mark the proposed outline with low-tack tape and view it from the doorway as well as from the bed.
Height affects function as much as appearance. A low board may disappear behind stacked pillows, while a deep shelf or projecting frame can become uncomfortable when sitting up. Check where your head and shoulders reach, leave access to sockets, and make sure the design does not trap the mattress or prevent bedding from being changed.
Inspect Materials, Edges, and Fixing Points
Reclaimed materials need a more careful inspection than new boards. Look for hidden nails, loose glass, unstable joints, flaking coatings, insect damage, strong odors, sharp corners, or sections that flex under light pressure. Remove anything unsafe and reject pieces that cannot be repaired without losing their strength.
The wall matters too. Find studs or confirm the correct fixing method for masonry, plaster, or another wall construction before building a heavy design. Large mirrors, doors, storage units, and dense timber panels may need professional installation. A headboard should never depend on pillows, the mattress, or a few decorative hooks to remain upright.
Decide How Permanent the Headboard Should Be
Not every idea needs drilling through the object itself. A wall cleat, bed-frame bracket, removable textile hanging, or separate backing panel can keep a meaningful door, textile, or furniture piece reversible. Photograph unusual hardware before removing it and store original parts in a labelled bag.
Also decide how much of the old finish to keep. Gentle wear can add depth, but loose paint, active rust, grime, and rough splinters need attention. I’d rather preserve one honest feature and make the rest safe than cover every surface with a new layer that hides why the material was worth reusing.
Minimalist Headboard Design
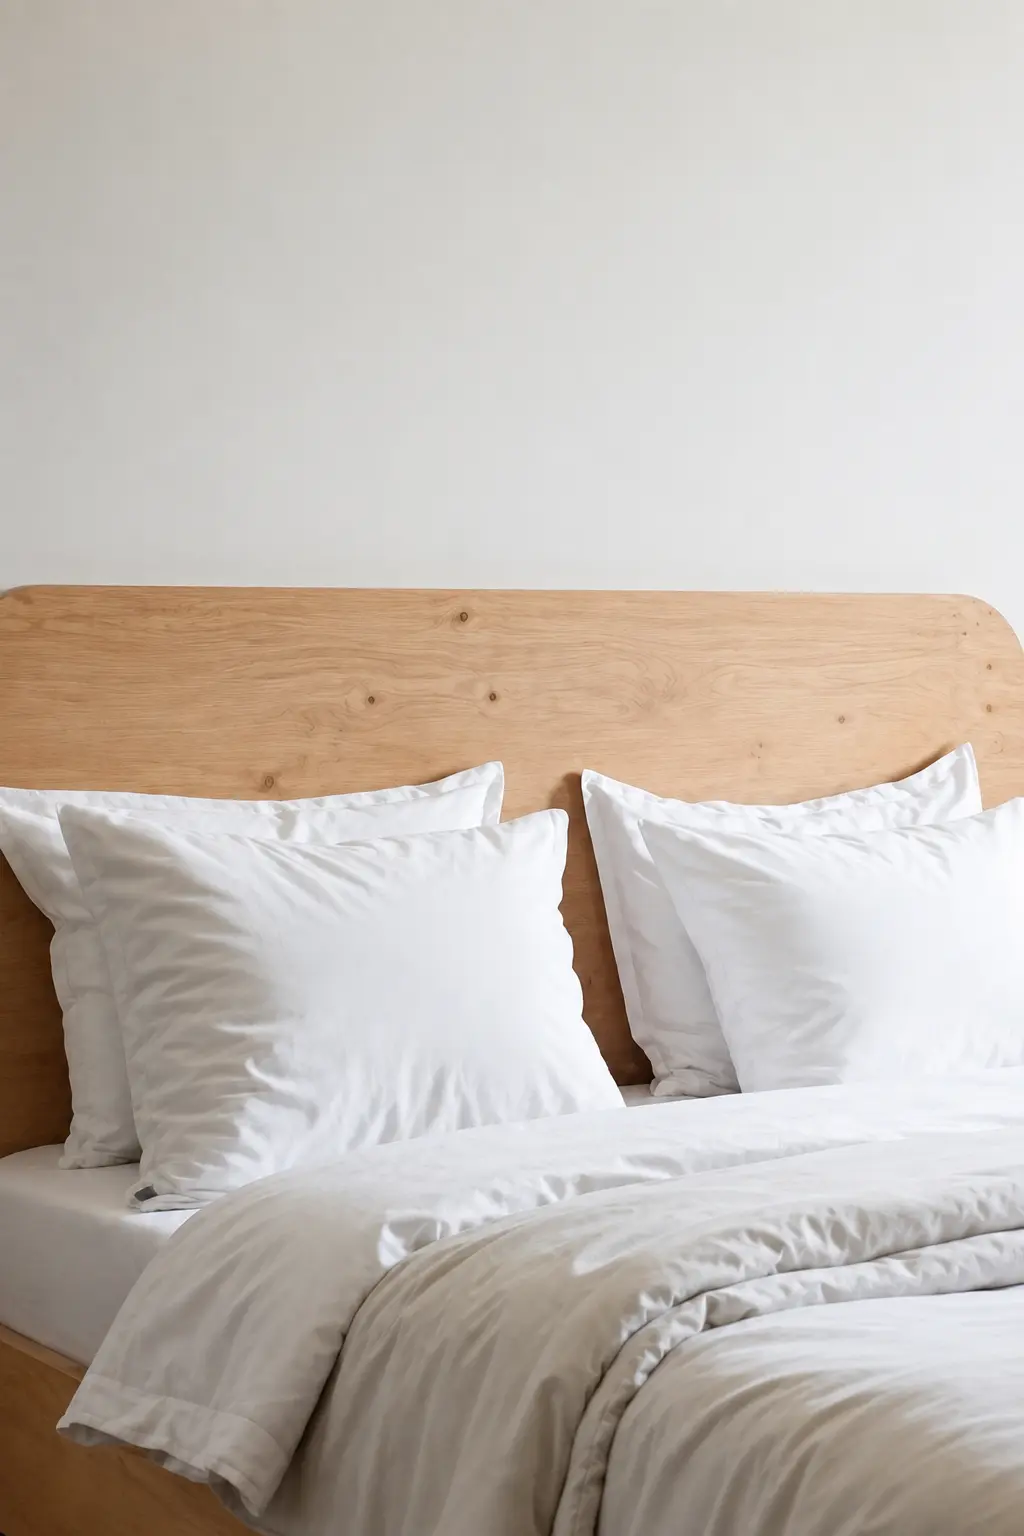
A single pale timber panel can do enough without asking the rest of the room to compete with it. The gently rounded upper corners soften the straight bed frame, while the visible knots keep the surface from feeling flat or factory-made. Against white bedding, the headboard reads as calm and useful rather than decorative for decoration’s sake.
This version is especially workable when you already have a sound tabletop, wide shelf, or joined timber panel that can be trimmed to size. The clean result depends less on expensive wood and more on careful sanding, an even outline, and secure fixing. I don’t think a minimalist headboard needs to be completely featureless; a few natural marks are often what stop it looking anonymous.
Materials and Tools
· A wide reclaimed timber panel, old tabletop, or several boards joined from the back
· Tape measure, pencil, straightedge, and a flexible curve or round template
· Sander or sanding block with suitable abrasive paper
· Saw appropriate for the material and protective eye equipment
· Clear finish, wax, or a light stain if the wood needs protection
· Wall cleat, bed-frame brackets, or another secure mounting system
Steps for This Headboard
1. Measure before shaping. Measure the mattress and mark a headboard width that feels balanced with the bed and nearby furniture. Draw the top line first, then use a round object or flexible strip to create matching curves at the upper corners.
2. Prepare the timber carefully. Check for hidden screws, splits, rough edges, or old finish before cutting. Sand the face, edges, and newly cut curves until pillows and bedding cannot catch on the surface, then remove every trace of dust.
3. Keep the finish restrained. Apply a clear or lightly tinted protective finish that allows the grain to remain visible. Test it on the back first because even a transparent product can deepen the wood more than expected.
4. Mount it without visible clutter. Use a secure cleat or strong brackets suited to the wall and the headboard’s weight. Level the panel, check that it cannot rock, and keep fixings away from places where pillows will press against the wood.
For me, the top outline is the detail worth slowing down for. If one rounded corner sits higher than the other, the simplicity makes the difference obvious, so mark both sides from the same template before cutting.
A renter-friendly variation is to attach a lighter panel to the bed frame rather than the wall. You could also wrap only the lower edge with a narrow felt strip if you want to prevent contact noise without changing the clean appearance.
Boho Headboard Idea
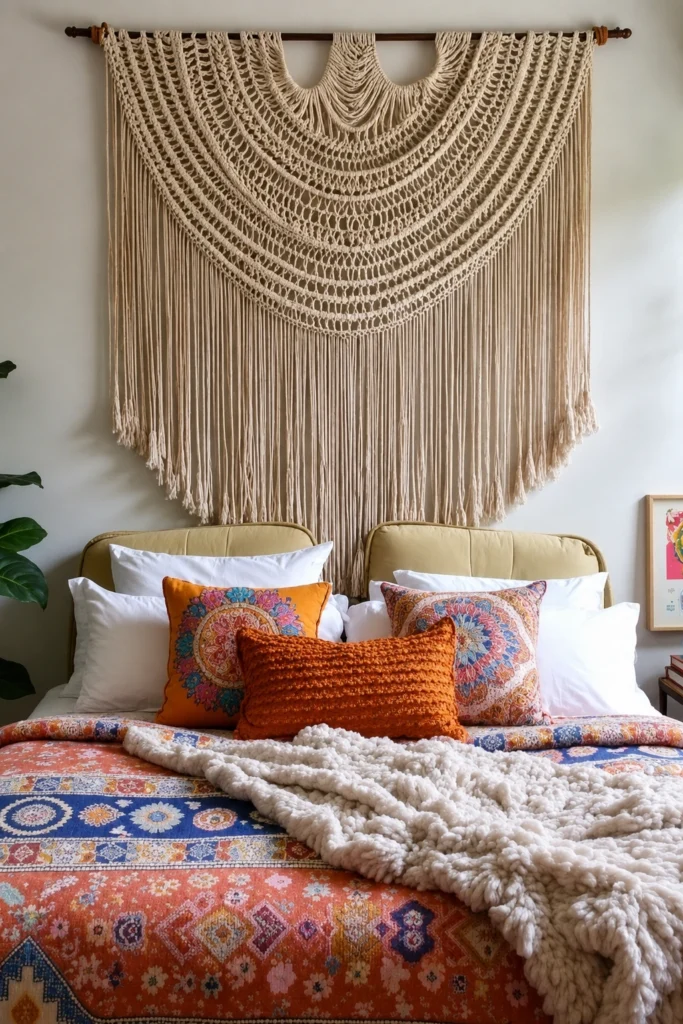
An oversized macrame hanging can frame the bed without becoming a rigid piece of furniture. The broad semicircular pattern, long fringe, and simple wooden rod create height, while the cream cord leaves room for patterned bedding and warmer accent colors below. It works because the textile is large enough to feel intentional rather than like a small wall ornament placed too high.
A similar headboard can be made from an existing wall hanging, a vintage crochet panel, or several smaller fibre pieces joined onto one rod. The important part is the scale. The hanging should visually connect with the width of the bed, but the fringe should stop above pillows so it does not tangle, collect skin products, or pull when someone sits up.
Materials and Tools
· Large macrame wall hanging, crochet panel, or strong cotton cord
· Smooth wooden dowel, reclaimed curtain pole, or straight branch
· Wall brackets or hooks rated for the combined weight
· Tape measure, level, pencil, and stud finder where appropriate
· Soft brush or handheld vacuum for later cleaning
· Optional cotton ties for extending or shortening hanging loops
Steps for This Headboard
1. Plan the height from the pillows upward. Make the bed with the pillows arranged as they are normally used, then hold the textile behind them. Mark a position that keeps the lowest fringe clear while leaving enough wall above for the full pattern to breathe.
2. Check the hanging support. Inspect the rod for cracks and confirm that the loops are evenly spaced. If the textile is handmade or vintage, reinforce weak hanging points with matching cotton rather than trusting a stretched loop.
3. Install level supports. Fix the brackets into studs or suitable wall anchors and use a level before tightening them fully. Hang the piece, then step back from the doorway because a small tilt is easier to notice from a distance.
4. Shape the fringe gently. Comb or separate tangled cords with your fingers and trim only isolated damaged ends. I know it can feel tempting to make every strand identical, but a slightly irregular fringe usually suits the relaxed character better.
The part I would watch is dust. A soft fibre headboard sits close to bedding, so occasional gentle vacuuming matters more than adding extra decoration.
For a smaller room, use a narrower panel centred over the bed and repeat its texture in one cushion. A darker cord can feel heavier, while undyed cotton keeps the wall treatment light and airy.
Budget-Friendly Headboard Solution
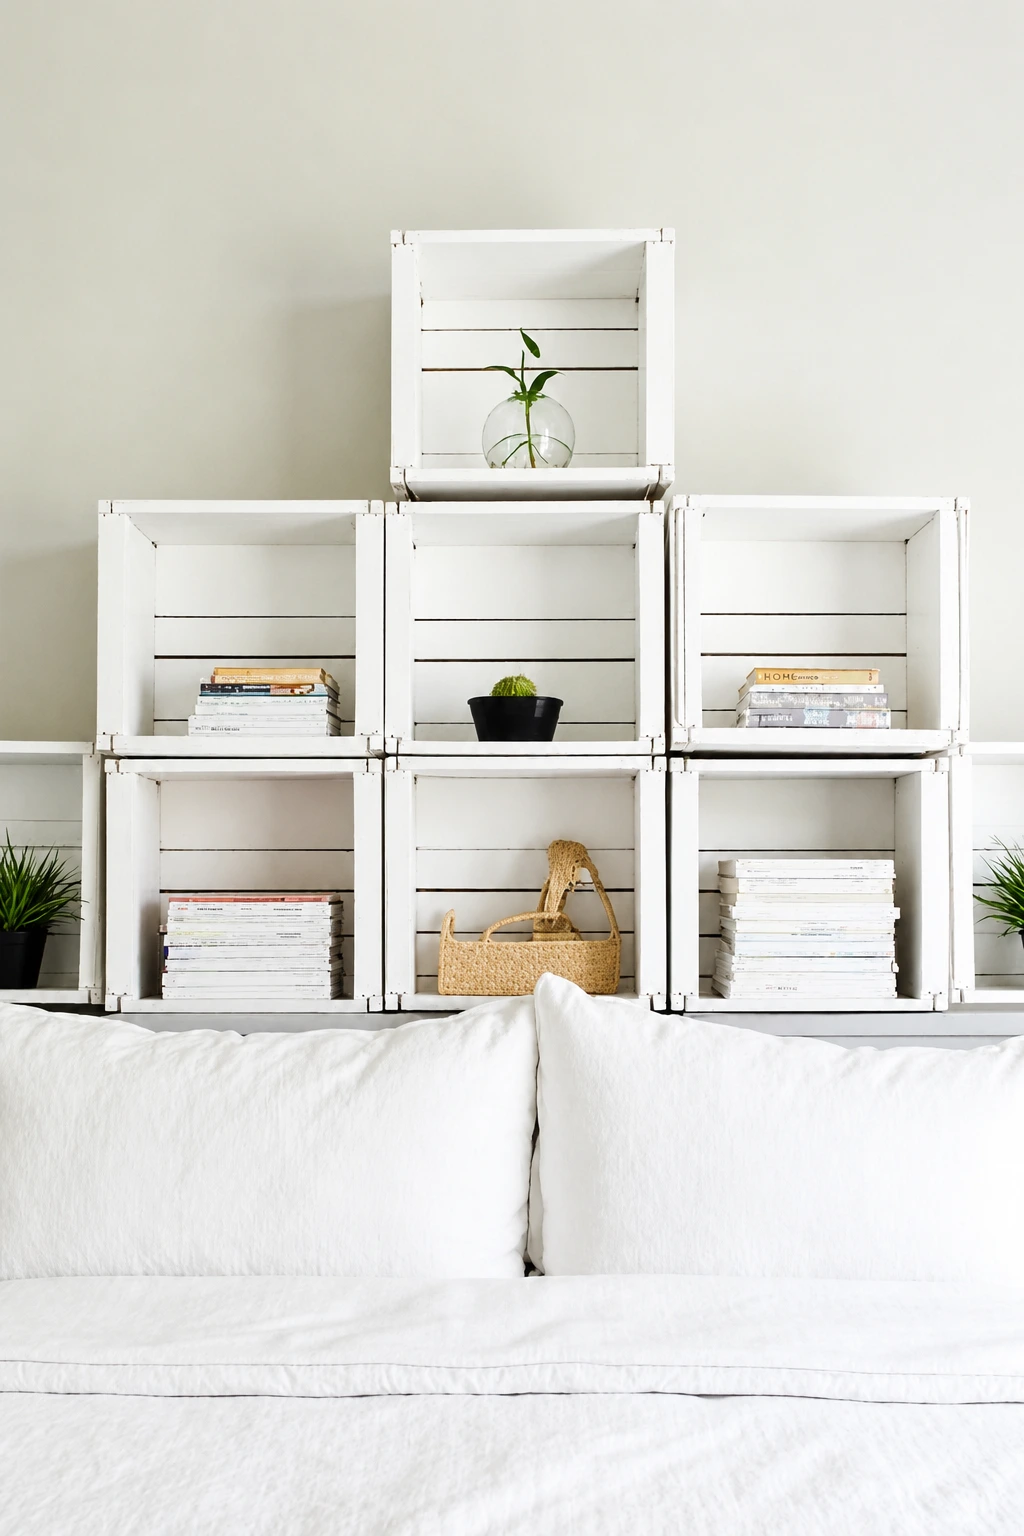
Painted wooden crates can create both a headboard shape and open storage using pieces that are often inexpensive or already available. Stacking them in a stepped arrangement draws the eye upward, and the separate compartments hold books, small baskets, or lightweight decor without taking floor space beside the bed.
The visual idea is simple, but the structure needs more care than the photograph first suggests. Loose crates should never be balanced behind a bed where they can shift. Treat the units as one wall-mounted storage system: inspect each box, join them together, anchor the full arrangement, and keep heavy objects out of the highest sections.
Materials and Tools
· Matching or mixed wooden crates in sound condition
· Screws, joining plates, and wall anchors suited to the wall type
· Drill, screwdriver, level, measuring tape, and pencil
· Sanding block and filler for splinters or old fastener holes
· Low-odor paint or clear finish, plus brush or small roller
· Optional shallow baskets or bookends for the compartments
Steps for This Headboard
1. Test the arrangement on the floor. Lay the crates out before painting or drilling and try a low rectangle, stepped pyramid, or symmetrical grid. Measure the total width and make sure the outer edges do not interfere with bedside lights or switches.
2. Repair and finish each crate. Sand rough slats, tighten loose joints, and fill sharp holes. Paint the crates separately so the corners and inner shelves receive an even coat, then let the finish harden before assembly.
3. Join the units into one structure. Clamp neighbouring crates together and fasten them through strong side rails rather than thin slats. Check the back remains flat, then add a continuous support strip if the individual boxes still flex.
4. Anchor before styling. Secure the arrangement into studs or appropriate heavy-duty anchors and test it without objects inside. Add only light items near the top, keep breakables away from the bed, and leave enough open space that the shelves do not feel packed.
One practical detail I would not skip is a small lip, basket, or bookend in any compartment directly above the pillows. It prevents a paperback or plant pot from moving forward when the wall is bumped.
The same idea can be made with only three crates in a straight row for a lower, simpler version. Leaving the wood natural also saves paint and makes mismatched boxes feel more connected.
Fabric-Covered Headboard
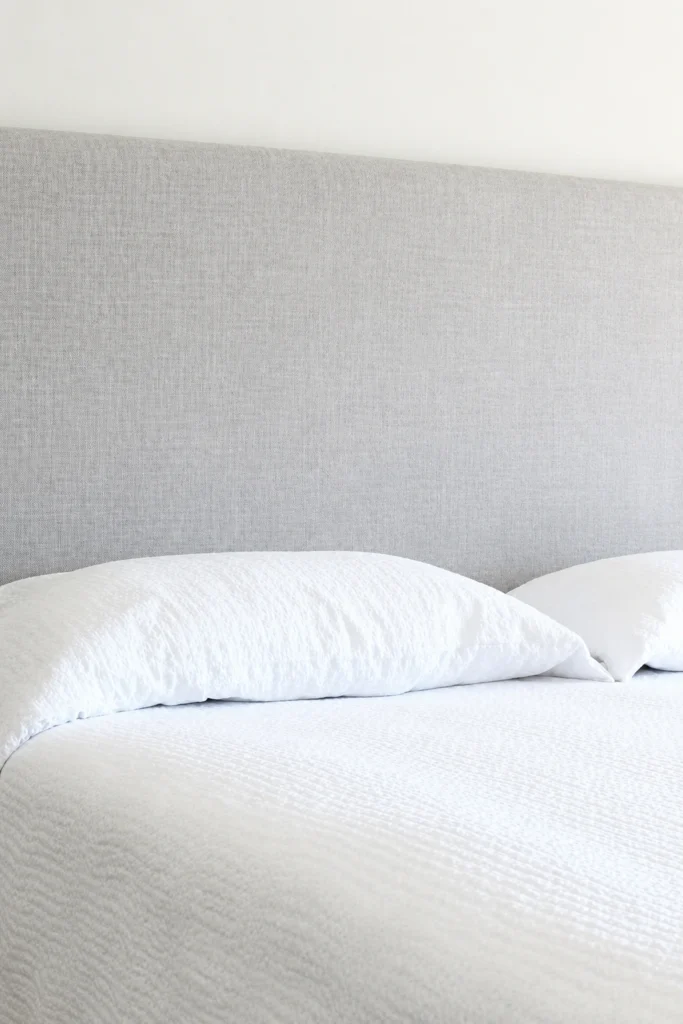
A broad upholstered panel gives the bed a quiet, continuous backdrop and offers a softer surface for reading than bare timber. The light grey fabric in this style has a fine woven texture, so it adds depth without introducing a strong pattern. Its generous height also makes the wall feel finished even when the rest of the room stays very simple.
You can build a similar version around an old flat headboard, a sound door-sized panel, or a new sheet material cut to the required shape. The neatness comes from even padding and firm fabric tension. If the cloth is pulled too tightly in one area and loosely in another, the uneven surface will show immediately in side light.
Materials and Tools
· Flat headboard, sturdy panel, or reused interior door with a smooth face
· Upholstery foam or a clean reusable foam layer
· Batting to soften the foam edges
· Durable upholstery fabric with enough extra for wrapping
· Staple gun and staples suitable for the backing material
· Scissors, tape measure, marker, and optional spray adhesive
Steps for This Headboard
1. Prepare a flat base. Remove handles, protruding hardware, loose veneer, and anything that could be felt through the padding. Round or sand sharp corners, then wipe the panel clean before laying out the foam.
2. Build the soft layers. Cut the foam to the face of the board and add batting that wraps around the edges. Secure the layers lightly so they stay centred, but avoid thick ridges of adhesive that may harden beneath the fabric.
3. Stretch the fabric in sequence. Centre the fabric, place one staple at the middle of each side, and then work outward in alternating directions. Smooth the front repeatedly and fold the corners neatly rather than gathering a bulky knot behind them.
4. Mount and inspect. Attach the completed panel securely to the wall or bed frame. Sit against it, check that the fabric remains smooth, and add a thin dust cover to the back if exposed staples or raw edges could touch the wall.
I would choose fabric by rubbing it with the same type of clothing or bedding that will touch it. A coarse weave may look appealing but can snag delicate pillowcases.
A washable slipcover is another option when the headboard belongs in a child’s room or guest room. Make the padded base slightly simpler, then fit a tailored cover that can be removed without taking the whole structure down.
Farmhouse-Style Headboard Idea
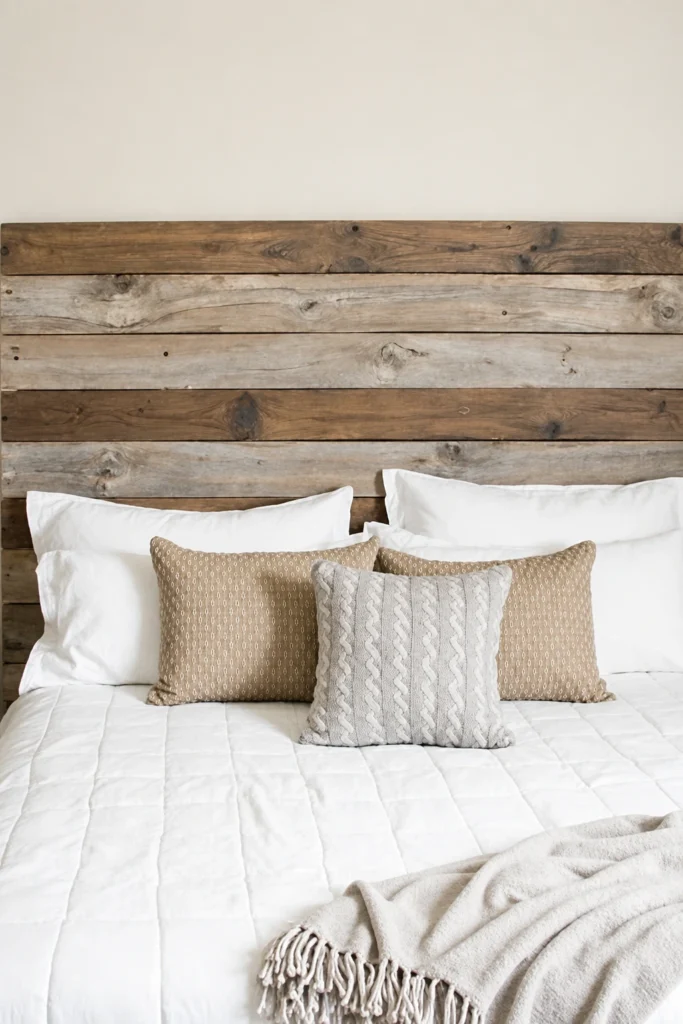
Horizontal reclaimed boards create a farmhouse-style headboard through texture rather than ornament. The mix of pale and darker timber tones keeps the wide surface lively, while the straight rows make it feel orderly enough for a bedroom. White and oatmeal bedding work well here because they let knots, saw marks, and age variations remain visible.
This is a practical use for old fence boards, shelving, or dismantled furniture panels, provided the wood is dry and structurally sound. Reclaimed does not automatically mean ready to use. Old nails, splinters, insect damage, and unknown coatings need attention before the boards sit close to pillows and skin.
Materials and Tools
· Reclaimed boards of similar thickness
· Two or three strong rear battens for joining the boards
· Detector or magnet for finding hidden metal
· Saw, drill, screws, clamps, and eye protection
· Sander, stiff brush, and suitable cleaning materials
· Clear matte finish or low-sheen wood sealer
Steps for This Headboard
1. Sort the boards by condition and tone. Lay every piece face-up and reject boards with active rot, strong odors, or serious splitting. Move the usable boards around until light and dark areas feel balanced rather than grouped in one corner.
2. Clean and make the surfaces safe. Remove nails and staples, scrub away loose dirt, and sand all contact edges. Preserve shallow marks if they add character, but smooth anything that could catch fabric or leave a splinter.
3. Join the planks from behind. Place the boards face-down with consistent gaps, then screw rear battens across them. Keep screws short enough that they cannot break through the front, and add support near both ends so the panel does not cup.
4. Seal and secure the headboard. Apply a low-sheen finish to reduce dust and make cleaning easier without creating a glossy new surface. Mount the finished panel using a cleat or strong brackets, then confirm the weight is distributed across solid fixing points.
For me, the best farmhouse finishes still show that the boards came from different places. Trying to stain every piece into one identical color can remove the variation that makes reclaimed wood interesting.
A cleaner variation uses new offcuts arranged in the same horizontal layout, with two or three tones of diluted stain. It gives a similar rhythm when genuine reclaimed boards are not suitable for indoor use.
Headboard with Storage
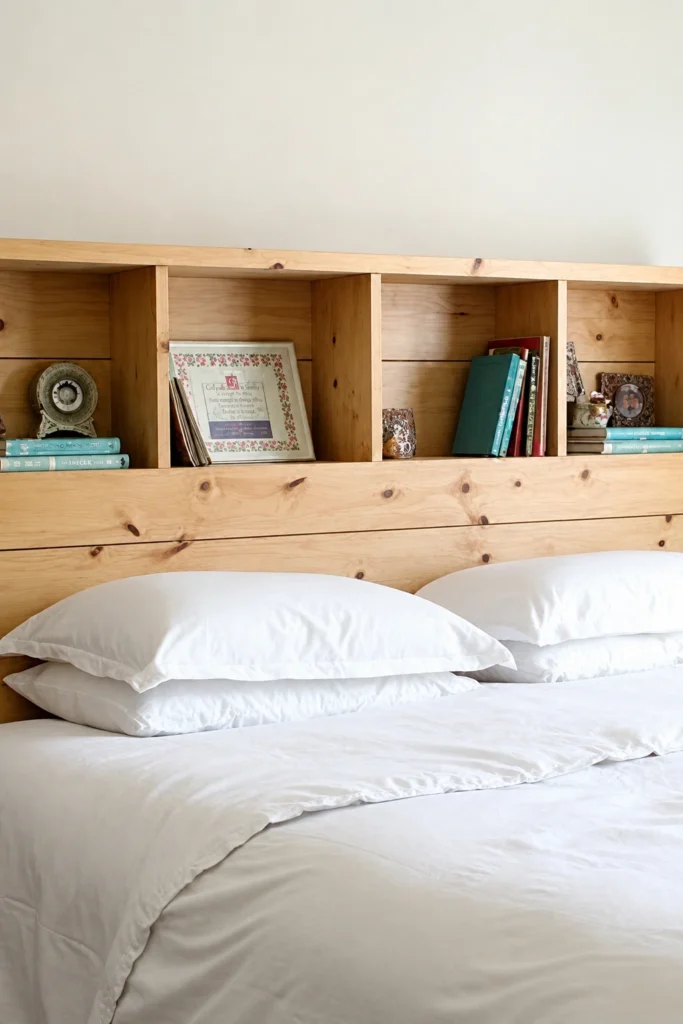
A timber headboard with open cubbies turns the wall behind the bed into useful storage without adding another cabinet to the room. The long top shelf creates a calm horizontal line, while the divided compartments keep books and small objects from becoming one crowded row. The design works especially well when bedside surfaces are limited.
Storage directly above sleeping space needs sensible limits. The shelves should be deep enough to hold items securely, but not so deep that you hit them when sitting up. I would reserve the upper compartments for light, unbreakable pieces and keep everyday reading within easy reach at the sides.
Materials and Tools
· Existing shelving unit, low bookcase, or timber boards for a custom frame
· Back panel or wall battens for stabilising the structure
· Screws, brackets, and wall anchors rated for the load
· Drill, level, tape measure, square, and pencil
· Sandpaper and a wipe-clean protective finish
· Optional bookends, shallow trays, and low-profile LED lighting
Steps for This Headboard
1. Design around how the bed is used. Sit against the pillows and mark the highest point your head normally reaches. Plan the lower solid section and shelf height above that line, then check whether lamps, sockets, and window trim will remain accessible.
2. Strengthen the storage frame. Repair loose shelves and add a back panel or cross supports so the unit cannot rack sideways. Round exposed corners and confirm that shelf pins or dividers cannot work loose.
3. Fix the unit to the wall. Level the headboard and anchor it through strong structural sections into studs or appropriate masonry fixings. Do not rely on the bed to hold it upright, and test the empty unit by applying gentle forward pressure.
4. Organise by weight and frequency. Place heavier books low and near the sides, with lightweight decor higher up. Use trays for small objects, avoid glass above the pillows, and keep the top surface uncluttered enough to dust properly.
The good thing about cubbies is that they can change with the room. A fabric basket can hide chargers today and hold spare pillowcases later without altering the headboard itself.
For a narrower bed, a single reclaimed wall shelf above a plain timber panel gives some of the same function with less construction. Add a raised front edge so objects cannot slide forward.
Headboard with Wall Decal
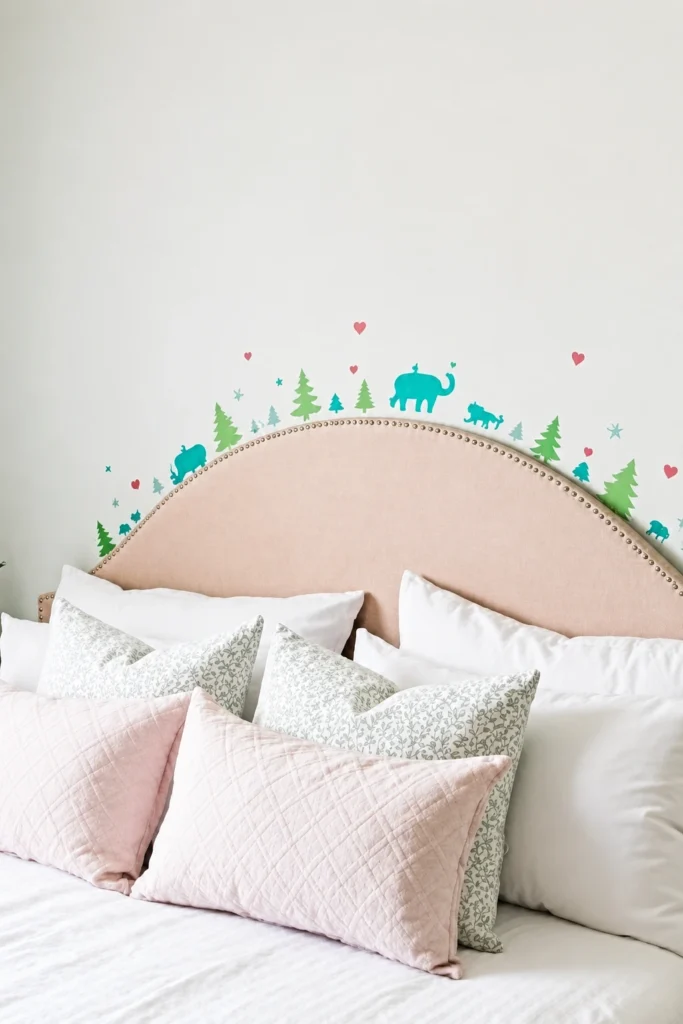
A curved blush headboard becomes more playful when small tree and animal decals continue the shape onto the wall. The decoration follows the upper arc rather than filling the entire wall, so it feels connected to the furniture instead of floating separately. Soft bedding keeps the little colored details noticeable without making the room busy.
This approach is useful when the headboard itself is already sound but feels too plain. Removable decals add a theme without cutting, painting, or permanently altering the fabric. What matters here is restraint: a narrow trail around the curve reads as one composition, while scattered stickers across the whole wall can quickly look accidental.
Materials and Tools
· Existing curved or rectangular headboard
· Removable wall decals suitable for the painted surface
· Low-tack painter’s tape and paper templates
· Tape measure, level, and soft pencil
· Clean microfiber cloth
· Optional removable fabric trim for the headboard edge
Steps for This Headboard
1. Clean both surfaces first. Dust the wall and wipe away marks without leaving cleaner residue. Let the area dry fully, especially around the top of the headboard where hair products or fabric dust may collect.
2. Plan the decal path on paper. Use small paper shapes or pieces of low-tack tape to test the arrangement before peeling any backing. Follow the curve or top edge, leaving irregular but balanced spaces so the design does not become a rigid border.
3. Apply from the centre outward. Position the central motif first, then add smaller pieces toward each side. Smooth each decal with a clean cloth and lift it slowly if it needs adjustment rather than stretching the material.
4. Review from normal viewing height. Stand in the doorway and sit on the bed to check the design from both angles. Remove any shape that feels isolated, then press the remaining edges once more after the wall has settled.
I know adding one more tiny animal can be tempting, but this idea usually improves when the empty wall remains part of the design. Space around the decals gives each shape a reason to be there.
A grown-up version could use simple leaves, line-drawn flowers, or geometric arcs. For renters, choose decals labelled removable and test one behind furniture before applying the full arrangement.
Homemade Headboard Designs
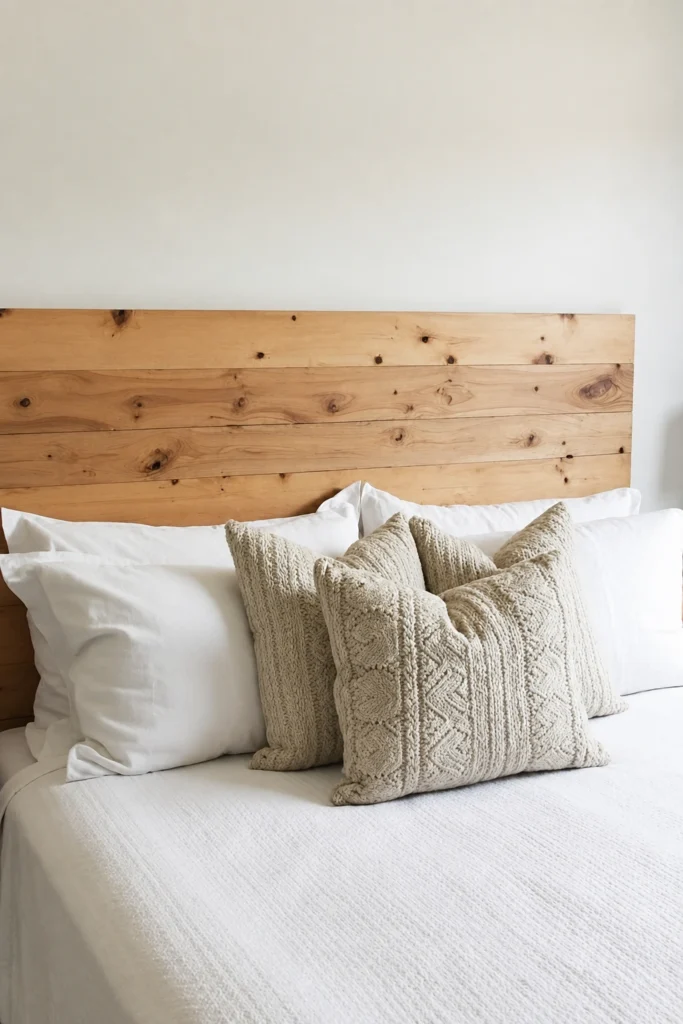
A broad, plain wood panel is one of the most achievable homemade headboard designs because it does not depend on complicated joinery or decorative moulding. The visible knots provide natural detail, while the squared outline gives the bed a defined centre. It can be made from joined boards, an old tabletop, or a sound furniture side panel.
The simplicity also makes poor preparation easy to see. Uneven board edges, a bowed panel, or rough screw holes will stand out against a blank wall. Take time to build one flat surface before thinking about stain or styling; that is where the finished headboard gains its quiet, solid appearance.
Materials and Tools
· Wide boards, reused tabletop, or furniture panel
· Rear battens or joining strips
· Saw, drill, square, clamps, and screwdriver
· Wood filler and sanding materials
· Clear coat, wax, paint, or stain chosen for indoor use
· Bed-frame brackets or wall mounting cleat
Steps for This Headboard
1. Choose the simplest sound material. Check old panels for bowing, delamination, or weak joints. If several boards are used, select similar thicknesses and arrange the grain before cutting them to a shared length.
2. Create a flat panel. Clamp the boards face-down against a level surface and attach rear battens. Check diagonals and top alignment as you work so the finished rectangle does not lean or twist.
3. Refine the visible face. Fill only distracting holes, then sand with the grain and soften every edge. Apply the chosen finish in thin coats, allowing each layer to settle before deciding whether the color needs more depth.
4. Attach it at a comfortable height. Position the headboard with pillows in place and mark the mounting points. Secure it, test for movement, and add felt spacers behind the corners if the wall is slightly uneven.
I would rather keep this design plain than add trim simply because the surface looks empty during construction. Once bedding, lamps, and cushions return, the clean wood often provides exactly enough structure.
For a lighter version, use a hollow-core furniture panel with a timber frame around the back, but attach fixings only through reinforced areas. A painted panel can also work when mixed boards have too many different tones to sit comfortably together.
Industrial-Style Headboard
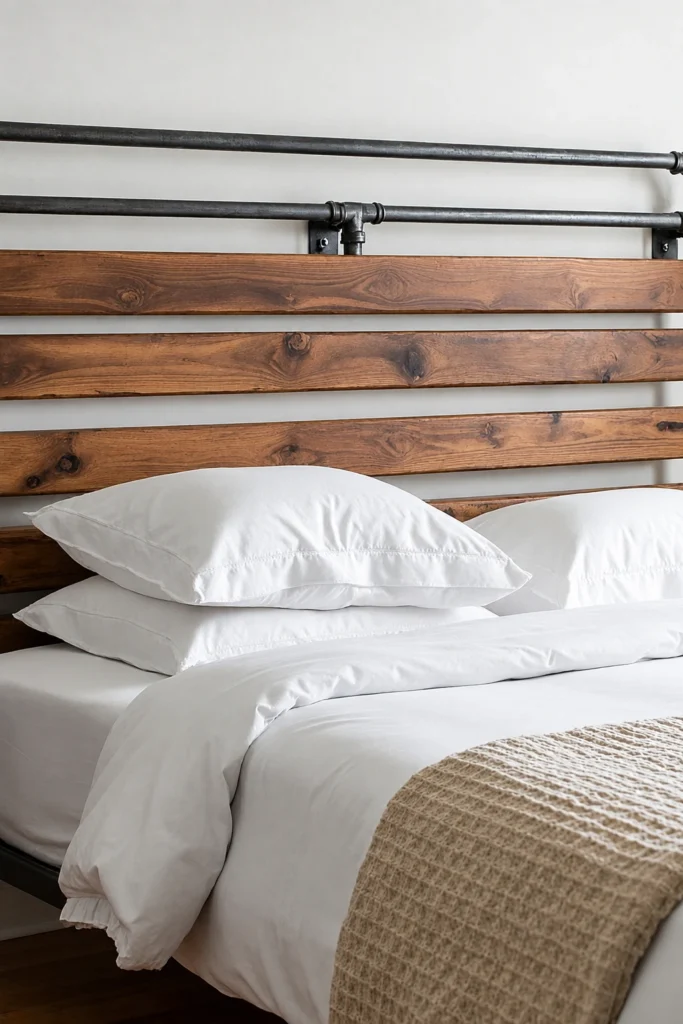
Warm wooden slats paired with black metal pipe create an industrial-style headboard that feels structured without becoming visually heavy. The gaps between the boards expose a little wall, and the dark pipe line above repeats the metal details often found in bed frames or lighting. It is the contrast between materials—not added decoration—that gives the design its character.
A similar piece can reuse scaffold boards, shelving, plumbing-style pipe, or black steel curtain hardware. Any pipe used decoratively must still be fixed as if someone may grab it, because a bar above a bed naturally invites contact. Clean reclaimed metal thoroughly and cover rough threads or sharp ends.
Materials and Tools
· Straight timber boards or reclaimed slats
· Black metal pipe, connectors, or sturdy rail hardware
· Rear supports, screws, and wall fixings
· Drill, level, saw, spanners, and eye protection
· Degreaser suitable for metal and sanding materials for wood
· Protective finish for both timber and metal
Steps for This Headboard
1. Design the wood and metal as one unit. Lay the slats with even gaps and position the pipe line above them before drilling. Check that connectors and brackets fall in visually balanced places rather than directly behind pillows.
2. Prepare both materials separately. Sand the timber and seal it against dust. Degrease the metal, remove loose rust, and make sure threaded ends are capped so no rough edge remains exposed.
3. Build a rigid timber panel. Join the slats to strong rear rails and confirm the assembly stays square. Leave enough clearance around pipe brackets for tools, then pre-drill to reduce splitting.
4. Mount and test every fixing. Anchor the timber and pipe components into solid wall points or a shared reinforced frame. Pull gently on the rail, press the slats, and tighten anything that shifts before the bed is pushed back.
The part I like is the narrow gap between each board. It keeps the timber from reading as one heavy block and makes the dark hardware look more deliberate.
A softer variation uses matte black curtain rods instead of plumbing pipe and pale wood instead of dark stain. Keep the metal purely decorative unless it has been installed to carry weight safely.
Macramé Headboard
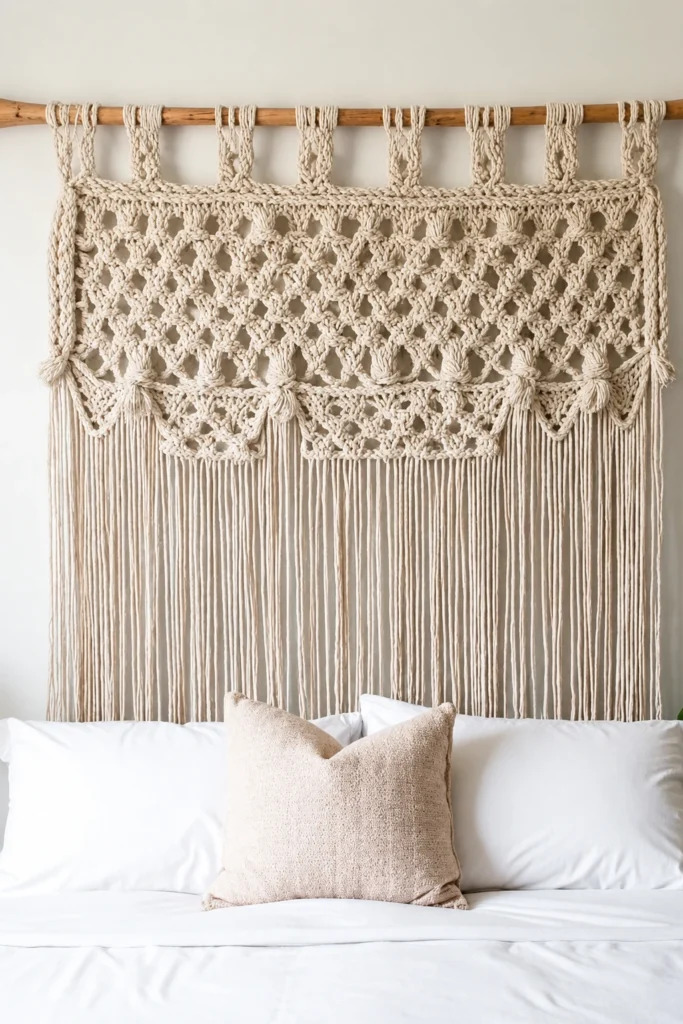
This macrame headboard uses a more rectangular pattern than the wider boho version, with repeated knots, looped sections, and a straight curtain of fringe. Its edges align closely with the bed, so the hanging behaves almost like a textile panel. The cream color adds texture while keeping the room quiet and easy to layer.
The design can be recreated with a finished macrame piece, a vintage lace curtain, or a hand-knotted panel. Because the lower cords hang freely, position them where they cannot wrap around lamp arms, wall switches, or bed hardware. Fibre decor should remain decorative, not become part of the bed’s moving structure.
Materials and Tools
· Rectangular macrame panel or strong cotton cord for knotting
· Smooth dowel or reclaimed wooden pole
· Wall brackets, screws, and suitable anchors
· Tape measure, level, and pencil
· Cotton thread for repairs
· Soft brush for maintenance
Steps for This Headboard
1. Set the width before the height. Choose a panel close to the visible width of the mattress and centre it on the wall. Then adjust the hanging height so the fringe clears pillows while the patterned section remains easy to see.
2. Repair and straighten the textile. Lay the macrame flat, tighten loose knots gently, and secure damaged loops with matching thread. Avoid pulling one strand hard because tension can travel through the pattern and distort a larger area.
3. Install the dowel securely. Use level brackets attached to reliable fixing points and confirm the dowel cannot roll out. Hang the panel evenly across the rod, then distribute the loops until both outer edges sit at the same height.
4. Finish without over-trimming. Separate twisted fringe with your fingers and snip only visibly damaged ends. The rows do not need ruler-straight precision; a soft lower line usually feels more natural.
One detail I wouldn’t skip is checking the wall behind the fringe from time to time. Long fibres can hide dust marks, so occasional cleaning keeps the pale textile looking intentional.
A shorter panel works above a shelf-style headboard, while a wider one can frame two small beds in a shared room. Colored cord is possible, but a limited palette will help the knot pattern remain readable.
Modern Geometric Headboard

Wide timber strips arranged into angular peaks turn a padded grey panel into a modern geometric headboard. The wood creates strong direction, while the soft backing stops the design from feeling cold. Because the angles mirror each other across the centre, the headboard looks balanced even though the pattern is bold.
This type of construction needs accurate planning before any adhesive or screws are used. Small errors repeat across adjoining pieces, and the central point draws attention immediately. Make a full-size paper layout or test the timber on the floor first; the first arrangement rarely ends up being the final one.
Materials and Tools
· Flat backing panel, optionally padded and fabric-covered
· Straight timber strips with consistent width
· Large paper, chalk line, square, protractor, or angle guide
· Mitre saw or suitable hand saw with eye protection
· Wood adhesive and hidden mechanical fixings where required
· Sanding materials and protective wood finish
Steps for This Headboard
1. Draw the full pattern first. Mark the centreline and establish the highest point of the main peak. Lay out every angle on paper or directly on the covered panel with removable chalk, checking that left and right sections mirror each other.
2. Cut and label the timber pieces. Make one test cut, place it on the pattern, and adjust before cutting the rest. Label the back of each strip so similar pieces do not become mixed during assembly.
3. Dry-fit from the centre outward. Place the central pieces first and build toward the edges without glue. Check gaps, endpoints, and symmetry, then trim individual pieces rather than forcing a strip into position.
4. Secure and finish carefully. Attach the timber with a method suited to the backing, keeping fasteners hidden and away from thin edges. Wipe away adhesive immediately, protect the timber, and inspect the padded sections for accidental dents or stains.
For me, the broad timber bands matter more than adding several small shapes. Fewer strong lines let the pattern remain clear behind pillows and bedding.
A beginner variation can use painted lightweight trim on a plain board instead of thick wood. Keep the layout shallow and use a limited number of angles so measuring stays manageable.
Repurposed Door Headboard
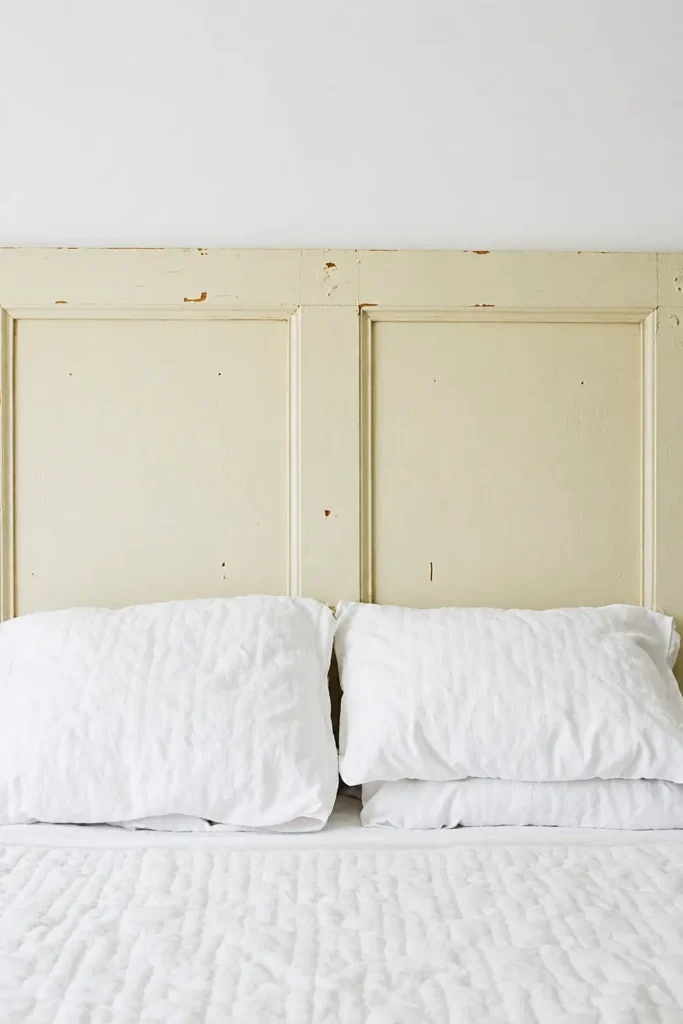
An old painted panel door already contains scale, symmetry, and moulded detail, so it can become a headboard with relatively little visual alteration. The pale cream finish and small areas of wear create a softer backdrop than raw wood, while the rectangular panels give the bed a traditional frame.
The door’s previous hardware and condition decide how much work is required. Remove handles, protruding hinges, and loose paint, but think before sanding away every age mark. If the existing finish is stable and non-flaking, a gentle clean and protective coat may preserve more character than a complete repaint.
Materials and Tools
· Solid or sound panel door without serious warping
· Screwdriver and pliers for removing hardware
· Filler or timber plugs for old holes
· Scraper, sanding block, mask, and eye protection
· Primer or clear sealer appropriate to the existing finish
· Strong wall cleat or reinforced bed-frame supports
Detailed Steps for This Headboard
1. Assess the door before carrying it indoors. Check both faces for rot, loose panels, sharp hardware, and strong odors. Older painted doors may require careful coating assessment, so avoid aggressive sanding until you know the finish can be handled safely.
2. Remove or recess the hardware. Take off knobs, latches, and hinges, then fill openings that would remain visible or catch bedding. Keep any attractive hardware in a labelled bag in case the door is restored later.
3. Stabilise the finish. Clean the surface, secure loose moulding, and smooth only rough or flaking areas. Seal or repaint as needed, preserving gentle wear if it suits the room and remains safe to touch.
4. Mount the door as a headboard. Decide whether the door will sit horizontally or vertically, then use a cleat or reinforced supports that spread its weight. Confirm it cannot slide sideways and that the lower edge does not press against electrical outlets.
I would keep at least one original feature visible—the recessed panels, old keyhole, or softened paint—because that is what separates a repurposed door from a newly built rectangle.
Two narrow doors can be placed side by side for a wider bed, or one lightweight cupboard door can serve as a small headboard. Avoid hollow damaged doors that cannot hold reliable fixings.
Rustic Wooden Headboard
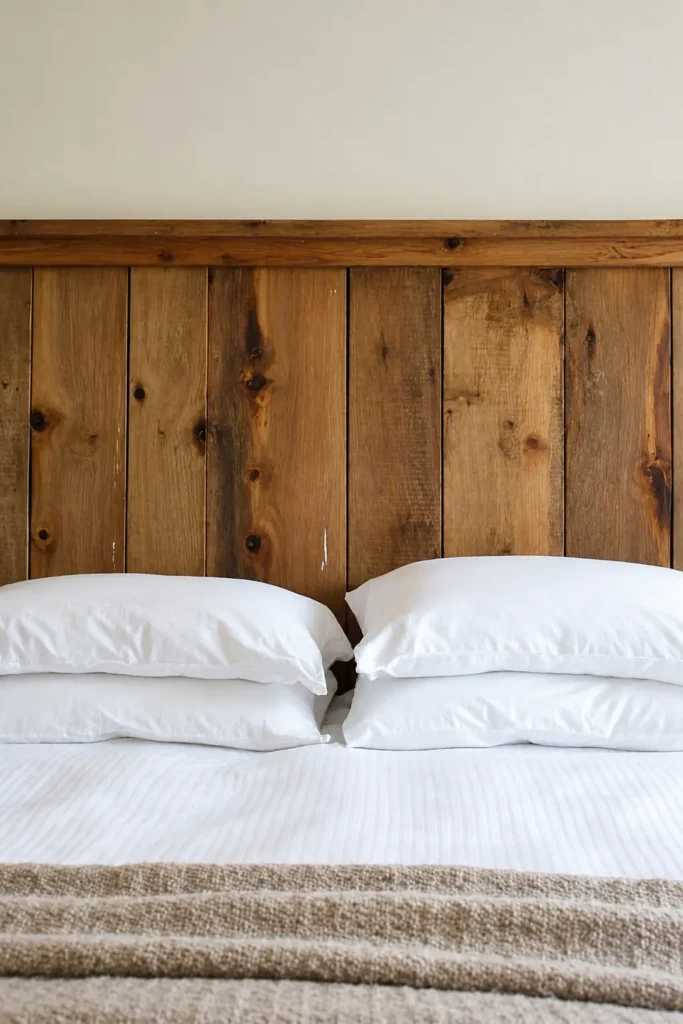
Vertical planks give this rustic wooden headboard a stronger, more enclosed appearance than horizontal boards. The warm brown tones and visible knots form a full-width backdrop, while a simple top rail creates a clean stopping line. The direction of the boards also makes a low ceiling feel slightly taller.
This style suits dismantled wall panelling, old cupboard sides, or reclaimed floorboards that are still flat enough to join. The wood can remain varied, but the thickness should be reasonably consistent so the front does not develop ridges that catch dust and look uneven under side lighting.
Materials and Tools
· Vertical reclaimed boards or panelling
· Top rail and rear cross battens
· Saw, drill, screws, clamps, and square
· Sander, brush, and wood-safe cleaner
· Matte sealer or stain
· Wall cleat or strong mounting brackets
Steps for This Headboard
1. Arrange the vertical boards. Lay the pieces side by side and vary the knots and tones across the width. Trim the bottoms to one straight line, then mark a common finished height at the top.
2. Join the panel from behind. Clamp the boards together and attach horizontal battens at several points. Leave room for the top rail, and use screw lengths that cannot reach the visible face.
3. Add the finishing rail. Fit a straight board across the top to protect end grain and visually connect the planks. Sand the corners and ends thoroughly because this rail often sits closest to hands during installation.
4. Seal and mount the headboard. Apply a matte finish to reduce dust while keeping the texture visible. Anchor the panel securely and check the lower edge does not trap bedding or prevent the mattress from sitting properly.
The slightly varied board widths can make this design feel more authentic, but random gaps will look untidy. I’d keep the vertical spacing consistent and let the wood itself provide the variation.
For a less enclosed look, stop the panel below the top of the bedside lamps or leave narrow wall margins at both sides. A grey wash can soften orange timber without hiding the grain.
Upcycled Furniture Headboard
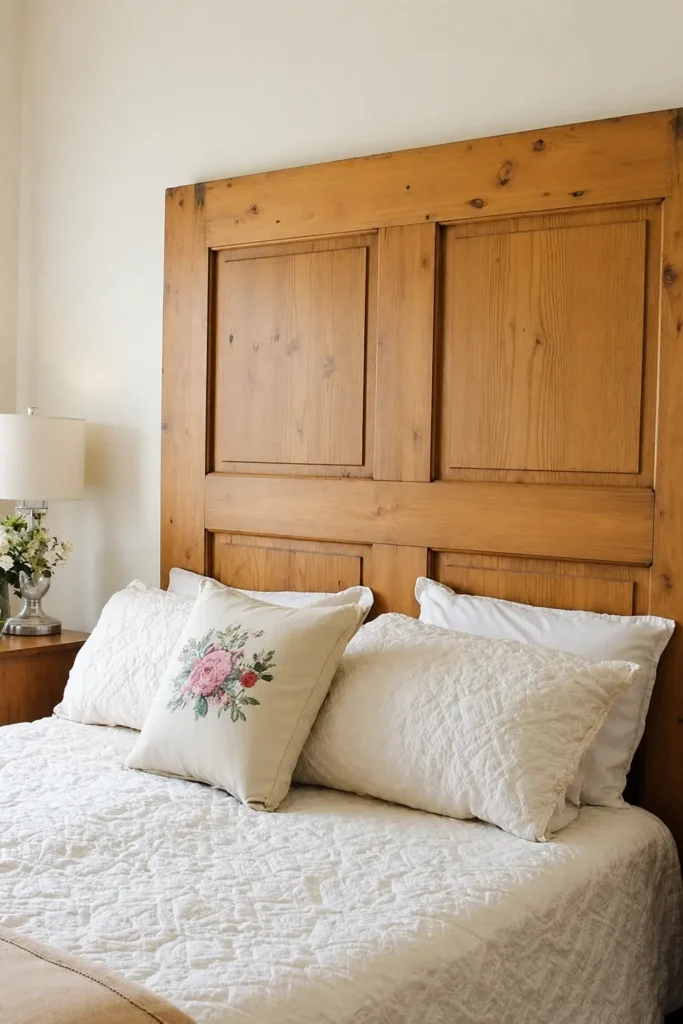
A large furniture panel with recessed sections can become a headboard without disguising what it used to be. The raised rails and four inner panels suggest a wardrobe door, cabinet side, or substantial furniture front, and that familiar construction gives the bed an architectural backdrop.
This is a useful route when a damaged cupboard or dresser contains one strong panel even though the full piece is no longer practical. Remove it carefully rather than breaking the surrounding furniture, then inspect the back for staples, brackets, and uneven blocks that may prevent it sitting flat against the wall.
Materials and Tools
· Large panel removed from a wardrobe, cabinet, dresser, or room divider
· Screwdrivers, pry tool, and containers for removed hardware
· Wood glue, clamps, and filler for minor repairs
· Sanding materials and a suitable finish
· Rear frame or battens for reinforcement
· Wall cleat or bed-frame attachment hardware
Detailed Steps for This Headboard
1. Salvage the panel without damaging its frame. Remove screws and hardware in a controlled order, supporting the panel as it comes free. Photograph the back first if the furniture contains complex joints, and retain useful brackets for another project.
2. Repair the furniture details. Glue loose moulding, fill sharp holes, and flatten protruding blocks on the rear. Keep shallow dents or wear that suit the piece, but correct any weakness that could worsen once it is mounted upright.
3. Refinish only as much as needed. Clean the surface and test wax, paint, or clear coat in a hidden area. A uniform natural finish can connect mismatched repairs, while a painted version may suit a panel with several old filler patches.
4. Reinforce and hang securely. Add rear battens if the panel flexes, then mount it from structural rails rather than decorative moulding. Check its centre aligns with the bed and that no old fastener can scratch the wall or bedding.
The part I would preserve is the furniture’s original panel layout. Covering it with fabric or extra trim would remove the clue that makes the reuse interesting.
Smaller cabinet doors can be joined into a grid for a modular version. Keep the spacing deliberate and attach all doors to one strong backing panel rather than mounting each piece independently.
Upholstered Headboard
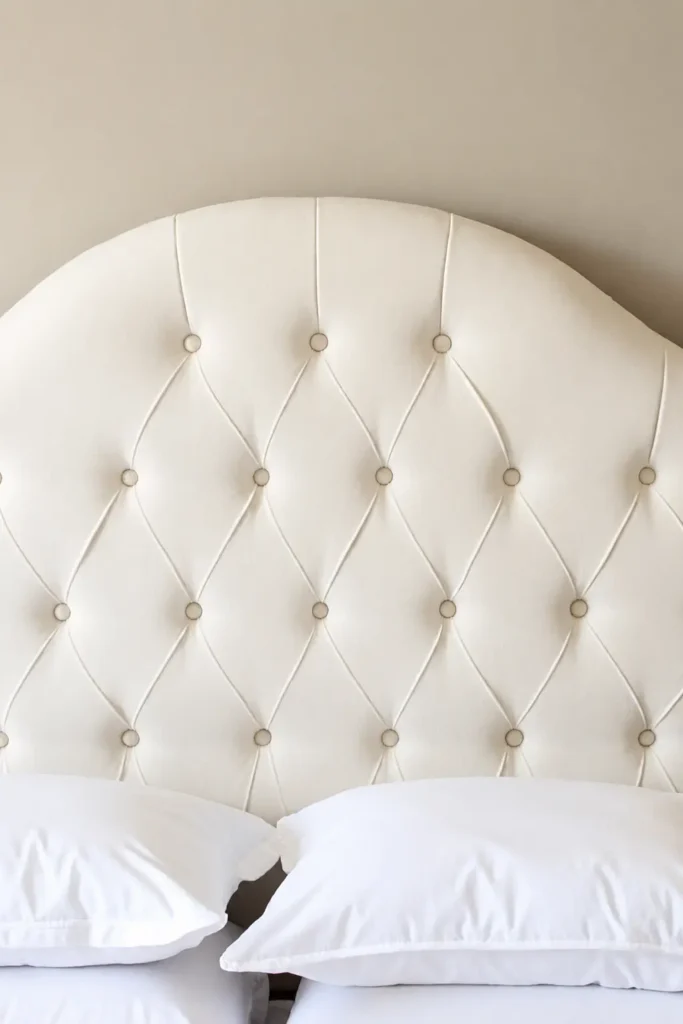
A rounded, diamond-tufted headboard creates a softer focal point than a plain rectangle. The high arch echoes the shape of the bed, while covered buttons pull the surface into an even pattern. In a light neutral fabric, the curves and tufting remain visible without overwhelming the bedding.
Recreating this look is more involved than wrapping a flat board because the button positions, foam depth, and fabric tension all work together. An old upholstered headboard can be recovered, which is often easier than building the tufting from nothing, but inspect the existing foam and frame carefully before covering it.
Materials and Tools
· Existing curved headboard or shaped plywood frame
· Upholstery foam and batting in clean condition
· Upholstery fabric with enough allowance for tufting
· Covered-button kit or reusable sound buttons
· Strong upholstery thread, long needle, and staple gun
· Marker, measuring tape, drill, and protective equipment
Steps for This Headboard
1. Check or create the curved frame. Trace a symmetrical arch on the panel and cut it with an appropriate saw, or repair the outline of an existing headboard. Sand the edge and mark a centreline so the tufting pattern cannot drift.
2. Lay out the button positions. Mark the diamond grid on the front and confirm equal spacing from the centre outward. Drill small holes through the backing at each mark, keeping them clear of rear braces and mounting hardware.
3. Add foam, batting, and fabric. Fix the foam and batting smoothly, then centre the fabric with generous extra material. Begin tufting at the middle, drawing each button back gradually so the folds form evenly rather than bunching in one area.
4. Finish the perimeter. Work toward the edges, shape the folds consistently, and staple the fabric to the rear. Cover the back neatly, mount the headboard, and check every button remains secure before leaning against it.
I would stop and correct a crooked centre row rather than hoping the outer buttons will hide it. Tufting repeats small errors, so the middle deserves patience.
A beginner version can keep the same rounded shape without buttons. Use one smooth fabric panel and add shallow stitched channels or a contrast piping edge for definition.
Vintage Headboard Idea
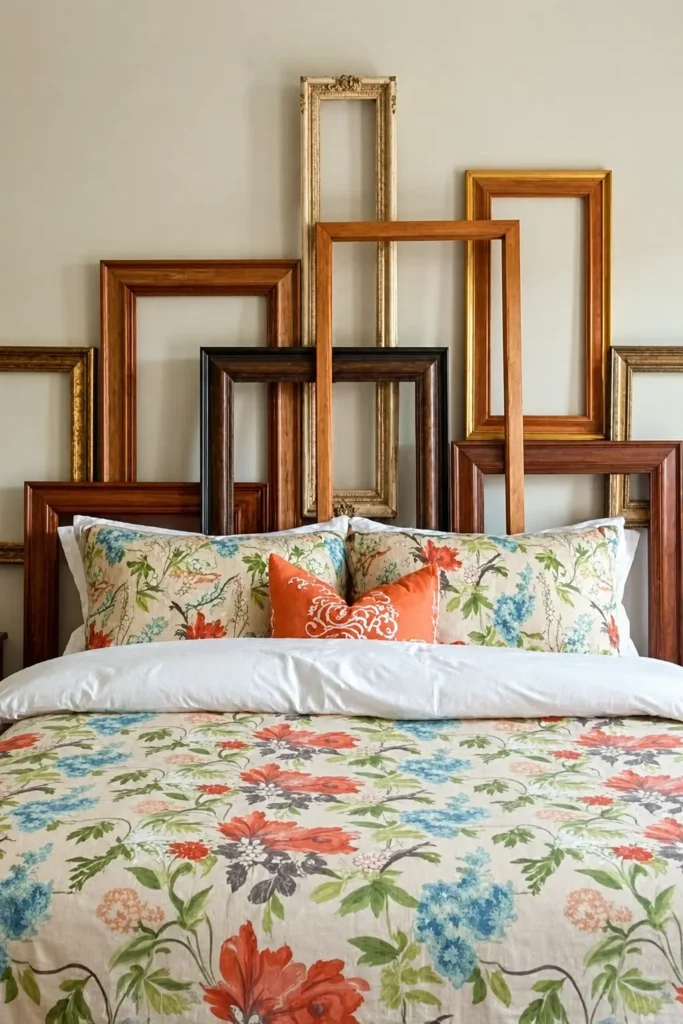
Empty vintage frames can form a headboard by turning a collection of unused mouldings into one layered wall arrangement. Different heights, wood tones, and narrow profiles overlap behind the bed, creating depth without filling every frame with artwork. The bedding can then carry the color while the frames provide structure.
This idea is lighter than a solid timber headboard, but each frame still needs secure fixing. Do not simply lean tall frames behind pillows where they can slide. Remove loose glass, sharp tabs, and unstable backing, then arrange the empty frames as wall decor rather than functional support.
Materials and Tools
· Assorted empty picture frames in sound condition
· Picture-hanging hooks or screws suited to each frame
· Paper templates or kraft paper
· Tape measure, level, pencil, and low-tack tape
· Screwdriver and pliers for removing glass and loose hardware
· Optional wax or touch-up finish for exposed wood
Steps for This Headboard
1. Prepare every frame. Remove glass, loose nails, and protruding tabs, then tighten corner joints. Clean carved details with a soft brush and decide which aged areas should remain rather than repainting the whole collection.
2. Build the arrangement with templates. Trace the frames onto paper and tape the shapes above the bed. Place one or two larger outlines first, then layer narrower rectangles around them until the group feels balanced across the mattress.
3. Hang from the back layer forward. Install the frames that appear furthest behind first, using separate secure fixings. Continue with the overlapping front pieces, checking that no frame rests only on another frame for support.
4. Connect the display to the bed. Keep the lowest edges above pillow movement and repeat one or two frame tones in nearby furniture or textiles. Step back and remove any small frame that makes the centre feel crowded.
For me, the empty centres are what make this arrangement work. Filling every opening would turn it into a gallery wall and compete with the bed rather than frame it.
A simpler version uses three large frames in one row. You can also place pressed fabric or cane inside one central frame while leaving the others empty for contrast.
Modern Mirrored Headboard
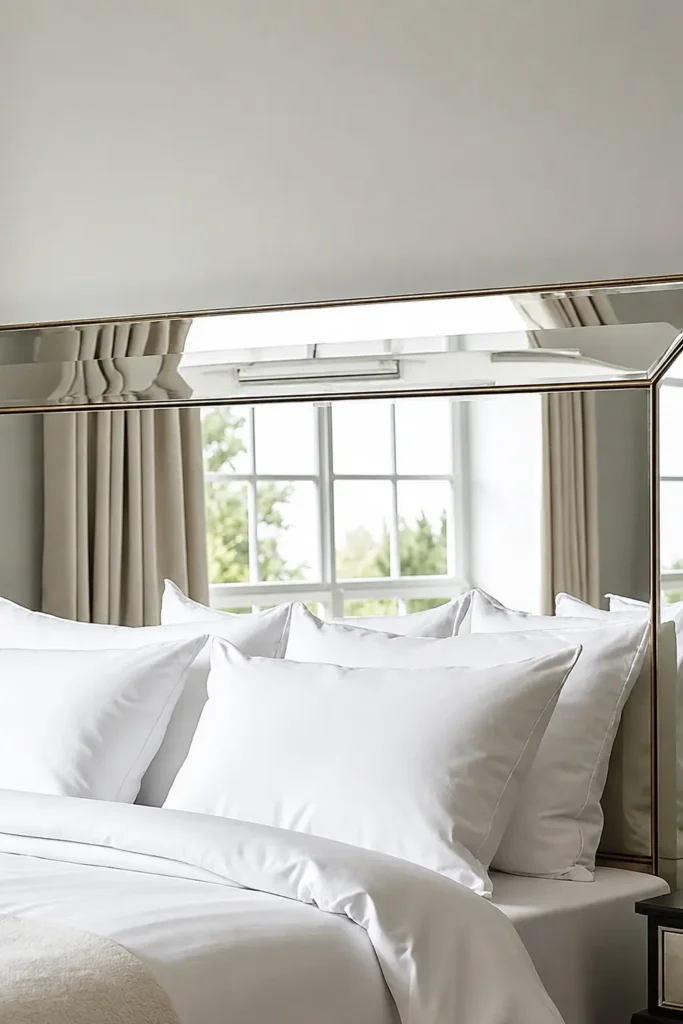
A wide mirror with a bevelled or metallic edge can act as a modern headboard by reflecting light and repeating the room beyond the bed. The horizontal shape visually widens the wall, and the pale bedding keeps the reflected view from becoming too busy. It is a strong effect, so very little additional decoration is needed.
Mirror installation above a bed is not a casual DIY shortcut. The glass must be intact, properly backed, and fixed with hardware designed for its weight and wall type. A damaged mirror, improvised adhesive, or decorative hook is not suitable in this position; professional installation is the sensible choice for large pieces.
Materials and Tools
· Intact framed mirror or purpose-made mirrored panels
· Manufacturer-approved brackets, clips, or mounting system
· Wall fixings selected for the wall construction and mirror weight
· Level, tape measure, stud finder, and pencil
· Protective gloves and help from another adult
· Non-ammonia glass cleaner and soft cloth
Steps for This Headboard
1. Choose a safe mirror. Inspect the frame, backing, corners, and glass for cracks or separation. Confirm the mounting points are structural and designed to hold the mirror in the intended horizontal orientation.
2. Plan the reflection as well as the position. Hold a paper template above the bed and check what the mirror will reflect from the doorway and sleeping position. Avoid angles that expose strong lights, cluttered shelves, or direct morning glare.
3. Use a professional mounting method. Locate studs or sound masonry and install the approved hardware level. Large mirrors should be lifted and secured by experienced installers, with secondary safety support where the system requires it.
4. Keep the surrounding styling quiet. Once mounted, add only low, stable objects on nearby tables and leave space around the frame. Clean fingerprints with minimal moisture and recheck fixings if the mirror ever shifts or rattles.
The reflected view becomes part of the headboard, so tidying the opposite wall matters more than adding another accessory beside the mirror.
A safer lightweight alternative is a set of acrylic mirror panels made for interior walls, but they still need correct fixing and may reflect with slight distortion. Another option is a framed antiqued mirror placed on a side wall rather than directly above the bed.
Simple Headboards
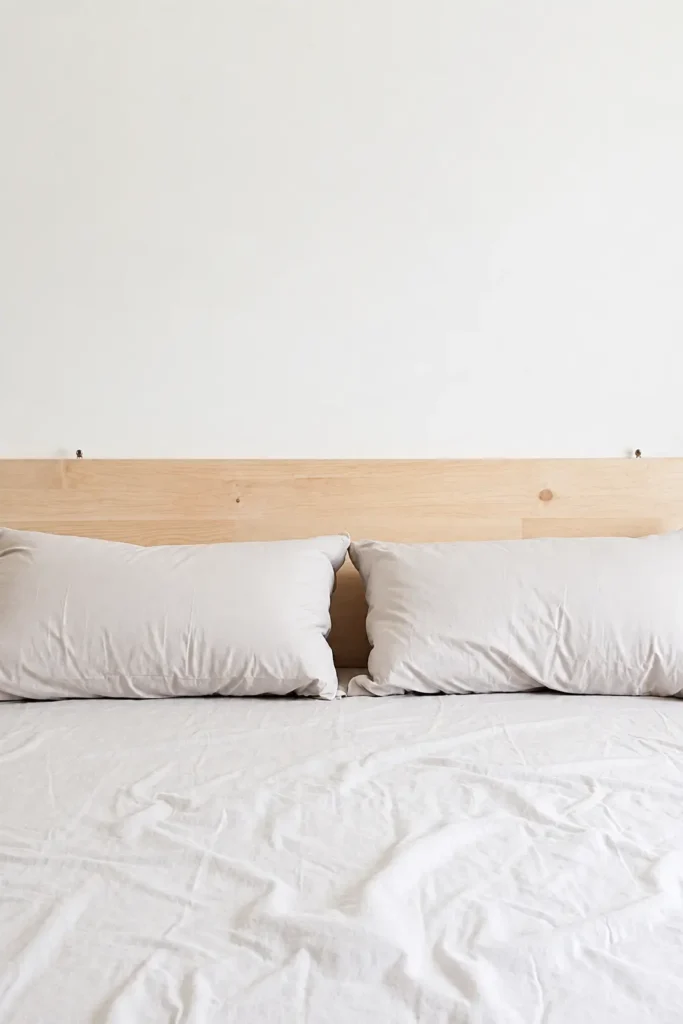
A narrow strip of light timber can define the bed without filling much of the wall. This simple headboard sits low behind the pillows, so the room keeps an open feeling and the wood provides just enough contrast against white bedding. It is a sensible use for a long shelf board, bench top, or offcut that is too shallow for a larger project.
The modest size makes installation easier, but the board still needs smooth edges and firm support. A thin plank can bow when fixed only at the ends, so add rear reinforcement or several evenly spaced mounting points. The result should look intentionally slim, not like a shelf that has slipped behind the mattress.
Materials and Tools
· Long timber board or reclaimed shelf
· Rear batten if the board is thin or bowed
· Saw, sander, drill, level, and tape measure
· Clear finish, wax, or paint
· Wall brackets, cleat, or bed-frame supports
· Felt pads or spacers for an uneven wall
Steps for This Headboard
1. Set the proportion. Measure the bed and choose a board that reaches at least across the visible pillow area. Test several heights, remembering that most of the plank should remain visible after the bed is made.
2. Straighten and smooth the board. Trim damaged ends, sand the face and edges, and add a rear batten if the timber flexes. Fill only holes that distract from the clean line.
3. Apply a quiet finish. Protect the wood with a clear or pale finish that suits the floor and nearby furniture. Let it cure fully so bedding cannot pick up residue or odor.
4. Mount it in a straight line. Use a level and several secure fixing points, then add discreet spacers if the wall pushes one end forward. Check the board stays still when pillows are moved against it.
The part I would keep simple is the styling. One long timber line loses its strength if it is covered with garlands, lights, and several small decorations.
A painted board can match the wall for an almost invisible version, or contrast with it in a darker tone. Two narrow planks with a small gap also create a slightly more architectural look without much extra material.
Sliding Barn Door Headboard
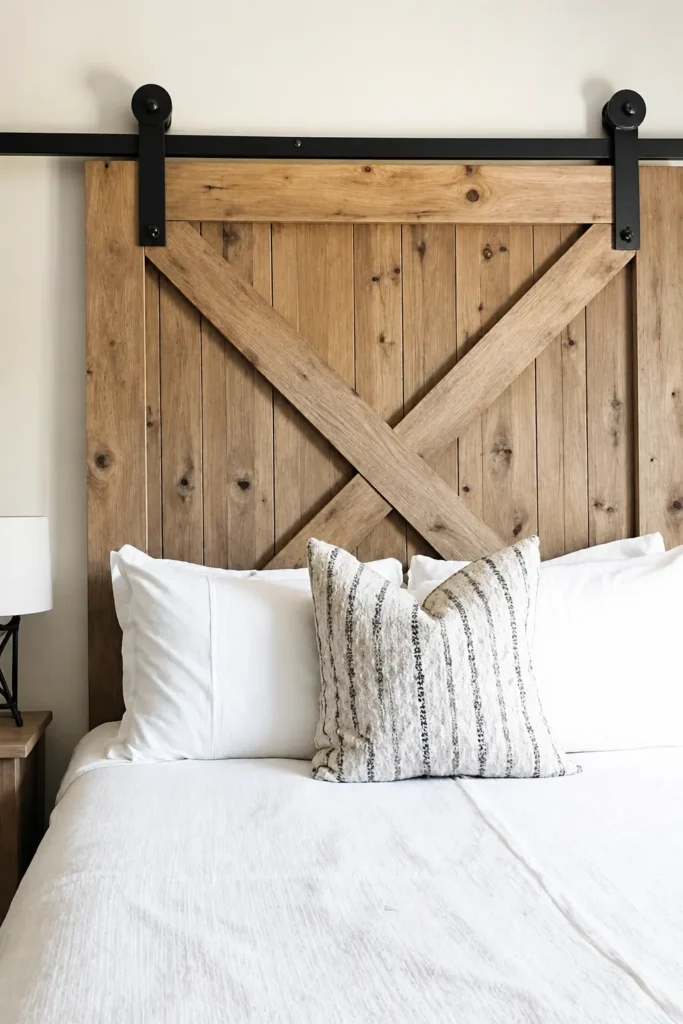
A barn-door panel with diagonal cross braces creates a strong rustic headboard, while the black rail and rollers add a clear industrial detail above it. Even when the door is not intended to slide, the hardware helps explain the original object and gives the wall a finished top line. The natural wood works well with simple bedding because the construction itself provides the pattern.
This is one of the heaviest ideas in the group, so appearance must come after structure. A real door and metal rail can place substantial load above the bed. The safest approach is to immobilise the panel as a decorative headboard or have the complete rail system installed by someone experienced with heavy doors and the wall construction.
Materials and Tools
· Sound barn door, gate panel, or newly built braced timber panel
· Rated barn-door rail and hardware, or secure fixed mounting brackets
· Structural wall blocking, studs, or masonry anchors as required
· Drill, level, spanners, tape measure, and protective equipment
· Sanding tools and wood finish
· Door stops, anti-jump fittings, and lower guides when using a rail
Steps for This Headboard
1. Decide whether it will move at all. For most bedrooms, a fixed door-shaped headboard is simpler and safer than a working slider. If movement is essential, confirm there is clear side space and that no lamp, outlet, or furniture can enter the door path.
2. Inspect and reinforce the panel. Tighten braces, repair split boards, remove sharp hardware, and check the door remains square. Sand contact edges and seal the wood so old dust or splinters do not fall onto bedding.
3. Prepare structural support. Locate suitable framing or install a continuous support board fixed into studs. The rail or fixed brackets must attach to structure, not only plasterboard, and the wall must be checked for hidden services before drilling.
4. Install all safety components. Mount the rail level, fit rated rollers, end stops, anti-jump devices, and a guide that prevents the bottom from swinging. Test the empty system repeatedly before placing the bed beneath it.
5. Style without blocking inspection. Keep pillows and lights clear of moving parts and leave access to fasteners. Recheck the hardware periodically, especially if the door is used rather than fixed in place.
I’d treat the black hardware as enough decoration. Adding handles, hooks, or hanging objects above the bed introduces more protrusions without improving the strong door shape.
A lighter variation uses a thin timber panel built to resemble a barn door and fixes it directly to the wall. You keep the cross-brace pattern while avoiding the weight and moving hardware of an actual door.
Headboard Decisions That Can Ruin a Good Idea
Choosing shape before checking function. A deep shelf, low beam, or projecting frame may look balanced on an empty wall but become awkward once pillows and a person are added. Test the outline at full scale and sit against the bed before committing to the final depth and height.
Mounting heavy pieces with decorative hardware. Picture hooks and light-duty anchors are not substitutes for structural fixing. Doors, mirrors, storage units, and thick timber panels need hardware selected for their actual weight and the wall construction.
Leaving reclaimed surfaces unfinished near bedding. Splinters, loose rust, flaking paint, and old residue can transfer to sheets or skin. Clean, stabilise, and seal the material while preserving only the wear that is sound and safe.
Placing loose objects above the pillows. Books, plant pots, glass decor, and unfastened frames can move when a wall or shelf is bumped. Keep upper storage light, use retaining edges or trays, and avoid breakables directly over sleeping space.
Making a headboard too narrow or visually off-centre. A panel that ends awkwardly behind one pillow can make the whole bed look shifted. Mark the centre of both bed and wall, then check the proposed width from the room entrance.
Overdecorating a material that already has character. Macrame, old doors, tufting, geometric timber, and rustic boards each provide their own pattern. Extra trim, signs, lights, or garlands can hide the strongest feature and make cleaning harder.
Forgetting future access. A fixed panel should not permanently cover sockets, junction boxes, radiator controls, or wall damage that may need repair. Leave sensible clearance or choose a mounting method that allows the headboard to be removed.
Frequently Asked Questions
How wide should a headboard be?
It should at least relate clearly to the visible width of the bed and pillows. Many designs look balanced when they reach slightly beyond the mattress, but the available wall, bedside furniture, and room proportions should make the final decision.
Can I attach a headboard directly to the bed frame?
Yes, when the frame has suitable mounting points and the headboard is not too heavy for them. Use proper brackets, check that bolts stay tight, and add wall support if the panel flexes or places excessive leverage on the frame.
Do reclaimed boards always need sanding?
They need to be safe and clean, but they do not always need to become completely smooth. Sand splinters, sharp edges, and unstable finish while leaving sound saw marks, dents, or grain texture that give the wood character.
What is the safest way to use an old door as a headboard?
Remove protruding hardware, repair weak joints, stabilise the surface, and mount the door through structural points with a strong cleat or reinforced supports. Large or very heavy doors should be installed with professional help.
Can a textile wall hanging replace a solid headboard?
It can create the visual effect of a headboard, but it will not provide firm back support. Keep fringe and cords clear of pillows, lights, and bed hardware, and mount the rod with fixings suited to the textile’s weight.
How can I make an upholstered headboard easier to clean?
Choose durable fabric and vacuum it gently with an upholstery attachment. A removable slipcover is useful in rooms where stains are likely, and the headboard should be kept slightly clear of damp walls.
Is a mirror safe above a bed?
Only when the mirror is intact and installed with a mounting system designed for its weight and wall type. Large glass pieces should be professionally fitted; cracked mirrors, improvised adhesive, and lightweight picture hooks are not appropriate.
Let the Wall Behind the Bed Work Harder
The strongest headboard ideas begin with the material you already have and the way the bed is used. A plain board may need little more than careful shaping, while a storage unit, mirror, door, or barn-style panel requires much more attention to fixing and weight. Reuse works best when the original object remains recognisable but the finished piece is safer, cleaner, and genuinely useful in its new position.
Start with the easiest reversible option that suits your room. Measure first, prepare the material, and then keep the decoration restrained enough for the reused feature to remain visible. Which of these 19 headboard ideas could work with an overlooked door, shelf, frame, textile, or timber panel already waiting in your home?