A wedding arch can hold a surprising amount of meaning for something that may only be used for a few hours during the ceremony. After the photographs are taken and the flowers come down, the frame often ends up in a garage, shed, or spare room because it feels too substantial to throw away but too specific to use again. I don’t think it needs to stay there. A sound arch already gives you height, structure, and a clear frame, which are useful qualities in a garden, living room, reading corner, or outdoor entertaining area.
I like repurposing projects that keep the strongest part of an object and change only what no longer suits its next job. With a wedding arch, that usually means removing temporary ceremony decorations, checking the frame carefully, and then deciding whether the structure should become decorative, practical, or a little of both.
The seven ideas here keep the transformations realistic. None depend on specialist construction skills, and most can be simplified further if your original arch is smaller, lighter, or already fixed into separate sections.
Check the Arch Before You Decide on Its Second Use
A wedding arch may look solid while standing indoors for a ceremony but behave very differently once it is moved, loaded with shelves, or placed outside. Start by identifying how the frame is assembled. Look for screws, bolts, dowels, brackets, welded joints, base plates, and any removable feet. Tighten loose hardware and check whether the vertical posts remain straight when the frame stands without fabric or flowers attached.
Wooden arches need a close look around screw holes and lower ends because those areas often split first. Metal frames should be checked for rust, bent tubing, sharp edges, or cracked welds. If the arch rocks, twists, or leans under gentle pressure, repair or brace it before decorating. I know it can feel tempting to let trailing greenery hide a weak joint, but decoration should never be asked to do structural work.
· Remove all temporary ties, florist wire, tape, cable ties, pins, and leftover adhesive before inspecting the frame.
· Check the base and feet first because every new use depends on the arch standing safely.
· Tighten reusable hardware and replace damaged fasteners with suitable equivalents.
· Sand wooden splinters and smooth any sharp metal edges before handling the arch regularly.
· If the arch was rented, borrowed, or made from a temporary event frame, confirm that it is yours to alter before drilling or cutting.
Decide Whether the Arch Will Live Indoors or Outdoors
The location changes almost every material choice. An indoor photo display can stay lightweight and decorative, while a garden arch needs to cope with wind, moisture, plant weight, and ground contact. Decide on the final location before adding fabric, lights, planters, or shelves. That one decision prevents a lot of unnecessary reworking later.
For outdoor use, protect suitable wooden surfaces with an exterior finish and keep untreated cut ends away from wet soil. Metal frames may need rust treatment and a compatible protective coating. Any electrical lights used outside should be rated for outdoor use and positioned so connections stay protected from water. Indoors, the main concerns are different: floor protection, wall clearance, stability around children or pets, and whether the repurposed arch blocks normal walking routes.
· Measure the intended space, including ceiling height, doorways, and the width needed to move around the arch.
· Consider how wind or climbing plants may increase the load on an outdoor frame.
· Avoid using indoor-only fabric, untreated paper decor, or indoor electrical products outside.
· Use floor pads beneath indoor wooden or metal feet if they could scratch hard flooring.
· Choose a location where the arch can be anchored or stabilised rather than relying only on its decorative weight.
Strip Back the Wedding Decor and Plan New Attachment Points
Once the frame is clean and stable, leave it bare for a little while before deciding what to add next. The original wedding arrangement may have been symmetrical, heavily floral, or designed to photograph well from only one direction. Its second use may need a completely different balance. A reading nook needs open floor space, a photo display needs clear horizontal lines, and a climbing plant needs access to the posts rather than layers of fabric wrapped around them.
Mark where you can safely attach hooks, screw eyes, brackets, curtain ties, garden wire, or removable clips. Reuse existing holes whenever they are in good condition instead of drilling a new set automatically. Then test the new layout with string, painter’s tape, or loose fabric before fixing anything permanently. This is where patience matters more than buying another accessory; a few minutes of testing can save a crooked shelf or an awkward curtain later.
· Keep load-bearing additions close to strong posts, crossbars, and existing joints.
· Use removable ties or clips for seasonal decor that you expect to change often.
· Pre-drill wood when adding screws near edges to reduce splitting.
· Do not hang heavy shelves or planters from a decorative crossbar unless the frame is strong enough for the load.
· Plan how the new additions will be removed for cleaning, weather protection, or future reuse.
Turn the Wedding Arch Into a Seasonal Garden Entryway
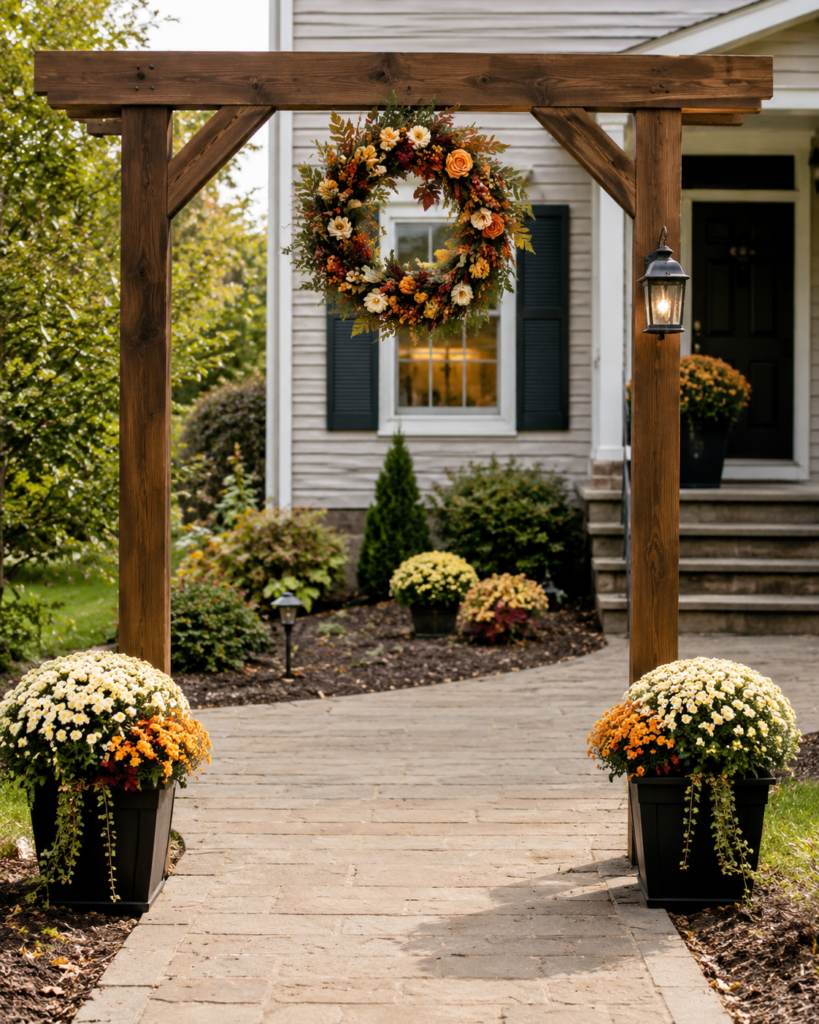
A freestanding wedding arch can become a welcoming garden or front-path entry without much rebuilding. The frame already creates a strong visual boundary, so the simplest approach is to keep the structure plain and let one seasonal wreath, a little foliage, and a pair of planters do the decorating. This works especially well when the arch sits at the beginning of a paved path, near a porch, or between two parts of a garden.
The advantage of this version is that almost everything can remain removable. A spring arrangement can use leafy branches and pale flowers, autumn can bring dried foliage and warmer colours, and winter can use evergreen cuttings. The arch itself stays the same. I’d rather change three easy-to-remove elements several times a year than permanently cover the frame with decorations that make maintenance difficult.
Materials and Tools
· Structurally sound wooden or metal wedding arch
· Exterior wood or metal protection if the frame needs it
· Large seasonal wreath or handmade foliage ring
· Two stable outdoor planters
· Plants suited to the site conditions
· Outdoor-rated hooks, screw eyes, or strong removable ties
· Optional outdoor lantern or solar light
· Basic screwdriver, drill, and level where required
Steps for This Wedding Arch Repurpose
1. Place and stabilise the bare arch first. Set the frame where the path naturally passes beneath it and check that both sides sit level. Anchor or weight the feet using a method suitable for the original frame and surface. Do this before adding decor so you can still access the base easily and see whether wind causes movement.
2. Create one main focal point. Centre a wreath on the top crossbar or place it slightly off-centre if that suits the shape of the arch better. Use secure outdoor-rated attachment points rather than wrapping thin wire around rough timber where it can loosen. Keep the wreath high enough that it does not reduce comfortable head clearance.
3. Balance the base with planters. Place one planter near each vertical post, leaving enough room for people to walk through comfortably. Use pots with enough weight and width that they will not tip easily. The plants do not need to match exactly; similar height or foliage density is usually enough to make the entrance feel connected.
4. Add one practical light only if it helps. A small outdoor lantern or solar fixture can make the entry easier to see in the evening. Keep wiring and fixtures away from wet soil and watering routes, and use only products suitable for outdoor exposure. Then step back from the path and remove anything that makes the arch feel crowded.
For me, the strength of this idea is how little it asks you to change. The old ceremony frame still reads as an arch, but its purpose shifts from framing two people for a few minutes to marking an entrance you use every day.
Variation: If the arch sits beside a doorway rather than over a path, use only one large planter and one asymmetrical foliage arrangement. That keeps the walkway open while still making the frame feel intentional.
Reuse the Arch as an Indoor Photo Display Frame
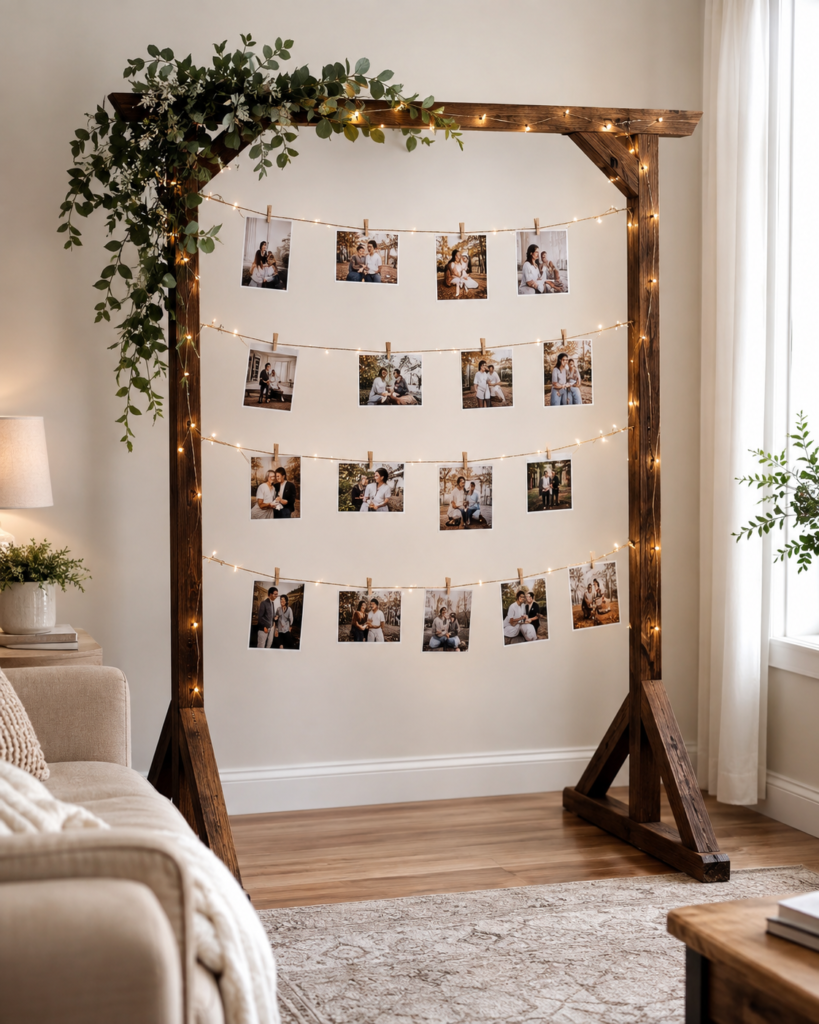
An indoor wedding arch can become a large freestanding photo display without needing a wall full of nails. This is useful in a living room, hallway, anniversary party, or family room where you want photographs to be easy to change. The broad wooden frame gives the display enough presence that the photographs themselves can stay small and simple.
The cleanest version uses several horizontal lines of cord or thin wire stretched between the side posts, with photographs attached using small clips. A short strand of warm lights and a limited amount of greenery can soften the timber without covering the pictures. The frame should still look like a frame, not a storage rack for every photo you own.
Materials and Tools
· Wedding arch with stable freestanding feet
· Strong cotton cord, picture wire, or similar hanging line
· Small wooden clips or lightweight photo clips
· Printed photographs
· Small screw eyes or removable attachment hooks
· Indoor string lights
· Optional faux or dried greenery
· Measuring tape and level
Steps for This Wedding Arch Repurpose
1. Choose the display height and line spacing. Stand the arch in its final room and decide how high the first photo row should sit. Mark three or four evenly spaced horizontal levels rather than filling the entire opening. Leave generous space at the top and bottom so the photographs have room to breathe.
2. Install the hanging lines with light tension. Attach screw eyes or suitable hooks to the inside faces of the posts, then run cord or wire between matching points. Pull each line firm enough to stay straight under a few photographs but not so tight that it pulls the posts inward. Check the frame again after all lines are fitted.
3. Arrange photographs before clipping everything in place. Lay the prints on the floor in rough rows first. Mix portrait and landscape images if you like, but keep enough empty cord between them so each photograph is easy to see. Clip the larger visual anchors first, then fill smaller gaps rather than starting at one side and hoping the balance works out.
4. Add subtle lighting and greenery. Wrap or clip indoor string lights along the outer frame, keeping the cable neat and away from the photo lines. Add greenery only to one upper corner or along part of the crossbar. Then dim the room lights and check whether reflections or bright bulbs distract from the photographs.
I know it can feel tempting to use every printed photo, but this display works better when the images have space around them. The good thing is that the clips make editing easy, so the arrangement can change with seasons, birthdays, or new family photographs.
Variation: Replace photographs with postcards, children’s artwork, recipe cards, or small fabric swatches if you want the arch to function more like a rotating inspiration board.
Create a Draped Reading Nook From the Arch
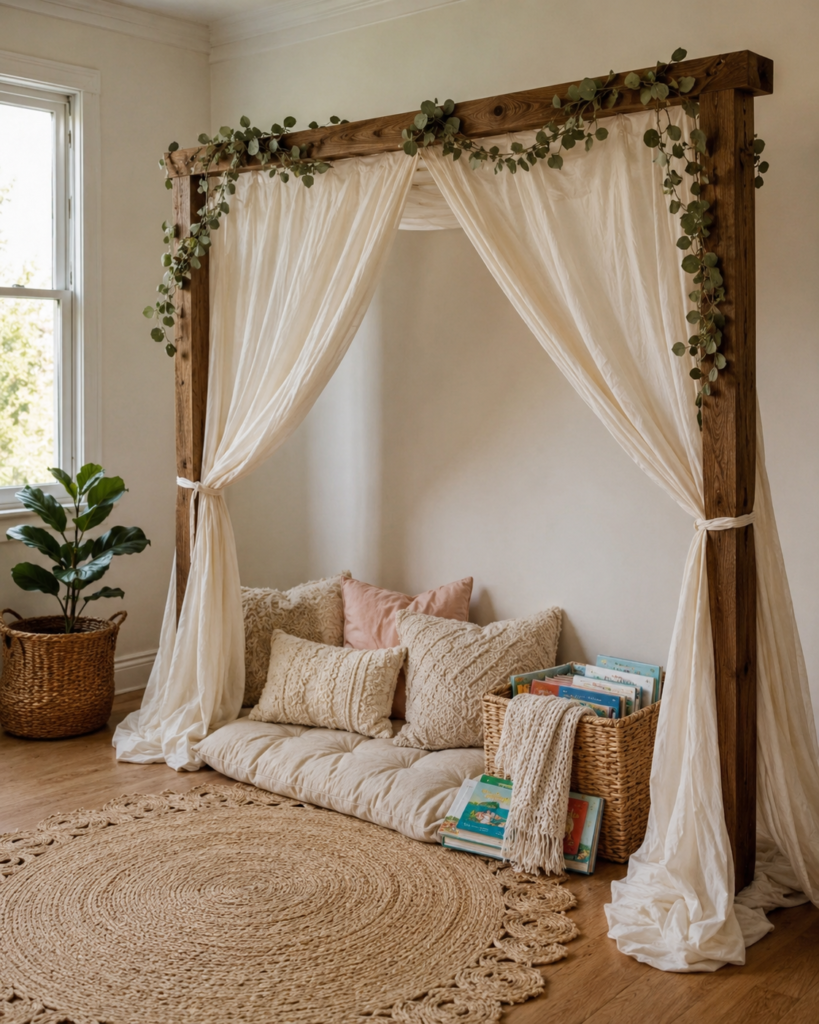
A wedding arch with a wide opening can become the structure for a quiet reading corner, especially when it already has a warm timber finish. Instead of treating the arch as wall decor, this version uses it to define a small floor area. Light curtains soften the edges, floor cushions make the space usable, and a basket of books gives the arch a clear new purpose.
This idea is easiest indoors because you do not have to worry about wind pulling at the fabric. It also works best when the arch is positioned against a wall rather than standing in the centre of a room. That gives the nook a more enclosed feeling while keeping three sides easy to access.
Materials and Tools
· Stable wedding arch
· Lightweight curtain panels, reclaimed sheers, or long fabric lengths
· Curtain rings, fabric ties, or removable clips
· Floor cushion or folded quilt
· A few washable cushion covers
· Basket or low box for books
· Optional faux greenery
· Non-slip mat if the floor is smooth
Steps for This Wedding Arch Repurpose
1. Position the frame before hanging fabric. Place the arch against a clear wall where the reading area will not block a doorway or main walking route. Check that the frame cannot tip when lightly pulled from the side. Use discreet anchoring if the shape or household setting makes that necessary.
2. Hang lightweight fabric from the top bar. Drape two curtain panels across the crossbar and let them fall along the side posts. Keep the centre opening wide rather than closing it like a tent. Secure the fabric so it cannot slide off the top, then tie each side loosely at a comfortable height.
3. Build the floor layer for actual use. Add a non-slip layer if needed, then place a broad floor cushion, folded quilt, or low mattress inside the frame. Use only a few cushions so there is still room to sit and move. A nearby basket can hold books without creating a hard obstacle inside the nook.
4. Finish the upper frame lightly. Add a short length of faux greenery or another soft decorative element along part of the top bar. Avoid hanging heavy items directly above the seating area. Sit in the nook yourself, look upward, and remove anything that feels likely to fall, catch, or make the space too enclosed.
The part I like here is that the arch does not have to become a complicated piece of furniture. It simply marks out a small place that feels different from the rest of the room, which is often enough to make a reading corner feel intentional.
Variation: Use an old bedsheet, muslin curtain, or two lightweight tablecloths instead of buying new drapery. Slight variation in fabric tone is fine because the soft folds hide small differences well.
Turn the Arch Into a Backyard Bench Canopy
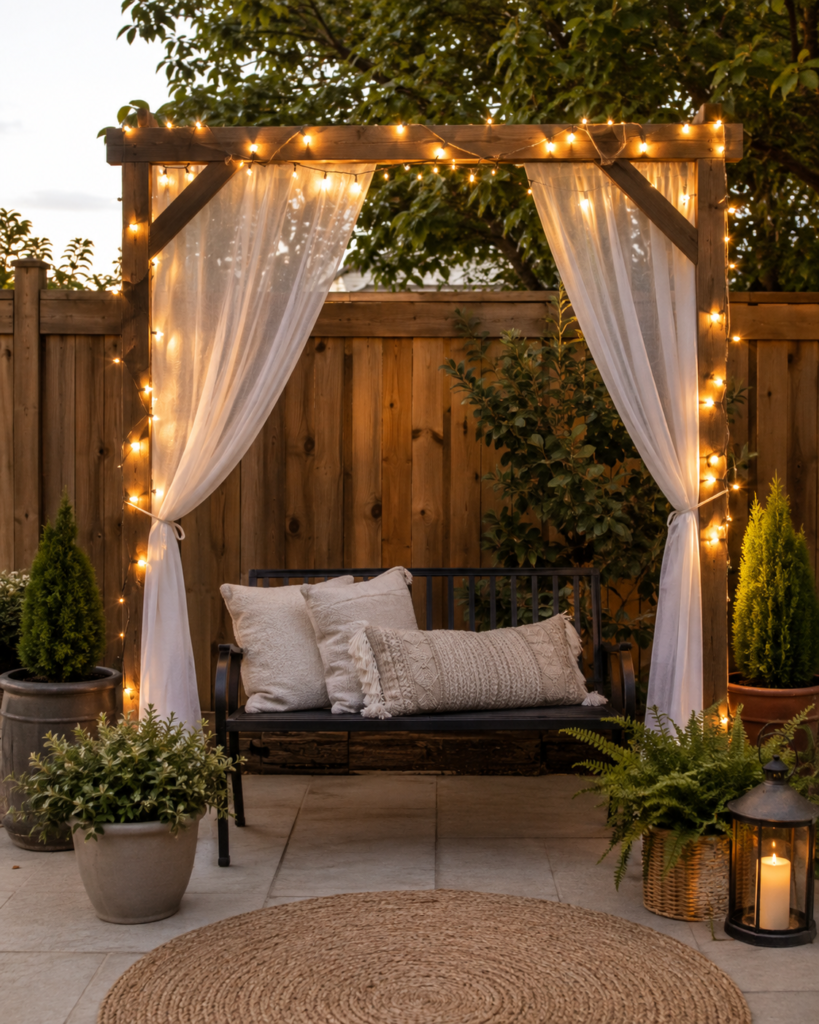
If the wedding arch is sturdy enough for outdoor use, it can frame a garden bench and create a simple sheltered-looking seating area without becoming a full pergola. Sheer curtains and warm outdoor lights give the structure a softer feel, while the bench remains separate underneath. That separation is useful because the arch does not need to carry the weight of the seating itself.
The important difference between this project and the indoor reading nook is weather. Fabric can catch wind, lights need outdoor protection, and every attachment must remain secure after rain and temperature changes. Keep the drapes narrow and easy to remove rather than wrapping the whole frame in fabric.
Materials and Tools
· Weather-suitable wedding arch
· Outdoor bench or weather-resistant seat
· Outdoor-rated string lights
· Light outdoor curtains or removable sheer panels
· Outdoor curtain ties or clips
· Exterior hooks or screw eyes
· Planters or garden containers
· Appropriate arch anchoring materials
Steps for This Wedding Arch Repurpose
1. Secure the arch and bench as separate pieces. Anchor the arch in its final patio or garden position first, then centre the bench beneath it with enough clearance behind and beside the seat. Do not fasten the bench to a lightweight decorative arch simply to make the arrangement feel more permanent.
2. Add curtains that can be removed quickly. Attach one lightweight panel to each side of the top bar, leaving the middle open. Tie the fabric back against the posts so wind cannot pull large sheets across the seating area. Use hardware that lets you take the curtains down before storms or during long periods of wet weather.
3. Install outdoor-rated lights along the frame. Run the light strand around the outer edges rather than allowing loose loops to hang over the bench. Keep plugs, adapters, and connectors protected according to the product instructions. Test the lights at dusk so you can see whether the brightness feels comfortable from the seat.
4. Style the base without blocking access. Place one or two planters outside the main footprint of the bench and arch. Choose foliage that will not constantly brush against people sitting down. Then check the whole area after watering to make sure no cable, tie, or fabric edge sits where water collects.
I’d keep this version simpler than a wedding setup. The bench, two curtain panels, and a light strand are already enough to make the frame feel different, and extra hanging decor can quickly make an outdoor seating area harder to maintain.
Variation: Leave the fabric off entirely and use only outdoor lights plus two climbing plants at the side posts for a lower-maintenance version.
Use the Wedding Arch as a Vegetable Garden Trellis
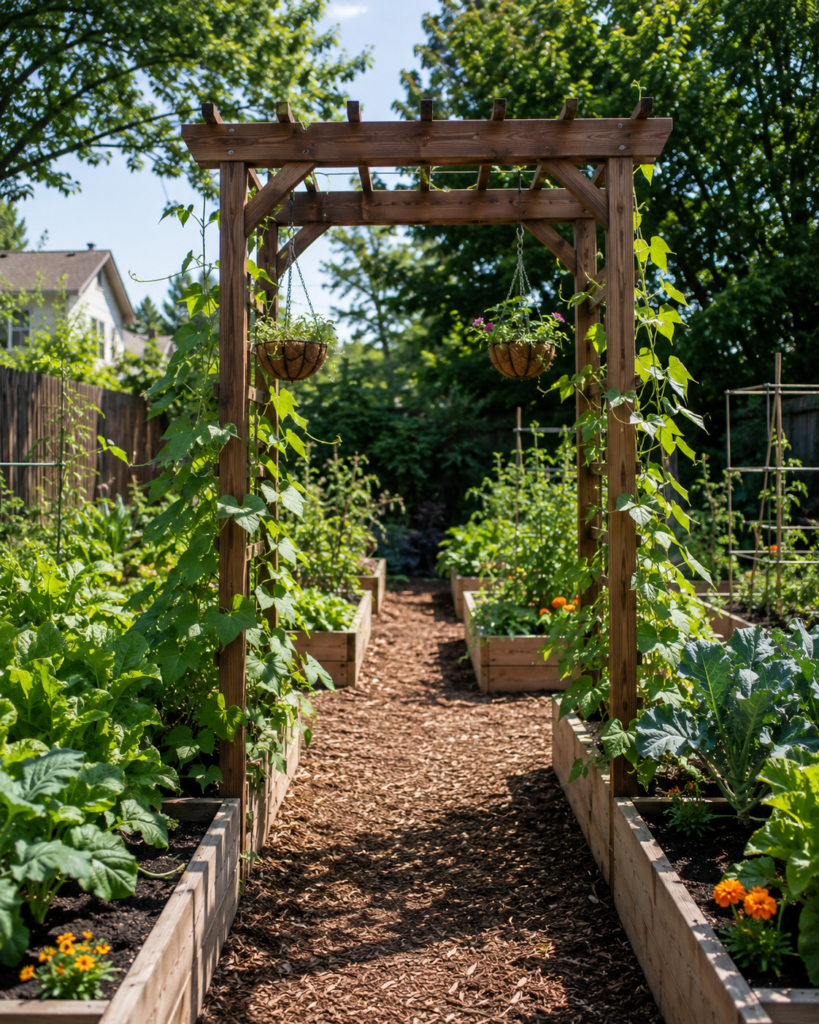
A wedding arch can make a useful entrance to raised beds or a kitchen garden because the vertical posts and top bar naturally support climbing growth. Beans, peas, cucumbers, light flowering vines, and other suitable climbers can use added twine or trellis panels rather than the decorative fabric the arch once held.
This is one of the most practical transformations because the arch gradually becomes part of the garden rather than remaining a piece of event decor. The frame needs to be strong enough for the mature plant weight and anchored well enough to cope with wind. Plants can become much heavier after rain, so plan for more load than the first few vines suggest.
Materials and Tools
· Outdoor-suitable wedding arch
· Garden twine, coated garden wire, or trellis netting
· Ground anchors or another suitable stabilising method
· Climbing plants suited to your climate and site
· Optional hanging baskets for lightweight plants
· Garden clips or soft plant ties
· Exterior finish if the frame needs protection
· Basic drill or screwdriver if adding attachment points
Steps for This Wedding Arch Repurpose
1. Set the arch at the path before planting. Place it where you can still move comfortably between beds and where both posts can be stabilised. Check sun exposure and make sure the mature plants will not shade crops that need full light. Protect the frame for outdoor use before vines begin covering the surfaces.
2. Add simple climbing lines or trellis sections. Run garden twine vertically and across the top, or fit narrow trellis pieces to the inside faces of the posts. Keep the pattern open enough that you can reach through to guide vines and harvest produce. Secure every line so loose ends cannot whip in wind.
3. Plant close enough to guide growth without crowding the base. Position climbers near the outer sides of the posts, following the spacing appropriate for the plants you choose. As stems grow, guide them toward the first support using soft ties rather than wrapping them tightly around wood or metal.
4. Maintain the structure as the plants gain weight. Check the arch, anchors, and support lines throughout the growing season. Remove dead growth, redistribute heavy vines, and avoid allowing all fruit or foliage to gather on one side. If you add hanging baskets, keep them light and confirm that the top bar can carry the extra load.
What matters here is remembering that the arch becomes a garden structure, not just garden decoration. Once plants take over, you still need to be able to inspect the frame, reach the crop, and walk through comfortably.
Variation: If edible climbers are not suitable for your site, use flowering annual vines or a removable trellis net for sweet peas and similar lightweight plants.
Build a Simple Backyard Refreshment Station Around the Arch
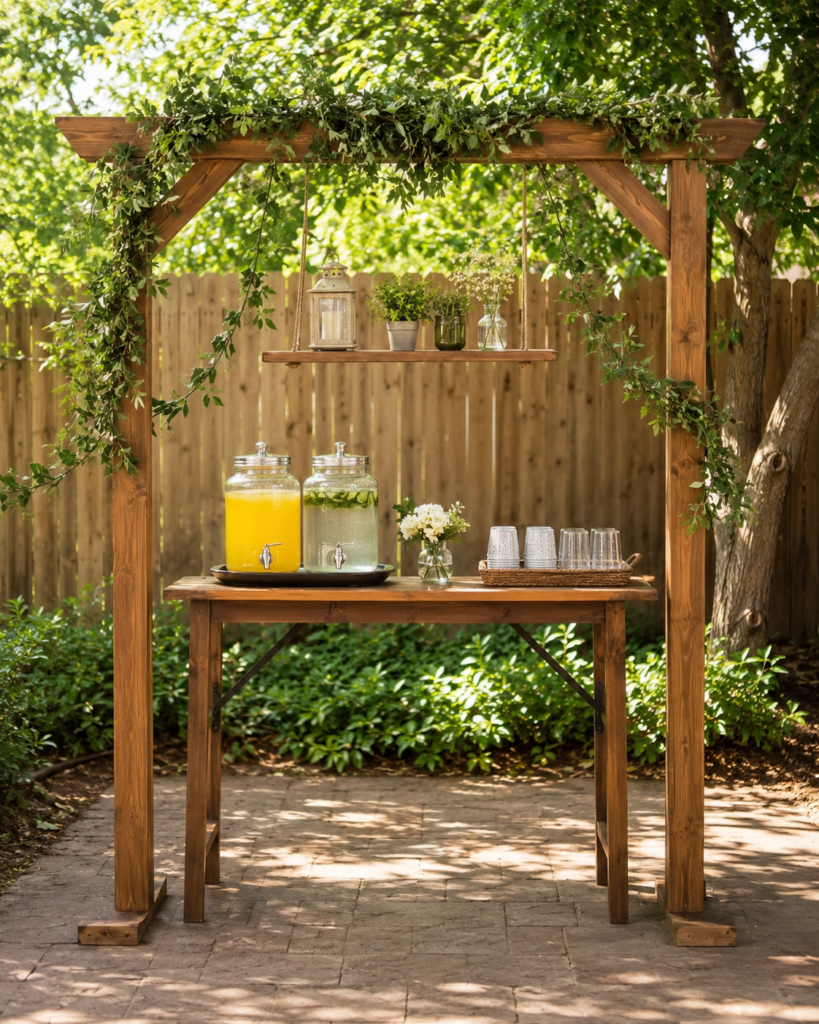
A wedding arch can also frame an outdoor drink or serving table for birthdays, family lunches, or summer gatherings. Instead of turning the frame itself into a complicated bar, use it as the visual surround for a separate sturdy table. One narrow hanging shelf, some removable greenery, and the existing arch are enough to make the station feel defined.
This approach keeps the practical load where it belongs. Heavy drink dispensers stay on the table rather than hanging from the arch, while the upper shelf holds only light items such as herbs, empty glasses, flowers, or a lantern. I don’t think an old ceremony arch needs to become load-bearing furniture to be useful at a gathering.
Materials and Tools
· Stable wedding arch
· Separate outdoor table or console
· Lightweight wooden shelf board
· Strong rope or rated hanging hardware
· Small lightweight decor items
· Removable greenery
· Serving tray and drink containers
· Level, drill, and suitable fasteners if required
Steps for This Wedding Arch Repurpose
1. Position the table independently under the frame. Set the arch on a level surface and stabilise it, then place the serving table beneath without relying on the arch for support. Leave working space behind or beside the table if someone needs to refill drinks during an event.
2. Add one lightweight hanging shelf only if the frame can support it. Use a narrow board and secure rope or rated hardware from strong points near the top corners. Level the shelf before placing anything on it. Test with a small temporary load and keep the finished shelf for light decor rather than glass drink dispensers or heavy serving equipment.
3. Keep the main serving weight on the table. Arrange drink containers, cups, and trays on the stable table surface. Put heavier items toward the centre and leave the front edge clear so guests can reach comfortably. Keep the floor around the station free from trailing cords, low decorations, and loose containers.
4. Finish with removable greenery and practical lighting. Clip greenery along part of the top bar or one side post, leaving the shelf ropes and structural joints visible enough to inspect. If the station will be used after dark, add suitable lighting nearby rather than hanging a heavy fixture from the frame. Then check the setup from the guest side before serving anything.
The easiest way to keep this realistic is to let the arch do what it already does well: create a frame. The table handles the drinks; the arch makes the setup feel like a destination in the garden.
Variation: Skip the hanging shelf and attach a lightweight menu board or decorative sign to one side instead. That reduces load and makes the setup faster to assemble.
Let the Arch Become a Permanent Flowering Walkway Trellis
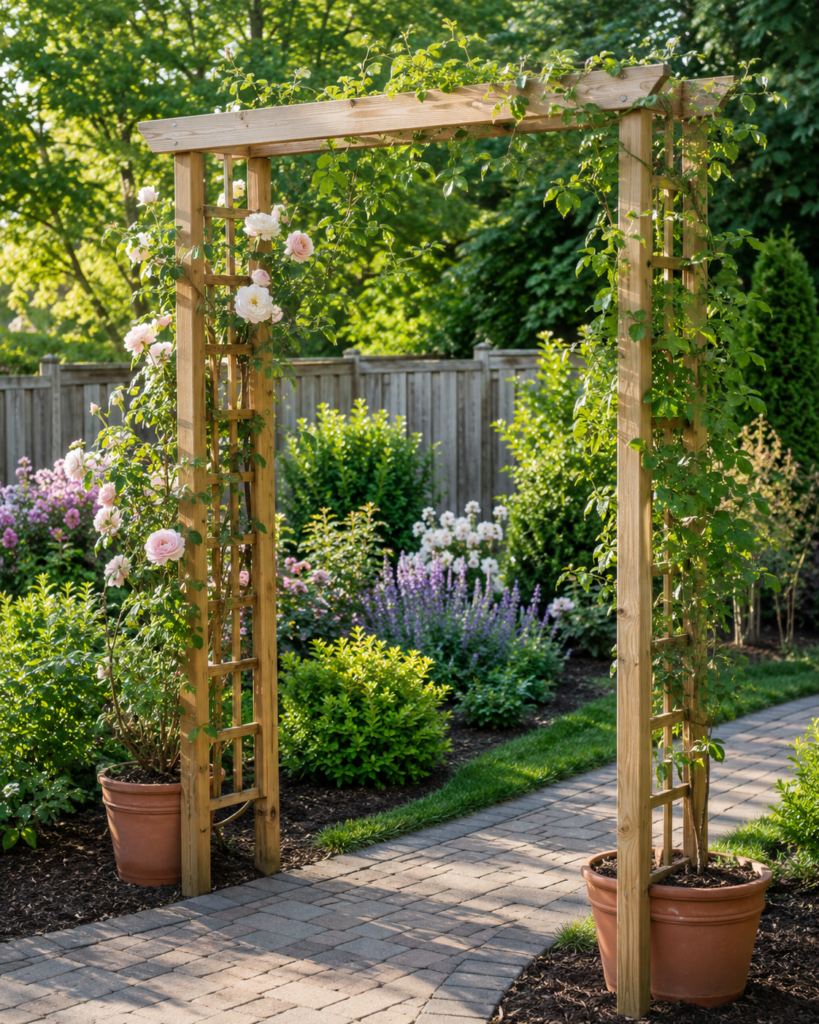
A simple wooden wedding arch can settle naturally into a flower garden when climbing roses or other suitable flowering vines are trained up the sides. Unlike a temporary floral installation, this version changes slowly. The plants may take more than one season to fill the structure, but that gradual growth is part of what makes the repurpose feel convincing rather than staged.
The arch should be placed where the mature plant can grow without blocking gates, windows, or narrow paths. Roses and woody climbers also need stronger support than light annual vines, so use trellis panels or sturdy wire where necessary and make sure the arch itself is suitable for long-term outdoor exposure.
Materials and Tools
· Strong weather-protected wedding arch
· Climbing roses or another suitable flowering climber
· Trellis panels, sturdy garden wire, or support battens
· Soft plant ties
· Ground anchors or appropriate permanent fixing
· Mulch and planting materials
· Pruning tools
· Gloves for thorny plants
Steps for This Wedding Arch Repurpose
1. Choose a long-term location before planting. Position the arch where it can remain for years and where the plants will receive the conditions they need. Check the width of the path and allow space for mature stems to project beyond the posts. Anchor the structure securely and apply any needed exterior protection before planting.
2. Add support that can remain visible under mature growth. Fit narrow trellis sections or run strong garden wire along the side posts and across the top. Keep fasteners neat but accessible for inspection. Avoid using temporary florist wire because it can rust, cut into stems, or become difficult to remove once plants mature.
3. Plant and guide the main stems gradually. Set the plants near the base according to their planting needs, then guide flexible stems toward the supports using soft ties. Do not force thick stems into sharp bends just to make the frame fill quickly. Let growth reach the crossbar over time, spreading branches where they can be supported without crowding one section.
4. Prune for access as well as flowers. Maintain enough clearance to walk through the arch comfortably and remove dead, damaged, or awkward growth using appropriate pruning methods for the plant. Recheck ties and structural fasteners as stems thicken. The finished goal is a usable garden entrance, not a dense thicket hiding an unstable frame.
For me, this is the most patient version of the wedding arch repurpose. You begin with a familiar ceremony structure, but after a few seasons the plants make it feel as though the frame was always meant to belong in the garden.
Variation: Use large containers beside each post instead of planting directly in the ground. That can work better on patios and gives you more control over soil and placement, provided the chosen plants are suitable for container growing.
Wedding Arch Repurposing Choices That Can Lead to Wobbly Frames, Weather Damage, or Awkward Use
Decorating Before Checking the Structure
A wreath, curtain, or climbing plant can hide a loose joint surprisingly well. That does not make the joint stronger. Repair, tighten, and stabilise the bare frame first so every later addition is attached to something dependable.
Assuming Ceremony Stability Is Enough for Outdoor Use
An arch that stood safely indoors for an afternoon may not be ready for wind, rain, wet soil, or heavy vines. Outdoor repurposing usually needs stronger anchoring and weather protection than the original event setup required.
Hanging Heavy Items From Decorative Crossbars
Drink dispensers, large planters, thick timber shelves, and heavy lanterns can overload a frame that was designed mainly to carry fabric and flowers. Keep substantial weight on the ground or on separate furniture unless you know the arch was built to carry more.
Using Fabric Outdoors Without a Removal Plan
Long curtains catch wind, hold water, and collect dirt. Use narrow, removable panels and take them down before severe weather rather than attaching them so permanently that maintenance becomes a chore.
Letting Plants Hide Every Joint
Dense vines make inspection difficult. Train growth so you can still reach anchors, screws, and key connections. If a frame begins failing under mature plants, removing those plants to reach the problem can be much harder than maintaining access from the beginning.
Blocking the Walkway With Planters and Decor
The arch opening should remain comfortable to use. Place pots, baskets, tables, and cushions outside the normal walking line, then test the space while carrying something bulky rather than checking clearance only while standing still.
Forgetting That the Next Use May Change Again
One of the nicest things about an old wedding arch is that it can keep adapting. Removable hooks, clips, ties, lights, and shelves give you more flexibility than covering the frame with permanent decorative layers. I’d rather preserve a sound structure that can change again than lock it into one use unnecessarily.
Frequently Asked Questions
Can any wedding arch be repurposed for outdoor use?
No. The frame needs to be structurally sound and made from materials that can be protected for the intended outdoor conditions. Lightweight event frames may be better suited to indoor photo displays or temporary covered-patio use than permanent garden installations.
How do I stop a repurposed wedding arch from tipping over?
Use a stabilising or anchoring method appropriate to the frame design and the surface beneath it. Outdoor arches may need ground anchors or secure footings, while indoor frames may need broader feet or discreet fixing depending on their shape. Do not rely on flower pots or hanging decor as the only source of stability.
Can I turn a metal wedding arch into a plant trellis?
Yes, if the metal is sound, free from dangerous rust, and strong enough for the mature plant load. Treat corrosion before planting and use soft plant ties so stems are not damaged against hard metal edges.
What can I use instead of buying new curtains for the arch?
Light bedsheets, old voile panels, muslin, or suitable table linens can work indoors when they are clean and large enough to drape safely. For outdoor use, choose fabric that can handle the setting and remove it during unsuitable weather rather than assuming household fabric will last outside.
Can I add a shelf to every type of wedding arch?
Not safely. A shelf introduces weight and sideways movement that some decorative frames were never designed to carry. If you are unsure about the frame strength, use a separate console table beneath the arch and keep the arch decorative.
How should I protect a wooden wedding arch before putting it in the garden?
Clean the wood, repair splits, smooth rough areas, and use an exterior protection system suitable for the timber and the conditions where it will stand. Pay special attention to end grain and lower sections that may receive more moisture. Follow the chosen product instructions instead of guessing application or curing times.
What is the easiest wedding arch repurpose for a beginner?
An indoor photo display or a seasonal entry arch with removable decorations is usually simpler than adding shelves or growing permanent vines. Both keep the original frame largely unchanged, so you can adjust the idea without major construction if the first layout does not feel right.
Let the Wedding Arch Keep Framing Useful Moments
The best answer to how to repurpose your wedding arch is not necessarily the most dramatic one. A sound frame already has useful qualities: height, symmetry, a clear opening, and enough presence to define a space. Once the temporary ceremony decorations are removed, those same qualities can support photographs, curtains, climbing plants, a garden bench, a serving table, or a seasonal entrance without disguising what the structure originally was.
I like the projects that keep the arch adaptable. Removable lights can come down, photo lines can change, curtains can be washed, shelves can be detached, and plants can be trained gradually. That means the frame does not have to spend the rest of its life pretending the wedding is still happening. It can simply become useful again in a way that suits your home now.
Start with the condition of the arch, choose one realistic location, and make only the changes that support that new job. Which of these second uses feels most natural for the wedding arch you already have?